Chapter 5. Inlay Cutting Boards
Meet the Maker
David Picciuto (Figure 5-1) is a full-time blogger and YouTuber who designs, creates, and teaches the art of woodworking and crafts. He has a deep passion for originality and design and truly believes that everyone can learn to be creative. Although he took some woodshop classes in high school, it wasn’t until 2011 that he really began woodworking on his own. This new hobby became a deep passion for him and he made a career of teaching and sharing what he’s learned. 3D carving allows him to incorporate his graphic design background into his projects. You can see more of his projects and videos at his website, https://makesomething.tv, where he shares his ideas and teachs others the beautiful craft of working with wood.

Figure 5-1. David Picciuto of Make Something
Project 3: Inlay Cutting Boards
There are two types of cutting boards: long grain and end grain. The terms “long” and “end” refer to the direction of the wood grain. long grain cutting boards (Figure 5-2) are much easier to make but harder on your knives. If you’re getting started, we recommend making the long grain style. The end grain style (Figure 5-3) is easier on your knives and the colored inlay will add a bit of “spice” to your kitchen. However, they’re more difficult to make unless you are an experienced woodworker and have access to a wood shop.
In this chapter, we show you how to make both types so you choose which is the right one for you. The long grain style was inspired by David’s but made at Inventables. For the end grain style, David will walk you through each of the steps. To make the end grain style, you will need a bit of experience and knowledge of basic woodworking skills using the table saw and planer. We’ve posted the files and videos for each style online. The links are at the beginning of each of the following sections.
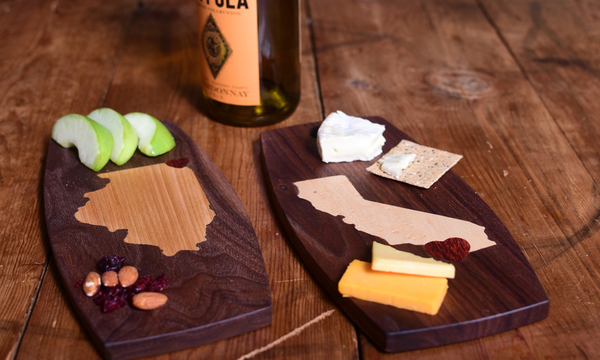
Figure 5-2. A long grain cutting board made using the Inlay app in Easel

Figure 5-3. The end grain cutting board
In this project, you’ll learn how to carve an inlay, install it, and add finish for a functional and beautiful cutting board for your kitchen.
Long Grain Style
The Inventables team has made available a template project and companion video episode of Easel Live for this chapter at https://www.inventables.com/projects/6-x-12-cutting-board-template.
Pick Your Shape
We’ve created three templates for the cutting board design. You can find the first one (Figure 5-4) by clicking the “Open in Easel” button on the aforementioned project page.
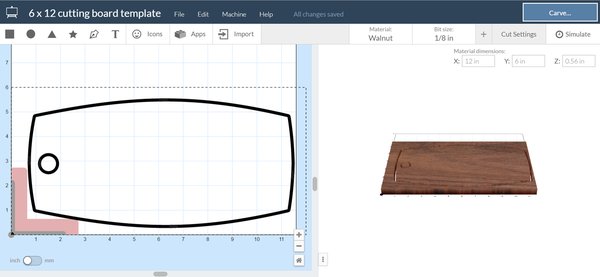
Figure 5-4. Curved cutting board
The other two templates (Figure 5-5 and Figure 5-6) are listed as links in step 2 on the web page.

Figure 5-5. Rustic cutting board
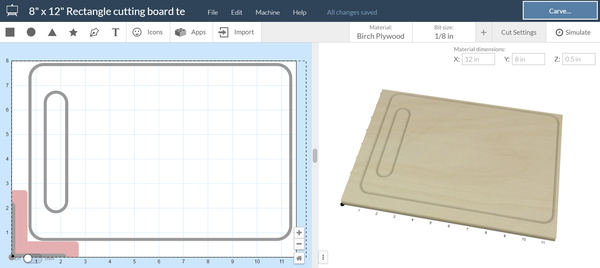
Figure 5-6. Rectangle cutting board
Design the Inlay
The next step is to draw or import the design for the inlay. You can choose a shape from the Icon menu, type some text, draw with the pen tool, or import an image from the internet, as illustrated in Figure 5-7.

Figure 5-7. Design or import the inlay
When you have the design you would like, select the design, click Apps, and then click the Inlay app (Figure 5-8).
The Inlay app will display both the pocket and insert part of the inlay. Choose the bit diameter you would like to use. The tolerance controls how tight the inlay will fit. If it is too tight, it will be very difficult to fit in. Making it too loose will show gaps between the insert and the pocket. We like to use a tolerance of .002″ for wood.
Click “Import” to add the design to the canvas.

Figure 5-8. The Inlay app
Create the Carve Files
First, delete your original design so you only have the shapes imported from the Inlay app. Once imported, the pocket and the outline will be placed on the canvas near each other. The pocket is the solid-gray one. The material will be removed to a fixed depth. You’ll want to ensure that the depth is the same as the thickness of the outline material: in this case, the material is 1/16″ thick. The outline is the inlay insert of the design. You’ll need to cut and paste the outline into a separate workpiece because it will be carved from the 1/16″ maple hardwood.
Inlay Size
You must set the size of the inlay design before you use the Inlay app. If you resize the pocket and outline afterward, it will change the tolerance and the outline will not fit inside the pocket with the proper tolerance.
Make sure you have selected walnut as your material and you’ve set the dimensions to 6″×12″×1/2″. For wood, you’ll get good results with the 1/8″ straight-cut mill. Straight-cut bits have vertical flutes that do not push material up or down. They are ideal for materials that can splinter easily, like woods.
Finally, position the remaining pocket design where you want it on your cutting board. If you want to place it in a precise part of the board, such as the center, use the Shape panel. First, select the perimeter of the board. Next, click the center radio button to find the position of the center of that element (Figure 5-9) and write it down. Click the pocket element. If you want the pocket in the center of the board, make sure its center is the same value as that of the perimeter.
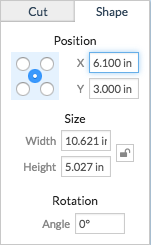
Figure 5-9. Positioning the pocket for the walnut board
When you are happy with the position (see Figure 5-10), click the Carve button and carve out your walnut board.
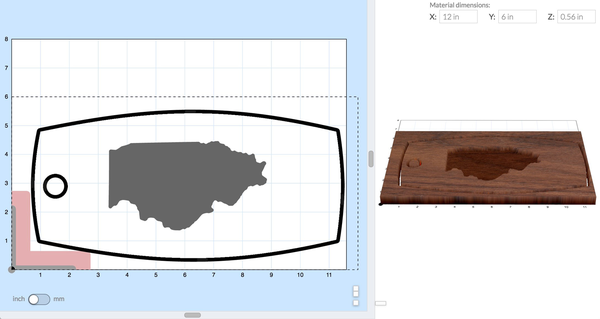
Figure 5-10. Inlay pocket for the walnut board
When the walnut board is finished, take it out of the machine. In Easel, load the second workpiece that has your outline (Figure 5-11). Make sure that maple is selected for the material and that the dimensions have been updated to 6″×12″×1/16″.
Figure 5-11. The inlay insert
For this carve, you’ll want to use tabs or double-sided tape to hold down the material. The part will break free when the perimeter is completely carved out and it can fly into the bit, damaging it such that it won’t fit into the pocket perfectly.
Because the 1/16″ wood is so thin, you should be able to remove the tabs with a utility knife or scissors. Now, sand the insert and pocket lightly to remove any burrs on the edges. Test to ensure that the inlay will fit. If the fit is very tight, do not insert all the way before gluing or you won’t be able to get it out.
Put some wood glue in the pocket and place the insert in it. To make sure the insert is as flush as possible with the surface of the pocket, you can either use another piece of wood on top of the insert and lightly tap it with a hammer or use the force of your hand to push it flush. When the insert is as flush as possible, wait for the glue to dry. Check the instructions on the bottle for the dry time.
After the glue is dry, sand the board to your liking. Use the mineral oil to give the board a shiny, finished look.
The mineral oil will keep the wood from cracking over time and is food-safe. You’re now done with the long grain board and it should look like one of the examples in Figure 5-12.
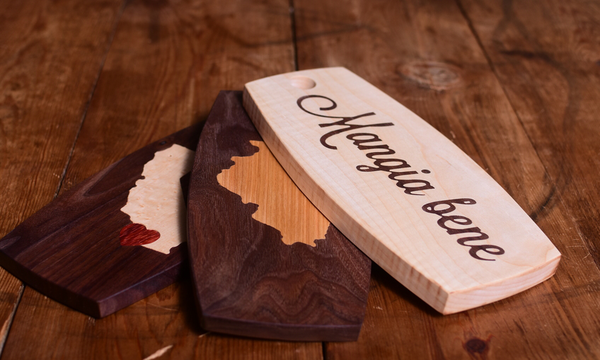
Figure 5-12. Long grain board examples
End Grain Style
The end grain style cutting board is for the experienced woodworker. You should have access to a shop and experience using a table saw and planer, but you may new to 3D carving.
The files and companion video for the end grain style are located at https://www.inventables.com/projects/cheeseburger-endgrain-cutting-board.
The files were designed for the X-Carve. If you want to carve it on a Carvey machine, you’ll need to resize it.
Cutting the Wood
You’ll need some pretty thick wood for this project. I found some 2″×2″ soft maple at my local hardwood dealer and planed it down to 1-3/4″ thick. I then cut the wood into 1-3/4″ thick squares at 20″ long on my table saw, as shown in Figure 5-13. You’ll need six pieces total for this cutting board. If you don’t have the tools or the time to do this part of the process, some specialty hardwood or lumber stores sell pre-glued hardwoods.

Figure 5-13. The prepared wood
Bonding #1
Next up, bond the six pieces together in a random pattern using Titebond II wood glue and plenty of clamps. Slowly tighten your clamps, making sure your pieces stay aligned and don’t slip out of place, as shown in Figure 5-14. Let this dry for six hours.
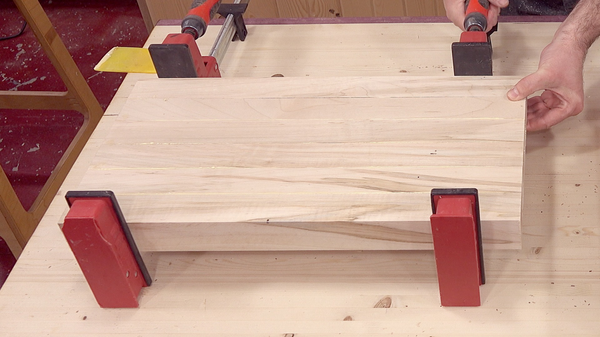
Figure 5-14. Gluing the pieces
Cutting Thickness Strips
Once the glue dries, take your work out of the clamps and run a couple of shallow passes through the planer to clean up the glue lines. You then crosscut 1-1/2″ strips on the table saw (Figure 5-15). The width of the strips will determine the thickness of your cutting board.
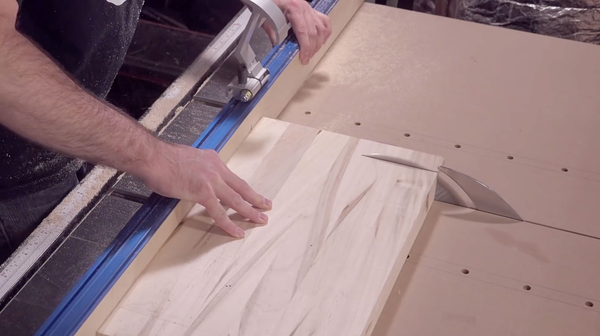
Figure 5-15. Cutting the strips
Bonding #2
Flip all of your pieces so that the end grain is face-up, and bond everything a second time using Titebond II wood glue. Again, tighten the clamps slowly and make sure the pieces don’t slip out of alignment (see Figure 5-16). Less slippage means less sanding and flattening in the next step.

Figure 5-16. Bonding, round 2
Sanding
Use a belt sander to flatten and clean up your cutting board (Figure 5-17). Use a very coarse grit paper and be prepared to sand for a while. Sanding end grain takes a long time. Patience is the key.

Figure 5-17. Sand it flat
Your material is now ready for carving. Before we can begin that part of the project, we need to work on the design. In this case, we are going to be making an inlay by embedding food-safe epoxy into a pocket in the shape of a hamburger carved into the wood. After it dries, we will sand it to be flush with its surface.
Skill Builder #1: Designing for Your Bit Size
I design most of my art in Adobe Illustrator. When drawing my artwork, I like to keep in mind what bit I’ll be using in the 3D carving process. I know for this cutting board that I’ll be using a 1/8″ bit, so I want to confirm that all inside corners and radiuses are no larger than 1/16″. That is the maximum size a 1/8″ diameter bit can carve on an inside corner. A good example of an inside corner is the hamburger bun. On an outside corner, a round bit can carve a 90-degree angle. Notice in Figure 5-18 that there are no sharp edges on the inside because I’m using rounded corners.

Figure 5-18. Inside corner close-up
After I’m happy with the design (Figure 5-19) I export the artwork in SVG format. For information on what settings you should use, read the SVG import guide online.

Figure 5-19. The final hamburger artwork
Skill Builder #2: Customizing Your Carving Calculations
Open Easel and log in with your Inventables credentials. Choose File → Import SVG and open your artwork (Figure 5-20). From here, you can set your material and dimensions. I’ll visually align my artwork on the material. You can position the artwork precisely by using the Shape tab in the Cut/Shape panel. I’ll be trimming the edges of my cutting board on the table saw in a later step, so exact placement isn’t critical.

Figure 5-20. The artwork in Easel
When you select your material and bit, Easel automatically calculates the feed rate and depth per pass. You’ll recall that the feed rate is the velocity at which the bit moves along the material. The depth per pass is how deep the bit goes into the material each time it carves your design.
When customizing this setting, I tend to gravitate toward a shallow depth per pass and a high feed rate, keeping in mind that different bits and materials will require different depths and rates. This tends to give a smoother finish. When customizing these settings, the formula to calculate your values is feed rate (IPM) = RPM x number of cutting edges x chip load. The chip load is the thickness of the chips. Chip load ranges are published by bit manufacturers for a given bit and type of material being carved.
The team at Inventables has tested the combinations of feed rate and depth per pass for each bit and material type in Easel. When you select the material and bit, Easel automatically selects the recommended feed rate. These are stored at the project-file level. If you are using a bit that is not in Easel, you can select “Other” and use the aforementioned formula to calculate your feed rate and depth per pass.
The big decision is determining how deep to carve the pocket that we will be filling in with epoxy. For an epoxy inlay, you don’t need to cut any deeper than 1/4″. In this case, we’ll do about 1/8″. To save a little time, you can set the total depth as a multiple of your depth per pass. For example if your depth per pass is 0.040″, make your inlay .120″ instead of .125″ so that you can complete it in three passes instead of four passes.
Skill Builder #3: Clamping for Carving
There are a million ways to clamp your material down for 3D carving. My favorite way, and the easiest way in my opinion, is to use double-sided tape (Figure 5-21). I like to purchase the 6-inch-wide rolls. This is an excellent way to secure the material for projects that require carving all the way to the edge or on the sides of the material. I cut off a piece for each corner and a fifth piece in the middle to keep it secure. When you remove the tape at the end of the project, there might be some residue left over. You can sand it off later.
If you know you’re going to be trimming off excess material from the edge of the project, you can also clamp or screw down your material right to the waste board. Both options are quick, easy, and don’t get in the way of the milling bits.

Figure 5-21. Use double-sided tape to help hold your material in place
Carve Away!
After you have your artwork set up in Easel and your material secured in the machine, click “Carve” and watch the magic happen (Figure 5-22).
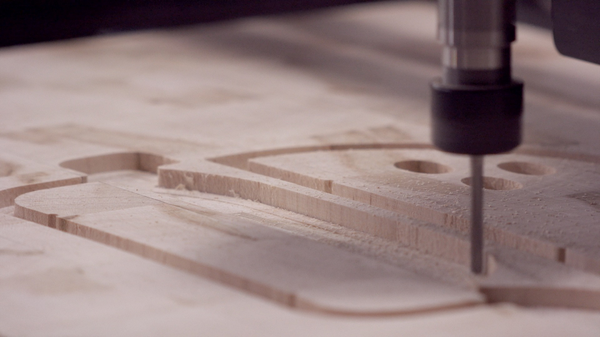
Figure 5-22. Carving the design
Cooking Up Some Epoxy
Now, it’s time to fill the pocket we just carved with some food-safe epoxy. I’ve had luck getting some from Ebay. If you can’t get your hands on food-safe epoxy, a two-part epoxy will work; however, you’ll need to wait four to five weeks for it to fully cure before you can use your cutting board. There’s a lot of conflicting articles on the internet regarding what is food-safe and what isn’t. Typically, any finish is food-safe after it’s fully cured and has a few weeks to off-gas. The polyurethane finish on your dining room table isn’t food-safe when applied, but after it is fully cured, it’s perfectly fine to eat from it. Do your research and choose what works best for you.
I like to tint my epoxy with dye or food coloring before filling the cavity. Also keep in mind that the epoxy will shrink and settle a bit, so you might want it to slightly overflow it so that it sits on top of the wood, as shown in Figure 5-23. This means that there will be some extra sanding in the next steps. Let this sit, dry, and settle for a couple of days.

Figure 5-23. Applying the epoxy
Sand, Sand, and Sand!
After the epoxy is dry, it’s time to trim off the edges of the cutting board using the table saw. Then, you’ll need to sand and prep your cutting board for finishing. Begin with a very coarse grit of around 100 to level off the epoxy and smooth things out. Like I mentioned earlier, sanding end grain takes a long time. I also like to round over the edges with the random-orbit sander. Work your way up to 220 grit for a fine, smooth finish (Figure 5-24).
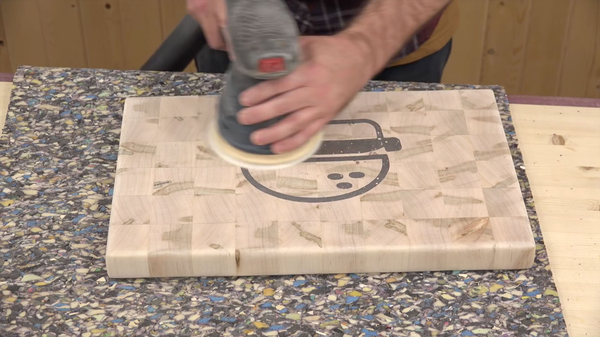
Figure 5-24. Sand down the epoxy
The Finish Line
For my cutting boards I like to use General Finishes Salad Bowl Finish. It’s food-safe and leaves a protective film on your cutting board (see Figure 5-25). This type of finish needs less maintenance than a mineral oil/wax finish. Three coats over three days should do the trick.

Figure 5-25. Finishing the board
It’s Time to Eat!
All that’s left is to add some rubber feet to the bottom, demonstrated in Figure 5-26. Be sure to use stainless screws because they’ll get wet when washing. Speaking of washing, you should only wash this cutting board by hand. Wood should never go in your automatic dishwasher.
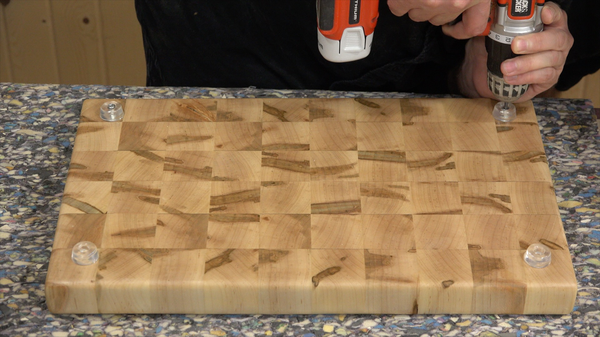
Figure 5-26. Mounting the rubber feet

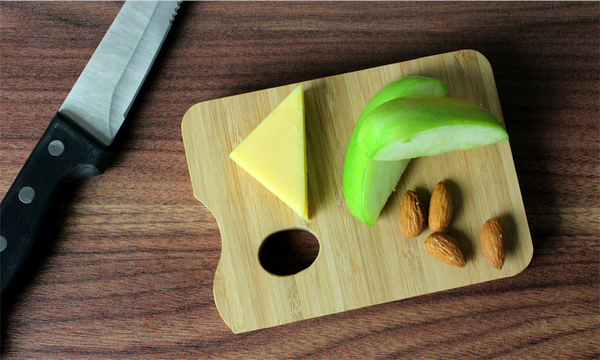
Figure 5-27. Enjoy!
Please post your cutting board to the Cutting Board Maker Challenge at https://www.inventables.com/challenges.
As always, share a picture of your cutting board with the community on social media using the hashtag #inventables on Twitter, Facebook, and Instagram.
Community Examples
At Inventables, we’re building an accessible community and tools for the maker journey. We hope that as you build your skills and confidence you are able to design your own remake of this project. Figures 5-28–5-30 show some similar projects other people in the community have created.
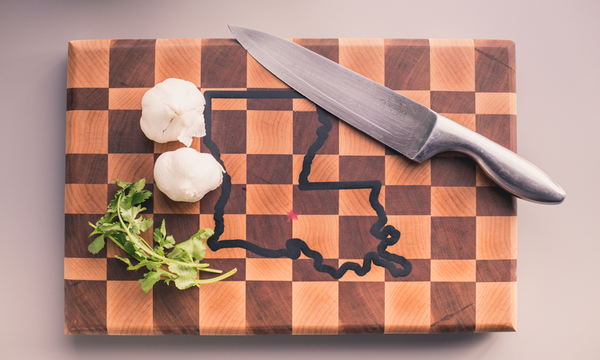
Figure 5-28. Lousiana cutting board by Frank Graffagnino
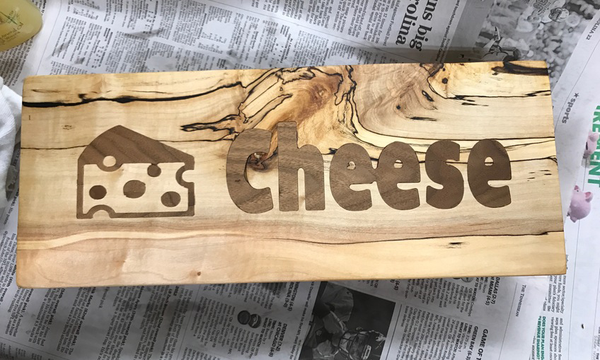
Figure 5-29. Cheese cutting board by John Walin