Chapter 2. Getting Started
The projects and skill builders in this book begin easy and increase in complexity. They’re designed to build your confidence, experience, and success as you go. In addition, you’ll learn that 3D carving is just one tool in the shop. For the more complex projects, you’ll use other tools to finish the job. Along the way, I’ll drop in small bits of knowledge, tips, and tricks. Since the projects were contributed by makers from the community, you’ll get a chance to meet the maker at the beginning of each chapter.
3D carving is a journey. Think of it as if you were playing a sport or a musical instrument. With practice, you can build skills beyond what was possible in the beginning of your journey. Each time you practice, you get a little bit better. Focus more on the process than the outcome. With 3D carving, the journey is the destination.
Getting Started with Easel
In Chapter 1, you contributed to the largest tile wall ever created. In this chapter, you’re going to load your mosaic tile design into Easel to prepare for your first carve. In Chapter 3, you’re going to carve it out.
The first thing to do is get an Easel account, if you haven’t done so already. Easel accounts are free. You can get one by going to www.easel.com. Then, click “Launch the app” to get to the login page.
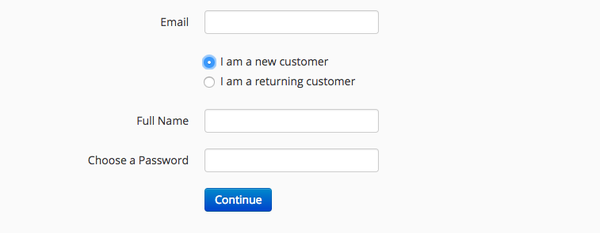
If you have an Easel account, log in as usual. If not, select “I am a new customer.” Type your email, full name, and a password of your choosing in the appropriate text boxes.
Easel is free web-based 3D carving software made by Inventables. Our software design and engineering team continually adds new features and functionality. Because it’s delivered over the web, improvements are rolled out to all users immediately. This means that every time you log in, you are using the latest version. As a result, Easel’s interface constantly changes. By the time you are reading this book, it is likely that Easel’s interface has been improved. Use the diagram that follows as a reference, but don’t be concerned if the version you see does not exactly match the version in this book.
The Easel User Interface

(a) Easel button This button opens and closes the project window where your files are stored.
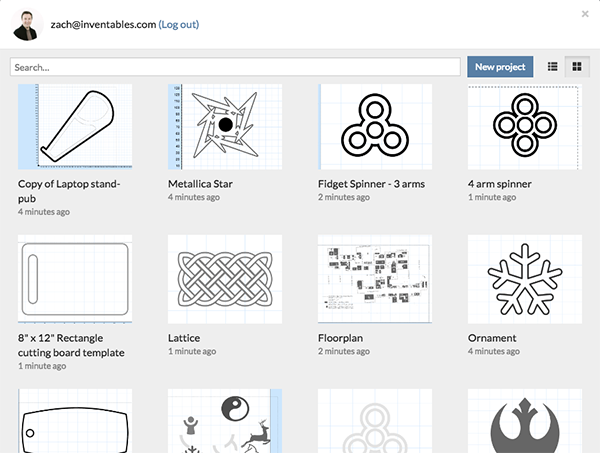
(b) Project Name This defaults to Untitled. Click it to rename your project.

(c) File menu This menu contains commands relating to the handling of Easel files. You can create a new file, open an existing file, rename a file, or make a copy. You also can import files, change the public sharing permissions, and publish your project to Inventables’ Project catalog.
(d) Edit menu Use this menu to edit information within the Easel file.
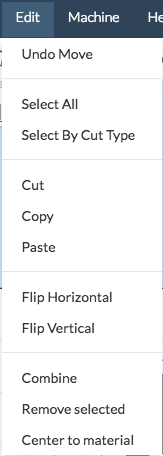
You can select all elements in the file, or select elements by cut type. The cut types available in Easel are outlines and fills. This feature is useful in a project like a puzzle: the artwork may be a fill, and the cuts to carve the individual pieces are outlines. You might want to set the depth shallow for all the fills, and all the way through the material for the outlines. The Edit menu lets you cut, copy, and paste whatever design elements are selected.
You also can use the Edit menu to manipulate the orientation of your project by using “Flip Horizontal” or “Flip Vertical.” At the bottom of the menu, you can manipulate the layering of the elements (what’s on top of what) by selecting “Send Backward,” “Send to Back,” “Bring Forward,” and “Bring to Front.” Changing the layering order of the elements changes what the carve will look like. Easel instructs the machine to carve from the front to the back (the same as carving from the top of your material to the bottom), so you can use these tools to set up the order of operations for your carve.

If two elements are selected, you can use the Combine feature. If the elements are overlapping, they will combine into one element (shown in the screenshot that follows). If they are not overlapping, they will become part of the same bounding box. However, the space between them will not be filled.
The last two features in the Edit menu do as their names imply: “Remove selected” removes the selection from the canvas, and “Center to material” takes the element and centers it on the material.
(e) Machine menu The Machine menu helps Easel communicate with your machine. The first drop-down menu prompts you to select the machine you’re trying to connect. Select your 3D carving machine from the drop-down menu. If your machine connects successfully, the Carve button (k) will turn green. Carvey users can also “Home” or “Park” the machine from the Machine menu.
By clicking the Advanced menu, you can adjust the safety height and stepover. The safety height is the height your machine is above your material when it is not carving. You might want to adjust this to clear your clamps if they stick up more than 0.15 inches in the path of the rapid movements. Stepover is the amount that one toolpath is offset from another, represented as a percent of the toolpath’s width. Think of it like mowing a lawn: you overlap a little bit of the last row when you turn around and go the other way. As a rule of thumb, the stepover should be between 10 percent and 40 percent of the carving bit’s cutting diameter. For harder materials and 3D countours, lower the stepover to reduce the stress on the bit.
If for any reason you can’t use the Easel driver to communicate with your machine, you can download the G-code for your file from the Advanced menu as well.
(f) Help menu This menu offers a number of ways to get help. The Community Forum is very active, so you can quickly get help from other Easel users. The Help Guides are written by the Inventables Customer Success team and provide more detailed information on each feature that is available in this book. You can report a problem directly to the Inventables Customer Success team, and they will respond on the same or next business day. From this same menu, you can download all versions—current and past—of the Easel driver.
(g) Material menu This menu lists materials for carving. When you know what material you are going to use, select it from this menu. When you make your selection, the material displayed in the 3D preview on the right side of the screen will change to the material you have selected. We are continually testing materials from the Inventables store and adding them to this menu.
(h) Bit Size menu The Bit Size menu lists all the bits that have been tested for the selected machine. Inventables uses a color coding system to make it easier to indentify and learn about the different sizes and styles of bits. If you are not using an Inventables bit, you can click “other” and add your own bit.
Caution
If you add your own bit, you will notice that the Cut Settings menu now displays a caution icon.

Inventables performs testing on all of the material and bit combinations presented in the menus to generate the recommended values for feed rate, plunge rate, and depth per pass. If you use your own bit, you need to calculate these values and enter them by clicking “Custom.”

(i) Additional Bit menu As of this writing, this feature is a beta feature. It enables you to add a second bit for small, detailed areas that can’t be carved with a larger bit. We’ll go over this in Chapter 7.
Note
Beta features are not in Easel by default. You can turn on beta features by going to Machine menu → Advanced and activating a feature you want to use. We are still testing these features and fixing issues before we are ready to release them to all users.
(j) Cut Settings menu This menu displays values for recommended feed rate, plunge rate, and depth per pass. Inventables did testing with each bit and each material to determine the recommended values for specific material and bit combinations. When you select a specific material and bit combination, the recommended values automatically update. If you want to type in your own values, click “Custom.”
Note
The formula we used is Feed Rate = Spindle Speed × Number of Cutting Edges (flutes) × Chip Load (thickness of chips).
Feed rate is the velocity at which the bit advances along the workpiece. It is measured in distance per time. In Easel, we use inches per minute for imperial, and millimeters per minute for metric.
Plunge rate is the velocity at which the bit plunges or descends into the workpiece. It is also measured in distance per time. In Easel, we use inches per minute for imperial, and millimeters per minute for metric. For soft materials like foam, plunging can be done faster; for harder materials like metals, it is best to plunge more slowly.
Depth per pass is the depth the bit goes down each time it begins a new pass deeper into the material.
(k) Carve button This button turns green when the machine is connected. When you click the button, a walk-through is initiated that helps you confirm that everything is in order before you begin carving. (Think of it as a preflight checklist.) At the end of the walkthrough, click “Start Carving” to begin the carving process.
(l) Simulate button This button simulates the carve. It estimates how long the carve will take to complete and visualizes the path the tool will take during your carve.
(m) Material dimensions You can use these input fields to change the length, width, and thickness of your material.
(n) 3D preview This displays a rendering of what your project will look like when it is completely carved.
(o) Window adjustment Drag this adjustment to the left or right to adjust the width of the window.
(p) Canvas Zoom and Home buttons The plus and minus buttons zoom the canvas in and out, respectively. The home button sets the size of the canvas to the full size available on the left side of the screen.
(q) Units switch This toggle switch changes the working units from inches to millimeters.
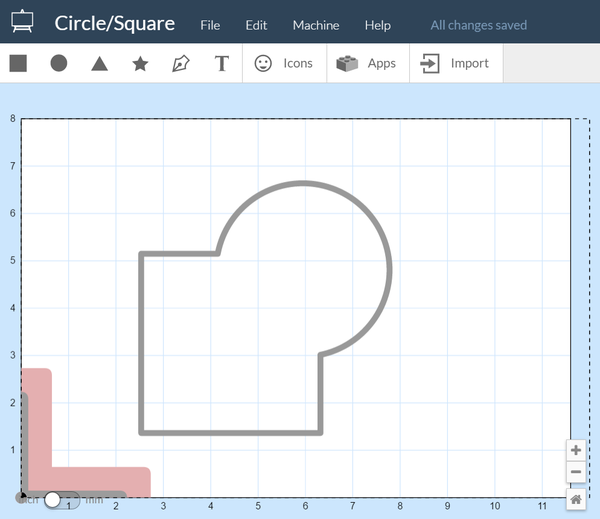
(r) Smart Clamp™ keep out area When Carvey is selected as the machine in the Machine menu, this red and gray area indicates the location of the Smart Clamp in Carvey’s work area. The gray area is the physical clamp. The red area represents the area that must be clear in order to keep your clamp safe. Remember, the collet is wider than the bit: even if the bit avoids the clamp during a carve, your collet may not. This is why the red area must remain clear, too.
(s) Canvas This is the area in which you create, import, and edit your designs.
(t) Shapes The default shapes are square, circle, triangle, and star. You can add each shape to the canvas by clicking it. After a shape is on the canvas, you can drag it to move it around, resize it by dragging one of the gray anchor points, or edit the shape’s geometry. To change a shape’s geometry, double-click a gray anchor point. When the anchor point changes to white, you can drag it to create the geometry you want.
(u) Pen tool This tool makes it possible to draw a straight line and other shapes by using anchor points. The simplest geometry you can draw is a straight line between two anchor points. If you continue to click around the canvas, you will create a path made of straight lines. To stop adding path segments, double-click the most recent anchor point. By placing another anchor point on the first point, you can create a closed shape. After you are done creating your shape, you can convert straight-line segments to curves by double-clicking them while pressing the Shift key on your keyboard.
(v) Text menu Use this menu to add text or change the font to the text already in your design.
(w) Icon menu This menu provides access to hundreds of pieces of artwork in vector format. To add an icon to the canvas, simply click it. It can then carve as outlines or fills. Like shapes, you can double-click icons and edit them by moving or deleting the anchor points.
(x) Apps button This menu provides access to all the apps in Easel. At a high level, apps make it easier for users to make things. They do this by providing properties (e.g., sliders, input boxes, and drop-downs) that you can manipulate. Each time you change one of these properties, your app’s executor function is invoked. Easel will provide the new values of all the properties, along with several other data elements representing the context of your project. Your app will use this data to create new design objects, or to modify existing ones. Example apps include the Inlay Generator, Box Maker, and Interlocker. The Easel API for creating apps is currently in early access. If you are a developer, we’d love your help to make it better. You can apply for early access at http://developer.easel.com.
(y) Import menu Use this to import SVG (scalable vector graphics) files or G-code. You can use “Image Trace” to generate a carvable vector file from a raster or image file.
(z) Material boundary This dotted line represents the perimeter of your material on the canvas. Any part of your design that you want to be carved must be within the boundary.
Engraving Your Tile
To start working on your title project, follow these steps:
-
When you first log in, you’ll notice the project window is open. Start by clicking “Start a new project.” You can also do this in the File menu (c) by clicking “New.”
-
Name your project. Either click “Untitled” or click File → Rename and type the name of your tile project.
-
In the Material menu (g), select the type of material you are using. For this project, you’ll be using two-color HDPE.
-
Next, click the Bit Size menu (h) and then select the blue 1/16″ 2FL Fish Tail.1 Click anywhere in the lower area of the screen to close the Bit Size menu.
-
In the upper right of the window, in the Material Dimensions menu (m), type the X, Y, and Z dimensions. For this project, it will be X=6″, Y=6″, and Z=0.25″. We will be confirming the exact thickness in Chapter 3 with your digital calipers.
-
Click the Import menu (y).
-
Select “Image Trace.”
-
Click “Upload file.”
-
Click “Choose File.”
-
Find where you stored the photo of your drawing (from Chapter 1), select it, and then click “Open.”
-
Use the Threshold and Smoothing sliders to adjust your image until you are satisfied, and then click “Import.”
-
Use the mouse to select your imported image.
-
Notice that the Cut/Shape panel appears when you select a shape. Click “Shape” to determine the exact size and position of the image. There are five radio buttons as well as X and Y coordinates. The radio buttons represent which part of the design the X and Y positions are being displayed for (upper-left corner, upper-right corner, center, lower-left corner, and lower-right corner).
-
Select the radio button in the center and then enter 3 for the X position and 3 for the Y. This will put your design in the center of the 6″ x 6″ piece of material.
-
Go to the Size portion of the menu and click the lock icon. This will constrain the proportions of your design. Type the size that you want it to be. I suggest 3″ or 4″, whatever you think looks better. You want to leave room on the border for the clamps.
Now you’re ready to move on to Chapter 3, where we will engrave your design into the tile.
1 FL stands for flutes. Flutes are the cutting edges on the bit.