
Beautiful Soup can be used effectively to search or navigate within an HTML/XML document. Apart from this, we can also use Beautiful Soup to change the content of an HTML/XML document. Modification of the content means the addition or deletion of a new tag, changing the tag name, altering tag attribute values, changing text content, and so on. This is useful in situations where we need to parse the HTML/XML document, change its structure, and write it back as an HTML/XML document with the modification.
Consider a case where we have an HTML document with a <table> tag holding around 1,000 or more rows (the <tr> tag ) with an existing set of two columns (the <td> tag ) per row. We want to add a new set of the two <td> tags to each row. It would be highly inappropriate to manually add these <td> tags for each of the <tr> tags. In this case, we can use Beautiful Soup to search or/and navigate through each of the <tr> tags to add these <td> tags. We can then save these changes as a new HTML document, which will then have the four <td> tags per <tr> tag. This chapter deals with the different methods to modify content using Beautiful Soup by considering the ecological pyramid example that we used in the previous chapters.
Beautiful Soup has the capability of altering completely different properties of the HTML/XML tags. We know that each tag in Beautiful Soup is represented as a Tag object and it is possible to perform the following tasks:
- Modifying the name property of
Tag - Modifying the attribute values of
Tag - Adding new tags
- Deleting existing tags
- Modifying string contents
A Beautiful Soup Tag object is always associated with a .name property; for example, a, div, and so on. Modifying the .name property with a new value will modify the HTML tag as follows:
html_markup = """<div class="ecopyramid">
<ul id="producers">
<li class="producerlist">
<div class="name">plants</div>
<div class="number">100000</div>
</li>
<li class="producerlist">
<div class="name">algae</div>
<div class="number">100000</div>
</li>
</ul>"""
soup = BeautifulSoup(html_markup,"lxml")
producer_entries = soup.ul
print(producer_entries.name)
#output
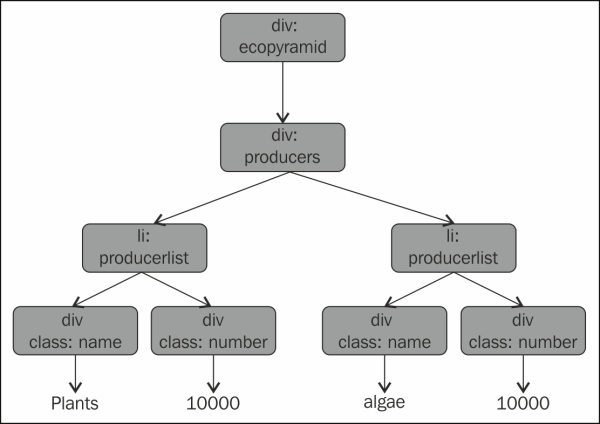
'ul'From the preceding output, we can see that producer_entries has the name ul; we can easily change this by modifying the .name property.
The representation of the HTML tree is given in the following diagram:

Let us modify the value to div, as shown in the following code:
producer_entries.name = "div"
print(producer_entries.prettify())

#output
<html>
  <body>
    <div class="ecopyramid">
    <div id="producers">
      <li class="producerlist">
        <div class="name">
          plants
        </div>
        <div class="number">
          100000
          </div>
        </li>
        <li class="producerlist">
          <div class="name">
            algae
          </div>
          <div class="number">
            100000
          </div>
        </li>
      </div>
    </div>
  </body>
</html>
This also causes the HTML tree to change as shown in the following diagram:
We can use the prettify() method to show the formatted output, as shown in the preceding code. As we can see, changing the Tag object's name property also changes the HTML tree. So, we should be careful when renaming the tags since it can lead to malformed HTML tags.
Beautiful Soup can also be used to modify the attribute values associated with a tag such as class, id, and style. Since the attributes are stored as a dictionary, it is as simple as dealing with a normal Python dictionary.
In the previous ecological pyramid example, the ul tag has the id attribute with the value producers. We can change this value to producers_new_value as follows:
producer_entries['id']="producers_new_value"
Now, if we print the producer_entries object, we can see the change in place as follows:
print(producer_entries.prettify())

#output
<div id="producers_new_value">
  <li class="producerlist">
    <div class="name">
      plants
    </div>
    <div class="number">
      100000
    </div>
  </li>
  <li class="producerlist">
    <div class="name">
      algae
    </div>
    <div class="number">
      100000
    </div>
  </li>
</div>We can add a new attribute to a Tag object. In the previous example, the ul tag doesn't have a class attribute. We can add this as follows:
producer_entries['class']='newclass'
The preceding code will add the new attribute if it doesn't exist or will update the attribute value if the attribute already existed in the HTML tree.
print(producer_entries.prettify())
#output
<div class="newclass" id="producers_new_value">
  <li class="producerlist">
    <div class="name">
      plants
    </div>
    <div class="number">
      100000
    </div>
  </li>
  <li class="producerlist">
    <div class="name">
      algae
    </div>
    <div class="number">
      100000
    </div>
  </li>
</div>
From the preceding output, we can verify that the new class attribute is being added to the HTML tree.
In the preceding example, we have added a new tag attribute to the ul tag. Beautiful Soup also allows deleting any of the tag attributes. Since the tag attributes are stored as a dictionary in Python, it is enough to use the del operator that is used to delete items in a Python dictionary as follows:
del producer_entries['class']
The preceding code will remove the attribute class associated with the ul tag. Refer to the following code:
print(producer_entries.prettify())

#output
<div id="producers_new_value">
  <li class="producerlist">
    <div class="name">
      plants
    </div>
    <div class="number">
      100000
    </div>
  </li>
  <li class="producerlist">
    <div class="name">
      algae
    </div>
    <div class="number">
      100000
    </div>
  </li>
</div>We've seen some of the different ways to change the Tag object's .name property and to modify the Tag attributes. Beautiful Soup also allows us to add a new tag to the existing HTML/XML document. The new_tag() method creates a new tag within the soup object. We can then add these tags to the tree by using either the append(), insert(), insert_after(), or insert_before() method.
In our ecological pyramid example, we already have plants and algae as the producers. Let us add one more producer to the HTML, for example, phytoplankton. If we analyze the HTML, we can see that we need to first add a li tag to the parent ul tag. For this, we need to create the li tag first.
The Beautiful Soup's new_tag() method will help us to create a new tag. The new_tag() method can be called only on the BeautifulSoup object. So, here we need to create a new tag, li, with the producerlist class. For this, refer to the following code:
soup = BeautifulSoup(html_markup,"lxml")
new_li_tag = soup.new_tag("li")
The preceding code will create and store the new li tag in the new_li_tag variable. The new_tag() method requires only the tag name as mandatory. We can pass attribute values or other properties as optional parameters. That is, we can have the following code:
new_atag=soup.new_tag("a",href="www.example.com")In the preceding example, we created the <a> tag by giving a name as well as the href property and its value.
It is also possible to add a new attribute value to the previously created li tag using the following code:
new_li_tag.attrs={'class':'producerlist'}We have created the li tag but we need to fix it to the correct position. Beautiful Soup allows us to add a tag to another tag or the soup object using the append() method. The append() method adds a newly created tag to the end of .contents. This can be called in the same way as the append() method in a Python list as follows:
producer_entries = soup.ul
producer_entries.append(new_li_tag)
The preceding code will append the newly created li tag to .contents of the ul tag. So, the li tag will now be the child of the ul tag. The ul tag structure will look like the following code:
print(producer_entries.prettify())

#output
<ul id="producers">
  <li class="producerlist">
    <div class="name">
      plants
    </div>
    <div class="number">
      100000
    </div>
  </li>
  <li class="producerlist">
    <div class="name">
      algae
    </div>
    <div class="number">
      100000
    </div>
  </li>s
  <li class="producerlist">
  </li>
</ul>
From the preceding output, we can see that the newly created li tag is added as the new child of ul. Now, we have to add the two div tags inside this li tag.
Like append(), the insert() method can also be used to add a new tag into the HTML tree. As we already know, append() adds a newly created tag to the end of .contents. But, insert() on the other hand, doesn't insert at the end of .contents; instead, we need to specify the position at which the tag has to be inserted. This is the same as the list insert() operation in Python. Refer to the following code:
new_div_name_tag=soup.new_tag("div")
new_div_name_tag["class"]="name"
new_div_number_tag=soup.new_tag("div")
new_div_number_tag["class"]="number"
The preceding lines of code will create the two new div tags with the corresponding class attributes as follows:
new_li_tag.insert(0,new_div_name_tag)
new_li_tag.insert(1,new_div_number_tag)
print(new_li_tag.prettify())

#output
<li class_="producerlist">
  <div class="name">
  </div>
  <div class="number">
  </div>
</li>
Now, we can see that new tags have been inserted into the li tags. But, the respective strings are missing in these tags.