
Chapter 1. Your First Intrepid Hops … err, Steps
Welcome! If you’re reading this, then you’ve undoubtedly heard about Spring Roo from a friend or colleague, or perhaps you read about it online or saw a presentation about it. “Well, that’s a presumptuous way to start a book!,” I can imagine you thinking. I would, were I in your position.
But we’ve only just begun. In fact, I suspect that most people that read this book will come to it having been introduced to it from some other resource. Sure, most people aren’t likely to just pick up a book accidentally, you might contend. But I’m willing to bet you picked this book up having heard quite a bit about Spring Roo a priori. This will be a common refrain: “My colleague was raving about Spring Roo and I just want to learn more …”
This is natural. Most people—having heard claims of Roo’s vaunted productivity and rapid turnaround times—will naturally assume they’ve not been told the whole story, that surely there must be a catch, even if what they heard was fantastic. It’s only natural that one might attempt to investigate further, to clarify. One might seek trustworthy resources to light the way. You know O’Reilly—a good publisher, one that’s never led you astray before.
And so, here we are.
You’ve got doubts. “If it sounds too good to be true…” But let me stop you right there! Spring Roo does sound too good to be true, but—as you’ll see in short order—it’s not.
The Pitch
Spring, the Most Productive Way to Build Java Applications
Spring Roo is a dynamic, domain-driven development framework from SpringSource, the makers of the insanely popular Spring framework, the de facto standard in enterprise Java. The Spring framework simplifies and expedites application development through a three-pronged approach: it enable services on plain-old-Java-objects (POJOs) declaratively and transparently through dependency injection and aspect-oriented programming, and—where functionality can’t be achieved effectively through those channels alone—it provides the simplest, cleanest abstractions and APIs under the sun to solve problems and to simplify existing, often verbose APIs.
If Spring’s so popular, and so productive, then surely Roo is redundant? After all, what could it possibly hope to add? “Spring’s the easiest way to work with Java today,” you think, “you just said it yourself!”
Spring is no doubt the most proficient way to work with Java, but the current thinking strongly supports the conclusion that the next barrier to enhancing productivity on the JMV is the Java language itself.
This too is not news.
A Worthy Alternative
SpringSource is also the custodian of the open-source Grails project, which has similar goals as Spring Roo. Grails is a highly productive web development framework built on the Groovy language. The framework’s built on top of Spring, but provides a workflow that’s far more like Ruby on Rails. Part of the productivity gains to be had in using this framework—part of its power—is that you can exploit the Groovy language’s dynamism and conciseness. Groovy’s a very dynamic language. It supports meta programming and the creation of exotic domain-specific languages. These features alone can pack quite a punch! They let the Grails developer specify more in far fewer lines of code than a Java developer could hope to achieve.
For some people, Grails is a compelling option, and the goal of Roo isn’t to take away from that. For some, however, Grails simply isn’t an option. Perhaps they can’t use Groovy in their environment, or they don’t want to make the large jump to Grails, feeling perfectly comfortable with their existing Spring and Java skills.
Spring Roo Means No Compromises
Spring Roo is built using standard Java. You object, “But you just said … !” (I’m getting to that, hold on!) Spring Roo uses standard Java and Spring, but during development time, the Spring Roo shell watches you work, helping out as possible and required. Think of Spring Roo as being the ultimate pair-programming buddy, or the most advanced code completion you’ve ever seen.
As an example of this power, suppose you’re in the middle of
editing a JPA entity in a Spring Roo project, and adding a field of
interest—perhaps a dateOfBirth field to a Customer entity. As soon as you’ve finished
typing out the field definition, Spring Roo automatically jumps in and
adds a corresponding accessor and mutator pair for that field to a
shadow class definition in the background. Similarly, it will implement
a toString() definition (reflecting
the fields added) if one does not already exist, and it will implement
an equals() method following the same
criteria. This assistance isn’t a one shot, either; it’s intelligent. If
you update the field, the accessor and mutator are updated as well as
the equals and toString methods. If you add an equals method
to the JPA entity, the shadow definition is removed, delegating to your
implementation instead. So, this shadow class definition is kept in
sync, responding to your changes, but it does not get in your way. It
defers to your will in all cases.
What is this shadow definition you ask? Well, it’s an AspectJ
Inter Type Declaration (ITD) that Spring Roo maintains in the
background. When your application compiles, the ITD is merged with the
Java code, creating one class that has both the field you typed in, as
well as the automatically generated accessor and mutator pair, a correct
equals() implementation, and a
correct toString() implementation.
So, you write Java code, and Spring Roo augments the Java code with
AspectJ Inter-Type Declarations (ITDs). You should never need to modify
these ITD definitions. However, if you do decide to make modifications,
do so at your own peril, as Spring Roo reserves the right to remove or
modify them at will.
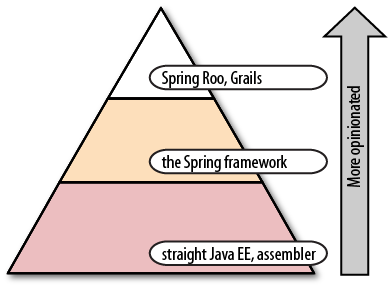
So, you get Java, but you don’t have to pay the cost of writing all that Java. For every line you write, Spring Roo will happily write any number of other boilerplate lines to relieve you of the burden. Because it is just code-generated Java and Spring, and nothing else, it’s as performant, well-written, and nicely architected as possible. Spring Roo is opinionated, but it always defers to you first.
Indeed, Spring Roo will never do anything unless you explicitly ask for it. It’s entirely opt-in—there’s no need to spend time undoing Spring Roo’s decisions. In the above example, we could bring Spring Roo into the project by explicitly directing it to do something for us from the shell, or by using compile-time retention-only annotations on our classes. If we did that, Spring Roo will monitor our workspace, using the annotations as a cue to intercede on our behalf, working in tandem with you in a background shadow definition.
Spring Roo’s very conducive to round tripping because of the aforementioned intelligence in the code generation. It’s possible to build your application entirely using Spring Roo. However, it may be that you eventually need to take your application out of Spring Roo’s sweet spot. Perhaps you’ve simply gotten 90% of your Spring application done, and want to take it the last 10% yourself. Here, too, Roo is different. You can completely remove Spring Roo from your application using push-in refactoring, yielding a generic Spring and Java-only web application that looks exactly as if you’d written it yourself and behaves exactly as it did when Spring Roo was managing its development.
This brings us around to the final piece of the puzzle: the
development environment. After all, “refactoring” connotes IDEs,
tooling, and Java development. And well it should! You already know that
Spring Roo’s a shell that sits and monitors your code as you work,
helping out wherever it can, passively, but what about these ITDs? The
ITDs that it creates are not valid Java—they comply with the AspectJ
language and can’t be compiled directly using javac. This is an easier problem to overcome
than you might imagine. First, both Eclipse (in conjunction with the
AspectJ Development Toolkit (ADJT) which is bundled with Eclipse and
with SpringSource Tool Suite) as well as IntelliJ IDEA support the ITD
format. As a result, when you work with Spring Roo projects, you still
have access to code completion and to the refactoring support you’d
expect. Those shadow definition accessors and mutators we created
earlier will still show up in the code completion prompt in your
favorite IDE. Additionally, every Spring Roo project ships with a
correctly configured Maven build that automatically processes the code
at compile time, so everything builds correctly.
Getting Started
The Tooling
Spring Roo is based on the sophisticated interplay between several moving parts. To do its work, Spring Roo needs to play a role during your development, and it must be there to help during compilation. This means you need a correctly configured development tool, and a correctly configured build process and test environment, beyond Spring Roo itself. This, as it turns out, is pretty easy to fix. In this section, we’ll set up the SpringSource Tool Suite (STS), a free development environment from SpringSource, based on Eclipse. The SpringSource Tool Suite’s got lots of extra features that makes working with Spring and the sister projects dead simple. Beyond being a particularly nice environment for Spring development, it’s also loaded to the gills with conveniences and useful-to-have packages. SpringSource Tool Suite always follows the main releases of Eclipse pretty closely, but integrates numerous plugins that can be a pain to set up independently, but that most people have to set up, anyway, like the Maven M2Eclipse plugin, or plugins for various source-code management options that aren’t included by default. It is effectively a subset of the Eclipse IDE for Java EE Developers, with a large superset of functionality integrated to reflect the realities of modern day enterprise Java development. We’ll use it throughout the book because it represents the path of least resistance and it’s a very capable choice, as well!
Because Spring Roo takes away so much of the boilerplate code, it is possible to develop Spring Roo applications using only a text editor and the Roo shell running in the background. Of course, we wouldn’t recommend it, but you could! Users of IntelliJ will be happy to know that the latest version of IntelliJ IDEA (the premium version) also supports Spring Roo development.
Let’s first obtain the SpringSource Tool Suite:
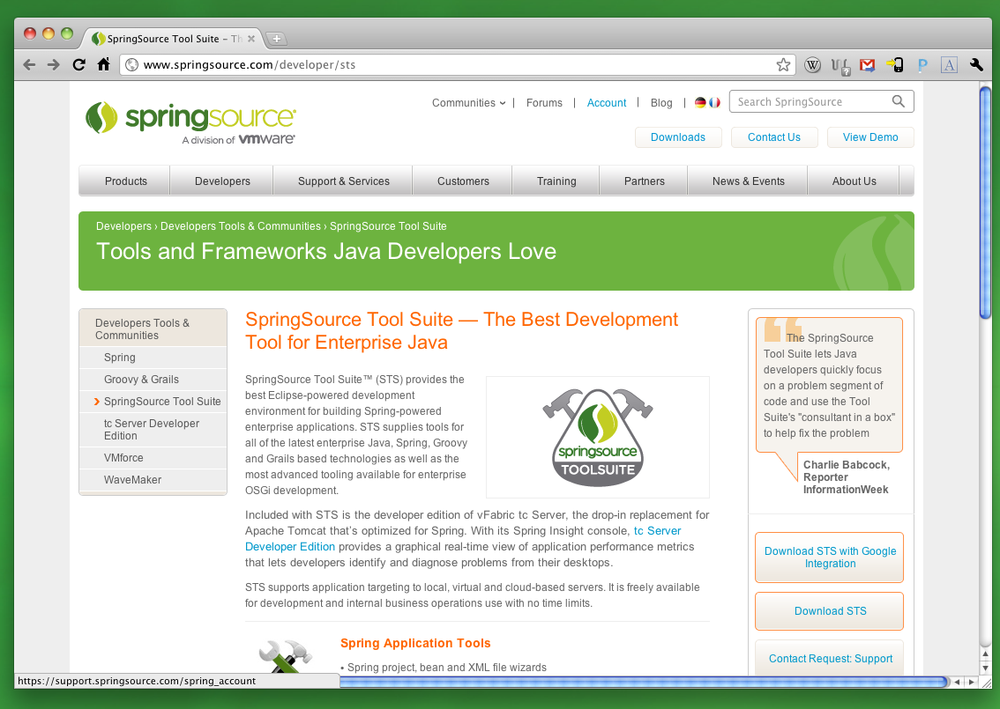
Go to http://www.springsource.com/developer/sts, and then click on “Download STS,” on the bottom right (Figure 1-2).
Install the distribution appropriate to your environment: there are builds for OSX (both Carbon and Cocoa, 32 and 64 bit), Linux, and Windows (Figure 1-3).
Once installed, you’ll have everything you need to be productive, quickly!
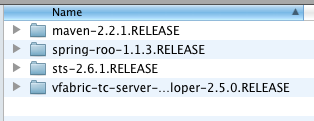
By default, the SpringSource Tool Suite comes integrated with Maven, Spring Roo, and the Developer Edition of SpringSource’s tcServer. SpringSource’s tcServer is a hardened, more robust distribution of the leading Apache Tomcat web server. The Developer Edition also includes integrated monitoring and analysis of your application in a package called Spring Insight, which lets you dissect the performance of your running Spring applications at fine granularity.
Our first Spring Roo application
Let’s dig in by building something simple—you know, to kick the tires a bit.
Building a CRM is a rite of passage for every application developer today. We’ve all written one at some point or another. If pressed, we suspect most developers would admit to having done it—at least once (in college, perhaps? You don’t have to admit it aloud. You were young. It was a warm summer evening … the moon was full … and your awesome new startup (TM) needed a way to manage customer data. Totally cool. No worries. We won’t judge.)
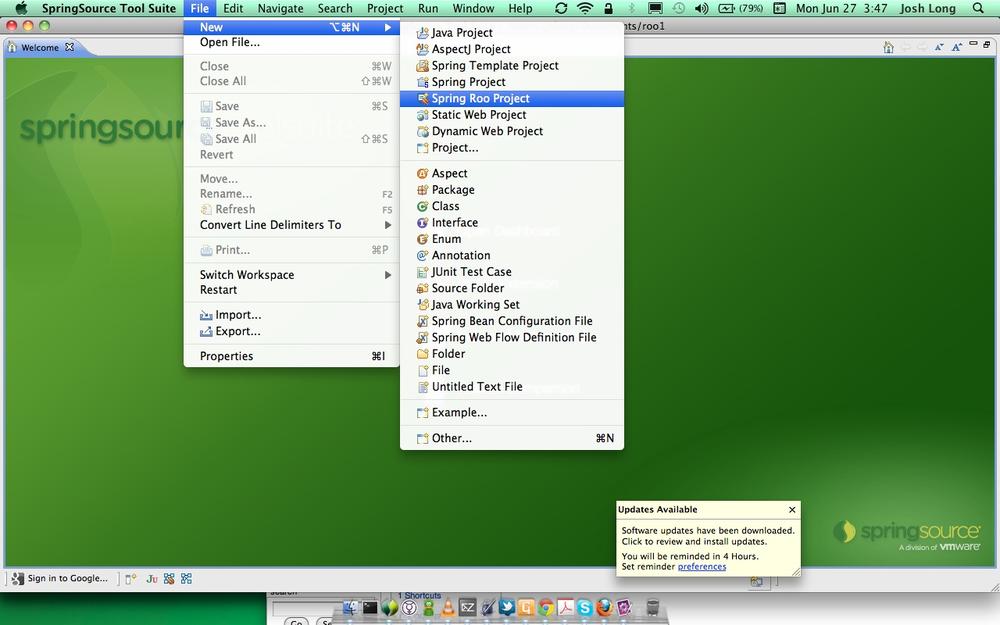
Now that you’ve got SpringSource Tool Suite installed, fire it up, select a workspace, and then go to File > New > Spring Roo Project (Figure 1-4).
The dialog’s a bit “busy,” but you don’t need to worry about most of it. This wizard simply dumps its inputs into a command line invocation, which you could do directly as well. Only fill out the first two fields—the rest you can leave as the defaults for the large majority of the time.
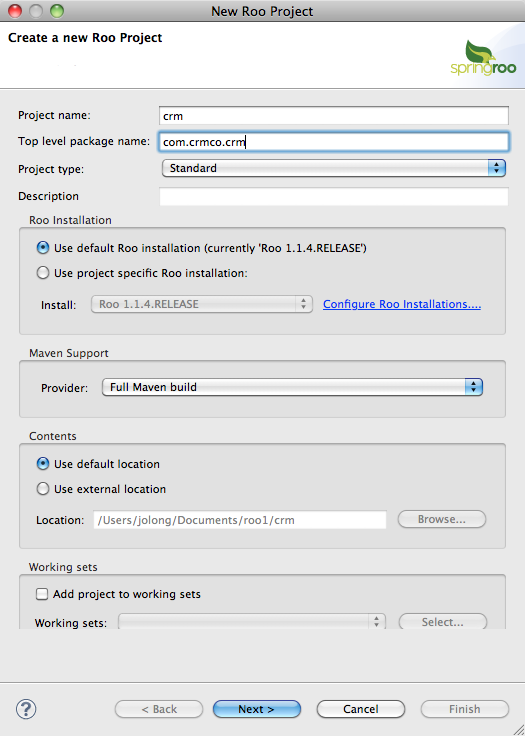
Click “Next,” and then click “Finish.” After a flash of activity, this will dump you into the Spring Source Tool Suite with a fresh Spring project, based on Maven.
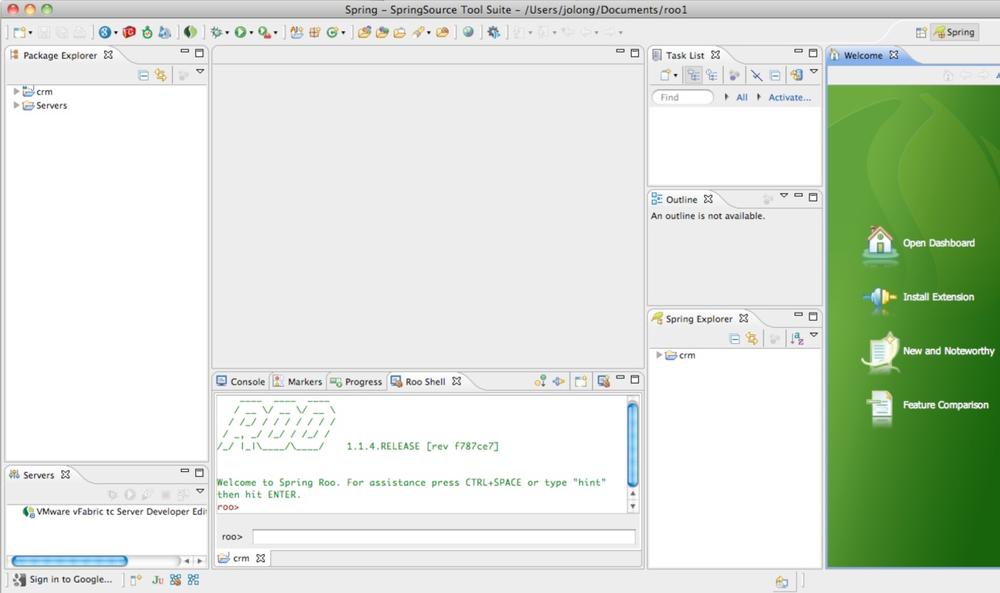
As you examine the workspace, you can see there’s a Roo Shell at the bottom of the screen. On the left is your freshly created project. First thing that you’ll notice is that it’s got a simple directory structure that confirms with the directory structure used in Maven builds. This project is a Maven project.
Directory | Description |
src/main/java | Where your Java code is to be stored. The code in this directory are to be included in your final build artifact. |
src/main/resources | Where things that should be reference-able from the root of the classpath should be stored. This includes META-INF folders and other non-.class files that you intend to be bundled with the final archive artifact. |
src/test/java | Where your Java-based test code lives. This code will not be in the final build archive, but it will be evaluated before your code’s built. |
src/test/resources | This serves the same role as the src/main/resources folder, except it exists only while the unit test code in src/test/java is being evaluated. |
Maven projects defined their dependencies in a file called
pom.xml that lives at the root of the project.
Dependencies defined in pom.xml are automatically
synchronized with the Eclipse project as classpath dependencies (you can
inspect them in the project properties dialog or simply click on the
“Maven Dependencies” Eclipse Classpath Container) thanks to the
M2Eclipse plugin which comes bundled with SpringSource Tool Suite out of
the box. As you enable features with Spring Roo, it will modify your
pom.xml file and add dependencies as required. This
is all automatic, and behind the scenes. The Maven file already
represents a sophisticated build. A fresh Roo project already has JUnit,
the correct and latest versions of Spring, AspectJ, logging, and the
latest servlet APIs. Not bad! We’ll revisit this
pom.xml as we build our application, so let’s get
back to building our CRM.
Spring Roo applications are domain driven, everything you do stems from your domain objects, your entity objects. You describe your domain objects to Spring Roo and it will handle building persistence code (using JPA 2.0), web application code to manipulate those entities, and much more.
Don’t take my word for it, though. If you ever have a question,
simply ask Spring Roo! Sometimes knowing that there is an answer is as
good as knowing the answer. If you’re ever in doubt as to what Spring
Roo can help you achieve, type “help,” and then hit Enter. Spring Roo
will show all the commands that it can respond to. Similarly, if you
ever have a doubt as to how to proceed, ask Roo by typing
“hint” on the shell. Let’s do so:
Welcome to Spring Roo. For assistance press CTRL+SPACE or type "hint" then hit ENTER.

roo> hint
Roo requires the installation of a JPA provider and associated database.
Type 'persistence setup' and then hit CTRL+SPACE three times.
We suggest you type 'H' then CTRL+SPACE to complete "HIBERNATE".
After the --provider, press CTRL+SPACE twice for database choices.
For testing purposes, type (or CTRL+SPACE) HYPERSONIC_IN_MEMORY.
If you press CTRL+SPACE again, you'll see there are no more options.
As such, you're ready to press ENTER to execute the command.
Once JPA is installed, type 'hint' and ENTER for the next suggestion.
roo>
See? Everything’s about the domain objects—it wants you to set up
the persistence infrastructure. So, oblige the shell—type in “persistence setup,” and then type CTRL +
SPACE. If you’re using Roo from the shell inside of SpringSource Tool
Suite, then the shell can offer you autocompletion using the same key
commands as you’d use in the Java code editor. On a standard operating
system shell, you’d use TAB, instead, just as you would to autocomplete
commands in Bash, for example.
The code completion for the persistence setup command offers two
options, both of which are required—one for --database, and one for --provider. Any code completion options that
you get when you type CTRL + SPACE are required. Once you’ve selected a
required code completion (like “persistence
setup --database”), type CTRL + SPACE again to see if Roo has
suggested values for that option. In this case, there are several
different suggested values for --database. For expedience, I recommend you
choose “H2_IN_MEMORY.” Hit CTRL + SPACE again, and the only remaining,
required option (“--provider”), will be added to the
command line. Type CTRL + SPACE again to get suggested values for the
“--provider” option. Again, there are
several options here, as well. One well-known option is “HIBERNATE” and
unless you have a preference, go ahead and select it.
Often, commands may have optional arguments that you can use to fine tune the results. To see the optional arguments for any command, type “--,” and then type CTRL + TAB to see a full list of possibilities. Hit Enter.
The shell will flash and you’ll see telltale signs that Roo has
added several new dependencies to your pom.xml in
service of your request, including Hibernate, the Hibernate JPA 2.0
implementation, Commons Pool, Commons DBCP, the Hibernate JSR 303 (Java
Bean Validation) implementation, and several Spring dependencies,
including the Spring JDBC and transaction support. It’s also added a JPA
persistence entity information file (src/main/resources/META-INF/persistence.xml),
as well as Spring application context (in src/main/resources/META-INF/spring/applicationContext.xml).
Finally, the Roo command has added a repository to the Maven pom.xml where new dependencies can be
found.
Sure, the narrative of these last few paragraphs has taken more than a few minutes of your life, but the code—from nothing, to this point, has taken an almost trivial amount of effort. Let’s keep rolling and build our model.
The model is simple enough to be approachable, but complex enough that we can see how Spring Roo handles common scenarios. We won’t reprint all the Roo commands here, just enough so that you can see how to begin—the rest are easy to piece together.
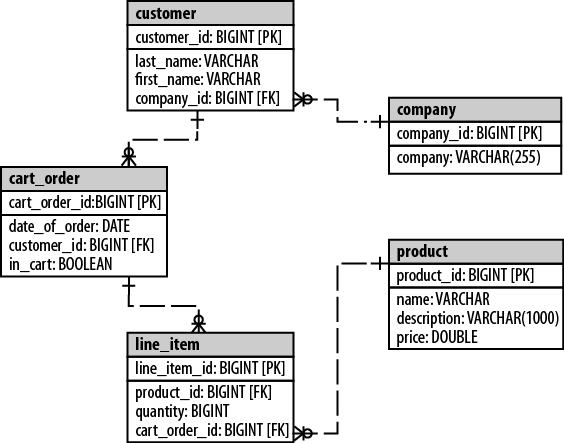
Roo supports a few different workflows when building your domain objects using JPA. For greenfield domains, you can declaratively build your entities using the Spring Roo command line. We’ll build the model above using this approach. You should know that Spring Roo also supports reverse engineering existing domain models from a database (a feature called “database reverse engineering,” commonly abbreviated as “DBRE”) and generating the appropriate JPA entities. We’ll look at this approach shortly. Finally, there’s no reason you can’t mix ’n match these workflows: perhaps you will bootstrap your Spring Roo application using DBRE, but then use Spring Roo to maintain and evolve those entities.
Note
As we are working, Roo is keeping track of our commands and
writing them to a log at the root of the project in a file called
log.roo which you can refer to
anytime you want. Naturally, you can also save off the commands into a
file and run them on the shell, effectively replaying your commands.
This is, among other things, a very convenient way to bootstrap new
projects.
We’re going to tell you how to do this, this time, but remember, long after you’ve finished reading this tidy, tiny tome on Spring Roo, you may occasionally find that you’re confused on the precise syntax or command options. Again, “hint” is your best friend here. It’ll guide the way.
To create an entity in Spring Roo, simply type “ent,” and then hit CTRL + TAB. It’ll
auto-complete the command for you, filling in “entity” as well as the
first and only required option, “--class.” Here you need to specify a class to
use.
Recall that the first step of the process was to fill out the
Spring Roo dialog, specifying a Project Name and a Top Level Package
Name. The Top Level Package Name is the root package of your
application. For instance, you might have a package, com.crmco.crm, that prefixes all parts of your
application; the domain model lives in com.crmco.crm.model, the web-tier specific
code lives in com.crmco.crm.web, etc.
Roo seizes upon this convention and enshrines it in the idea of the Top
Level Package Name. You can use the tilde character (“~”) as shorthand for the Top Level Package
Name. It’ll be automatically replaced with the appropriate value
whenever it’s referenced, in very much the same way as the tilde
character is commonly substituted for the $HOME environment variable on Unixes.
So, for our Customer entity, simply specify “~.model.Customer” as the value for the --class
option, and Roo will create a new JPA entity class com.crmco.crm.model.Customer.
Hit Enter and Roo will list the files that it has changed or created in response to your command:
roo> entity --class ~.model.Customer
Created SRC_MAIN_JAVA/com/crmco/crm/model
Created SRC_MAIN_JAVA/com/crmco/crm/model/Customer.java
Created SRC_MAIN_JAVA/com/crmco/crm/model/Customer_Roo_Configurable.aj
Created SRC_MAIN_JAVA/com/crmco/crm/model/Customer_Roo_Entity.aj
Created SRC_MAIN_JAVA/com/crmco/crm/model/Customer_Roo_ToString.aj
~.model.Customer roo>
A couple of things are striking about this output.
First, the prompt has changed. It was “roo>,” and now it’s “~.model.Customer roo>.” The prompt
indicates the focus. The focus describes the
subject of actions on the shell. In this case, Roo has given the entity
you’ve just created focus. It knows that, more than likely, subsequent
commands will attempt to modify this entity, and that it would be
inconvenient if you had to specify the entity each time.
Second, Roo gave you four files, not just a single one! The first
file (SRC_MAIN_JAVA/com/crmco/crm/model/Customer.java)
you might correctly recognize as the Java class for your Customer JPA
entity. It looks like this:
package com.crmco.crm.model;
import org.springframework.roo.addon.entity.RooEntity;
import org.springframework.roo.addon.javabean.RooJavaBean;
import org.springframework.roo.addon.tostring.RooToString;

@RooJavaBean
@RooToString
@RooEntity
public class Customer {
}
Kind of underwhelming, huh? Not a lot here. The only thing of interest here are the annotations at the top. These annotations are compile-time retention only—they disappear once the code’s compiled. They are used to signal to Roo that you want Roo to manage boilerplate code for you while you are developing. This boilerplate code exists in the other .aj files that were created.
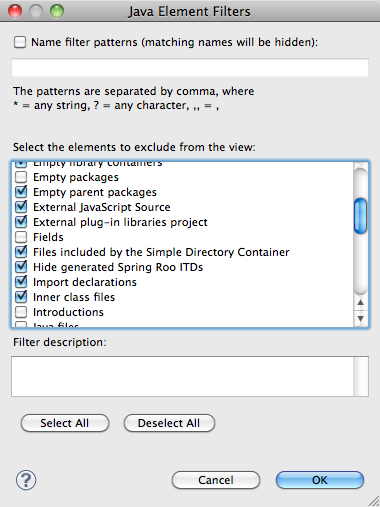
You can click on the shell to open the other files, those ending
in .aj. These files are the AspectJ
ITDs we mentioned earlier. You won’t be able to see them in the Eclipse
Package Explorer unless you disable a filter. To do so, click on the
little down-arrow on the Package Explorer, choose Filters, and then find
the checkbox for “Hide generated Spring Roo
ITDs” (Figure 1-8). Uncheck
it if it’s selected.
You are not supposed to modify these other files, they are there
for Roo but lets see whats in them. Open the SRC_MAIN_JAVA/com/crmco/crm/model/Customer_Roo_Entity.aj
file. This file exists because Spring Roo placed a @RooEntity annotation on your class. If you
examine the code, you’ll see that Spring Roo’s already generated an ID
for your Customer entity, it’s already generated a version column,
and it’s already generated simple,
ActiveRecord-style CRUD methods to create, remove, update, and delete a
Customer object using a JPA EntityManager. If you examine the other file
(Customer_Roo_ToSring.aj), you’ll see
that Spring Roo knows about the instance variables in the
class—including the ID and the version column—and already incorporates
them into a useful toString() definition. The last file (Customer_Roo_Configurable.aj) simply adds the
AspectJ @Configurable annotation to
the entity so that Spring can transparently inject the JPA EntityManager into the entity class. Spring
has no problems injecting collaborating beans into other Spring beans
that it instantiates in the application context. Because Spring doesn’t
control the construction and lifecycle of the JPA Customer entity—it needs to use AspectJ, which
@Configurable specifically
supports.
Note
A quick word about Roo’s (neighborly, but sometimes unsolicited)
help: it’s entirely optional. For example, if you feel like you have a
lot to offer in toString method
implementations, and want to provide your own, then you can do so. Add
a toString method implementation in
your Customer.java class and the corresponding Customer_Roo_ToString.aj file will
disappear! Spring Roo will never presume to know
more than you. At the first sign that you want to drive, to exert
control over the code, Roo will get out of the way. If you simply
don’t want Roo to even bother, simply remove the annotation from the
Customer.java file and watch as
Spring Roo removes the corresponding .aj file. If, later, you decide you that you
were a bit hasty in dismissing its help, simply replace the annotation
and Roo will obediently hop back into action again.
Let’s get back to it. We’ll define the column for the first name
and the last name. To create the attribute, use the Roo field command, like this:
field string --fieldName lastName --notNull
Spring Roo will automatically add a field to the Customer.java class and it’ll generate
corresponding accessors and mutators in the Customer_Roo_Entity.aj file. It also updates
the Customer_Roo_ToString.aj to
include the new field. Very smooth! You type a field, and Roo contorts
to welcome that new field into the code base, updating everything as
appropriate.
You could simply add the field to the entity class, if you’d like. In this case, it turns out to be roughly the same amount of typing so it really is a matter of choice. The Roo shell command has other options that you may not remember how to set up manually, which makes the Spring Roo command more convenient. For the lastName field, simply add it, manually:
@NotNull private String lastName;
Just as last time, Spring Roo hops into action, changing the other code as required to welcome the new field. See? Roo’s flexible. It gets out of your way and helps whenever it can.
So far, so good! Admittedly, this is a very simple entity so far.
Let’s set up the CartOrder entity,
which has a one-to-many relationship with the Customer entity. First, create the CartOrder entity, just as you did the Customer entity:
entity --class ~.model.CartOrder
field boolean --fieldName inCart
field date --fieldName dateOfOrder
To link the two, we need to use a special variant of the field
command to establish the one-to-many relationship from the Customer, to the CartOrders. Let’s go back to our Customer
entity and manipulate it.
Type:
focus --class ~.model.Customer
to change back to the Customer
entity. Then, define the collection:
field set --fieldName orders --type ~.model.CartOrder --cardinality ONE_TO_MANY --mappedBy customer
This is half of our relationship, but we have to define the
reverse side of the relationship, too. The “mappedBy” attribute tells Spring Roo that the
field to use on the CartOrder entity
is the customer attribute, presumably of type Customer. This is how you map a foreign
key—the inverse side of this relationship—in JPA. Focus on the CartOrder, again, and then add the reference
to the owning side—a Customer
entity:
focus --class ~.model.CartOrder
field reference --fieldName customer --type ~.model.Customer --cardinality MANY_TO_ONE
Database Reverse Engineering
It would be easy to continue in this way, fleshing out the balance of the model. Instead, however, let’s look at Spring Roo’s database reverse engineering feature (DBRE) to simply generate the model for us from an existing schema.
database reverse engineer --package ~.domain --schema PUBLIC
The command will fail because it can’t figure out which driver to use to connect to the database from which the domain model should be generated, but Spring Roo knew this might arise and has provided guidance. When you issue the command, it’ll respond that you need to install a driver for the database, and then show results:
database reverse engineer --package ~.domain --schema PUBLIC

Located add-on that may offer this JDBC driver
1 found, sorted by rank; T = trusted developer; R = Roo 1.1 compatible
ID T R DESCRIPTION ------------------------------------------------------------------------
01 Y Y 1.3.155.0020 H2 #jdbcdriver driverclass:org.h2.Driver. This bundle...
------------------------------------------------------------------------
[HINT] use 'addon info id --searchResultId ..' to see details about a search result
[HINT] use 'addon install id --searchResultId ..' to install a specific search result, or
[HINT] use 'addon install bundle --bundleSymbolicName TAB' to install a specific add-on version
JDBC driver not available for 'org.h2.Driver'
You heard the man … err … shell! Get hopping! It’s practically rolled the red carpet:
addon install id --searchResultId 01
Spring Roo will try to connect to the H2 database instance and
look for tables to generate the entities from. It won’t find any, of
course. You need to install the tables, which are available as part of
this book’s source code download, as roo_crm.sql. In our local installation, we’re
running the H2 database as a server, not in-memory. You can see what
database properties Roo’s already using by using the database properties list command (which simply
dumps the values in src/main/resources/META-INF/spring/database.properties).
Our local configuration looks like this:
database.password=
database.url=jdbc:h2:tcp://localhost/~/roo_crm
database.username=sa
database.driverClassName=org.h2.Driver
In this configuration, the H2 client will try to connect to an H2
database instance running as a server, locally. You can download the H2
database from www.h2database.com. Unzip it
where you’d like and the run the h2.bat or h2.sh script inside the bin folder.
Change the H2 database connection URL like this:
database properties set --key database.url --value jdbc:h2:tcp://localhost/~/roo_crm
It’ll churn for a second, and then return you to the shell, at
which point you can simply re-issue the database reverse engineering
command. Note that we’ve specified ~.domain, not ~.model, to avoid having the DBRE command
overwrite, and conflict with, the existing Customer class definition. You may simply
delete the existing ~.model
package.
Note
“I Need To See Your ID” Be sure that your tables have a primary key. Roo requires a primary key (and also really, really likes a version column—some addons don’t work without it) to do its work, so make sure that you’ve got one on all tables you import. Some recommended guidelines: use a long or equivalent type for the ID, and at least an integer for the version column. This will please Roo (and make your queries faster).
The entities that are brought in from the DBRE process are
empty—all the fields that were generated are in an ITD—of the form
$ENTITY_Roo_DbManaged.aj.
If you’re confident in the reverse engineering, then open up the
$ENTITY_Roo_DbManaged.aj file and
move all the fields into the entity directly. This will cause the
$ENTITY_Roo_DbManaged.aj file to be
deleted, and works more naturally when adding finder methods, as we
describe in the next section.
Riddle Me This
Thus far, we’ve simply built our entities and relied on the generated query methods that are added to them by default. We can, for example, interact with our database using the methods added to each of our entities by default:
// create a new Customer entity
Customer customer = new Customer() ;
customer.setFirstName("steve");
customer.setLastName("mayzak");
customer.persist();

// presumably we've gotten ahold of the ID
Customer steve = Customer.findCustomer( 1L ) ;
steve.setFirstName( "Steve" );
steve.setLastName( "Mayzak" );
steve.merge() ;

// count the records in the database
long customers = Customer.countCustomers();
This is a start, but often we need to retrieve data using more sophisticated queries. To do this in Spring Roo, we need to create “finder” methods. This, as it turns out, is very easy. Spring Roo has a whole arsenal of finders that it knows how to generate without your help at all. First consult this list to see if any of the ones it can add are what you’re looking for:
~.domain.Customer roo> focus --class ~.domain.Customer
~.domain.Customer roo> finder list
findCustomersByCartOrders(Set cartOrders)
findCustomersByCompanyId(Company companyId)
findCustomersByFirstNameEquals(String firstName)findCustomersByFirstNameIsNotNull()
findCustomersByFirstNameIsNull()
findCustomersByFirstNameLike(String firstName)
findCustomersByFirstNameNotEquals(String firstName)
findCustomersByLastNameEquals(String lastName)
findCustomersByLastNameIsNotNull()
findCustomersByLastNameIsNull()
findCustomersByLastNameLike(String lastName)
findCustomersByLastNameNotEquals(String lastName)
~.domain.Customer roo>
Use the finder add command,
specifying the finder name as specified in the finder list output:
~.domain.Customer roo> finder add --finderName findCustomersByFirstNameLike
Open up the newly created Customer_Roo_Finder.aj file to inspect the finder method that was created for you.
If you don’t see a finder that you want already, you can of course simply add a finder as you’d like in the entity’s Java class, in the same style as the finders generated by Spring Roo.
On The (Active) Record
Spring Roo builds active record style entity objects. Active record objects—from Martin Fowler’s active record pattern—are essentially entity objects whose interface includes methods to store, retreive (through queries, or by ID), update, and delete the entity. While the active record pattern is famously used quite succesfully in Ruby on Rails and Grails, it’s little known in typical enterprise Java shops where the preferred approach is to use services, or, as often, services and repositories. It is still easy to build a service tier facade with Spring Roo, delegating to the active record-style entities to perform basic repository object duties.
Persistence with Spring Data Graph
Has always featured great support for JPA, and—with a newly revised, more generic meta-model available to addon developers, you can expect Spring Roo to support alternative persistence models.
This is becoming valuable as companies are increasingly faced with more complex or higher volume data challenges. There is a new breed of database—iconified by the name “NOSQL” (Not-Only-SQL). NOSQL is all about pragmatism—use the best tool for the job, and—to use a cliche—understanding that one size does not fit all. When we talk about persistence challenges that use a hybrid architecture consisting of both the new generation of databases, and more traditional RDBMSes, we call it “polyglot persistence.”
The Spring Data project embraces and simplifies NOSQL technologies and provides idiomatic Spring support for the various technologies, including template implementations, exception translation, mapping and conversion support, and much more.
Spring Data is an umbrella project. There is distinct support for all manner of technologies, including key-value stores (e.g., Redis), document stores (e.g., MongoDB), and graph stores (e.g., Neo4j), among others.
In this section, we’ll look at a Roo addon for Spring Data Graph—which brings the power of Neo4j to your Spring applications. Neo4j is an open-source, Java graph database that has been available since 2003, and is in use in production in companies worldwide. The Spring Roo addon was developed by Neo4j, in cooperation with the Spring Data and Spring Roo teams.
Graph Databases are the most flexible of the available NOSQL solutions. They store your data as a graph of nodes and relationships both having properties. This maps naturallly to what most people imagine when they build their entity domain models. You can see that object networks map directly to a graph without having to deal with object-relational management pains like impedance mismatch. Most graph databases are schema free and embrace your data as it is, without bending it to fit their constraints.
In the end, everything is connected and the relationships between things are often more important than the things themselves. It’s not hard to think of examples that are better served by these kinds of topologies: social networks, computer networks, inventory management or e-commerce solutions all spring to mind. Graph databases excel at heavily interconnected data. They invite you to add more relationships and properties to enrich your data model with all information available. This very rich data model invites you to explore and traverse the graph to find answers to your questions. Perhaps even to questions you didn’t know you had.
Graph traversals are local operations which are independent of data set size and extremely fast. Even on commodity hardware, Neo4j can traverse millions of nodes in mere milliseconds regardless of dataset size.
Spring Data Graph comes with an object graph mapping technology that uses conventions and some annotations (much like JPA) and leverages AspectJ under the hood to provide a transparent mapping between your POJOs and the graph database. Entities are mapped to nodes in the graph, references to other entities are mapped to relationships. You even have the ability to map relationships to real entities (Relationship Entity) that provides a much richer way of working with them. All fields of an entity or relationship are mapped to properties of the graph elements. Spring Data Graph also stores type information inside the graph which allows you to retrieve any node and automatically get it back as instance of the correct type. But as the graph is schema-less you can also project nodes to other, unrelated types that share properties with the initial one. AspectJ is also used to add some Active Record like operations to each entity—just as we saw earlier, in the JPA examples.
Spring Data Graph is also able to integrate with a JPA application—this is called cross-store persistence or polyglot persistence. This support lets you have the best of both worlds: store your line of business data in a traditional RDBMS, but store the data about the relationships in Neo4j.
Let’s dive directly into action and see how the plugin is installed and used. Spring Roo addons make it even easier to set up your NOSQL project. To install the Neo4j addon, you need to use the Roo Bot the plugin management solution for Spring Roo. Let’s go to the Roo shell and search for the add-on and install it. You probably have to trust my pgp key first, like this:
roo> pgp trust --keyId 0x29C2D8FD
Added trust for key:
>>>> KEY ID: 0x29C2D8FD <<<<
     More Info: http://keyserver.ubuntu.com/pks/lookup?fingerprint=on&op=index&search=0x29C2D8FD
     Created: 2011-Jan-06 10:48:11 +0000
     Fingerprint: 558eb0489fe5500c68fa8a306107f33d29c2d8fd
     Algorithm: RSA_GENERAL
     User ID: Michael Hunger <[email protected]>
          Signed By: Key 0x29C2D8FD (Michael Hunger <[email protected]>)
     Subkey ID: 0xDEFB5FB1 [RSA_GENERAL]

roo> addon search graph
roo> addon install id --searchResultId 01
And with that, you’re ready to go. Most of the commands available to the Neo4j add-on are similar to the ones you’ve already seen with JPA. Let’s set up your new project and the graph database:
roo> project --topLevelPackage com.crmco.crm
roo> graph setup --provider NEO4J --databaseLocation crmdata.db
Spring Roo will update the Maven dependencies to use the current Spring Data Graph and Neo4j version, as well as add an applicationContext-graph.xml configuration file which contains a single line of namespace-based configuration, shown below:
<datagraph:config storeDirectory="${neo4j.location}"/>Now we can start to model our domain. Unsurprisingly, the syntax resembles the default Roo syntax for creating entities and adding fields:
roo> graph entity --class ~.model.Customer
roo> field string lastName
roo> field string firstName
These commands created the Customer entity class. But instead of
having the @RooEntity annotation on top of the class
(which would mark it as a JPA Entity), you can see that the addon added
@NodeEntity which causes the AspectJ handling for the
object graph mapping of Spring Data Graph to kick in:
roo> graph entity --class ~.model.Company
roo> field string company

roo> graph entity --class ~.model.CartOrder
roo> field date --fieldName dateOfOrder --type java.util.Date

roo> graph entity --class ~.model.LineItem
roo> field number --fieldName quantity --type int

roo> graph entity --class ~.model.Product
roo> field string name
roo> field string description
roo> field number --fieldName price --type double
Creating relationships is similar to adding references in a JPA-based domain model. Lets start with a simple relationship:
roo> graph relationship --from ~.model.LineItem --to ~.model.Product --fieldName product
This adds a field to LineItem pointing to Product which is annotated with the direction of the relationship. Whenever this variable is read, Spring Data Graph looks for an outgoing “product” relationship of the LineItem node in the graph and returns the end node (i.e., a product). If you set the variable, a relationship is created. It is as simple as that:
@RelatedTo(direction = Direction.OUTGOING)
private Product product;
Creating a many-to-one relationship between
CartOrder and Customer is
simple:
roo> graph relationship --from ~.model.CartOrder --to ~.model.Customer --fieldName customer --type ORDERED --cardinality MANY_TO_ONE
Adding the inverse relationship results in having a single customer field in the order with the type we provided at the command:
@RelatedTo(type = "ORDERED", direction = Direction.OUTGOING)
private Customer customer;
A bit more demanding is the relationship between
Customer and CartOrder:
roo> graph relationship --from ~.model.Customer --to ~.model.CartOrder --fieldName orders --type ORDERED --cardinality ONE_TO_MANY --direction INCOMING
Roo springs into action, adding a
Set<CartOrder> orders field with the appropriate
annotation to the Customer entity. Please note that
this Set is auto managed, you never have to create it yourself and it will
always reflect the relationships that exist in the graph. Any modification
of the set will result in the appropriate modification of the graph
relationships as well:
@RelatedTo(type = "ORDERED", direction = Direction.INCOMING)
private Set<CartOrder> orders;
Graph relationships are directed, but can always be traversed in the opposite direction. So if your domain model doesn’t call for explicit relationships in either direction to model a domain concept, you should just use one relationship and specify the opposite direction at the other end.
Let’s repeat that, with a twist.
This was the non-graphy way of modelling this domain. What if your line items are not much more than a relationship between orders and products? If there is no order, there is no line item. If there is no product, there is no line item for that too.
So instead of creating the line item as graph entity, we do the following:
roo> graph relationship --from ~.model.CartOrder --to ~.model.Product --via ~.model.LineItem --fieldName items --cardinality ONE_TO_MANY
The result of this operation unsurprisingly added a relationship field to CartOrder:
@RelatedToVia(direction = Direction.OUTGOING)
private Iterable<LineItem> items;
This time with a different annotation which annotates fields that don’t return the target Node-Entity but rather the relationship entities in between. The iterator is read-only and can also handle millions of relationships between two nodes because of the lazy evaluation:
@RelationshipEntity
class LineItem {
   @StartNode CartOrder cartOrder;
   @EndNode Product product;
}
It also created a new class called LineItem but this time with a
@RelationshipEntity annotation and two fields. One for
CartOrder annotated with @StartNode
and the other one for Product annotated with
@EndNode. As of now, relationship entities cannot be
created directly but rather via calling
entity.relateTo(targetEntity) (e.g.,
cartOrder.relatedTo(product)).
Relationship entities can have fields too:
roo> field number --fieldName quantity --type int
After setting up the domain model, you’re ready to go! Not bad for a few incantations, eh?