Chapter 3. SQLite
What Is SQLite?
As discussed in the previous chapter, there are many places to put data. But oftentimes we want a quick, easy place to put data without all the hassle of a client–server setup. We want to store data in a simple file and edit it just as easily as a Word document. This is an optimal situation to use SQLite.
SQLite is the most widely distributed database in the world. It is put on iPhones, iPads, Android devices, Windows phones, thermostats, car consoles, satellites, and many other modern devices that need to store and retrieve data easily. It is used heavily in the Windows 10 operating system as well as the Airbus A350 XWB aircraft. It excels where simplicity and low overhead is needed. It is also great for prototyping business databases.
But every technology has a trade-off. Because it has no server managing access to it, it fails in multiuser environments where multiple people can simultaneously edit the SQLite file. Still, for our training purposes, SQLite is perfect.
SQLiteStudio
There are many SQL editors you can use to work with a SQLite database. I strongly recommend using SQLiteStudio, as it is intuitive and makes it easy to explore and manage a database. We are going to use that application in this book. You can download it at http://sqlitestudio.pl/?act=download. Be sure to choose Windows, Mac, or Linux for your respective OS. Then open the downloaded folder and copy it to a location of your choice. No installation is needed. To start SQLiteStudio, double-click SQLiteStudio.exe (Figure 3-1). You can also create a shortcut on your desktop so you can easily launch the application in the future.

Figure 3-1. The SQLiteStudio folder
Note that SQLiteStudio is an independent, third-party program not associated with SQLite or its developers. SQLite is a database engine built by Richard Hipp and a talented team of programmers. SQLiteStudio merely takes this engine and wraps a nice user interface around it. Therefore, if you ever have issues with SQLiteStudio, you should contact the SQLiteStudio team, not the SQLite team.
Importing and Navigating Databases
When you first start SQLiteStudio, you will probably see a dashboard with no content (Figure 3-2). The left pane is the database navigator, and the gray area on the right is the SQL work area where you will write SQL against the databases.

Figure 3-2. The SQLiteStudio dashboard
Let’s get some databases into SQLiteStudio. Some SQLite database samples used in this book are provided at http://bit.ly/1TLw1Gr.
Download the databases by clicking the Download ZIP button and copy the contents to a folder of your choice. You will probably want to dedicate this folder to all the databases you will work with in this book.
After downloading the databases, navigate in the top menu to Database → Add a Database (Figure 3-3).
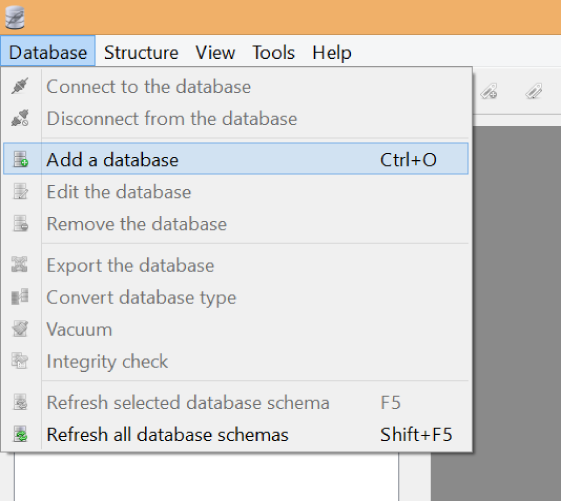
Figure 3-3. Adding a database
You will come to a dialog box prompting for a database file. Click the yellow folder icon to select a database file and import it (Figure 3-4).

Figure 3-4. Opening a database
Browse for the folder with the saved databases, and double-click the rexon_metals.db database file to load it into SQLiteStudio (Figure 3-5).

Figure 3-5. Browsing and opening database files
You will now see rexon_metals added to the database navigator (Figure 3-6). Double-click on it to see its contents, which include three tables and two views. Take some time to poke around and explore this database in the navigator.
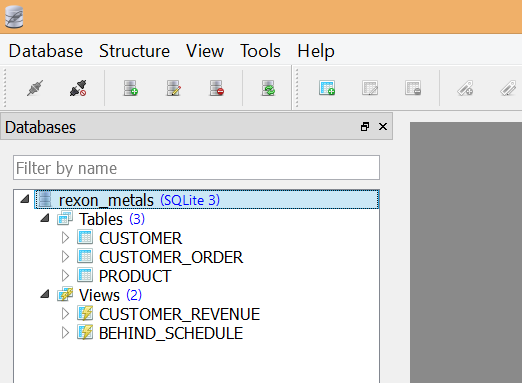
Figure 3-6. Navigating a database
Notice you can click the arrows to get more detailed information on different database objects, such as tables (Figure 3-7). For example, clicking the arrow for the CUSTOMER table can reveal information such as the columns it contains.

Figure 3-7. Expanding a table to see columns
You may be wondering what “views” are. Do not worry about them for now. They are basically prebuilt SQL queries that are used so frequently, they are conveniently stored in the database.
If you double-click the CUSTOMER table itself, a new window will pop out in the work area holding all kinds of information about the table (Figure 3-8). It initially opens on the Structure tab, which provides detailed information about each column. At the moment, the only detail you need to be concerned with is the data type for each column.

Figure 3-8. Each column in a table has a data type, such as integer or text
The CUSTOMER_ID and ZIP fields are stored as INTEGER, which is the data type for a whole (nondecimal) number. This means these fields should only hold INTEGER values. The rest of the columns are stored as TEXT. There are other data types that could be used, such as DATETIME, BOOLEAN (true/false), and DECIMAL, which are not used in this particular table.
For now, if you understand the concept of data types, then that is all you need to observe in the Structure tab. We will explore table design in detail when we create our own tables later.
Click the Data tab, and you will actually see the data in the table itself (Figure 3-9). There are only five records (or rows) in this table, but SQLite could hold millions if it needed to. You can also conveniently edit the values in this table (without using SQL) by simply double-clicking and editing a cell, and then clicking the green checkmark to save it.

Figure 3-9. The CUSTOMER table
Take some time and get familiar with SQLiteStudio. As soon as you are satisfied that you’ve poked around enough, close all the windows in the work area. Then, in the top menu, navigate to Tools→Open SQL Editor. While we’ve discovered that SQLiteStudio provides many ways to view and manipulate data without using any SQL, it does not come close to the flexibility and power that SQL offers.
Now that we know our tables and what we are working with, writing SQL will be somewhat more intuitive. It is difficult to query databases without knowing the tables in them first.