
Many developers will have strong opinions on unit testing. If you are considering using unit tests in your code, then start by understanding why unit tests are useful and sometimes necessary.
Creating and running unit tests
Using live unit tests
Using IntelliTest to generate unit tests
How to measure Code Coverage in Visual Studio
Unit tests allow you to maintain the health of your code and find errors quickly, before shipping your application to your customers. To introduce you to unit testing, we will start off with a very basic example of creating a unit test.
Creating and Running Unit Tests
Convert Celsius to Fahrenheit
We have constant values for the multiplier and addition to the conversion formula. This means that we can easily write a test to check that the conversion is an expected result.

A screenshot depicts the unit test project with three options, C hash, windows, and test. The left panel shows an option to add a new project and recent project templates.
Add a new Unit Test project

A screenshot depicts the solution explorer window. It indicates the addition of project unit test 1 to the solution Acme Corp Shipping.
Unit Test project added to the solution

A screenshot depicts the reference manager window for visual studio tests. It indicates the selection of visual studio unit testing under projects.
Reference class to test
Unit Test for Fahrenheit
Arrange – Where we set up the test
Act – Where we test the code to get a result
Assert – Where we check the actual result against the expected result

A screenshot depicts four tests and the duration times of 11 milliseconds each.
Running your Unit Test
From the results displayed in the Test Explorer, you can easily see which tests failed and which have passed. From our rather simple test in Listing 4-2, you can see that the test passed easily and that the result we expected was indeed the actual result of the test. Note that our test compares two type double values for exact equality. The Assert.AreEqual method has an overload that accepts an error tolerance parameter.
Modify the Fahrenheit Constant

A screenshot depicts four tests with durations of 86 milliseconds each. The last test, Test_Fahrenheit_Calc, indicates the failed result.
Failed test results for Fahrenheit calculation
What the unit test does is to keep an eye on the quality of the code as it changes throughout development. This is especially important when working in a team. It will allow other developers to see if any code changes they have made have broken some intended functionality in the code.
In Visual Studio 2022, you can also run the tests by right-clicking the test project and selecting Run Tests from the context menu.

A screenshot depicts the panel with icons to run all or selected test, run the last test, run failed tests, filter test results, create or run test playlists, start a live unit test, group tests, and test settings.
Test Explorer menu
Run all tests or just the last test
Only run failed tests (great if you have many tests in your project)
Filter the test results
Group tests
Start Live Unit Testing (more on this later)
Create and run a test playlist
Modify test settings
Let’s have a look at creating a test playlist.
Create and Run a Test Playlist

A screenshot highlights the new playlist option under add to playlist.
Create a playlist
This will open a new Test Explorer window where you can run the tests and save the tests you selected under a new playlist name. This will create a .playlist file for you.
Temperature_Tests.playlist File Contents
To open and run a playlist again, click the Create or run test playlist button and select the playlist file you want to run.
Testing Timeouts
Adding a Timeout Attribute
Sleeping the Thread

A screenshot depicts seven tests with different durations. The text reads, test 'Test_Fahrenheit_Calc' exceeded the execution timeout period.
Test timeout exceeded
Identifying critical methods in your code and setting a specific timeout on that method will allow developers to catch issues early on when tests start exceeding the timeout set. You can then go back and immediately refactor the code that was recently changed to improve the execution time.
Using Live Unit Tests
First introduced in Visual Studio 2017, Live Unit Testing runs your unit tests automatically as you make changes to your code. You can then see the results of your unit tests in real time.
Live Unit Testing is only available in Visual Studio Enterprise edition for C# and Visual Basic projects targeting the .NET Framework or .NET Core. For a full comparison between the editions of Visual Studio, refer to the following link: https://visualstudio.microsoft.com/vs/compare/.
You will immediately see failing tests, allowing you to easily identify breaking code changes.
It indicates Code Coverage, allowing you to see what code is not covered by any unit tests.
xUnit.net – Minimum version xunit 1.9.2
NUnit – Minimum version NUnit version 3.5.0
MSTest – Minimum version MSTest.TestFramework 1.0.5-preview

A screenshot includes the selection of pause live unit testing when the battery is below 30 per cent, delete persisted data tab, and O K tab.
Configure Live Unit Testing
Once you have configured the Live Unit Testing options, you can enable it from Test ➤ Live Unit Testing ➤ Start. To see the Live Unit Testing window, click the Live Unit Testing button as seen in Figure 4-6.

A screenshot depicts the live unit testing window with tests of different durations. The duration includes 17 milliseconds and less than 1 millisecond.
Live Unit Testing window

A screenshot highlights Test underscore Fahrenheit underscore Calc of duration 2 seconds. The test detail summary indicates the source, duration, and message.
Live Unit Testing results updated
Container Class Implementing ICloneable
Unit Test for the Container Class

A screenshot depicts the codes under the public void Test underscore Container.
Live Unit Test results failed

A screenshot depicts the code for a public class container.
Container class Live Unit Test results
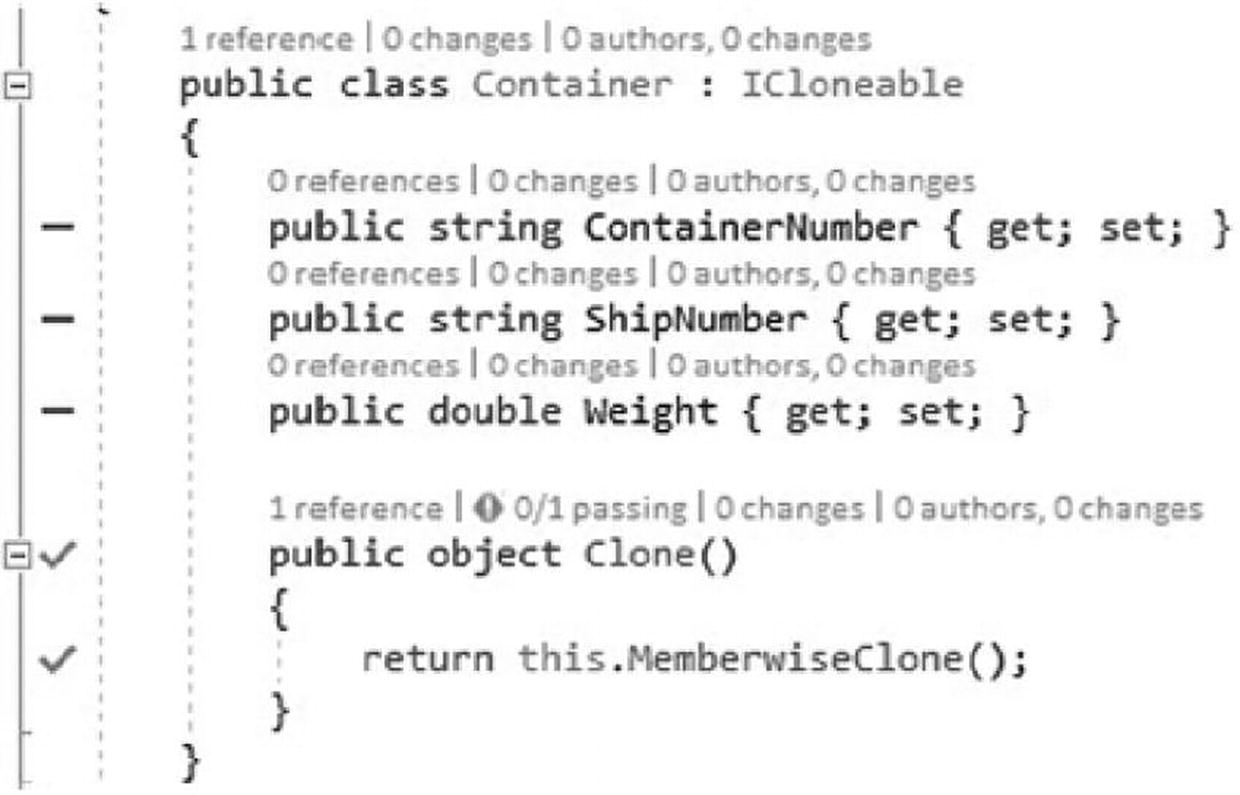
A screenshot depicts the public class container, I cloneable.
Implementing the Clone method
With Live Unit Testing, areas of code indicated by a dash are not covered by any tests. A green tick indicates that the code is covered by a passing test. A red X indicates that the code is covered by a failing test.
Using IntelliTest to Generate Unit Tests
IntelliTest helps developers generate and get started using Unit Tests. This saves a lot of time writing tests and increases code quality.
IntelliTest is only available in Visual Studio Enterprise edition.
Calculate ShippingCost Method

A screenshot depicts the Intelli test exploration results. It includes the target, type, result, and details.
IntelliTest results
IntelliTest has taken each parameter going to the method and generated a parameter value for it. In this example, all the tests succeeded, but there is still a problem. This is evident from the result value which is always zero.
Modified Calculate Class

A screenshot depicts the Intelli test exploration results. It includes the length, width, height, type, result target, and results of 7 targets.
IntelliTest results on the modified class
This time, you can see that no matter what the value of the parcel dimensions is, we will always have a result returned for the shipping costs. To create the unit tests generated by IntelliTest, click the Save button in the IntelliTest window.

A screenshot highlights the visual studio unit testing tests in the solution explorer window.
Generated Unit Tests
You can now run the generated Unit Tests as you normally would with Test Explorer. As you continue coding and adding more logic to the Calculate class, you can regenerate the Unit Tests by running IntelliTest again. IntelliTest will then crawl through your code again and generate new Unit Tests for you to match the logic of your code at that time.
The underlying engine that IntelliTest uses to crawl through your code and generate the Unit Tests is Pex. Pex is a Microsoft Research project that was never productized or supported until IntelliTest started using it.
For a moment, I want you to think back to the code in Listing 4-10. Remember how we modified the code to include constant values to cater for IntelliTest setting the default parameter values to zero? Imagine for a minute that we will never receive a zero as a parameter and that this check is built into the calling code. We can tell IntelliTest to assume values for these parameters.
Generated CalculateTest Partial Class
We are now going to tell the Pex engine that we want to assume certain values for the parameters. We do this by using PexAssume.
PexAssume is a static helper class containing a set of methods to express preconditions in parameterized Unit Tests.
Modified CalculateTest Partial Class
Modified Calculate Class

A screenshot depicts the Intelli test exploration results window. It includes the length, width, height, type, result target, and results of 4 targets.
IntelliTest results with PexAssume

A screenshot highlights calculate test c s under solution Acme Corp shipping in the solution explorer.
ShippingCost generated tests
These correspond to the IntelliTest results as seen in Figure 4-18. Do not modify these code files, as your changes will be lost when IntelliTest is run again and it regenerates those tests.
Focus IntelliTest Code Exploration
Focusing Code Exploration

A screenshot depicts the Intelli test exploration results with 2 runtime warnings and events.
Focus code exploration

A screenshot depicts the Intelli test exploration results with 2 runtime warnings and events. An arrow mark indicates the click icon.
Tell IntelliTest which class to use
IntelliTest now updates the PexAssemblyInfo.cs file by adding [assembly: PexUseType(typeof(Package))] to the end of the file to tell IntelliTest which class to use. Running IntelliTest again results in no more warnings being displayed.
How to Measure Code Coverage in Visual Studio
Code Coverage indicates what portion of your code is covered by Unit Tests. To guard against bugs, it becomes obvious that the more code is covered by Unit Tests, the better tested it is.
IntelliTest is only available in Visual Studio Enterprise edition.

A screenshot indicates the analysis of code coverage for all tests under the run icon.
Analyze Code Coverage
Click Analyze Code Coverage for All Tests in the menu.
You can also go to the Test menu, click Windows, and click Test Explorer.

A screenshot depicts the code coverage results. It includes the hierarchy, blocks, and percentage of blocks not covered and covered.
Code Coverage Results

A screenshot depicts the code coverage results. An arrow indicates the fourth icon.
Toggle Code Coverage coloring

A screenshot highlights fonts and colours under environment and coverage not touched area under display items.
Change Fonts and Colors
This should give you a good understanding of how much code is covered by unit tests. Developers should typically aim for at least 80% Code Coverage. If the Code Coverage is low, then modify your code to include more tests. Once you are done modifying your code, run the Code Coverage tool again as the results are not automatically updated as you modify your code.

A screenshot depicts the code coverage results. It includes the hierarchy, lines, and percentage of lines not covered and covered.
Code Coverage expressed in lines
Code Coverage is a great tool to allow you to check if your code is sufficiently covered by unit tests. If you aim for 80% Code Coverage, you should be able to produce well-tested code. The 80% Code Coverage is not always attainable. This is especially true if the code base you’re working on has a lot of generated code. In instances such as these, a lower percentage of code cover is acceptable.
Summary
Unit testing in Visual Studio helps developers maintain the health of their code and find errors quickly, before shipping their applications to their customers. While some features are not available in all editions of Visual Studio, the free Visual Studio Community does offer developers some unit test functionality. This is enough to get them by. In the next chapter, we will be looking at a feature that all developers should be very familiar with. Source control management is essential to any project. We will explore this and some new features of Visual Studio 2022 such as multi-repo support, comparing branches, Checkout Commit, and line staging but to name a few. Let’s look at source control next.