Chapter 7. Argo CD
In the previous chapter, you learned about Tekton and other engines such as GitHub Actions to implement the continuous integration (CI) part of a project.
Although CI is important because it’s where you build the application and check that nothing has been broken (running unit tests, component tests, etc.), there is still a missing part: how to deploy this application to an environment (a Kubernetes cluster) using the GitOps methodology and not creating a script running kubectl/helm commands.
As Daniel Bryant puts it, “If you weren’t using SSH in the past to deploy your application in production, don’t use kubectl to do it in Kubernetes.”
In this chapter, we’ll introduce you to Argo CD, a declarative, GitOps continuous delivery (CD) tool for Kubernetes. In the first part of the section, we’ll see the deployment of an application using Argo CD (Recipes 7.1 and 7.2).
Argo CD not only supports the deployment of plain Kubernetes manifests, but also the deployment of Kustomize projects (Recipe 7.3) and Helm projects (Recipe 7.4).
A typical operation done in Kubernetes is a rolling update to a new version of the container, and Argo CD integrates with another tool to make this process smooth (Recipe 7.5).
Delivering complex applications might require some orchestration on when and how the application must be deployed and released (Recipes 7.7 and 7.8).
We’ll see how to:
-
Install and deploy the first application.
-
Use automatic deployment and self-healing applications.
-
Execute a rolling update when a new container is released.
-
Give an order on the execution.
In this chapter, we are using the https://github.com/gitops-cookbook/gitops-cookbook-sc.git GitHub repository as source directory.
To run it successfully in this chapter, you should fork it and use it in the YAML files provided in the examples.
7.1 Deploy an Application Using Argo CD
Solution
Create an Application resource to set up Argo CD to deploy the application.
To install Argo CD, create the argocd namespace and apply the Argo CD installation manifest:
kubectl apply -n argocd Let’s make Argo CD deploy a simple web application showing a box with a configured color.
The application is composed of three Kubernetes manifest files, including a Namespace, a Deployment, and a Service definition.
The files are located in the ch07/bgd folder of the book’s repository.
All these files are known as an Application in Argo CD.
Therefore, you must define it as such to apply these manifests in your cluster.
Let’s check the Argo CD Application resource file used for deploying the
application:
apiVersion:argoproj.io/v1alpha1kind:Applicationmetadata:name:bgd-appnamespace:argocdspec:destination:namespace:bgdserver:https://kubernetes.default.svcproject:defaultsource:repoURL:https://github.com/gitops-cookbook/gitops-cookbook-sc.gitpath:ch07/bgdtargetRevision:main

Namespace where Argo CD is installed

Target cluster and namespace

Installing the application in Argo CD’s default project

The manifest repo where the YAML resides

The path to look for manifests

Branch to checkout
In the terminal window, run the following command to register the Argo CD application:
kubectl apply -f manual-bgd-app.yaml
At this point, the application is registered as an Argo CD application.
You can check the status using either argocd or the UI; run the following command to list applications using the CLI too:
argocd app list
And the output is something like:
NAME     CLUSTER                         NAMESPACE  PROJECT  STATUS
bgd-app  https://kubernetes.default.svc  bgd        default  OutOfSync
The important field here is STATUS.
It’s OutOfSync, which means the application is registered, and there is a drift between the current status (in this case, no application deployed) and the content in the Git repository (the application deployment files).
You’ll notice that no pods are running if you get all the pods from the bgd namespace:
kubectl get pods -n bgd

No resources found in bgd namespace.
Argo CD doesn’t synchronize the application automatically by default. It just shows a divergence, and the user is free to fix it by triggering a synchronized operation.
With the CLI, you synchronize the application by running the following command in a terminal:
argocd app sync bgd-app
And the ouput of the command shows all the important information regarding the deployment:
Name: bgd-app Project: default Server: https://kubernetes.default.svc Namespace: bgd URL: https://openshift-gitops-server-openshift-gitops.apps.openshift.sotogcp.com/applications/bgd-app Repo: https://github.com/lordofthejars/gitops-cookbook-sc.git Target: main Path: ch07/bgd SyncWindow: Sync Allowed Sync Policy: <none> Sync Status: Synced to main(384cd3d)Health Status: Progressing Operation: Sync Sync Revision: 384cd3d21c534e75cb6b1a6921a6768925b81244 Phase: Succeeded Start:2022-06-1614:45:12 +0200 CEST Finished:2022-06-1614:45:13 +0200 CEST Duration: 1s Message: successfully synced(all tasks run)GROUP KIND NAMESPACE NAME STATUS HEALTH HOOK MESSAGE Namespace bgd bgd Running Synced namespace/bgd created Service bgd bgd Synced Healthy service/bgd created apps Deployment bgd bgd Synced Progressing deployment.apps/bgd created Namespace bgd Synced
You can synchronize the application from the UI as well, by clicking the SYNC button as shown in Figure 7-1.
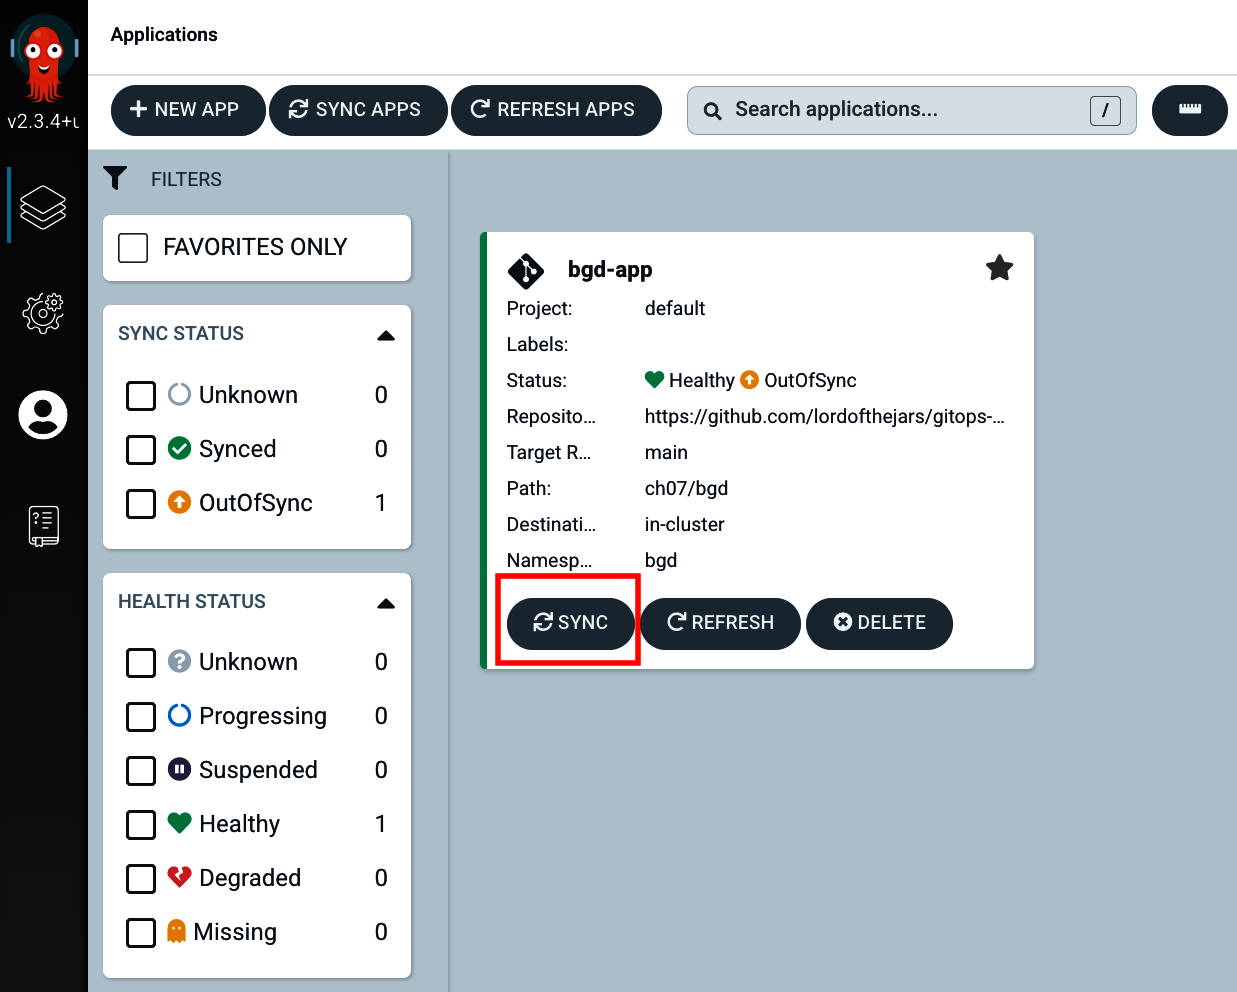
Figure 7-1. Argo CD web console
If you get all the pods from the bgd namespace, you’ll notice one pod running:
kubectl get pods -n bgd NAME READY STATUS RESTARTS AGE bgd-788cb756f7-jll9n1/1 Running060s
And the same for the Service:
kubectlgetservices-nbgdNAMETYPECLUSTER-IPEXTERNAL-IPPORT(S)bgdClusterIP172.30.35.199<none>8080:32761/TCP
In the following sections, you’ll need to access the deployed service to validate that it’s deployed. There are several ways to access services deployed to Minikube; for the following chapters, we use the Minikube IP and the exposed port of the service.
Run the following command in a terminal window to get the Minikube IP:
minikube ip -p gitops
192.168.59.100
Open a browser window, set the previous IP followed by the exposed port (in this example 192.168.59.100:32761), and access the service to validate that the color of the circles in the box is blue, as shown in Figure 7-2.

Figure 7-2. Deployed application
Discussion
Now it’s time to update the application deployment files. This time we will change the value of an environment variable defined in the bgd-deployment.yaml file.
Open ch07/bgd/bgd-deployment.yaml in your file editor and change the COLOR environment variable value from blue to green:
spec:containers:-image:quay.io/redhatworkshops/bgd:latestname:bgdenv:-name:COLORvalue:"green"
In a terminal run the following commands to commit and push the file so the change is available for Argo CD:
git add .
git commit -m "Updates color"

git push origin main
With the change pushed, check the status of the application again:
argocd app list

NAME     CLUSTER                         NAMESPACE  PROJECT  STATUS
bgd-app  https://kubernetes.default.svc  bgd        default  Sync
We see the application status is Sync.
This happens because Argo CD uses a polling approach to detect divergences between what’s deployed and what’s defined in Git.
After some time (by default, it’s 3 minutes), the application status will be OutOfSync:
argocd app list
NAME     CLUSTER                         NAMESPACE  PROJECT  STATUS     HEALTH
bgd-app  https://kubernetes.default.svc  bgd        default  OutOfSync  Healthy
To synchronize the changes, run the sync subcommand:
argocd app sync bgd-app
After some seconds, access the service and validate that the circles are green, as shown in Figure 7-3.

Figure 7-3. Deployed application
To remove the application, use the CLI tool or the UI:
argocd app delete bgd-app
Also, revert the changes done in the Git repository to get the initial version of the application and push them:
git revert HEAD

git push origin main
7.2 Automatic Synchronization
Solution
Use the syncPolicy section with an automated policy.
Argo CD can automatically synchronize an application when it detects differences between the manifests in Git and the Kubernetes cluster.
A benefit of automatic sync is that there is no need to log in to the Argo CD API, with the security implications that involves (managing secrets, network, etc.), and the use of the argocd tool.
Instead, when a manifest is changed and pushed to the Git repository with the changes to the tracking Git repo, the manifests are automatically applied.
Let’s modify the previous Argo CD manifest file (Application), adding the syncPolicy section, so changes are deployed automatically:
apiVersion:argoproj.io/v1alpha1kind:Applicationmetadata:name:bgd-appnamespace:argocdspec:destination:namespace:bgdserver:https://kubernetes.default.svcproject:defaultsource:path:ch07/bgdrepoURL:https://github.com/gitops-cookbook/gitops-cookbook-sc.gittargetRevision:mainsyncPolicy:automated:{}
At this point, we can apply the Application file into a running cluster by running the following command:
kubectl apply -f bgd/bgd-app.yaml
Now, Argo CD deploys the application without executing any other command.
Run the kubectl command or check in the Argo CD UI to validate that the deployment is happening:
kubectl get pods -n bgd NAME READY STATUS RESTARTS AGE bgd-788cb756f7-jll9n1/1 Running060s
Access the service and validate that the circles are blue, as shown in Figure 7-4.

Figure 7-4. Deployed application
To remove the application, use the CLI tool or the UI:
argocd app delete bgd-app
Discussion
Although Argo CD deploys applications automatically, it uses some default conservative strategies for safety reasons.
Two of these are the pruning of deleted resources and the self-healing of the application in case a change was made in the Kubernetes cluster directly instead of through Git.
By default, Argo CD will not delete (prune) any resource when it detects that it is no longer available in Git, and it will be in an OutOfSync status.
If you want Argo CD to delete these resources, you can do it in two ways.
The first way is by manually invoking a sync with the -prune option:
argocd app sync --prune
The second way is letting Argo CD delete pruned resources automatically by setting the prune attribute to true in the automated section:
Another important concept affecting how the application is automatically updated is self-healing.
Argo CD is configured not to correct any drift made manually in the cluster.
For example, Argo CD will let the execution of a kubectl patch directly in the cluster change any configuration parameter of the application.
Let’s see it in action.
The color of the circle is set as an environment variable (COLOR).
Now, let’s change the COLOR environment variable to green using the kubectl patch command.
Run the following command in the terminal:
kubectl -n bgd patch deploy/bgd--type='json'-p='[{"op": "replace", "path": "/spec/template/spec/containers/0/env/0/value", "value":"green"}]'
Wait for the rollout to happen:
kubectl rollout status deploy/bgd -n bgd
If you refresh the browser, you should see green circles now, as shown in Figure 7-5.

Figure 7-5. Deployed application
Looking over the Argo CD sync status, you’ll see that it’s OutOfSync as the application and the definition in the Git repository (COLOR: blue) diverges.
Argo CD will not roll back to correct this drift as the selfHeal property default is set to false.
Let’s remove the application and deploy a new one, but set selfHeal to true in this case:
argocd app delete bgd-app
Let’s enable the selfHealing property, and repeat the experiment:
apiVersion:argoproj.io/v1alpha1kind:Applicationmetadata:name:bgd-appnamespace:argocdspec:destination:namespace:bgdserver:https://kubernetes.default.svcproject:defaultsource:path:ch07/bgdrepoURL:https://github.com/gitops-cookbook/gitops-cookbook-sc.gittargetRevision:mainsyncPolicy:automated:prune:trueselfHeal:true
And in the terminal apply the resource:
kubectl apply -f bgd/heal-bgd-app.yaml
Repeat the previous steps:
-
Open the browser to check that the circles are blue.
-
Reexecute the
kubectl -n bgd patch deploy/bgd ...command. -
Refresh the browser and check that the circles are still blue.
Argo CD corrects the drift introduced by the patch command, synchronizing the application to the correct state defined in the Git repository.
To remove the application, use the CLI tool or the UI:
argocd app delete bgd-app
7.3 Kustomize Integration
Solution
Argo CD supports several different ways in which Kubernetes manifests can be defined:
-
Kustomize
-
Helm
-
Ksonnet
-
Jsonnet
You can also extend the supported ways to custom ones, but this is out of the scope of this book.
Argo CD detects a Kustomize project if there are any of the following files: kustomization.yaml, kustomization.yml, or Kustomization.
Let’s deploy the same BGD application, but in this case, deployed as Kustomize manifests.
Moreover, we’ll set kustomize to override the COLOR environment variable to yellow.
The Kustomize file defined in the repository looks like this:
apiVersion:kustomize.config.k8s.io/v1beta1kind:Kustomizationnamespace:bgdkresources:-../base-bgdk-ns.yamlpatchesJson6902:-target:version:v1group:appskind:Deploymentname:bgdnamespace:bgdkpatch:|-- op: replacepath: /spec/template/spec/containers/0/env/0/valuevalue: yellow

Directory with standard deployment files (blue circles)

Specific file for creating a namespace

Patches standard deployment files

Patches the deployment file

Overrides the environment variable value to
yellow
Note
You don’t need to create this file as it’s already stored in the Git repository.
Create the following Application file to deploy the application:
apiVersion:argoproj.io/v1alpha1kind:Applicationmetadata:name:bgdk-appnamespace:argocdspec:destination:namespace:bgdkserver:https://kubernetes.default.svcproject:defaultsource:path:ch07/bgdk/bgdkrepoURL:https://github.com/gitops-cookbook/gitops-cookbook-sc.gittargetRevision:mainsyncPolicy:automated:{}
At this point, we can apply the Application file to a running cluster by running the following command:
kubectl apply -f bgdk/bgdk-app.yaml
Access the service and you’ll notice the circles are yellow instead of blue.
To remove the application, use the CLI tool or the UI:
argocd app delete bgdk-app
Discussion
We can explicitly specify which tool to use, overriding the default algorithm used by Argo CD in the Application file.
For example, we can use a plain directory strategy regarding the presence of the kustomization.yaml file:
Possible strategies are: directory, chart, helm, kustomize, path, and plugin.
7.4 Helm Integration
Solution
Argo CD supports installing Helm Charts to the cluster when it detects a Helm project in the deployment directory (when the Chart.yaml file is present).
Let’s deploy the same BGD application, but in this case, deployed as a Helm manifest.
The layout of the project is a simple Helm layout already created in the GitHub repository you’ve cloned previously:
├── Chart.yaml
├── charts
├── templates
│   ├── NOTES.txt
│   ├── _helpers.tpl
│   ├── deployment.yaml
│   ├── ns.yaml
│   ├── service.yaml
│   ├── serviceaccount.yaml
│   └── tests
│       └── test-connection.yaml
└── values.yaml
Create a bgdh/bgdh-app.yaml file to define the Argo CD application:
apiVersion:argoproj.io/v1alpha1kind:Applicationmetadata:name:bgdh-appnamespace:argocdspec:destination:namespace:bgdhserver:https://kubernetes.default.svcproject:defaultsource:path:ch07/bgdhrepoURL:https://github.com/gitops-cookbook/gitops-cookbook-sc.gittargetRevision:mainsyncPolicy:automated:{}
At this point, we can apply the Application file into a running cluster by running the following command:
kubectl apply -f bgdh/bgdh-app.yaml
Validate the pod is running in the bgdh namespace:
kubectl get pods -n bgdh NAME READY STATUS RESTARTS AGE bgdh-app-556c46fcd6-ctfkf1/1 Running05m43s
To remove the application, use the CLI tool or the UI:
argocd app delete bgdh-app
Discussion
Argo CD populates build environment variables to Helm manifests (actually also Kustomize, Jsonnet, and custom tools support too).
The following variables are set:
-
ARGOCD_APP_NAME -
ARGOCD_APP_NAMESPACE -
ARGOCD_APP_REVISION -
ARGOCD_APP_SOURCE_PATH -
ARGOCD_APP_SOURCE_REPO_URL -
ARGOCD_APP_SOURCE_TARGET_REVISION -
KUBE_VERSION -
KUBE_API_VERSIONS
In the following snippet, you can see the usage of the application name:
apiVersion:argoproj.io/v1alpha1kind:Applicationmetadata:name:bgdh-appnamespace:openshift-gitopsspec:destination:...source:path:ch07/bgd...helm:parameters:-name:appvalue:$ARGOCD_APP_NAME

Specific Helm section

Extra parameters to set, same as setting them in values.yaml, but high preference

The name of the parameter

The value of the parameter, in this case from a Build Env var
Argo CD can use a different values.yaml file or set parameter values to override the ones defined in values.yaml:
argocd appsetbgdh-app --values new-values.yaml argocd appsetbgdh-app -p service.type=LoadBalancer
Note that values files must be in the same Git repository as the Helm Chart.
7.5 Image Updater
Problem
You want Argo CD to automatically deploy a container image when it’s published.
Solution
Use Argo CD Image Updater to detect a change on the container registry and update the deployment files.
One of the most repetitive tasks during development is deploying a new version of a container image.
With a pure Argo CD solution, after the container image is published to a container registry, we need to update the Kubernetes/Kustomize/Helm manifest files pointing to the new container image and push the result to the Git repository.
This process implies:
-
Clone the repo
-
Parse the YAML files and update them accordingly
-
Commit and Push the changes
These boilerplate tasks should be defined for each repository during the continuous integration phase. Although this approach works, it could be automated so the cluster could detect a new image pushed to the container registry and update the current deployment file pointing to the newer version.
This is exactly what Argo CD Image Updater (ArgoCD IU) does.
It’s a Kubernetes controller monitoring for a new container version and updating the manifests defined in the Argo CD Application file.
The Argo CD IU lifecycle and its relationship with Argo CD are shown in Figure 7-6.
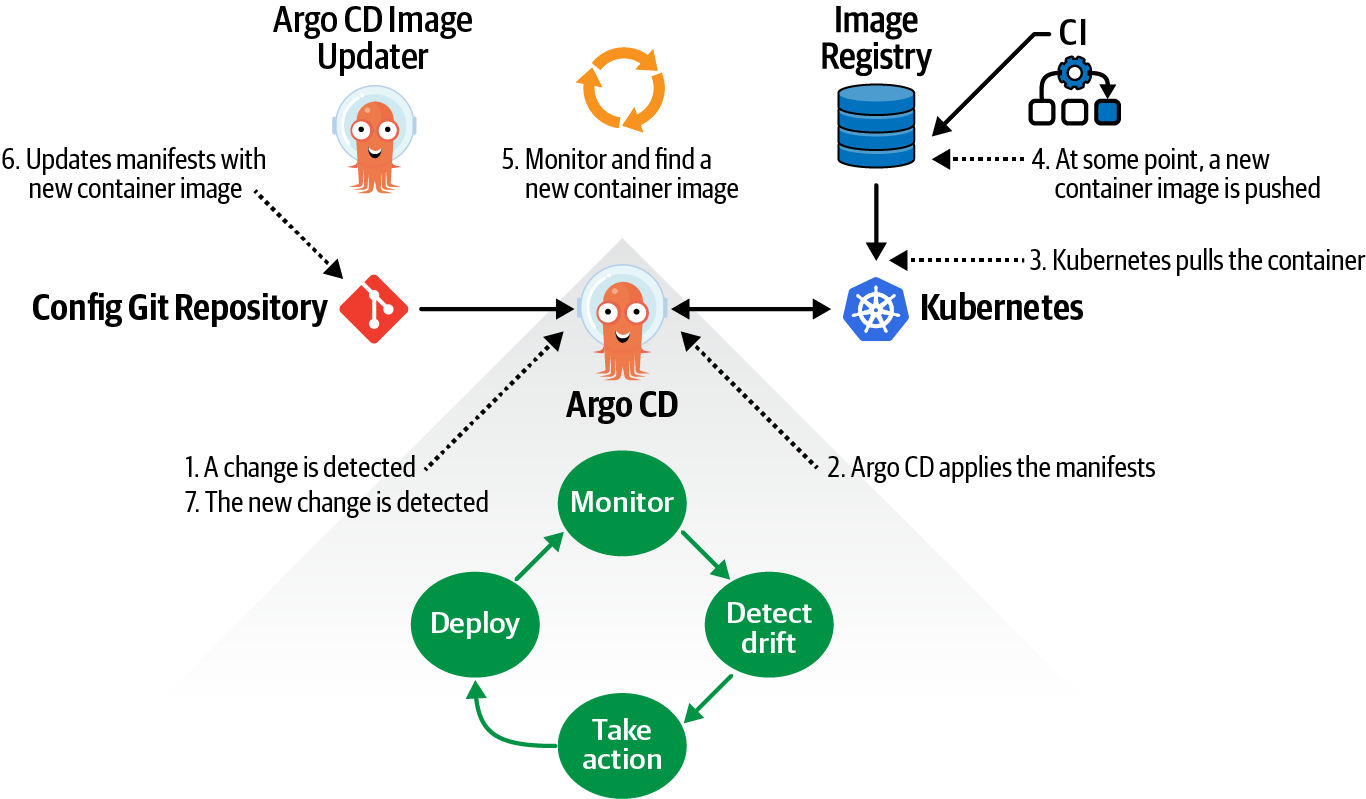
Figure 7-6. Argo CD Image Updater lifecycle
At this time, Argo CD IU only updates manifests of Kustomize or Helm.
In the case of Helm, it needs to support specifying the image’s tag using a parameter (image.tag).
Let’s install the controller in the same namespace as Argo CD:
kubectl apply -f Validate the installation process, checking that the pod status of the controller is Running:
kubectl get pods -n argocd NAME READY STATUS RESTARTS AGE argocd-image-updater-59c45cbc5c-kjjtp1/1 Running040h
Before using Argo CD IU, we create a Kubernetes Secret representing the Git credentials, so the updated manifests can be pushed to the repository.
The secret must be at the Argo CD namespace and, in this case, we name it git-creds.
kubectl -n argocd create secret generic git-creds--from-literal=username=<git_user>--from-literal=password=<git_password_or_token>
Finally, let’s annotate the Application manifest with some special annotations so the controller can start monitoring the registry:
- image-list
-
Specify one or more images (comma-separated-value) considered for updates.
- write-back-method
-
Methods to propagate new versions. There are
gitandargocdmethods implemented to update to a newer image. The Git method commits the change to the Git repository. Argo CD uses the Kubernetes/ArgoCD API to update the resource.
There are more configuration options, but the previous ones are the most important to get started.
Let’s create an Argo CD Application manifest annotated with Argo CD IU
annotations:
apiVersion:argoproj.io/v1alpha1kind:Applicationmetadata:name:bgdk-appnamespace:argocdannotations:argocd-image-updater.argoproj.io/image-list:myalias=quay.io/rhdevelopers/bgdargocd-image-updater.argoproj.io/write-back-method:git:secret:openshift-gitops/git-credsargocd-image-updater.argoproj.io/git-branch:mainspec:destination:namespace:bgdkserver:https://kubernetes.default.svcproject:defaultsource:path:ch07/bgdui/bgdkrepoURL:https://github.com/gitops-cookbook/gitops-cookbook-sc.gittargetRevision:mainsyncPolicy:automated:{}

Adds annotations section

Sets the monitored image name

Configures to use Git as
write-back-method, setting the location of the credentials (<namespace>/<secretname>)
Sets the branch to push changes
Now apply the manifest to deploy the application’s first version and enable Argo CD IU to update the repository when a new image is pushed to the container registry:
kubectl apply -f bgdui/bgdui-app.yaml
At this point, version 1.0.0 is up and running in the bgdk namespace, and you may access it as we’ve done before.
Let’s generate a new container version to validate that the new image is in the repository.
To simplify the process, we’ll tag the container with version 1.1.0 as it was a new one.
Go to the Quay repository created at the beginning of this chapter, go to the tags section, push the gear icon, and select Add New Tag to create a new container, as shown in Figure 7-7.
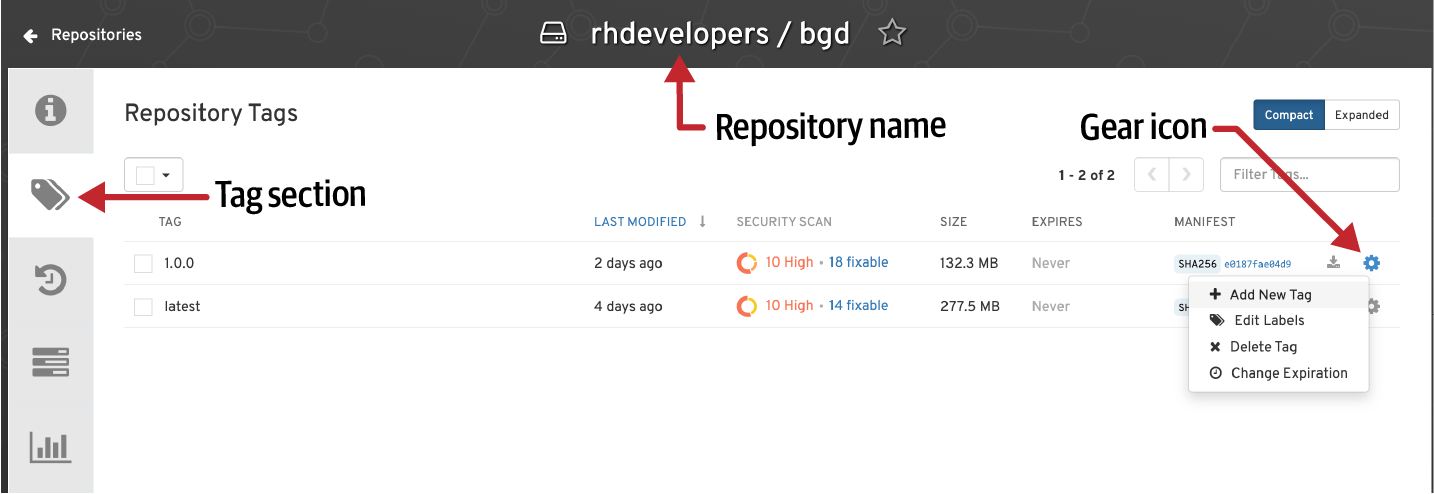
Figure 7-7. Tag container
Set the tag to 1.1.0 value as shown in the figure Figure 7-8.
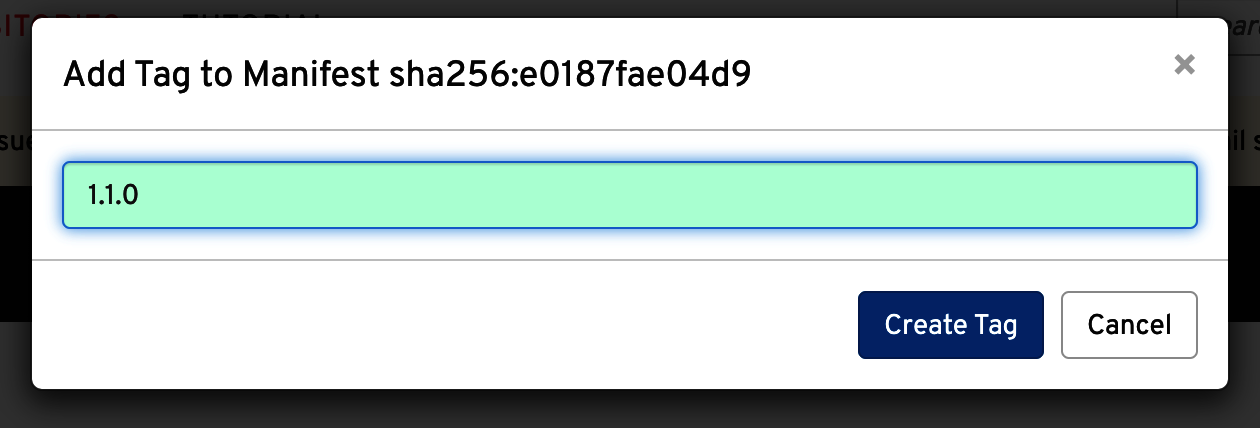
Figure 7-8. Tag container
After this step, you should have a new container created as shown in Figure 7-9.
Wait for around two minutes until the change is detected and the controller triggers the repo update.

Figure 7-9. Final result
To validate the triggering process check the logs of the controller:
kubectllogsargocd-image-updater-59c45cbc5c-kjjtp-f-nargocd...time="2022-06-20T21:19:05Z"level=infomsg="Setting new image to quay.io/rhdevelopers/bgd:1.1.0"alias=myaliasapplication=bgdk-appimage_name=rhdevelopers/bgdimage_tag=1.0.0registry=quay.iotime="2022-06-20T21:19:05Z"level=infomsg="Successfully updated image 'quay.io/rhdevelopers/bgd:1.0.0' to 'quay.io/rhdevelopers/bgd:1.1.0', but pending spec update (dry run=false)"alias=myaliasapplication=bgdk-appimage_name=rhdevelopers/bgdimage_tag=1.0.0registry=quay.iotime="2022-06-20T21:19:05Z"level=infomsg="Committing 1 parameter update(s) for application bgdk-app"application=bgdk-app...
After that, if you inspect the repository, you’ll see a new Kustomize file named .argocd-source-bgdk-app.yaml, updating the image value to the new container, as shown in Figure 7-10.

Figure 7-10. New Kustomize file updating to the new container
Now Argo CD can detect the change and update the cluster properly with the new image.
To remove the application, use the CLI tool or the UI:
argocd app delete bgdk-app
Discussion
An update strategy defines how Argo CD IU will find new versions. With no change, Argo CD IU uses a semantic version to detect the latest version.
An optional version constraint field may be added to restrict which versions are allowed to be automatically updated.
To only update patch versions, we can change the image-list annotation as shown in the following snippet:
argocd-image-updater.argoproj.io/image-list:myalias=quay.io/rhdevelopers/bgd:1.2.x
Argo CD Image Updater can update to the image that has the most recent build date:
argocd-image-updater.argoproj.io/myalias.update-strategy:latestargocd-image-updater.argoproj.io/myimage.allow-tags:regexp:^[0-9a-f]{7}$
The digest update strategy will use image digests to update your applications’ image tags:
argocd-image-updater.argoproj.io/myalias.update-strategy:digest
So far, the container was stored in a public registry. If the repository is private, Argo CD Image Updater needs read access to the repo to detect any change.
First of all, create a new secret representing the container registry credentials:
kubectl create -n argocd secret docker-registry quayio --docker-server=quay.io --docker-username=$QUAY_USERNAME--docker-password=$QUAY_PASSWORD
Argo CD Image Updater uses a ConfigMap as a configuration source, which is the place to register the private container registry.
Create a new ConfigMap manifest setting the supported registries:
apiVersion:v1kind:ConfigMapmetadata:name:argocd-image-updater-configdata:registries.conf:|registries:- name: RedHat Quayapi_url: https://quay.ioprefix: quay.ioinsecure: yescredentials: pullsecret:argocd/quayio

Name of the Argo CD IU
ConfigMap
Place to register all registries

A name to identify it

URL of the service

The prefix used in the container images

Gets the credentials from the
quayiosecret stored atargocdnamespace
Argo CD Image Updater commits the update with a default message:
commit 3caf0af8b7a26de70a641c696446bbe1cd04cea8(HEAD -> main, origin/main)Author: argocd-image-updater <[email protected]> Date: Thu Jun2309:41:002022+0000 build: automatic update of bgdk-app updates image rhdevelopers/bgd tag'1.0.0'to'1.1.0'
We can update the default commit message to one that fits your requirements.
Configure the git.commit-message-template key in ArgoCD IU argocd-image-updater-config ConfigMap with the message:
apiVersion:v1kind:ConfigMapmetadata:name:argocd-image-updater-configdata:git.user:alexgit.email:[email protected]git.commit-message-template:|build: automatic update of {{ .AppName }}{{ range .AppChanges -}}updates image {{ .Image }} tag '{{ .OldTag }}' to '{{ .NewTag }}'{{ end -}}
See Also
7.6 Deploy from a Private Git Repository
Solution
Use Argo CD CLI/UI or YAML files to register the repositories’ credential information (username/password/token/key).
In Argo CD, you have two ways to register a Git repository with its credentials. One way is using the Argo CD CLI/Argo CD UI tooling. To register a private repository in Argo CD, set the username and password by running the following command:
argocd repo add https://github.com/argoproj/argocd-example-apps Alternatively, we can use the Argo CD UI to register it too. Open Argo CD UI in a browser, and click the Settings/Repositories button (the one with gears) as shown in Figure 7-11.

Figure 7-11. Settings menu
Then click the “Connect Repo using HTTPS” button and fill the form with the required data as shown in Figure 7-12.
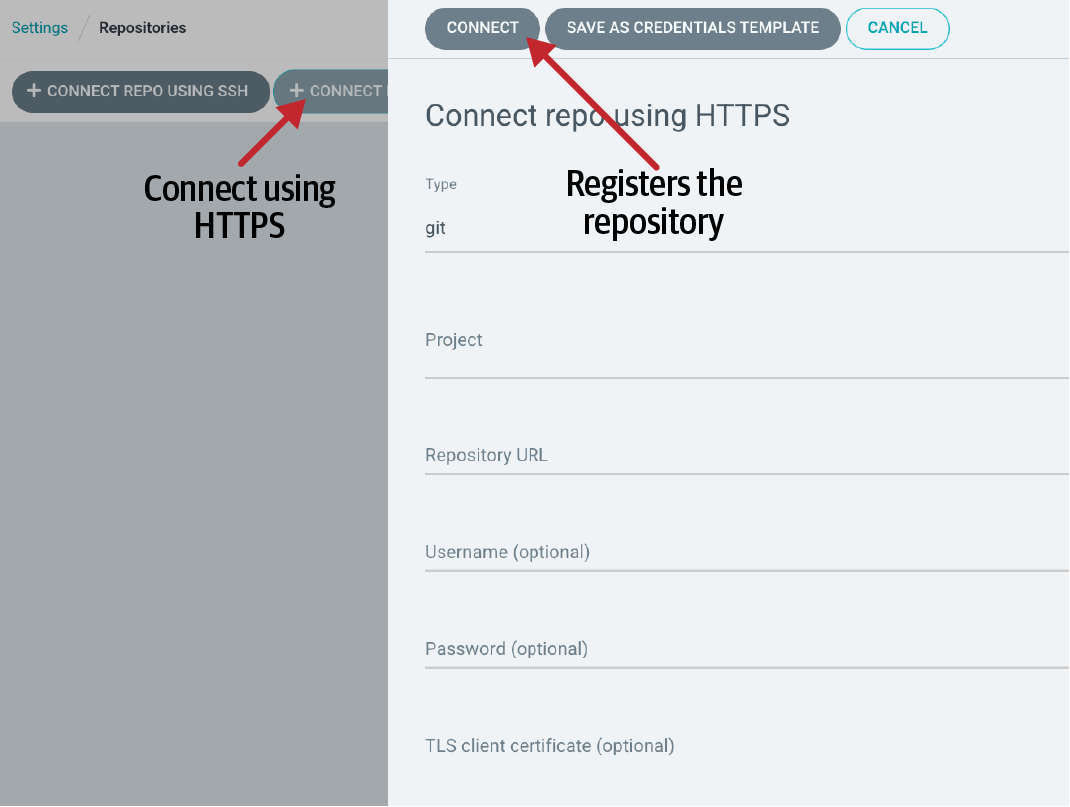
Figure 7-12. Configuration of repository
Finally, click the Connect button to test that it’s possible to establish a connection and add the repository into Argo CD.
The other way is to create a Kubernetes Secret manifest file with that repository and credentials information:
apiVersion:v1kind:Secretmetadata:name:private-reponamespace:argocdlabels:argocd.argoproj.io/secret-type:repositorystringData:type:giturl:https://github.com/argoproj/private-repopassword:my-passwordusername:my-username

Create a secret in the Argo CD namespace

Sets secret type as
repository
URL of the repository to register

Password to access

Username to access
If you apply this file, it will have the same effect as the manual approach.
At this point, every time we define a repoURL value in the Application resource with a repository URL registered for authentication, Argo CD will use the registered credentials to log in.
Discussion
In addition to setting credentials such as username and password for accessing a private Git repo, Argo CD also supports other methods such as tokens, TLS client certificates, SSH private keys, or GitHub App credentials.
Let’s see some examples using Argo CD CLI or Kubernetes Secrets.
To configure a TLS client certificate:
argocd repo add https://repo.example.com/repo.git--tls-client-cert-path ~/mycert.crt--tls-client-cert-key-path ~/mycert.key
For SSH, you just need to set the location of the SSH private key:
argocd repo add [email protected]:argoproj/argocd-example-apps.git apiVersion:v1kind:Secretmetadata:name:private-reponamespace:argocdlabels:argocd.argoproj.io/secret-type:repositorystringData:type:giturl:[email protected]:argoproj/my-private-repositorysshPrivateKey:|-----BEGIN OPENSSH PRIVATE KEY-----...-----END OPENSSH PRIVATE KEY-----
If you are using the GitHub App method, you need to set the App ID, the App Installation ID, and the private key:
argocd repo add https://github.com/argoproj/argocd-example-apps.git --github-app-id1--github-app-installation-id2--github-app-private-key-path test.private-key.pem
Or using the declarative approach:
apiVersion:v1kind:Secretmetadata:name:github-reponamespace:argocdlabels:argocd.argoproj.io/secret-type:repositorystringData:type:gitrepo:https://ghe.example.com/argoproj/my-private-repositorygithubAppID:1githubAppInstallationID:2githubAppEnterpriseBaseUrl:https://ghe.example.com/api/v3githubAppPrivateKeySecret:|-----BEGIN OPENSSH PRIVATE KEY-----...-----END OPENSSH PRIVATE KEY-----
For the access token, use the account name as the username and the token in the password field.
Choosing which strategy to use will depend on your experience managing Kubernetes Secrets. Remember that a Secret in Kubernetes is not encrypted but encoded in Base64, so it is not secured by default.
We recommend using only the declarative approach when you’ve got a good strategy for securing the secrets.
Note
We’ve not discussed the Sealed Secrets project yet (we’ll do so in the following chapter), but when using Sealed Secrets, the labels will be removed to avoid the SealedSecret object having a template section that encodes all the fields you want the controller to put in the unsealed Secret:
spec:...template:metadata:labels:"argocd.argoproj.io/secret-type":repository
7.7 Order Kubernetes Manifests
Problem
You want to use Argo CD to deploy.
Solution
Use sync waves and resource hooks to modify the default order of applying manifests.
Argo CD applies the Kubernetes manifests (plain, Helm, Kustomize) in a particular order using the following logic:
-
By kind
-
Namespaces
-
NetworkPolicy
-
Limit Range
-
ServiceAccount
-
Secret
-
ConfigMap
-
StorageClass
-
PersistentVolumes
-
ClusterRole
-
Role
-
Service
-
DaemonSet
-
Pod
-
ReplicaSet
-
Deployment
-
StatefulSet
-
Job
-
Ingress
-
-
In the same kind, then by name (alphabetical order)
Argo CD has three phases when applying resources: the first phase is executed before applying the manifests (PreSync), the second phase is when the manifests are applied (Sync), and the third phase is executed after all manifests are applied and synchronized (PostSync).
Figure 7-13 summarizes these phases.

Figure 7-13. Hooks and sync waves
Resource hooks are scripts executed at a given phase, or if the Sync phase failed, you could run some rollback operations.
Table 7-1 lists the available resource hooks.
| Hook | Description | Use case |
|---|---|---|
| Executes prior to the application of the manifests | Database migrations |
| Executes at the same time as manifests | Complex rolling update strategies like canary releases or dark launches |
| Executes after all | Run tests to validate deployment was correctly done |
| Executes when the sync operation fails | Rollback operations in case of failure |
| Skip the application of the manifest | When manual steps are required to deploy the application (i.e., releasing public traffic to new version) |
Hooks are defined as an annotation named argocd.argoproj.io/hook to a Kubernetes resource.
In the following snippet, a PostSync manifest is defined:
apiVersion:batch/v1kind:Jobmetadata:name:todo-insertannotations:argocd.argoproj.io/hook:PostSync
A sync wave is a way to order how Argo CD applies the manifests stored in Git.
All manifests have zero waves by default, and the lower values go first.
Use the argocd.argoproj.io/sync-wave annotation to set the wave number to a resource.
For example, you might want to deploy a database first and then create the database schema; for this case, you should set a sync-wave lower in the database deployment file than in the job for creating the database schema, as shown in the following snippet:
Discussion
When Argo CD starts applying the manifests, it orders the resources in the following way:
-
Phase
-
Wave (lower precedence first)
-
Kind
-
Name
Let’s deploy a more significant application with deployment files, sync waves, and hooks.
The sample application deployed is a TODO application connected with a database (PostgreSQL) to store TODOs. To deploy the application, some particular order needs to be applied; for example, the database server must be running before creating the database schema. Also, when the whole application is deployed, we insert some default TODOs into the database to run a post-sync manifest.
The overall process is shown in Figure 7-14.
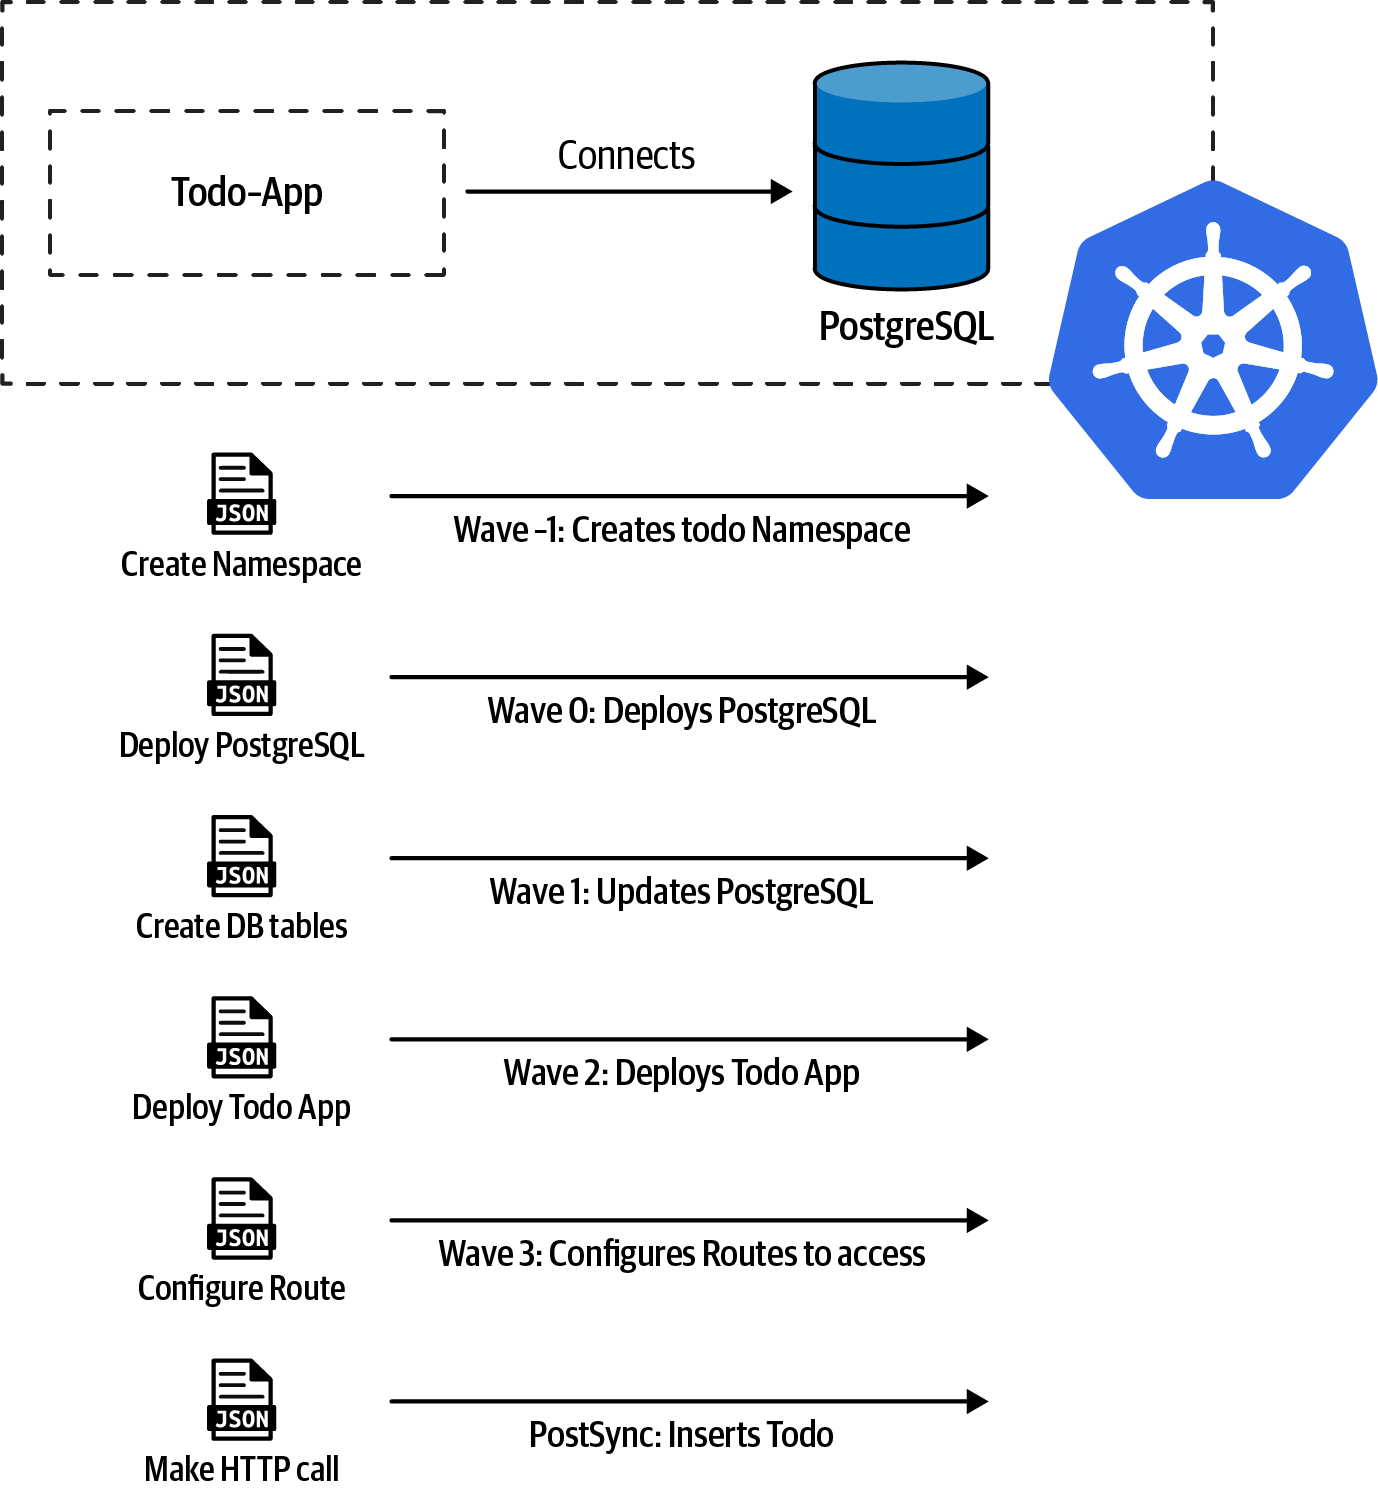
Figure 7-14. Todo app
Create an Application resource pointing out to the application:
apiVersion:argoproj.io/v1alpha1kind:Applicationmetadata:name:todo-appnamespace:argocdspec:destination:namespace:todoserver:https://kubernetes.default.svcproject:defaultsource:path:ch07/todorepoURL:https://github.com/gitops-cookbook/gitops-cookbook-sc.gittargetRevision:mainsyncPolicy:automated:prune:trueselfHeal:falsesyncOptions:-CreateNamespace=true
In the terminal, apply the resource, and Argo CD will deploy all applications in the specified order.
7.8 Define Synchronization Windows
Solution
Argo CD has the sync windows concept to configure time windows where application synchronizations (applying new resources that have been pushed to the repository) will either be blocked or allowed.
To define a sync window, create an AppProject manifest setting the kind (either allow or deny), a schedule in cron format to define the initial time, a duration of the window, and which resources the sync window is applied to (Application, namespaces, or clusters).
The AppProject resource is responsible for defining these windows where synchronizations are permitted/blocked.
Create a new file to permit synchronizations only from 22:00 to 23:00 (just one hour) and for Argo CD Applications whose names end in -prod:
Discussion
We cannot perform a sync of the application (neither automatic nor manual) when it’s not the time configured in the time window defined in the AppProject manifest.
However, we can configure a window to allow manual syncs.
Using the CLI tool:
argocd proj windows enable-manual-sync <PROJECT ID>
Also, manual sync can be set in the YAML file.
In the following example, we’re setting manual synchronization for the namespace default, denying synchronizations at 22:00 for one hour and allowing synchronizations in prod-cluster at 23:00 for one hour:
apiVersion:argoproj.io/v1alpha1kind:AppProjectmetadata:name:defaultnamespace:argocdspec:syncWindows:-kind:denyschedule:'022***'duration:1hmanualSync:truenamespaces:-bgd-kind:allowschedule:'023***'duration:1hclusters:-prod-cluster

Block synchronizations

Enable manual sync to
defaultnamespace
Configure namespaces to block

Configure clusters to allow syncs at 23:00
We can inspect the current windows from the UI by going to the Settings → Projects → default → windows tab or by using the argocd CLI tool:
argocd proj windows list default ID STATUS KIND SCHEDULE DURATION APPLICATIONS NAMESPACES CLUSTERS MANUALSYNC0Inactive deny022* * * 1h - bgd - Enabled1Inactive allow023* * * 1h - - prod-cluster Disabled
