Chapter Three
Composition – Beyond the Basics
- The Illusion of 3D
- The Lines: Horizontal, Vertical, Diagonal, Curved
- The Depth Factor: Foreground, Middle Ground, Background
- Depth Cues: Overlapping, Object Size, Atmospherics
- Lens Talk: Focal Length, Primes, Zooms
- Lens Talk: Focus
Up until now we have kept most of our compositions relatively basic – one or two subjects in a simple environment. By this point you should feel comfortable with your camera’s aspect ratio, the families of shot types, the rule of thirds, headroom, look room, and camera angles on action. Chapter Three builds on these basic components of cinematic language and introduces new and compelling ways to compose your shots – increasing their visual information, meaning, and beauty.
The Illusion of the Third Dimension
There are many ways to use compositional elements to create the illusion of three-dimensional space within a still photograph, an animation, or a video frame. Many popular methods include diagonal lines, foreground and background objects, object size, atmospherics, focus, wide and long lenses, and lighting.
As we have said, the basic film or video camera captures a flat, two-dimensional image and the movie theatre, television, tablet and computer screens display a flat, two-dimensional image. So how is it that when we watch television and, more noticeably, movies on very large theatre screens the elements of the frame seem to occupy a three-dimensional space? Well, the simple answer is to say that this phenomenon is achieved through visual illusions and tricks for the human eye and brain. There are many more in-depth physiological and psychological reasons, but this is not the appropriate place to explore those topics fully. Feel free to do your own research on the human visual system and how we interpret light, color, motion, depth, and so forth.
What we will discuss briefly is how our human visual system differs from the visual system of a traditional camera. On the most simplistic level it comes down to how many lenses are used to create the image. Humans have two eyes on the front of their heads, and the eyes are spaced several inches apart. This configuration results in binocular vision (bi- meaning “two” and -ocular referring to the “eye”). Binocular vision allows us to establish depth in our visual space by causing us to see the same objects from two separate vantage points. Each eye, offset by those several inches, sees the same objects from slightly different horizontal positions and therefore “captures” a slightly different picture. The brain then unites those two separate pictures and generates one view of the world around us rendered with three-dimensional perspective (Figure 3.1).
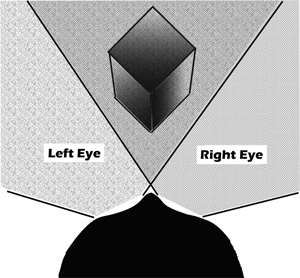
Figure 3.1 Each eye’s vantage point helps create the illusion of 3D depth. The left and the right see slightly different versions of the same close up object. This difference in “angle” on objects does not apply to things further away from us.
Each eye’s vantage point helps create the illusion of 3D depth. Test this yourself by holding any 3D object about 1.5 feet in front of your face, making sure that it is askew and not perfectly flat to your vision, then alternately open one eye and look at the object and then close that eye and open the other eye to see the same object – note how the two views of this close object are slightly different.
Technical Note – Relatively new on the market are consumer level 3D video cameras. Most have two lenses and record two separate images much as the human eyes do. The appropriate computer video editing software and display technologies will render a more “realistic” 3D viewing experience for the audience, although it is all still only seen on a two-dimensional screen.
Traditional film and video cameras, of course, only have one eye – the single lens – so they are unable to record the same type of three-dimensional space as the human visual system. Filmmakers must generate the illusion of multidimensionality. The following sections will give you some tools and techniques to help you explore ways to be a great 3D illusionist with your own shots.
In artwork, the use of lines – both straight and curved – helps us render patterns and shapes, direct attention and energies, and define sections. The filmmaker has to make many decisions about lines and how to incorporate them into the imagery of the motion picture. Just as in other works of art, film lines can do different jobs and generate different feelings. The following topics touch on some of their purposes and effects.
The Horizon Line
We are going to leave our human subjects aside for the time being and put our attention into shooting an exterior environment. Shot-wise we are talking about the long shot family, especially the extreme long shot (XLS) and very wide shot (VWS). Depending on the surrounding topography of your shoot location and your camera angle, this shot should result in capturing a large field of view of the world – the ground, the sky, and many things within those zones. For illustrative purposes we will keep the environment rather bare and start with just a horizon line (Figure 3.2).

Figure 3.2 A simple horizon line bisecting the vertical plane of the frame.
The horizon line helps keep the audience grounded in an understandable spatial relationship with the environment depicted in the frame. In other words, it allows them to perceive a clear up/down and left/right orientation in the film world. Typically, a major goal is to keep your horizon line as level as possible and in alignment with – parallel to – the top and bottom edges of your physical film frame. You will see that Figure 3.2 accomplishes this goal, but let us add actual objects to help further discuss horizon line and composition (Figure 3.3).

Figure 3.3 Adding visible objects to your horizon line frame helps establish place, time, and physical scale.
Now we can begin to appreciate what the level horizon line is doing for our picture composition. Figure 3.3 shows a frame cut directly in half – the horizon line bisects the frame, separating top from bottom. There is headroom for the volcano, sky, and clouds, but does the image follow the rule of thirds? Does it have to? Horizon lines may be placed across your frame wherever you see fit, but its placement will allow you to highlight more sky and less ground or less sky and more ground. If we tilt the camera angle down, we push the horizon line up in our frame (Figure 3.4). If we tilt the camera angle up, we push the horizon line down in our frame (Figure 3.5). Each of these examples shows the horizon line following the rule of thirds. To many, this is a more pleasing position within the frame, but it truly depends on what fits the visual needs of your story.

Figure 3.4 By tilting the vertical camera angle down, the horizon line now falls along the upper one-third of the frame, resulting in less headroom for the volcano and sky and more ocean.
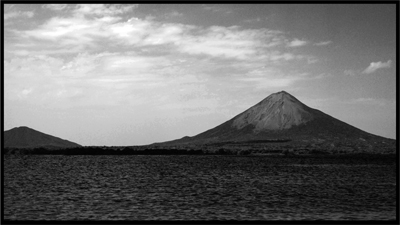
Figure 3.5 By tilting the vertical camera angle up, the horizon line now falls along the lower one-third of the frame, resulting in more visible space for the volcano and sky and less ocean.
Designing your shot composition around your story is a key responsibility of any film-maker, animator, or visual storyteller. After the rectangular border of your frame is set you should be planning the placement of the horizon line. Dropping the line towards the bottom of frame will expose more nighttime sky in your story about the possibility of invading aliens – the audience feels that they might be out there. Raising the line towards the top will expose a vast expanse of open ocean in your story about the possibility of sea serpents – the audience feels that they might be lurking just under the surface. Perhaps your story is about a long-struggling farmer during a drought. You can play it both ways with this. Push horizon up to show more dry, scorched barren fields, or pull it down to show the cloudless sky baking the thirsty earth below. Either way, the audience is feeling the farmer’s plight.
Keep in mind that a horizon line exists in interior film spaces as well; it just may not be the actual “edge of the world.” Interior spaces usually have strong horizontal lines such as where the floor meets a wall, window sills, tops of laboratory benches, tables or desk, and so on. The idea would be to keep these horizontal lines flat and level. Any narrative significance would have to be dependent upon the size of the set and the art direction, etc. Horizontal lines in general can imply stability, repose and order.
Vertical Lines
When your horizon is level, then all vertical lines in your frame should rise up straight, parallel to your left/right edges and perpendicular to the top/bottom (Figure 3.6).

Figure 3.6 Bold vertical “lines” like these trees accentuate height, strength and solidity.
Filmmakers use strong vertical lines for many purposes in their compositions. Just look around yourself and, depending on your location in the world, you are bound to see several strong vertical lines – doorways, corners of walls, edges of windows, edges of buildings, lamp posts, telephone poles, and trees, just to list a few possibilities. They are often associated with strength, height, loftiness, or even rigidity and staunchness.
A single vertical element can divide the frame into sections of different sizes depending upon where you place it. This serves to partition areas of your film world or separate characters from one another – both literally and figuratively. Doorways, or “frames” within your film frame, can do the same thing. Multiple vertical elements, like the posts in a fence, could symbolize the bars of a jail cell. Your wide horizontal rectangle of a frame can easily be cut down, blocked off, and recomposed by using verticals to create smaller squares and rectangles (see Figure 3.7). Beware of placing a single vertical background line directly behind your subject as it can appear strange on the screen and detract from the overall composition.

Figure 3.7 Vertical “lines” or objects can cut the frame into smaller pieces and can figuratively separate subjects in the narrative.
You will most often strive to keep your horizon line stable and level, thus ensuring an even viewing plane for your audience. A shift in your horizon line is also likely to cause shifts in your vertical lines – any tall building, tree, door frame, and so on will look tilted or slanted, not upright and even. When horizontal and vertical lines go askew it causes a sense of uneasiness and a slight disorientation in your audience. If this is done unintentionally, then you get people confused. Done on purpose and you have created what is called a Dutch angle, a Dutch tilt, a canted angle, or an oblique angle. When a character is sick or drugged or when a situation is “not quite right” you may choose to tilt the camera left or right and create this non-level horizon. The imbalance will make the viewer feel how unstable the character or environment really is – think of a murder mystery aboard a boat in rough seas; things tilt this way and then that, everyone unsure, everyone on edge. Once again, visuals underscore the story (Figure 3.8).
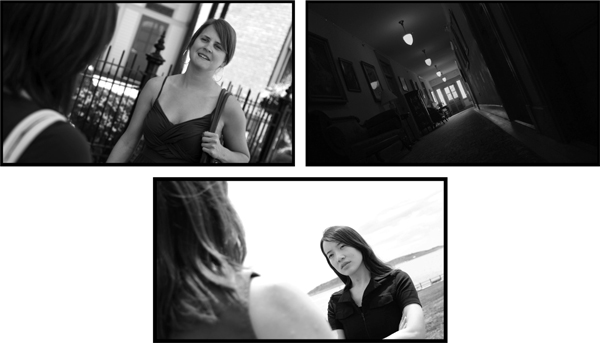
Figure 3.8 Examples of Dutch angle or canted angle shots. Note how the slanted horizontal and vertical lines skew the balance of the image. Something is not quite right within the story at this point.
Diagonal Lines
The grid-like horizontal and vertical lines do a good job of partitioning the two-dimensional frame, but we need to begin our exploration of how lines help us achieve the illusion of depth. To get us started, let’s look at Figure 3.9. This line shape could represent the slope of a hill. Depending on whether your energy is moving up the “hill” or down it, the symbolic meaning of this ball shape within your story can be different. Implied “direction” and “movement” have been added, but we’ll explore those topics in Chapter Six, Dynamic Shots. This example helps somewhat in understanding diagonal lines and how their varying thickness adds to an otherwise flat third dimension.
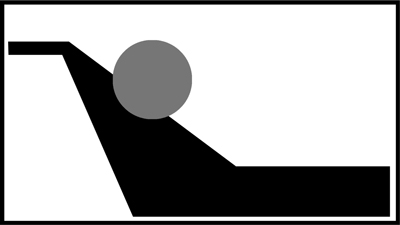
Figure 3.9 This bent line and small circle could indicate a “hill” and a “ball” rolling down the hill due to gravity.
If we switch our example back to a horizon line and add two diagonal lines from the bottom that converge at the horizon, then we have made something new (Figure 3.10). Does this look familiar? To some of you with a studio art background, you may know that this example employs an artistic technique called the vanishing point. These diagonal lines may represent a road, a stream, a sidewalk, or, in our example, a train line (Figure 3.11). Railroad tracks have a consistent width and therefore should be parallel to one another for as long as the tracks cover the ground. In reality, when observed across a large distance, the tracks seem to get closer and closer together until they appear to merge at the horizon. This place along the horizon where parallel lines appear to merge together is the vanishing point (see Figure 3.12).

Figure 3.10 Two lines converge at a third. Where they meet is called the Vanishing Point.

Figure 3.11 A railroad track provides a good example of diagonal line perspective and the illusion of 3D.

Figure 3.12 The box indicates where the parallel tracks converge and appear to vanish at the horizon line.
This illusion, as perceived by our human visual system, signifies “distance” to our brains. When observed in reality, in drawings or paintings, and on a filmed image, we infer the existence of depth. This is related to foreshortening, as mentioned in our section on high angle shots, and is most noticeable on linear shapes (buildings, roads, even people) but is less effective on amorphous shapes of unknown mass (ocean, sky, rocks). The key thing to realize here is that the use of diagonal lines can bring that illusion of depth to your frame. So, whenever you can employ diagonal lines within your composition (a road, a hallway, a line of people waiting for the bus) you are creating the impression of three-dimensional space on the two-dimensional film frame.
Staircases and their railings can generate a great deal of visual interest and energy when incorporated into your composition. They can rise up or down diagonally or recede into the depth of your shot straight on. Much like roads, paths, rivers, etc. they lead the eyes of the viewer in or out of the depth of your frame and they are useful for up/down power dynamics as well (Figure 3.13).

Figure 3.13 Examples of how stairs or railings can create depth into your shot composition.
This does not mean that you must always use diagonal lines, however. Yes, they are compositionally bold elements within your frame, and yes, they can create depth, but what if your goal is to create a shot that has no depth? Your character is feeling trapped or not capable of moving in a dynamic direction at this point of the narrative. Composing her in a flat space, like up against a wall, could help visually underscore her state of being, reflecting the story’s subtext and psychological messaging (Figure 3.14).

Figure 3.14 The person, framed up against a flat wall, seems boxed in or trapped by the environment. Lacking indicators of depth, this shot can convey hidden meaning about the character in the story.
To achieve the shot in Figure 3.14, the camera had to be placed at the height of the subject and perpendicular to the wall itself. This frame, flat on to a wall, has no real sense of depth. The full frontal angle on action only shows some horizontal lines on the wall. The person is enclosed by the environment and can only move left or right, or potentially toward camera. In this instance, the absence of perceived depth adds to the mental or emotional state of the character. The composition of the shot underscores the state of being for the character recorded within it.
A slight shift in the camera’s angle on action (horizontal repositioning) yields a different image with a different meaning (Figure 3.15). It shows the same woman in front of the same wall, but now a diagonal line exists, as does a distant horizon. With the frame opened up this way, the character has more options for movement – left, right, near, or far – and she is pictorially and thematically freer. Depth is created because we can now see out into the world along those diagonal lines that draw the viewer’s eye away from the main character and out into the deep space of the film world. So, in addition to helping create the illusion of depth, the presence of strong diagonal lines in a composition helps you direct the attention of the audience into that depth – to explore deeper inside your frame for more visual information about your story.

Figure 3.15 By recording the same woman by the same wall from a different camera angle, we now unlock the diagonal lines, which lead the eye into the depth of the “3D” shot. The meaning of the shot and the character’s mental state may now be different – free and open.
Curved Lines
Performing similar tasks to diagonal lines are curved lines, either enclosed like circles and ellipses or open like arcs and S-curves. Adding curves to your compositional arrangements can help lead a viewer’s eyes into or out from the depth of your film frame, separate sections of your frame, conjure feelings of unity, or establish implied directions of the flow of movement or energy.
Curves may be fluid and smooth and subtle. These work well to help an audience feel relaxed by showing some natural connectivity (Figure 3.16).

Figure 3.16 Relaxed or uniform curved lines help the eye stay calm and ask us to follow them.
Tightly kinked curves can generate feelings of anxiety or confusion (Figure 3.17).

Figure 3.17 A viewer may just feel a mess while looking at these confused curved lines.
Curves do not have to be physical lines either. They can be constructed, artfully, in your compositions by arranging people, objects, colors, and contrast (covered more in Chapter Four). The audience will “extract” the shape you “embed” in your shot (Figure 3.18). Humans are quite good at seeing patterns and shapes in our environment, and image makers (artists, film people, video game designers, etc.) count on this when they construct their images (Figure 3.19).

Figure 3.18 A viewer may sense the curved “lines” in this composition.

Figure 3.19 Do you see a familiar pattern in these “random” shapes?
The Depth of Film Space – Foreground/Middle Ground/Background
We have seen that diagonal and curved lines framed within a shot can help draw a viewer’s eyes from objects close to the camera to objects further away from the camera, or deeper into the film’s space. To help us understand this space better, let’s first divide it into three sections based on the proximity to the camera’s lens: foreground (FG), middle ground (MG), and background (BG). Together with the borders of the frame, these zones help form the film’s three-dimensional space: height, width, and depth.
Foreground
As the name implies, the foreground is the zone between the camera’s lens and the main subject being photographed. It is the space before, or in front of, the main area of interest. Nothing has to occupy this space and often it is simply filled with empty air. A creative filmmaker, however, can choose to place something in that space. Of course, a foreground element should enhance the composition of the shot and, if it is stationary, it should not obscure the zones behind it unnecessarily.
The object may serve to help set the environment (a tree branch), it may be an abstract shape (part of a lamp post or a park bench), and it may also carry meaning for the narrative (a stop sign at a crossroads) (Figure 3.20). Whatever the object and whatever the purpose, you should be judicious in choosing your treatment of foreground elements because they may distract your viewer from observing the more important details that are staged deeper in your shot. This type of overlapping or obscuration would work if your story involves someone “spying” on a character and the shot using excessive foreground elements is a POV (Figure 3.21).

Figure 3.20 The foreground elements help set up depth in the shots.

Figure 3.21 If used as a POV shot, the foreground elements create a sense of mystery or of spying.
Regardless of the size of your shooting location, much of your important action may be staged in the middle ground. This is the zone where dialogue can unfold, a couple can dance, or a car can pull up to a stop sign. All or most of the physical action is visible within the frame. An audience member is likely to receive all of the information within the shot when the main action is staged here. Middle ground is much easier to establish in wider shots such as medium and long shots (Figure 3.22). With the close-up family of shot types it gets trickier to find the depth to show all three zones, but it is still possible if you plan well.

Figure 3.22 The woman occupies the middle ground of this image 1. The addition of the FG element clarifies this in image 2.
Background
You now understand foreground and middle ground, so it will be easy to guess what the background is – everything behind the MG out to infinity (Figure 3.23). Of course, if you are shooting an interior location such as a restaurant then there will be no “infinity.” The physical space behind the main action being recorded will be the background of your shot. The other patrons eating, the servers walking about, and the wall at the back end of the room all become part of the shot’s background. The BG zone can be rather barren, like the dunes of a desert, or rather busy, like the commotion found along a city’s avenue. When shooting on location, you may be limited by how much you can control the BG, but you should try to frame your shots so that the background does not overpower the main action in the middle ground. Later, we will discuss how focus and lighting can help direct the attention of your audience into the various depths of FG, MG, and BG – the OTS discussed earlier is a good example of this practice (Figure 3.24).

Figure 3.23 The background is like the backdrop of a theatre stage. It sets the location for exterior and interior scenes.

Figure 3.24 A traditional OTS represents all three “grounds” in the depth of film space.
Overlapping
The combination of foreground, middle ground, and background elements helps create the illusion of three dimensions on the 2D film frame through overlapping. The physical objects in your video frame accomplish this just like the layers in your photo editing or animation software. A tree branch in the foreground will partially obscure the elements of the MG and BG. The main action taking place in the MG will obscure visual elements found in the BG zone. So, just like in real life, when objects (static or moving) appear to be in front of one another it allows our brains to establish depth cues (Figure 3.25).
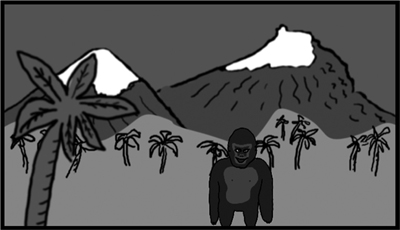
Figure 3.25 The layers of this simple animation overlap to help create depth cues.
Object Size
The relative size of a known object will also trigger depth cues in your shots. Something large, like a mountain, appears in your composition. It seems comparatively small when viewed along with the other objects in your frame. From their real-life experiences the audience will understand that a mountain is not a small object, and for it to be seen as small in the image it must therefore be far away – somewhere deep in the background of the film space (Figure 3.26). Cartoonists and animators use this technique in their illustrations.
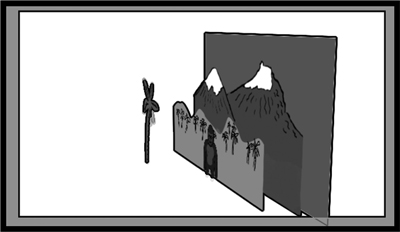
Figure 3.26 Mountains are significantly larger than a tree or an ape, but their small size in this image indicates that they are far away.
However, many filmmakers (especially those interested in special visual effects) have played with this optical illusion to create a false sense of depth where scale and perspective were tricking the eyes and brains of the audience. Oversized props in the MG would look like normal objects in the FG. Miniaturized models of larger items placed in the FG or MG would have the appearance of existing as “normal” sized items (Figure 3.27).
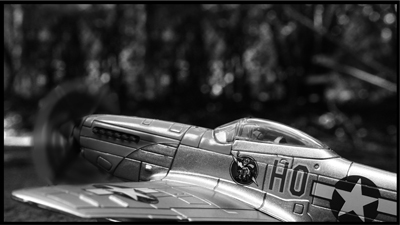
Figure 3.27 This plane… is it real or a toy?
Atmosphere
Another depth cue, found especially in wide or long exterior shots, is atmosphere (or atmospherics). If you have ever looked up a long street in the city or stood atop a hill in the countryside and stared off toward the horizon, then you may have experienced the dissatisfaction of a less than clear view. Perhaps the distant hills or distant buildings seemed blurry or hazy or even totally obscured. This is often the result of what are called atmospherics – the presence of particulates suspended in the air (Figure 3.28). This is most often water vapor, but it may be smoke from a nearby fire, dust, pollen, or even pollutants.
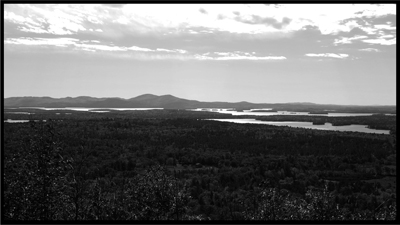
Figure 3.28 The atmosphere obscures the background alluding to greater distance.
When you stand in this atmosphere, it may not obscure your vision of local objects very much (unless it is thick ground fog), but when viewed across a greater expanse (as in an XLS) the cumulative effect of the particles in the air causes distant objects to be obscured. If you were to record a shot in such an environment, the viewing audience would immediately understand the depth cue. Fog machines are often employed for just such a purpose on film sets, in addition to the diffusion of light and the creation of mood (see Figure 3.29).

Figure 3.29 Man-made “fog” on set helps create a mood in these environments and catches backlight.
The Camera Lens – The Observer of Your Film World
All this talk of frames, headroom, lines, and depth cues is great but there would be no grammar of the shots for us to discuss if there were no lens on the camera to record those shots. So, let us switch gears a bit and put some attention toward an extremely important piece of visual storytelling equipment – the camera lens.
For all of its complexity, the modern camera lens still performs the same tasks that it has done for a very long time:
- Collect light rays bouncing off the world in front of the camera (the scene you are shooting).
- Focus those light rays on to whatever recording medium you are using (emulsion film or a video camera’s electronic sensor).
- Control the amount of light that hits the light-sensitive recording medium in your camera.
It can be that simple, yet the job of the lens, the types of lenses, and the quality of lens materials can vary widely.
It is through the lens that your frame is bound, your composition is created, the perspective is set, and the exposure is controlled. Depending on the lens you choose and how you use it, you can achieve very different and stylized looks for your story. Because we do not have the time to delve deeply into the history and current technology of film and video camera lenses, we will try to touch on the main points of interest that will help you make good decisions about your shots and about what the lens choice does for the grammar of those shots.
Primes vs Zooms
Camera lenses for motion picture creation come in two major categories: primes and zooms. Both types of lens are gauged by their ability to capture light rays (the focal length) and by their ability to pass more or less of those light rays through (the f-stop or iris). Filmmakers need to be familiar with both the technical differences and the corresponding aesthetics associated with each characteristic. This is not the place for getting deep into the mathematics and physics of optics and light energy, so we will keep the main concepts rather basic.
- Focal length (FL) is measured in millimeters
- Smaller FL numbered lenses (e.g. 10 mm) have glass elements that bend more light to a greater degree over a shorter focal distance and therefore capture a wider angle of view [you see more of the film space]
- Larger FL numbered lenses (e.g. 300 mm) have glass elements that bend less light to a lesser degree over a longer focal distance and therefore capture a narrower but seemingly more magnified angle of view [you see less of the film space but what you see is enlarged]
- F-stop is a calculated measurement in fractions of the lens aperture (iris or opening) at a particular focal length – used to help gauge exposure
- Small F-stop numbers (e.g. 1.4, 2, 2.8) signify a larger lens opening, allow more light into the camera, and let you shoot in slightly darker environments
- Larger F-stop numbers (e.g. 16, 22) signify a smaller lens opening, let less light into the camera, and let you shoot in slightly brighter environments
The Prime Lens
Historically, prime lenses came first. They are distinguished by the fact that they have only one focal length (e.g. 50 mm). A filmmaker would have to have several separate prime lenses in his or her kit in order to render different magnifications or shot type framings from the same camera position. If you had a camera with only one prime lens, and you wished to change the relative size of your subject in your frame, you would have to either move camera closer to subject or vice versa. Our initial shot type examples used this technique to generate the images.
Having few glass elements (lenses) built inside, they tend to be “sharp” and can render a very detailed image when properly focused. The basic construction of the prime lens also allows for it to be “fast” and yield maximum light transmission with lower F-stop numbers (larger apertures). Prime lenses tend to be smaller in size and lighter in weight than zoom lenses.
The prime lens is used a great deal in professional still photography and high-end motion picture production. They are less expensive than the more complex zoom lenses, but you would have to purchase or rent several prime lenses in order to cover your desired range of focal lengths. Most amateur filmmakers cannot consider using primes because their video cameras come with built-in zoom lenses (although the recent DSLR craze has changed this option of lens choice).
Most likely you will be shooting your projects with some format of digital video (DSLR, HD, or less likely mini-DV). Your camera will probably have a built-in lens and that lens will most likely be a zoom lens. The zoom lens is very popular, especially with video camera manufacturers, because the one lens provides a large range of focal length settings (e.g. 28 mm to 135 mm). You can optically create a variety of frames – from a wide shot with a wide angle of view to a tighter, more magnified field of view without having to change camera to subject distance.
On your camera’s zoom control, the wide end of the lens view is usually marked with a “W” (for wide) or maybe a “–” (for less magnified). The narrow angle of view or magnified end of the lens is usually marked “T” (for telephoto) or maybe a “+” (for more magnified). DSLR and other more professional video cameras can employ interchangeable “cinema” zoom lenses that use a focal length ring on the lens barrel (measured in mm) to manually change the magnification of the image.
The zoom lens is a complicated construction of many glass elements and telescoping barrels or rings that all work together to collect light. They can be expensive and heavy and, because of the numerous glass elements for the longer focal lengths, zoom lenses are often not as “fast” as prime lenses. Most of the less expensive ones cannot open to very wide apertures and therefore are not as good to use in low-light conditions. Due to the extra glass, zoom lenses may also not be as “sharp” – particularly around the edges of the image.
Until this point, our discussions of shot types, framing, and composition have all been based on camera proximity to subject. This means that if we had wanted to frame a CU shot we either moved the camera closer to the talent or moved the talent closer to the camera. This is just like your own eyes. If you want to see something in more detail you must move closer to it or move it closer to your eyes. The obvious point here is that we do not have zoom capabilities with our human eyes. We have one focal length to our vision, and that is relatively wide (recall the finger waggling trick from Chapter One). Because we cannot zoom with our own eyes, the zooming shot that moves quickly through a large range of focal lengths can feel very unnatural to an audience.
Lens Perspective
Having a fixed focal length lens in our human eyes, we get to see the world from a constant perspective. Camera lenses are manufactured to also have this “normal” field of view (in between the extremes of the wide end and narrow end of the zoom range). They appear natural or neutral in their perspective on the subject or scene shown, just as if the scene had been recorded through a pair of human eyes. Without getting too technical, the “normal” camera lens angle of view depends on the camera to subject distance when considering the focal length of the lens, the diameter of lens, and the size of the format imager (35 mm film, SD or HD video, etc.) (see Figure 3.31).
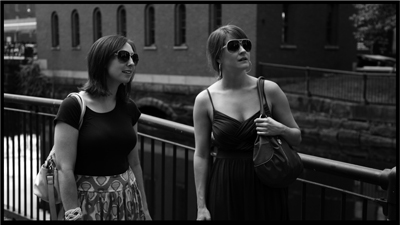
Figure 3.31 Subjects seen through “normal” lens perspective. Note the apparent distance between subjects and background.
All this discussion leads up to one key point, and that is the feeling your shot perspective conveys to an audience. The normal or neutral field of view captures the shot as if we were there personally, observing the action rather than the camera. As soon as you move to the extremes of the zoom range, however, the optical illusions start to creep in.
A wide angle shot (from the short end of the focal length range) generates an illusion of perspective change between the near and far subjects in the shot. It appears to expand the depth of the shot and optically exaggerates the space between objects, therefore playing up the 3D perspective of the image (Figure 3.30). A wide angle lens is helpful if you want to make a small film space appear larger or deeper on screen (think closet, airplane bathroom, etc.). It is also good for shooting establishing shots of locations and broad vistas as in an XLS. Due to this illusion of expanded space, any moving object (either towards or away from the camera’s wide angle lens) will appear to move quickly and cover a good deal of film space without much effort. This perspective illusion of quick movement can be used for certain stunt work and for comic purposes.
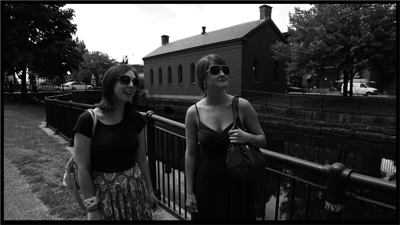
Figure 3.30 Subjects seen through a wide angle lens. Note the apparent distance between subjects and background. The illusion of spatial expansion.
An image shot with a narrow telephoto angle of view (from the long end of the focal length range) appears to deemphasize 3D space. Through magnifying all subjects in the foreground, middle ground, and background equally, an apparent compression of the depth of film space takes place (see Figures 3.30, 3.31, and 3.32). Objects in the frame have the appearance of being closer together on the screen than they actually are in real life. This illusion of space compression can help you safely record action sequences or stunt work and is used heavily in the coverage of sporting events when the camera cannot physically be located on the playing field. Be aware that this long lens magnification can make it more difficult to hold moving objects within the “tighter” frame.

Figure 3.32 Subjects seen through long (or telephoto) lens perspective. Note the apparent distance between subjects and background. The illusion of spatial compression.
Of course, the more extreme the focal length, the more the illusion of perspective distortion in the image will appear. This holds especially true for short focal length, very wide angle lenses (sometimes called “fisheye” lenses), which can really warp the depth cues of your shot and exaggerate the 3D space on close subjects (Figure 3.33). The grammar of shots like these tells your viewer that there is a warped or distorted view of the film world going on. Something is not quite right. Perhaps it is a nightmare sequence or a fantasy episode, or a character is thinking or behaving in an altered state of some kind. Whatever the creative visual reason, it certainly is not “normal.” Much as in still portraiture photography, it may be advisable to shoot your subject’s close-up shots with a slightly longer focal length lens from further away so that you do not exaggerate his or her features (enlarged nose, receding ears, etc.) (see Figure 3.34).

Figure 3.33 “Fisheye” lens distortion. An ultra-wide-angle lens very close to your subject can yield this sort of physical distortion within your image. A surreal, comical, or fantastical feeling may be generated by this lens choice.

Figure 3.34 Using a slightly longer than “normal” lens focal length combined with a further camera-to-subject distance often leads to pleasing portraiture of subjects in close-up framing.
When you combine a long lens with subjects further away from the camera, you get a more compressed perspective (see Figure 3.32). This compression can imply a “tight” or “flat” life being led by a character, or a place that is constraining or prison-like. The “slice” of background or environment around your subject is also small and confining. When you use a very long lens and you have a subject move from the depth of your shot to closer to camera it seems to take a very long time for that subject to cover a very small distance. This illusion is often used to give the impression that this character’s movements are futile – he just cannot get anywhere no matter how hard he tries. Filmmakers use perspective optical tricks such as these as another tool in their visual toolbox – another part of their cinematic language.
Lens Focus – Directing the Viewer’s Attention
We now understand that a big part of the “look” of a shot is established through camera format, proximity, angle, and lens focal length. Creating a composition of subjects that is interesting and appropriate to your story’s visual style is a major goal. You will now be staging those visual elements with the rule of thirds and along diagonal and curved lines into the frame’s “depth.” The foreground, middle ground and background zones in your film frame also allow you to unlock an additional tool in your shot construction tool kit – focus.
Your eyes can only focus on one thing at a time. As you look from one object to another, your eye instantly changes focus to the new distance of the new object. The illusion of constant focus is achieved, but, in reality, you are only able to focus on one physical plane or distance from your eye at any one time. Go ahead and try it. Look around you at things at different distances. What is in focus? What is out of focus?
A camera lens behaves in the same way. It can only generate clear, crisp focus at one distance from the camera at one time. This distance is called the point of critical focus. There is a zone around this distance of critical focus that may also appear to be in acceptable focus (not yet blurry), and this zone is called the depth of field (DOF) (Figure 3.35). Luckily for you, image optics follow certain scientific rules, so there are many charts and tables available to help you predict this changing depth of field. They allow you to creatively set what may be in focus within your frame [see internet and book references for DOF Charts in Appendix A].
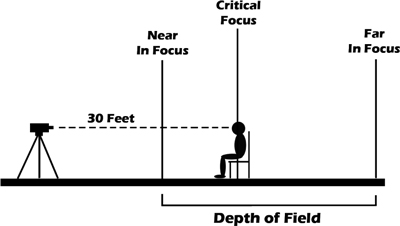
Figure 3.35 Critical focus set to main subject while depth of field occupies some distance roughly one-third in front of and two-thirds behind that critical focus plane.
Depending on the size of your production and crew, setting focus is the job of the camera assistant or the camera operator. Determining what important object within the composition of the frame gets treated to the primary critical focus is often the job of the director and/or the director of photography. As staging talent and set dressing deep into the shot are now possible, you get to determine where (what distance from the camera) the focus is set and can therefore control what the viewing audience will most likely pay attention to on the screen. Here’s another bit of shot grammar for you: what is in focus in your shot is the important thing for the viewer to watch.
Again, the human visual system creates the illusion that all things at all distances are in focus all of the time. We are not accustomed to seeing things blurry (unless we need corrective lenses and choose not to wear them). A camera lens does not know what is or what should be in focus. Only you, the filmmaker, knows that. You set the critical plane of focus and the corresponding depth of field according to what you wish to have in proper focus. The audience will want to look at the objects within that zone of most clear and crisp focus. Anything outside the depth of field will appear blurry to the viewer’s eye and therefore not be an attractive element to watch.
As you can see, selecting the focus object is a key component to directing your viewer’s experience as they watch the elements within the width, height, and depth of your frame. Because the human face and eyes are usually the main objects of interest, you may wish to keep the DOF narrow on the face but blur out the possibly distracting BG. This way, the audience pays attention to the actor and not to the unimportant visual elements behind him. While shooting, check and recheck for proper focus on your subject. Large video monitors on set can help, as does instant playback of video mediafiles that are in question. The keen eyes of the viewer easily notice soft focus or slightly blurry shots, and unless there is an immediate correction or introduction of some element within the frame that comes into clear focus, the viewer will reject the shot and disassociate from the viewing experience. Bad focus remains one critical element of film production that cannot be “fixed in post.”
Pulling Focus or Following Focus
A shallow depth of field allows you to place critical focus on your one subject in your frame – the foreground and background elements will blur out and the audience is left to pay attention to one thing. What if you wanted to have another subject enter the same shot but at a distance that is outside the established depth of field? The new character will be blurry – unless you shift the DOF closer to or away from the camera depending on the distance of this new subject in your shot.
This practice is called pulling focus or racking focus. If your goal is to keep focus on one moving object within your frame, then you may call it following focus. Many camera lens technologies allow only Auto Focus and focus shifts of this nature are harder to achieve. A camera with a Manual Focus setting unlocks this creative control for the film-maker and you can move the lens’s focus ring in order to actually (optically) shift the focus from one distance to another in the depth of your shot. The current popularity of DSLR HD video cameras is partly due to this “cinematic” capability of the manually controllable still camera lenses. This shifting of focus within the depth of your shot is yet another technique to help you direct the viewer’s attention around your frame.
The option to pull focus or to follow focus requires that not everything in your shot’s FG, MG, and BG will be in focus at the same time. This scenario is the result of your manipulation of the depth of field. As you remember, the DOF is the zone around that point of critical focus that will appear to be in acceptable focus and it can grow larger to infinity or shrink smaller to just a few inches or centimeters. As a general rule of thumb, the DOF will be found roughly one-third in front of and two-thirds behind the plane of critical focus (see Figure 3.35).
What determines your DOF is a combination of various factors involved in capturing the image. In order to keep it simple, we will just say that the focal length of your lens, the aperture (iris) set on the lens, the size of format (SD/HD video sensor or 16 mm/35 mm film), and the distance from the lens to the object of primary or critical focus all work together to determine the overall DOF. Let us explore the two extremes found in Table 3.1.
Table 3.1 – Factors that control the depth of field without regard to size of format
| Large Depth of Field | Small Depth of Field | |
Focal Length |
Short (Wide) |
Long (Narrow) |
Camera to Subject Distance |
Far |
Near |
| Lens Aperture | Small (High Number) | Large (Low Number) |
What this chart tells us is that when you shoot a daylight exterior wide shot of your subject with a short focal length (wide angle) lens, you will generate the largest possible DOF. Most likely a few feet from the camera to infinity will be in acceptable focus. Conversely, when you shoot a dimly lit interior XCU with a long focal length (telephoto) lens, you will generate the shallowest DOF. Perhaps only a few inches to a few centimeters might be seen in acceptable focus.
The lesson is that you can face difficulties in controlling your DOF in well-lit locations. Lots of light calls for a “stopping down” of your lens iris (closing to a smaller hole) to maintain proper exposure – which expands your depth of field. You can employ tools such as neutral density filters (ND filters) on the lens to help lessen the amount of light entering the lens on daylight exteriors. Some cameras handle this exposure limit electronically but still call it an ND adjustment.
A common problem with shooting low-light nighttime interiors is a DOF that is too shallow. Your subjects, especially if they are moving, will fall in and out of focus – moving in and out of the very shallow DOF. In order to get exposure, the lens iris has to be wide open. Adding more light will allow you to use a smaller aperture setting and therefore expand the depth of field – more of the important subject can then be in focus (Figures 3.36 and 3.37). If you do not have access to more illumination, you may try raising the video camera’s electronic “gain” setting to increase sensitivity, but image quality will most likely degrade and not improve the DOF.
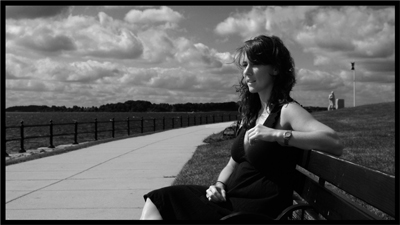
Figure 3.36 A large depth of field allows all visual elements in the FG, MG, and BG to appear in rather sharp focus. This can often make it difficult for your viewer to know where to look for the most important visual information.
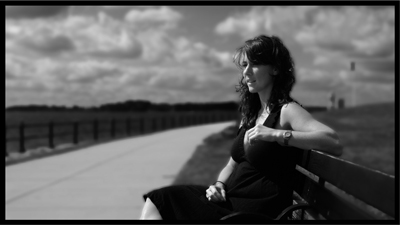
Figure 3.37 A shallow depth of field keeps the critical focus on the main subject and blurs the other elements outside the near and far distances of acceptable focus.
- Understand how to create the illusion of 3D on a 2D image.
- Horizon line – keep it level and steady. Raise or lower it in your frame for thematic reasons.
- Vertical lines – indicate solidity, substance or strength and are good for dividing up the frame into smaller sections.
- Dutch angle – skews horizontal and vertical lines to create imbalance. Implies that something is not quite right with this character or scene.
- Diagonal lines – force perspective to vanishing point and create depth. Draw your viewer’s eyes into the depth of your shot.
- Curved lines – Natural and soft, they help your viewer move their eyes around and deep into the frame.
- The depth of film space – foreground/middle ground/background – zones where you stage action and that exist at varying distances from the lens.
- Overlapping objects – a depth cue that creates layers of objects and can highlight the importance of certain objects in the depth of the shot.
- Object size – larger in frame means near, and smaller indicates far.
- Atmospherics – great distance is implied via water vapor obscuration.
- Prime lenses – only one focal length; often small, fast, and lightweight.
- Zoom lenses – wide angle and/or telephoto – focal lengths capture a wide field of view or a narrow field of view of the film space, all in one lens housing. Often larger, slower, and heavier.
- Focus – creatively shifting focus within your film’s depth will direct the viewer’s eye around the width and depth of your frame and keep them engaged – pull, rack, or follow focus.
- Depth of field – only objects within the DOF will appear to be in acceptable focus to the audience. Expand/contract or shift that zone in order to achieve more creative compositions into the depth of your shots and generate energy and visual interest for the viewer.
Chapter Three – Exercises & Projects
- Compose and record a long shot with a single human subject in the middle ground. Now recompose this shot with some overlapping visual element in the foreground. What object did you choose and where in the frame did you place it? How is the focus? What kind of distances did you have to spread between the camera and the foreground object and the subject in the middle ground?
- If you have access to a video camera with a zoom lens, frame a wide shot of a subject and then recompose as you do a slow zoom through a medium shot and into a final close-up. Next, pick a “middle-ish” focal length on your lens and reshoot the same wide, medium, and close-up shots of your subject, but this time move the camera closer each shot to get the approximately similar framing/subject magnification. Compare the video results. What differences do you notice? What similarities?
- With any camera, go out into the world and record images that have differing horizon lines, strong verticals, diagonals, and curved lines. What physical elements did you use to create each kind of “line?”
Chapter Three – Quiz Yourself
- What happens when you shoot in outer space? Where is the horizon line established then?
- What might it mean if your horizon line is slightly canted or tilted on purpose?
- What optical illusion (spatial perspective) seems to occur when you shoot with very wide lens focal lengths?
- True or false: The “f/stop” is the place along the horizon line where two parallel lines appear to converge.
- The depth of field surrounds what “point?” How much area of the DOF lives in front of this point and how much lives behind it?
- How can you use diagonal lines in your composition to direct the visual attention of your audience?
- How can you use “planes” of sharp focus and blurry areas in your composition to direct the visual attention of your audience?
