
Chapter One
- Cinematic Language Defined
- Choose Your Frame Size
- Typical Shot Names and Definitions
- Master Scene Technique and Shooting Coverage
- Script Analysis and Breakdown
- Shot Lists and Storyboards
- Phases of Film Production
You can find moving images just about everywhere these days. Advancements in micro-processing, wireless transmission, and screen display technologies allow us to access time-based visual media on our mobile phones, tablets, and laptops. You can see motion imagery playing around the world in taxis, on planes, on billboards, on the sides of buildings, at bus stops, in the aisles of “big box” stores, at the malls, in museums, and, of course, on television and in the movie theatres. So many kinds of moving images, made by so many diverse groups of people for so many different purposes, are available via these numerous outlets. Yet we, the receiving audience, somehow know what all of these images mean. We may not understand the spoken or written language in these “movies” but we do understand, perhaps on a subconscious level, the visual language – the grammar of the shot.
It is this globally understood visual communication – in our case the cinematic language – that is the focus of this book.
Let’s say you want to make a short film, or a funny web animation, or you need to interview someone for a school project. You, the filmmaker, are in a position of great creative power. You get to decide what the content of your video will be and how you will show it to a viewer. Your visual expressions (the pictures that show your story) need to be presented in ways that your audience can properly understand and interpret. If you do not “speak” the right language (use the proper grammar of the shot), then your message may not come across clearly. Think of this book as an introductory lesson in the visual language of moving imagery. It presents you with some of the core guidelines, commonly used tools, and accepted methodologies found in the art and craft of filmmaking.
If we are going to be discussing the grammar of the shot, then we are going to have to define what we mean by grammar and what we mean by shot. It should be understood that grammar in this sense of the word refers to the basic rules governing the construction and presentation of visual elements that are created for inclusion in a motion picture. These are the commonly accepted guidelines that define how visual information should be displayed to an audience. Viewers, all of us who have grown up watching films and television, have been trained over the years to observe, decode, and comprehend the various elements of the shots used in motion picture creation. In other words, we may not consciously express it, but we know what certain images mean and how they make us feel. An adept filmmaker uses this dynamic between the shots and the viewer to tell better stories.
We will explore what the basic types of shots are and what goes into their construction. We will also see what information and meaning the viewer can pull out of these shots when viewed in the context of your edited film. Remember, filmmaking is simultaneously a creative and a technical craft, and the extent of your success often depends upon how well you communicate your vision to your audience. If you confuse them with faulty film language or improper visual “grammar,” then they will most likely not respond well to your work.
In order to keep things simple, we are, for the most part, using generic terms for discussion and explanation. For instance, the terms “motion picture,” “motion imagery,” etc. refer to any time-based media piece, work, show, animation, film, project, or program that is made up of individual images that, when displayed to our eyes very rapidly, provide the illusion of movement. The term “camera” will refer to any device that can record these moving images. The term “filmmaker” refers to any person undertaking the creation of a motion picture. At times, camera person or camera operator will refer to anyone who operates the camera that is recording the moving images.
It may seem counterintuitive, but in filmmaking, if you are not sure where to begin, it can be very helpful to start at the end. Ask yourself some key questions. What is your goal? What are you setting out to make? What kind of story are you trying to tell and how do you wish to tell it? Who is the target audience? What purpose does this motion media piece have? What tools and other assets will you need to make it? Where and how will it be shown and viewed? Understanding what your end result should be will help inform where you can begin, and it will lead to many more creative and logistical questions for you to answer along the way. The best plan in media production (an often costly and time-consuming endeavor) is to have a plan. Our main concerns in this book are with the visual elements of your motion picture, so let’s begin your planning there.
Movies, television shows, music videos, commercials, cartoons – all rely heavily on their visual elements. You have to decide very early on in the creation process what is important for the viewer to see and how should they, the audience, be shown those particular actions, events, or details. You have to develop a visual plan – one that incorporates both the overall style and look of your project and the technologies and techniques that can help you achieve that look. The decisions of what to actually photograph and how to photograph them can be the result of input from many people involved in the filmmaking process – from the writer to the director to the director of photography, actors or producers, and so on (see a list of film crew positions and their common job responsibilities in Appendix B). Regardless of who makes these choices, someone will, and for your initial projects it will most likely be you, the filmmaker.
The visual needs of your motion picture project are guided by the script of your fictional narrative story (discussed later in this chapter), or they are dictated by real-time documentary events. Knowing how you want to show your story can lead you to one of your first decisions regarding your visual plan – what camera and what lens? These two very important tools, the camera and the lens, work together to capture a particular horizontal rectangle of reality. This rectangle is only a small segment or cutout window of the total sphere of the physical world around the camera. This cutout has a defined and finite area and we call it the frame (see Figure 1.1).

Figure 1.1 Basic widescreen 16 × 9 frame and ye olde tyme standard definition 4 × 3 television frame. Think of these as your empty canvases where you will get to “paint” the various elements of your shots.
Whatever is inside this frame is recorded as a two-dimensional (2D) representation of the actual world that exists in front of the lens. At present, because our video and film cameras can really only capture the two dimensions of width and height (frame left to right and frame top to bottom), they get displayed as flat images on a screen (projected movie, television set, computer monitor, tablet, or smart phone). The third dimension, depth, although present in reality, is only captured as an illusion on the actual 2D film or video. This concept is discussed in more detail in Chapter 2. We will not be discussing the technologies behind dual-camera 3D production – that goes well beyond the scope of this book.
Not to get too technical at the outset, but this next topic, frame size and aspect ratio, really should be addressed early on so that you can begin shooting your project with a solid understanding of the visual frame. It is the camera’s format (the area of width and height of the imager) and the type of lens used that really dictate the shape and amount of space you get to record and what the audience may ultimately watch within the 2D rectangular frame. We will discuss lenses later, but we should address this topic of frame sizes now. Your choice of camera (Video Format or Film Gauge with variable masking) will lead to many other decisions in both the aesthetics of your motion picture (the grammar of your shots) and the workflow (or media pathways) used to complete it.
Aspect Ratio
The dimensions of a camera’s frame (the active recordable image area) or the width-to-height relationship of that frame is often expressed as a ratio of that width to that height. This ratio is called the aspect ratio and, depending on the format of the medium, may be written 4:3, 16:9, 1.85:1, and so on. The first example, 4:3 (said “four to three” and sometimes written 4 × 3, or “four by three”), means that if the height is three units tall, then the width is equal to four of those same units. This is the aspect ratio for standard definition (SD) television in North America (NTSC, NTSC miniDV, and DVD) and Europe (PAL, and DV-PAL) [although the “standard” for 20th Century TV, SD has been rapidly phased out of both production and broadcast by HD – see below]. It can also be represented by the ratio of 1.33:1 (which is said “one-three-three to one”). The aspect ratio of all high definition (HD) video is 16:9, or 1.78:1.
Figure 1.2 shows several frame sizes and their aspect ratios from television and motion picture history. The size has evolved over the decades as technologies changed. At present, theatrical motion pictures, residual standard definition content, and high definition television all have different aspect ratios, which makes it rather confusing and complicated to get the images of one format to fit into the shape of another, but we will not worry about that now. We will simply select a single frame size and work with that. As SD has become a thing of the past, and professionals as well as amateurs have adopted Hi-Def or HD (of one flavor or another), we are going to use the wide screen 16:9 HDTV aspect ratio for our examples. If your project calls for using any gauge of film, NTSC-DV or PAL-DV, you have nothing to fear – the concepts we discuss, and our examples, will all translate into the shape of your particular frame. The beauty of film language is that no matter what camera or aspect ratio you choose, the shot grammar is still applicable, as many of these guidelines have remained relatively unchanged for the past one hundred years.
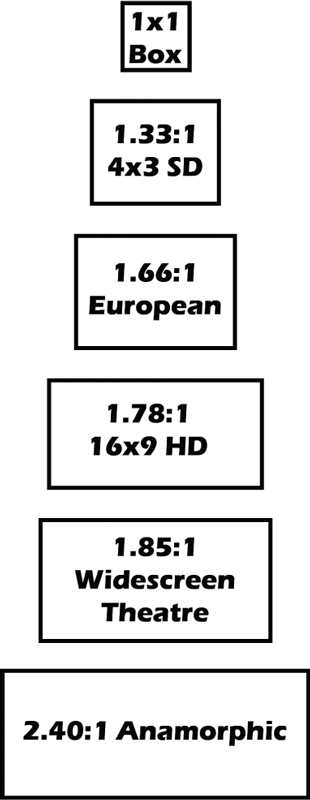
Figure 1.2 Comparison of various frame sizes from the history of film and video. Note the tendency to move toward a wider rectangular frame.
Further Exploration – A Brief History of Aspect Ratios
Theatrical motion pictures in North America have been widescreen (1.85:1) for a long time now. European widescreen theatres projected 1.66:1 images. Glass tube standard definition television sets of the 20th Century (roughly 1.33:1 or 4:3) were more square-like in shape and less rectangular than Hollywood features and today’s widescreen HDTV (roughly 1.78:1 or 16:9). There were several reasons for these differences, but the gist of it was that classical Hollywood 35-mm motion picture film had, for many years, used an aspect ratio of 1.33:1. This is overly simplistic, but when television became very popular in the late 1940s and early 1950s, the broadcasters needed material to play, and Hollywood could offer several decades of motion pictures to be displayed – thus the 1.33:1 television aspect ratio.
Television became more popular, and in order to compete with that popularity the movie industry began to create very wide or large-screen aspect ratio film formats such as VistaVision, Cinemascope (2.4:1), and, more recently, IMAX®. The less costly 1.85:1 was also popularized, and thus the standard North American widescreen aspect ratio was born. The problem was that the 1.33:1 frame size of television was too small to show the wider 1.85:1, 1.66:1, and certainly the 2.4:1 movies. A process called pan and scan was developed so that a smaller screen size could be extracted from the larger, wider original film’s aspect ratio to show the television audience. The big downside to this was that the original composition – basically all of the hard work of the filmmaker’s visual plan – was destroyed. Letterboxing (maintaining the original aspect ratio of the picture by placing black bars at the top and bottom of the frame) improved upon this, but TV audiences were never truly won over by this approach. Happily, the native widescreen aspect ratio of HDTV more closely matches that of the feature films and there is not as much need for this “cutting off” of the original frame.
Further Exploration – Why We Might Like Widescreen so Much
It can be argued that the widescreen aspect ratios are a better choice for image capture because their display on the screen is more suited to audience appreciation. Longer, more horizontally rectangular in shape, the widescreen imagery appeals to our eyes (and brains) because the field of view (what we get to watch) is closer to what our eyes naturally see when we look at the world.
Try this – Stand in a well-lit room and stare straight forward. Hold your arms out at your sides, shoulder high but slightly behind you. With palms forward, point your fingers straight ahead and wiggle them quickly. Do you see your fingers moving? If not, slowly move your arms forward. Stop when you see your fingers moving in your peripheral vision.
Now, drop your left arm down towards your waist and raise your right arm straight over your head. Looking directly in front of you, do the same finger wiggle and slowly move your arms in front of you until you can see your fingers moving.
You should find that you are able to see a field of view much wider than it is tall. We see in widescreen.
The Basic Cinematic Building Blocks – An Introduction to Shot Types
You know the shape and size of your frame, but now you have to figure out how to fill it. Visual communication in the cinematic language starts with the most basic pictorial building blocks – the shot types. A shot is the recording of one action from one particular point of view at one time. Its imagery shows a discrete unit of photographic coverage of a person, place, or event in a motion picture from a unique distance and angle.
Typically, a shot is gauged by the power of magnification of its subject – meaning how small or how big the subject looks on screen. An audience member relates to the subject according to its apparent proximity – small is far away and less important, while big is closer and more personal. The “size” of the shot also helps show more or less information to the audience – or should we say different kinds of information. A successful filmmaker uses this connection between the viewer and the shot’s perceived meaning and its visual information to create effective cinematic experiences.
Perhaps the terms long shot, medium shot, and close-up are already familiar to you, but let us take a look at an example of each shot type now. Although you may photograph or illustrate any subject matter in the world for your movie or animation, for clarity of discussion, we will first explore the shots through the simple framing of a standing human subject (static, locked-off shots). We will then build in complexity of content, composition, and execution throughout the remainder of the book.
Long Shot/Wide Shot
The long shot or wide shot (often abbreviated LS or WS) is a wide, encompassing shot that shows a large area (width, height and depth) of the film space. Physical, or spatial, relationships between or among subjects, objects and their actions are clearly visible from this apparently distant vantage point. The environment or location is the “star” and any persons or objects appear smaller within it. The long shot can establish place, time, and mood for an audience (Figure 1.3).
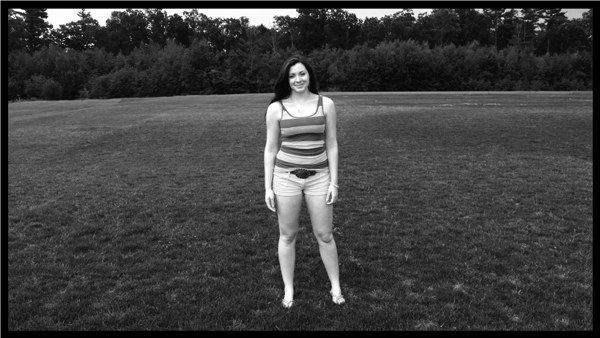
Figure 1.3 A long/wide shot with a single human subject.
Medium Shot
The medium shot (MS) is the shot type that nearly approximates how we, as humans, see the environment most immediately around us. Typically there would be several feet of space between you and another person, which would most likely result in your viewing each other in medium shots – roughly from the waist up. A moderate distance then (let us say 3 to 5 feet) may lead to a medium shot. Other factors, such as actual object size and focal length of lens on the camera, can also come into play, but we’ll explore those options later in the book. What it really comes down to, though, is how much of a person, object, or environment is included in the frame. A viewer watching a medium shot should feel comfortable with the proximity because the subject is near but not in their “personal space” (Figure 1.4).

Figure 1.4 A medium shot with a single human subject.
The close-up (CU) is the intimate shot in filmmaking. It provides a greatly magnified view of some person, object, or action. As a result, it can yield rather specific, detailed information to the audience. It also brings the subject inside the viewer’s “personal space” – in a good way if the viewer likes the subject, and in a bad way if they do not (Figure 1.5).

Figure 1.5 A close-up with a single human subject.
These three major types of shot – LS, MS, and CU – will be the basic building blocks that you can use to start capturing your moving images. It will be up to you, the filmmaker, which shot type you use to cover the various persons, objects, or actions in your visual story. To help you decide, you may find it useful to ask yourself, “If I were watching this motion picture, what would I want to be seeing right now?” Remember, it is the audience who ultimately watches all of your shots edited together, and their experience viewing your movie is based, in large part, upon the quality, variety, and appropriateness of shot types that you choose to present your story.
Next, we will list and define other derivations of these three basic shot families. So don’t worry, you will have plenty of shot variety available to you for making your movies.
The Extended Family of Basic Shots – The Powers of Proximity
99.9% of motion imagery that is made is meant to be viewed by some audience of some kind in some way. A filmmaker should always be thinking about how to best show the “story” to the viewer. A key responsibility you have is to present the viewer with images that are engaging, informative, and efficient. The extended family of basic shots provides you with a larger vocabulary of visual expression.
The illustrative examples presented here are an introduction to the various magnitudes of shots that you will be able to create in each category. In order to keep things simple, the illustrations will depict a lone human subject in a plain environment. The recording camera is placed roughly at the same height as the subject’s eyes. For comparative training purposes we will keep the subject centered in our frame, and looking straight to lens. As you continue to read this book, you will learn about more interesting ways to frame your subjects, but we have to start somewhere.
The following is a list of the basic shots (see Figure 1.6):
- Extreme long shot/extreme wide shot
- Very long shot/very wide shot
- Long shot/wide shot
- Medium long shot
- Medium shot
- Medium close-up
- Close-up
- Big close-up [UK]/Choker [US]
- Extreme close-up
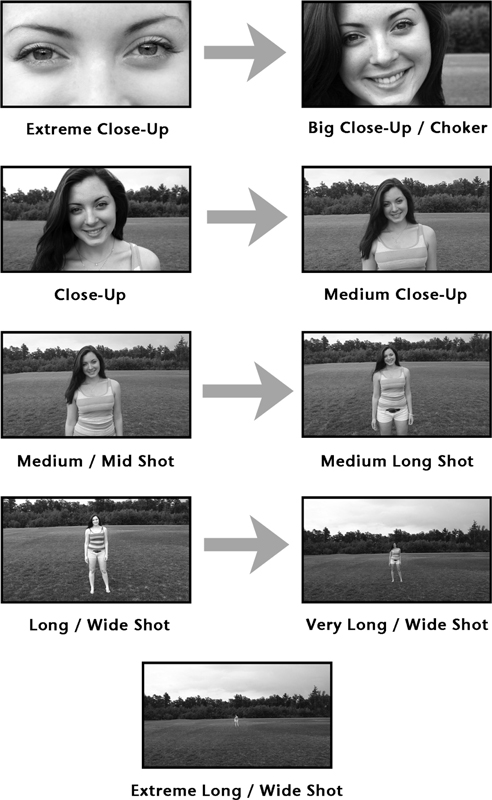
Figure 1.6 Examples of the nine shot types.
Extreme Long Shot/Extreme Wide Shot
- May be abbreviated as XLS, ELS, EWS, or XWS
- Also referred to as an extreme wide angle shot
- Traditionally used in exterior shooting
- Encompasses a wide and deep field of view, forming an image that shows a large amount of the environment within the film space
- Often used as an establishing shot at the beginning of a motion picture or at the start of a new sequence or scene within a motion picture (typical of epic battle scenes, etc.)
- Shows where – urban, suburban, rural, mountains, desert, ocean, battlefield, etc.
- May show when – day, night, summer, winter, spring, fall, distant past, present, future, etc.
- May show who – lone stranger walking into town, massive invading army – most often the human figures in the XLS are so small that details are not distinguishable – general, not specific, location information will be conveyed (Figure 1.7)
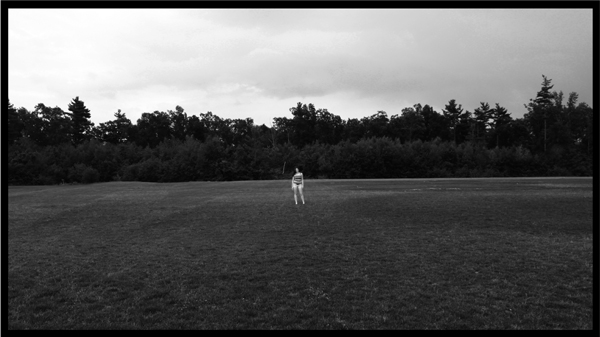
Figure 1.7 Example of an XLS.
- May be abbreviated VLS
- Also in the wide shot family
- May be used in exterior or interior shooting when enough width and height exist within the studio set or location building, such as an open warehouse, airline hangar, or sports arena
- Environment within the film space is still very important as it fills much of the screen, but the human figure is more visible and limited clothing detail may be observed
- May be used as an establishing shot where movement of character brings the figure closer to the camera
- Shows where, when, and a bit more of who (Figure 1.8)
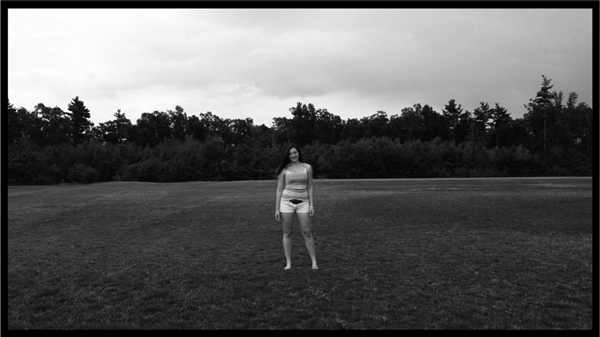
Figure 1.8 Example of a VLS.
- Abbreviated LS and/or WS
- This is usually considered a “full body” shot, wide but in close to a figure with head and feet just visible in the frame
- Interior or exterior shooting
- Larger human figure should take attention away from the environment; however, the character’s surroundings are still visible and still important for the audience to see
- May still work well for an establishing shot, especially within a smaller interior space or a contained exterior space like a storefront
- Shows where, when, and who – the gender, clothing, movements, and general facial expressions may be observed more easily (Figure 1.9)
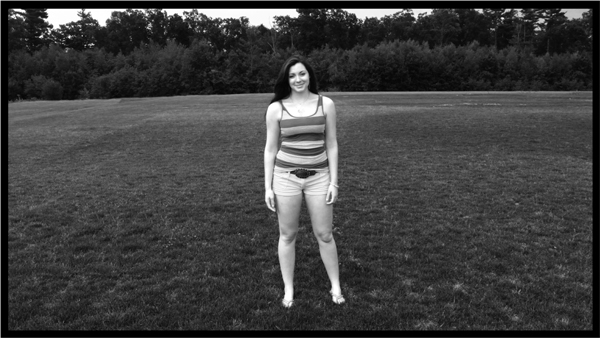
Figure 1.9 Example of a long/wide shot.
- Abbreviated MLS
- First shot in increasing magnitude that cuts off a body part of the human subject – traditionally framed such that bottom of frame cuts off the leg either just below or, more commonly, just above the knee. The choice for where to cut may depend on costuming or body movement of the individual in the shot. If you cut off above the knee, it is sometimes referred to as the “Cowboy” because in American Western movies there was interest in being able to show the firearm in the holster strapped to the thigh of a cowboy
- May be interior or exterior shot
- Human figure is prominent; details in clothing, gender, and facial expressions are visible
- Shows more of who than where and can still show when (Figure 1.10)

Figure 1.10 Example of a medium long shot.
- Abbreviated MS
- May also be called the “Waist” shot, as the frame cuts off the human figure at or just below the waist
- Interior or exterior
- Human figure is most prominent in the frame – eyes and the direction they look, clothing, hair color and hairstyle are all plainly visible
- Subject movement may become a concern, as the tighter framing restricts the freedom of gesture – be careful not to break frame (have an actor’s body part touch or move beyond the established edge of the picture frame)
- Certainly shows who and may still provide generic detail about where (inside or outside, apartment, store, forest, etc.) and when (day or night, season) (Figure 1.11)

Figure 1.11 Example of a medium shot.
- Abbreviated MCU
- Sometimes called a Bust Shot or “two-button” for the tight bottom frame cutting off at the chest, roughly where you would see the top two buttons on a shirt. Definitely cuts off above the elbow joint. Adjust bottom frame slightly for men or women, depending on costuming
- Interior or exterior
- Subject’s facial features are rather prominent – where the eyes look is obvious, as is emotion, hair style and color, make-up, etc. This is one of the most commonly used shots in filmmaking because it provides so much information about the character while speaking, listening, or performing an action that does not involve much body or head movement. Ideal for news broadcasts and “talking head” interviews in documentaries
- An audience is supposed to be watching the human face with this framing, so actions or objects in the surrounding environment hold little to no importance – although these background objects should not be distracting, and blurring them helps
- Depending on general lighting and costuming, you may discern general information about where and when (Figure 1.12)
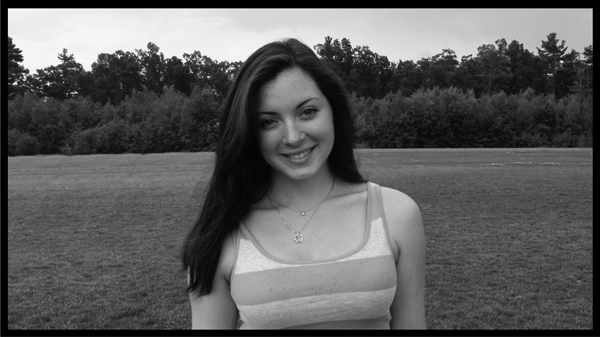
Figure 1.12 Example of a medium close-up.
- Abbreviated CU
- Sometimes called a “head shot,” as the framing may cut off the top of the subject’s hair and the bottom of the frame can begin anywhere just below the chin or, more traditionally, with a little upper shoulder visible (costuming and hairstyle dependent)
- Interior or exterior
- A very intimate full face shot of a human subject showing all detail in the eyes and conveying the subtle emotions that play across the eyes, mouth, and facial muscles of an actor – health conditions and facial hair in men and make-up use in women are clearly visible
- An audience member should be totally focused on the human face with this framing, especially the eyes and/or mouth
- Who, but not so much where or when (except as indicated by lighting) (Figure 1.13)

Figure 1.13 Example of a close-up.
Big Close-Up (UK)/Choker (USA)
- Abbreviated BCU – although many filmmakers may simply refer to it as a tight close-up or a choker
- Human face occupies as much of the frame as possible and still shows the key features of eyes, nose, and mouth at once – however, the top of forehead and bottom of chin are cut off
- Interior or exterior
- Such an intimate shot puts the audience directly in the face of the subject. Because every detail of the face is highly visible, facial movements or expressions need to be subtle – very little head movement can be tolerated before the subject moves out of frame. An emotional connection is easy to make with this “in your face” framing
- This shot is about who and how that “who” feels – angry, scared, loving, etc. (Figure 1.14)

Figure 1.14 Example of big close-up/choker.
- Abbreviated ECU or XCU
- Purely a detail shot – framing favors one aspect of a subject such as his/her eyes, mouth, ear, or hand only – OR a solitary object or magnified portion of a larger object
- Lacking any points of reference to the surrounding environment, the audience has no context in which to place this body part or object detail, so understanding will stem from how or when this shot is edited into the motion picture. It may be helpful if the content of the XCU is first shown in its larger form in a wider shot so that context may be established for the viewer
- This type of extremely magnified imagery can be used in documentary work, such as medical films or scientific studies, music videos, commercials, experimental art films, and may be used sparingly in fictional narrative, depending on the established visual style of the project (Figure 1.15)

Figure 1.15 Example of an extreme close-up.
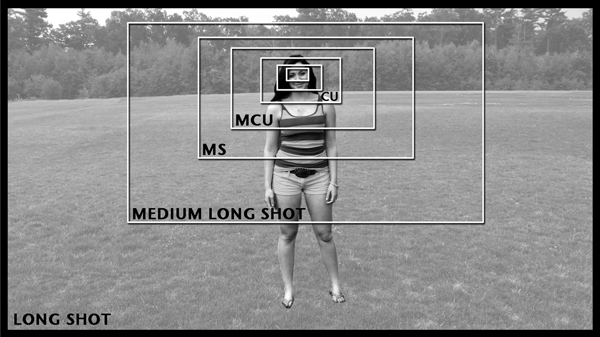
Figure 1.16 The closer shots.
Why Do We Even Have Different Shot Types?
The shot types just discussed were not all originally part of the visual language of film production when it began in the late 1800s. The first motion pictures often just documented actual events from real life, like workers leaving a factory or a train pulling into a station – almost exclusively filmed in a wide shot. Filmmakers then began to tell short stories from scripted material, but these too were photographed from a distance with a wide-angle view of the action. Much like a staged play in a theatre, the audience only got to experience the action from one vantage point. The sophistication of the camera (and lenses) and the storytelling devices evolved quickly and it wasn’t long before an expanded visual vocabulary was forming. New shot types, like the close-up, and new editing techniques soon allowed for greater flexibility in showing an audience a more visually complex and emotionally engaging story.
What eventually developed was an approach to filmmaking that is still used by many today – the Master Scene Technique. A story is broken down into scenes, or events that take place at a certain time and in a certain place. The filmmaker initially records the entire scene from one, often wide, camera angle called the master shot. The actors say all of their lines and do all of their actions chronologically from the beginning of the scene until the end. The filmmaker then repeats the actions and records shots that show the events with closer and more magnified imagery – traditionally from the outside in or from wider shots to closer shots. The result is a selection of shots that depict all of the events in the scene from different angles and with different subject sizes within the frame. They call this shooting coverage.
On larger productions, a Script Supervisor takes notes on all coverage shot on each character for each scene. These notes, the script, and the video and audio media files of this production footage are later handed over to the editor. The editor takes all of these different views of the repeated action of the scene (the coverage) and stitches them together according to the script and notes – traditionally from wider to tighter shots. In its most simplistic assembly it might go something like this:
- A master (wide) shot opens the scene to establish the location and the subjects’ placement within that environment – they begin their dialogue here
- CUT TO
- A medium shot that provides more detail of the subjects gesturing and speaking
- CUT TO
- A close-up that reveals the intimate detail of the emotional state of the subject at the most dramatic moment of the scene (typically near the end)
This process gets more interesting and elaborate when you add more shot types and subject/camera movement, etc. (see Chapters Two, Three and Six for more information).
The Master Scene technique, complete with shooting coverage using a variety of shot types, is a very thorough approach to filmmaking. You will be learning more about preparing your visual material for the editing process in Chapter Five.
Pulling Images from the Written Page
When you read a novel you get to create the look of the characters and the locations in your imagination. The descriptions on the written page help you conjure the imagery in your head. Making motion pictures involves a similar process. Whether you are creating a short film, an animation, a music video, or a how-to video, you are most likely going to start with a written script.
Scripts and Script Breakdown
The script for a project, even if just rough ideas for scenes or segments, provides the basic framework of your “story” around which you build your visual plan. Understanding the story you are trying to tell helps you figure out what shots you can use to show that story to your audience. This is often referred to as script analysis and script breakdown. You read over the scene and determine where it would be best to show the action from a medium long shot, a medium shot, a close-up, and so on. You analyze the content of the scene (dramatic dialogue, factual information, band performing a stanza from their song, etc.) and you break down the imagery into the necessary coverage for shooting that specific moment in your video.
Shot Lists
It helps to document these shot choices you decide upon during the script breakdown, so you should create what is called a Shot List. The shot list does what its name says – it lists the shots you need to record. Because you have done a scene-by-scene breakdown of the script, it makes sense to list your shots according to their chronology in the story. The first thing we see in the movie is Scene 1; the next major action at a new location is Scene 2, and so on. To be clear, the actual shooting of the film does not have to follow the chronology of scenes in the script. The shooting schedule is made around actor and location availability, etc. – so Scene 24 may be recorded first and Scene 3 may be recorded last. The goal is to record all of the scenes’ coverage on your shot list.
Each individual shot type on your list that you need to record will most likely require a different physical camera placement. This unique camera position/framing is called a set-up. As each scene has a number, the first camera set-up for that scene, usually your master wide shot, would be noted as “Scene 1” or simply “1.” The second setup of that scene would then receive a letter starting with “A” as in “Scene 1, A” or, more typically, just “1A.” The third camera set-up would be “1B” and so on. The English alphabet has 26 letters so you should be safe using this method, but on larger productions, repeats like “AA” or “BB” may be required.
If you have to record the action of a single set-up many times in order to get it just right, then these multiple recordings are called “Takes.” The first attempt at shooting the first set-up of the first scene in your movie would be, “Scene 1, Take 1” or simply “1-1.” If there was a flub then you would reset and shoot, “Scene 1, Take 2” or 1-2, and on it would go until it was recorded satisfactorily. Your goal should be to get the material recorded correctly in as few takes as possible in order to save time, energy, and money. Nobody wants to see “Scene 52ZZ, Take 117.”
Storyboards
Beyond the shot list, another resource that will help you be efficient is a storyboard. If the written script is your framework, then the storyboards are the blueprints for your visual plan. You actually illustrate (draw) what each framing (shot type choice) will look like when you physically compose the visual elements for the set-up. Everyone on the film production crew will have a picture of what the visual goal will be when the time comes to record it (see Figure 1.17). On today’s sets, with laptops or tablets so handy, the use of animatics has become more popular. Animatics are animated storyboards that can not only show framing, but animate the movements of subjects and cameras during each shot and may include voiceover and music. Regardless of how crude or advanced your pre-production “boards” are, their purpose is the same – to visualize what the final product will look like and help everyone get them set up correctly.
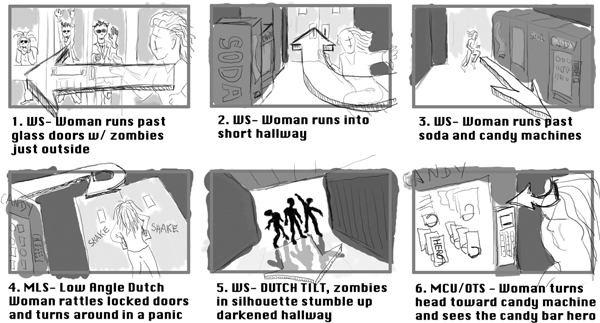
Figure 1.17 An example of a storyboard.
All of this important preparation work should be accomplished before you begin the recording process. This initial phase of filmmaking is called “pre-production.” The script is written or acquired, your visual style is determined, you select your camera and other equipment, form the shot list, draw the storyboards, and do hundreds of other things like scheduling and budgeting and so forth. Which means that once you begin principal photography (the actual recording of the main shots of your story) you are in the phase called “production.” Production continues until you have recorded all of your elements for the final version of your motion picture. All elements (picture and sound) are passed off to the editorial team and the “post-production” phase of filmmaking takes place. The shots are edited together to show the best story possible given the production materials submitted. The last steps in this chain are the distribution and exhibition stages – getting your finished product out to the world for people to see and enjoy.
The following is a sample script that you may use to practice shot selection, storyboard creation, and coverage shooting using the shot type families (found in both Chapter One and Chapter Two). It is referred to as a “contentless scene” – meaning it is purposefully vague and does not follow strict screenplay formatting so that you may interpret freely and maximize your creativity. It may be helpful if you first read the script, make some choices about who these characters are and what their story is. Those choices will then inform how you may approach shooting the two brief scenes. Have fun.
CHARACTER A
Hey.
CHARACTER B
Hey.
CHARACTER A
How’s it going?
CHARACTER B
Good.
CHARACTER A
Cool. Cool. Um, listen – I’m really
sorry about the –
CHARACTER B
Yeah. It’s no big deal.
What are you going to do about it, right?
CHARACTER A
Right.
CHARACTER B
Well, I’ve got to get going.
A Yeah. Yeah. Me too.
CHARACTER B exits – cut to new location. Character B enters followed by Character A.
CHARACTER A
Hey. Hey. Wait up. You forgot this.
CHARACTER B
That’s not mine.
[A few hints about this particular script: it should happen in at least two different locations; Character A must be sorry about something that can be represented visually, in some way, in the scene; Character A must try to present Character B with some “forgotten” item, in either a literal sense or in a figurative or symbolic fashion.]
- Visual “grammar” or film language is used and understood around the world.
- The format of your camera initially determines the shape of your frame.
- The aspect ratio describes the dimensions of your active recording area.
- The three basic shot types are the long/wide shot, medium shot, and close-up.
- The extended family of nine basic shot types comprises extreme long shot, very long shot, long shot, medium long shot, medium shot, medium close-up, close-up, choker, and extreme close-up.
- Traditional approaches to the Master Scene technique encourage shooting coverage shots of the dialogue exchange between characters from different angles and with different “magnifications” of the subjects.
- The written script or screenplay presents the bare bones of the story with brief descriptions of location and action and thorough inclusion of dialogue content. Filmmakers “break down” the scenes from the script into the shots that will best cover the action, and create a Shot List.
- Having a storyboard, or drawings that represent the shot types needed for the project, is very helpful when you go to shoot the actual scene.
- Pre-production, production, and post-production are the three main phases in the filmmaking process.
Chapter One – Exercises & Projects
- Using your smart phone, tablet, video, or stills digital camera, practice capturing images of a person in all nine basic shot types. (Refer to Figure 1.6.)
- In a similar fashion, practice location/object photography without any human subjects. Choose your own objects and your own locations, but shoot an example of each shot type.
- Shoot and edit a shot type “training” video where you must teach someone who knows nothing about the nine basic shot types what they are called, what they look like and how they may be used in a short fictional narrative story. You should include illustrative video examples of the shot types (refer to Figures 1.7 to 1.15 for what to shoot, or use the images/video you shot for Exercise 1 above). Also, have clear examples of them “in use” in your own short movie you produce for this project. Titles/keyed graphics and voiceover will help clarify the educational points you need to make.
- Create a shot list and storyboard for the script found at the end of this chapter.
- Record the shots for the script based on your pre-production work from #4 above.
Chapter One – Quiz Yourself
- If you need to clearly show the emotion in the eyes of your subject, which shot type might be best and why?
- You’re creating an animated cartoon that takes place in a dark, decaying futuristic city. You want to generate a wide view of this moody environment to show at the beginning of this story – what kind of shot would be good to use?
- XCU is the abbreviation for what shot type?
- What is the aspect ratio of HDTV?
- Why might human beings respond well to widescreen motion picture imagery?
- What is a camera “set-up” and how many would you need if you had to record an LS, MS and CU of only one subject?
- What is “principal photography” and when does it occur?