
Chapter Two
- Headroom
- Shooting Style: Subjective vs Objective
- Look room/Nose room
- The Rule of Thirds
- Camera Angles
- The Two-Shot
- The Over-the-Shoulder
- The Power Dynamic Two-Shot
- The Three-Shot
Composition, as we are applying the term, is the purposeful arrangement of artistic parts selected for the “art form” being practiced. One can compose notes in music, steps in a dance routine, figures in a painting, elements on a web page, subjects within a film frame, and so forth.
Now that we understand how shots pictorially cover persons, actions, or events within a certain size frame, we have to look at how you can fill that frame with objects and information – meaning where, specifically, do you place the person’s head in a closeup shot or where, specifically, do you place that tree in a wide shot? And it is not only where you place these compositional elements but also why you place them where you do. The arrangement of these visual elements and their placement within the overall frame is a big part of visual communication and should be a part of your visual plan for expressing your story. Object positioning helps establish traditional film aesthetics and can convey particular meanings to the audience. This is the power of picture composition. In this chapter we will explore ways to compose basic shots and see what those compositions can do to enhance a viewer’s understanding of your visual story.
As the filmmaker, you decide what to capture in your motion picture frame, so let us go ahead and place a camera in your hands. Okay. Now what? Well, first you determine the shape of the frame for that camera’s format. Knowing the active recording area and aspect ratio, you now understand the boundaries of width and height that are going to help you plan for the various compositional choices ahead of you. Next, figure out what you would like to shoot, point the camera at that thing, and record the images. Did you think about how you held the camera or where you placed that “thing” in relationship to other things or in relationship to the edges of your frame?
A new creative dilemma presents itself – you know the subject to be recorded, but you have to be equally aware of how you place that subject within the frame. It is this artful placement of objects around the frame that helps underscore meaning, provides sub-text, and, in general, empowers your imagery with an internal sense of beauty, balance, and order. This is the art of composition.
Simple Guidelines For Framing Human Subjects
Let us start with something simple that you will have to shoot many, many times: a medium close-up of a human subject. Perhaps you’ve already done this a thousand times, taking still pictures of your friends and family. We shall see that what at first seems rather simple will, in fact, require you to make many creative choices – choices that will help make your images better, stronger, and more understandable to a motion picture audience.
Here is a medium close-up (Figure 2.1).

Figure 2.1 Generic medium close-up of a single human figure.
What do you notice about this image? Does it look like one of those candid photos you took of your friends? The compositional elements are pretty simple, but where is the person’s body located within the frame? Where is the head? Where do the person’s eyes look? How much other visual information do we get from the rest of this image? A quick observation will tell you that the body is aligned down the middle, the head is very close to center frame and the eyes are looking directly at you, the audience member. This got the job done, but depending on the type of motion media project you are producing there are other choices you could make regarding this composition. We will first discuss the placement of the head.
Within a given shot type (LS, MS, CU) there is a generally accepted guideline as to where the head of a person should be placed within the frame. This guideline applies much more to MS and CU shots because in these tighter shots you mostly see the person’s body and head and much less of the environment. When communicating, human beings naturally tend to look each other in the face and, specifically, in the eyes. This “face focus” allows us to gain insight into the physical and mental health of an individual and to get a handle on their emotional state. Therefore, when an audience member watches a human subject on screen they will most often look at the person’s face, particularly at the eyes and the mouth. Filmmakers know this to be true and they count on it when composing shots of people.
The placement of the head within the frame is very important, which is why we have the guideline of headroom. Headroom specifically refers to how much or how little space exists between the top of the subject’s head and the top edge of the recorded frame. Because screen space is at a premium, it would be a shame to waste it, so we often set the top of the frame to cut off just above the talent’s head in a tighter shot (Figure 2.2). In wider shots you should also consider how much screen space above the talent you allow (Figure 2.3). Unless the story or event calls for some extra room above the head, you let it go in favor of more information at mid-frame. Later, when we review examples of closer shots, you will see how it is appropriate to also cut off (or “frame out”) the hair and tops of people’s heads as long as you keep their eyes and mouths well within the screen space. There is no exact measure or global standard of what headroom needs to be for each shot. The amount allowed can vary from filmmaker to filmmaker, reflecting an individual style, but most will be very similar. In general, try not to give too much headroom as it wastes screen space and can throw off the overall composition.
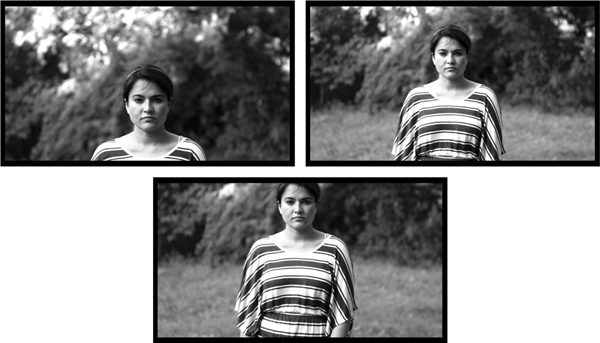
Figure 2.2 Medium close-ups with too much, about right, and too little headroom.
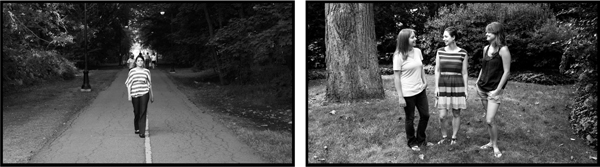
Figure 2.3 Wider shots (VLS and LS) demonstrating proper headroom.
Subjective Versus Objective Shooting Styles
Now let us address how the subject’s eyes are looking straight at you. What might it mean if the person being recorded by the camera looks directly into the lens? How does it make you, the viewer, feel when you are addressed directly by on-screen talent? Of course, it may depend on the kind of project you are watching or shooting, but it may make you feel “connected” to the person on screen or it may make them seem to be some sort of authority figure. If you were photographing a news reporter on location, then it would make sense for him/her to look straight into the camera’s lens and deliver the factual report. The reporter makes a direct connection with you, the home audience, by looking you square in the “eye” and speaking directly to you. You see this all the time with game show, talk show and talent show hosts, sports analysts, and it is used quite a bit in music videos. These television programming genres have an accepted visual style that a subject may look directly into the lens and address the viewer. This style of camera work is often referred to as subjective shooting or direct address.
This is not so for scripted fictional narrative projects (at least for the most part – as you will grow to learn, there are often exceptions to the rules). With a fictional story you have actors playing roles in a pretend world. The camera is almost always an observer – a proxy for the audience – therefore it is not a direct participant, not something or someone to be addressed. The talent is not supposed to look directly into the lens – and often, not even near it. If an actor looks into the lens, or addresses the camera, it is called “breaking the fourth wall.” This expression gets its origins from the theatre stage where the audience is always seeing the actors from the same direction – through this fourth “invisible” wall. If the camera were in a room recording the actions of a performer, the camera may see the back wall and the two side walls. The wall behind the camera, that is, the wall that should be physically in place where the camera is positioned, is the “fourth wall.” It is the place from where the actions are being recorded and, ultimately, the place where the viewing audience is privileged to sit and observe the story. All on-screen talent behave as though the camera is not even there. This style of camera work is often called objective shooting.
For ease of demonstration, let us continue our medium close-up examples as though we are shooting for a fictional narrative film project where an objective shooting style is the goal. So let us take our subject’s eyes off the lens axis (Figure 2.4).
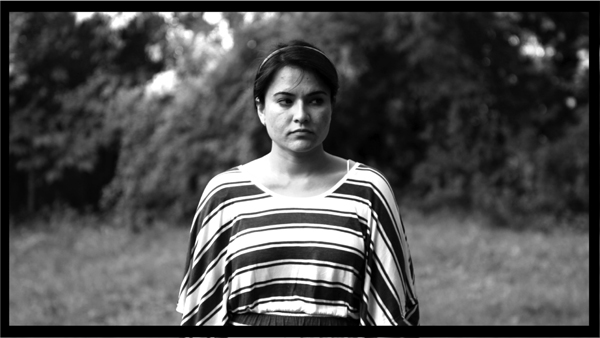
Figure 2.4 MCU of talent with eyes looking away from lens axis.
This is a good start, but the face and body are still straight to lens. Depending on the focal length of the lens you are using, this can cause a flattening to the facial features and is not always that interesting for the viewer. Let us put a small shift on how the subject is standing in relation to the camera (Figure 2.5). Now it appears that this person is looking at someone or something just out of frame. She is engaged by an unknown element within the film world. A viewer of this image will be curious about what she is seeing and will want to see that “thing” in the next shot. This is one of the key strengths of an objective filmmaking style. Rather than being told information directly by the talent, an audience is invited to get involved, to observe, to wonder, and to anticipate. They become invested in the story via the visual construction of the shots and how they are edited together.

Figure 2.5 Subject turns body and eyes off lens axis resulting in objective shooting style.
Our composition of this individual is getting better, but the center framing may not work so well for our story. Notice how the face in the center of the screen is looking off to the side – at someone or something yet to be shown in another shot. A centralized framing like this is very solid and is often used in news reporting and hosted programming (with subjective or direct address), but perhaps it is too uniform or compositionally neutral for narrative fiction. Let us shift the image’s balance and create more look room for our subject (Figure 2.6).
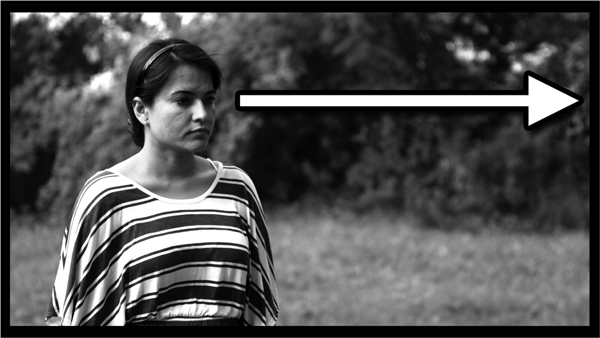
Figure 2.6 Placing head and body on frame left allows the subject to look across the empty space. The left and right halves of the frame are balanced.
Look room (also called looking room or nose room) is the empty space that we have provided within the frame, between the talent’s eyes and the edge of the frame opposite the face. It is this empty area or “negative space” that helps balance out this new frame where the weight of the object (the talent’s head) occupies frame left and the weight of the empty space occupies frame right. In this case, the word “weight” really implies a visual mass whether it is an actual object, such as a head, or an empty space, such as the void filling frame right. This frame is now composed of two balanced masses. We will see later how the actor’s gaze across this negative space causes an audience to also want to see what the actor is looking at, but for now, let us stay focused on where in the frame the head is placed.
What if we moved a subject’s head to the opposite side of the screen but kept the face and eyes looking in the same direction (Figure 2.7)?
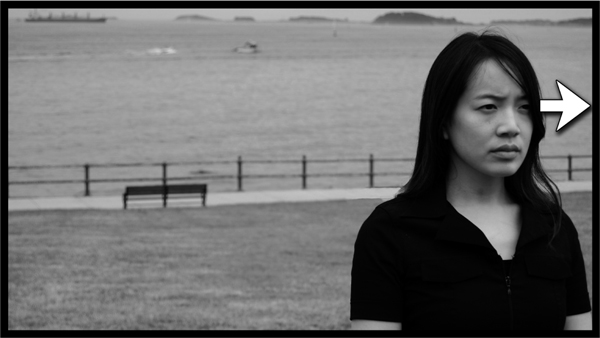
Figure 2.7 No look room creates a void behind this subject crying out to be filled.
The look room in this composition is severely cut off on frame right and we have a large, empty space on frame left. Our weighted objects – the body and the void – still exist, but their placement just does not feel correct. We have not achieved a visual balance. The actor’s face is too close to the near “wall” of the frame, making it look congested, claustrophobic, and trapped. Of course, this might be stylistically appropriate if the subtext for your character at this point is “up against it.” Also, one gets the sense that the empty space occupying the majority of frame left is crying out to be filled with someone or something. That negative space behind the head can conjure feelings of suspense, dread, or vulnerability. An audience might expect that void to be filled by something, and they would call out, “Look out behind you!” So, unless that is your creative intention and it fits the mood of your story, it might be best not to compose your shot this way.
Our original MCU example with the head at the center of the frame is not wrong – it’s a stylistic choice. It just may not always be as visually engaging to keep your objects of interest at the center of the frame. That may work well for still photographic portraiture and news broadcasting, but it lacks a certain punch for motion picture imagery recorded with an objective shooting style – especially when it comes to dialogue scenes. You will become quite adept at arranging important objects in your frame as you study and practice your visual grammar. We will discuss the direction of the look room in more detail later in the book, but right now let us introduce you to another rule or guideline that will help you place these objects within the composition.
We moved the subject’s head off toward frame left in our MCU example in order to generate a more balanced frame of weighted objects. Notice that we did not choose framing like the examples shown in Figures 2.8 and 2.9.
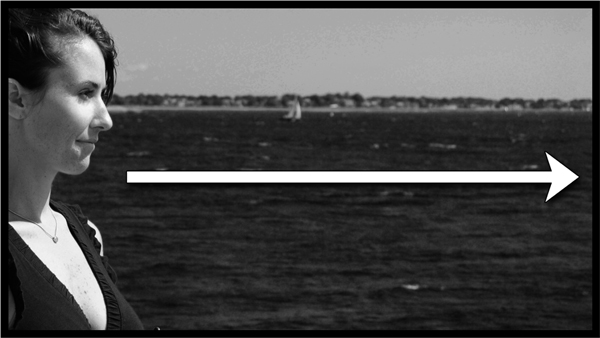
Figure 2.8 Back of talent’s head is too close to frame left, breaking the frame edge.

Figure 2.9 Cutting the face in half may be considered “artsy” or “experimental” or useful in music videos.
We could create frames like this for particular reasons, but for the most part we are going to be following the accepted visual grammar, and the rule of thirds is definitely one of those points to follow. The rule of thirds is very easy to remember and very simple to execute. Take your frame and divide it up into thirds, both vertically and horizontally (Figure 2.10). Other art forms, such as painting, sculpture, and architecture, also have similar rules (often mathematically based) for the division of sections, etc. Feel free to explore those on your own to help expand your understanding of image composition and visual communication (see web and book references in Appendix A).
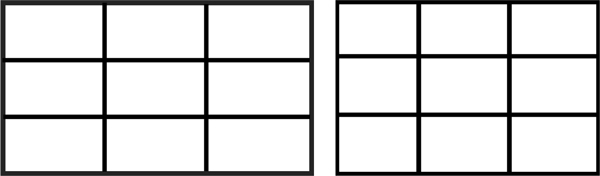
Figure 2.10 Frame markings along the 1/3 lines inside a 16:9 frame and a 4:3 frame.
Of course, these lines seen in our illustrations will never physically live on your frame (unless you want them to). You have to know their approximate placement on your particular viewfinder in your camera (although many digital video cameras do have a builtin grid overlay that you can make appear in your viewfinder or monitoring screen, often found under display settings). So, when searching for a rule of thirds composition, you may choose to frame your talent such that elements of visual interest appear at the crossing points where two of the lines intersect.
In Figure 2.11, the eyes within the head of our MCU figures are placed roughly at the upper left or right crossing point. The object in Figure 2.12 has been placed at the lower right intersection of thirds.

Figure 2.11 Subjects placed along the vertical 1/3 lines.
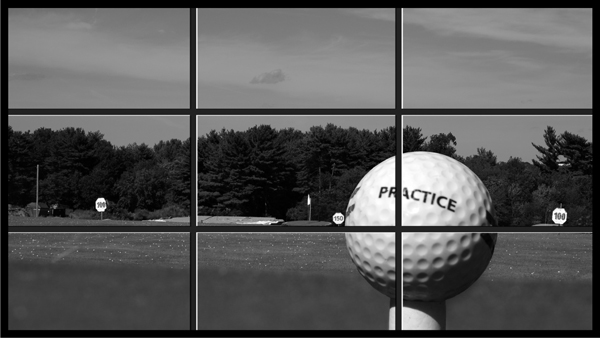
Figure 2.12 This object was purposefully placed at the lower right third intersection.
So now you should feel comfortable composing simple subjects within your frame. The rule of thirds, good headroom, and appropriate look room provide you with some basic techniques for creating a well-balanced frame for use with an objective shooting style. Although we have stopped our actor from looking directly into the lens and the head is turned at a slight angle, we are still photographing the talent from a frontal camera placement. This makes some sense because you usually wish to place your camera at the most advantageous position to record the important details – in this case, the expression on the actor’s face and the look in both of the eyes. There are times, however, when you need to move the camera around the actor and record the action from a different angle.
We will explore the “angles on action” from two separate circles that surround your subject. The “angles on action” refer to the angle from which you photograph a person, object, or event. The position of the camera and the view of our subject that that position offers to the audience will affect how much visual information is conveyed. It can also allow the viewer to glean certain meaning from the shot. First, we will work our way around the subject along a horizontal circle, where the actor is the center and our camera traces the circumference (see Figure 2.13). Then we will explore a vertical circle, where the actor is the center and our camera will move above or below a neutral height to show our subject from a low or high angle (see Figure 2.14).
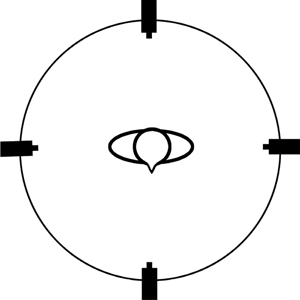
Figure 2.13 Bird’s-eye view of camera’s horizontal circle around the subject.
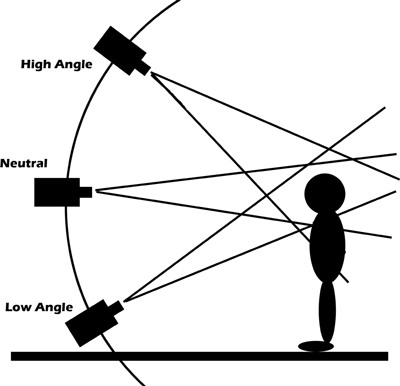
Figure 2.14 Side view of camera tracing path along vertical circle around subject. It is used to create high, neutral and low angle shots.
As mentioned earlier, when you photograph a person directly from the front of his or her face, it often yields a rather flat, uninteresting image (depending on lighting, which we will touch upon later in Chapter Four). An easy fix to this is to ask the talent to angle his/her face/body away from the camera lens. Keep in mind, however, that the camera can also be moved around the subject. Let us imagine that the talent is at the center of a circle, like the hub of a bicycle wheel laying flat. The camera, facing inward, can then move around that circle’s center, showing the subject from any horizontal angle.
360 Degrees Method
As there are 360 degrees in a circle, let us use the degrees to help define how far along the circumference we can move the camera and what kind of shot that would create. We’ll split the circle into positive and negative values up to 180 degrees (Figure 2.15).
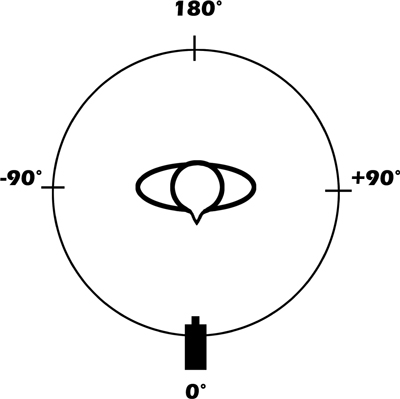
Figure 2.15 Camera’s horizontal circle divided into degrees.
With the camera facing the talent at the zero degree mark, we would have a full frontal shot – flat and often uninteresting, but factual as in a news report. If the talent remains stationary and the camera begins to move around the subject along the arc of the circle to the talent’s left side, then we go through the positive degrees (+45, +90, etc.) until the camera comes to the backside of the talent and sees only the back of the head at +180 degrees (Figure 2.16). The same type of arc can be made around the circle on the talent’s right side and the degrees would progress the same but in negative values (−45, −90, −135, 180) (Figure 2.17).
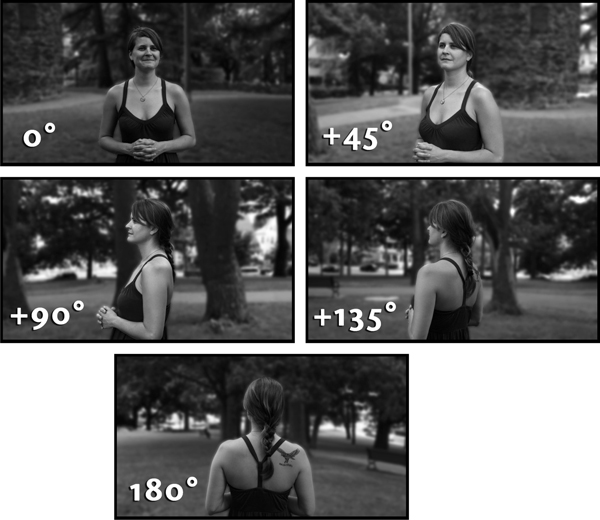
Figure 2.16 Camera’s horizontal arc along positive angles around the subject.
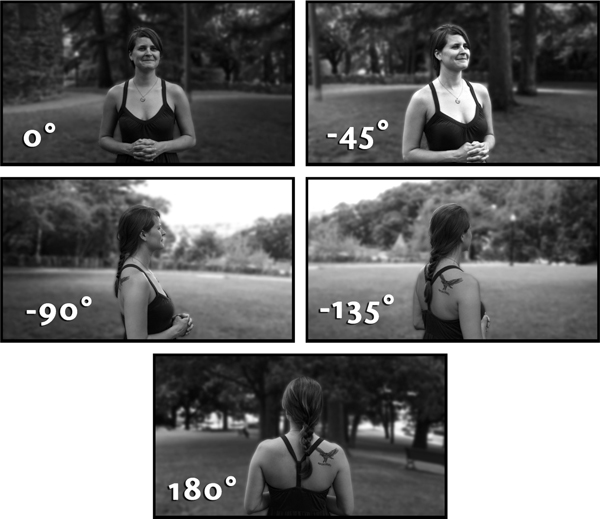
Figure 2.17 Camera’s horizontal arc along negative angles around the subject.
It might be easier to think of the degrees of the circle like the face of a clock where the subject is at the center of the hands and the camera is at the outer ring of numbers. In this case, you could use the callouts of six o’clock for full frontal, three o’clock for left profile, nine o’clock for right profile, and twelve o’clock for full back of head – which is sometimes called a Reverse (Figure 2.18).
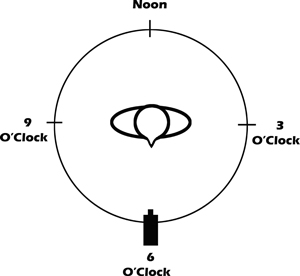
Figure 2.18 The numbers of the clock face can represent camera positions around the subject.
Many people simply use a family of rough camera positions around talent, such as frontal, 3/4 front, left or right profile, 3/4 back, and from behind or a “reverse” (see Figures 2.19–2.23).
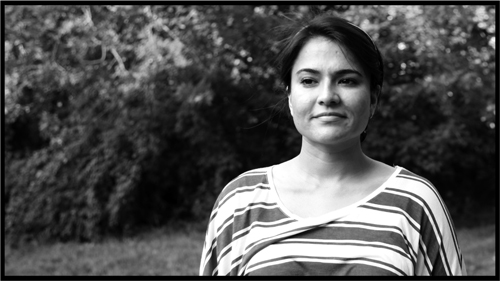
Figure 2.19 Frontal camera angle.
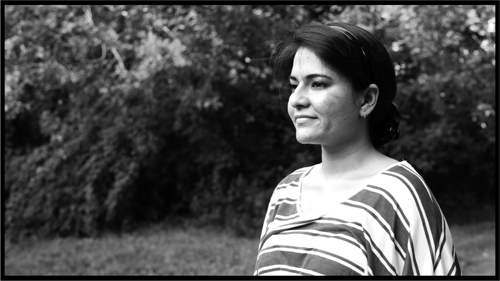
Figure 2.20 The 3/4 front left camera angle.
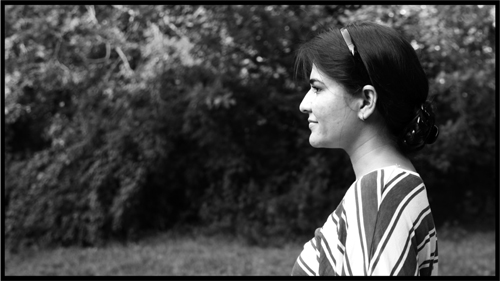
Figure 2.21 Subject shown in profile.

Figure 2.22 The 3/4 back camera angle on subject.
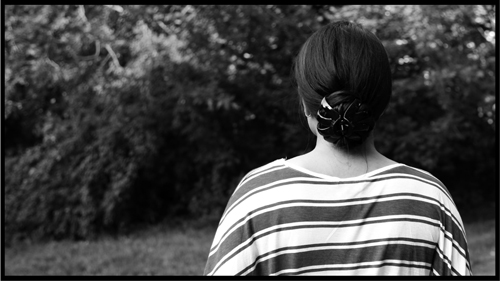
Figure 2.23 Full back camera angle on the subject.
The Frontal View
Remember from our earlier discussion that frontal shooting is used a great deal in nonfiction production (news reporters and talk show hosts, etc.), but you will also see it used often in fictional filmmaking when the subject is speaking or thinking, walking toward camera, or when they are driving (as seen straight in through the windshield). The difference lies entirely with shooting style – subjective or objective. The frontal view provides the audience with the entire face and both eyes. Much character information is visible. However, the overall image (depending on style of lighting and lens used) can sometimes seem flat and lacking a dynamic dimension.
The 3/4 front, or 3/4 profile as some call it, is probably the most common angle on talent in fictional filmmaking. It provides the audience with a clear view of the front of talent so that facial expressions, hand gestures, and the like may be plainly seen. It also provides the frame with an increased degree of dimension. In closer shots of the human face, it brings out the contours and depth of the facial structures (nose, mouth, cheek bones, brow, jaw, ear, etc.) and it still shows both of the subject’s eyes. Note that the subject has swiveled around to achieve the 3/4 frontal view, and we have also placed the head and eyes along the line of thirds, yielding appropriate headroom and ample look room (Figure 2.20).
The profile shot shows a person directly from the side. It quickly reveals the prominent facial features of the nose, lips, and chin, and can also help identify a character if they are known for a particular hairstyle, hat, or headdress (think superhero or cartoon character). In works of art and coinage, the profile was and is used to represent the portrait of a strong leader. The chiseled facial definition of this leader looks out and surveys all that she or he commands. Unfortunately, only half the information is visible. The viewer can admire this personality, but will not be privileged enough to see what the character might really be thinking or feeling. It is said that the eyes are the windows to the soul. Not showing your audience the eyes (and full facial expressions) of an actor (as with a profile shot) can generate feelings of duplicity, distrust, aloofness, or secrecy. Certainly there will be difficulty in making an emotional connection to someone you cannot fully embrace with your vision. Thematically, in your story’s visual plan, if this is the desired result you seek, then by all means use the profile shot; otherwise, you may wish to reserve it for special compositions or for special characters (Figure 2.21). However, when you add another subject to the shot, as you will see later in the 2-shot, the profile view becomes a common and efficient way to show both characters interacting.
When used in tighter shots, the 3/4 back shot looks more like what is called an over-the-shoulder shot (OTS), which we discuss later. The camera gets to peek over the shoulder of our main subject and shows the audience what the subject is looking at (Figure 2.22). They get to see the film world from the character’s point-of-view (POV). Granted, the face of the actor is hidden from view, so we do not know what he or she may be thinking or feeling from this particular angle, but the filmmaker probably has other angles of this character to cover the scene. The 3/4 back view still has the feeling of an objective shot and asks the viewer to share the experience along with the character in the story. The participating viewer is invited to do the thinking and feeling as if they were the character.
The Full Back View
180 degrees from the front view is the full back view. It is sometimes called a “Reverse,” especially if used in a wider framing of the subject. Although you do not see the face of the subject, the usual rules of framing apply – headroom, look room, rule of thirds, etc. As you may have already guessed, this type of shot totally obscures the subject’s face and therefore keeps hidden the real thoughts, feelings, and intentions of this character. If, however, this is a known character placed in a suspenseful situation in the narrative, then this type of shot takes on a very subjective point of view, as though someone or something were following our hero from behind and is just about to strike. Scary stuff (Figure 2.23)! When you add movement to the full back view (as in a tracking shot, discussed in Chapter Six) it becomes another strong method to have the subject lead the audience into a new scene or location, or to reveal new story information as the camera follows behind. On tighter shots, this view can generate mystery or suspense as the camera follows closely behind the subject without showing much of the environment to the curious audience.
Vertical Camera Angles
So far our camera has been on an even plane with the object of interest – our actor’s head most often. In other words, if the head is four feet off the ground then our camera and its lens are also four feet off the ground (see Figure 2.24). We commonly refer to this value as the lens height. The lens height can also rise above or drop below the height of the subject, as we will see in the next section (see Figure 2.25).
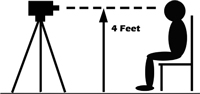
Figure 2.24 Camera height and angle of coverage traditionally fall at same height as subject’s head for a neutral angle on action.
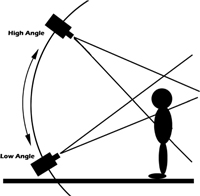
Figure 2.25 Vertical camera angles: high and low. Camera angles down or up to subject height.
The general guideline to follow is that the camera and its lens should be looking at the subject from the same horizontal plane as the subject’s eyes. This generates a neutral angle on action. The camera is positioned to observe the people, objects, or events from the same height as where the people exist or where the action takes place. The audience will relate to the characters as equals. Whether the subject is standing, sitting up in a tree, or laying stomach down on the ground, it is a good idea to place the camera at a similar height in order to maintain a neutral view (Figure 2.26). Once you raise the camera position above your actors or actions, or drop the camera below them, you begin to create a privileged point of view that deviates from how we might normally observe others in real life. These high and low angle shots usually result in a power dynamic within the frame and within the story itself. Let us explore both options.
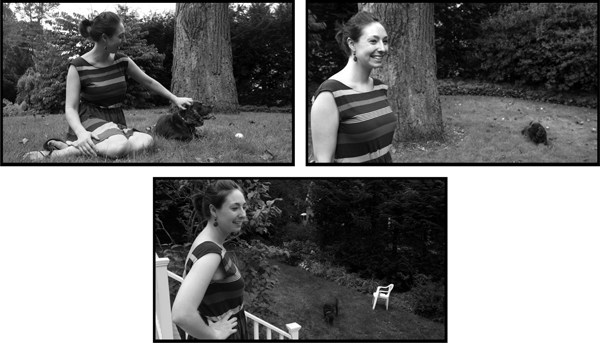
Figure 2.26 Regardless of subject height (distance from ground), the camera observes from the same neutral, height.
Shooting from a high angle means that you are covering a shot of a person or action from a higher vantage point. The camera is physically higher than the subject or the scene being recorded. Unlike a neutral shot, the lens is angled downward. Depending on the context of the shot in your story, there can be different implied meanings.
High Angle of an Individual
The grammar of a high angle shot of a character in a movie may be interpreted by the viewer to mean that who they are seeing on screen is small, weak, subservient, diminutive, or is currently in a less powerful or compromised position – perhaps both physically and thematically within the narrative. Through foreshortening and through “compressing” the character into the floor or ground underneath them, the camera’s frame “contains” the subject and makes him or her physically appear small and “trapped” (Figure 2.27). Alternately, one will also find that a slightly higher camera angle down on a subject yields a more pleasing line of the nose and jaw (think about why most people hold their camera up high when taking a self-portrait picture for their social networking profile). As a filmmaker you will often strive to make your talent look as good as possible and this small angle down might do the trick.
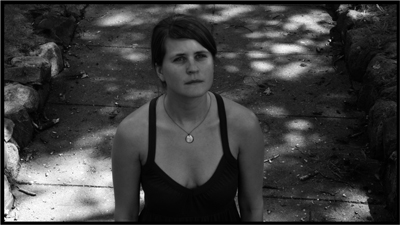
Figure 2.27 A high angle view of the subject. The background enclosing the figure creates a claustrophobic feeling.
What can it mean if the high angle shot represents a point-of-view from another character in the story? Literally, it simply shows that one character is physically up higher in the film space, looking down on the other character. Figuratively, this shot could mean that the higher character has the upper hand or does not think much of the other, lower character at this time. This POV may come from many entities such as a king, a giant, a judge, a dragon, or an alien spaceship. An up/down power dynamic is created. Of course, this scenario would require an answering shot up to the higher character and we’ll discuss that in the next main section on Low Angles.
High Angle of an Environment
Whenever there is a vast expanse of geography to show within your frame (think XLS or very wide shot) it can be helpful to have the camera elevated above the space. You can establish the layout of the space and the events going on within it if you have a higher angle view. The parade, the concert, the crowded beach, the epic medieval battlefield can all benefit from being shown from above but still within the “human scale” of observation (Figure 2.28). Were the camera to be neutral in one of these environments it puts the audience in the scene as one of the players – only the immediate vicinity could be viewed. Drop the camera lower and angle up and you now have a victim, a child or someone vulnerable observing the scene from a compromised position within it.

Figure 2.28 A high angle view of an environment, shows more information in an objective style.
If you place the camera very high, directly above the action, then you move into the realm of the bird’s-eye view or God view (Figure 2.29). This angle down on action is not something that a typical viewer is accustomed to seeing in their real-world experiences and therefore it will stand out in your visual style – for good or for worse. Watching from directly overhead really compresses the subject into the ground, almost like a two-dimensional ant, and this unnatural vantage point can create feelings of being observed by otherworldly entities (ghosts, angels, aliens, etc.).
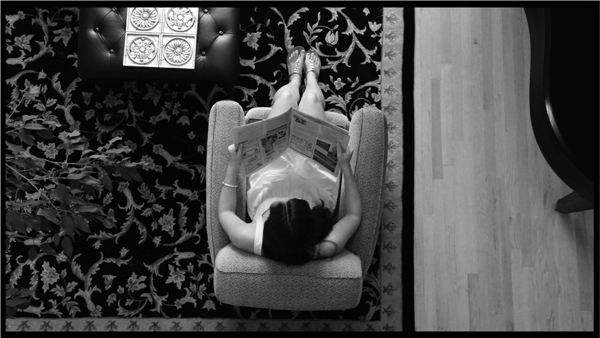
Figure 2.29 A bird’s-eye view of a subject.
Low Angle Shot
Let us now go in the opposite direction and drop the camera and lens below the neutral point and shoot from a lower angle up onto our person or action.
Low Angle of an Individual
As you may have already guessed, this angle on action usually generates the reverse feeling in your audience member to that of the high angle. On a psychological level, the character seen from below appears larger, more looming, more significant, and more powerful. It is part of the accepted film grammar that a shot from below implies that the person or object you observe from that angle has a substantial presence, is considered “larger than life,” or may, at that point in the narrative, have the upper hand (literally and figuratively) (Figure 2.30). Of course, this character may also simply be physically higher in the film space – running down a fire escape, climbing a ladder, etc.
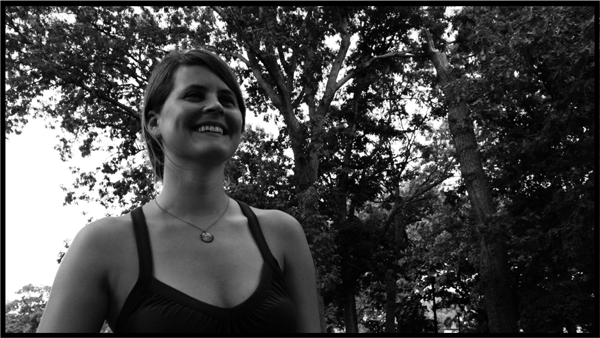
Figure 2.30 A low angle view up on to the subject.
Low Angle as a POV
The low angle as a POV shot also implies that the person (camera) doing that low angle observing is smaller, weaker, or in a more compromised position (think of a jungle adventure story where someone who fell into a pit trap is looking up at the person who set the trap for them – clearly a situation where the film space and narrative allow for the use of these shots). The low angle POV may also indicate awe or respect on the part of the observing character (think of a young person at the circus who longs to be a great aerialist one day looking up at the trapeze artist, or the bird watcher staring up at the majestically soaring birds in the sky). Again, it should be pointed out that sometimes a character is just at a lower elevation than other characters for the purpose of compositional balance in the frame. All of these views help to visually create a different energy and a different mood within the story and the viewing experience.
Low Angle of an Environment
Think of environments that could benefit from being seen at a low angle – perhaps a mountain range, a city skyline, or the interior of a giant cave. As a filmmaker, if you want to convey that a space is large and imposing then it can be helpful to show it from a lower camera angle (Figure 2.31). This can have greater effect if you incorporate your characters in the frame, as in an XLS or VLS. Their diminutive size compared to the looming environment will further underscore the expanse of the location.
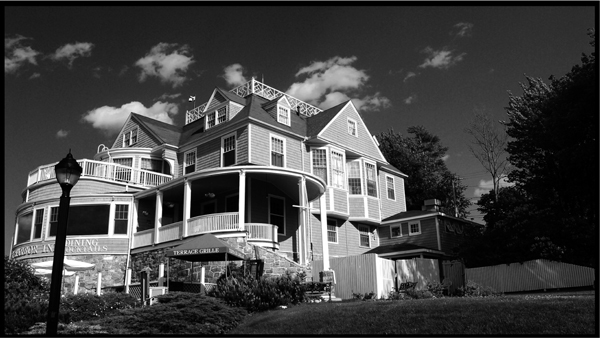
Figure 2.31 A low angle view of an environment.
At this point, it would be wise to draw a distinction between a low angle shot and a shot that has a neutral angle but is taken from ground level. The tilt of the actual camera lens determines what the shot becomes and what the viewer experiences because of that angle. If you are making an animated cartoon about a family of worms, and you frame them neutrally against blades of grass, then we get to see them as equals – on their plane (Figure 2.32). Seen often in children’s cartoons, the camera stays neutral to the height of the subjects (talking babies, cats, mice, etc.) and actually frames out the heads/faces of the adult humans – allowing the audience to make a connection with these smaller characters. But, if a giant boot heel looming over them suddenly imperils the worm family, then the camera could assume a low angle position shooting upwards on to the large foot overhead. This would yield a more diminutive POV from the worm’s endangered position below (Figure 2.33). Similar treatments of the low angle could be used for babies or dogs or people among giant beings, etc. when you wish to stress the size differences.
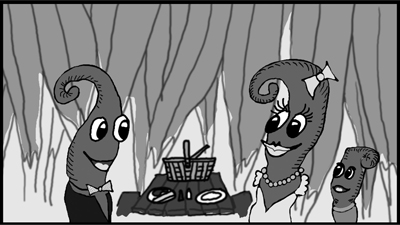
Figure 2.32 A neutral angle view of the worm family picnic.
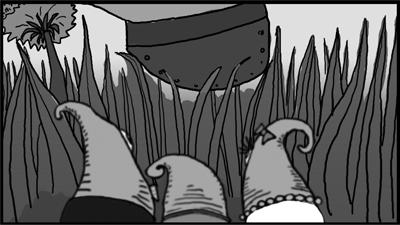
Figure 2.33 A low angle view of the threatened worm family. Look out!
The Two-Shot: Frame Composition with Two People
So far our basic shot types have been composed around one person. What happens when you need to include two people in a single frame? Well, as you have probably already guessed, you follow similar guidelines as used for the single subject. Headroom, look room, rule of thirds, balance of weighted objects, and so forth all apply to a shot that must encompass two people having some interaction. The nature of the physical interaction, of course, also helps dictate what type of framing must be used and what type of two-shot will be composed.
The Profile Two-Shot
Perhaps the most common variety of two-shot, the profile two-shot, is used quite often to help set up a dialogue between two people in a scene. A long shot or medium long shot will most successfully cover all of the action during the meeting of the two characters. As the figures are smaller and the environment is more prominent, the setting can be established and larger body movements may be covered, particularly if one character must hand something over to the other character – the object could also be seen in this framing. There are innumerable scenarios where a profile two-shot may be appropriate. Some examples are a meeting of two friends (Figure 2.34), a confrontation between two feuding characters (Figure 2.35), or a romantic dinner for two over a small, candle-lit table (Figure 2.36).
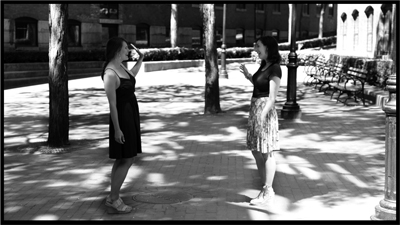
Figure 2.34 Profile two-shot as composed for the long shot.
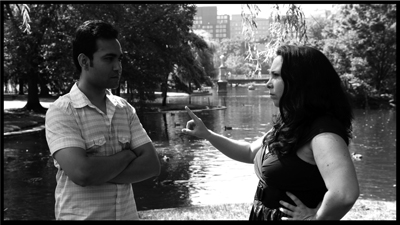
Figure 2.35 Medium shot brings the feuding characters very close together in this profile two-shot.
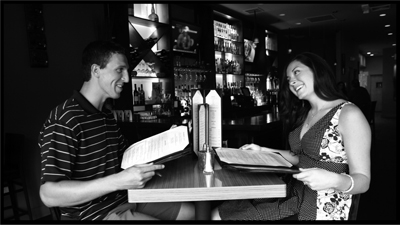
Figure 2.36 Profile two-shot as composed for the medium long shot.
When using a tighter framing to compose a profile two-shot (sometimes called a 50-50), you alter the implied meaning of the encounter by enclosing the characters in a much smaller space. A medium close-up or a close-up will force the characters’ faces together in an unnatural way, unless there is an obvious aggressive intention or an intimate overtone. On the basis of our previous examples, the confrontation (Figure 2.38) and the romantic dinner (Figure 2.39) may be good candidates for the medium close-up profile two-shot, but the meeting between the two friends may not be well served by that framing (Figure 2.37). Forcing the faces of two characters together in a tight frame, when there is no real reason to do so, can make the viewing audience feel subconsciously uneasy. For comedic purposes you could also unite two unlikely characters together in a tight frame, particularly if our hero is encountering a “close talker.” We get to feel his discomfort.

Figure 2.37 A casual meeting between two friends on the street seems a bit close in this MCU.

Figure 2.38 An aggressive confrontation works well in this tighter MCU.

Figure 2.39 An intimate occasion like this romantic dinner for two feels right at home in this MCU.
Whenever two people stand side by side and face the camera, you generate a more subjective shot. Their attention is toward the lens and not necessarily toward one another. An example of a truly subjective direct-to-camera two-shot would be two news anchors or sportscasters sitting side by side, addressing the viewing audience directly. A less subjective example would be two characters walking side by side down a city sidewalk approaching the camera (often called a “walk & talk”) (Figure 2.40), or perhaps two characters sitting in the front seats of a motor vehicle (Figure 2.41).
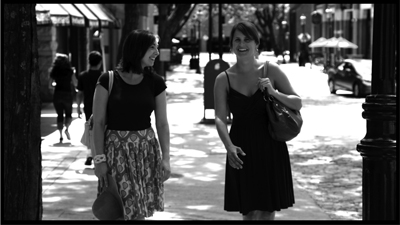
Figure 2.40 The medium long shot allows for ample room to move in this open to camera two-shot.
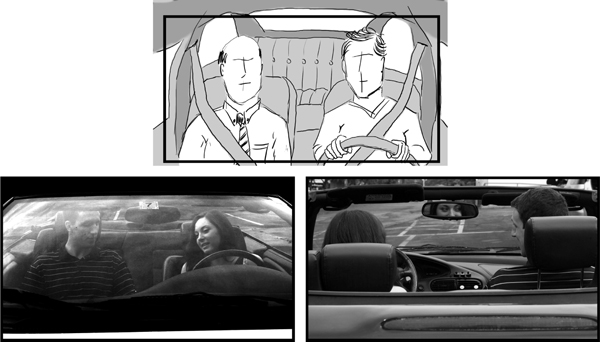
Figure 2.41 A very common type of direct to camera two-shot. The car’s interior dictates the distance between and placement of the two characters facing the same camera. Here we see the storyboard frame, a front on and a reverse view.
These subjects have their bodies and faces “opened up to” (that means facing) the camera. The audience is privileged to observe what they do, what they say, and how they react.
Either way, the framing for this type of shot must be wide enough to accommodate the shoulder width of the two people. The 16:9 wide-screen aspect ratio of HD video will certainly help with this, but an MS or MCU may be the closest shot types that could be used to adequately frame a direct-to-camera two-shot. Attempting to frame any tighter will necessitate the use of overlapping one body in front of the other. This establishes a visual “favor” for the character in the unobstructed frontal position. In this case, “favor” may establish a more dominant character in the story, or it may just prove a convenient way of seeing a more intimate view of faces within one shot. Sometimes it is easiest to have the shorter talent in front and the taller one behind (Figure 2.42).
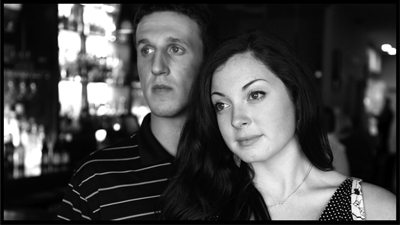
Figure 2.42 Achieving a two-shot open to camera in this tight MCU requires overlapping the subjects’ bodies.
The Over-the-Shoulder Two-Shot
This shot looks like its name – while recording a dialogue scene you place the camera behind one character (A) and shoot over his shoulder to see the face of the other character (B). The backside of character A’s head and shoulder form an “L” shape at either left/bottom or right/bottom of frame, depending on which side you have placed him (Figures 2.43 and 2.44).
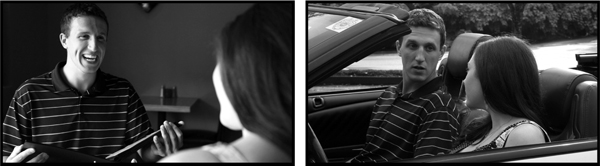
Figure 2.43 Examples of over-the-shoulder shots for Character A.
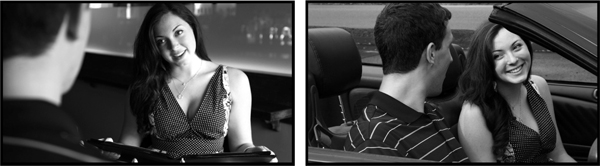
Figure 2.44 Examples of over-the-shoulder shots for Character B.
This is a form of overlapping composition and is most often edited into a scene after the audience has first viewed an establishing shot and a wider profile two-shot. These preceding shots establish the location and the two characters involved in the dialogue.
An OTS shot allows the audience to focus more attention on the visible subject, what he says and his reactions to what the other character says. Of course, you would eventually shoot the matching OTS from character B onto A so you could alternate back and forth in the edit if needed. In both previous versions of the two-shot, an audience member could choose which character’s face they would look at and when, but with the OTS the filmmaker decides that for them – for emphasis and/or for further character or story development.
An over-the-shoulder two-shot may be composed appropriately within a variety of shot types ranging from the long shot to the medium close-up and may or may not contain multiple characters (see OTS reference under 3/4 Back View in this chapter). Sometimes, as in Figure 2.45, the camera height is dropped and it shoots from behind the waist, hips, or thighs of a character, especially if they are carrying something of visual or dramatic interest at their side (a letter, gun, bouquet of flowers, etc.). The most commonly used framing, however, is the MCU (Figures 2.43 and 2.44). It allows for proper composition of the body, equal headroom, and maintains the screen direction of the “look” from one character to the other. The wider aspect ratio of 16:9 may allow for a tighter framing of an OTS, but it might run the risk of compromising good composition in favor of more facial detail – you won’t know until you try it with your camera and your particular actors. A standard “clean” single close-up may be more appropriate.

Figure 2.45 Camera height has dropped in this modified over-the-shoulder shot. The foreground object is important to the story line as is seeing the look on this subject’s face.
If you wish to get a small slice of character A in a shot of character B, but you do not want a full OTS or a “clean” single, you may compose what is called a “dirty” single (Figure 2.46). This slice of A in the shot helps keep the viewer oriented. As with any of these shots that incorporate a bit of head or body of the non-favored subject, you have to be extra careful with their placement and movement. Even the slightest gesture or head nod could disrupt the shot’s composition. Be clear in your need for relative stillness when you discuss the shot with your talent.
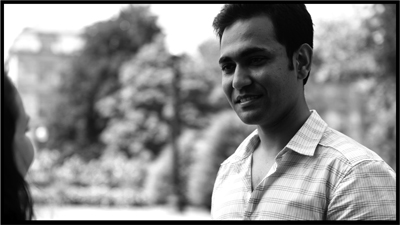
Figure 2.46 Just a slice of Character A is visible in this “dirty” single.
Additionally, as a filmmaker, you may have to ask your talent to stand unnaturally close to one another in order to achieve the two-shot framing you are seeking. This holds especially true for the over-the-shoulder shot or any tighter 50-50. For the actors it may feel strange, but on the recorded image the distance will look appropriate to the viewing audience. Also, depending on the scene, the players, and your camera placement/lens, you may have to ask the actors to stand or sit further apart, higher, or lower, in order to make the shot composition look correct for your needs. Just be aware that in cinematic language, proximity and grouping equate a unity between characters. The family of “two-shots” is an integral part of your standard scene coverage and the OTS may often be the best choice for recording different angles of the same conversation between two characters.
The Power Dynamic Two-Shot
We call this an “up/down” in a two-person profile shot. One character (A) is placed higher in the frame while the other character (B) is placed lower on the opposite side of frame (Figure 2.47). Even though the camera angle is neutral in this special two-shot, a power dynamic is created. As you will read further in Chapter Seven, the subtext of this shot tells us that the higher character has the “upper hand.” The OTS coverage will clearly call for the use of high angle and low angle answer shots, further underscoring the significance of this composition within the story.

Figure 2.47 The character whose head is placed higher in the frame has control of this scene.
Much as the standard two-shot works for two people, the “linear” three-shot can show three people standing side by side – especially with the widescreen aspect ratio of HD (Figure 2.48). The shot types capable of comfortably generating this framing range from the XLS up to the MCU. Think of the three contestants on a game show, three news anchors at the desk, or three friends walking down a school hallway. You may use similar guidelines for headroom and the rule of thirds. This shot could apply to both subjective and objective shooting styles.

Figure 2.48 The three figures fit comfortably in this “linear” three-shot.
If you were to put one person in the back seat of the vehicle shown in Figure 2.41, then you would have created another flavor of direct-to-camera three-shot. A triangle of connectivity is now present and the audience can play with the energy generated by bouncing attention from one to the others in this composition (Figure 2.49). You will find that geometric shapes (lines, triangles, squares, ellipses, etc.) are used quite often in visual communications. We discuss these more completely in the next chapter.
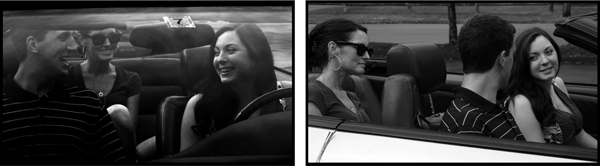
Figure 2.49 The triangle shape created by the three heads generates energy lines for the audience to follow.
OTS three-shots are also possible when you are shooting coverage for a three-person dialogue, but generating two-shots can pose problems for the editor. A linear three-person OTS relies heavily on figure overlapping within the frame and can look rather “stagey” (Figure 2.50). A high or low angle three-shot OTS will create the same power dynamic as the triangular two-shot version (Figure 2.51).

Figure 2.50 Tight framing and tight talent blocking can generate this three person OTS.

Figure 2.51 Camera angle and triangular composition provide extra meaning to this OTS three-shot.
Wrapping up the Basics of Composition
The basics of frame composition are relatively simple. We have demonstrated them using several basic shot types covering one person placed “creatively” within the frame. The various two-shots introduce a second subject into the frame but still follow similar framing guidelines, and so it goes for the three-shot as well. The basics of composition will apply to any of the wide variety of shot types and to any objects that you need to record. When you create a shot of a vase with flowers, a cat, or a lone planet floating in space, you should consider the same guidelines of composition – headroom, look room, rule of thirds, camera angle, etc. Once you know the shot types, the basics of framing, and the power behind camera angles, you are well on your way to using our shared film language to make well-balanced images for your motion pictures – whatever the project may be.
- Provide appropriate headroom for each shot type.
- Decide whether a subjective (to camera lens) or objective (not to camera lens) shooting style is more appropriate for your project.
- Create ample look room/nose room for your subject to balance the weight of the frame.
- Follow the rule of thirds and place important objects along the one-third lines within the frame, both horizontally and vertically, and at their intersections.
- Choose a horizontal camera angle around your subject for more meaningful coverage (the 3/4 profile being the most popular).
- Shoot from a neutral, high, or low vertical camera angle to inform an audience about a character’s “power dynamic.”
- Profile and direct to camera two-shots work best from long to medium shots, but over-the-shoulder two-shots may work best from the medium close-up.
- A “dirty” single contains only a small portion of the other character in the scene. Good for audience reference but may pose a continuity problem for the editor.
- A power dynamic can be generated while using a neutral camera angle on a profile two-shot if you place one character higher in the frame.
- The three-shot can add a triangular energy pattern to your composition.
Chapter Two – Exercises & Projects
- With whatever camera you have access to, practice framing a single human subject in all shot types, paying particular attention to your angle on action, rule of thirds, headroom and nose room, etc.
- Shoot still picture storyboards of two people having a conversation:
- Across a table from one another
- Walking side-by-side down a street or hallway (either leading them or following them – for extra information on this, you may wish to skip ahead to Chapter Six, Dynamic Shots)
- Find two actors of differing heights and shoot them in a standing profile two-shot and then try to figure out the best approach for getting matching over-the-shoulder shots of each. Or simply have one actor stand and one sit and shoot their matching OTS shots.
- If you wanted to make a character in your story look subordinate or diminutive, where might you want to put the camera in relation to his/her body?
- In a scene involving only one character, why might you choose to compose a frame shooting over that person’s shoulder?
- Why might you want to shoot a character in profile?
- The cartoon you are animating starts where a little girl gets lost in a big jungle. In your shot composition, how could you visually indicate her feelings of being alone and small?
- At what level, or height, would the majority of neutral shots of people be recorded? Why?
- What possible scenarios would benefit visually from uniting the heads of two people in a profile CU?
- What is the difference between a “clean” single and a “dirty” single?