
The
OAuth protocol became one of the dominant ways to perform authorization in the emerging amount of web applications and services. The final draft of v1.0 was released in 2007. In 2009, v1.0a was published to fix a security flaw known as session fixation.
In October 2012, OAuth 2.0 was released. It is not backward compatible with OAuth 1.0a. OAuth 2.0 received a lot of negative criticism, even though some of the major providers (such as Google or Facebook) support OAuth 2.0 already. Furthermore, the new protocol specification leaves too many open points to the implementer, which makes it somewhat hard to apply a generic approach to.
In this recipe, we will cover the OAuth 1.0a protocol and how it can be used to authorize your access to the Twitter API.
The scenario that we will try to achieve is a standalone application that reads tweets on a user's behalf:
- First of all, you need to register your application (script) with Twitter through this page https://dev.twitter.com/apps/new. Obviously, before you can do it, you should also sign up for a Twitter account. After you registered your application, you will get a unique consumer key and consumer secret values that you will need to identify your application.
- That's only half of the story, because now you need to get an access token and a token secret from the user, on whose behalf you are going to access Twitter's API. In order to do that, we will use the
oauth-signpostlibrary (http://code.google.com/p/oauth-signpost/) that offers lightweight support for the OAuth 1.0a protocol. - The following script performs the application authorization flow, which involves interaction with a user who needs to open the authorization URL in his browser, accept the authorization request, and give a generated PIN code back to the script:
@Grab('oauth.signpost:si parentFilegnpost-core:1.2.1.2') import oauth.signpost.basic.DefaultOAuthConsumer import oauth.signpost.basic.DefaultOAuthProvider import oauth.signpost.OAuth def consumer = new DefaultOAuthConsumer('...', '...') def provider = new DefaultOAuthProvider( 'http://twitter.com/oauth/request_token', 'http://twitter.com/oauth/access_token', 'http://twitter.com/oauth/authorize') String authUrl = provider. retrieveRequestToken( consumer, OAuth.OUT_OF_BAND ) println "Open this URL in the browser: ${authUrl}" print 'Authorize application and enter pin code: ' def pinCode = null System.in.withReader { pinCode = it.readLine() println() } provider.retrieveAccessToken(consumer, pinCode) println "Access token: ${consumer.token}" println "Token secret: ${consumer.tokenSecret}" - While executing, the script will print the authorization URL, which you should open in your browser.
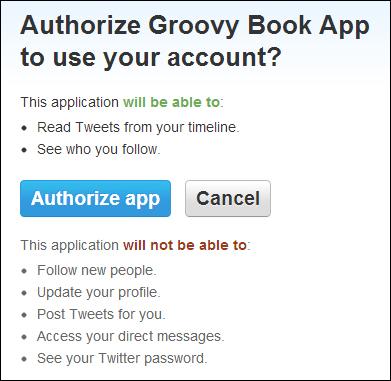
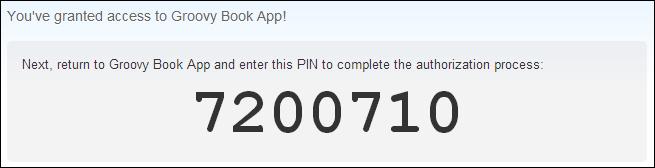
- After you pressed the Authorize app button, you are supplied with a PIN code that you should submit back to the running script console, which is waiting for user input.
- Eventually the script will print the access token and token secret that can be used to call Twitter's API in the script described in the next section.
Now, we are ready to send authorized requests to twitter through our script:
- First of all we need to import the
RESTClientclass, which is part of theHTTPBuilderlibrary:@Grapes([ @Grab( group='org.codehaus.groovy.modules.http-builder', module='http-builder', version='0.6' ), @Grab('oauth.signpost:signpost-commonshttp4:1.2.1.2'), @Grab('oauth.signpost:signpost-core:1.2.1.2') ]) import groovyx.net.http.RESTClient - Then we need to define the variables that hold our security keys, tokens, and secrets:
def consumerKey = '...'
def consumerSecret = '...'
def accessToken = '...'
def tokenSecret = '...'
For obvious reasons, you need to add your own values.
- After that, we can create a
RESTClientinstance:def url = 'https://api.twitter.com/1.1/statuses/' def twitter = new RESTClient(url)
- Then we need to set
OAuthdetails in the following way:twitter.auth.oauth(consumerKey, consumerSecret, accessToken, tokenSecret) - Now, we are ready to use the Twitter's API and call operations to retrieve JSON data with tweet information:
println twitter.get(path : 'mentions_timeline.json').data
Under the hood, HTTPBuilder uses the oauth-signpost library to sign HTTP requests with OAuth-specific headers. This gives the ability to access the public APIs on behalf of a user. It is important to understand that, for each new application (consumer) and for each different Twitter user you need a separate set of keys, tokens, and secrets. If your script needs to access different user data on their behalf, then you need to generate a new access token and a token secret, which requires the active involvement of the user.