
In this chapter, we will cover some more advanced Groovy features. Coincidentally, these are also the features that, along with closures, allow us to extend and manipulate the language in order to create DSLs. We will cover a lot of ground in this chapter, including the following important features:
Named parameters
To begin, we will look at this simple but effective feature, and see how Maps passed as parameters act as named parameters to a method.
Builders
We will cover how to use Groovy builders to rapidly construct anything from web pages and XML to Swing UIs. While looking at Groovy builders, we will also introduce the native Groovy support for tree-based DOM structures, by looking at the built-in
GPathoperators in the Groovy language.SwingBuilder
We will add a quick and simple UI to our Twitter DSL, by using the
SwingBuilderclass.Method pointers
We will cover method pointers as a useful way to create aliases.
Meta Object Protocol
We will cover the inner workings of Groovy's Meta Object Protocol (MOP).
How Builders work
Once we have covered the concepts behind the MOP, we will revisit Groovy Builders to understand how they are implemented using features from the MOP.
ExpandoMetaClassFinally, we will take a look at the
ExpandoMetaClass, which is one of the most interesting Groovy classes as it provides the keys to dynamically change the behavior of any existing class, including Java classes, on the fly.
We have touched upon the concept of named parameters already. In a previous chapter, we looked at how Groovy allows us to construct a POGO by using a default built-in constructor that accepts a Map argument. We can construct a POGO by passing an inline Map object to the constructor. Groovy uses the map object to initialize each property of the POGO in turn. The map is iterated and the corresponding setter is invoked for each map element that is encountered.
class POGO {
    def a = 0
    def b = 0
    def c = 0
}

def pogo1 = new POGO(a:1, b:2, c:3)

assert pogo1.a == 1
assert pogo1.b == 2
assert pogo1.c == 3

def pogo2 = new POGO( b:2, c:3)

assert pogo2.a == 0
assert pogo2.b == 2
assert pogo2.c == 3

def pogo3 = new POGO(b:2, a:3)

assert pogo3.a == 3
assert pogo3.b == 2
assert pogo3.c == 0
When we pass a Map object to a constructor, the parentheses [] can be left out. We can also list the property values in any order we like. If a property is excluded, the corresponding setter will not be called, so its default value will be preserved.
Groovy also allows the same parameter-passing scheme to be used with method calls. If we invoke a method and pass a list of map elements in the same fashion as above, Groovy will collect the map elements into a Map object and pass this to the method as the first parameter. Parameters passed in this way are generally known as named
parameters. The key that we use for each parameter provides a name for the parameter, which otherwise is anonymous.
def namedParamsMethod(params) {
assert params.a == 1
assert params.b == 2
assert params.c == 3
}

namedParamsMethod(a:1, b:2, c:3)
If the method has other parameters, Groovy allows the map entries to be placed before or after the other parameters. The map entries will still get collected and passed as the first argument.
def namedParamsMethod(params, param2, param3) {
assert params.a == 1
assert params.b == 2
assert params.c == 3
assert param2 == "param1"
assert param3 == "param2"
}

namedParamsMethod("param1","param2",a:1, b:2, c:3)
In fact, the map entries can be interspersed among the other parameters in any order we like. Groovy will collect the map entries and pass them as the first parameter. It will then scan the rest of the parameters from left to right and assign them to the subsequent parameters of the method. We can also drop the method call parentheses, which allows us to invoke the method call as follows:
namedParamsMethod a:1, "param1", b:2, "param2", c:3
These features combine neatly together for use in a DSL. Consider a method call to transfer funds from one account to another for a customer. The conventional way to layout parameters to a method is in the order of their importance from a programming logic point of view. So we declare the customer as the first parameter, as this is the primary object that we are operating on. We follow this with the accounts we are operating on, and finish up with the amount to transfer.
def transfer( customer, from_account, to_account, amount) {
println """debiting ${amount} from ${from_account} account,
crediting ${to_account} account for ${customer}"""
}

transfer("Joe Bloggs", "checking", "savings", 100.00)
Reading the method call does not provide an immediate clarity as to the function of all of the parameters. So we will only know for sure that savings is the receiving account by checking the method documentation to see that the third parameter is the receiving account. What if we make a small change to this method and have it accept named parameters instead?
def transfer( transaction, amount) {
    println """debiting ${amount} from ${transaction.from} account,
 crediting ${transaction.to} for ${transaction.for}"""
}

transfer 100.00, from: "checking", to: "savings", for: "Joe Bloggs"
transfer for: "Joe Bloggs", 200.00, from: "checking", to: "savings"
Now our method call even starts to look like English. We also have a good degree of flexibility in the order that we place the named parameters and where we place the amount parameter; so if we like we can turn the call into something that looks like English.
transfer 100.00, from: "checking", to: "savings", for: "Joe Bloggs"
Being able to clarify exactly what a parameter means is a very useful technique to use in a DSL. Not only does it improve the readability of the DSL but it can also remove potential ambiguities. Looking back at our GeeTwitter
DSL from the last chapter, we had a sendMessage call, which sends a text message to a Twitter user. Both the message parameter and the user id parameter were defined as strings, which of course could lead to ambiguity in the calling sequence.
def sendMessage(id, message) {
    println "Sending (${message}) to ${id}"
}

// Correct
sendMessage "GroovyDSL", "Hi from GeeTwitter"
// Incorrect
sendMessage"Hi fromGeeTwitter", "GroovyDSL"
The second invocation here would of course cause an exception in the real GeeTwitter as we try to send a message to a user called "Hi from GeeTwitter" instead of to GroovyDSL. A small change removes this ambiguity and improves the readability of the DSL.
def sendMessage(id, message) {
    println "Sending (${message}) to ${id.to}"
}

// Correct
sendMessage to: "GroovyDSL", "Hi fromGeeTwitter"
// Correct – order is no longer important
sendMessage"Hi fromGeeTwitter", to: "GroovyDSL"
It might seem a little redundant or inefficient, from a programming point of view, to package a single value in a map. However, even though we are only going to pass the single value to a parameter along with a message parameter, naming this to parameter adds significantly to the resulting DSL script in terms of legibility.
Much of what we do in writing software involves construction or assembly of some sort or other. It could be building a graphical user interface, constructing a file to be saved on disk, or structuring a response to be sent to another system through a web services request. A lot of coding effort is dedicated to getting the structure of what we are building correct. Web pages need to be structured correctly in order to be displayed in a browser. XML-based files and responses to service requests need to be well-formed or they will cause validation exceptions. Building rich client UIs is an art in itself with each client framework—such as Swing or SWT—having its own arcane API to work with.
Beyond the complexities of the structures that we build, the pattern of construction and the order of initialization imposed by different APIs bring their own constraints. This alone will often obfuscate the structure of what we are building by burying it deep within boilerplate code. In addition to this, the classes of object that we need to construct may be of similar nature and have different means of construction.
It would be useful to have a means of constructing objects such that the method of construction was hidden. Enter the builder design pattern. The concept of a design pattern comes originally from the architectural profession in the late 1970s. In building architecture, a design pattern refers to the reuse of design solutions for similar problems. In office complexes, the collocating of stairwells, elevators, and bathrooms around central service columns is a typical design pattern.
Using such a design pattern, architects designing large office buildings can quickly lay out floor after floor of the building by repeating the layouts around the service columns on each floor. This leaves more time and effort to be expended on developing the functional work areas and aesthetics of the building. This not only benefits the architect but also benefits the user of the building.
No matter where we travel, whether it is to Bangkok, San Francisco, Paris, or London, it's usually not too difficult to find a bathroom presuming we can remember how to find our way back to the elevator that we came up in. When we do, we are benefiting from the application of a design pattern.
Design patterns are seldom invented. Instead, they are usually observed in existing buildings and catalogued. Good design evolves over time and is repeated again and again. By exploiting existing design patterns, the architect can rely on the experience of generations of previous building projects and be sure that at least these elements of the building will work as expected.
Design patterns began to be observed and catalogued in software engineering in the late eighties. Ward Cunningham and Kent Beck wrote one of the first conference papers on the subject at OOPSLA 1987. By 1994, the seminal work by Eric Gamma, Richard Helm, Ralph Johnson, and John Vlissides—Design Patterns: Elements of Reusable Object-Oriented Software—was published, which catalogued over 20 reusable design patterns, including the Model View Controller (MVC) and Factory and Builder patterns.
These authors were not claiming to have invented all of these patterns. For each of the patterns, they listed source systems where the patterns could be observed in use. Some came from ET++, an object-oriented framework developed by Gamma and others at Taligent. Many of the patterns, including MVC and Builder, originated from the Smalltalk language and framework.
We will focus our attention on the builder design pattern. The builder pattern originates from the Parser, ClassBuilder, and ByteCodeStream classes in Smalltalk. Gamma and the others describe its intent in their book as to "separate the construction of a complex object from its representation so that the same construction process can create different representations". The builder pattern has four components:
Builder
This is an abstract interface, which specifies the methods that are needed to create the parts of a final product (file, UI, and so on). In the following figure, the
buildPartmethod is listed, but a Builder could implement any set of methods that describe the production process of an object or a class of objects.ConcreteBuilderThis is the concrete implementation of the builder interface, which is capable of building a specific product. The
ConcreteBuilderimplements the abstract builder methods and hides the complexities.Director
This is the code or class that constructs a particular product by using the builder interface methods.
Product
This is the end result of the building process. It could be a file (XML, text, CSV, and so on), a UI (Swing, SWT), or markup (XML, HTML).

An important and powerful part of Groovy is its implementation of the Builder pattern. In the UML diagram of the Builder pattern above, we would expect that the Director component might be implemented through a Director class. The Groovy implementation goes beyond this by providing a mini DSL, which appears to embed the building process right into the language.
This style of markup is known as GroovyMarkup, and whose code looks more like a customized markup script than a regular Groovy script. This is due to the clever use of the Groovy's Meta Object Protocol (MOP) and closures.
At first glance, Groovy's builders defy our understanding of how things should work in an object-oriented language. We no longer seem to be creating objects and invoking methods as we would expect. For this section, let's suspend our disbelief and just enjoy the power that Groovy builders provide.
Here we will just try to understand how to use GroovyMarkup to build things. Later on in the chapter, we will cover how the MOP works, and it will become clear what tricks are being employed by the Groovy designers in order to give us a very neat way of constructing complex objects.
The best way to illustrate the GroovyMarkup feature is by way of an example. We'll start with something simple. Suppose that we need to export customer records from our e-commerce package in such a way that they can be used to initialize the customer database of a new CRM system that has been installed by us. The CRM system accepts customer records formatted in XML with customer IDs, names, and addresses. The XML required might look like this:
<customers>
  <customer id='1001'>
    <name firstName='Fred' surname='Flintstone' />
    <address street='1 Rock Road' city='Bedrock' />
  </customer>
  <customer id='1002'>
    <name firstName='Barney' surname='Rubble' />
    <address street='2 Rock Road' city='Bedrock' />
  </customer>
</customers>
Constructing this simple snippet of XML in Java requires numerous method calls to create XML elements and to set attributes of these elements. The nested structure of the document would need to be explicitly constructed by appending some elements as children of other elements. By the time that we are done coding, the procedural nature of the construction process means that the code doing the markup bears no resemblance to the end result XML.
Consider the GroovyMarkup equivalent. The following is an actual self-contained script, which outputs the previous XML to the command line. Run this in the Groovy Console and you will see what it does.
def builder = new groovy.xml.MarkupBuilder()

def customers = builder.customers {
    customer(id:1001) {
        name(firstName:"Fred",surname:"Flintstone")
        address(street:"1 Rock Road",city:"Bedrock")
    }
    customer(id:1002) {
        name(firstName:"Barney",surname:"Rubble")
        address(street:"2 Rock Road",city:"Bedrock")
    }
}
The striking thing about the previous code snippet is that, unlike the Java code required to do the same, this snippet is remarkably similar in structure to the XML that is output. In this example, we are using the MarkupBuilder class from the groovy.xml package. MarkupBuilder is one of the several builder classes provided out of the box as part of the Groovy jars. MarkupBuilder can be used to effortlessly build XML- and HTML-formatted output. What we are in fact looking at is a series of nested closures, one within the other. The nesting of the closures exactly matches the tree-like structure of the desired XML output.
The same code can be modified to write the XML to a file, by constructing MarkupBuilder with a FileWriter object, as follows:
def builder = new groovy.xml.MarkupBuilder(
                      new FileWriter("customers.xml"))

def customers = builder.customers {
    customer(id:1001) {
        name(firstName:"Fred",surname:"Flintstone")
        address(street:"1 Rock Road",city:"Bedrock")
    }
    customer(id:1002) {
        name(firstName:"Barney",surname:"Rubble")
        address(street:"2 Rock Road",city:"Bedrock")
    }
}What if we would like to create namespaced XML? In GroovyMarkup, tags conform to the method call syntax. So how can we do that if namespace:tag is not a valid Groovy method name? Fortunately, there is a way around this. In order to insert the colon into a tag name, we simply surround the element name in quotes. Groovy allows us to invoke a method by using a string in place of the method name, so "myMethod"() is treated the same as myMethod().
def xml = new groovy.xml.MarkupBuilder()

def params = [:]

params."xmlns:bk" = "urn:loc.gov:books"
params."xmlns:isbn" = "urn:ISBN:0-393-36341-6"

def bk_tag = "bk:book"
xml."bk:book"(params) {
    "bk:title"("Cheaper by the Dozen")
    "isbn:number"(1568491379)
}
Here we are using the strings' references to set the xmlns namespaces for bk and isbn. Then we use strings to declare the element names in our markup. All of this results in the following output:
<bk:book xmlns:bk='urn:loc.gov:books' xmlns:isbn='urn:ISBN:0-393-36341-6'>
  <bk:title>Cheaper by the Dozen</bk:title>
  <isbn:number>1568491379</isbn:number>
</bk:book>
This technique is not limited to namespaces. We can use it anywhere that we need to output a character in a tag name, which would otherwise not be valid as a Groovy method name (for instance, hyphenated element names). Any Groovy string can be used as an element name, so the following is also valid, where we use ${book_title} to paste the tag name into the markup from a local variable:
def xml = new groovy.xml.MarkupBuilder()

def book = "bk-book"
def book_title = "bk-title"

xml."${book}" {
    "${book_title}"("Cheaper by the Dozen")
    "isbn-number"(1568491379)
}
The MarkupBuilder class will slavishly emit whatever we ask it to. In the previous code snippet, we are creating namespaces by using standard markup with the MarkupBuilder class. A more elegant way of creating namespaced XML is by using the StreamingMarkupBuilder class, which has built-in support for namespaces.
StreamingMarkupBuilder decouples the output of the markup from the creation of the markup closure. We then bind the closure to the StreamingMarkupBuilder at the time at which we want the output to take place.
def xml = new groovy.xml.StreamingMarkupBuilder()

def markup = {
    customers {
        customer(id:1001) {
            name(firstName:"Fred",surname:"Flintstone")
            address(street:"1 Rock Road",city:"Bedrock")
        }
        customer(id:1002) {
            name(firstName:"Barney",surname:"Rubble")
            address(street:"2 Rock Road",city:"Bedrock")
        }
    }
}

println xml.bind( markup )
Within the closure, we can reference a variable, mkp, which allows us to give instructions to the builder in order to control XML generation. Two handy methods we can invoke are xmlDeclaration(), which causes the XML declaration header to be output, and declareNamespace(), which sets up a namespace.
def xml = new groovy.xml.StreamingMarkupBuilder().bind
{
    mkp.xmlDeclaration()
    mkp.declareNamespace('bk':'urn:loc.gov:books')
    mkp.declareNamespace('isbn':'urn:ISBN:0-393-36341-6')

    println mkp.class

    bk.book {
        bk.title("Cheaper by the Dozen")
        isbn.number(1568491379)
    }
}

println xml
Once we have made the builder aware of our namespaces, we can utilize them in the markup code by using suffix notation. So namespace.tag will be output in the XML as namespace:tag, as follows:
<?xml version="1.0"?>
<bk:book xmlns:bk='urn:loc.gov:books' xmlns:isbn='urn:ISBN:0-393-36341-6'>
   <bk:title>Cheaper by the Dozen</bk:title>
   <isbn:number>1568491379</isbn:number>
</bk:book>
GroovyMarkup is nothing more than method call syntax combined with closures and named parameters. But in effect these Groovy syntactical features are combined to produce a new DSL syntax for GroovyMarkup with its own rules. Let's look in detail at the syntax from the previous examples.
def customers = builder.customers {
...
To begin with, we define the root node of our XML by invoking MarkupBuilder.customers() on the builder object. This causes a root customers tag to be output into the XML stream and the code. The tag is not closed off until the following closure is executed. This looks and behaves like a customer method taking a closure as a parameter even though there is no such method.
Nested within the closure we come across more methods, such as calls to customer, title, name, and address.
customer(id:1001) {
...
This method call will cause a new nested customer tag to be output into the XML stream with an id attribute set to 1001. Once again, the tag is not closed off until the closure is executed, during which more method-like calls are encountered.
title("Mr")
name(firstName:"Fred",surname:"Flintstone")
address(street:"1 Rock Road",city:"Bedrock")
No methods exist for customers, customer, title, name, or address. The MarkupBuilder, in conjunction with its base BuilderSupport class, uses the Groovy MOP to make all of this work as if by magic. The beauty of this approach is how intuitive the resulting code is, because it closely reflects the resulting markup. All we need to remember is that pseudo method call syntax will create a tag, and named parameters will be inserted as attributes in the resulting output.
The parameters passed follow the same conventions that we discussed earlier in relation to named parameters. In this case, all named parameters are collected and become the attributes of the element. We should only pass one additional parameter, which is used as the body of the tag/element.
We can try to understand GroovyMarkup in the context of the builder pattern described earlier.
Builder
MarkupBuilderis derived from theBuilderSupportclass, which is the Builder component of the pattern.ConcreteBuilderIn this case,
MarkupBuilderclass is theConcreteBuilder, which is designed to handle all XML-style nested tag formats delineated by angled brackets.Director
The director is the
GroovyMarkupcode itself, as illustrated earlier.Product
The product is the XML streamed directly to standard output or to the
Writerwe specify when constructing theMarkupBuilderobject.
With MarkupBuilder, it's also just as easy to build HTML pages. Here we generate a simple HTML page:
def html = new groovy.xml.MarkupBuilder()

html.html {
    head {
        title "Groovy Builders"
    }
    body {
        h1 "Groovy Builders are cool!"
    }
}
In the next example, we build a more complex HTML page containing nested tables. MarkupBuilder will close all tags correctly so that they are well formed. A classic mistake when working with nested tag formats is to misplace or unbalance the closing of tags. The HTML <table> tag and its nested <tr> and <td> tags are highly prone to error when hand-coded. Assume that we want to generate HTML to display the names of the various Groovy Builder and ConcreteBuilder classes in a nested table.
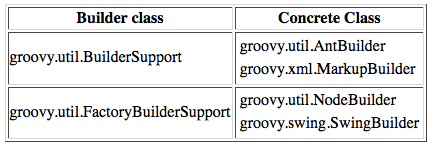
The HTML to produce this table would be something like the following:
<html>
<body>
 <table border="1">
  <tr>
    <th>Builder class</th>
    <th>Concrete Class</th>
  </tr>
  <tr>
    <td>groovy.util.BuilderSupport</td>
    <td>
      <table>
        <tr><td>groovy.util.AntBuilder</td></tr>
        <tr><td>groovy.xml.MarkupBuilder</td></tr>
       </table>
      </td>
  </tr>
  <tr>
    <td>groovy.util.FactoryBuilderSupport</td>
    <td>
      <table>
        <tr><td>groovy.util.NodeBuilder</td></tr>
        <tr><td>groovy.swing.SwingBuilder</td></tr>
       </table>
      </td>
  </tr>
 </table>
</body>
</html>
Although the HTML above looks correct, one of the TABLE tags is incorrectly terminated as </td>. Displaying the above code in a browser would show an extra layer of nesting in the TABLE that was not intended. The same HTML can be generated using MarkupBuilder as shown in the following listing:
def html = new groovy.xml.MarkupBuilder()
html.html {
    head {
        title "Groovy Builders"
    }
    body {
        table(border:1) {
            tr {
                th "Builder class"
                th "Concrete class"
            }
            tr {
                td "groovy.util.BuilderSupport"
                td {
                    table {
                        tr {
                            td "groovy.util.AntBuilder"
                        }
                        tr {
                            td "groovy.xml.MarkupBuilder"
                        }
                     }
                }
            }
            tr {
                td "groovy.util.FactoryBuilderSupport"
                td {
                    table {
                        tr {
                            td "groovy.util.NodeBuilder"
                        }
                        tr {
                            td "groovy.swing.SwingBuilder"
                        }
                     }
                }
            }
        }
    }
}
In the Groovy version, all of the tags that are produced are guaranteed to be correct with respect to nesting and balancing. The Groovy version also looks much less cluttered and readable. In fact, it is impossible for us to make the same type of errors with the Groovy version, as the compiler will insist that all parentheses are properly balanced.
So far we have just used Groovy builders as straightforward markup scripts. In spite of the unusual syntax, GroovyMarkup scripts are still just plain Groovy scripts; so there is nothing stopping us from mixing the construction process with regular program logic if we please. Here we iterate over a list of customer data while generating XML from the customer records that we find.
def builder = new groovy.xml.MarkupBuilder()

class Customer {
    int id
    String firstName
    String surname
    String street
    String city
}
def fred = new Customer(id:1001,firstName:"Fred", surname:"Flintstone",
street:"1 Rock Road",city:"Bedrock")
def barney =  new Customer(id:1002,firstName:"Barney", surname:"Rubble",
street:"2 Rock Road",city:"Bedrock")
def customerList = [ fred, barney]

def customers = builder.customers {
    for (cust in customerList) {
        customer(id:cust.id) {
            name(firstName:cust.firstName,surname:cust.surname)
            address(street:cust.street, city:cust.city)
        }
    }
}Out of the box, the Groovy libraries include a suite of builders for most of the common construction tasks that we might encounter. Here is a list of some of them:
This we have already seen. It can be used to generate any XML-style tagged output. Class:
groovy.xml.MarkupBuilderNodeBuilderThis is a useful builder for building tree-like structures in memory Node instances in memory. Class:
groovy.util.NodeBuilderDOMBuilderThis builder will construct a WC3 DOM tree in memory from the
GroovyMarkupthat we provide. Class:groovy.xml.DOMBuilderSAXBuilderThis is very similar to the
DOMBuilderin so far as the end result is a WC3 DOM in memory. The difference is that it works with an existing SAXContentHandlerclass and fires SAX events to it as theGroovyMarkupis executed. Class:groovy.xml.SAXBuilderAntBuilderAntBuilderis a little bit of a conundrum in that it is not strictly speaking a builder in the "builder design pattern" sense. TheGroovyMarkupclosely matches the equivalent Ant XML but what actually happens is that the Ant tasks are fired directly by the script rather than producing an Ant XML script. Class:groovy.util.AntBuilderJMXBuilderAlso in the same vein as
AntBuilderis theJMXBuilderclass, which can be used to deploy JMX management beans by using simple markup-style syntax.JMXBuilderis a Groovy-based DSL for declaratively exposing services, POJOs, POGOs, and so on, via the Java Management Extensions (JMX). Class:groovy.jmx.builder.JMXBuilderSwingBuilderNext we'll cover
SwingBuilderin detail with an example. This builder constructs Swing-based UIs. Class:groovy.swing.SwingBuilder
NodeBuilder is used to build tree structures of Node instances in memory. We use exactly the same GroovyMarkup syntax as before. Here we build up a tree structure in memory from customer data, using the same structure as with MarkupBuilder. All that needs to change to construct a node-based tree in memory is to replace the builder instance created with an instance of NodeBuilder. Once the markup code has been executed, the customers field contains the tree structure, which can be accessed by using Groovy's XPath-like syntax, GPath.
def builder = new groovy.util.NodeBuilder()

class Customer {
    int id
    String firstName
    String surname
    String street
    String city
}
def fred = new Customer(id:1001,firstName:"Fred", surname:"Flintstone",
    street:"1 Rock Road",city:"Bedrock")
def barney =  new Customer(id:1002,firstName:"Barney", surname:"Rubble",
    street:"2 Rock Road",city:"Bedrock")
def wilma = new Customer(id:1003,firstName:"Wilma", surname:"Flintstone",
    street:"1 Rock Road",city:"Bedrock")
def betty =  new Customer(id:1004,firstName:"Betty", surname:"Rubble",
    street:"2 Rock Road",city:"Bedrock")
def customerList = [ fred, barney,wilma,betty]

def customers = builder.customers {
    for (cust in customerList) {
        customer(id:cust.id) {
            name(firstName:cust.firstName,surname:cust.surname)
            address(street:cust.street, city:cust.city)
        }
    }
}

assert customers.customer[0].'@id' == 1001
assert customers.customer[1].'@id' == 1002
assert customers.customer[0].address[0].'@street' ==
                       customers.customer[2].address[0].'@street'
assert customers.grep{
     it.name.any{it.'@surname' == "Rubble"}
}.size == 2
assert  customers.grep{
     it.name.any{it.'@surname' == "Rubble"}
}.address.every{ it.'@street'[0] == "2 Rock Road"}We've used GPath in the preceding code to access the node structure created from our markup. To make sense of how the GPath syntax works, we must visualize it as a tree structure where customers is the root node. Node attributes are accessible as map entries, so element.'@attribute' is used to access the attribute values.
assert customers.customer[0].'@id' == 1001
assert customers.customer[1].'@id' == 1002
Below the root customers node, each node can have 1 to n leaf nodes, so customer is always returned as a list object even if only one item is contained in the list. We access individual elements by using array syntax (customer[1]) but any list method can be used. The snippet below will list out the first names of all customers in the tree.
customers.customer.each {
    println it.name[0].'@firstName'
    }
As we index deeper into the tree, we still need to use array syntax to access the lower nodes, even if the elements at these levels are singletons. Here we assert that Fred and Wilma live at the same address.
assert customers.customer[0].address[0].'@street'
 == customers.customer[1].address[0].'@street'
Finally, we can use a more complex GPath query to assert that all the Rubbles live at "2 Rock Road". This is quite a complex query, so we will decompose it as shown below. First, we use grep on the root customers node to produce a tree of all customers whose surname is Rubble. This tree should have two nodes: one for Barney and one for Betty.
def rubbles = customers.grep{ it.name.any{it.'@surname' == "Rubble"}}Now we can assert that every Rubble lives at "2 Rock Road":
assert rubbles.address.every{ it.'@street'[0] == "2 Rock Road"}Most Java developers I know hate Swing UIs with a passion. This is a pity because Swing is still to this day the best way to build a native UI application that will genuinely work on any operating system. The reason why people hate Swing is because of the APIs. Let's face it, Swing UIs are a chore to build and maintain, due to the unwieldy nature of the Swing APIs.
Any Swing app I've ever worked on has been a mess of component initialization code, intermingled with anonymous inner classes for event handling. Each Swing component, however small or insignificant, has to be newed and given a name. Figuring out how all of the components nest together, when some such as button groups and panels may not even be visible, is an endless chore.
We have all worked with apps that started out with a neat and tidy code layout, but generations of code changes later ended up as Frankenstein monsters. A neat trick with apps like this that I learnt years ago is the border hack. This involves placing a different colored border around each important top-level component in your layout, and bingo! You can start to make sense of the structure of your UI and debug layouts.
So for me SwingBuilder is the single most joyful Groovy feature to use—a much needed markup language for Swing UIs. For years I've been doing my quick and nasty UI prototyping with Swing and the Napkin Look & Feel. By the time you've hacked together a UI and given a demo, you just want to throw it away and start coding again from scratch. But not with SwingBuilder!
Note
The Napkin Look & Feel (http://napkinlaf.sourceforge.net/) is a Swing Look & Feel designed with one purpose in mind—to give the impression of something temporary so that your pointy-haired boss does not think the demo that you just gave him is of production-ready code that should be ready to ship.
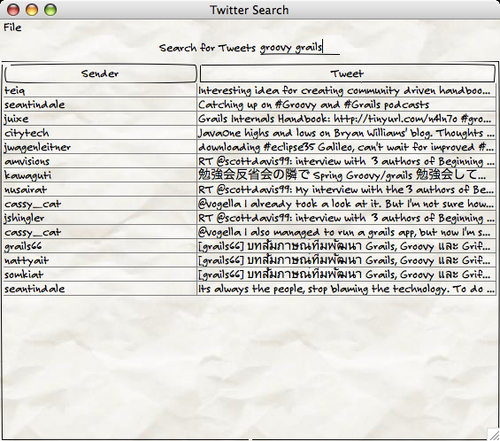
Below is a UI built with SwingBuilder that puts a simple UI onto the GeeTwitter searching DSL from the last chapter. You can see in the coming screenshot how the markup mirrors the actual layout in the UI. Closures are used in place of anonymous inner classes for events such as actionPerformed on the Exit menu. This took less than five minutes to throw together, and unlike a pure Swing API version, it is production-ready as soon as we remove the Napkin Look & Feel line from the code.
import groovy.swing.SwingBuilder
import javax.swing.*
import java.awt.*
import net.sourceforge.napkinlaf.*

data = []

def results
swing = new SwingBuilder()
swing.lookAndFeel(new NapkinLookAndFeel())
frame = swing.frame(title:'Twitter Search') {
  menuBar {
    menu('File') {
      menuItem 'Exit', actionPerformed: { System.exit(0) }
    }
  }
  panel(layout: new BorderLayout()) {
    panel (constraints:BorderLayout.NORTH) {
      label 'Search for Tweets'
      textField(columns:10, actionPerformed: { event ->
          data = GeeTwitter.search(event.source.text)
          results.model = tableModel(list:data) {
            propertyColumn(header:'Sender',
                           propertyName:'from',preferredWidth:20)
            propertyColumn(header:'Tweet',
                           propertyName:'tweet',preferredWidth:140)
          }
        })
    }
    scrollPane (constraints:BorderLayout.SOUTH){
      results = table() {
        tableModel(list:[]) {
          propertyColumn(header:'Sender',
                         propertyName:'from',preferredWidth:20)
          propertyColumn(header:'Tweet',
                         propertyName:'tweet',preferredWidth:140)
        }
      }
    }
  }
}
frame.pack()
frame.show()
The GroovyMarkup that we use for SwingBuilder is pretty much identical to what we've seen before, with a few differences. Unlike MarkupBuilder and NodeBuilder, we can't simply invent tags to insert into the GroovyMarkup, as this would not make sense. The tags must correspond to real UI widgets or controls that can be placed into the UI. Above, we use frame, menuBar, panel, and textField, among others. The full list of widgets can be found at http://groovy.codehaus.org/Alphabetical+Widgets+List. There are other non-widget tags, such as tableModel, that must be used in conjunction with a table tag and others.
In the above example, we start with a frame tag. The SwingBuilder class takes care of creating a JFrame widget for this frame, maintaining it. Any further widgets declared in the nested closure below this frame will be added to the frame. Take the preceding scrollPane, for example. Widgets that are nested below this will be added to the scrollPane, and so on. The nesting of the closure code that we use to declare the components dovetails exactly with how these components are nested in the UI. Declaring a widget returns the corresponding Swing widget; so the frame variable above contains a JFrame instance that allows us to call the regular swing pack() and show() methods to display the UI.
SwingBuilder handles the Swing event loop and dispatches any event that occurs. All we need to do is supply a closure for the actionPerformed attribute of any widget that we want to provide event handling for. This is far neater than the anonymous classes that regular Swing code is usually littered with.
The following result is a quick and nasty UI for Twitter searching:
If you like the look of SwingBuilder, then take a look at the Griffon project. Griffon is a Grails-like application framework for desktop application development. Griffon provides an MVC paradigm where the view portion of the application can be coded in the Builder of your choice.
Griffon adds the framework and runtime support around the Builder code so that only the markup needs to be written to create a View. Here is the View code for a simple Griffon application:
application(title:'DemoConsole', pack:true, locationByPlatform:true) {
  panel(border:emptyBorder(6)) {
    borderLayout()

    scrollPane(constraints:CENTER) {
      textArea(text:bind(target:model,
         targetProperty:'scriptSource'),
         enabled: bind {model.enabled},
         columns:40, rows:10)
    }

    hbox(constraints:SOUTH) {
      button("Execute",
         actionPerformed:controller.&executeScript,
         enabled: bind {model.enabled})
         hstrut(5)
         label("Result:")
         hstrut(5)
         label(text:bind {model.scriptResult})
    }
  }
}
The set-up code for the Builder objects is not necessary as Griffon takes care of this. Used in this context, Builder markup code is now more like a declarative DSL for the user interface. Later on in the book, we will take a look at how another Groovy project Gant uses AntBuilder in a similar fashion, to make a declarative Groovy DSL replacement for Ant scripts.
Groovy allows you to assign a method to a closure by using the & syntax. The closure returned is often referred to as a method pointer. Method pointers can be assigned by de-referencing the method name from any object instance, for example:
def list = ["A", "B", "C"]

def addit = list.&add

addit "D"

assert list ==  ["A", "B", "C", "D"]
The difficulty with method pointers to instance methods is being sure what instance the method pointer is referencing. In essence, an instance method pointer violates the encapsulation rules for the object by passing control to an object that is outside the direct control of a class. So I recommend caution when using them. However, method pointers when applied to static methods can be a very useful way to create DSL shortcut keywords.
Looking back at the GeeTwitter DSL from Chapter 4, we ended up with a neat DSL script that could search for tweets and automatically follow the Twitter user responsible for the tweet.
How about improving this by adding a method pointer to alias the GeeTwitter.follow method:
def follow = GeeTwitter.&follow

"Groovy DSL".search { fromUser, message ->
follow fromUser
}
By defining a method pointer variable called follow in the current scope, we have a convenient alias to use instead of GeeTwitter.follow(). This is a much more natural way to do a Twitter follow than invoking a static method. This is especially useful when we are providing our DSL for use to a non-programming audience.
In a nutshell, the term metaprogramming refers to writing code that can dynamically change its behavior at runtime. A Meta-Object Protocol (MOP) refers to the capabilities in a dynamic language that enable metaprogramming. In Groovy, the MOP consists of four distinct capabilities within the language: reflection, metaclasses, categories, and expandos.
The MOP is at the core of what makes Groovy so useful for defining DSLs. The MOP is what allows us to bend the language in different ways in order to meet our needs, by changing the behavior of classes on the fly. This section will guide you through the capabilities of MOP, and based on what we learn we will later dissect some builder code in order to understand how builders work under the covers.
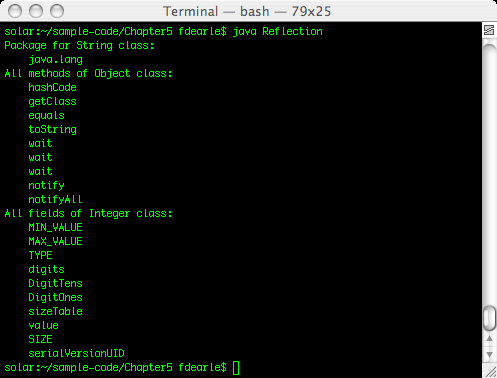
To use Java reflection, we first need to access the Class object for any Java object we in which are interested through its getClass() method. Using the returned Class object, we can query everything from the list of methods or fields of the class to the modifiers that the class was declared with. Below, we see some of the ways that we can access a Class object in Java and the methods we can use to inspect the class at runtime.
import java.lang.reflect.Field;
import java.lang.reflect.Method;

public class Reflection {
   public static void main(String[] args) {
      String s = new String();
      Class sClazz = s.getClass();
      Package _package = sClazz.getPackage();
      System.out.println("Package for String class: ");
      System.out.println("    " +  _package.getName());
      Class oClazz = Object.class;
      System.out.println("All methods of Object class:");
      Method[] methods = oClazz.getMethods();
      for(int i = 0;i < methods.length;i++)
         System.out.println("    " + methods[i].getName());
      try {
         Class iClazz = Class.forName("java.lang.Integer");
         Field[] fields = iClazz.getDeclaredFields();
         System.out.println("All fields of Integer class:");
         for(int i = 0; i < fields.length;i++)
            System.out.println("    " + fields[i].getName());
      } catch (ClassNotFoundException e) {
         e.printStackTrace();
      }
   }
}
We can access the Class object from an instance by calling its Object.getClass() method. If we don't have an instance of the class to hand, we can get the Class object by using .class after the class name, for example, String.class. Alternatively, we can call the static Class.forName, passing to it a fully-qualified class name.
Class has numerous methods, such as
getPackage(), getMethods(), and getDeclaredFields()
that allow us to interrogate the Class object for details about the Java class under inspection. The preceding example will output various details about String, Integer, and Double.
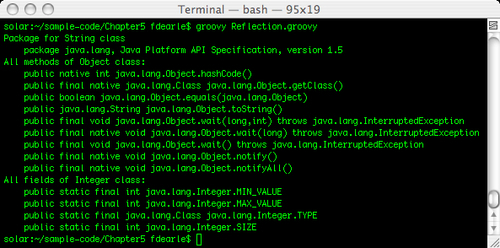
Groovy, as we would expect by now, provides shortcuts that let us reflect classes easily. In Groovy, we can shortcut the getClass() method as a property access .class, so we can access the class object in the same way whether we are using the class name or an instance. We can treat the .class as a String, and print it directly without calling Class.getName(), as follows:

The variable greeting is declared with a dynamic type, but has the type java.lang.String after the "Hello" String is assigned to it. Classes are first class objects in Groovy so we can assign String to a variable. When we do this, the object that is assigned is of type java.lang.Class. However, it describes the String class itself, so printing will report java.lang.String.
Groovy also provides shortcuts for accessing packages, methods, fields, and just about all other reflection details that we need from a class. We can access these straight off the class identifier, as follows:
println "Package for String class"
println "    " + String.package
println "All methods of Object class:"
Object.methods.each { println "    " + it }
println "All fields of Integer class:"
Integer.fields.each { println "    " + it }
Incredibly, these six lines of code do all of the same work as the 30 lines in our Java example. If we look at the preceding code, it contains nothing that is more complicated than it needs to be. Referencing String.package to get the Java package of a class is as succinct as you can make it. As usual, String.methods and String.fields return Groovy collections, so we can apply a closure to each element with the
each method. What's more, the Groovy version outputs a lot more useful detail about the package, methods, and fields.
When using an instance of an object, we can use the same shortcuts through the class field of the instance.
def greeting = "Hello"
assert greeting.class.package == String.package
An Expando is a dynamic representation of a typical Groovy bean. Expandos support typical get and set style bean access but in addition to this they will accept gets and sets to arbitrary properties. If we try to access, a non-existing property, the Expando does not mind and instead of causing an exception it will return null. If we set a non-existent property, the Expando will add that property and set the value. In order to create an Expando, we instantiate an object of class groovy.util.Expando.
def customer = new Expando()

assert customer.properties == [:]

assert customer.id == null

assert customer.properties == [:]

customer.id = 1001
customer.firstName = "Fred"
customer.surname = "Flintstone"
customer.street = "1 Rock Road"

assert customer.id == 1001

assert customer.properties == [
    id:1001, firstName:'Fred',
    surname:'Flintstone', street:'1 Rock Road']
customer.properties.each { println it }
The id field of customer is accessible on the Expando shown in the preceding example even when it does not exist as a property of the bean. Once a property has been set, it can be accessed by using the normal field getter: for example, customer.id. Expandos are a useful extension to normal beans where we need to be able to dump arbitrary properties into a bag and we don't want to write a custom class to do so.
A neat trick with Expandos is what happens when we store a closure in a property. As we would expect, an Expando closure property is accessible in the same way as a normal property. However, because it is a closure we can apply function call syntax to it to invoke the closure. This has the effect of seeming to add a new method on the fly to the Expando.
customer.prettyPrint = {
    println "Customer has following properties"
    customer.properties.each {
        if (it.key != 'prettyPrint')
            println "    " + it.key + ": " + it.value
    }
}

customer.prettyPrint()
Here we appear to be able to add a prettyPrint() method to the customer object, which outputs to the console:
Customer has following properties
    surname: Flintstone
    street: 1 Rock Road
    firstName: Fred
    id: 1001
Adding a closure to an Expando to give a new method is a useful feature, but what if we need to add methods to an existing class on the fly? Groovy provides another useful feature—Categories—for this purpose. A Category can be added to any class at runtime, by using the use keyword.
We can create Category classes that add methods to an existing class. To create a Category for class, we define a class containing static methods that take an instance of the class that we want to extend as their first parameter. By convention, we name this parameter as self. When the method is invoked, self is set to the object instance that we are extending. The Category can then be applied to any closure by using the use keyword.
class Customer {
    int id
    String firstName
    String surname
    String street
    String city
}

def fred = new Customer(id:1001,firstName:"Fred", surname:"Flintstone",
street:"1 Rock Road",city:"Bedrock")
def barney =  new Customer(id:1002,firstName:"Barney", surname:"Rubble",
street:"2 Rock Road",city:"Bedrock")

def customerList = [ fred, barney]

class CustomerPrinter {
    static void prettyPrint(Customer self) {
        println "Customer has following properties"
        self.properties.each {
            if (it.key != 'prettyPrint')
                println "    " + it.key + ": " + it.value
        }
    }
}

use (CustomerPrinter) {
    for (customer in customerList)
        customer.prettyPrint()
}
Java libraries are full of classes that have been declared final. The library designers in their wisdom have decided that the methods they have added are all that we will ever need. Unfortunately, that is almost never the case in practice. Take the Java String class, for example. There are plenty of useful string manipulation features that we might like to have in the String class. Java has added methods progressively to this class over time: for instance, match and split in Java 1.4, with replace and format being added in Java 1.5.
If we needed these style methods before Sun got around to adding them, we could not do it ourselves because of the final modifier. So the only option has been to use classes from add-on libraries such as Commons StringUtils. The Apache Commons Lang component class contains a slew of useful classes that augment the basic capabilities of Java classes, including BooleanUtils, StringUtils, DateUtils, and so on. All of the util class methods are implemented as static, taking String as the first parameter. This is the typical pattern used in Java when we need to mix in extra functionality to an existing class.
import org.apache.commons.lang.StringUtils;

public class StringSplitter {

   public static void main(String[] args) {
      String [] splits = StringUtils.split(args[0], args[1]);

      for (int i = 0; i < splits.length; i++) {
         System.out.println("token : " + splits[i]);
      }
   }
}
Conveniently, this pattern is the same as the one used Groovy categories, which means that the Apache Commons Lang Util classes can all be dropped straight into a use block. So all of these useful utility classes are ready to be used in your Groovy code as Categories.
import org.apache.commons.lang.StringUtils

use (StringUtils) {
    "org.apache.commons.lang".split(".").each { println it }
}In addition to the regular Java Class object that we saw earlier when looking at reflection, each Groovy object also has an associated MetaClass Object. All Groovy classes secretly implement the groovy.lang.GroovyObject interface, which exposes a getMetaClass() method for each object.
public interface GroovyObject {
    /**
     * Invokes the given method.
     */
    Object invokeMethod(String name, Object args);

    /**
     * Retrieves a property value.
     */
    Object getProperty(String propertyName);

    /**
     * Sets the given property to the new value.
     */
    void setProperty(String propertyName, Object newValue);

    /**
     * Returns the metaclass for a given class.
     */
    MetaClass getMetaClass();

    /**
     * Allows the MetaClass to be replaced with a
     * derived implementation.
     */
    void setMetaClass(MetaClass metaClass);
}
Pure Java classes used in Groovy do not implement this interface, but they have a MetaClass assigned anyway. This MetaClass is stored in the MetaClass registry. Earlier versions of Groovy required a look-up in the registry to access the MetaClass. Since Groovy 1.5, the MetaClass of any class can be found by accessing its .metaClass property.
class Customer {
    int id
    String firstName
    String surname
    String street
    String city
}

// Access Groovy meta class
def groovyMeta = Customer.metaClass

// Access Java meta class from 1.5
def javaMeta = String.metaClass

// Access Groovy meta class prior to 1.5
def javaMetaOld = GroovySystem.metaClassRegistry.getMetaClass(String)
Metaclasses are the secret ingredients that make the Groovy language dynamic. The MetaClass maintains all of the metadata about a Groovy class. This includes all of its available methods, fields, and properties. Unlike the Java Class object, the Groovy MetaClass allows fields and methods to be added on the fly. So while the Java class can be considered as describing the compile time behavior of the class, the MetaClass describes its runtime behavior. We cannot change the Class behavior of an object but we can change its MetaClass behavior by adding properties or methods on the fly.
The Groovy runtime maintains a single MetaClass per Groovy class, and these operate in close quarter with the GroovyObject interface. GroovyObject implements a number of methods, which in their default implementations are just facades to the equivalent MetaClass methods. The most important of these to understand is the invokeMethod().
An important distinction between Java and Groovy is that in Groovy a method call never invokes a class method directly. A method invocation on an object is always dispatched in the first place to the GroovyObject.invokeMethod() of the object. In the default case, this is relayed onto the MetaClass.invokeMethod()
for the class and the MetaClass is responsible for looking up the actual method. This indirect dispatching is the key to how a lot of Groovy power features work as it allows us to hook ourselves into the dispatching process in interesting ways.
class Customer {
    int id
    String firstName
    String surname
    String street
    String city

    Object invokeMethod(String name, Object args) {
        if (name == "prettyPrint") {
            println "Customer has following properties"
            this.properties.each {
                println "    " + it.key + ": " + it.value
            }
        }
    }
}

def fred = new Customer(id:1001,firstName:"Fred",
    surname:"Flintstone", street:"1 Rock Road",city:"Bedrock")
def barney =  new Customer(id:1002,firstName:"Barney",
    surname:"Rubble", street:"2 Rock Road",city:"Bedrock")

def customerList = [ fred, barney]

customerList.each { it.prettyPrint() }
Above, we added a Customer.invokeMethod()
to the Customer class. This allows us to intercept method invocations and respond to calls to Customer.prettyPrint() even though this method does not exist. Remember how in GroovyMarkup we appeared to be calling methods that did not exist? This is the core of how GroovyMarkup works. The Customer.prettyPrint() method in the previous code snippet is called a pretended method.
Like Java, Groovy has a this keyword that refers to the "current" or enclosing Java object. In Java, we don't have any other context that we can execute code in except a class method. In an instance method, this will always refer to the instance itself. In a static method, this has no meaning as the compiler won't allow us to reference this in a static context.
In addition to the instance methods, Groovy has three additional execution contexts to be aware of:
Code running directly within a script where the enclosing object is the script.
Closure code where the enclosing object is either a script or an instance object.
Closure code where the enclosing object is another closure.
In addition to the this keyword, Groovy has two other keywords that are referred only in the context of a closure—owner and delegate.
The
ownerkeyword refers to the enclosing object, which in the majority of cases is the same asthis, the only exception being when a closure is surrounded by another closure.The
delegatekeyword refers to the enclosing object and is usually the same asownerexcept thatdelegateis assignable to another object. Closures relay method invocations that they handle themselves back to theirdelegate. This is how the methods of an enclosing class become available to be called by the closure as if the closure was also an instance method. We will see later that one of the reasons builders work the way they do is because they are able to assign the delegate of a closure to themselves.
Note
The delegate will initially default to owner, except when we explicitly change the delegate to something else through the Closure.setDelegate method.
The following example illustrates this, owner, and delegate working under various different contexts. This example is necessarily complex, so take the time to read and understand it.
class Clazz {
 void method() {
        println "Class method this is : " + this.class
    }
 void methodClosure() {
       def methodClosure = {
            println "Method Closure this is : " + this.class
            assert owner == this
            assert delegate == this
       }
       methodClosure()
    }
}

def clazz = new Clazz()

clazz.method()

def closure = { self ->
    println "Closure this is : " + this.class
    assert this == owner
    assert delegate == clazz
    def closureClosure = {
        println "Closure Closure this is : " + this.class
        assert owner == self


        assert delegate == self
    }
    assert closureClosure.delegate == self

    closureClosure()

}

closure.delegate = clazz
closure(closure)
clazz.methodClosure()

println this.class
Running the preceding code will output the following text:
Class method this is : class Clazz
Closure this is : class ConsoleScript1
Closure Closure this is : class ConsoleScript1
Method Closure this is : class Clazz
Script this is : class ConsoleScript1
So the rules for resolving this, owner, and delegate in the various contexts are:
In a class
instancemethod,thisis always the instance object.owneranddelegateare not applicable and will be disallowed by the compiler.In a class
staticmethod,this,owner, anddelegatereferences will be disallowed by the compiler.In a closure defined within a script,
this,owner, anddelegateall refer to theScriptobject unlessdelegatehas been reassigned.In a closure within a method,
thisandownerrefer to the instance object of the enclosing class; as willdelegate, unless it has been reassigned to another object.In a script,
thisis theScriptobject, andowneranddelegateare not applicable.
Earlier, when we looked at the MarkupBuilder code, the unfamiliar syntax must have seemed strange. Now that we have an understanding of how the MOP and pretended methods work, let's take a quick look again at some builder code and, see if we can figure out what might be happening. MarkupBuilder is derived from the BuilderSupport class. When describing how MarkupBuilder works, I won't make a distinction between BuilderSupport and MarkupBuilder. Most of the mechanism described here is in fact implemented by BuilderSupport and is shared with other Builder classes.
def customers = builder.customers {
    customer(id:1001) {
        name(firstName:"Fred",surname:"Flintstone")
        address(street:"1 Rock Road",city:"Bedrock")
    }
    customer(id:1002) {
        name(firstName:"Barney",surname:"Rubble")
        address(street:"2 Rock Road",city:"Bedrock")
    }
No matter how far you look in the documentation for MarkupBuilder, you won't find anything about it having a customers method. So what's happening when we write:
def customers = builder.customers {
...
The answer is that MarkupBuilder is pretending to have a method with the signature: MarkupBuilder.customers(Closure c). In the next line of code, things get a little more interesting. This line of code is defined within the body of the closure itself.
customer(id:1001) {
...
To explain this, we need to understand how closures handle method calls. When a closure encounters a method call that it cannot handle itself, it automatically relays the invocation to its owner object. If this fails, it relays the invocation to its delegate. Normally, the delegate would be the enclosing script or class, but the MarkupBuilder sets the delegate to itself. The closure relays the customer method invocation to MarkupBuilder, which has an invokeMethod() implementation that pretends to have a method MarkupBuilder.customer(Map m, Closure c).
Note
Method invocation and property lookup are governed by the resolve
strategy of the Closure. The resolve strategy tells the Closure what objects it should look at when attempting to resolve a method or property reference. By default, the Resolve Strategy is set to OWNER_FIRST, which means that the first place we look is in the owner. If this lookup fails, then the search continues to the delegate object.
MarkupBuilder relies on the default resolve strategy, but we can change the resolve strategy as the need arises. The full list of resolve strategies is as follows:
OWNER_FIRST(the default): Resolve methods and properties in theownerfirst followed by thedelegateif not found.DELEGATE_FIRST: Resolve in thedelegatefirst and then search theownerif not found.OWNER_ONLY: Resolve in theowneronly and don't search thedelegate.DELEGATE_ONLY: Resolve in thedelegateonly with no search of theowner.TO_SELF: This is a special case to allowgetPropertyof theClosureitself to be overridden. With this resolve strategy, the closure callsgetPropertyon itself first before continuing the lookup through the normal lookup process.
Coming back to our markup processing, the next line of code is in the context of a closure within a closure:
name(firstName:"Fred",surname:"Flintstone")
At this level of nesting, the delegate would normally refer to the enclosing script or instance object. Once again MarkupBuilder has reassigned the delegate to refer to itself. When this Closure relays the invocation up to its delegate, MarkupBuilder.invokeMethod() handles it and again pretends it has a method MarkupBuilder.name(Map m, Closure c).
With each of these pretended methods, MarkupBuilder outputs a tag with the name of the method and attributes set according to the named parameters, and then calls the closure. As with most things in Groovy, building your own Builder is surprisingly easy when you know how to do it.
class PoorMansTagBuilder {
    int indent = 0
    Object invokeMethod(String name, Object args) {
        indent.times {print "    "}
        println "<${name}>"
        indent++
        args[0].delegate = this // Change delegate to the builder
        args[0].call()
        indent--
        indent.times {print "    "}
        println "</${name}>"
    }
}

def builder = new PoorMansTagBuilder ()

builder.root {
       level1{
        level2 {
       }
    }
}
In order to illustrate the builder mechanism shown in the previous code snippet, we are conveniently ignoring any parameter passing, and assuming that args just contains a first parameter of type Closure. However, this short example does illustrate method pretending through the invokeMethod(), and method relaying by assigning the delegate. The code will output a nice tagged representation of our GroovyMarkup code.
<root>
    <level1>
       <level2>
       </level2>
    </level1>
</root>
We briefly touched on metaclasses when building our Twitter DSL in Chapter 4. In the coming example, we've used String.metaClass to dynamically add a method to the String class for Twitter searching. Let's look at what is happening here.
String.metaClass.search = { Closure c ->
   GeeTwitter.search(delegate,c)
}
From the earlier section on Expandos, we understand how an Expando allows us to dynamically add a property to a class. That's all that is happening here. In the above code, we are dynamically adding a property to the MetaClass for String in the same way as we added properties to the Expando. This property happens to be a Closure, and the object happens to be the MetaClass of String, so it has the effect of adding a new method to the String class.
Adding a regular property to a MetaClass can be achieved in the same way as with Expandos. There is only a single MetaClass per Groovy or Java class, so this is useful only if we have a new property that is relevant across all instances of a class. In practice, this will rarely happen. Apart from adding properties and methods, there are a whole bunch of other interesting things that we can do with the ExpandoMetaClass. We will go through a selection of these here.
The technique that we use to add a method can also be used to replace an existing method. When doing so, we can subvert the existing logic of a class. Wouldn't it be nice if we could change all bank managers' minds as easily as this?
class BankManager {
    def loan_approval_status = false

    boolean approveLoan() {
        return loan_approval_status
    }
}

def myBankManager = new BankManager()

assert myBankManager.approveLoan() == false

BankManager.metaClass.approveLoan = { true }

myBankManager = new BankManager()
assert myBankManager.approveLoan() == true
Any method can be overridden or added. This includes any of the operator methods, such a plus(), minus(), multiply(), divide(), and so on. If need be, we can add operator semantics to any class, even if we have not written it ourselves.
To add or override a static method of a class, we just insert the static keyword before the method name. In this example, we take the abstract Calendar class and supply a static getInstance method that instantiates a GregorianCalendar object. We then add a static
now method that makes use of the new instance.
Calendar.metaClass.static.getInstance = { new GregorianCalendar() }

println Calendar.getInstance().getTime()

Calendar.metaClass.static.now = { Calendar.getInstance().getTime() }

println Calendar.now()We can use GStrings to name methods as we add or override them in a class. This means that we can dynamically generate method names on the fly. In the following example, we iterate all of the properties in the Customer class. We can exclude the class and metaClass properties with the find operator it =~ /lass/ so that we just add methods for the properties that we want.
class Customer {
    def firstName
    def lastName
    def address1
    def address2
}

def c = new Customer()
// Find all properties except class and metaClass and add
// a new print(field) method
c.properties.keySet().findAll { !(it =~ /lass/)} .each {
 Customer.metaClass."print_${it}" = { -> println delegate."${it}" }
}
def cust = new Customer(firstName:"Fred",
                 lastName:"Flintstone",
                 address1:"Rock Road",
                 address2:"Bedrock")

cust.print_firstName()
cust.print_lastName()Whenever we add a method to the ExpandoMetaClass that has the same signature as an existing method, the original method is overridden. In the following snippet, we can see that it is the last
String
blanked method that is in place after we override on subsequent occasions.
String.metaClass.blanked = { delegate.replaceAll(/./) {'%'} }
String.metaClass.blanked = { delegate.replaceAll(/./) {'@'} }
String.metaClass.blanked = { delegate.replaceAll(/./) {'*'} }

assert "A String".blanked() == "********"
To add overloaded versions of methods, we can continue to add new methods. As long as the signatures are different from the last each method, it will be added as an overloaded method.
String.metaClass.static.valueAndType = { double d ->
    "${d.class.name}:${valueOf(d)}"
}
String.metaClass.static.valueAndType = { float f ->
    "${f.class.name}:${valueOf(f)}"
}
String.metaClass.static.valueAndType = { int i ->
    "${i.class.name}:${valueOf(i)}"
}
String.metaClass.static.valueAndType = { long l ->
    "${l.class.name}:${valueOf(l)}"
}

assert String.valueAndType(1.0) == "java.lang.Double:1.0"
assert String.valueAndType(3.333f) == "java.lang.Float:3.333"
assert String.valueAndType(101) == "java.lang.Integer:101"
assert String.valueAndType(1000000L) == "java.lang.Long:1000000"
When we are overloading subsequent methods with different signatures, we can make use of the append operator <<.
String.metaClass {
 static.valueAndType << { double d ->
    "${d.class.name}:${valueOf(d)}"
 }
 static.valueAndType << { float f ->
    "${f.class.name}:${valueOf(f)}"
 }
 static.valueAndType << { int i ->
    "${i.class.name}:${valueOf(i)}"
 }
 static.valueAndType << { long l ->
    "${l.class.name}:${valueOf(l)}"
 }
}

assert String.valueAndType(1.0) == "java.lang.Double:1.0"
assert String.valueAndType(3.333f) == "java.lang.Float:3.333"
assert String.valueAndType(101) == "java.lang.Integer:101"
assert String.valueAndType(1000000L) == "java.lang.Long:1000000"We have covered a lot of ground in this chapter. We have now covered all of the important features of the Groovy language, and looked in depth at how some of these features can be applied to developing DSLs. We now have an appreciation of what can be achieved by using features in the MOP, and how using the MOP enables other powerful features, such as GroovyMarkup.
Now that we have a better familiarity with the Groovy language, it's time to take a look at some of the readily-available DSLs and figure out how they are implemented within the Groovy language. In the next chapter, we will take a look at some Groovy-based DSLs, such a Gant and GSpec. This will give us a greater understanding of how to use Groovy power features in concert, in order to implement fully-functioning DSLs of our own.