By now we have covered a lot of ground in describing the DSL-enabling features of Groovy. In this chapter, we will look at some of the existing Groovy DSLs that are freely available for download. The purpose of this chapter is not to try to give a comprehensive tutorial on any of them. We will explore each in turn in order to understand how they work, but more importantly we will go through them in order to understand how they are implemented using the Groovy features and techniques that we have covered in the book so far.
The Grails Object Relational Mapping (GORM) is a core component of the Grails web application framework and uses DSL- style techniques to apply persistence to regular Groovy classes. We will be looking at how GORM decorates regular POGO classes to add persistence semantics to them.
Gant is an Ant-based build system that uses the
AntBuilderclass to add Groovy-scripting capabilities to Ant. We will be looking at how Gant uses the Builder paradigm to provide Groovy-scripted builds on top of Ant.GSpec, EasyB, and Spock are Behavior Driven Development (BDD) tools. BDD is all about enabling collaboration between developers, QA, and non-technical stakeholders in a software development environment. These tools aim to enable the development of specifications in a Groovy-based DSL that can be run as tests in order to validate the completeness of a system. To achieve this, specifications need to be written in a language that can be understood by all of the various stakeholders. We will see how these three tools use Groovy to try to achieve this aim.
The Grails framework is an open source web application framework built for the Groovy language. Grails not only leverages Hibernate under the covers as its persistence layer, but also implements its own Object Relational Mapping layer for Groovy, known as GORM. With GORM, we can take a POGO class and decorate it with DSL-like settings in order to control how it is persisted. GORM can be considered a DSL as it uses many of the cool DSL features that we have already discussed, in order to add its own mini dialect to Groovy in order to implement persistence.
Grails programmers use GORM classes as a mini language for describing the persistent objects in their application. In this section, we will do a whistle-stop tour of the features of Grails. This won't be a tutorial on building Grails applications, as the subject is too big to be covered here. Our main focus will be on how GORM implements its Object model in the domain classes.
Before we proceed, we need to install Grails and get a basic app installation up and running. The Grails' download and installation instructions can be found at http://www.grails.org/Installation. Once it has been installed, and with the Grails binaries in your path, navigate to a workspace directory and issue the following command:
grails create-app GroovyDSL
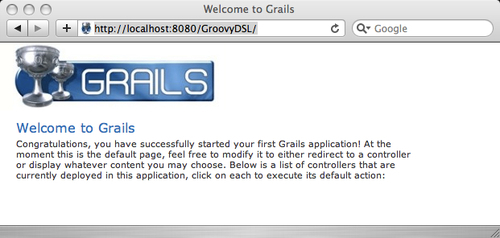
This builds a Grails application tree called GroovyDSL under your current workspace directory. If we now navigate to this directory, we can launch the Grails app. By default, the app will display a welcome page at http://localhost:8080/GroovyDSL/.
cd GroovyDSL
grails run-app
The GroovyDSL application that we built earlier has a grails-app subdirectory, which is where the application source files for our application will reside. We only need to concern ourselves with the grails-app/domain directory for this discussion, but it's worth understanding a little about some of the other important directories.
grails-app/conf: This is where the Grails configuration files reside.grails-app/controllers: Grails uses a Model View Controller (MVC) architecture. The controller directory will contain the Groovy controller code for our UIs.grails-app/domain: This is where Grails stores the GORM model classes of the application.grails-app/view: This is where the Groovy Server Pages (GSPs), the Grails equivalent to JSPs are stored.
Grails has a number of shortcut commands that allow us to quickly build out the objects for our model. As we progress through this section, we will take a look back at these directories to see what files have been generated in these directories for us.
Note
In this section, we will be taking a whistle-stop tour through GORM. You might like to dig deeper into both GORM and Grails yourself. You can find further online documentation for GORM at http://www.grails.org/GORM.
Out of the box, Grails is configured to use an embedded HSQL in-memory database. This is useful as a means of getting up and running quickly, and all of the example code will work perfectly well with the default configuration. Having an in-memory database is helpful for testing because we always start with a clean slate. However, for the purpose of this section, it's also useful for us to have a proper database instance to peek into, in order to see how GORM maps Groovy objects into tables. We will configure our Grails application to persist in a MySQL database instance.
Grails allows us to have separate configuration environments for development, testing, and production. We will configure our development environment to point to a MySQL instance, but we can leave the production and testing environments as they are.
First of all we need to create a database, by using the mysqladmin command. This command will create a database called groovydsl, which is owned by the MySQL root user.
mysqladmin –u root create groovydsl
Database configuration in Grails is done by editing the DataSource.groovy source file in grails-app/conf. We are interested in the environments section of this file.
environments {
   development {
      dataSource {
            dbCreate = "create-drop"
            url = "jdbc:mysql://localhost/groovydsl"
            driverClassName = "com.mysql.jdbc.Driver"
            username = "root"
            password = ""
      }
   }
   test {
      dataSource {
           dbCreate = "create-drop"
           url = "jdbc:hsqldb:mem:testDb"
      }
   }
   production {
      dataSource {
           dbCreate = "update"
           url = "jdbc:hsqldb:mem:testDb"
      }
   }
}
The first interesting thing to note is that this is a mini Groovy DSL for describing data sources. In the previous version, we have edited the development dataSource entry to point to the MySQL groovydsl database that we created.
Note
In early versions of Grails, there were three separate DataSource files that need to be configured for each environment, for example, DevelopmentDataSource.groovy. The equivalent DevelopmentDataSource.groovy file would be as follows:
class DevelopmentDataSource {
   boolean pooling = true
   String dbCreate = "create-drop"
   String url = " jdbc:mysql://localhost/groovydsl "
   String driverClassName = "com.mysql.jdbc.Driver"
   String username = "root"
   String password = ""
}
The dbCreate field tells GORM what it should do with tables in the database, on startup. Setting this to create-drop will tell GORM to drop a table if it exists already, and create a new table, each time it runs. This will keep the database tables in sync with our GORM objects. You can also set dbCreate to update or create.
Note
DataSource.groovy is a handy little DSL for configuring the GORM database connections. Grails uses a utility class—g
roovu.utl.ConfigSlurper—for this DSL. The C
onfigSlurper class allows us to easily parse a structured configuration file and convert it into a java.util.Properties object if we wish. Alternatively, we can navigate the ConfigObject returned by using dot notation. We can use the ConfigSlurper to open and navigate DataSource.groovy as shown in the next code snippet. ConfigSlurper has a built-in ability to partition the configuration by environment. If we construct the ConfigSlurper for a particular environment, it will only load the settings appropriate to that environment.
def development =
          new ConfigSlurper("development").parse(new File('DataSource.groovy').toURL())
def production =
           new ConfigSlurper("production").parse(new File('DataSource.groovy').toURL())
assert development.dataSource.dbCreate == "create-drop"
assert production.dataSource.dbCreate == "update"
def props = development.toProperties()
assert props["dataSource.dbCreate"] == "create-drop"
The grails command can be used as a shortcut to carve out GORM domain classes. We can create a domain class for Customer by issuing the following Grails command from the GroovyDSL application directory:
grails create-domain-class Customer
This will create a stub Customer.groovy file in the grails-app/domain directory, as follows:
class Customer {

    static constraints = {
    }
}
If we add some fields to this class, we can peek into the MySQL database to see how GORM automatically creates a table for this class.
class Customer {
   String firstName
   String lastName

    static constraints = {
    }
}
Now if we restart Grails by issuing the grails run-app command, we can inspect the resulting table in MySQL:
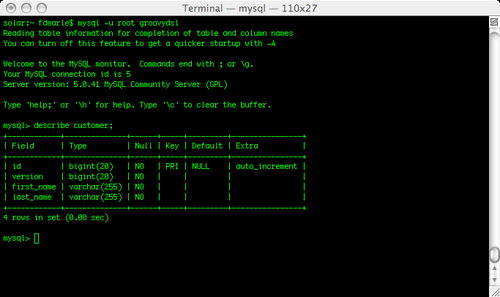
GORM has automatically created a customer table for us in the groovydsl database. The table has two fields by default, for the row id and the object version. The two fields we added to Customer have been mapped to the first_name and last_name of Type
va
rchar(255) columns in the database.

Now that we have a domain class, how do we go about trying it out? We could dive in and write controllers and a view in order to build UI pages for the Customer object, which would be the norm if we were building a full-blown Grails application. We don't want to do this as all we want to do is look at how the GORM model is constructed.
Fortunately, Grails has some ways to let us interact directly with model classes without building any UI superstructure. The simplest of these is to use the GroovyConsole that we have used in our previous chapters. The grails command can be used to launch the console with the Grails environment running, so that model classes are immediately accessible.
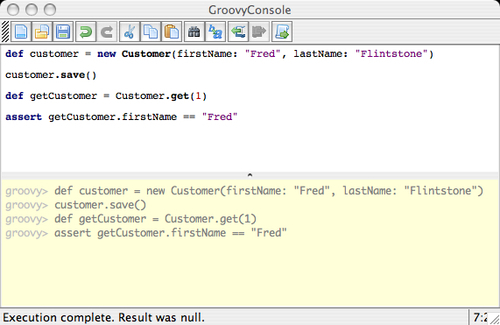
A
normal POGO class would only allow us to construct it and interact with its properties at this point. However, Grails has used the Groovy MOP to add some persistence methods to the Customer class. If we run the code shown in the previous example, we call the save method on a Customer object that causes it to be stored in the MySQL database. Using mysql we can confirm to our satisfaction that a row has actually been saved, by doing this:
mysql> select * from customer;
+----+---------+------------+------------+
| id | version | first_name | last_name  |
+----+---------+------------+------------+
|  1 |       0 | Fred       | Flintstone |
+----+---------+------------+------------+
1 row in set (0.00 sec)
mysql>
We also have methods to get(
) an object from the database by ID, update() the object, and list() available objects.
def barney = new Customer(firstName: "Barney", lastName: "Rubble")
barney.save()

def fred = Customer.get(1)
fred.firstName = "Fred"
fred.save()

def customers = Customer.list()
customers.each { println c.id + ": " + c.firstName + " , " + c.lastName }
The above example saves a new customer "Barney" to the database, gets the customer object for "Fred", and updates the firstName field. The list
method returns all customers as a regular list collection so that we can apply a closure to all members to print them.
1: Fred, Flintstone
2: Barney, Rubble
Note
Let's take a second to look at what Grails has done to our class. The
Customer class that we declared had no base class to inherit methods from, and it did not define these methods. Grails has used the Groovy MOP to add these methods. When we run our Grails app in development mode, Grails iterates of all the domain classes in grails-app/domain. As it does so, it adds these persistence methods to the MetaClass of each doma
in class that it encounters. We have covered several different options as to how to add a method to a class on the fly. In this case, Grails has augmented the MetaClass for Customer with a combination of static and normal methods, as follows:
class Customer {
 ...
}
Customer.metaClass.static.get = { ... }
Customer.metaClass.static.list = { ... }
Customer.metaClass.save = { ... }
Storing and retrieving simple objects is all very well, but the real power of GORM is that it allows us to model the relationships between objects, as we will now see. The main types of relationships that we want to model are associations, where one object has an associated relationship with another, for example, Customer and Account, composition
relationships, where we want to build an object from sub components, and inheritance, where we want to model similar objects by describing their common properties in a base class.
Every business system involves some sort of association between the main business objects. Relationships between objects can be one-to-one, one-to-many, or many-to-many. Relationships may also imply ownership, where one object only has relevance in relation to another parent object.
If we model our domain directly in the database, we need to build and manage tables, and make associations between the tables by using foreign keys. For complex relationships, including many-to-many relationships, we may need to build special tables whose sole function is to contain the foreign keys needed to track the relationships between objects. Using GORM, we can model all of the various associations that we need to establish between objects directly within the GORM class definitions. GORM takes care of all of the complex mappings to tables and foreign keys through a Hibernate persistence layer.
The simplest association that we need to model in GORM is a one-to-one association. Suppose our customer can have a single address; we would create a new Address domain class using the grails create-domain-class command, as before.
class Address {
   String street
   String city

    static constraints = {
    }
}
To create the simplest one-to-one relationship with Customer, we just add an Address field to the Customer class.
class Customer {
   String firstName
   String lastName
   Address address

    static constraints = {
    }
}
When we rerun the Grails application, GORM will recreate a new address table. It will also recognize the address field of Customer as an association with the Address class, and create a foreign key relationship between the customer and address tables accordingly.

This is a one-directional relationship. We are saying that a Customer "has an" Address but an Address does not necessarily "have a" Customer.
We can model bi-directional associations by simply adding a Customer field to the Address. This will then be reflected in the relational model by GORM adding a customer_id field to the address table.
class Address {
   String street
   String city
   Customer customer

    static constraints = {
    }
}
mysql> describe address; +-------------+--------------+------+-----+---------+----------------+ | Field | Type | Null | Key | Default | Extra | +-------------+--------------+------+-----+---------+----------------+ | id | bigint(20) | NO | PRI | NULL | auto_increment | | version | bigint(20) | NO | | | | | city | varchar(255) | NO | | | | | customer_id | bigint(20) | YES | MUL | NULL | | | street | varchar(255) | NO | | | | +-------------+--------------+------+-----+---------+----------------+ 5 rows in set (0.01 sec) mysql>
These basic one-to-one associations can be inferred by GORM just by interrogating the fields in each domain class via reflection and the Groovy metaclasses. To denote ownership in a relationship, GORM uses an optional static field applied to a domain class, called belongsTo. Suppose we add an Id
entity class to retain the login identity of a customer in the application. We would then use
class Customer {
   String firstName
   String lastName
   Identity ident
}

class Address {
   String street
   String city
}

class Identity {
   String email
   String password

   static belongsTo = Customer
}
Note
Classes are first-class citizens in the Groovy language. When we declare static belongsTo = Customer, what we are actually doing is storing a static instance of a java.lang.Class object for the Customer class in the belongsTo field. Grails can interrogate this static field at load time to infer the ownership relation between Identity and Customer.
Here we have three classes: Customer, Addre
ss, and Identity. Customer has a one-to-one association with both Address and Identity through the address and ident fields. However, the ident field is "owned" by Customer as indicated in the belongsTo setting. What this means is that saves, updates, and deletes will be cascaded to identity but not to address, as we can see below. The addr object needs to be saved and deleted independently of C
ustomer but id is automatically saved and deleted in sync with Customer.
class Customer {def addr = new Address(street:"1 Rock Road", city:"Bedrock")
def id = new Identity(email:"email", password:"password")
def fred = new Customer(firstName:"Fred",
    lastName:"Flintstone",
    address:addr,ident:id)

addr.save(flush:true)

assert Customer.list().size == 0
assert Address.list().size == 1
assert Identity.list().size == 0

fred.save(flush:true)

assert Customer.list().size == 1
assert Address.list().size == 1
assert Identity.list().size == 1

fred.delete(flush:true)

assert Customer.list().size == 0
assert Address.list().size == 1
assert Identity.list().size == 0

addr.delete(flush:true)

assert Customer.list().size == 0
assert Address.list().size == 0
assert Identity.list().size == 0
You will have noticed that every domain class produced by the
grails create-domain-class command contains an empty static closure, constraints. We can use this closure to set the constraints on any field in our model. Here we apply constraints to the e-mail and password fields of Identity. We want an e-mail field to be unique, not blank, and not nullable. The password field should be 6 to 200 characters long, not blank, and not nullable.
class Identity {
   String email
   String password

    static constraints = {
      email(unique: true, blank: false, nullable: false)
      password(blank: false, nullable:false, size:6..200)
    }
}
From our knowledge of builders and the markup pattern, we can see that GORM could be using a similar strategy here to apply constraints to the domain class. It looks like a pretended method is provided for each field in the class that accepts a map as an argument. The map entries are interpreted as constraints to apply to the model field.
The Builder pattern turns out to be a good guess as to how GORM is implementing this. GORM actually implements constraints through a builder class called
ConstrainedPropertyBuilder. The closure that gets assigned to constraints is in fact some markup style closure code for this builder. Before executing the constraints closure, GORM sets an instance of ConstrainedPropertyBuilder to be the delegate for the closure. We are more accustomed to seeing builder code where the Builder instance is visible.
def builder = new ConstrainedPropertyBuilder()
builder.constraints {
}
Setting the builder as a delegate of any closure allows us to execute the closure as if it was coded in the above style. The constraints closure can be run at any time by Grails, and as it executes the ConstrainedPropertyBuilder, it will build a HashMap of the constraints it encounters for each field.
Note
We can illustrate the same technique by using MarkupBuilder and NodeBuilder. The Markup class in the following code snippet just declares a static closure named markup. Later on we can use this closure with whatever builder we want, by setting the delegate of the markup to the builder that we would like to use.
class Markup {
    static markup = {
        customers {
            customer(id:1001) {
                name(firstName:"Fred",
                  surname:"Flintstone")
                address(street:"1 Rock Road",
                  city:"Bedrock")
            }
            customer(id:1002) {
                name(firstName:"Barney",
                  surname:"Rubble")
                address(street:"2 Rock Road",
                  city:"Bedrock")
            }
        }
    }
}

Markup.markup.setDelegate(new groovy.xml.MarkupBuilder())

Markup.markup() // Outputs xml

Markup.markup.setDelegate(new groovy.util.NodeBuilder())

def nodes = Markup.markup() // builds a node tree
A one-to-many relationship applies when an instance of class such as customer is associated with many instances of another class. For example, a customer may have many different invoices in the system, and an invoice might have a sale order object for each line on the invoice.
class Customer {
   String firstName
   String lastName
   static hasMany = [invoices:Invoice]
}

class Invoice {
   static hasMany = [orders:SalesOrder]
}

class SalesOrder {
   String sku
   int amount
   Double price
   static belongsTo = Invoice
}
To indicate the "has many" associations between Customer/Invoice and Invoice/SalesOrder, we insert a static hasMany setting. We can also indicate ownership by using the belongsTo setting. In the preceding example, a sales order line has no relevance except on an invoice. We apply a belongsTo setting to bind it to the invoice. The belongsTo setting will cause deletes to cascade when the owning object is deleted. If an invoice is deleted, the delete will cascade to the sales order lines. Invoice does not belong to Customer, so for auditing purposes the invoice object will not be automatically deleted even if the customer is removed.
Note
From the Groovy DSL point of view, hasMany is just a static table containing a map of IDs and Class objects. GORM can analyze this map at load time in order to create the correct table mappings.
GORM will automatically take care of the mapping between the Customer, Invoice, and
SalesOrder classes by creating invoice_sales_order and customer_invoice join tables. We can peek at these by using mysql, to confirm that they exist.
mysql> describe customer_invoice;
+---------------------+------------+------+-----+---------+-------+
| Field               | Type       | Null | Key | Default | Extra |
+---------------------+------------+------+-----+---------+-------+
| customer_invoice_id | bigint(20) | YES  | MUL | NULL    |       |
| invoice_id          | bigint(20) | YES  | MUL | NULL    |       |
+---------------------+------------+------+-----+---------+-------+
2 rows in set (0.01 sec)
mysql>
Customer objects are linked to Invoice objects through the customer_invoice join table. Invoices are linked to sales orders via the invoice_sales_order join table, using foreign keys, as we can see from following DDL diagram:

The hasMany setting is defined as a Map containing a key and class for each domain object that is associated. For each hasMany key encountered on a domain class, GORM will inject an a
ddTo(key) method. This translates to an a
ddToOrders method, which is added to Invoice, as the key used was Orders and an a
ddToInvoices method is added to Customer. Invoking these methods will automatically save an order or invoice in the database and also update the join tables with the correct keys.
def fred = new Customer(firstName:"Fred", lastName:"Flintstone")

fred.save()

def invoice = new Invoice()

invoice.addToOrders(new SalesOrder(sku:"productid01",
                                   amount:1, price:1.00))
invoice.addToOrders(new SalesOrder(sku:"productid02",
                                   amount:3, price:1.50))
invoice.addToOrders(new SalesOrder(sku:"productid03",
                                   amount:2, price:5.00))

fred.addToInvoices(invoice)
Note
GORM adds the a
ddTo{association} methods to a domain class by iterating the hasMany map in the class, and updating the MetaClass with a new method for each association that it encounters. Below we can emulate how GORM does just this. In this example, we iterate over the hasMany map of the Customer class. We add a closure method that returns a string corresponding to each map entry that we encounter. The closure names that we add are dynamically generated and include the key values from the hasMany map.
class Customer {
    static hasMany = [invoices:Invoice,
          orders:SalesOrder]
}
class Invoice {
}
class SalesOrder {
}
Customer.hasMany.each {
  def nameSuffix = it.key.substring(0,1).toUpperCase()
  def relation = "${nameSuffix}${it.key.substring(1)}"
  Customer.metaClass."addTo${relation}" {
     "Add to ${relation}"
  }
}
def customer = new Customer()
assert customer.addToInvoices() == "Add to Invoices"
assert customer.addToOrders() == "Add to Orders"When GORM establishes a one-to-many association with a Class, it also adds a field to the class with the same name as the key used in the h
asMany map. So we can access the list of orders on an invoice as follows:
invoice.orders.each {println sku + " " + amount + " " + price
Many-to-many associations are rarer than any of the other associations, and can be tricky to model. In GORM, all we need to do is to make the association bi-directional and give ownership to one side by applying a belongsTo setting. GORM will take care of the rest.
A tunes database needs to model the fact that artistes perform on many songs but also that artistes collaborate on songs, so songs can have many artistes. Modeling this in GORM is the essence of simplicity.
class Artist {
   String name
   static hasMany = [songs:Song]
}

class Song {
   String title
   static belongsTo = Artist
   static hasMany = [artists: Artist]
}
When maintaining a database, it does not matter whether we add songs to artistes or artistes to songs—GORM will maintain both sides of the relationship.
def song1 = new Song(title:"Rich Woman")
def song2 = new Song(title:"Killing the Blues")

def artist1 = new Artist(name:"Jimmy Page")
def artist2 = new Artist(name:"Alison Krauss")

song1.addToArtists(artist1)
song1.addToArtists(artist2)
artist1.addToSongs(song2)
artist2.addToSongs(song2)

artist1.save()
artist2.save()

println artist1.name + " performs "
artist1.songs.each { println "    " + it.title }
println artist2.name + " performs"
artist2.songs.each { println "    " +  it.title }

println song1.title + " performed by"
song1.artists.each { println "    " +  it.name }
println song2.title + " performed by"
song2.artists.each { println "    " +  it.name }
We add both artistes to song1 and then add song2 to both artistes. We only need to save the artiste objects that are the owners of the relationships, and all associations are preserved. The example prints out the following:
Composition is used when instead of having separate tables for each business object, we would like to embed the fields of a child object in the table of its parent. In the previous one-to-one examples, it may be useful for us to have Address and Identity classes to pass around in our Groovy code, but we may prefer the data for these to be rolled into one database table. To do this, all we need to do is to add an embedded setting to the C
ustomer domain class, and GORM takes care of the rest.
class Customer {
   String firstName
   String lastName
   Address billing
   Address shipping
   Identity ident
   static embedded = ['billing','shipping','ident']
}

class Address {
   String street
   String city
}

class Identity {
   String email
   String password
}
We can see a useful application of embedding in the previous code snippet, where we needed two addresses—one for billing and one for shipping. This does not warrant a full one-to-many association between Customer and Address because we only ever have the two addresses. The fields from Address and Identity get mapped into columns in the customer table, as we can see here.

By default, GORM implements inheritance relationships with a table-per-hierarchy. A class column in the table is used as a discriminator column.
class Account {
   double balance
}

class CardAccount extends Account {
   String cardId
}

class CreditAccount extends Account{
   double creditLimit
}
All of the properties from the hierarchy are mapped to columns in an account table. Entries in the table will have the class column set to indicate what class the object in the entry belongs to. You will note from the upcoming mysql table that all properties in the derived classes are set to nullable. This is one downside of using the table-per-hierarchy approach, but it can be overcome by using the mapping setting.
mysql> describe account;
+--------------+--------------+------+-----+---------+----------------+
| Field        | Type         | Null | Key | Default | Extra          |
+--------------+--------------+------+-----+---------+----------------+
| id           | bigint(20)   | NO   | PRI | NULL    | auto_increment |
| version      | bigint(20)   | NO   |     |         |                |
| balance      | double       | NO   |     |         |                |
| class        | varchar(255) | NO   |     |         |                |
| credit_limit | double       | YES  |     | NULL    |                |
| card_id      | varchar(255) | YES  |     | NULL    |                |
+--------------+--------------+------+-----+---------+----------------+
6 rows in set (0.01 sec)
mysql>
We can use the mapping setting to apply a table-per-subclass strategy to inheritance mapping. This will overcome the need to allow all properties to be nullable. Mapping also allows us to map GORM domain classes onto a legacy database, as it gives us fine control over both table and column names in the relation model that we map to.
class Account {
   double balance

   static mapping = {
      table "fin_account"
      balance column:"acc_bal"
   }
}
Note
The mapping closure is implemented in Grails in a fashion very similar to constraints. The mapping closure is executed, having set its delegate to an instance of HibernateMappingBuilder. Within the closure code for mapping, we can use any of the built-in methods to control how mapping should occur, or we can name the column field itself for more fine-grained control over the mapping of a column. To apply a table-per-subclass strategy and turn on caching, we can add the following:
static mapping = {
    tablePerSubclass = true
    cache = true
}We
've already seen in the examples some basic querying with list() and get(). The list method can be used with a number of named parameters that gives us finer control over the result set returned.
// list all customers
Customer.list().each {
    println "${it.firstName} ${it.lastName}"
}
// List the first 10 customers
Customer.list(max:10).each {
    println "${it.firstName} ${it.lastName}"
}
// List the next 10 customers
Customer.list(max:10, offset:10).each {
    println "${it.firstName} ${it.lastName}"
}
// List all customers in descending order sorted by last name
Customer.list(sort:"lastName",order:"desc").each {
    println "${it.firstName} ${it.lastName}"
We've seen the get() method in action, which uses the database ID to return an object. We can also use the ge
tAll() method when we want to return more than one object, as long as we have the IDs that we need.
def customers = Customer.getAll(2, 4, 5, 7)
GORM supports a unique and powerful query function through the use of dynamic finders. A dynamic finder is a pretended method applied to a domain class, that can return one or many queried objects. Finders work by allowing us to invent method names, where the syntax of the query is bound into the method name. All finders are prefixed by findBy or fi
ndAllBy.
// Find the first customer called Fred
def fred = Customer.findByFirstName("Fred")
// Find all Flintstones
def flintstones = Customer.findAllByLastName("Flintstone")
// Find Fred Flintstone
def fred_flintstoner = Customer.findByFirstNameAndLastName("Fred", "Flintstone")
Finder names can also include comparators, such as Like, LessThan, and IsNotNull.
// Find all customers with names beginning with Flint
def  flints = Customer.findAllByLastNameLike("Flint%")
We can include associations in queries. Here we can find all invoices for Fred:
def fred = Customer.findByFirstNameAndLastName("Fred", "Flintstone")
def invoices = Invoice.findAllByCustomer(fred)
Note
Dynamic finders open up a huge range of possible finder methods that can be used with a class. The more fields there are, the more possible finder methods there are to match. Rather than trying to second-guess what all of the possible combinations might be and adding them to the metaclass, GORM takes a slightly different approach.
From Groovy 1.0, we can add a method called methodMissing to the MetaClass object. This differs slightly from the invokeMethod call that we provided in previous chapters, because methodMissing is called as the last chance saloon before Groovy throws a MethodMissingException, whereas invokeMethod will be called for every method invocation.
Grails adds its own methodMissing implementation, which catches all of the missing method invocations with the prefixes find and findAll the first time that they occur. At that point, the actual method implementation is registered in the metaclass, so subsequent calls to that finder will not suffer the overhead.
We 've only scratched the surface of what can be done with GORM and Grails. For a more comprehensive view of GORM, take the time to look at the Grails reference at http://www.grails.org. The publishers of this book have also released an excellent reference, Grails 1.1 Web Application Development by Jon Dickinson, which covers GORM in much more depth than we have time to do here.
What is most interesting about GORM in relation to this book is how it achieves its goals through a suite of mini DSLs implemented in Groovy. DataSource configuration is achieved through a markup syntax that can be understood without any prior knowledge of Groovy. Domain classes could be designed and written by a database architect who can also be insulated from the intricacies of the Groovy language.
Apache Ant is the venerable old build system for the Java world. Arguably, Ant has been superseded in features and benefits by another Apache project, Maven. Ant still has a significant following and still is the de facto building standard for a lot of projects. Both systems now have Groovy scripting support in the form of Gant for Ant and GMaven for Maven. In this section we will be taking a look at Gant.
Ant was developed by The Apache Software Foundation. Ant was designed as a replacement for command-like make tools such as make and nmake. Ant was written in Java, so unlike other make tools it runs across platforms. Ant build scripts are written in XML. Build files contain one project and many target elements that can be defined to have dependencies on each other. Each target element will define one or more task elements, which are responsible for doing the actual work.
One benefit of Ant over existing make tools is that instead of invoking shell commands directly, Ant implements all of its functionalities through the task elements. Tasks are implemented as plugin modules to Ant itself. The plugin module takes care of any cross platform issues, so a <mkdir> task will create a directory regardless of what operating system we run on.
The plugin module approach for implementing tasks also means that additional tasks can be added to Ant in order to achieve any build operation we need. From its earliest days, there have been numerous additional plugin modules available for everything from building stripped down JAR files to deployment on every conceivable platform. The extensibility and modularity of the task plugin interfaces have been key to Ants' continued success over the years.
Here we take a look at an Ant build file that illustrates some of the important features. To try this out you need to edit the ${path-to} and ${version} to point to a copy of the groovy-all JAR file on your system.
Note
Not all Groovy distributions have a copy of groovy-all-1.x.x.jar in lib. If it is missing from your distribution, you can download it from http://groovy.codehaus.org, or make use of the one that is packaged in the Grails distribution, under either the lib or embeddable directories.
<project name="hello" default="run">
   <property name="dist" value="./dist"/>
   <path id="hello.class.path">
        <pathelement location="${path-to}groovy-all-${version}.jar"/>
        <pathelement location="${dist}/classes"/>
        <pathelement path="${java.class.path}"/>
   </path>

   <taskdef name="groovyc"
         classname="org.codehaus.groovy.ant.Groovyc"
        classpathref="hello.class.path"/>

   <target name="init">
      <mkdir dir="${dist}/classes"/>
   </target>

   <target name="compile" depends="init">
      <groovyc srcdir="." destdir="${dist}/classes" />
   </target>

   <target name="run" depends="compile">
      <java classname="Hello">
         <classpath refid="hello.class.path"/>
       </java>
   </target>
</project>
This simple Ant script defines three targets:
run, compile, and init. The default target is run, which runs the next Groovy Hello script as a class file in the Java VM. The run target depends on compile, which compiles the Groovy script to a Java class file in the dist/classes directory. Compile depends on init, which creates a directory for classes.
Groovyc is not available in the default Ant distribution as an available task, so we use the taskdef tag to make the Groovyc Ant plugin available. This plugin is packaged in the groovy-all-
{version}.JAR file. Ant is so pervasively used these days that it is commonplace now to find appropriate Ant tasks bundled with component and tool distributions.
Once everything is in place and Ant is installed, all we need to do is to invoke Ant from the command line to compile and run Hello.groovy.
// Hello.groovy

println "Hello, Groovy World!"
$ ant
Buildfile: build.xml
init:
compile:
run:
     [java] Hello, Groovy World!
BUILD SUCCESSFUL
Total time: 2 seconds
$
In our discussion on builders in the previous chapter, we came across AntBuilder, which is a Groovy builder class that implements a scripting interface to Ant through GroovyMarkup. With AntBuilder, we are able to run Groovy scripts that call Ant tasks directly, and can contain Groovy conditional logic. In the following example, we emulate the Ant script from above. The only things that we are missing with AntBuilder are the dependency-based targets.
def ant = new AntBuilder()
dist = "./dist"
taskdef name: "groovyc", classname: "org.codehaus.groovy.ant.Groovyc"

ant.mkdir(dir:"${dist}/classes")
ant.groovyc( srcdir: ".", destdir: "${dist}/classes",
    includes:"Hello.groovy")
ant.java(classname:"Hello") {
    classpath {
        pathelement path: "${path-to}groovy-all-${version}.jar "
        pathelement path: "${dist}/classes"
    }
}
To interpret the above code, we need to understand how AntBuilder treats method calls encountered within the GroovyMarkup.
Method calls on the
AntBuilderobject translate to task names. These are pretended method calls. SoAntBuilderwill map the method call to an equivalent task plugin, and attempt to invoke it.Task attributes are passed to the pretended methods as maps, which allow us to use the named parameter syntax seen above.
Nested code within closures map to nested Ant tasks or elements similar to the nesting in an Ant
build.xmlscript.. In the following code example, we wrap the same code in an Ant sequential task.def ant = new AntBuilder() ant.sequential { dist = "./dist" taskdef name: "groovyc", classname: "org.codehaus.groovy.ant.Groovyc" mkdir(dir:"${dist}/classes") groovyc( srcdir: ".", destdir: "${dist}/classes", includes:"Hello.groovy") java(classname:"Hello") { classpath { pathelement path: "${path-to}groovy-all-${version}.jar" pathelement path: "${dist}/classes" } } }
An important point to note is that although the AntBuilder code is a GroovyMarkup, it is not producing any Ant build file XML. The mechanism that AntBuilder uses is to wrap the task plugins with Groovy scripting. So what is happening above is that the script is calling the tasks sequential, taskdef, groovyc, and so on, in sequence. We lose the dependency mechanism of Ant itself but we can add our own scripting logic, which may be more appropriate to what we need. Instead of a dependency, we can put more regular Groovy logic in our script:
def classesDir = new File("${dist}/classes")
if (!classesDir.exists())
ant.mkdir(dir:"${dist}/classes")Although AntBuilder may be considered a mini DSL for building with Ant, the fact remains that you need to be a Groovy programmer to develop with it. We are still playing with some boilerplate to make use of the DSL, and there are obvious limitations in the lack of targets and dependencies. Gant takes the obvious next step. Internally, Gant extends from AntBuilder, but adds a bunch of capabilities to it. Gant also comes with its own runtime, so we do not have to construct an AntBuilder object in our script. Gant allows us to write simply write markup code directly in the script, with no precursors. Here we have a Gant script that is a complete functional replacement for our first Ant script. Just like the original, there are init, run, and compile targets.
dist = "./dist"

ant.taskdef (  name : 'groovyc' ,
               classname : 'org.codehaus.groovy.ant.Groovyc' )

target (init: "Create directories") {
mkdir(dir:"${dist}/classes")
}

target(compile:"Compile groovy code") {
depends(init)
groovyc( srcdir: ".",
             destdir: "${dist}/classes",
             includes:"Hello.groovy")
}

target(run:"Run in JVM") {
	depends(compile)
	java(classname:"Hello") {
		classpath {
			pathelement path: "${path-to}groovy-all-${version}.jar "
			pathelement path: "${dist}/classes"
		}
	}
}

setDefaultTarget(run)
Gant hides the fact that we are using an
AntBuilder class. Actually, we are using Gant's own builder GantBuilder, which extends AntBuilder.
On startup, Gant will load the supplied build.gant script, and then run it. Prior to running the script, it sets up some additional properties in the binding. We can see some of these in use in the previous example.
The call to ant.taskdef()
is a call to a GantBuilder instance that has been stored in the binding.
Calls to target() are in fact to a closure property target that has been stored in the binding. The target closure accepts a Map and a Closure as its parameters. The Map defines the name and description of a target, while the closure is stored for execution later when the target is invoked. All that target does when called is to store a closure with a target name as a key, along with a description.
The setDefaultTarget(run) call is also a closure stored in the binding, that sets the default target to run, which is the target set up by the previous target call.
If we were to pause Gant immediately after running the build.gant script, we would see that nothing more has happened other than setting up a new groovyc task in the builder. This is done through ant.taskDef, which stores the closures for three targets, namely init, compile, and run, and sets the default target to run.
Now Gant can start executing the build logic. It will start by calling the closure stored for the default target by first setting its delegate to the GantBuilder instance. This closure will now behave just like
AntBuilder markup, with the one additional piece of logic being provided by depends(). The
depends() method is implemented through an overloaded invokeMethod in the GantBuilder metaclass.
The depends() call will invoke the stored closure for the dependent target before continuing with the rest of the closure logic. In this way, by invoking the first target closure, Gant will chain through all of the dependent target closures, in sequence. Every time a target closure is invoked, the GantBuilder instance will be set as its delegate, so the result is the same as invoking one large AntBuilder closure containing all of the build logic.
Note
If we were to dig into the code for Gant, we would find that some of its implementation classes, including GantBuilder, are not written in Groovy, but in Java. There is no particular reason for this that I can tell, other than that Gant was first written in 2006 and perhaps at the time the author felt that he had greater flexibility to work with the Groovy MOP in Java. In fact, the Java code does not do anything different from what we have already covered in Groovy. The two languages are interchangeable, anyway.
Gant is neatly packaged with a runtime command line gant. Just like Ant expects a default build script of build.xml, gant will first look for a default build.gant. By convention, gant scripts take the extension .gant, which helps to define them as standalone DSL scripts. Looking at the previous script, it would be hard to tell to the uninitiated that this is actually Groovy code. A configuration engineer can learn gant as a mini-language in its own right, and work effectively with it without knowing anything about Groovy. Of course, the Groovy aspect and the fact that we can augment gant scripts with full-blown scripting means that it is a superb power tool for the experienced configuration engineer or developer.
We run gant from the command line, as you would expect. Assuming that the above script is saved as build.gant, all we have to do is:
$ gant
    [mkdir] Created dir: /Users/fdearle/ /gant/dist/classes
  [groovyc] Compiling 1 source file to /Users/fdearle/gant/dist/classes
Hello, Groovy World!
$
If we need to know what targets are available, then:
$ gant -p
 compile  Compile groovy code
 init     Create directories
 run      Run in JVM
Default target is run.
$
Gant does not replace Ant, but builds on its capabilities. I personally am loath to use regular Ant XML in my builds scripts anymore. Gant provides so much more power and flexibility.
Test Driven Development (TDD) has become an essential capability for software developers over the past decade. TDD can mean different things to different organizations. It can mean the adoption of a full-blown test first style of coding, where unit tests are written before any functional code. It could just mean that you write extensive unit tests for every piece of functional code in the system. It may or may not mean the use of continuous integration builds that run a battery of unit tests after each code check in. Whatever TDD means to your organization, the chances are that flavors of xUnit test frameworks, including JUnit, WEBUnit, and HTTPUnit have been essential tools in your software developer's arsenal for some considerable time now.
The problem with xUnit-style testing is that these are all tools that are designed by programmers, for programmers. Your QA staff might be familiar with running xUnit tests and reporting on problems that they encounter, but they are less likely to be involved in originating the code tests with these frameworks. Unit tests tend to be written to test features at the class and method level rather than testing the intended behavior of the software.
Two alternate models of testing—Acceptance Test Driven Development (ATDD) and Behavior Driven Development (BDD)—have been advocated, primarily within the agile community, as a solution to this issue. The key to promoting ATDD and BDD is the creation of tools that allow all of the stakeholders, including developers, business analysts, and QA, to be able to use a common tool with a common language. Testing begins with a specification of the intended behavior for the software, which will be entered into the tool. This implies being able to develop a specification in a language that can be written and understood by of all the stakeholders, and not just the developers.
The common language of ATDD and BDD revolves around defining behavior in user-centric terms. Whether we are writing acceptance tests or defining behavior, we end up using terms such as GIVEN, WHEN, and THEN as follows:
GIVEN a precondition
WHEN certain actors perform certain actions
THEN we expect a predetermined result
Of course, this type of terminology is ripe for using a mini-language or DSL to define the tests or behavior. And this is exactly what is happening. There are a plethora of BDD style testing frameworks out there already, the most notable being RSpec, a BDD-style framework implemented by using Ruby's dynamic features. At the time of writing this book, there are several BDD-style DSL frameworks for Groovy, including GSpec, EasyB, and Spock. We will take a brief look at these frameworks here.
GSpec is the oldest BDD project for Groovy, having made its first appearance in 2007. The lack of current development by the project founder, and the fact that it is still defined as being in Alpha, would lead us to believe that Spock is superseding it. Below is an example of a GSpec specification. It's still worth taking a look at this from our perspective, to see what Groovy features are being used to implement the DSL. Here is segment of a specification that can be found at http://groovy.codehaus.org/Using+GSpec+with+Groovy. This script defines a specification that defines a part of the desired behavior for a
FixedStack class. Notice how the DSL is structured to give a pseudo English style to it.
import com.craig.gspec.GSpecBuilderRunner

def the = new GSpecBuilderRunner()

the.context('A non-empty stack') {
    initially {
        the.stack = new FixedStack()
        ('a'..'c').each { x -> the.stack.push x }
        the.stack.should_not_be_empty
    }

    specify('should return the top item when sent #peek') {
        the.stack.peek().should_equal 'c'
    }

    specify('should NOT remove the top item when sent #peek') {
        the.stack.peek().should_equal 'c'
        the.stack.peek().should_equal 'c'
    }

    specify('should be unchanged when sent #push then #pop') {
        the.stack.push 'Anything'
        the.stack.pop()
        the.stack.peek().should_equal 'c'
    }

    specify('should return the top item when sent #pop') {
        the.stack.pop().should_equal 'c'
        the.stack.push 'c' // put it back the way it was
    }

    specify('should remove the top item when sent #pop') {
        the.stack.pop().should_equal 'c'
        the.stack.pop().should_equal 'b'
    }

    specify('should add to the top when sent #push') {
        the.stack.push 'd'
        the.stack.peek().should_equal 'd'
    }
}

the.context('An empty stack') {
    initially {
        the.stack = new FixedStack()
        the.stack.should_be_empty
    }

    specify('should no longer be empty after #push') {
        the.stack.push 'anything'
        the.stack.should_not_be_empty
    }
}

the.context('A stack with one item') {
    initially {
        the.stack = new FixedStack()
        the.stack.push 'anything'
        the.stack.should_not_be_empty
    }

    specify('should remain not empty after #peek') {
        the.stack.peek()
        the.stack.should_not_be_empty
    }

    specify('should become empty after #pop') {
        the.stack.pop()
        the.stack.should_be_empty
    }
}

}
GSpec implements markup style syntax through the GSpecBuilderRunner class. Specifications are defined by invoking the pretended method
specify() within the scope of a
context() block. For each context, the GIVEN preconditions are set within an
initially() block. Within each
specify() block, we describe the preconditions that need to be met.
If we want to make an assertion about a condition, we can set a property on the
GSpecBuilderRunner object. So in each
initially() block, we set a
stack property to be a new
FixedStack object that will be the object acted upon in the specification. Any properties that are added to the Builder are wrapped with some new behavior supplied by GSpec, which adds some pretended property accessors starting with should_be_ and should_not_be. These accessors are equivalent to assertions on the object. So the.stack.should_not_be_empty is equivalent to asserting the.stack.isEmpty() == false.
GSpec also adds some pretended methods to properties that are added to the builder. The methods
should_equal and should_not_equal also act as assertions and will assert that the parameter passed is either true or false. Between the two GSpec supplies, a dialect of assertions exists that is easier to read than traditional assertions. For a
specify block to be complete, it must contain at least one
should_style assertion, although the DSL makes no attempt to ensure that this happens.
Note
GSpec makes no attempt to hide the fact that it is using a Builder. From the previous DSL example we have seen techniques that could be used to conceal the Builder instance. However, the mechanism that GSpec uses to add the should_be and should_equal style assertions requires access to the builder instance.
GSpecBuilderRunner extends the
GSpecBuilder class. GSpecBuilder has an overloaded
setProperty() method that wraps every property set in the Builder instance as a
GSpecDelegate object. It is the
GSpecDelegate class that injects all of the
should_be and
should_not_be property accessors, and the should_equal and should_not_equal methods. As a result, a call to the stack should_be_empty translates to a
GSpecDelegate.getProperty(). Instead of being a property lookup for should_be_empty, the GSpecDelegate recognizes this as an assertion, and asserts that wrappedObject.isEmpty() is true.
EasyB is becoming one of the most popular BDD frameworks used by the Groovy community. The dialect that it provides is similar to GSpec in a lot of ways. Below is an example specification from the EasyB website. You can download EasyB from http://easyb.org/download.html. EasyB provides a BDD style dialect through the description, before, it, and, and after keywords. The main specification keyword is it, which encourages you to follow a descriptive statement that must be fulfilled: for example, it "should dequeue item just encoundeted".
package org.easyb.bdd.specification.queue

import org.easyb.bdd.Queue

description "This is how a Queue must work"

before "initialize the queue for each spec", {
 queue = new Queue()
}

it "should dequeue item just enqueued", {
 queue.enqueue(2)
 queue.dequeue().shouldBe(2)
}

it "should throw an exception when null is enqueued", {
 ensureThrows(RuntimeException.class) {
  queue.enqueue(null)
 }
}

it "should dequeue items in same order enqueued", {
 [1..5].each {val ->
  queue.enqueue(val)
 }
 [1..5].each {val ->
  queue.dequeue().shouldBe(val)
 }
}
The it specification keyword is followed by a closure block containing the specification assertions. Within that closure we can assert the state of any object by calling assertion methods on it. EasyB provides an extended list of assertion methods that can be called on an object within the closure. These are just a few of them: shouldBe(), shouldBeLessThan(), shouldBeEqualTo(), isA(), isNotA(), shouldNotBeA().
Note
GSpec and EasyB are quite similar in structure, but they use different mechanisms to implement their DSL-style keywords and assertions. EasyB keywords are implemented by adding named closures to the Script binding, as follows:
binding.before = {description, closure = {} ->
....
}
By setting a named closure as a variable in the binding, it becomes available as a callable function in the EasyB script. Later on, we will use this feature ourselves to build a Rewards DSL.
Within the it closure, EasyB applies the additional assertion methods shouldBe(), shouldNotBe(), and others through a
category class. The
BehaviorCategory class implements all of the assertion methods as follows:
class BehaviorCategory {
    static void shouldBeGreaterThan(Object self, value) { ...
    }
}
The implementation of the it keyword uses this BehaviorCategory class when calling the closure body. The BehaviorCategory is therefore applied to the entire closure code that follows the it keyword.
binding.it = { description, closure = {} ->
   use(BehaviorCategory) {
      closure()
      }
}
Placing a named closure in the binding gives us options for how we treat the closure body in the DSL. EasyB just applies a category to the closure block, as shown in the above code snippet. However, we can also set the closure delegate to a Builder if we prefer to have markup-style syntax in our closure blocks.
To finish off our look at BDD frameworks, we will look at Spock. Spock uses similar principles to GSpec and EasyB, as the next example from the Spock framework example code shows. This code snippet is from the Spock Stack example. You can find the full example, downloads, and documentation for Spock, hosted on Google Code at http://code.google.com/p/spock/.
import org.junit.runner.RunWith
import spock.lang.*

@Speck(java.util.Stack)
@RunWith(Sputnik)
class EmptyStack {
  def stack = new Stack()

  def "size"() {
    expect: stack.size() == 0
  }

  def "pop"() {
    when: stack.pop()
    then: thrown(EmptyStackException)
  }

  def "peek"() {
    when: stack.peek()
    then: thrown(EmptyStackException)
  }

  def "push"() {
    when:
    stack.push("elem")

    then:
    stack.size() == 1
    stack.peek() == "elem"
  }
}
Spock tries to hide as much boilerplate from the user as possible, by using annotations. The @Speck annotation in the preceding code snippet tells Spock to expand the
EmptyStack class into a full-blown Spock test for the java.util.Stack class. There is no need to instantiate a Builder in GSpec. The
@Sputnik tells Spock to use its own JUnit runner to run the specification.
A Spock specification consists of several parts, as follows:
@Speck
@RunWith(Sputnik)
class MyFirstSpecification {
  // fields
  // fixture methods
  // feature methods
}
Fields: Class instance fields can be used to set up objects to be used by the fixture methods.
Fixture methods: These include
setup(),cleanup(),setupSpeck(), andcleanupSpeck(). These are called before and after eachfeaturemethod. Together with fields, these make up the GIVEN preconditions of a behavior test.Feature methods: These describe the features of the specification to be tested. Feature methods are named with string literals so that they can be highly descriptive of the feature to be tested. For instance, the pop feature method can be named "pop from an empty stack should raise an exception".
A block is a segment of code that starts with a label, for example, when:, and continues until the end of the feature method or the start of another block. Spock supports a number of different block types.
setup:which also has an alias ofgiven:and is used to denote the preconditions of a feature.when: then:which describe the stimulus and expected response of a feature.expect:is used when the stimulus and response can be combined into a single expression; for example,expect:"ABC".toLowerCase()=="abc".where:allows multiple inputs to be fed into the feature method. For example, we can declare thattoLowerCaseshould lower the case of all letters regardless of whether we start with all uppercase, mixed case, or all lowercase.expect: a.toLowerCase() == b where: a << ["ABC" , "Abc" , "abc"] b << ["abc", "abc", "abc" ]
The block label code is an unusual Groovy code. You may be aware of labels in Java and Groovy as a means of breaking or continuing from loops:
outer:
    for( i=0; i<10; i++ ){
        for( j=10; j>0; j--){
            if( j == 5 ) {
             break outer;       // exit entire loop
            }
        }
    }

outer:
    for( i=0; i<10; i++ ){
        for( j=10; j>0; j--) {
            if( j== 5 ) {
              continue outer;   // next iteration of i
            }
        }
    }
Note
Attaching a label such as setup:and expects: to any statement is valid Groovy code, but in the absence of a loop it is redundant, as we cannot associate a break; or continue; statement to navigate to it. Neither Java nor Groovy has a goto; statement. So how is Spock making use of these blocks?
The answer is that Spock uses an advanced feature of Groovy to provide its own implementation of the label-handling code. The Abstract Syntax Tree (AST) Transformation feature introduced in Groovy 1.6 allows Spock to transform the AST before it gets compiled into bytecode. In this respect, Spock is not a pure Groovy-based DSL because it is compiling its own code blocks behind the scenes. However, labeling blocks of code in this way is a clever subterfuge because it uses valid Groovy syntax to decorate the code in a way that makes the intention very clear to the reader.
GSpec, EasyB, and Spock all attempt to achieve the same objective. The ultimate goal is to wrap xUnit assertions in a user-friendly DSL that allows specifications to be written in a more user-friendly way. GSpec unashamedly wears its heart on its sleeve as a Groovy Builder. EasyB implements keywords through binding variables and categories. Spock subverts the Groovy syntax with AST transformations and lessens boilerplate with annotations.
For my money, EasyB provides the most usable syntax out of the three. GSpec forces the introduction of a Builder instance, which is an unnecessary boilerplate that may confuse users who are trying to read the specifications. Although Spock's clever manipulation of the AST is impressive, the resulting DSL is still structured in quite a programmatic idiom. EasyB on the other hand scans almost like a structured English representation of the specification.
In this chapter, we looked at some existing Groovy DSLs that are in current use and are free to download. GORM implements a full persistence layer over Hibernate that layers over standard Groovy classes. GORM allows us to decorate a regular POGO with settings for applying the most common associations and relationships that we can expect in our object models.
Much of what GORM provides in terms of querying via dynamic finders requires a Groovy-knowledgeable developer to appreciate and use them. However, the basic object modeling semantics provided through the belongsTo, hasMany, and other persistence settings could be used quite readily by a data modeling architect who has little or no knowledge of the Groovy language. The domain classes can be viewed as an independent model specification language, which has the advantage of being immediately usable by Groovy developers responsible for other parts of the system.
In the same vein, Gant provides a GroovyMarkup style syntax to interface with Ant, as an alternative to XML. Gant can be learned as a mini DSL for Ant or it can be augmented with Groovy program logic that makes it significantly more powerful than plain Ant XML build files.
GSpec, EasyB, and Spock all attempt to bring BDD style specification-based testing to the Java/Groovy platform. Each provides a means to write specifications by using GIVEN/WHEN/THEN style semantics that are easier to interpret than regular xUnit style testing frameworks. The pseudo-English style syntax of these DSLs should mean that the specifications can be understood by business stakeholders even if they still need to be coded by a Groovy-proficient developer.
Most importantly, in this chapter, we have seen how all of these projects exploit different Groovy features in order to implement DSL style structures and syntax.