
![]()
JavaScript Basics
As we said in Chapter 1, enchant.js is written in the JavaScript programming language. When you program games in enchant.js, you’ll write commands and other code in the JavaScript language, so we need to examine simple JavaScript before diving headfirst into enchant.js games. If you are already familiar with JavaScript, feel free to skip this chapter.
JavaScript is the primary programming language used for scripting on web pages. Unlike most programming languages used to create software applications that must be installed on computers to function, JavaScript code runs on the client web browser. Given that enchant.js and games written using enchant.js are created using JavaScript, it is imperative to understand the fundamental concepts of JavaScript. If you are new to programming, learning these fundamentals will benefit you immensely, as they happen to also be the building blocks of object-oriented languages and are a useful starting point from which to learn other popular programming languages, such as Java and C++.
The grammar of a programming language, or rather, the specific way elements of the language are written, is called syntax. In this chapter, you learn the building blocks of JavaScript, their syntax, and their functions by writing code on the code.9leap.net web site. We’ll take you step-by-step through the process and explain each of these building blocks through a series of simple code projects.
Summary List
In this chapter, we’ll show you how to do the following:
- Declare a Variable
- Assign a Value to a Variable
- Add Variables
- Check the Value of a Variable
- Manipulate a Variable Using Itself
- Manipulate a Variable Using Incrementation
- Compare a Variable
- See How Similar Two Variables Can Be
- Manipulate a Comparison
- Implement Logic with the If Statement
- Create an Object
- Work Smarter with the While and For Loop Statements
- Interrupt a Loop with Break
- Skip a Loop Iteration with Continue
- Generate Random Numbers
- Define Scenarios with Switch
- Store Numbered Data in an Array
- Store Non-Numbered Data in an Associative Array
- Save Time with Functions
- See Where Variables Live
- Make Object Blueprints with Prototypes
Declare a Variable
Variables are containers for values and in most cases can be updated at any time with a new value, hence their name. Their values “vary,” so they are “variable.” The benefit of using variables over explicit values is due to the dynamic nature of a variable. If you include a variable in a calculation, and then later change the value of that variable, the next time you perform the same calculation the new value will be used.
To use a variable, you must first declare it with the var statement, which tells the application to reserve a spot in memory for the variable. At the end of any single statement in JavaScript, you must include a semicolon (;).
To declare three variables with the names num0, num1, and sum, do the following:
- Go to http://code.9leap.net and log in or sign up if you don’t already have an account.
- Go to http://code.9leap.net/codes/show/26854 and fork the Blank JavaScript Template by clicking the Fork button.
- Change the title of the project by modifying the field directly to the right of the code.9leap logo in the upper-left corner of the screen. Choose something appropriate such as “Declare a Variable.” (For all future examples forking this code, please change the title in this manner to keep track of your individual projects.)
- Type in the code shown in Listing 2-1.
Listing 2-1. Declaring a Variable
var num0;
var num1;
var sum;
You can use the following characters in variable names:
- letters (A–Z, a–z)
- numbers (but not as the first character of a variable name)
- underscores (_)
Table 2-1 shows reserved words in JavaScript that cannot be used as variable names.
Table 2-1. Reserved Words in JavaScript
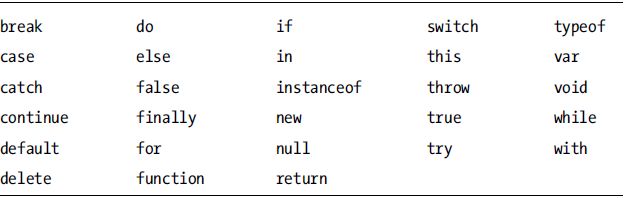
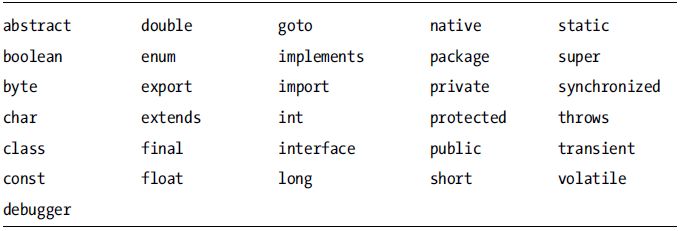
Table 2-2 shows words that currently are not used, but have a high probability of being used in the future. We recommend avoiding them when naming your variables.
Table 2-2. Words Reserved for Future Use
You cannot use any other word that is predefined for use in JavaScript, such as String, true, and so on. For a complete list, please see www.javascripter.net/faq/reserved.htm.
Once a variable has been declared, a value can be assigned to it. To assign values to num0 and num1, do the following:
- Below the Listing 2-1 code you entered, type in the code shown in Listing 2-2.
Listing 2-2. Assigning Values to Variables
num0 = 100;
num1 = 200;
![]() Note Variables can be declared and assigned a value at the same time by using
Note Variables can be declared and assigned a value at the same time by using
var num3 = 400;
Add Variables
Variables can be used in place of numbers for arithmetic. A variable’s current value will be used for the calculation if arithmetic is performed using a variable. To add num0 and num1 and assign the result to sum, do the following:
- Below the Listing 2-2 code you entered, type in the code shown in Listing 2-3.
Listing 2-3. Adding Variables
sum = num0 + num1;
Basic Arithmetic Operators
You are not limited to just adding variables or numbers. All the basic arithmetic operations can be performed. Table 2-3 shows the basic operators.
Table 2-3. Basic Arithmetic Operators
| Operator | Description | Example |
|---|---|---|
| + | Addition | a + b (add a and b) |
| – | Subtraction | a – b (subtract b from a) |
| * | Multiplication | a * b (multiply a and b) |
| / | Division | a / b (divide a by b) |
| % | Remainder | a % b (the remainder of a divided by b. In other words, 7 % 4 = 3 because 4 goes into 7 one time, with a remainder of three.) |
The operators possess a priority: multiplication and division take place first, before addition and subtraction. To change the order of precedence, which might be useful if you want to calculate specific sections of a calculation before others, use parentheses, as seen in Listing 2-4. You do not need to copy this code. It is just for reference.
Listing 2-4. Changing the Order of Operations with Parentheses
var result0 = 1 + 2 * 3;        //result0 will be 7
var result1 = (1 + 2) * 3;      //result1 will be 9
To see the value of sum, do the following:
- Below your current code, type in the code shown in Listing 2-5. The document.write() command tells the program to display whatever is within the parentheses on-screen, and uses the plus sign to combine, or concatenate, values together to display a final result. Commands like this are called methods, and can be identified by the parentheses at the end of the method name. The period before write indicates that it is a method of the document object, a predefined set of code allowing JavaScript to have access to the browser window. We’ll cover objects in more detail later.
Listing 2-5. Displaying the Value of Sum on the Screen
document.write("Total amount = " + sum); - Click the Run button. (We will refer to this simply as Run hereafter.) The preview area should show “Total amount = 300”.
If you would like to check your code against a finished example, you can find one at http://code.9leap.net/codes/show/19823.
Why do we have to put quotes around what we place inside of document.write() in Listing 2-5? This is because document.write() accepts only values that are a string. A string, used to store strings of text characters, is one of the five basic, or primitive, data types in JavaScript. Three of those data types-number, string, and Boolean-are used to store data, while the other two are used to designate the current state of a variable. Table 2-4 shows the five data types.
Table 2-4. Basic Data Types
| Type | Assigned Value | Usage Example |
|---|---|---|
| Number | Base 10 | var num = 10; |
| Base 8 (0 appended to beginning of value) | var num = 011; | |
| Base 16 (0x appended to beginning of value) | var num = 0x9A; | |
| Floating point, base 10 (using a period [.]) | var fnum = 3.1415; | |
| Floating point, exponent (using a period[.] and E) | var fnum = -3.1E12; | |
| Boolean | true or false | var flag = true; |
| String | String surrounded by double or single quotations | var str = “character string”; |
| var str = ‘character string’; | ||
| null | The object is known to exist, but has no value | var obj = null; |
| undefined | The object does not exist, does not return a value, or has not been initialized |
In addition to the basic data types, there are complex data types in JavaScript:
- Object: Objects are a set of multiple basic data types and/or other objects, usually either predefined or defined by the developer. If you were to create a bowling game, you would most likely have multiple objects representing bowling pins, and another object representing the bowling ball.
- Array: An array is a set of indexed and ordered data. In the bowling game example, your bowling pin objects could all be stored inside a single array. Each item added to the array is assigned a number, starting with 0, and increased by 1 with each item added to the array.
- Associative array: An associative array is a set of named data joined together in no particular order. Unlike a regular array, associative arrays can pair together an item with any other value or item. Imagine for a moment that our bowling game is a 3-D game, and that there are several lights suspended above the bowling pins. An associative array could be used to link together each bowling pin to a specific light.
- Function: Functions execute a defined computation or set of code. In the bowling game example, a function could be used to cause the bowling pin to tip over if the bowling ball comes in contact with the pin.
We’ll cover the complex data types in more detail later.
![]() Note In programming languages like C/C++ and Java, variables have static data types (such as integer or string), and you cannot assign a value of one data type to a variable of a different data type. In other words, if you have an integer variable, you cannot assign a string of characters to that variable.
Note In programming languages like C/C++ and Java, variables have static data types (such as integer or string), and you cannot assign a value of one data type to a variable of a different data type. In other words, if you have an integer variable, you cannot assign a string of characters to that variable.
In JavaScript, this is not the case. A value of any data type can be assigned to a variable, and a variable of a completely different data type can later be reassigned to the same variable. A variable of name foo could be assigned a number value with foo = 10; and then the very next line could state foo = "bar"; to assign a string value to the same variable. This flexibility is a major benefit in JavaScript, but the drawback is that sometimes you have to take extra care when performing calculations. We’ll see examples of this later on.
Manipulate a Variable Using Itself
Many games contain a score that is constantly updated when a player gets points. To update this score, the variable containing it must be increased. Do the following to see how:
- Clear the code you wrote up to Listing 2-5.
- Type in the code shown in Listing 2-6.
Listing 2-6. Manipulating a Variable by Referencing Itself
var score = 10;
score = score + 20;
document.write(score); - Click Run. The preview screen should show “30.”
- Replace score = score + 20; with score += 20;
- Click Run again. The result is the same. Step 4 uses an abbreviated form of the self-referencing operation called a compound assignment operator.
Compound Assignment Operators
Compound assignment operators are operators that perform a value assignment to a variable along with another operation simultaneously. Table 2-5 shows these useful operators.
Table 2-5. Compound Assignment Operators
| Operator | Description | Example |
|---|---|---|
| += | Addition | a += 10 (equivalent to a = a + 10) |
| –= | Subtraction | a –= 10 (equivalent to a = a – 10) |
| *= | Multiplication | a *= 10 (equivalent to a = a * 10) |
| /= | Division | a /= 10 (equivalent to a = a / 10) |
| %= | Remainder | a %= 10 (equivalent to a = a % 10) |
Manipulate a Variable Using Incrementation
When a variable needs to be increased by a value of 1, an even more abbreviated operator can be used. Do the following to see it in action:
- Clear your current code.
- Type in the code in Listing 2-7.
Listing 2-7. Declaring and Incrementing a Variable
var num = 1;
num++;
document.write(num); - Click Run. The preview screen should show “2,” showing that ++ increases the value of num by 1.
- Clear your current code.
- Type in Listing 2-8.
Listing 2-8. Incrementing a Variable within a Statement
var num = 1;
document.write(num++);
num = 1;
document.write(++num); - Click Run. The screen first shows “1” and then “2.” When inside a statement like document.write(), if the increment operator (++) is after the variable, the document.write() statement will be executed first, and if the operator appears before the variable, the operator will be executed before document.write().
![]() Note The opposite of the increment operator is the decrement operator (--). The decrement operator works in the exact same way as the increment operator, except that it subtracts one from whichever variable it is attached to.
Note The opposite of the increment operator is the decrement operator (--). The decrement operator works in the exact same way as the increment operator, except that it subtracts one from whichever variable it is attached to.
Compare a Variable
JavaScript contains commands called relational operators that compare two values and return a Boolean value of true or false, depending on the result. Do the following to see them in action:
- Clear your current code.
- Type in the code in Listing 2-9.
Listing 2-9. Comparing Values
var num0 = 4;
var num1 = 7;
document.write(num0 >= num1);
document.write(num0 < num1);
document.write(num0 === num1); - Click Run. The screen first shows false, as 4 is not greater than or equal to 7; shows true, as 4 is less than 7; and shows false again, as 4 is not equal to 7.
Table 2-6 shows the useable relational operators.
Table 2-6. Relational Operators
| Operator | Description | Example |
|---|---|---|
| == | Equivalent | a == b |
| === | Strictly equivalent | a === b |
| != | Inequivalent | a != b |
| !== | Strictly inequivalent | a !== b |
| > | Greater than | a > b |
| >= | Greater than or equal to | a >= b |
| < | Less than | a < b |
| <= | Less than or equal to | a <= b |
See How Similar Two Values Can Be
See how the equivalent (==) and strictly equivalent (===) relational operators differ by doing the following:
- 1. Clear your current code.
- 2. Type in the code in Listing 2-10.
Listing 2-10. Differing Equivalent Operators
var num0 = 4;
var num1 = "4";
document.write(num0 == num1);
document.write(num0 === num1); - 3. Click Run. The screen first shows true, as the == sign temporarily converts all values to strings if one of the values being compared is a string. This is called type conversion. The screen then shows false, as the === sign does not perform type conversion. To evaluate as the same, compared values must be of the same data type.
![]() Note The opposite of the equivalent operators are the inequivalent operators (!= and !==), which perform almost the exact same operation. However, the != operator performs type conversion and the !== operator does not.
Note The opposite of the equivalent operators are the inequivalent operators (!= and !==), which perform almost the exact same operation. However, the != operator performs type conversion and the !== operator does not.
Manipulate a Comparison
Sometimes you’ll want to manipulate how a comparison resolves (true/false). To see how these comparisons can be manipulated, do the following:
- 4. Clear your code.
- 5. Type in the code in Listing 2-11.
Listing 2-11. Manipulating Comparisons
document.write(!(4 > 3));
document.write((4 < 7) && (5 < 13));
document.write((4 > 5) || (4 < 5)); - 6. Click Run.
The screen will first say false because the statement (4 > 3) resolves to true, and the ! logical operator reverses the Boolean statement (true/false) after it, making it false. The screen then lists true because both (4 < 7) and (5 < 13) evaluate to true. The && (and) logical operator returns true only if both statements around it are true. Finally, the screen shows true again, because out of (4 > 5) and (4 < 5), one of them is true. The || (or) operator resolves as true if at least one of the statements is true. Table 2-7 shows the logical operators.
Table 2-7. Logical Operators
| Operator | Description | Example |
|---|---|---|
| ! | false if a is true, true if a is false | !a |
| && | true if both a and b are true, otherwise false | a&&b |
| || | true if a or b is true, otherwise false | a||b |
Implement Logic with the If Statement
Sometimes we want to perform specific actions in our code if and only if a certain condition is met. Do the following to see how:
- Clear your current code.
- Type in the code in Listing 2-12.
Listing 2-12. Implementing Logic with the If Statement
var num0 = 4;
var num1 = 8;
if (num0 >= num1) {
    document.write(num0 + " is greater than or equal to " + num1 + ".");
}
else if (num0 < num1) {
    document.write(num0 + " is less than " + num1 + ".");
} - Click Run. The screen will display “4 is less than 8.” Change the values of num0 and num1 to see how you can change the results. The else if() statement will be evaluated only if the first if statement evaluates as false (num0 >= num1 returns false).
An object is a structure that can contain its own variables (called properties), and methods. These are called instance properties and instance methods when they belong to an object. To create an object that will enable you to get the current date, do the following:
- 1. Clear your code.
- 2. Type in the code in Listing 2-13. This code creates a variable as an instance of an object called the Date object, which contains methods that can give us information about the current date. The new Date() part of the code is called the constructor of the Date object, and by assigning it to a variable, you create the object.
Listing 2-13. Creating the Date Object
var date = new Date(); - 3. Type in the code in Listing 2-14. The methods of the date object return information about the year, month, or day of the current date. When getMonth() is called, 1 is added to the result because getMonth() counts January as 0, February as 1, and so on. Table 2-8 shows the methods that can be used with the Date object.
Listing 2-14. Assigning Date Information to Variables
var y = date.getFullYear();
var m = date.getMonth() + 1;
var d = date.getDate();
Table 2-8. Methods of the Date Object
| Method | Effect | Return Value |
|---|---|---|
| getFullYear() | Returns the four-digit Gregorian calendar year | {Number} 4-digit Gregorian calendar year |
| getMonth() | Returns the month - 1 (this is because it is an array reference) | {Number} Month - 1 |
| getDate() | Returns the day | {Number} Day |
| getDay() | Returns the day of the week | {Number} Day of the week |
| getHours() | Returns the hour | {Number} Hour |
| getMinutes() | Returns the minute | {Number} Minute |
| getSeconds() | Returns the second | {Number} Second |
| getMilliseconds() | Returns the millisecond | {Number} Millisecond |
- 4. Type in the code in Listing 2-15. You are concatenating multiple strings and values of the month, day, and year variables together into a single variable, text.
Listing 2-15. Creating a String and Displaying It
var text = "The date is " + m + "/" + d + "/" + y;
document.write(text); - 5. Click Run. A string is displayed onscreen showing the current date. If you run into problems, you can view the full code sample at http://code.9leap.net/codes/show/19827.
The Date object is just one of the many objects that come predefined with JavaScript. Table 2-9 contains some of the main objects bundled with JavaScript.
Table 2-9. Main Objects Included with JavaScript
| Object Name | Object Description |
|---|---|
| window | Browser window |
| document | Web page in a browser |
| frame | Frame within a web page |
| history | Browser history |
| location | Current page location |
| anchor | HTML hyperlink |
| applet | Embedded program in a web page |
| area | Clickable area on an image |
| form | Web form |
| image | Image on a web page |
| layer | Layers for transparent elements |
| link | Link to external style resource |
| button | Clickable button |
| checkbox | Markable check box |
| fileupload | Dialog box for file upload |
| hidden | Conceals passwords |
| password | Accepts a password |
| radio | Markable radio button |
| reset | Clears choices in a form |
| text | Single line of text |
| linkarea | Text area |
| select | Selection on a drop-down menu |
| Array | Array of values |
| Boolean | Boolean value (true/false) |
| Date | Stores a date |
| Event | Occurs with an event (such as a click) |
| Function | Function (method) |
| Math | Numerical calculations |
| Navigator | Browser information |
| Number | Stores a number |
| Object | Stores code elements |
| RegExp | Regular expression |
| String | String of characters |
This large list of objects might seem daunting at first, but it’s only meant as a quick reference. If you’d like to learn more, see the section on “Predefined Core Objects” in the Mozilla Developer Network’s JavaScript guide at https://developer.mozilla.org/en-US/docs/JavaScript/Guide/Predefined_Core_Objects. It’s a great resource on the basic core objects of JavaScript and their uses.
![]() Note If you are familiar with object-oriented languages such as C/C++ or Java, you might be familiar with the concept of class. In these languages, classes act as predefined templates for objects. Properties and methods can be defined for a given class, and then all objects created from that class will inherit those properties and methods.
Note If you are familiar with object-oriented languages such as C/C++ or Java, you might be familiar with the concept of class. In these languages, classes act as predefined templates for objects. Properties and methods can be defined for a given class, and then all objects created from that class will inherit those properties and methods.
In JavaScript, the concept of class technically does not exist and is replaced by the concept of prototypes. A prototype is a specially designated object for which properties and methods can be defined. When new objects are created, they can be created from a prototype and will have the same properties and methods of that prototype.
The concept of class and prototype might seem similar at first, but they are different in their restrictions. We will not discuss class-based vs. prototype-based programming in detail, but the main difference is objects created from prototypes can override predefined prototype functions with their own function definitions, while objects created as part of a class are generally unable to do so.
Work Smarter with the While and For Loop Statements
Repetition makes your coding life easier because there are many cases where a program can be easily engineered to perform repetitive tasks for you. Let’s imagine we need to devise a way to add together all the numbers between 1 and 1000 and assign that value to a variable (int). If we were to manually add every single number between 1 and 100, we’d end up with code that would look something like the code in Listing 2-16.
Listing 2-16. An Impractical Way to Add Sequential Numbers
int num = 1 + 2 + 3 + 4 + 5 + 6 + 7 + 8 + 9 + 10 + 11 + 12 + 13 + 14 + 15 + 16 + 17 + 18 + 19 + 20 + 21 + 22 + 23 + 24 + 25 + 26 + 27 + 28 + 29 + 30 + 31 + 32 + 33 + 34 + 35 + 36 + 37 + 38 + 39 + 40 + 41 + 42 + 43 + 44 + 45 + 46 + 47 + 48 + 49 + 50 + 51 + 52 + 53 + 54 + 55 + 56 + 57 + 58 + 59 + 60 + 61 + 62 + 63 + 64 + 65 + 66 + 67 + 68 + 69 + 70 + 71 + 72 + 73 + 74 + 75 + 76 + 77 + 78 + 79 + 80 + 81 + 82 + 83 + 84 + 85 + 86 + 87 + 88 + 89 + 90 + 91 + 92 + 93 + 94 + 95 + 96 + 97 + 98 + 99 + 100;
Ouch. That doesn’t look like a very practical way to spend your time, does it? To speed things up, we can use loop statements to perform this repetitive calculation for us. To see this in action, do the following steps:
- Clear your code.
- Type in the code in Listing 2-17 to first create a variable, i, which will be used to control the loop (in other words, the control variable), and then create two other variables to store the results from the upcoming loops.
Listing 2-17. Creating Variables
var i;
var sumFor;
var sumWhile; - Create a while loop to add together all numbers from 1 to 100 by typing in the code in Listing 2-18 after your current code. First, you must give sumWhile a value of 0 because you will be using a self-referencing operator (+=) in your code, so it must have a value before you begin. Next, you give i a value of 1. This number represents both the first time through the while loop, and the first number to be added to sumWhile. Finally, you enter the while loop. At the beginning of the while loop, the program will check to see if i has a current value equal to or less than 100. If it does, it will move into the loop, add the current value of i to sumWhile, and then add one to i. The loop will then check again to see if i is less than or equal to 100 and start again. This will continue repeatedly until the last value, 100, is added to sumWhile.
Listing 2-18. The While Loop
sumWhile = 0;
i = 1;
while (i <= 100) {
        sumWhile += i;
        i++;
}
document.write("The result using a while loop: " + sumWhile + "<BR />");
Note The “<BR />” in the document.write() method is an HTML tag (the name of an HTML element surrounded by brackets, specifying an element of a web page to be inserted) that tells the system to move down a line before displaying more text.
 - Click Run. The screen will display the result of 5050.
- Now do the same thing with a different kind of loop, the for loop, by typing in the code in Listing 2-19 below your current code. The for loop has three statements at the beginning of it. The first (i = 1;) declares and creates a variable to control the loop. The second one (i <= 100;) is checked before the for loop is run or rerun, exactly the same as the statement at the beginning of the while loop. Finally, the last statement (i++) is run when a for loop completes, before the second statement is checked against for a rerun.
Listing 2-19. The For Loop
sumFor = 0;
for (i = 1; i <= 100; i++) {
        sumFor += i;
}
document.write("The result using a for loop: " + sumFor + "<BR />"); - Click Run. The screen will display 5050 twice, as both loops calculate the same thing. If you run into problems, you can check your code against the full code sample at http://code.9leap.net/codes/show/19828.
![]() Tip If a for statement has only one command, as does the one in Listing 2-19, the curly braces are not necessary. For instance, the for loop in the listing could be rewritten as
Tip If a for statement has only one command, as does the one in Listing 2-19, the curly braces are not necessary. For instance, the for loop in the listing could be rewritten as
for (i = 1; i <= 1000; i++) sumFor = sumFor + i;
Interrupt a Loop with Break
Occasionally, in the middle of a loop’s execution, we want to stop the processing of the code in that loop and continue processing code past the end of the loop. This is easily accomplished with the break statement, which breaks the current processing out of the loop, even if the loop’s condition is still fulfilled. To see it in action, do the following:
- Clear your code.
- Type in the code in Listing 2-20.
Listing 2-20. Breaking Out of a Loop
var sumWhile = 0;
var i = 1;
while (true) {
    sumWhile += i;
    i++;
    if (i > 100) break;
}
document.write(sumWhile); - Click Run. The result is the same as before. When i is equal to 100, it gets added to sumWhile, becomes 101, and then because it is greater than 100, the while loop stops.
Skip a Loop Iteration with Continue
On other occasions, you might want to skip the remaining code in a loop and start it again. As long as the conditional expression of a for or while loop is fulfilled, this can be done with the continue statement. When this statement is issued, the next iteration of the loop’s code is immediately started. As usual in a for loop, when returning to the beginning of the loop code, the increment/decrement expression of the for loop get executed. Do the following steps to try this out by making a program that calculates only the even numbers from 0 to 100:
- Clear your code.
- Type in the code from Listing 2-21. The line if (i % 2 != 0) continue; says if the remainder after dividing i by 2 is not 0 (if i is odd), skip the remaining code in the current for loop iteration and begin the next for loop iteration immediately.
Listing 2-21. Using Continue to Skip Odd Numbers
var sumFor = 0;
for (i = 1; i <= 100; i++) {
    if (i % 2 != 0) continue;
    sumFor = sumFor + i;
}
document.write("The sum of all even numbers up to 100 is " + sumFor); - Click Run. A result of 2550 is displayed.
Generate Random Numbers
If you want enemy characters to appear randomly in your game or if you want to create a game that tells you your fortune for the day and randomly assigns you a “luckiness” value, you need to be able to create random numbers. Do the following to see how it works for a fortune-telling game:
- Clear your code.
- Type in the code in Listing 2-22 to create variables and assign a random number to num.
Listing 2-22. Creating Variables for the Fortune-Telling Game
var num;
var text = "";
num = Math.floor(Math.random() * 4);
Math.random() returns a value from 0 (inclusive) up to 1 (exclusive – not including 1). By multiplying this by 4, you get a value from 0 up to, but not including, 4. The floor() method of the Math object rounds down whatever is in its parentheses. Thus, the code you just wrote will return 0, 1, 2, or 3, randomly.
- Create the fortune-telling game using your random variable by typing in the code in Listing 2-23 below your current code.
Listing 2-23. Fortune Telling with the If Statement
if (num===0) {
    text = "Super Lucky";
} else if (num===1) {
    text = "So-so Luck";
} else if (num===2) {
    text = "Minor Luck";
} else {
    text = "Bad Luck";
}
document.write("Your fortune: " + text);
Here, you are assigning a value to text depending on the value of num and then outputting the result.
- Click Run. You randomly get a response for your current level of “luckiness.”
Define Scenarios with Switch
In the last code example, several if statements were used to determine what value should have been assigned to text. However, there is an easier way to make this work, without all the if statements. Do the following to see how:
- Delete the document.write() statement and all if statements. Your code should look as it does in Listing 2-24.
Listing 2-24. Setting Up for the Switch Example
var num;
var text = "";
num = Math.floor(Math.random() * 4); - Add the switch statement by typing in the code in Listing 2-25 below your current code.
Listing 2-25. The Fortune-Telling Switch Statement
switch (num) {
        case 0:
                textSwitch = "Excellent Luck";
                break;
        case 1:
                textSwitch = "Moderate Luck";
                break;
        case 2:
                textSwitch = "Small Luck";
                break;
        default:
                textSwitch = "Bad Luck";
                break;
}
The switch statement takes whatever value is in its parenthesis, finds the case that matches that number, and then executes the code beneath it. If there is no break statement in the current case, the switch statement will continue executing code from the next case and so on, until either a break statement is encountered or the end of the switch statement is reached. The default case is executed if no matches are found.
- Click Run. You will get a randomly generated fortune.
Store Numbered Data in an Array
Arrays are used to keep track of sets of data, which are necessary when dealing with maps, strings (arrays of text characters), and more. Do the following to see how a set of numerically indexed (numbered) data can be created in an array:
- Clear your code.
- Create an array to represent a collection of three devices by typing in the code in Listing 2-26.
Listing 2-26. Creating an Array of Devices
var array = new Array(3);
array[0] = "iPhone";
array[1] = "Android";
array[2] = "Computer";
Just like when we created an instance of the Date object, you use a constructor to create an array (new Array(3)). The Array(3) tells the program to create an array with 3 spaces.
- Create a string to save parts of the array into it, and then iterate through the array, adding all of the array elements to the string before displaying it. Listing 2-27 shows how to do this.
Listing 2-27. Iterating Through an Array
var text = "";
for (var i = 0; i < array.length; i++) {
    text += array[i] + "<BR />";
}
document.write(text);
Notice how the compound assignment operator += can be used to add characters to the end of a string. Using a for loop allows you to go through all of the elements in an array automatically.
- Click Run. The screen will display the three elements in the array.
![]() Note You do not need to specify the array to be larger to add more items to the array. For example, typing in array[3]="iPad"; in the example above will not cause an error.
Note You do not need to specify the array to be larger to add more items to the array. For example, typing in array[3]="iPad"; in the example above will not cause an error.
Methods of the Array Object
In the previous example you created an array object. That object comes with several methods that can be executed on it. For instance, if you were to type in array.push("Galaxy"); at the end of your code, it would have added “Galaxy” to the array at whichever position was after the last item in the array. Table 2-10 provides a summary of the array object methods.
Table 2-10. Methods of the Array Object
| Category | Code | Effect |
|---|---|---|
| Add Elements | push(element) | Adds an element to the end of the array. |
| unshift(element) | Adds an element to the beginning of the array. | |
| Remove Elements | pop() | Removes the element at the end of the array. |
| shift() | Removes the element at the beginning of the array. | |
| Sort Elements | sort() | Sorts the elements of the array in ascending order. |
| reverse() | Sorts the elements of the array in reverse order. | |
| Extract Elements | slice(start,end) | Extracts the elements within a specified start and end position and creates a new array with them. |
| slice(start) | Extracts the elements from a specified starting position to the end of the array and creates a new array with them. |
Store Non-Numbered Data in an Associative Array
What if you want to store a color for each of the devices in the array you just made? To do this, you need to use an associative array instead of a regular array. Do the following to make an associative array:
- Clear your code.
- Create your associative array by typing in the code in Listing 2-28.
Listing 2-28. Creating an Associative Array
var obj = new Object();
obj["iPhone"]     = "White";
obj["Android"]    = "Black";
obj["Computer"]   = "Silver";
Associative arrays are not stored as array objects in JavaScript because all array objects are indexed, containing one key value (starting from 0) and one paired value for each entity in the array. Here, we use the ability of objects in JavaScript to be an array of values to link together the strings of device names and colors.
- Create a string, add the associative array objects, and then display the string by typing in the code in Listing 2-29.
Listing 2-29. Manually Iterating Through the Associative Array
var textObj = "";
textObj += "The iPhone is " + obj["iPhone"] + ".<BR />";
textObj += "The Android is " + obj["Android"] + ".<BR />";
textObj += "The Computer is " + obj["Computer"] + ".<BR />";
document.write(textObj); - Click Run. The list of colors of the devices are displayed on the screen.
Because object arrays are not indexed in the same way as standard arrays, they cannot be iterated through with a simple for loop.
Save Time with Functions
You’ve seen objects that come with their own functions such as arrays, but if you’re planning on doing almost anything that requires you to type the same code multiple times, you can define your own functions to save you time. Do the following to see how:
- Clear your code.
- Define a function that accepts an argument (whatever is passed in parentheses), and then writes it on the screen after “I will buy the,” by typing in the code in Listing 2-30.
Listing 2-30. Defining the buy() Function
function buy(device) {
    document.write("I will buy the " + device + ".<BR />");
} - Call the function using “iPhone” and “Android” as arguments by typing in the code in Listing 2-31.
Listing 2-31. Calling the Function
buy("iPhone");
buy("Android"); - Click Run. The screen will display the “I will buy” line twice because you called the function twice.
See Where Variables Live
I want you to imagine for a moment that a program you’re going to write takes place in a medieval kingdom, with several villages and one castle. For explanatory purposes, imagine the king of this kingdom is named Bob. Throughout the kingdom, if someone talks about Bob, everyone knows that they are talking about the king. However, what if, in a given village, there is also someone else named Bob? Inside that village, people might refer to the local resident Bob as “our Bob,” but in the castle if someone refers to “Bob” it’s likely everyone will assume the person in question is the king.
This is, in essence, the concept of scope. It refers to the visibility of a variable within a program. In other words, scope is the context for a variable. To see how this works, do the following:
- Clear your code.
- Create a variable representing King Bob and assign him a value of 39 to represent his age by typing in the code in Listing 2-32. Because he is the ruler of the kingdom, we will create him as a variable at the beginning of the program, giving him a global scope. This means that if you type “bob” anywhere in the program, the program will know you mean King Bob.
Listing 2-32. Making King Bob
var bob = 39; - Create a function that creates a variable representing a random Bob in one of the kingdom’s villages, assign him a random age between 10 and 50, and then increase that age by one to simulate the villager Bob celebrating his birthday, before displaying that Bob’s age on the screen, by typing in the code in Listing 2-33.
Listing 2-33. Creating a Function to Create a Random Bob
function villager() {
        var bob = Math.floor(Math.random() * 50 + 10);
        this.bob += 1;
        document.write("King Bob's age is " + bob + ".<BR />");
        document.write("Villager Bob, this Bob, is " + this.bob + ".");
}
Notice that when you refer to the Bob inside a function, you use this.bob to specify you mean the one inside the function. To explain the visibility of villager Bob, we say he has function scope, instead of global scope like King Bob.
- Call the villager function by typing in the code in Listing 2-34 below your current code.
Listing 2-34. Calling the Villager Function
Villager(); - Click Run to see the result. You will see King Bob’s age of 39, and then a random age for villager Bob.
![]() Note You cannot reference variables created within a function outside of that function. This is the limitation of function scope. For example, we could not type this.bob outside the function to refer to villager Bob. Outside of villager(), the only Bob we can see or interact with is King Bob.
Note You cannot reference variables created within a function outside of that function. This is the limitation of function scope. For example, we could not type this.bob outside the function to refer to villager Bob. Outside of villager(), the only Bob we can see or interact with is King Bob.
Make Object Blueprints with Prototypes
Prototypes essentially are a set of blueprints that can be used to create objects. By creating a prototype with properties and methods, we can easily create new objects equipped with the same properties and methods specified in the prototype. To create and use a software prototype that contains a name and a programming language, do the following:
- Clear your code.
- Create the prototype first as a function, and then add properties by typing in the code in Listing 2-35.
Listing 2-35. Creating the Prototype and Properties
function Software() {
}

Software.prototype.name     = "";
Software.prototype.language = ""; - Create a function for the prototype that displays information about it by typing in the code in Listing 2-36.
Listing 2-36. Creating The Prototype Function
Software.prototype.output = function() {
    document.write(this.name + " is written in " + this.language + "<BR />");
}; - Type in the code in Listing 2-37 to create a new object, accounting, as an instance of the Software prototype; specify values for its properties; and then call its function to display information on the screen.
Listing 2-37. Creating the Accounting Object
var accounting = new Software();

accounting.name     = "Spreadsheet Master";
accounting.language = "Java";

accounting.output(); - Click Run. You’ll see a message saying that Spreadsheet Master is written in Java.
- Try creating another object below the accounting object and call the output() function. If you run into trouble, check http://code.9leap.net/codes/show/19835 for a working example.
![]() Note Using the preceding code as an example, with accounting as the name of an object, you can add properties at any time to this object by typing something like accounting.secondLanguage = "C++";. Here, secondLanguage has not been declared with var or anything before. It is an on-the-fly declaration. Functions can also be added to the object in a similar manner with accounting.showLanguage = function() {document.write(this.language)};.
Note Using the preceding code as an example, with accounting as the name of an object, you can add properties at any time to this object by typing something like accounting.secondLanguage = "C++";. Here, secondLanguage has not been declared with var or anything before. It is an on-the-fly declaration. Functions can also be added to the object in a similar manner with accounting.showLanguage = function() {document.write(this.language)};.
Conclusion
Congratulations! If you’ve read through this section and worked with the example code on code.9leap.net, you should now have an understanding of variables, operators, strings, arrays, functions, and prototypes. These are the building blocks of JavaScript as well as many object-oriented languages in current use today. Understanding these basics gives you the foundation you need to learn how to code your own HTML5 games in enchant.js.
In Chapter 3, we delve into the enchant.js library and learn about sprites, scenes, labels, surfaces, and more. These are the basic features that enchant.js provides. As we progress through Chapter 3 and on into Chapter 4, you’ll begin to see how these features come together into creating a game.