
![]()
Creating a Stand-Alone 3-D Game
The arcade shooter we created in Chapter 6 is an example of a two-dimensional game. Sprites, labels, and even the scenes in a standard enchant.js game exist on a flat plane, as seen by the existence of only an x and y axis within the game. Although we can stack entities on top of each other, this is simply to manipulate visibility. There is no “depth” that can be controlled.
Enchant.js comes with a plug-in called gl.enchant.js, which enables three-dimensional games to be created. In this chapter, we explore how to use gl.enchant.js to create a 3-D version of the Whack-A-Mole game we created earlier. On the way, we cover the essential topics of gl.enchant.js, namely 3-D Scenes, 3-D Cameras, and 3-D Sprites.
Before we get into 3-D games, however, let’s take a second look at creating your own enchant.js games outside of code.9leap.net and briefly explore what is needed to put together an enchant.js game from scratch. At the time of the writing of this book, code.9leap.net supports most, but not all, functions of enchant.js plug-ins. We need to use one of these functions in our 3-D version of Whack-A-Mole.
Until now, practically all our code examples and instructions have recommended the use of code.9leap.net for simplicity. It is an easy way to keep track of your code and develop on-the-fly. That being said, to take your game development to the next level, it is important to understand how to put together an enchant.js game from scratch if ever the need arises.
There are a number of reasons you might need or want to create a stand-alone game. First, because code.9leap.net is in beta, certain file formats are not supported for upload into projects. Currently, 3-D model files cannot be uploaded into a code.9leap.net project. That is why when you make a 3D game, it cannot be written inside code.9leap.net. The other reason for creating a stand-alone game instead of a game hosted on code.9leap.net is to host it on your own web site.
Creating a game from scratch involves preparing all the files necessary for a game locally on your computer. While game authoring and testing can be done on standard local files (in other words, double-clicking on an index.html file to open it in a browser), some functions, such as loading 3-D data from a file, require the browser to have evidence the file is being accessed from a web server. This is due to a security restriction known as the same origin policy.
Same Origin Policy
The same origin policy is a security measure for restricting the ability of certain files to be loaded by a script. In enchant.js games, files usually affected by the policy are those containing sound or 3-D data. However, it’s best to think of all files, except for images, as restricted by this policy. The same origin policy can be overridden by using specific commands or settings, depending on your browser.
Chrome
In Chrome, you can override the same origin policy by opening Chrome with a specific argument. Open up Terminal (Mac) or the command prompt (Windows) and type the following:
- Mac :open /applications/Google Chrome.app --args --allow-file-access-from-files
- Windows :C:Program FilesChromeChrome.exe --allow-file-access-from-files
Firefox
In Firefox, you can override the same origin policy through a setting:
- Type about:config in the address bar. Click to accept the warning message if Firefox alerts you that changing these settings might affect the performance of the browser.
- In the search box that appears under the address bar, type origin.
- Double-click security.fileuri.strict_origin_policy to set the value to false.
Safari
Safari also supports disabling the same origin policy:
- Go to Safari Preferences (Safari
 Preferences (Mac), File Preferences (Windows)), click the Advanced tab, and check the box that says Show Develop menu in menu bar.
 - Close the settings window, click the Develop menu, and choose Disable local file restrictions.
Internet Explorer
We highly recommend against developing games in Internet Explorer, as several features of HTML5 are not supported.
While disabling the same origin policy is a quick fix, we recommend installing a web server for larger development projects. This will help make the transition to the final release easier.
Local Web Servers
Local web servers allow files that make up a web site to be accessed in a way similar to how files are accessed off a standard server from the Internet. A variety of free server emulators are available online. An emulator is a virtual version of hardware. Instead of having a physical server running a web site, you can download and run a virtual server with emulation software. This makes working on web sites easier, as you do not need to upload your files to a server on the Internet to test it. We recommend XAMPP at http://sourceforge.net/projects/xampp/ for Windows, Mac, or Linux or MAMP at http://www.mamp.info/, which is for Mac only. These emulators are free and easily available.
For this exercise we use XAMPP, but feel free to use any other web server if you are familiar with it.
Setup
To get started, download and install XAMPP from its project page on SourceForge, as shown in Figure 7-1.

Figure 7-1. The XAMPP official SourceForge project page (http://sourceforge.net/projects/xampp/)
If you encounter any problems with installation, or if you would like to learn more technical details about XAMPP, you can find official documentation and installation instructions at http://www.apachefriends.org/en/xampp-macosx.html (for Mac) or http://www.apachefriends.org/en/xampp-windows.html (for Windows). Open XAMPP after installing it, and make sure the indicator light next to Apache is green or the Apache service has been started before continuing.
Once you have installed XAMPP (or another web server package) and it is currently running, navigate to the root folder of the web server. If you are using XAMPP on a Mac, you can access this at /Applications/XAMPP/htdocs/ (Mac) or C:xampphtdocs (Windows). This is where you will put all your files for the game. If, for instance, you put a file called index.html into this htdocs folder, you’ll be able to view it through a browser by visiting http://localhost/index.html.
While 2-D games are based on entities that move around on a flat space, 3-D games are based on depth. For the player, this means there is more to see and more aspects to see it from. The game space exists in three dimensions: length, width, and height (x, y, and z). This environment supports the viewing of objects within it from any angle. However, this means the game-creating process is more complex for the programmer.
While the benefits of a 3-D game include the possibility of creating a more immersive environment (in other words, making the player see through the eyes of a virtual character that can move and look around the game world), 3-D can also be used to create simple games enhanced with visual upgrades. Specifically, by altering the position of the camera during the game, you can create a level of depth that is visually impressive when compared to most games created in enchant.js.
You need to consider a larger number of variables when you create a game in three dimensions than a game in two dimensions. Many events that occur inside a 3-D game cannot be created using the same functions that would cause the same event to occur in a 2-D game. As such, there is a completely separate set of plug-ins that enable 3-D games to be created in enchant.js.
Creating a 3-D Whack-A-Droid Game
For our game-creating exercise in this chapter, we create a 3-D version of the Whack-A-Droid game we made earlier. To do this, we use gl.enchant.js and learn how to implement the various elements of a gl.enchant.js 3-D game, including 3-D scenes, 3-D cameras, and 3-D sprites. Figure 7-2 shows what the game looks like when it is complete.
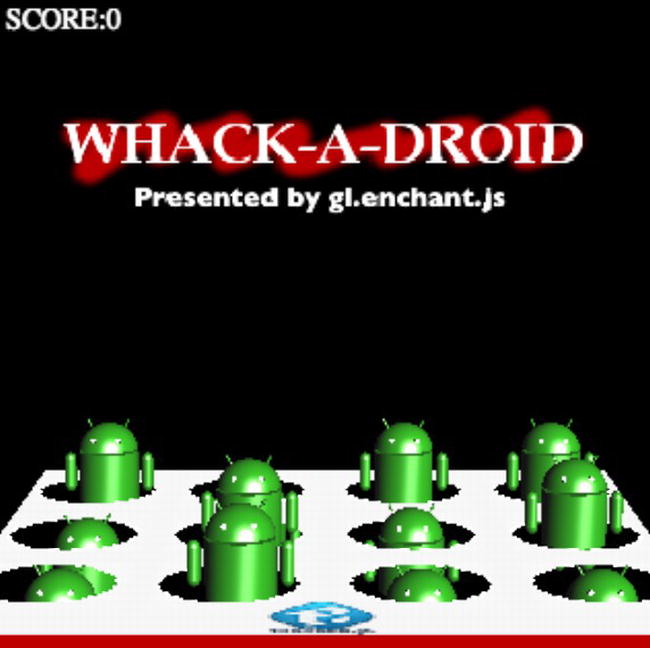
Figure 7-2. Whack-A-Droid 3-D
We walk through the creation of this game step-by-step. Let’s get started!
- Go to http://enchantjs.com/?p=731 and download the WhackADroid3D-initial zip file for Chapter 7 and unzip it to the directory being used by your local web server. Another file, WhackADroid3D-Steps, is available on the page under the WhackADroid3D-initial zip file that includes the entire source code that is shown after each major step in this chapter. Steps corresponding to the named folders (in other words, Step 1 -> /Step1/) are marked on the code listings in this chapter.
- Open index.html in a text editor and make sure the code matches the code in Listing 7-1.
Listing 7-1. index.html Containing Plug-in References
<html>
<head>
<title>Whack-A-Mole 3D</title>
<meta http-equiv="cache-control" content="no-cache">
<meta http-equiv="content-type" content="text/html; charset=UTF-8">
<script type="text/javascript" src="lib/glMatrix-1.3.7.min.js"></script>
<script type="text/javascript" src="lib/enchant.js"></script>
<script type="text/javascript" src="lib/nineleap.enchant.js"></script>
<script type="text/javascript" src="lib/gl.enchant.js"></script>
<script type="text/javascript" src="lib/collada.gl.enchant.js"></script>
<script type="text/javascript" src="lib/primitive.gl.enchant.js"></script>
<script type="text/javascript" src="main.js"></script>
<style type="text/css">
    body {
        margin: 0;
    }
</style>
</head>

<body>
</body>

</html>
The following list shows the different plug-ins that are loaded, with explanations for each:
- glMatrix-1.3.7.min.js: An open-source JavaScript library that contains the mathematical computations necessary to perform various operations with gl.enchant.js.
- nineleap.enchant.js: The 9leap plug-in for enchant.js. We use it here for the game start and end screens.
- gl.enchant.js: The core WebGL-enabling plug-in for enchant.js.*
- collada.gl.enchant.js: Allows 3-D models in collada (.dae) format to be loaded into enchant.js games.
- primitive.gl.enchant.js: Contains several pre-made 3-D objects that can be used in 3-D games.
* WebGL is a JavaScript API (or interface) that allows elements in web pages, specifically canvas elements – which are parts of an HTML5 web page used to draw graphics – to communicate with a computer’s graphics card to render those graphics with hardware acceleration. The enchant.js plug-in, which allows for the use of WebGL in enchant.js games, gl.enchant.js, comes with the enchant.js package, and is primarily used for making 3-D games with enchant.js.
If any of these plugins are missing, you’ll run into problems with the game, so ensure they are all in the code before moving on.
Creating a Scene3D and Lights
Just as in regular enchant.js games, 3-D enchant.js games also require a scene within which everything occurs. However, these scenes are categorized as “Scene3D” to indicate their 3-D nature in the code. When you create a new Scene3D, you are telling enchant.js to initialize and create a three-dimensional space that will support the addition of objects into it.
- 1. Open main.js, which should be empty, and type in the code in Listing 7-2 to set up the basics of the game. Notice how there is nothing new here just yet.
Listing 7-2. Framework of the 3-D Game
enchant();
var game;

window.onload = function(){
    game = new Core(320, 320);
    game.fps = 60;

    game.onload = function(){
    };

    game.start();
}; - 2. Inside the game.onload function, create a new Scene3D by typing in the code in Listing 7-3.
Listing 7-3. Creating a Scene3D
scene = new Scene3D();The Scene3D creates a dimensional space, as shown in Figure 7-3.
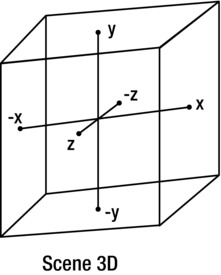
Figure 7-3. Scene3D
Points within the 3-D space are designated on an x, y, and z axis, within a set of parentheses (x, y, z). If you look at the origin (x = 0, y = 0, z = 0) in the 3-D space from a point where x = 0, y = 0, and z = 10, the x axis would run left (-x) to right (+x), the y axis would run from down (-y) to up (+y), and the z axis would run from inside the screen (-z) to outside the screen, towards you (+z).
This is known as a right-handed system. If you stretch out your thumb and first two fingers in a way that each finger is at a 90-degree angle to the other two and imagine your thumb representing the x axis and your index finger as the y axis, your middle finger will form the z axis. Each finger represents the positive direction of each axis. In a left-handed system, the positive direction of the z axis would point away from you.
It is important to note that this coordinate system is different from how locations are determined in standard enchant.js 2-D games. In the normal 2-D environment, the top left-hand corner of the screen is designated as (0,0) and values increase to the right and below that point. In the 3-D system, the origin, or (0,0,0), is thought of as the center of the environment, as shown in Figure 7-3. Because of this, both positive and negative values are common.
- 3. Under the creation of the new Scene3d, but still inside the game.onload function, type in the code in Listing 7-4 to create a new directional light.
Listing 7-4. Creating a Directional Light
scene.setDirectionalLight(new DirectionalLight());
A directional light simply creates an array of light waves that bounce off of objects in the scene. Some of these light waves reflect off of objects and can be picked up by other objects, such as cameras, allowing them to be seen by the player. At the time of the writing of this book, directional lights created without parameters are created at a default point of (0.5, 0.5, 1). From this default point, a line is drawn to the origin of the scene (0, 0, 0). From the direction of this line, virtual light waves are generated that travel parallel to this line throughout the scene, as shown in Figure 7-4.
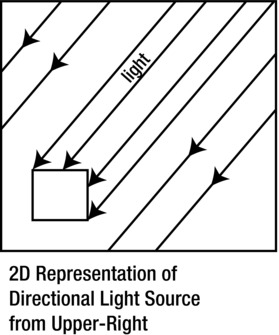
Figure 7-4. 2-D representation of directional light source from the upper right
We also could have created the directional light by writing (var light = new DirectionalLight(); scene.setDirectionalLight(light);) instead of (scene.setDirectionalLight(new DirectionalLight());). If you use this var approach, you could change the origin of the light from its default position of (0.5, 0.5, 1) to another position with the properties directionX, directionY, and directionZ.
Creating a Camera3D
Although we now have our scene and a directional light, we still need a viewpoint from which to view the scene. If we have objects in a 3-D space, how the object looks will depend on where we’re looking at it from. These viewpoints are designated as Camera3D objects in gl.enchant.js. They pick up the virtual light waves reflected off of objects in the scene from directional lights.
- 1. Create a Camera3D by typing in the code in Listing 7-5 under the creation of the DirectionalLight, but still inside game.onload.
Listing 7-5. Creating a new Camera3D
camera = new Camera3D();
                       camera.y = 1.1;
                       camera.z = -1.65;
                       camera.centerZ = -10;
                       camera.upVectorZ = 10;
                       camera.upVectorY = 100;
Cameras have a default position of (0, 0, 10) when created, so with our additions in Figure 7-5, the camera is situated at (0, 1.1, -1.65). The camera object also has the properties centerX, centerY, and centerZ. These values specify a point at which the camera should “look at” or be pointed towards.
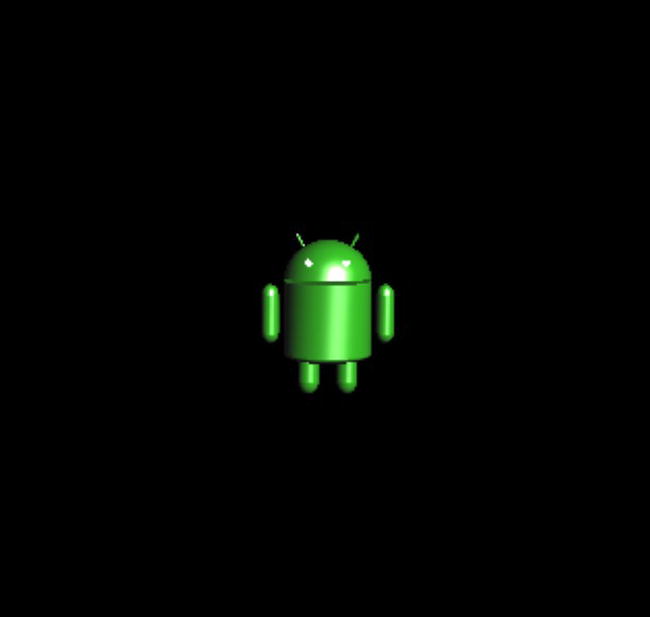
Figure 7-5. Showing a Droid on the screen
If a camera is located at one point and is pointed towards another point, the camera could rotate in any direction and still be pointed towards the specified coordinates. Think of it this way: if I am looking at you upside down, I am still looking at you. This is why there are “upVector” properties. These properties specify a point towards which the camera should consider as “up.” By changing the upVector, the camera (and therefore the view of the camera) can be axially rotated.
You can place objects and cameras inside a 3-D space essentially at will. Multiple cameras can be created without any problems. As long as the camera is pointing towards the entities you create within the 3-D scene, you’ll be able to see them. You might have to adjust your camera to get a more desired view of your objects, but the best way to achieve this is with practice.
Although we have now created the camera, specified where it should exist, what it should point at, and which direction is up, we still need to tell Scene3D to use it.
- 2. Make the scene use our new camera as the view for the player by typing the code in Listing 7-6 beneath camera.upVectorY = 100;, but still inside the game.onload function.
Listing 7-6. Designating the Scene’s Camera
scene.setCamera(camera);
If there are multiple Camera3D objects inside the Scene3D, this function (setCamera) can be called at any time to switch between them.
Creating a Sprite3D
Sprites also exist in gl.enchant.js as Sprite3D objects and contain many similar properties and functions. In our game, we create multiple Droid characters, and each one will be an instance of Sprite3D. To save us from manually creating a new instance of Sprite3D each time we need another Droid, let’s create a Droid class containing all the necessary variables and then call it whenever we need a Droid. Do the following to make this happen:
- In the window.onload function, under game.fps=60;, add a line to preload droid.dae by typing in the code in Listing 7-7. This file was included in the download package earlier and is a 3-D model of the Droid image.
Listing 7-7. Preloading droid.dae
game.preload('images/droid.dae'),Files that end in .dae are in a format known as Collada. Collada is a file format for saving 3-D data and is supported by most major 3-D modeling software. Collada files can even be opened by Adobe Photoshop.
- Above the window.onload function, create the Droid class as an extension of the Sprite3D class by typing in the code in Listing 7-8. The initialize function should include arguments for x, y, and z, which represent the position of the Droid on the x, y, and z axes respectively.
Listing 7-8. Creating the Droid Class
var Droid = Class.create(Sprite3D, {
    initialize: function(x, y, z) {
    }
}); - Inside the initialize function, make Droid an instance of the Sprite3D class and set it to use the Collada file as its model by typing in the code in Listing 7-9. Notice how when working with Sprite3D, the image is not set through the image property, but rather through the set function.
Listing 7-9. Calling Sprite3D and Setting the Collada File
Sprite3D.call(this);
this.set(game.assets["images/droid.dae"]); - In its current form, the droid.dae file is too large, so scale it to 30 percent by typing in the code in Listing 7-10 on the next line.
Listing 7-10. Scaling Droids
this.scaleX = 0.3;
this.scaleY = 0.3;
this.scaleZ = 0.3; - Assign the arguments x, y, and z to their Sprite3D counterparts by typing in the code in Listing 7-11.
Listing 7-11. Assigning x, y, and z
this.x = x;
this.y = y;
this.z = z; - Inside the game.onload function, under the line scene.setCamera(camera);, add a new Droid to the Scene3D by typing in the code in Listing 7-12.
Listing 7-12. Adding a New Droid to Scene3D
scene.addChild(new Droid(0, 0, -8)); - Save the file you are working on (main.js), but do not close it. If you are using a virtual web server, open up a web browser other than Internet Explorer and go to the path where index.html is stored (most likely http://localhost/index.html). Your screen should appear as it does in Figure 7-5.
If you encounter any problems with the code in this section, you can find a working code sample in the Step2 folder from the zip file mentioned earlier in this chapter.
We now have a legitimate, visible 3-D sprite, but to make it closer to a true game, we need to add some sort of interactivity.
Droid Interactivity
We need some sort of interactivity to make this a real game. Do the following to take the game to the next step:
- 1. Near the top of the code, under var game;, type in the code in Listing 7-13 to create a function to generate random numbers and some variables we’ll use to keep track of the total number of Droids.
Listing 7-13. Creating a Random Number Function and Variables
function rand(n) {
    return Math.floor(Math.random() * n);
}

//Variables to keep track of droids
var maxDroid = 100;
var hitDroid = 0;
var combo = 1; - 2. Below that, create a ScoreLabel by typing in the code in Listing 7-14. This ScoreLabel contains an add function to easily add and update the score.
Listing 7-14. Creating ScoreLabel
//Define ScoreLabel
var ScoreLabel = Class.create(Label, { //Extends Label class
    initialize: function(x, y) {
        enchant.Label.call(this, "SCORE:0"); //Call the Label class constructor
        this.x = x;
        this.y = y;
        this.score = 0;
        this.color = "#ffffff";
    },
    add: function(pts) { //Add the score
        this.score += pts;
        this.text = "SCORE:" + this.score; //Update display
    }
}); - 3. In the game.onload function, at the very end, create a new instance of ScoreLabel and add it to rootScene by typing in the code in Listing 7-15.
Listing 7-15. Creating and Adding ScoreLabel
//Display score label
scoreLabel = new ScoreLabel(5, 5);
game.rootScene.addChild(scoreLabel); - 4. Edit the contents of the Droid class to match Listing 7-16. New code is in boldface. This will prepare the class for some interactivity upgrades in the next section, which will use the a and mode variables shown in the code sample. The tick function will be called every frame, and the hit function will be called whenever the player clicks on the Droid.
Listing 7-16. Restructured Droid Class
//Define Droid class
var Droid = Class.create(Sprite3D, { //Extend Sprite3D class
    initialize: function(x, y, z) {
        Sprite3D.call(this); //Call the Sprite3D constructor
        this.set(game.assets["images/droid.dae"]);

        this.scaleX = 0.3;
        this.scaleY = 0.3;
        this.scaleZ = 0.3;
        this.x = x;
        this.y = y;
        this.z = z;
        this.a = 0.01;

        this.addEventListener('enterframe', this.tick); //Define event listener
        this.addEventListener('touchstart', this.hit); //Define event listener for hit
        this.mode = 2; //Set initial Droid mode to wait, and then appear
        this.nextMode = 0;
        this.waitFor = game.rootScene.age + rand(100) + 75;
    },
    tick: function() { //Iterate Droid animation based on mode
    },

    hit: function() { //Hit Droid
    }
});
Droid Appearance Behavior
In the Whack-A-Droid game, the Droids must behave in a specific way. First, they are created inside a hole until the game starts. Then, after a random amount of time, they appear from that hole. (For now, do not worry so much about the hole, but focus on the movement of the Droid.) They wait for another random amount of time, and then hide in the hole from which they first appeared. In our game, when they are outside their hole and are hit, they will fly up, off-screen, and a new Droid will appear in its place.
From this description, we can infer that a Droid will always be in one of five states at any given moment. Table 7-1 shows a listing of these states and the logic that drives that behavior. The mode number shown in the table is the number we will assign to the Droid when it is in that state to keep track of it.
Table 7-1. States of a Droid
| State (mode number) | Description |
|---|---|
| Appearing (1) | Increase the y position of the Droid every frame until a certain point. Switch to Waiting mode with the intention to go to Hiding mode after a random amount of time. |
| Hiding (2) | Decrease the y position of the Droid every frame until a certain point. Switch to Waiting mode with the intention to go to Appearing mode after a random amount of time. |
| Waiting (3) | Once an allotted amount of time has passed, move on to the next mode. |
| Deactivated (4) | Do nothing. No more Droids should appear at this hole. |
| Flying Away (5) | Increase the y-position of the Droid every frame (at some point, the Droid will fly off the screen). After a random amount of time, reset the position of the Droid below the hole and set to Appearing mode. |
These states will match up with a switch statement we’ll create next in the Droid class declaration.
- 5. There is already an event listener that calls the tick function inside the Droid class definition. Type in the code in Listing 7-17 inside the tick function to create a system for moving the Droids.
Listing 7-17. The tick Function
if (game.rootScene.age === 0) {
    this.waitFor++;
}
switch (this.mode) {
    case 0: //Appear from hole
        this.a *= 0.98;
        this.y += this.a;
        if (this.y >= -1.2) {
            this.mode = 2;     //Go to wait mode after fully appearing
            this.nextMode = 1; //After wait mode, go to mode 1 (hide)
            this.waitFor = game.rootScene.age + rand(100) + 10;
        }
        break;
    case 1: //Hide in hole
        this.y -= this.a;
        this.a *= 0.98;
        if (this.y <= -1.5) {
            this.mode = 2;    //After fully hiding, go to wait mode
            this.nextMode = 0; //After waiting, go to mode 0 (appear)
            this.waitFor = game.rootScene.age + rand(100);
            //Reduce number of max droids (to control length of game)
            maxDroid--;
            //If number of max droids has been reached, and the given
            //Droid is instructed to hide, block the hole
            if (maxDroid <= 0) this.mode = 3;
        }
        break;
    case 2: //Wait
        if (this.y < -1.5) this.y += 0.05;
        if (game.rootScene.age > this.waitFor) {
            this.mode = this.nextMode;
            this.a = 0.05;
        }
        break;
    case 3: //Deactivated (no more Droids will appear from this hole)
        break;
    case 4: //Fly
        this.y += this.a;
        this.a *= 1.1;
        if (game.rootScene.age > this.waitFor) {
            this.nextMode = 0;
            this.waitFor = game.rootScene.age+rand(50) + 30;
            this.mode = 2;
            this.y = -3;
            this.a = 0.05;
        }
        break;
}
First, we tell the frame to wait for one frame before continuing to increase by one in the rare case that a Droid is created on frame 0 of the rootScene. This most likely wouldn’t occur, but we want to cover our bases.
The a variable in the code is used for dynamic movement. During each frame, the value of a changes depending on which mode the Droid is in. For example, if the Droid is flying away, the value of a will increase by 10 percent (this.a *= 1.1;) every frame, and since the y position of the Droid is increased every frame by the value of a (this.y += this.a;), the Droid will fly up faster and faster as time elapses. This all happens very quickly, but adds a nice physics-simulating effect that appears more realistic.
Note that in case 4 (fly), after the waitFor value is reached by the game (in other words, after the Droid has flown off the screen), the Droid is repositioned back at (y = -3;), restarting the process and acting like a “new” Droid.
- 6. Define the hit function by entering Listing 7-18 into the hit function in the Droid class definition. This function is called whenever the player clicks a Droid.
Listing 7-18. The hit Function
if (this.y >= -1.4) { //If Droid is over halfway out of hole
    this.mode = 4;  //Enter fly mode
    this.a = 0.02;
    this.waitFor = game.rootScene.age + 30; //Wait for 30 frames (0.5s)
    scoreLabel.add(combo); //Add combo score
    combo++;
    hitDroid++;
} else {
    //If Droid is whacked before appearing out of hole, reset combo
    combo = 1;
}
If no Droid is hit by a player in the course of a game, the Droids will just loop through the Appearing, Waiting, and Hiding modes. However, this hit function, when called from the touchstart event listener earlier in the Droid class definition, will cause the following things to happen, line by line:
- If the droid is over half-way out of the hole:
- Enter fly mode.
- Set the modifier (a) to increase the y value (in fly mode) initially by 0.02.
- Tell the droid to not change modes for 30 frames.
- Add the user’s current combo (starts at 1) to the overall score.
- Increase the current combo by 1.
- Increase the value of hitDroid by 1.
- After 30 frames have elapsed, change the mode to 2 (Waiting), and reposition the Droid at (y = -3), from case 4 in the Droid definition.
- Otherwise (in other words, if the player tries to hit a Droid that isn’t over halfway out of its hole):
- Reset the player’s current combo to 1.
Finally, we changed the position of the Droid we added to our Scene3D to (0, -1.5, -9.2). This wasn’t completely necessary, but we did it to get a feel for how the Droid would look appearing and disappearing off of the screen.
- 7. Finally, reposition the Droid created and added to rootScene by replacing the line that reads scene.addChild(new Droid(0, 0, -8)); in the game.onload function with the line shown in Listing 7-19.
Listing 7-19. Adding a Droid With a Different Position
scene.addChild(new Droid(0, -1.5, -9.2));We are changing the position of the Droid here because now that it moves around, it would not show up initially in the view of the camera otherwise.
- 8. Save the code and view the game in a browser. The Droid should pop up and down over time and should be clickable when it is in its up state. When the Droid is clicked, it should fly up the screen until it disappears, and another should take its place.
If you encounter problems in this section, you can find a working code sample in the Step3 folder of the download package.
Planes: The Signboards and More of gl.enchant.js
The enchant.js package includes the plug-in primitive.gl.enchant.js. This plug-in contains pre-defined objects of the most common 3-D shapes for use in your games. The object we’ll be using in this section is a plane, which is simply a flat surface on which an image or color can be loaded. Because all these objects are built upon Sprite3D, any Sprite3D method or property is also useable or accessible to a plane. Do the following to implement planes in this game:
- 1. Change the game.preload('images/droid.dae'), line in the window.onload function to match what is shown in Listing 7-20. This is just loading in pictures to be used by the planes coming up.
Listing 7-20. Preloading Images
game.preload('images/pit.png', 'images/sign.png', 'images/droid.dae'), - 2. Create a Plane to represent the pit (containing the holes the Droids come out of) by typing in the code in Listing 7-21 after the line scene.setCamera(camera); in the game.onload function.
Listing 7-21. Creating the Pit
var pit = new PlaneXZ();
pit.scaleX = 3.0;
pit.scaleY = 3.0;
pit.scaleZ = 3.0;
var texture = new Texture(game.assets['images/pit.png'], { flipY: false });
texture.ambient = [1.0, 1.0, 1.0, 1.0];
pit.mesh.texture = texture;
pit.y = -1;
pit.z = -10;
scene.addChild(pit);
First, we create the pit variable as a new PlaneXZ. This is one of the predefined 3-D objects from primitive.gl.enchant.js. Since a plane is a 2-D object, it will exist only on two of the three 3-D axes, which is why we create the pit as a PlaneXZ. This designation tells enchant.js that the plane should be created in the two-dimensional space created by the X and Z axes.
Next, we scale the pit by a factor of 3 with scaleX, scaleY, and scaleZ. Planes are created using coordinates equal to -0.5 or 0.5 for each of their corners, or vertices (e.g., (-0.5, 0, -0.5), (0.5, 0, -0.5), etc.). By scaling these by a factor of three on all three axes, the final coordinates for the plane end up being either -1.5 or 1.5 for each value (e.g., (-1.5, 0, -1.5), (1.5, 0, -1.5), etc.). When you are creating your own games, you’ll want to experiment with the scaling setting to see what looks best at your scene camera’s angle.
The next step is to create a texture, which can eventually be applied to the plane you just created. Here, we load in pit.png as the image, and pass a parameter (flipY: false). Why do we do this? When applying textures to planes, enchant.js will do its best to figure out how to apply the texture in a way to make it appear right side up. However, sometimes enchant.js will get it wrong.
In WebGL, any object that can store pixels contains the property UNPACK_FLIP_Y_WEBGL, which flips an image along the vertical axis, and is assigned to the property flipY in gl.enchant.js. The flipY property defaults to true, so setting it to false in this way reverses the image along the Y axis. Although technically there is no Y axis on an XZ plane, a texture is two-dimensional, so the flipY designation will work as expected, as a texture has no Z axis. (If you’re up for a challenge, you can find more information on how textures are handled in WebGL by searching for information on texture coordinates in OpenGL. WebGL is based on OpenGL.)
Moving on to the texture.ambient line, we set a value of [1.0, 1.0, 1.0, 1.0]. The first three values correspond to red, green, and blue, and the last value corresponds to the visibility or transparency of the light. A value of 1.0 is equal to 100 percent, so this translates to a white light with full visibility. The visibility value is used only in very specific instances, which will not be covered here.
Lastly, we apply the newly created texture to the pit’s mesh texture property and adjust the position of the pit to place it somewhere appropriate on the screen. The final step is to add it to the Scene3D, and the pit will appear onscreen.
- 3. Directly under the line scene.addChild(pit);, type in the code in Listing 7-22 to create a red base for our pit. This adds a nice touch to the finished product.
Listing 7-22. Creating the Base
var base = new PlaneXY();
base.z = -8.6;
base.y = -2.5;
base.scaleX = 3.0;
base.scaleY = 3.0;
base.scaleZ = 3.0;
base.mesh.setBaseColor('#ff0000'),
scene.addChild(base);
This code is pretty straightforward. We simply create the base as a new PlaneXY, position it, scale it, and then set a base color. Notice how the base color method accepts a hexadecimal value for the color. Any value valid for a CSS color property will be accepted here, but we like to use a hexadecimal value to keep things simple.
A value of #ff0000 translates to red, as the first two numbers correspond to red, the second two green, and the last two blue. Since the values are in hexadecimal, this value is in base sixteen. A value of ff corresponds to 256. Because only the red placeholder has a value, and the value is 256, the color of the base PlaneXY will be red.
Lastly we add base to the Scene3D to make it appear onscreen.
- 4. Beneath that, create a sign to make our game even snazzier by typing in the code in Listing 7-23.
Listing 7-23. Creating a Sign
var sign = new PlaneXY();
sign.scaleX = 2.0;
sign.scaleY = 2.0;
sign.scaleZ = 2.0;
var signTexture = new Texture(game.assets['images/sign.png']);
signTexture.ambient = [1.0, 1.0, 1.0, 1.0];
sign.mesh.texture = signTexture;
sign.y = 0.5;
sign.z = -8.6;
scene.addChild(sign);
There is nothing new here. Just like the pit, we create a new Plane, this time a PlaneXY, scale it, create a new texture (this time without the false flipY parameter as enchant.js positions the image correctly for our needs), set the ambient light for the texture, and assign it to the sign. After positioning the sign with the y and z properties, we add it to the scene.
- 5. Save the code and run it through a web browser. It should appear as it does in Figure 7-6.
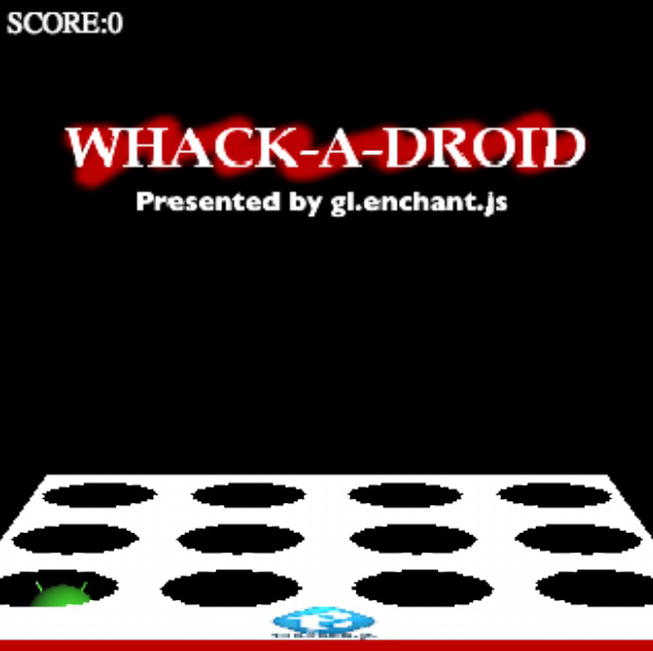
Figure 7-6. Whack-A-Droid 3-D with planes
If you encounter problems, you can find a working code sample in the Step4 folder of the download package mentioned at the beginning of the chapter.
Replicating the Droid and Finishing the Game
We’re now getting pretty close to having a finished game, but we still have only one Droid on our screen. Let’s replicate that Droid to have a full collection, filling up our pit image.
- 1. In your code, create a Droid in each one of the holes shown in the pit by replacing scene.addChild(new Droid(-1.1, -1.5, -9.2)); in the game.onload function with the code shown in Listing 7-24.
Listing 7-24. Creating Multiple Droids
//Create all Droids
for (var j = 0; j < 3; j++) {
    for (var i = 0; i < 4; i++) {
        scene.addChild(new Droid(i * 0.75 - 1.1, -1.5, -9.2 - j * 0.9));
    }
}
We created the Droid as a class that could be called and designated the behavior of all instances of that class, so replicating the Droid is as simple as using a for loop to iterate through all the ones we want to create.
The for loop controlled by the j variable represents each row, and the for loop controlled by the i variable represents each column in a given row. Notice how we multiply the x position by 0.75 in the new Droid declaration to move the space a new Droid will be created in over to the right. Similarly, we multiply the value of j by 0.9 before subtracting it from -9.2 to move the position of a new Droid back a row or two. It’s a very efficient way to create multiple instances of anything in your enchant.js games.
- 2. Directly underneath this, type in the code in Listing 7-25 to create an event listener that ends the game once the maximum number of Droids has reached zero or lower.
Listing 7-25. Ending the Game
game.rootScene.addEventListener('enterframe', function() {
    if (maxDroid <= 0) {
        game.end(scoreLabel.score, "You whacked " + hitDroid + " Droids for a score of " + scoreLabel.score + " points!");
    }
});
Because whacking Droids or allowing them to retreat back into their holes causes the variable maxDroid to decrement by one each time, we also add an enterframe event listener to end the game once maxDroid has reached 0 or lower, showing the number of droids whacked with the player’s score.
 Note Keep in mind that because the game.end function is fully supported only by the nineleap.enchant.js plug-in, the final message with a player’s score and the number of Droids hit will appear only if the game is uploaded on 9leap.net.
 - 3. Save the code and run it from a web browser. You should have a working game that appears as it does in Figure 7-7.
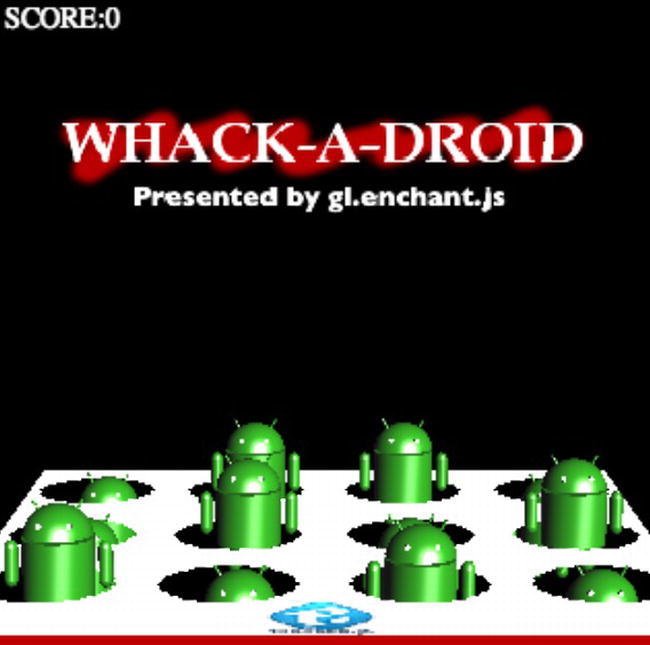
Figure 7-7. After replicating the Droids
If you encounter problems in this section, you can find a fully working code sample in the Step5 folder from the download package mentioned earlier in this chapter.
Panning Camera Effect
Although we have a working game now, let’s add one final finishing touch: a panning camera effect at the beginning of the game. When the game starts, the player will have a bird’s eye view of the pit, and then the camera will pan down to the view we’ve had up until now. This allows you to see the 3-D nature of the game you’ve just created.
Do the following to create the panning camera effect:
- 1. Inside the game.onload function, replace the lines that read camera.y = 1.1; and camera.z = -1.65; with the code in Listing 7-26 to change the initial camera position.
Listing 7-26. Changing the Camera Position
camera.y = 14;
camera.z = -8.1;
This camera position is further away from the pit, but still angled towards it. This makes the panning effect more drastic and noticeable.
- 2. After the line that reads if (maxDroid <= 0) {game.end(scoreLabel.score, "You whacked " + hitDroid + " Droids for a score of " + scoreLabel.score + " points!");}, but still inside the event listener, type in the code in Listing 7-27 to make the camera pan down at the beginning of the game.
Listing 7-27. Making the Camera Pan at the Beginning
//Pan camera down at beginning
if (game.rootScene.age < 130) {
    camera.z += 0.05;
    camera.y -= 0.1;
}
The actual panning effect takes place here. For the first 130 frames of the game, the camera will get closer and closer to the pit, stopping at the perfect viewpoint. This is accomplished by modifying the z and y axis positions by a very small amount every frame to reach a specific point by the time 130 frames have passed. When developing something like this, it helps to calculate where you want the camera to start from, where you want it to end, and then figure out how much the camera needs to move each frame to achieve this.
- 3. Save the code and run the game through a web browser. The game should start from the viewpoint shown in Figure 7-8 and quickly pan down to the view that is featured in preceding code samples.
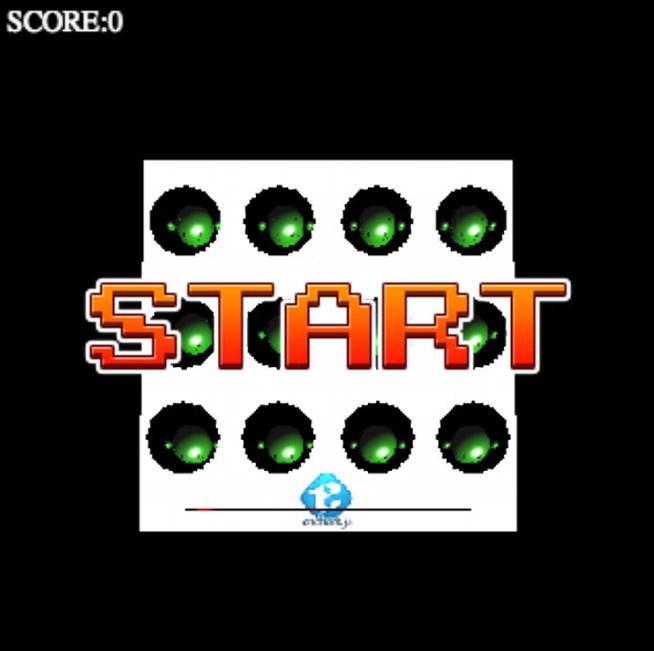
Figure 7-8. Whack-A-Droid 3-D with a new starting perspective
If you encounter problems in this section, you can find a working code sample in the Step6 folder available from the zip file mentioned earlier in the chapter.
Conclusion
In this final chapter, we took a look at how to develop a stand-alone 3-D enchant.js game. We briefly touched on WebGL and the various WebGL-enabled plug-ins of enchant.js: gl.enchant.js, primitive.gl.enchant.js, and collada.gl.enchant.js.
We created a 3-D version of our Whack-A-Droid game and saw how instances of Scene3D, Camera3D, and Sprite3D can be used to construct a 3-D environment and interface a player with it. By creating instances of planes and our self-authored Droid class, we were able to put together a working 3-D version of our Whack-A-Droid game, even adding a swooping camera effect at the end to show off the 3-D nature of our game.
We hope this chapter inspires you to experiment with 3-D on your own through enchant.js and eventually try authoring your own 3-D game. As 9leap.net supports any game created with enchant.js, we encourage you to publish your game on 9leap and share it with the world!
Stay connected with us:
- Official site: enchantjs.com
- Reddit: reddit.com/r/enchantjs – ask questions here!
- Facebook page: facebook.com/enchantjs
- Twitter: @enchantjs_en
- GitHub: github.com/wise9/enchant.js
Best of luck with your game authoring!
The enchant.js team