

Chapter 2
Complexity from Simplicity
This chapter will take a look at game design to see how you can make a game fun at its most basic level. A case study of a game called “A to B” will be used to highlight some of the essential theories of design implementation. This chapter will also discuss the use of the JavaScript library, Processing.js in the implementation of A to B. We will go over some advantages and disadvantages of building your game with this framework.
By the end of this chapter, you will have a better understanding of the following:
- Game design fundamentals
- Workflow
- Processing.js
- How to use Processing.js for HTML5 games
Who am I?
As of this writing, I am working towards a graduate degree in media art at Emerson College in Boston, Massachusetts. The beginning of my academic career was centrally focused on computer science. As I advanced, however, I found myself less interested in algorithms and efficiency and more interested in graphics. This sparked an exploration into the fine arts. At the end of my undergraduate studies, I found that the overlap of the two fields was what really inspired me. Since then, I’ve been exploring the hybrid art of programming and visuals. This has manifested in the form of data visualizations, interactive installations, and most recently, gaming.
Game design background
Unlike many game designers, I have never been obsessed with gaming. As a child, I was not allowed to own a gaming console (PC not included) until I was in high school. However, like most game enthusiasts, I can recall the first moment games became an important part of my life. For me, it was when my babysitter brought me a floppy disk (remember those?) with the classic Atari games. I can’t even begin to imagine how many hours I logged playing Asteroids and Battlezone. From then on, I have been in and out of the game world. Occasionally, I find a great game that captivates me for a couple weeks, but I am not a gamer.
More recently, my work began to take on some game-like qualities. It started with an experimental game called “The Sea,” which was an attempt to bring Brian Eno’s theory of ambient music into the realm of gaming. While it wasn’t well-received by my peers (mainly due to the fact that it was a game without input), it got me in the game mindset. The timing was just right for me to get into games. I was not only reading some wonderful theories on gaming, but HTML5 was hitting the web. As a freelance web designer, naturally this was on my radar. It was at that time that I realized I needed to make a game for the web.
A to B
For my first HTML5 game, I created a simple puzzle game called A to B (check it out at http://russellgoldenberg.com/atob). Like the title states, the goal of the game is to get a ball from point A to point B (see Figure 2-1). Before the game even starts, the player is greeted with an old-school, high-score list, much like old arcades. The game environment is an empty two-dimensional space. At the beginning of each level, the ball is placed (frozen) at a pre-determined point A on the screen. There is a point B that refers to the target, and a set of modifiers on the bottom.
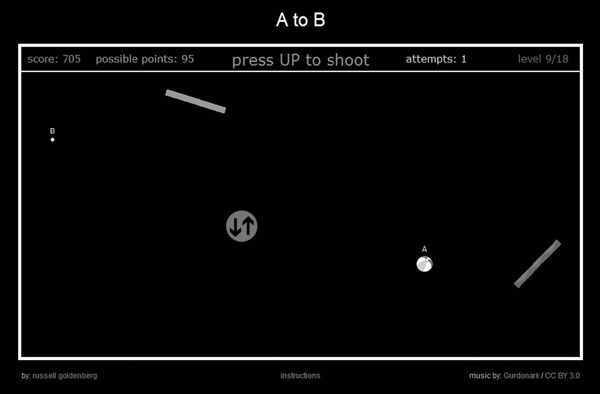
Figure 2-1. Screenshot of A to B in action
When the player presses Go, the ball is launched (at the same angle and velocity every time), and then is subjected to gravity. If the ball hits point B, the player receives points and moves on to the next level. If the ball goes off screen, the ball is returned to its original resting position and is allowed to go again until the player hits point B. In order for the ball to get to point B, the player must position a set of modifiers to guide the ball there. The possible modifiers include a wall, a bouncy wall, a speed booster, a speed reducer, and a gravity flipper. Each level has between one and five modifiers. The ball must interact with each modifier in order to pass the level. Additionally, a modifier becomes invisible or non-interactive once it has been used.
There are 18 levels in all. The levels start out with only one modifier and eventually progress up to a set of five. The player can obtain a maximum of 100 points each level. The way the scoring system works is that a player starts with 100 potential points. With each failed attempt, the points available decrease by five. Essentially, if a player wants to score any points at all, he must get the ball to point B in less than 20 attempts.
Influence and inspiration
A to B is actually derived from a piece I created a year earlier called “Infinite Loop” (see Figure 2-2), which was essentially a criticism of certain online games. The entire “game” consisted of a ball that you need to drop through a loop to hit a target. Every time you hit the target, you would get a point. The game would continue forever until the player quit. The experiment was to see how long people would actually repeat the boring task simply to receive points.
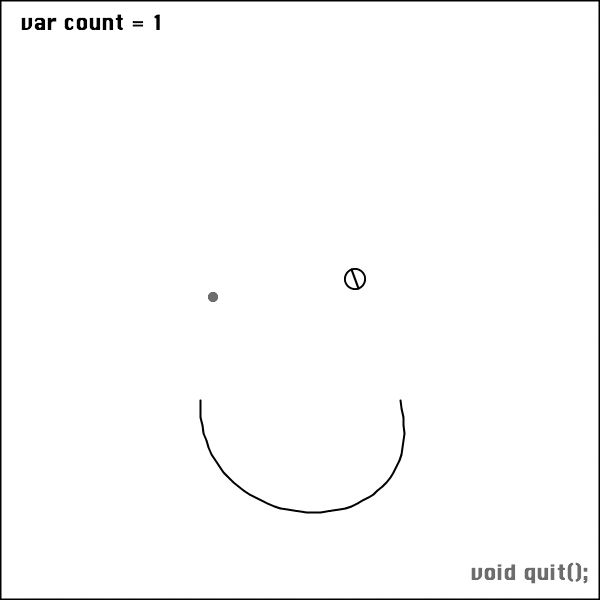
Figure 2-2. Screenshot from the game Infinite Loop
At its core, A to B is influenced by the Atari classics that I mentioned earlier. At the start, I recognized that since I am new to gaming, I needed to keep it simple. Asteroids was in black and white and the player controlled a triangle, yet somehow it was one of the most compelling games I ever played. I decided that in order to enter into the world of gaming, I needed to understand fundamentally why games are fun. Without going into the detail, I will strongly recommend reading a copy of Ralph Koster’s A Theory of Fun for Game Design (Paraglyph Press, 2004). This text was an extremely insightful look into what makes games fun. Inspired by his discussion and my appreciation of some of the originals, I set out with a strong vision for A to B.
Brainstorming phase
All the details and many alterations of A to B were conceived during brainstorming sessions. I find that a very informal and unplanned brainstorming process works best. This produces the most natural flow of ideas and information. For me, this amounted to a pretty simple loop. One day when thinking about the game (usually on the train to school or while exercising), I would have an idea for how something should function. I would then sketch out my vision and present it to a friend. The process of clearly explaining my idea was not only good for the friend to see what I was seeing, but it also provided an indirect way to stumble upon more issues and possibilities. In particular, I found that almost all the good “what-ifs” came from conversations with my friends. Having active conversations was the best way to get the creative juices flowing and to consider other viewpoints, eventually resulting in the best possible implementation.
Pre-production
Once the idea was officially cemented, it was time to plan out the development. The first thing I determined was the technology. Having decided the game was going to be exclusively HTML5, I knew I was going to be using the newly-implemented canvas and audio tags. I also realized that I wanted a high-score table, both for the retro-arcade feel and as a secondary motivational factor in the game itself.
In order to make the high-score table, I needed to utilize an online database, so I went with MySQL and PHP to make that happen. In terms of the actual scripting for the game, I decided to use the Processing.js (PJS) library. PJS is a JavaScript port of Processing, a popular creative coding language geared towards artists and beginner programmers. It has become a cornerstone in the programming world because it is both accessible for new users and powerful to handle advanced ideas and implementation. PJS allows the developer to write in the original Processing syntax, which is then automatically converted to the canvas element. This was a major factor in the timeline for the A to B project because I am an avid Processing user. PJS enabled me to handle the bulk of the coding and debugging within the familiar Processing environment before making it internet-ready.
This brings me to another lesson that I learned; which is as long as the job gets finished, who cares what you used to do it? People are often too concerned with keeping up with the latest and greatest technology. If the end product is what matters, then it shouldn’t matter how you get there, as long as you do.
In addition to learning a bit of PHP and MySQL, I had to touch up on my jQuery skills. jQuery proved to be very helpful with the high-score table. Since JavaScript is a client-side language, I needed a way to read and write to my database from the JavaScript, which is where jQuery came in handy.
Once I established the technology, I set up a list of deliverables and deadlines. Planning out a timeline for this is useful for project organization and motivation. Having certain deliverables due at a certain time not only made me stay on schedule, but prevented me from getting sidetracked. My initial goal was to finish the entire project in four weeks and be able to submit it to a few different game festivals. By planning out due dates, I was able to realize these goals.
Production
The development of A to B followed a pretty standard loop, which looked like Figure 2-3.
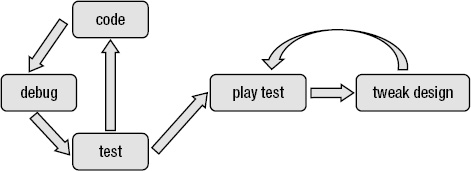
Figure 2-3. Stages of development of the game
While it is generally good practice to plan the entire system before one begins development, I followed a looser approach. Since I knew the game wasn’t going be a large scale software project, I knew I could get away with a more unscripted design. Essentially, this resulted in less efficient and less modular code. There are many people (like me), however, that believe that as long as you get the job done effectively, it doesn’t matter how you get there. As you can see in Figure 2-3, I always started by coding something. Usually, I would break down my code sessions to set up and accomplish small achievements. For example, one session revolved around getting a ball to adhere to “real” physics.
Instead of building the system with breadth and no depth, I approached a specific topic and went all the way down. Although this was less modular in terms of focus and learning, it proved to be a more effective approach. I would immerse myself in a single issue and not stop until it was resolved. This allowed me to not have a bunch of loose ends to tie up at the end.
The next layer of production after coding, debugging, and testing, was play testing. Play testing is one of the most helpful areas of the development process. During play testing two major things occur: bugs and what-ifs. When coding, you often lose sight of the bigger picture. You know exactly how you want things to function, but you don’t see it from a different perspective. Having other people who aren’t familiar with the operations of the code play test for you is like stepping back from the painting. In doing so, they may approach the same problem from a different angle. This can reveal inconsistencies or bugs in your code. It is much like pouring water in a bucket. If there are tiny holes, it will be obvious where they are.
Additionally, and possibly more importantly, you will begin pondering the what-ifs. What-ifs are an extension of the brainstorming phase. As you’re watching the tester play, you immediately see something that could be changed, enhanced, or removed that will make the game better. To help manifest this activity, you should inform your players to use the “think aloud” method. This is a common practice in user interface prototyping. You instruct players to verbalize all of the decisions and thoughts that are going through their minds as best they can. This gives you insight into what everything in your game is triggering in players’ minds. If a player sees a red object and is thinking it means danger (but it doesn’t), then maybe you need to change the color. Small details of what the mind is actively doing can expose flaws and/or things that are successfully working in your game.
Once the game engine was in place, it was time to sugarcoat it. Since A to B is minimalist at its core, the graphics needed to represent that. I chose to stick with few effects and basic graphics to embody this theme. I believe this emphasized the point of the game, which was built on the basic concept of getting the ball from one point to another. To make the game a little more alive, I added a soundtrack. I chose to utilize the web resource ccmixter.org. This web site provides Creative Commons licensed music. Each song on the site specifically covers how the song may be used; be it commercial or personal use, it is very explicit. I found a fun and simple song called “Kindergarten” by a user named Gurdonark.
Post-production and release
Once the site was up and running, submissions to festivals and a little promotion was in order. Being a novice game developer, I was unfamiliar with many of the available festivals. In the end, I only ended up submitting it to two competitions: the IGF Student Showcase and Mozilla’s Game On competition. I did a small bit of social network promotion to get some foundational users as well. A few posts to both Facebook and Twitter got friends and some random people involved. There are many other ways to promote your game, but I was relying on the power of word of mouth to carry this project.
Reception
As of this writing, the high score on A to B is 1795 (see Figure 2-4). Sadly, I do not possess the high score; although I am on the list with 1665. A perfect game would be an 1800. I still have not figured out how the highest score was even possibly obtained.
In Mozilla’s HTML5 game competition, A to B was a finalist. The game has also been featured on a few blogs and HTML5 game sites, and reviewed on playthisthing.com. Within the first three months of the release, it received over 10,000 plays. To date, 274 people have beaten the entire game.
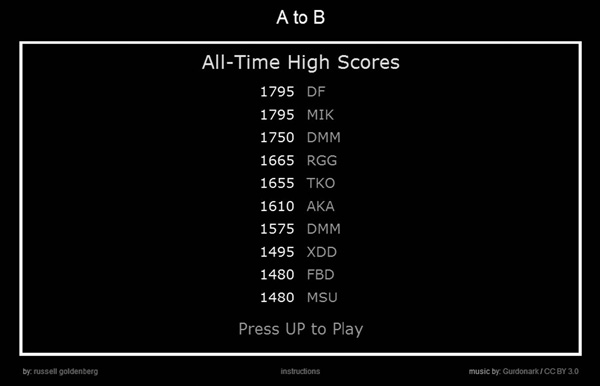
Figure 2-4. A to B high-score list
Rules of simplicity
A to B helped me learn a few valuable lessons for making a simple, yet compelling, game.
- Focus on the core mechanics. By keeping A to B stripped down and transparent, the player is able to participate directly with the core mechanics of the game. While I’m not saying that every game should do this, it does prove a valuable lesson: the core mechanics are what ultimately drive the game. In A to B, there is no story involved or other components to get distracted by. The game’s title even reflects this transparent nature of the mechanism. Despite the lack of substance or depth, however, the game is still fun and played by many people. That is because as a designer, I only worry about the game’s mechanics. The object of the game is clear, and the player’s role is also clear: move the modifiers so that the ball hits them and gets to point B. By focusing my attention on how that simple process would work, as well as continually tweaking everything based on that idea, the game became a success.
- Aesthetics are secondary. This is basically a sub-section of rule number one. Like the story, the aesthetics are mostly fluff. Aesthetics can play a major role in the game, but I feel that it is secondary. Aesthetics are what initially intrigue players; mechanics are what make them continue playing. There is no doubt that aesthetic choices can have a major impact on the game, but they are like a magic spell that eventually wears off. If the visuals and audio are amazing but the game play is boring, a player will stop playing. The substance of the game is the mechanics, so don’t invest too much effort into the aesthetics unless it plays an integral role in the core of the game.
- Be explicit with instructions. Since there are hundreds of thousands of games available, a player won’t give a game much of a chance to let it make its point. Therefore, it needs to be clear and not frustrating to learn how to play the game. It is important to immediately provide the tools for or instruction on how to play your game. Players should be able to participate and understand how the mechanics work right off the bat. This does not imply, however, teaching players how to solve the problems. You want to leave that to them, because that is the point of the game.
- Don’t reveal everything. Although we want the player to immediately understand how the mechanics work, you don’t want to give away everything. The element of positive surprise is a very powerful tool in games. Players enjoy discovering something unexpected. Therefore, it is wise to keep some things hidden. Even in a simple game like A to B, I was able to withhold some key information and let the players discover it on their own. I utilized the fact that players didn’t necessarily realize that they could make a ball go in the opposite direction. More astute players discovered this right away, while others came to realize it down the road—creating an “Aha!” moment.
- Patterns are good. The final rule of simplicity is about creating patterns. Patterns allow you, as a developer, to recycle code and mechanics. This makes it super-easy to create new levels and experiences without having to do much work. In order for this to work from a player’s perspective, you must continue to feed them new content. While they will enjoy recognizing the patterns, they need something fresh to apply them to. For example, in A to B, when a player realizes that a good combo is to use a speed reducer immediately followed by a bouncy wall, he discovers a re-usable pattern. By changing up the locations of points A and B, however, and adding additional modifiers, the player is presented with a new situation to apply what they’ve learned. This is an effective method to keep the player in a state of flow. This means the challenge is the perfect balance between difficult and easy. By slowly compounding more and more of the skills they have developed, you can maintain this flow state and progress from easy to difficult levels quite smoothly.
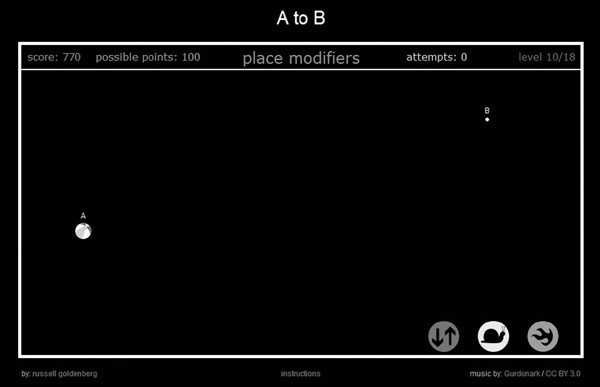
Figure 2-5. The beginning of the level screen, the modifiers available in bottom right
Why A to B works
Whether or not you care for the simple graphics, game play in A to B just works. This can be attributed to much of the theory that I read surrounding game development. First and foremost was Jesse Schell’s Art of Game Design: A Book of Lenses (Morgan Kaufmann, 2008). This book did a fantastic job breaking down game design. Everything from inspiration to execution was covered in detailed and easily digestible checklists and methods. In the book, Schell claims that the mechanics are the foundation of the game, so most of your attention needs to be focused on it. For me, this was the most important piece of information in the book, and became the basis for my first rule of simplicity.
Another helpful idea was from the seminal work on the concept of flow by Mihaly Csikszentmihalyi. Flow is the idea that a perfect state of mind is achieved through the balance of skill and challenge. Too much challenge causes anxiety, too little causes boredom. There are number of other resulting emotions, but flow occurs when everything is just right. This idea was instrumental in the process of level design. Between fine-tuning the positions of A and B, along with carefully selecting the number and set of modifiers, I hoped to provide the perfect balance. This is essential in almost any type of game. If the game starts out and is too challenging, the player will quit. If it takes too long to become challenging, the player will quit. The level of skill involved in the challenges provided another key component. In a game like A to B that relies on precision and repetition, everything needed to be entirely skill-based. Leaving anything up to chance would simply frustrate the player. However, there are certain games where chance and uncertainty play an important role in the game. It is crucial to analyze your exact circumstances to decide how much skill vs. chance should be involved.
One of the most important elements to the success of the game was the balance of risk vs. reward. Similar to skill and chance, there needs to be an appropriate balance between the two, or else a game will feel “off.” With A to B, reward always came in the form of more points. Risk is a little more difficult to identify, but was equally as critical. For example, if a player has laid a certain path of modifiers and is struggling to get to point B, there are two options. The first and safer method is to continue to tweak the current setup slightly until the ball reaches point B. The riskier, but potentially more rewarding option is to totally rearrange the modifiers to create a different strategy. While this might pay off big-time, the player might also end up back-tracking and have to do many more minor tweaks. This example illustrates how you can provide subtle design elements to make for a more compelling game.
Processing.js
While Processing has been around since 2004 and has grown into a powerful tool, Processing.js is in its infancy. There are a few distinctions between Processing and its JavaScript brother. Processing has more than 100 libraries. This is a central attraction to using Processing because it greatly expands its functionality. The libraries include everything from physics simulation to camera and face detection. The first downside of the JavaScript version is that there is no ability to import and utilize these libraries. Essentially, you only have access to the core functionality of Processing. That being said, there are people out there who are attempting to port some of the popular libraries to JavaScript to allow for some more expanded integration.
Additionally, Processing.js lacks power. In the original version, you can draw thousands of objects to the screen without sacrificing frame rate. With the JavaScript port, however, there is a significant disparity between the two. This is largely due to the constraints of using the HTML5 canvas; but with each browser update, we are seeing increased rendering speeds on the side of the canvas.
How does Processing.js work?
Although Processing.js can be viewed as a “lite” version of Processing, it is still an exceptional tool considering that it runs on the web. The way it works from a user perspective is quite simple. All you have to do is code as you would in Processing. Then, when you want to make the project web-ready, you follow some simple instructions to connect it to the canvas. The way Processing.js works is that it simply converts what you’ve written and applies it to the HTML5 element, the canvas tag. It makes life easier for the coder because instead of learning a new technology, you can simply apply what you already know and instantly make Processing sketches deployable on the web.
Note In Processing, a sketch is simply the resulting visual application that runs once your code has been compiled.
Who should use Processing.js?
New coders would benefit from using Processing.js. Since the library revolves around the creation of visuals, it is a very intuitive way for beginners to learn and understand the concepts of programming. You don’t even need to download any software to get started. If you check out the Resources section of this chapter, you will find a few different online editors that make working with Processing.js hassle-free.
Web designers who want to add some interactivity or dynamic elements to their web sites can also benefit from using it.
Game developers are another group that should utilize Processing.js for the ease of creating graphics and visuals, and the power of flexibility. Not only do I find working with Processing.js more intuitive than JavaScript and the canvas API, but you are able to intertwine the two.
In short, Processing makes programming accessible. It enables people with little to no coding knowledge an easy transition to powerful tools. It also provides experienced programmers with dozens of libraries geared towards coding visuals to accommodate a nearly infinite array of ideas.
What are its strengths and weaknesses?
The two major players in the creative, coding-specific software industry are Processing and openFrameworks. The major difference between the two is that openFrameworks is based on C++ while Processing is based on Java. All in all, they are very similar in terms of functionality and capability, much like Coke and Pepsi. While other creative coding software exists (Cinder, VVVV, and nodeBox, to name a few), Processing and openFrameworks are the most popular.
In regards to the JavaScript version of Processing, the following is a rundown of the strengths and weaknesses of Processing.js:
Strengths
- Excellent graphics library
- Don’t need to learn JavaScript
- Great forum and community
- Cross-browser compatibility
- Can write stand-alone or JavaScript integrated code
- It’s free!
Weaknesses
- Limited functionality (missing a few core libraries, such as video and audio support)
- Limited access to Processing libraries
- Difficult to debug
- Significantly less powerful than the offline version
Is it a good fit for games?
The short answer: yes.
Certain types of games will lend themselves better to using Processing.js. Puzzle-based games like mine that are less reliant upon stunning visuals are the perfect form for Processing.js. With fewer on-screen objects to be rendered, the canvas has no issue. A full-on, simulation-based soccer game or a multi-player shooter, on the other hand, is best left to the more sophisticated engines like Unity, which has a far more powerful graphics-rendering engine that can handle a large amount of objects. Unity is, at heart, a game engine; so it has built-in game functionality that relieves you from making code.
I believe that the aesthetic is what draws you in to a game, while the game play is what keeps you there. If you design with this in mind, Processing.js can be the perfect solution—not only to prototype a game, but to create a final product.
Examples and integration of Processing.js
With all of this talk about Processing.js, it is time to take a look at how easy it is to put into action. This section will take a look at the basics of getting started with Processing.js. I will provide a few examples with code on how to get started. We will also take a look at a few of the tricks that I learned to make some of the more important features happen.
Basic Processing syntax
If you are familiar with Processing or Java, this bit will look familiar to you.
void setup(){

size(400,200);

}

void draw(){

background(0);

fill(255,0,0);

ellipse(mouseX,mouseY,50,50);

}
This is a very basic example of the Processing syntax. This code will create a canvas that is 400 200 pixels. It will then repeatedly draw an ellipse at the x and y positions from the mouse’s current location for width and a height of 50 pixels. The color will be red. As mentioned earlier, Processing is basically a wrapper for Java. With Processing, there is a setup function that is run only once on the start; then the draw loop runs repeatedly until the program exits. Also, creating any sort of graphic is as simple as entering the parameters into the function.
Embedding a sketch
Now that we’ve had a glimpse of what Processing looks like, we will now take a look at how you embed it into your HTML to get it up and running with the canvas tag. Let’s say you have written the program in the previous section (called a “sketch” in Processing lingo). The sketch will have a file name ending with the extension .pde. The following shows how to embed our example.pde sketch into HTML5.
<html>

<head>

<title>Processing with HTML5 </title>

<script type="text/javascript" src="processing.js"></script>

</head>

<body>

<canvas id="processingCanvas" data-processing-sources="example.pde"/>

</canvas>

</body>

</html>
You only need two things to get your first sketch up and running online: your processing sketch and the processing.js file, which can be downloaded at Processing.js.org/download. Simply download the latest stable version of the processing-x.x.x.js file, and you are ready to go. All you have to do is define the canvas, tell it to load your sketch, and voila, you have Processing on the web. In the upcoming release of Processing (2.0), you can actually click a button to switch into JavaScript mode. This means you don’t even have to download a library because when you export your sketch, it will create the web page and include the JS library by default.
In-line processing
For people like me, you may want more access to the code than this. Processing.js allows you to write your Processing code directly in the script tag. The processing.js file will automatically convert what you write into Processing. The following is what the same sketch would look like using this method.
<html>

                <head>

                        <title>Processing in HTML5</title>

                        <script type="text/javascript" src="processing.js"></script>

                </head>

                <body>

                        <script type="application/processing" >

                        void setup() {

                        size(400,200);

                        }

                        void draw() {

                        background(0);

                        fill(255,0,0);

                        ellipse(mouseX,mouseY,50,50);

                        }

                        </script>

                        <canvas id="processingCanvas"></canvas>

                </body>

        </html>
Notice that instead of the standard type="text/javascript" we have replaced that with "application/processing". This lets the compiler know that we are including Processing in here, not just JavaScript.
Integrating JavaScript
So why do this over the embed version? Because now you are able to combine JavaScript and Processing code in the same space. The compiler will be able to differentiate between the two. This means you can use a hybrid style of coding that gives you access to functions of Processing and traditional JavaScript. Let’s say we have a simple ellipse that is growing in size. If we want to alert the user once it has hit a certain size, we can tap into the JavaScript functionality right inside the Processing code.
        <html>

                <head>

                        <title>Processing in HTML5</title>

                        <script type="text/javascript" src="processing.js"></script>

                </head>

                <body>

                        <script type="application/processing" >

                        int ellipseSize = 5;

                        void setup() {

                        size(400,200);

                        }

                        void draw() {

                        background(0);

                        fill(250);

                        ellipse(mouseX,mouseY,ellipseSize,ellipseSize);

                        ellipseSize++;

                        if(ellipseSize==100){

                        alert("the ellipse is 100!");

                        }

                        }

                        </script>

                        <canvas id="processingCanvas"></canvas>

                </body>

        </html>
Switching between the JavaScript and Processing code couldn’t be easier. You can also pass variables and values from JavaScript into the Processing code. This functionality makes Processing.js a great choice for people who already know JavaScript. You get a very powerful graphics library that plays nicely with the canvas tag.
Using audio
Audio is another feature that nearly anyone making a game will need. In A to B, I made use of both background music and small audio bits throughout the game. To incorporate audio into your HTML game, you must make use of another new feature of HTML5, the audio tag.
First, you must create your audio tags, which is done in the body of your HTML. By default, the audio tags will create mini audio players that will appear on screen. You can turn these off in your stylesheet.
<audio id="sound1"><source src="boom.mp3"></audio>
This is a basic audio tag. However, there are a few properties that you can define within the tag that are really helpful. For example, I wanted my background soundtrack to loop repeatedly throughout the game and play automatically once it loaded.
<audio id="soundtrack" autoplay loop><source src="snowfall.mp3"></audio>
Once you have created your audio object, you are ready to insert it into your Processing code. You can place this anywhere, just make sure you use the proper variable names.
document.getElementById("sound1").play();
Since different browsers utilize different audio codecs, it is important to have multiple types of audio files to ensure cross-browser compatibility. Use a free application like Audacity to convert your audio file to other formats. For example, if you wanted to have an MP3 version and a WAV version, it would look like this:
<audio id="sound1"><source src="boom.mp3"><source src="boom.wav"></audio>
The browser will choose whichever audio file that it supports to load.
Importing and loading images
For anyone out there that wants to make a game, it is quite likely that you will want to have some sort of images involved. In order to incorporate them in your Processing.js code, it is handled a bit differently than with building web sites. The following is a sample code that will import two images and then display them on the screen. Also, two slashes (//) means a comment in Processing. I will use the comments in line to describe what is going on.
<script type="application/processing">

//first we have to preload the images from the directory, assuming they are in the root folder

/* @pjs preload="snow.png , squiggle.png"; */

//next, we must make some variables that will reference these images

PImage theSnow, theSquig;

void setup(){

size(400,200);

//in Processing, you must load the images inside of the setup function

theSnow = loadImage("snow.png");

theSquig = loadImage("squiggle.png");

}

void draw(){

background(255);

//displaying the images simply pass the function the variable and a location

image(theSnow,0,0);

image(theSquig,mouseX,mouseY);

}

</script>
One thing to note is that when you preload and load the images, you must make sure to include the proper path to the file. For example, if the picture is in a sub-folder called pictures, in both places it would look like "/pictures/theBall.jpg".
High-score list with jQuery
In order to implement a high-score list, you need to create a database. Once a database is created and you have written the PHP file that talks to the database, you can make calls to the database within the Processing code. Normally this would not work because PHP is a server-side language, while JavaScript is client-side; but thanks to the magic of jQuery, it is possible. Simply use the jQuery $.post function. The following is my code:
$.post("highscorelist.php",{score: theScore, name: playerName},function(data){

result = data;

}
As long as you can do some simple PHP communication, you can easily implement any sort of data storage that you can envision.
Summary
By now you have hopefully witnessed the power of Processing.js and the benefits of keeping things simple. While games are becoming more graphically and technologically advanced, a good game must always adhere to some core principles. The cliché expression “the simplest idea is often the best” couldn’t be more true when it comes to online games. Players have extremely short attention spans, so it pays to concentrate on the heart of the experience to make it come across.
Resources
To learn more about Processing, check out some of the following web sites:
processing.org: download processing; check out the forum, examples, and reference docsProcessingjs.org: the JavaScript port of Processingsketchpad.cc: an online editor to write and save Processing.js sketchesopenprocessing.org: share and explore sketches