
Chapter 3
How to Make Multi-Platform HTML5 Games from Scratch
Introduction
Today, applications like Twitter, or games like Angry Birds, are available on many platforms. The number of different instances of an application can become huge.
Such an application can target the number of platforms (mobile, tablet, desktop), the number of operating systems (iOS, Android, webOS, etc.) and the number of application versions (free and full versions, for instance). Hence, there are potentially P*O*V applications to develop.
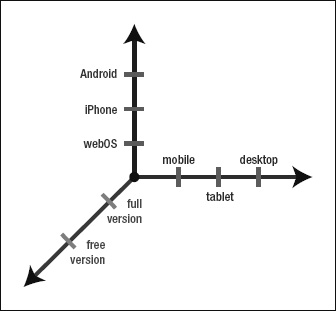
Figure 3-1. Various platform directions
It’s almost unfeasible to develop so many instances and maintain them yourself. You want to fix bugs and add features once—and only once.
Hence, what’s required is a common language to describe an application for multiple instances—and that’s exactly what the web proposes. We don’t need to learn new, device-specific languages, and API—the web is our strong, high-level, common language.
Recent years have seen a powerful rise of web technologies, including the advancement of rendering engines (WebKit, Gecko, etc.), the considerable improvement of JavaScript engines (V8, SpiderMonkey, etc.), and the emergence of new HTML5 API and CSS3 support (Animations, Transitions, etc.). It’s highly likely that these standard technologies will replace RIA (Rich Internet Application) browser plugins like Flash or Silverlight.
Note WebKit is an open-source layout engine that is broadly used across multiple platforms, such as desktop browsers like Chrome and Safari; Android smartphones and the iPhone; the Android tablet and the iPad; and “smart” TV (for example, France’s Freebox 6 browser). Future devices will probably continue using WebKit, benefitting from its experience and performance.
Having this portable technology, we must now find an easy way to integrate our application to any app store (Android Market, Apple Store, Chrome Web Store). We also want to keep a single code source to write and maintain. This will be done through the use of frameworks. We'll talk about PhoneGap, which provides a skeleton required for packaging an application for an OS and the PhoneGap JavaScript library, which exposes an API to exploit full functionality of the device.
Throughout this chapter, we will examine the case study of Same Game Gravity (a game available on six platforms: iPad, iPhone, Android, web, Chrome Store, and Facebook; see http://github.com/gre/chess-game) and look at how we can apply these lessons to our own projects.
Same Game Gravity is a mind-bending, ball removal puzzle game where you try to remove all of the balls from a board. Balls can only be removed when they are grouped with others of the same color. The balls are influenced by gravity. On mobile, you influence gravity by rotating your device, and on the desktop you have arrow keys.
The Same game is not new, but the gravity principle gives it a unique twist. You can rotate the game board through 360 degrees to change the gravity of the game and consequently, the balls’ positions.
The first challenge in the game development was to maintain most of common source code while adapting it to the device. For instance, the game’s gravity is handled by the accelerometer for mobile and tablet versions, but just the mouse/keyboard for the web version.
The second challenge was to reduce maintenance cycles (bug fixes, features add) and game instance “deployment.” Reducing the number of steps to move from a n to a n+1 version on different markets is very important, so we need tools to easily build game packages (in fact, PhoneGap build is a new web service that satisfies this need).
For Same Game Gravity, I developed and used a micro framework I called “WebAppBuilder,” which is a mashup of tools to perform different game instances “compilation.”
Once we’ve covered the basics, we will then apply this knowledge to creating a multi-platform chess game that will run on desktops and smartphones.
The web offers an interesting architecture for making dynamic applications. Web development is usually split in three parts: HTML, CSS and JavaScript. Let’s focus on and independently explain the power of each—then mix them together to bootstrap our multi-platform chess game from scratch.
Three-part code organization
Web client-side development is about HTML, CSS, and JavaScript. Basically, HTML helps us to describe the content, CSS describes how that content is displayed, and JavaScript describes what the content does.
It is essential to make the best use of each part and not to blend their goals. The source code separation is important because it adds modularity for the developer and allows us to be more productive: we only have to focus on one part at a time and our repository also becomes far more maintainable.
For now we will focus only on client-side parts of a game, but it is also possible to have a web server that receives, for instance, player scores via asynchronous requests (Asynchronous JavaScript and XML).
HTML, a content language
HTML (HyperText Markup Language) is the language that describes all the content of a web page. Like XML, it is a markup language, meaning it is structured as a tree of tags with content. The current range of available HTML elements is very rich. It links and structures different resources: images, videos, stylesheets, and JavaScript scripts (to learn more about all available elements, see the Other Resources section).
The most recently released version of the HTML specification is HTML4, but for several years the fifth version has been a work in progress and its release is imminent. But “HTML5” as a buzzword describes more than just the next version of HTML: it includes new HTML5 tags, new (JavaScript) APIs like canvas, video, audio, geolocation, drag and drop, and more.
Writing HTML5 is straightforward. All HTML source code should start with a doctype, a meta comment that describes the nature of a document. For HTML5, it’s simply <!DOCTYPE html>.
This doctype must be followed by an <html> tag containing all the HTML content.
This tag will contain two tags:
- The
<head>tag contains all the metadata and resources to load. - The
<body>tag contains the body of the page; in other words, the content to display.
Listing 3-1. Hello world in HTML
<!DOCTYPE html>

<html>

  <head>

    <title>My first page</title>

  </head>

  <body>

    <h1>Hello world!</h1>

  </body>

</html>
Bootstrapping our game
It is good practice is to keep HTML code simple, readable, semantic, and valid. Again, HTML should only focus on “the content.” This will help to keep your application portable. A good reference for how to best control your HTML content to keep the code simple is Pro HTML5 and CSS3 Design Patterns by Michael Bowers, Dionysios Synodinos, and Victor Sumner (Apress, 2010). This book provides solid templates and guidelines to minimize verbosity in your HTML code.
Now let’s analyze how a game is structured. You often have different pages, like the menu page, the settings page, the about page, the help page, the high score page, and the game page itself.
For our chess game, we’ll just have a menu page, a game page, and a help page.
Listing 3-2. game.html
<!DOCTYPE html>
<html>
<head>
<meta name="viewport" content="user-scalable=no, width=device-width, initial-scale=1,
maximum-scale=1, minimum-scale=1;" />
<title>A Chess Game</title>
<link href="game.css" rel="stylesheet">
<script type="text/javascript" src="game.js"></script>
</head>
<body>
<div id="pages">
<section id="menu" class="current"></section>
<section id="game"></section>
<section id="help"></section>
</div>
</body>
In the <head>
The meta viewport tag helps to display the game on smartphones and tablets, and avoids some default web page behaviors like zooming.
We link the CSS stylesheet with a link tag, and the actual game logic JavaScript script with a script tag. These two resources will be loaded and executed before the page displays.
In the <body>
Instead of having multiple content HTML files, we have chosen to represent each page of the game with an HTML5 section tag. This gives us a simple maintainable codebase. These sections are wrapped in a <div id="pages">. Defining an id for each section is important in order to be easily styled in CSS and accessed via JavaScript.
We must also identify which page is currently visible. This is the goal of the "current" class. And that’s all for the moment; but in the coming sections, we are going to style the page in CSS and make a page router system in JavaScript.
Note An important convention we have taken is to order pages by navigation level. This means the menu page comes before the game page or the help page. This will help us in the next CSS section.
We can now focus on the content of each page. See Listing 3-3.
Listing 3-3. Menu Section
<section id="menu">

  <h1><img src="icon.png"/> Chess</h1>

  <ul>

    <li><a class="showOnlyIfContinuableGame" href="#!/game/continue">Continue Game</a></li>

    <li><a href="#!/game/new">New Game</a></li>

    <li><a href="#!/help">Help</a></li>

  </ul>

</section>
The menu is simply a title followed by a list of links, where each link targets another page. We have chosen to start the href of pages with a “#!/”. The JavaScript router explained in the JavaScript section will work with this convention.
CSS, a descriptive stylesheet language
CSS (Cascading Style Sheets) allows us to easily describe web application styles through a list of rules. CSS is often neglected or misunderstood in game development, but CSS—especially in its third version—is a very powerful tool that you should most certainly be interested in. With CSS, we can tersely describe styles and behaviors (like a mouse hover).
The cascading of CSS is a powerful “transversal” inherence system that allows us to easily redefine existing styles just by providing a more accurate CSS selector. The browser defines default styles that you can override. You can then express broad, general styles that “cascade” to many elements, and then override these for any specific elements, as necessary.
CSS also allows us to perform animated transitions, which is often a better alternative to JavaScript animation because it’s hardware-accelerated by the render engine of the browser.
In our game, we will do exactly this, and use CSS Transitions for our page change animations.
CSS syntax
A CSS stylesheet is structured as a set of rules. A CSS rule has two main parts: a selector and one or more declarations. Each declaration is composed of a property and a value, as shown in Figure 3-2.

Figure 3-2. Selector and declarations
A CSS property is actually a style attribute. The set value will style all elements of the page that match the current selector in which the declaration is defined.
There are many CSS properties that you can use for different needs: font properties, color and background properties, text properties, “box” properties, transforms properties, transition properties, animation properties, and much, much more.
The property value is linked to the property itself. In other words, each property’s value has its own syntax.
However, some domain values are defined, as follows:
- Pixels. For example:
45px - Colors. For example:
red,#F00,#FF000,rgb(255,0,0),rgba(255,0,0,1)andhsl(0,100%,50%)are different ways to obtain a red color - Percentages. For example:
33% - Strings in double quotes. For example:
h1:before { content: ">"; }, which add a > character before allh1headings.
And much, much more.
Some significant CSS properties
If you want to learn some basic CSS properties, we recommend you follow some of the resources listed at the end of this chapter. For now, we’ll concentrate on some of the more advanced and indispensable features for games.
Note Some of the upcoming features we’ll cover still need a vendor prefix to work properly in every browser. For some CSS properties, Firefox requires the -moz- prefix, Chrome and Safari requires the -webkit- prefix, and Opera requires the -o- prefix. These prefixes are temporarily required until the specification’s final standardization.
Web fonts
Web fonts are perhaps the most indispensable feature that you will need for your game. You can use your own fonts and attach a font file to improve text displays.
The @font-face rule allows for linking to fonts. To use it, you need to define a src property to link the related font resource. Typically for a link, you will use url().
Next, you have to assign some “character” to the font context; usually it is a font-family, but also a font-style, or a font-weight, and so forth. Then if you define these properties anywhere in your CSS code, the selected elements will have this font.
In our chess game, we will use a custom true type font, Chewy.ttf, which is placed in the same directory of our CSS file and linked to the “body” selector (see Listing 3-4). Hence, all our pages will use this font by default (because “body” is the highest selector, after html).
Listing 3-4. Using Chewy.ttf
/* Defining a "Chewy" font linked to Chewy.ttf */

@font-face {

  src: url(Chewy.ttf);

  font-family: Chewy;

}

/* Using the "Chewy" font */

body {

  font-family: Chewy, arial, serif;

}
Note Google Fonts is a cool tool that can help you to select the perfect font for your game; it’s available at www.google.com/webfonts.
Transitions
CSS Transitions are a way to easily add animations to a web page. Basically, it allows us to perform an animation between two given states. CSS properties will change CSS values, which will be animated smoothly over a specified duration.
To use CSS Transitions, like in a state machine, we first need to identify states and actions. States are CSS selectors and actions are changes made between these CSS selectors.
We’ll describe the transition with the following four CSS Transitions properties:
transition-property: describes properties to use for transitions (all by default)transition-duration: describes the duration of the transitiontransition-delay: describes the delay before starting the transitiontransition-timing-function: describes the speed variation of the transition
If you want to make an effect when hovering the mouse over an element, for example, you will use the :hover pseudo-class and your two selectors could be #myel and #myel:hover.
The following code makes a one-second color transition from red to green when the mouse is hovering.
#myel {

  transition-duration: 1s;

  color: red;

}

#myel:hover {

  color: green;

  /* transition-duration: 1s; is found through by inherence */

}
Tip The transition-duration property describes the transition time to enter to the related state. Hence, we can have different times for the two directions.
You can also have different transitions for different properties by splitting values between commas. For instance, from #myel to #myel:hover, you can easily and simultaneously
- increase the padding from 0 to 10 pixels within 2 seconds
- change the color from red to green after a 1 second of delay
Listing 3-5. The code
#myel {

  transition-duration: 1s, 2s;

  transition-delay: 1s, 0s;

  transition-property: color, padding;

  color: red;

  padding: 0px;

}

#myel:hover {

  color: green;

  padding: 10px;

  /* transition-* are getted by inherence */

}
CSS Transitions allows us to make degradable games because CSS interpreters are nice; if they meet unknown properties, they simply ignore them and keep working. So if a browser doesn’t support CSS Transitions, the state transition will still be executed—but without animation. Anyway, today’s modern browsers are all supporting CSS Transitions (even Internet Explorer version 10).
CSS Animations is another way to animate page elements. CSS Animations is a more “global” animation concept for CSS, but currently it is only available on WebKit and the latest Firefox versions. It is a very powerful tool and you should think about it for your future games development.
Transforms
CSS Transitions become even more powerful using with CSS Transforms, which allows elements to be translated, rotated, scaled, and skewed in two-dimensional space. There is also a CSS 3D Transforms spec, but it hasn’t yet been implemented everywhere.
We will focus on CSS 2D Transforms, which provides the following two properties:
- The
transform-originproperty helps you to define the center of the transformation. - The
transformproperty allows you to apply transformations to selected elements. Its value can take different transform functions at the same time. There are four significant transform functions:translate(x, y),scale(x)orscale(x, y),rotate(angle), andskew(angle).
For example, the following code will translate selected elements 10 pixels to the left, scale by 2 and rotate by 45 degrees:
transform: translate(10px, 0) scale(2) rotate(45deg);
Don’t forget to provide vendor prefixes.
Tip You can directly define a transform matrix with matrix(a,b,c,d,e,f) transform functions; see www.w3.org/TR/css3-2d-transforms/.
Fixing user interface for your needs
Web usage is huge, but creating dynamic and real-time games is not the primary purpose of the web. That’s why some decisions made in terms of user interface design are not very relevant for games. However, web technologies are flexible enough to make changes and some CSS properties allow us to redefine how the user interface behaves for our games.
First of all, avoiding text selection in games is important. A visual selection on inconvenient elements (such as images, animated elements, transparent elements) can break the style and the professionalism of a game. It can occur when dragging and dropping the mouse or triggering some shortcut like Select All (Ctrl+A). Moreover, on mobile and tablet, you usually want your application (your game) to look like a real native application. Imagine playing a real-time game and accidentally triggering the text select mobile user interface! It will rudely interrupt the game, most likely leading to a dead player and an angry user. Hence, you have to prevent the default behavior of text selection.
To do this, you have to use the user-select property, which can be set to none to disable the text selection feature on selected elements.
If you want to prevent all elements from user selection, use the following code:
* {

user-select: none;

}
Let’s now introduce two further properties that disable some unwanted default behaviors on smartphones and tablets:
- The
-webkit-tap-highlight-colorproperty, which allows us to set the color of the default highlight feature when you tap on some element (like a link, a canvas, etc.). Set it to a transparent color to disable it. - The
-webkit-touch-calloutproperty, which when set tonone, disables the default callout shown when you touch and hold an element.
* {

  -webkit-tap-highlight-color: rgba(0, 0, 0, 0);

  -webkit-touch-callout: none;

}
The cursor
To get closer to a desktop game experience, you usually want to change the mouse cursor when hovering over particular elements; you do this by using the cursor property. There are already default cursor changes on some elements like links and inputs, but you can override them.
The value can be taken in a set of specified cursors; the most used are as follows:
move: usually used for draggable elementshelp: indicates that help is availablepointer: the default cursor hover linkstext: the default cursor for inputs and textscrosshairwait
Tip See the documentation on the cursor at www.w3.org/TR/css3-ui/#cursor for more details.
Stylesheet languages above CSS
SASS (or SCSS) and LESS are both stylesheet languages that simplify writing and maintaining CSS source codes. They are compiled into regular CSS.
We will use SASS in our examples (in fact, we’re using the “old SASS style,” which is just personal preference; both provide quite similar features).
The following is a list of the main advantages of such languages:
- Nesting selectors avoids repetition (don’t repeat yourself)
- Defining your variables helps to define once and easily change shared assets
- Using elementary operations on pixels, colors, and so forth
- Reusability lets you define your own “mixins” to factorize your source code
- CSS minification and unification (with an include system)
- The syntax is simplified in CSS—no more brackets or semicolons—but indenting is essential
Tip For more information on SASS and LESS, visit http://sass-lang.com and http://lesscss.org/.
Compass
Compass defines a set of ready-to-use SASS mixins. It helps to easily use CSS3 features. Moreover, it provides browser support for not-yet-standardized CSS properties.
We will now go deeper and see a real usage of Compass and SASS in the next section.
Tip For more information on compass, visit http://compass-style.org.
Making our page transition effects
Today, navigation in games and applications is done with links and back/next buttons and, usually, some animated transitions between pages occur.
We will style the work made in the HTML section and make page transition effects. We will use CSS Transitions and CSS Transforms to perform them, as shown in Listing 3-6.
Listing 3-6. The CSS Transitions and Transforms
// page generic styles

#pages > section

  background: black url(background.jpg) no-repeat 50% 0%

  position: absolute

  top: 0

  left: 0

  width: 100%

  height: 100%

  +box-sizing(border-box)

#pages > section

  z-index: -1

  opacity: 0

  +translate3d(-100%, 0, 0)

  +transition-property((transform, opacity))

  +transition-duration((1s, 0s))

  +transition-delay((0s, 2s))

  &.current

    z-index: 0

    opacity: 1

    +translate3d(0%, 0, 0)

    +transition-delay((0s, 0s))

  &.current ~ section

    z-index: -1

    opacity: 0

    +translate3d(100%, 0, 0)

    +transition-delay((0s, 2s))
There are a few things to keep in mind about CSS selector operator and Compass mixins:
- The
#pages > sectionselectors target the#pagesdirectsectionchildren. - The
section.current ~ sectionselectors target all sections that are after any section with a "current" class. - The
+translate3d($x, $y, $z)Compass mixin is equivalent to: -webkit-transform: translate3d($x, $y, $z);- transform: translate3d($x, $y, $z);
A convention we described in the HTML section was to sort section by ascendant priority in order to know if a page has to transit to the left or to the right.
Because we have these two different possible directions, we have three states for a page, as follows:
- The page is the current visible page:
#pages >section.current - The page is before the current visible page:
#pages > section - The page is after the current visible page :
#pages > section.current ~ section
As you can see, we have split transitions in two kinds: a transform transition and an opacity transition.
The transform transition will translate the page on the X axis. We have chosen to use 3D Transforms because they are better optimized on WebKit and especially because they are hardware-accelerated on Safari and iPhone. We could also have used a 2D Transforms for the desktop version. A current page is placed at the origin (x=0%). Pages before the current pages are stacked precisely to the left of the current page (x=-100%). Pages after the current pages are symmetrically placed on the right (x=100%).
This means that only the current page is in the viewport of the browser (and take the full space with the styles we defined), other pages are outside, so are effectively invisible. We define a 1-second transition duration to perform a smooth animation.
The opacity transition is indispensable: it prevents pages from showing up where they aren’t wanted, especially sections that transit from state B to state C and vice versa.
This transition is a little special: there is no transition-duration, only transition-delay, which is used for the opacity property. Basically, if the page is current, it takes a full opacity (opacity set to 1), otherwise it is transparent (opacity set to 0). Just doing that, this will not work because transparency would occur before the page switch animation ends. To ensure this blink effect doesn’t occur, we have set a transition delay to 2 seconds.
JavaScript, a high-level dynamic language
JavaScript is a dynamic and weakly-typed script language supporting imperative, functional, and oriented-object programming paradigms. It follows the ECMAScript standard.
HTML provides a JavaScript API called DOM (Document Object Model), which allows us to work with the document tree.
JavaScript libraries like jQuery (and its little brother, Zepto) help us work with the DOM, and provide full support of its features for whatever the browser used. We’ll cover more on jQuery and Zepto a little further into the chapter.
Coding the game controller
Let’s finish our page system by making a router and a controller for our game. The router is the entry point of a controller’s action. It helps to bind a URL to an action: when the URL hash changes, the related action is called. This is done with the hashchange event.
We have made a scene function, which just moves the “current” class on the right page.
Listing 3-7. The Game Controller
ns.Controller = function(){

  var scene = function(id){

    $('#'+id).addClass('current').siblings().removeClass('current')

  }

  return {

    route: function(path) {

         callRouteChangeFunctions();

         if(path=="/") return this.index();

         if(path=="/menu") return this.menu();

         if(path=="/game/continue") return this.continueGame();

         if(path=="/game/new") return this.newGame();

         if(path=="/game") return this.game();

         if(path="/help") return this.help();

    },

    index: function(){ return this.menu(); },

    menu: function(){ /* ... */ scene('menu'),  },

    continueGame: function(){ /* ... */ },

    newGame: function(){ /* ... */ scene('newgame'), },

    game: function(){ /* ... */ scene('game'), },

    help: function(){ /* ... */  scene('help'), }

  }

}();
Listing 3-8. Starting the Router Entry Point of the Game Controller
$(document).ready(function(){

  ns.Controller.init();

  $(window).bind("hashchange", function() {

    var uri = !location.hash ? '/' :location.hash.replace('#!',''),

    ns.Controller.route(uri);

  }).trigger("hashchange");

});
Coding our Chess Game
After setting up some game pages, let’s get to the heart of the matter. We will start by writing a quick specification of the game and then have a look at the main parts of the code.
Game specification
We will start by specifying the user interface. This means defining the HTML structure, the basic styles, states and properties that each element can have. Each state will be translated via a class, which will also help us to style the game with CSS.
The game chessboard is an 8 8 square board. We have chosen to represent it with a div#chessboard element (a div with the chessboard id) containing 64 div empty elements (created in JavaScript). Each of these elements represents a square ordered from left to right and from top to bottom.
Note We could have used a table element, but our solution is still viable: CSS can help us to style a sequence of div elements like a table.
We define the states of the chessboard, the classes we are going to set on #chessboard:
player-black | player-white means it’s the black (or white) player’s turn.
Let’s now establish the states (and classes) that we are going to use on each square:
- A square code to identify a square in the chessboard and follow chess name conventions: (from
a1toh8) lighterindicates the square is lighter on the chessboard (1 out of 2 vertically and horizontally)pieceindicates the square has a pieceblack | whiteindicates the color of the piecerook | knight | bishop | queen | king | pawnindicates the type of the piececurrentmeans the piece on the square is selected by the userplayablemeans the square is playable for the selected piece
That’s everything to make the user interface work. We can now style it in CSS and use it in JavaScript. As you can see, most of the work falls on the shoulders of CSS; hopefully, this gives you a small taste of its awesome power!
Game styles
We will now use SASS to describe the style of our game. Listing 3-9 is the complete code used to style our chessboard. It uses classes defined in the specification to style the game.
Listing 3-9. Code Used to Style Our Chessboard
$pieceSize: 40px // define $pieceSize somewhere

// Generate background image for all pieces

.piece

  @each $color in black, white

    &.#{$color}

      @each $type in rook, knight, bishop, queen, king, pawn

        &.#{$type}

          background-image: url("images/#{$color}_#{$type}.png")

// Styling the chessboard. pieceSize must be defined before

#chessboard

  width: 8*$pieceSize

  height: 8*$pieceSize

  &.player-white .piece.white, &.player-black .piece.black

    &:hover:not(.current)

      background-color: #cce // highlight pieces on hover

  > div

    padding: 0

    margin: 0

    width: $pieceSize

    height: $pieceSize

    display: block

    float: left

    background-size: 100% 100% // scale the bg image to the pieceSize

    background-color: #cba

    &.lighter

      background-color: #edb

    &.current, &.current.lighter

      background-color: #beb

    &.playable

      background-color: #bbe

      &.lighter

        background-color: #ccf
Note that the & character replaces the parent selector; for example, the following SASS code:
#chessboard > div

  &.current, &.current.lighter

    background-color: #beb

results in the following CSS:
#chessboard > div.current, #chessboard > div.current.lighter {

  background-color: #bbeebb;

}
Game logic
We will now implement the game logic in the game.js JavaScript file.
Before writing it, we need to know some best practices for good code organization, such as scope and namespace.
Scope and namespacing
Scope refers to where variables and functions are accessible, and in what context it is being executed. You have two kinds of scopes: the global scope (like window, document, etc.) and the local scope, which you can define. Any variables or functions put in the global scope can be accessed anywhere in the code. For instance the alert() function defined in window.alert is available anywhere. On the other hand, the local scope means some variables can only be accessed in a particular context; for instance, a variable defined in a function can only be accessed in this function.
On a browser, the default scope used is window (a global object representing the window itself). Hence, variables or functions you define without scoping are defined in this window object.
It’s a bad (and old school) practice to define all your variables and functions in the window scope. It’s a bit like defining all your C variables in the global scope. You should avoid polluting the global scope.
Hence, a good practice is to isolate the code from the window scope. You can put it in your own scope with a closure. However, you still need to access to some of your objects. Let’s look at how to achieve it.
The following is a code skeleton to isolate some source code from a global scope:
(function(){

  // put your code here

}());
We just have defined an anonymous function that is instantly called.
Now let’s look at the closure power, as follows:
(function(ns){

  // ...

  ns.Service = function(){

    var private = "something";

    // inaccessible code and scoped inside ns.Service

    return {

      publicFunctionGetter: function(){ return private; }

    }

  }();

  // ...

}(window));
Inside the first closure, we have defined a ns argument, which refers to the window variable because we pass it in argument at the end. This is how you can redefine an object access name.
This ns argument is used as the “root” of all services we want to expose outside. In this example, calling window.Service.publicFunctionGetter() will return "something".
We could use another argument instead of window, like window.Game:
(function(ns){

  // ...

}(window.Game={}));
We have set window.Game to the empty object. This assignment is optional if you have already done it elsewhere.
A real example for our chess game
In our game, we will use Zepto on mobile and tablet platforms, and jQuery for web browsers (see the Mobile Frameworks section). Both libraries provide almost the same API, but jQuery provides a better fallback and support for all browsers (from IE6). Zepto is lighter and convenient for WebKit browsers that are used by most of the smartphones and tablets today. To perform full support and have a generic code for both libraries in total transparency, we use the following code:
(function(ns, $){

  // ns namespace is defined in window.Game

  // jQuery OR Zepto are available by using $

}(window.Game={}, window.jQuery||window.Zepto));
The Game class
The Game class contains all the logic of the chess game. In Listing 3-10, notice the init method, which initializes piece positions in the game board.
Listing 3-10. init Method
ns.Game = function(o){
var self = this;
self.pieces = [];
self.whiteEated = [];
self.blackEated = [];
self.currentPlayer = 'white';
self.currentPiece = null;
self.init = function(){ // Init the chessboard pieces
var piece = function(c, t, p){ return { color: c, type: t, position: p } };
var firstRowTypes = ['rook', 'knight', 'bishop', 'queen', 'king', 'bishop',
'knight', 'rook'];
for(var i=0; i<=7; ++i) {
var c = String.fromCharCode(i+97);
self.pieces.push( piece('white', firstRowTypes[i], c+'1') );
self.pieces.push( piece('white', 'pawn', c+'2') );
self.pieces.push( piece('black', 'pawn', c+'7') );
self.pieces.push( piece('black', firstRowTypes[i], c+'8') );
}
}
// ... the rest of the game logic code ...
}
We can now focus on the game logic code independently of the content and the style.
The Renderer class
The Renderer class intends to bring the game logic (from the Game class) into the DOM. It helps the Game class development to focus only on the pure logic of the game; whereas the Renderer will connect it to the user interface. Following our game specification, all it will do is update classes on squares, as shown in Listing 3-11.
Listing 3-11. Renderer class
ns.Renderer = function(){

  var self = this;

  self.init = function(game){

    self.game = game;

    self.board = $('#chessboard').empty();

    forEachPosition(function(p){ /* init chessboard squares */ });

    self.render();

    self.game.bindChange(function(){ self.render() });

    return this;

  }

  self.render = function(){

    self.board[0].className = 'player-'+self.game.currentPlayer;

    forEachPosition(function(p, l, d){ // on each square p:

      // [code] Update the classes of p for the current game state

    });

    // [code] update black eated div

    // [code] update white eated div

  }

}
The Storage class
We will use Local Storage, an HTML5 feature that allows us to persist data on the client side.
The localStorage variable has three main methods:
- A setter
setItem(key, text) - A getter
getItem(key) - and a “remover”
removeItem(key)
We want to be able to save a game, as shown in Listing 3-12, so that we can retrieve it between interruptions.
Listing 3-12. Saving Game
ns.Storage = function() {

  var gameKey = 'chessdemo_game';

  return {

    saveGame: function(game) {

      localStorage.setItem(gameKey, JSON.stringify(game));

    },

    retrieveGame: function() {

      return JSON.parse(localStorage.getItem(gameKey));

    },

    emptyGame: function() {

      localStorage.removeItem(gameKey);

    }

  }

}();
Implementing our controller
Let’s implement the actions of the controller made previously. You will see the entry point of the game initialization in these actions. We are going to use all classes defined before, as shown in Listing 3-13.
Listing 3-13. Insert Listing Caption Here.
// ...

continueGame: function(){

    if(!ns.currentGame && ns.Storage.hasGameSaved()) {

      ns.currentGame = new ns.Game( ns.Storage.retrieveGame() );

    }

    return this.game();

  },

  newGame: function(){

    ns.Storage.emptyGame();

    ns.currentGame = null;

    return this.game();

  },

  game: function(){

    var renderer = new ns.Renderer();

    if(!ns.currentGame)

      ns.currentGame = new ns.Game().init();

    var game = ns.currentGame;

    renderer.init(game);

    game.bindChange(function(){

      ns.Storage.saveGame( game.export() );

      if( game.isFinished() ) {

        alert("CheckMate!"); // TODO: render a finish page instead

        ns.currentGame = null;

        history.back();

      }

    })

    scene('game'),

  }, // ...
The result
Figures 3-3 and 3-4 show how the chess game should appear.
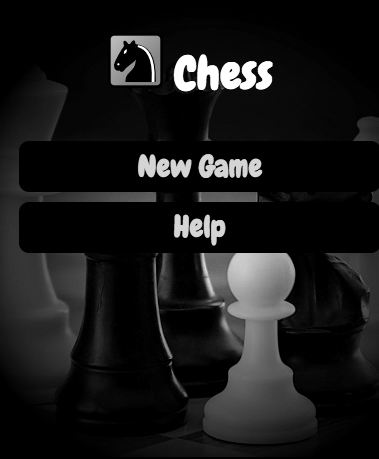
Figure 3-3. Menu display
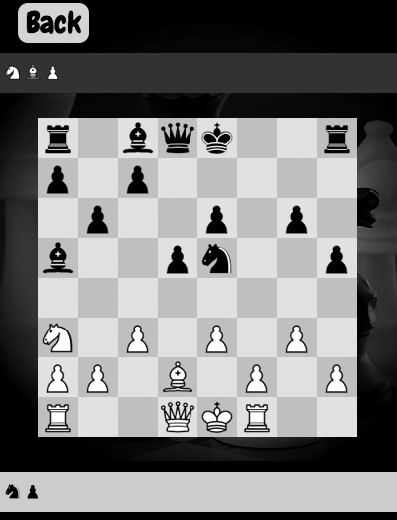
Figure 3-4. chessboard
Mobile frameworks
jQuery and Zepto
jQuery is an awesome, widely-used JavaScript library that makes working with the DOM easier and offers an abstraction to support all browsers. Zepto is an alternative to jQuery that only targets WebKit browsers. Its usage is perfect for mobile and tablet platforms because they mostly use a WebKit browser.
To summarize, take jQuery, clean it from all hacks, polyfill, and fallback aimed to support old browsers, and you get Zepto—a lightweight and efficient library.
Tip To learn more about the jQuery API, visit http://jquery.com.
PhoneGap
PhoneGap is a convenient library for deploying web applications to most of the smartphone and tablet platforms. The PhoneGap JavaScript library enhances the HTML5 API to gain access to native device features in JavaScript. For instance, if you have permission, you can theoretically access phone contacts, access the accelerometer (used in Same Game Gravity), shoot a photo, get a geolocation, get the network state, and so forth.
Some of these features (like geolocation) are available in HTML5 specs and are already implemented in browsers. Globally, most of these features will be implemented. PhoneGap is just a polyfill, a shell that guarantees the support of a feature.
It also provides app skeletons that help you to build packages for app stores.
Figure 3-5. Supported platforms
PhoneGap Build
PhoneGap Build is a web service that helps you to build your web application for different platform packages (Android apk, iOS ipa, Symbian wgz, Blackberry ota, webOS ipk). You just upload your zip application or link to a Git repository to get these different packages. That’s revolutionary because you no longer require thousands of frameworks to build your application for each platform, and it’s much, much faster.
The application configuration is described in a config.xml manifest, which is an abstraction of platform-related manifests.
The first limitation of PhoneGap Build is the security/privacy: will a company trust this cloud system and accept its certificates? The second limitation is, in my opinion, the coverage of the config.xml: will this manifest cover all the needs and possibilities a platform provides?
Configuration of our chess game
Listing 3-14 shows the config.xml we used to make our chess game:
Listing 3-14. config.xml
<?xml version="1.0" encoding="UTF-8"?>
<widget xmlns="http://www.w3.org/ns/widgets" xmlns:gap="http://phonegap.com/ns/1.0"
id="fr.gaetanrenaudeau.chess" version="1.0.0">
<name>Chess</name>
<description>A Chess Game demo</description>
<author href="http://greweb.fr" email="[email protected]">
Gaetan Renaudeau
</author>
<icon src="icon.png" gap:role="default" />
<feature name="http://api.phonegap.com/1.0/network"/>
<preference name="orientation" value="portrait" />
</widget>
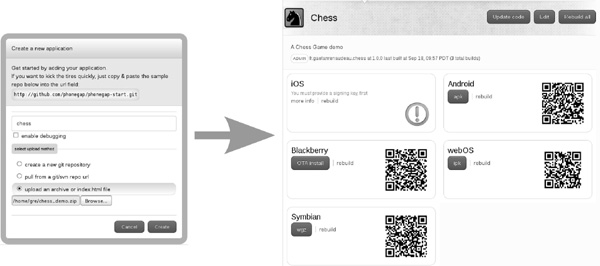
Figure 3-6. Simple interface of PhoneGap build
WebAppBuilder
This tool was created during the Same Game Gravity development—and does not claim to be a solution to all problems of the world! It was born with the objective of automating a number of commands needed to create multiple instances of an application. It’s actually a mashup of many tools.
We could simply have the exact same source code inside all application instances (in assets/ for Android; www/ for iOS; and / for the web versions) and it works in most simple cases, but you can also have very specific code, which would not be used in other instances. You could also use different libraries for different platforms like we did with jQuery and Zepto.
Moreover, we need tools to make game development and maintenance easier. In fact, this tool quickly becomes essential to quickly spread (you can almost even say “compile”) the changes we made on a single source to different instances of the application.
WebAppBuilder is just a configurable Makefile, which targets call some scripts to perform some code transformation and build an application instance.
You can extend WebAppBuilder, adding other tools to fit your needs. The following is a partial list of features:
- Easy templating of your HTML files with Mustache
- Copy, concatenate, and minimize JavaScript the way that you want
- Retrieve JavaScript files from URLs (useful for libraries)
- Compile SASS files into CSS files (and possible usage of the Compass framework)
- Merge your CSS files
- Copy and optionally rename resources that you want to include (images, fonts, sounds, etc.)
- Error handling and atomicity: if one operation fails, the make fails (JavaScript syntax error, SASS syntax error, etc.)
Makefile for of our chess game
We have used WebAppBuilder for making our chess game. We currently target only two versions, but it can easily evolve. Targets are stored in android/ and desktop/. We bootstrapped the android/ directory with a PhoneGap Android skeleton. Some modifications have to first be performed on this skeleton to make it ready for deployment.
All our application source code is stored in the src/ directory. Some of the source files used in our chess game include the following:
common.sass: all stylesheetsdesktop.sass: defines some variables specific to desktop versions and importscommon.sassmobile.sass: defines some variables specific to mobile versions and importscommon.sassdesktop.html: the wrapper page that embedsgame.htmlin aniframefor desktop versionsgame.html: the game pagegame.js: the game logicjquery.min.js: the jQuery library; only used by the desktopzepto.min.js: the Zepto library (alternative to jQuery) for mobile versionsunderscore-min.js: provides some functional programming conceptimages/: contains all chess piece imagesbackground.jpg: the background of the gameicon.png: the icon of the gameChewy.ttf: the font used
The following is an extract of an Android/Makefile:
SRC_DIR = ../src

DIST_DIR = assets

RESOURCES = images Chewy.ttf background.jpg icon.png

VIEWS = index.html=game.html:"{version:'1.0'}"

SCRIPTS = game.min.js=!game.js lib.min.js=underscore-min.js,zepto.min.js

STYLES = game.css=mobile.sass

# ...
The following is an extract of a desktop/Makefile:
SRC_DIR = ../src

DIST_DIR = assets

RESOURCES = images Chewy.ttf background.jpg icon.png

VIEWS = index.html=desktop.html game.html:"{version:'1.0'}"

SCRIPTS = game.min.js=!game.js lib.min.js=underscore-min.js,jquery.min.js

STYLES = game.css=desktop.sass

# ...
Figure 3-7 shows making the desktop instance:
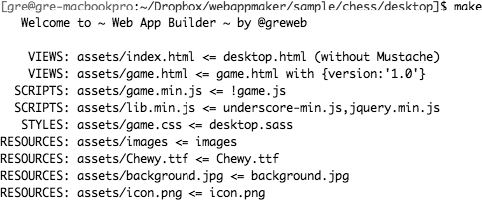
Figure 3-7. Desktop instance
Internationalization
Internationalizing your game is important because it can greatly expand your user base. An internationalization system is quite simple to make and has many possible implementations.
The internationalization of a word or a sentence in many languages is done with a key identifier to represent the text to translate. We want to both load translations on page load, and also to access a translation later.
To do this, we’ll inject translations in the DOM on page load with JavaScript. Our convention to identify a translation key is to have a i18n-{key} class on the DOM tag to replace the translation where {key} is the key of the translation (the key should only contain alphanum and _ characters to be selected properly).
The example
Table 3-1 shows the English and French translations we used for the example.
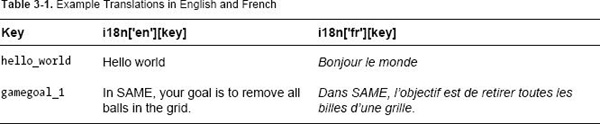
HTML code
<!doctype html>

<html>

  <head></head>

  <body>

    <div><span class="i18n-hello_world"></span>. bla bla bla</div>

    <div><span class="i18n-gamegoal_1"></span>. bla bla bla</div>

  </body>

</html>
JavaScript i18n basic code
Listing 3-15 is a simple internationalizer code using jQuery or Zepto.
Listing 3-15. Internationalizer Code
var Locale = { get: function(){ ... } };
var i18n = function() {
var lang, defaultLang = "en";
var dictionaries = {
"en": { "hello_world": "Hello world", "gamegoal_1": "In SAME, your goal is to
remove all balls in the grid." },
"fr": { "hello_world": "Bonjour le monde", "gamegoal_1": "Dans SAME, l'objectif
est de retirer toutes les billes d'une grille." }
};
var updateDOM = function() {
var dict = dictionaries[lang] || dictionaries[defaultLang];
for(var key in dict) $(".i18n-"+key).text(dict[key]);
}
return {
init: function() {
lang = Locale.get() || defaultLang;
updateDOM();
},
get: function(key) {
var dict = dictionaries[lang] || dictionaries[defaultLang];
return ""+dict[key];
},
updateDOM: updateDOM
}
}();
$(document).ready(i18n.init);
Pure DOM vs. canvas–based game
There are mainly two ways to develop a game.
The first solution, which we call “Pure DOM,” is to decompose the game into multiple HTML elements (for each game atomic element) and to use the power of CSS to style this game. This is what we did with our chess game.
Another solution is to use a big canvas to run the game. Canvas allows you to manipulate bitmap pixels in JavaScript. It provides a low-level API with different draw methods and properties that we will explore.
Both solutions are viable, but do not cover the same needs. The solution depends on the game type.
Overview of the Canvas API
To manipulate the canvas API, you need to get a context. It can be "2d" for the Canvas 2D, "webgl" for WebGL, and so forth. For the Canvas 2D API, you retrieve it with
var ctx = document.getElementById("mycanvasid").getContext("2d");
You can now access to the full Canvas 2D API from the ctx variable.
Listing 3-16 is an example of the canvas code that I used in Same Game Gravity. It draws a piece of the game.
Listing 3-16. Canvas Code from Same Game Gravity
var canvas = document.getElementById("mycanvasid");

var ctx = canvas.getContext("2d");

function drawBrick = function(brick, size) {

  if(!size) size = 1;

  ctx.save(); // Save the current ctx state

  ctx.translate(brick.x, brick.y); // change origin and units

  ctx.scale(brick.w, brick.h);     // to work with easy values


  var gradient = ctx.createLinearGradient(0,0,0,1);

  gradient.addColorStop(0, brick.colorLighter);

  gradient.addColorStop(0.6, brick.color);

  ctx.fillStyle = gradient; // the fillStyle is a gradient


  ctx.clearRect(0,0,1,1); // empty the rect

  ctx.beginPath();

  ctx.arc(.5, .5, .4*size, 0, Math.PI*2, true);

  ctx.fill(); // fill a disc with gradient

  ctx.restore(); // restore the last ctx state saved

}
Tip There is much more to explore with canvas; see www.w3.org/TR/html5/the-canvas-element.html.
Solutions comparison: Canvas
The problem with canvas-oriented applications is that you usually have stacks of JavaScript code that are probably far more complex. Choosing this solution means reducing the usage of CSS and HTML, so everything these technologies give us now has to be implemented in JavaScript. For instance, you have to handle “redrawing” yourself. If you are used to DOM development, then you will have to learn new concepts to deal with efficient re-drawing, layering, mouse selection, and so forth—all on your own. At best, you must use a library (sometimes heavily) to abstract these concepts. Another problem is that you can encounter cross-browser issues. For instance, I experienced an issue with the Android 2.1 browser; the drawImage method didn’t work properly.
Although JavaScript performance has been remarkably improved, it is generally less efficient to make JavaScript animations than use CSS Transitions and Animations, which can be more easily optimized and hardware-accelerated. Anyway, it’s a tricky claim since requestAnimationFrame, the JavaScript function designed to make animation loop, is implemented by browsers.
There are also some advantages with using canvas. The major advantage is that possibilities are clearly wider. Accessing the pixels array, you can do whatever you want. For instance, making a particle system should be done with canvas and especially using the powerful canvas blend mode (see www.mrspeaker.net/dev/parcycle).
Moreover, 3D has recently been introduced as a web specification. Supported by almost all recent desktop browsers, WebGL is a bridge to OpenGL. Hence, it allows us to create high-performance 3D with impressive graphic acceleration.
Solutions comparison: Pure DOM
For now, the Pure DOM approach is usually better because it takes more advantage of web technologies. First of all, it’s generally more efficient and optimizable with the browser (if only to a certain extent; for instance, if you have a very large number of DOM elements, then the performance will suffer—especially for animations). Second, as we explained before, it’s more maintainable and easy to split the content, the style, and the logic into separate and descriptive parts. CSS is a descriptive language, meaning you define how elements are styled. There are also some beneficial side effects, such easier debugging with a DOM inspector.
However, CSS is limited. With the new CSS3, browser display differences occur when a browser doesn’t yet support a given CSS property. But the good news is, because the CSS is descriptive, there is usually an acceptable fallback: the application should work even if some effects don’t occur (for instance, not supporting CSS Transitions will simply disable the transition animation). CSS transforms are very powerful and efficient (rotation, scale, skew, etc.) and are hard to make in canvas.
You can mix both
To summarize, canvas is awesome but should be used wisely. Otherwise, favor a DOM solution to your problem. Of course, we can compromise and mix both Pure DOM and canvas. It is not illegal to use some canvas in the Pure DOM solution! For instance, you could have a background canvas under the game to draw special effects.
While we’re talking about mixing and matching, there is also a third solution to drawing game graphics—SVG usage. Libraries like Raphaël JShelp to build SVG interfaces in JavaScript.
In our chess game, the pure DOM solution fits because there was no need for complex animations or effects.
However, Same Game Gravity uses canvas. This choice is mainly for the ball animation. On one hand, having elements influenced by gravity is not efficient when animating with CSS; but on the other hand, the balls must move at the same speed as they fall independently of the move offset. It’s not something trivial to do in CSS. In the spirit of having “the right tool for the right job,” however, some parts, like the time bar, are still made with CSS.
Conclusion
This chapter introduced you to some techniques for making HTML5 games from scratch.
The full code of the chess game we developed is available at http://github.com/gre/chess-game.
Keep in mind that HTML, CSS, and JavaScript are all important languages that help you make the work easier.
One thing that I really enjoy is working with the web’s openness. If open, a web application is hackable—you can browse the source code of any web game and learn from it. Web developers are open-minded and have developed open-source libraries and frameworks all around the web.
In this chapter, we focused on just a small fraction of web technologies, in order to meet our given needs; but there is so much more to explore: web APIs, libraries, web services, and so forth. You should stay tuned to the important web actors (developers, designers, specification writers, etc.) to keep up-to-date on today’s web evolution—because web technologies are moving extremely rapidly. For several years AJAX allowed you to make HTTP requests in JavaScript, but today we are able to keep a socket connection between a client (browser) and a server with WebSockets, which is a fantastic feature for making real-time games.
With every cool new feature—from WebSockets to WebGL—we see a new era dawning. It’s up to us to take advantage of it to create awesome multi-platform games.
Other resources
The following web sites provide additional useful information on HTML5, the latest web technologies, and advanced JavaScript:
www.w3.org: Web specifications are available at The World Wide Web Consortium (W3C), an international community that develops open standards to ensure the long-term growth of the web.https://developer.mozilla.org: The Mozilla Developer Network features documentation, links, and demos of the latest web technologies.http://diveintohtml5.infoandwww.html5rocks.com: The Dive into HTML5 and HMTL5 Rocks web sites contain well-written articles about HTML5.http://ejohn.org/apps/learn: “Learning Advanced JavaScript” by John Resig, jQuery’s creator.