
PROJECT: BUILDING A MOBILE WEBSITE USING jQUERY MOBILE
The focus of this project is to provide you with a complete jQuery Mobile website. To up the ante and give you a little more, I am also going to show how you can incorporate a second framework that dynamically pulls in external data to automatically populate your screens.
What You Will Need
To get started with this project you will need to download the files from www.visualizetheweb.com. The files for this project are contained in a ZIP file that you can extract on your desktop.
All you need to build the project are the following project files:
• Index.html
• History.html
• Images folder (with one image)
• SpryAssets (containing two JavaScripts and one CSS document)
Setting Up jQuery Mobile
Unlike a normal website where you have individual pages for content, jQuery Mobile uses a method where all the screens for a website are in a single document. The illusion of moving from screen to screen is created using JavaScript.
Let’s get started with the main document you will create. Open the file named index.html, as shown in Figure P2.1.
This project uses the CDN version of jQuery Mobile. The advantage the CDN version provides is that the files are hosted on a different website and do not use your own web server resources.

Figure P2.1 The first screen in the jQuery Mobile app.
As you will see, the files point to document hosted on jQuery.com:
<!DOCTYPE html>
<html>
<head>
<title>Pocket History - Ancient Egypt</title>
<link rel=“stylesheet” href=“http://code.jquery.com/mobile/1.0a4.1/jquery.mobile-1.0a4.1.min.css” />
<script src=“http://code.jquery.com/jquery-1.5.2.min.js“></script>
<script src=“http://code.jquery.com/mobile/1.0a4.1/jquery.mobile-1.0a4.1.min.js”></script>
</head>
<body>
The documents you are pointing to include jQuery, jQuery Mobile, and the jQuery Mobile CSS Theme.
The BODY element is where you will place the visual content. Screens are managed within DIV elements on the page with a special Data-role attribute labeled “page”. Each “page” is a screen that displays content. To navigate from screen to screen you must provide a name for the screen in the ID attribute. Here you will see that the ID is “menu”:
<!-- Start of first page -->
<div data-role=“page” id=“menu” data-theme=“e”>
<div data-role=“header”>
<h1>Ancient Egypt Rocks</h1>
</div>
<!-- /header -->
The preceding code is the content that appears as the “header” section for a screen. You will see that the Data-theme attribute has been added to include support for the jQuery Mobile swatch labeled “e” to give a yellow theme to the application.
The following is the content that appears on the screen. The Data-role attribute in the first DIV element defines this section as “content.”
There are two pieces of content on the screen: a graphic and a button. The button points to a screen called “history”:
<div data-role=“content”>
<p align=“center”> <img src=“images/head.png” ></P>
<p align=“center”><a href=“#history” data-role=“button” >What are Hieroglyphics?</a></p>
</div>
<!-- /content -->
</div>
<!-- /page -->
The screen labeled #history contains a list that points to additional information. You can manually create additional screens or you can use the following technique to dynamically build your screen with JavaScript.
Pulling in Dynamic Data
Taking advantage of Ajax techniques to pull data into your applications dynamically can save you a lot of work. This project demonstrates how you can use additional Ajax libraries to supplement jQuery to manage complex data.
The toolset you will use is Adobe’s Spry framework. The Spry framework is built into Adobe’s Dreamweaver but you can also download the files here: http://labs.adobe.com/technologies/spry/.
Adobe’s Spry has a lot of features that allow for animation, content control, and forms management. The single task you want Spry to perform is dynamically creating data on the screen. There are two types of structured data supported by Spry: XML and HTML tables. For this project you are using an HTML table for the structure data.
Open the web document named history.html. The main structure of the document is a table with rows for each entry.
The TABLE element is a normal table. There is an ID attribute in the table. A web page can have many TABLE elements. The ID is used to instruct Spry which TABLE to use. The ID attribute in this project is named “history”:
<table width=“100%” border=“1” id=“history”>
Following the ID is the first row of data. Spry takes the first row and assumes that each entry within the TD elements is a column header. Later, you will use the column headers to create a dynamic template.
<tr>
<td>LeadIn</td>
<td>Content</td>
<td>Author</td>
<td>Order</td>
<td>Source</td>
</tr>
The second and all following rows each represent content. The structure for each row must follow the same as the first row:
<tr>
<td>Introduction</td>
<td>Egyptian hieroglyphs were a formal writing system used by the ancient Egyptians which contained a combination of logographic and alphabetic elements. Egyptians used cursive hieroglyphs for religious literature on papyrus and wood. Less formal variations of the script, called hieratic and demotic, are technically not hieroglyphs.</td>
<td> </td>
<td>1</td>
<td>Wikipedia.com</td>
</tr>
To pull in data you will need to add some additional content to the project. The first step is to add the following references to the Spry framework in the HEAD element of the page:
<script src=“SpryAssets/SpryData.js” type=“text/javascript”></script>
<script src=“SpryAssets/SpryHTMLDataSet.js” type=“text/javascript”></script>
<link href=“SpryAssets/SpryMasterDetail.css” rel=“stylesheet” type=“text/css” />
The three files allow you to connect to structured data. You will need to reference the history.html file in JavaScript within the HEAD element:
<script type=“text/javascript”>
var dsl = new Spry.Data.htmlDataSet(“history.html”, “history”);
dsl.setColumnType(“Content”, “html”);
</script>
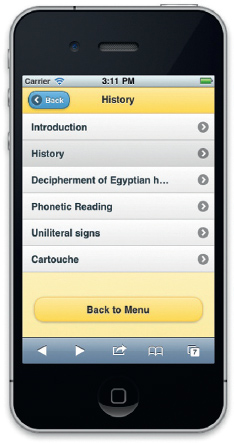
Figure P2.2 Adobe’s Spry is used to pull in external data.
The first line of the script creates a new Spry dataset that has been labeled ds1. The dataset is pointing to a web page named history.html and is looking for a table with the ID “history”.
The default formatting setting for Spry is plain text. The “content” column, however, contains HTML formatting that you want to bring into your app. The setColumnType allows you to specify a column and formatting.
There are two screens that will display Spry-generated data: the main History menu and History details screens, as shown in Figures P2.2 and P2.3.
The first screen, History menu, has a link from the main screen for the web app. For this reason, when you set up the History screen you must assign the ID “history” in the opening DIV element, as shown:
<div data-role=“page” id=“history” data-theme=“e”>
<div data-role=“header”>
<h1>History</h1>
</div>
<!-- /header -->
The HEADER element is a normal jQuery Mobile component. Things get a little different when you begin editing the “content” section.
The “content” begins as normal with a DIV element Data-role attribute identifying the section as “content”.
Following that is a SPAN element. The SPAN element controls a section of HTML that will control how data is pulled into the page using the Spry framework. Notice that the spry:region identified is a reference to the ds1 dataset created using JavaScript in the HEAD element of the page.
The UL element defines a jQuery Mobile list:
<div data-role=“content”> <span spry:region=“ds1” class=“listClass”>
<ul id=“quotes” selected=“true” data-role=“listview”>
Following is a LIST ITEM (LI) element. Here is where you create your Spry template. The row uses the spry:repeat element to list all the data in the history.html file. A template reference labeled {LeadIn} places the content from the first column in the History.html document.
<li spry:repeat=“ds1” spry:setrow=“ds1” ><a href=“#details”>{LeadIn}</a></li>
</ul>
</span><br>
<br>
<p><a href=“#menu” data-role=“button” >Back to Menu </a></p>
<br>
<br>
<br>
</div>
</div>
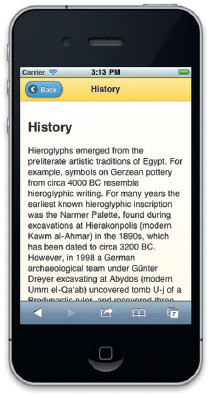
Figure P2.3 The Details screen.
The next step is to allow content selected in the LI element to appear in a screen labeled “Details”. This leads to the third screen you need to create labeled Details.
As with the History screen, the Details screen starts as a normal jQuery Mobile screen, as shown in Figure P2.3.
<!-- Start of details page -->
<div data-role=“page” id=“details” data-theme=“e”>
<div data-role=“header”>
<h1>History</h1>
</div>
<!-- /header -- >
It is not until you reach the “content” section of the screen that you see a difference. As with the History screen you need to add a SPAN element which specifies that this is a detailregion for the dataset ds1:
<div data-role=“content”> <span spry:detailregion=“ds1” class=“DetailContainer”>
Following your specific reference you can then add references to columns of data you are pulling, as shown within the {} brackets:
<h2>{LeadIn}</h2>
<p class=“DetailColumn”>{Content}</p>
<br>
<p class=“DetailColumn”>Source: {Source}</p>
<br />
</span><br>
<br>
<p><a href=“#menu” data-role=“button” >Back to Menu</a> </p>
<br>
<br>
<br>
</div>
<!-- /content -- >
</div>
<!-- /page -- >
Save your file.
At this point you can view your content within a mobile browser. The jQuery Mobile library will set the frame of the document. Content is pulled in dynamically with Spry. There are many other ways of pulling in dynamic data—Spry is just one example.
To publish your jQuery Mobile application you only need to upload the files to your website. It is as simple as that.
Summary
As you have seen in this project, jQuery Mobile allows you to build stunning web applications very quickly. Without a deep understanding of JavaScript or a programming language you can have an application running that looks and feels like a native app, albeit written in HTML.
Add dynamic data pulling techniques such as the Ajax-driven Spry and you can begin to create an app that can be easily managed. The data, visual elements, and business logic are all held in separate places.
The bottom line is you want to be able to deliver a rich, mobile-specific experience. This is what jQuery Mobile offers you today.