C H A P T E R 4
Computer Vision
Several powerful image processing techniques can be made even more effective when used with a depth image from a Kinect. In this chapter, we will go over how to perform basic image processing. We will then discuss how these techniques work with standard camera input, what they are used for, and how the Kinect's depth image can be used in place of the normal image for different results or to solve some of the issues that can occur with these traditional approaches.
Anatomy of an Image
Digital images are made of pixels. A pixel is the single smallest unit of an image. Images have rows and columns of pixels; the number of columns by the number of rows is said to be the image's resolution. The more pixels an image has, the more faithful a representation can be made. Then too, the more pixels an image has, the more processing is required to analyze it, which can slow down your program. In general, for image processing, it is ideal to keep the image as small as possible while maintaining the desired fidelity. Figure 4-1 shows some different resolution examples.

Figure 4-1. Icons (left) can be as small as 8 × 8 pixels (64 total pixels). A 1024 × 728 resolution image (right) has 745,472 pixels. The Kinect RGB and depth cameras (center) are both 640 × 480 (307,200 pixels).
A color image will be made up of color pixels, while a greyscale image will be made up of various shades of gray between the two extremes of black and white. Color pixels are made of different amounts of red, green, and blue (RGB), while greyscale images are a single value representing how bright, or how white, that pixel is. The Kinect provides a color image from its RGB camera and greyscale image from its depth camera. Both images have a resolution of 640 × 480.
Image Processing Basics
Image processing encompasses a number of techniques to make an image more amenable to interpretation, manipulation, and display. You can simplify an image by, for example, removing color. You can apply techniques to reduce the effects from image noise, which is unwanted fluctuation produced by the electronics in digital cameras. The next few sections go over some fundamental image processing techiques.
Simplifying Data
Many image processing techniques focus on simplifying data, literally changing a detailed image (either greyscale or color) into a simpler black-and-white image, where the white portions of the image indicate areas of interest (for example, the position of an object). These images can be combined with other techniques or used individually. Figure 4-2 shows a greyscale image that has been simplified into a black-and-white image in order to highlight the area of focus.
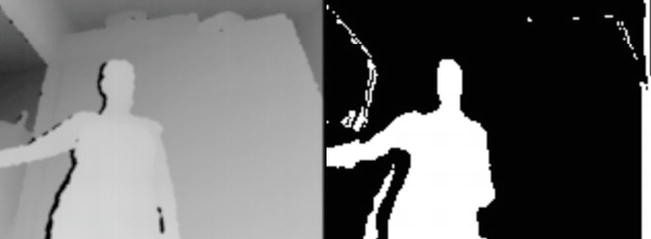
Figure 4-2. A greyscale image from the camera (left) and a black-and-white image that has been simplified by image processing to highlight the focus(right)
Many image libraries, including the ones used in this book, use a one-dimensional array to store all the pixels of an image. This makes image processing faster but also requires a little more work to get a pixel from a specific x and y location.
Let's say that you had a very small image, 5x5 pixels. That is a total of 25 pixels. The first 5 pixels in the array make up the first line of the image, thus positions 0-4 in the array represent the top row of pixels in the image. (Remember, arrays start at position 0.) The 6th pixel in the array, in position 5, wraps around to the next row of the image. Take a look at the Figure 4-3
Figure 4-3. The mapping of a pixel grid to a pixel array
So, if we wanted to know the value of the pixel when x and y equal 1, we would look at the value of position 6 in the array (the rows and columns start at 0, just like the array). You can use the following formula to determine which array you want from a given value of x and y:
int index = x + y * width;
where index is the position in the array you want to access and width represents the width of the image.
![]() Note You may want to reverse the image from the camera. This is useful if you want to make the camera input work like a mirror. To do this, you need only to alter the formula to
Note You may want to reverse the image from the camera. This is useful if you want to make the camera input work like a mirror. To do this, you need only to alter the formula to
int index = (width - x - 1) + y * width;
Noise and Blurring
Digital cameras produce images that are subject to image noise, which is a variation in brightness or color of pixels that is not present in reality. Higher quality cameras will produce less noise, but it will still occur. Both the RGB and depth image of the Kinect are very noisy.
We can employ processes to reduce the effect of noise. One such approach is to blur the image. There are many different blurring techniques, but some can be slow and thus not ideal for real-time image processing. The function in Listing 4-1 shows a box blur, a quick and simple blurring method, good for real time image processing. Instead of returning the value of the pixel, Box Blurring returns the average value of the pixel and its surrounding pixels specified by parameters passed to the function.
Listing 4-1. Blurring Algorithm
#include "testApp.h"

float testApp::blur(ofImage* img, int x, int y, int blurSize){

        float greyLevel = 0;

        unsigned char* pixels = img->getPixels();

        int numPixels = 0;

    for(int dx = -blurSize; dx <= blurSize; dx++){

                for(int dy = -blurSize; dy <= blurSize; dy++){


                        int newX = ofClamp((dx + x), 0, greyImage.getWidth()  - 1);

                        int newY = ofClamp((dy + y), 0, greyImage.getHeight() - 1);

                        numPixels++;

                        int i =  (newX + newY * img->getWidth());

                        greyLevel += pixels[i];


                }

    }


    greyLevel = greyLevel/numPixels;

        return greyLevel;

}
Figure 4-4 shows the result of an image blurred with the algorithm in Listing 4-1. You can see the effects from different blurring boxes.

Figure 4-4. The original image (right), the image blurred with a box of two neighboring pixels (center), and the image blurred with a box of four neighboring pixels (right)
The more an image is blurred, the less the image will look like real life. What's more, the larger the blur size, the slower the program will run. The extent to which blurring is required depends on how much noise your image contains. We recommend starting with a blur size of at least 2.
Image blurring is not only effective for removing noise, but is also helpful when comparing images, as you will see later in this chapter.
Contriving Your Situation
Even after employing techniques like blurring and thresholding (which is discussed in the next section), there will most likely still be some issues with your image processing. Computer vision is an advanced field in computer science and even very complicated algorithms cannot ensure accuracy for all situations.
It is far simpler, therefore, to contrive your situation to be a controlled environment that encourages consistent and predictable results. It is easier to write a program that can distinguish an object from a flat, solid-color background than from an arbitrary background of colors and shapes. The upcoming technique of brightness thresholding works better when you can control for the background. For example, you will notice our images in this chapter feature a white wall with a single person in front of it. You may not be able to duplicate this situation exactly, but the simpler you can make your scene, the better your results will be.
Brightness Thresholding
Now that you know how pixels are arranged, how to blur an image, and how to contrive your situation, let's consider a simple example that will create a black-and-white image. Listing 4-2 uses a technique called brightness thresholding, where any pixel at or below a certain brightness level will set to black, and any pixel above that level will be set to white.
Listing 4-2. Brightness thresholding algorithm
#include "testApp.h"

int mod = 4;

float threshold = 150;


//--------------------------------------------------------------

void testApp::setup() {

        kinect.init();

        kinect.setVerbose(true);

        kinect.open();


        resultImage.allocate(kinect.width/mod, kinect.height/mod, OF_IMAGE_GRAYSCALE);

            ofSetFrameRate(60);

        // zero the tilt on startup

        angle = 0;

        kinect.setCameraTiltAngle(angle);

}


//--------------------------------------------------------------

void testApp::update() {

        ofBackground(100, 100, 100);

        threshold = ofMap(mouseX, 0, ofGetViewportWidth(), 0, 255, 255);


        kinect.update();

        if(kinect.isFrameNew())   // there is a new frame and we are connected

        {
                greyImage.setFromPixels(kinect.getPixels(), kinect.getWidth(), kinect.getHeight(), OF_IMAGE_COLOR,true);

                //greyImage.setFromPixels(kinect.getDepthPixels(), kinect.getWidth(), kinect.getHeight(), OF_IMAGE_GRAYSCALE,true);

                greyImage.setImageType(OF_IMAGE_GRAYSCALE);

                greyImage.resize(greyImage.getWidth()/mod, greyImage.getHeight()/mod);


                unsigned char * pixels = resultImage.getPixels();


                for(int x = 0; x < greyImage.width; x++){

                        for(int y = 0; y < greyImage.height; y++){

                                int i = x + y * greyImage.width;


                                int color = blur(&greyImage, x, y, 1);


                                pixels[i] = color;


                                if(color > threshold){

                                        pixels[i] = 255;

                                } else {

                                        pixels[i] = 0;

                                }

                        }

                }


                resultImage.update();

        }

}


//--------------------------------------------------------------

void testApp::draw() {

        ofSetColor(255, 255, 255);

        resultImage.draw(0, 0, 640, 480);

}


//--------------------------------------------------------------

void testApp::exit() {

        kinect.setCameraTiltAngle(0); // zero the tilt on exit

        kinect.close();

}


//--------------------------------------------------------------

float testApp::blur(ofImage* img, int x, int y, int blurSize){

        float greyLevel = 0;


        unsigned char* pixels = img->getPixels();


        int numPixels = 0;


    for(int dx = -blurSize; dx <= blurSize; dx++){
                for(int dy = -blurSize; dy <= blurSize; dy++){


                        int newX = ofClamp((dx + x), 0, greyImage.getWidth()  - 1);

                        int newY = ofClamp((dy + y), 0, greyImage.getHeight() - 1);


                        numPixels++;


                        int i =  (newX + newY * img->getWidth());


                        greyLevel += pixels[i];


                }

    }


    greyLevel = greyLevel/numPixels;


    return greyLevel;

}


//--------------------------------------------------------------

void testApp::keyPressed (int key) {

        switch (key) {

                case OF_KEY_UP:

                        angle++;

                        if(angle>30) angle=30;

                        kinect.setCameraTiltAngle(angle);

                        break;


                case OF_KEY_DOWN:

                        angle--;

                        if(angle<-30) angle=-30;

                        kinect.setCameraTiltAngle(angle);

                        break;

        }

}
The preceding example uses the Kinect's color image, but the result is quite different if we change it to use the depth image instead, by taking the following steps:
- Comment out this line:
greyImage.setFromPixels(kinect.getPixels(), kinect.getWidth(), kinect.getHeight(), OF_IMAGE_COLOR,true); - And add in this line:
greyImage.setFromPixels(kinect.getDepthPixels(), kinect.getWidth(), kinect.getHeight(), OF_IMAGE_GRAYSCALE,true);
The Kinect depth image shows parts of the image that are closer to the sensor as lighter and parts that are further away from the sensor as darker. When you apply the program in Listing 4-2, along with the preceding modification, to the depth image, the result actually shows items that are within a certain distance of the camera as white and anything further away as black.
Figure 4-5 shows the result from processing a Kinect depth image.

Figure 4-5. Kinect brightness image
Brightest Pixel Tracking
A simple interface can be created with a brightest pixel tracking algorithm. By giving the user a bright object, like a flashlight or an LED, you can track a user's movements by following the brightest pixel created by the light source, as shown in Listing 4-3.
Listing 4-3. Brightest Pixel Tracking Algorithm:
#include "testApp.h"

int mod = 4;

float threshold = 150;

int brightestX, brightestY;

//--------------------------------------------------------------

void testApp::setup() {

        kinect.init();

        kinect.setVerbose(true);

        kinect.open();


        resultImage.allocate(kinect.width/mod, kinect.height/mod, OF_IMAGE_GRAYSCALE);

        ofSetFrameRate(60);

        // zero the tilt on startup

        angle = 0;

        kinect.setCameraTiltAngle(angle);

}


//--------------------------------------------------------------

void testApp::update() {

        ofBackground(100, 100, 100);

        threshold = ofMap(mouseX, 0, ofGetViewportWidth(), 0, 255, 255);
        kinect.update();

        if(kinect.isFrameNew())  // there is a new frame and we are connected

        {


                greyImage.setFromPixels(kinect.getPixels(), kinect.getWidth(), kinect.getHeight(), OF_IMAGE_COLOR, true);

                //greyImage.setFromPixels(kinect.getDepthPixels(), kinect.getWidth(), kinect.getHeight(), OF_IMAGE_GRAYSCALE, true);

                greyImage.setImageType(OF_IMAGE_GRAYSCALE);

                greyImage.resize(greyImage.getWidth()/mod, greyImage.getHeight()/mod);

                unsigned char * pixels = resultImage.getPixels();

                int brightest = 0;

                for(int x = 0; x < greyImage.width; x++){

                        for(int y = 0; y < greyImage.height; y++){

                                int i = x + y * greyImage.width;

                                int color = blur(&greyImage, x, y, 1);

                                pixels[i] = color;

                                if(color >= brightest){

                                        brightest = color;

                                        brightestX = x;

                                        brightestY = y;

                                        cout << brightestX << "x" << brightestY <<endl;

                                }

                        }

                }


                resultImage.update();

        }

}


//--------------------------------------------------------------

void testApp::draw() {

        ofSetColor(255, 255, 255);

        resultImage.draw(0, 0, 640, 480);


        ofSetColor(255, 0, 0);

        ofEllipse(brightestX * mod, brightestY * mod, 50, 50);

}


//--------------------------------------------------------------

void testApp::exit() {

        kinect.setCameraTiltAngle(0); // zero the tilt on exit

        kinect.close();

}


//--------------------------------------------------------------

float testApp::blur(ofImage* img, int x, int y, int blurSize){

        float greyLevel = 0;

        unsigned char* pixels = img->getPixels();

        int numPixels = 0;
    for(int dx = -blurSize; dx <= blurSize; dx++){

                for(int dy = -blurSize; dy <= blurSize; dy++){


                        int newX = ofClamp((dx + x), 0, greyImage.getWidth()  - 1);

                        int newY = ofClamp((dy + y), 0, greyImage.getHeight() - 1);

                        numPixels++;

                        int i =  (newX + newY * img->getWidth());

                        greyLevel += pixels[i];


                }

    }


    greyLevel = greyLevel/numPixels;

        return greyLevel;

}


//--------------------------------------------------------------

void testApp::keyPressed (int key) {

        switch (key) {

                case OF_KEY_UP:

                        angle++;

                        if(angle>30) angle=30;

                        kinect.setCameraTiltAngle(angle);

                        break;


                case OF_KEY_DOWN:

                        angle--;

                        if(angle<-30) angle=-30;

                        kinect.setCameraTiltAngle(angle);

                        break;

        }

}
When used with the depth image of the Kinect, brightest pixel tracking has a completely different effect. The brightest pixel will be the pixel closest to the Kinect. Tracking that pixel is useful for simple interfaces that involve tracking an object—for example, an extended hand. The modification to the code in Listing 4-3 is simple. Simply comment out the following line:
greyImage.setFromPixels(kinect.getPixels(), kinect.getWidth(), kinect.getHeight(), OF_IMAGE_COLOR,true);
And add in this line:
greyImage.setFromPixels(kinect.getDepthPixels(), kinect.getWidth(), kinect.getHeight(), OF_IMAGE_GRAYSCALE,true);
Comparing Images
Computer programs can receive several images per second from a camera input. Each one of these images is called a frame. The next techniques we'll explore in this chapter will center around comparing the current frame's image with another frame's.
When comparing images, it is important to realize that even when the subject of a camera has not changed, the pixel values in images captured by that camera will seldom be identical.
Thresholding with a Tolerance
Even with blurring pixels, values will likely differ some between frames. To compensate for this, we introduce a tolerance variable to use when comparing images. Rather than comparing the different values directly, we check to see if the new value is within a certain range (tolerance) of the value it's being compared to. So, rather than
newPixel != oldPixel
we use
(newPixel + tolerance <= oldPixel) || (newPixel - tolerance >= oldPixel)
![]() Note Adjusting the tolerance level appropriately for the level of noise present in your image is important. If the tolerance is too low, the image comparison will still suffer from issues resulting from noise. If the tolerance is too high, the comparison will ignore valid differences between images.
Note Adjusting the tolerance level appropriately for the level of noise present in your image is important. If the tolerance is too low, the image comparison will still suffer from issues resulting from noise. If the tolerance is too high, the comparison will ignore valid differences between images.
Figure 4-6 shows the effects from having your tolerance too low or too high.

Figure 4-6. Tolerance too low (left), tolerance too high (center), and tolerance at the correct level (right)
Now that we have established how to blur pixels and remove noise, we can compare two different images. We want to create a black-and-white image that shows the differences between one frame and another. To do so, we need to compare the pixels in each position of an image with the pixels in the same positions in another image. The algorithm is demonstrated in Listing 4-4.
Listing 4-4. Algorithm for image comparison
for(int x = 0; x < currentImage.width; x++){
for(int y = 0; y < currentImage.height; y++){
int i = x + y * currentImage.width;
int color = blur(¤tImage, x, y, 10);
int prevColor = prevImage.getPixels()[i];
                                if((color + threshold > prevColor) || (prevColor < color + threshold)){

                                        pixels[i] = 0;

                                } else {

                                        pixels[i] = 255;

                                }

                        }

                }
Background Subtraction
One common algorithm for image processing is called background subtraction. Figure 4-7 shows an example. In background subtraction, the algorithm first stores a single frame from the camera and then uses it for a basis of comparison. The resulting image will show anything that has changed in the scene.
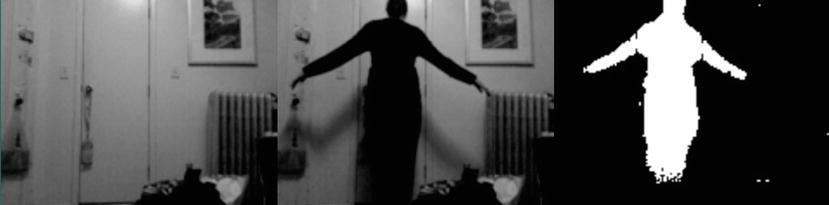
Figure 4-7. A background image (left), a new image (center), and the image resulting from comparison (right)
Once you understand how to compare images, background subtraction is a simple matter of deciding when to capture the scene. It is useful to attach the capturing of the user image to a user key press, as we do in Listing 4-5 (in this case, the return key).
Listing 4-5. Code for Capturing an Image on a Keypress (for Background Subtraction)
void testApp::keyPressed (int key) {

        switch (key) {

                case OF_KEY_RETURN:

                        prevImage.setFromPixels(

                currentImage.getPixels(),

                currentImage.getWidth(), currentImage.getHeight(), OF_IMAGE_GRAYSCALE, true);

                        break;

        }

}
The completed code for background subtraction is in Listing 4-6:
Listing 4-6. Code for Background Subtraction
#include "testApp.h"


int mod = 4;


float threshold = 150;


//--------------------------------------------------------------

void testApp::setup() {

       kinect.init();

       kinect.setVerbose(true);

       kinect.open();


       prevImage.allocate(kinect.width/mod, kinect.height/mod, OF_IMAGE_GRAYSCALE);

       resultImage.allocate(kinect.width/mod, kinect.height/mod, OF_IMAGE_GRAYSCALE);


       ofSetFrameRate(60);


       // zero the tilt on startup

       angle = 0;

       kinect.setCameraTiltAngle(angle);

}


//--------------------------------------------------------------

void testApp::update() {

       ofBackground(100, 100, 100);


       threshold = ofMap(mouseX, 0, ofGetViewportWidth(), 0, 255, 255);


       kinect.update();

       if(kinect.isFrameNew())  // there is a new frame and we are connected

       {


                    currentImage.setFromPixels(kinect.getPixels(), kinect.getWidth(), kinect.getHeight(), OF_IMAGE_COLOR, true);

                    //currentImage.setFromPixels(kinect.getDepthPixels(), kinect.getWidth(), kinect.getHeight(), OF_IMAGE_GRAYSCALE, true);

                    currentImage.mirror(false, true);

                    currentImage.setImageType(OF_IMAGE_GRAYSCALE);

                    currentImage.resize(currentImage.getWidth()/mod, currentImage.getHeight()/mod);


                    unsigned char * pixels = resultImage.getPixels();


                    int brightest = 0;


                    for(int x = 0; x < currentImage.width; x++){

                                 for(int y = 0; y < currentImage.height; y++){

                                               int i = x + y * currentImage.width;
int color = blur(¤tImage, x, y, 5);
int prevColor = prevImage.getPixels()[i];
if((color + threshold <= prevColor || color - threshold >= prevColor)){
pixels[i] = 255;
} else {
pixels[i] = 0;
}
}
}
resultImage.update();
}
}
//--------------------------------------------------------------
void testApp::draw() {
ofSetColor(255, 255, 255);
resultImage.draw(640, 0,
320, 240);
currentImage.draw(320, 0,
320, 240);
prevImage.draw(0, 0,
320, 240);
}
//--------------------------------------------------------------
void testApp::exit() {
kinect.setCameraTiltAngle(0); // zero the tilt on exit
kinect.close();
}
//--------------------------------------------------------------
float testApp::blur(ofImage* img, int x, int y, int blurSize){
float greyLevel = 0;
unsigned char* pixels = img->getPixels();
int numPixels = 0;
for(int dx = -blurSize; dx <= blurSize; dx++){
for(int dy = -blurSize; dy <= blurSize; dy++){
int newX = ofClamp((dx + x), 0, img->getWidth() - 1);
int newY = ofClamp((dy + y), 0, img->getHeight() - 1);
numPixels++;
                                 int i =  (newX + newY * img->getWidth());


                                 greyLevel += pixels[i];


          }

    }


    greyLevel = greyLevel/numPixels;


    return greyLevel;

}


//--------------------------------------------------------------

void testApp::keyPressed (int key) {

       switch (key) {

                     case OF_KEY_RETURN:

                                    prevImage.setFromPixels(currentImage.getPixels(), currentImage.getWidth(), currentImage.getHeight(), OF_IMAGE_GRAYSCALE, true);

                                      break;

            }

     }
Background subtraction is very effective in identifying whether a part of the image has changed since the initial background image was captured. Unfortunately, many factors can cause the scene captured by the camera to change over time.
Look at the example image shown in Figure 4-8.
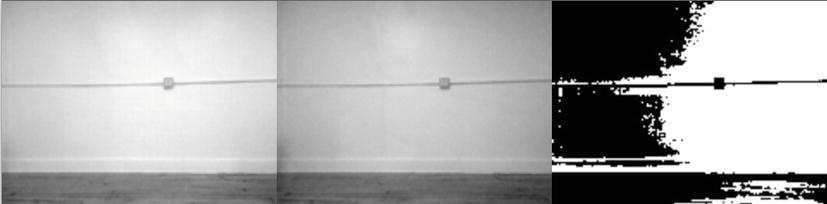
Figure 4-8. A background image (left), the same scene with lighting changes (center), the resulting image (right)
Though there are no new objects in the scene, the background subtraction interprets the light changes as new entities. One of the benefits of using the Kinect's depth image is that the depth image uses infrared light, rather than visible light, to analyze the scene. Thus, changes in visible light do not affect how the background subtraction algorithm works, (see Figure 4-9).

Figure 4-9. A background depth image (left), the same depth image with a person in it and lighting changes (center), and the resulting image (right)
Again, by simply replacing the RGB image with the depth image, we resolve some of these issues.
- Comment out the following line:
          //greyImage.setFromPixels(kinect.getPixels(), kinect.getWidth(),

kinect.getHeight(), OF_IMAGE_COLOR, true); - Add in this one:
          greyImage.setFromPixels(kinect.getDepthPixels(), kinect.getWidth(),
kinect.getHeight(), OF_IMAGE_GRAYSCALE, true);
This means that we process images not only when light conditions change but also in the dark!
Frame Differencing
Frame differencing shows the difference between the current frame's image and the previous frame's image and is often used to detect motion in a scene. When an object is located in one position in one frame, the color value of the pixels in those locations changes. In Figure 4-10 shows the frame difference between two frames in which the user's hand moves form a raised to a lowered position.
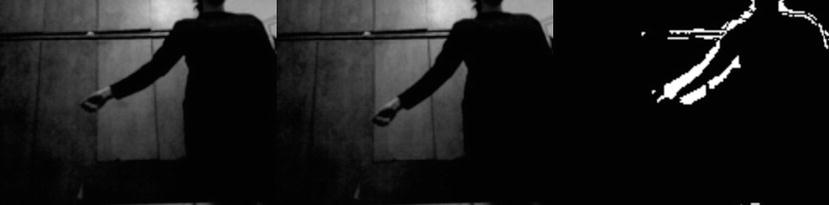
Figure 4-10. User with a hand raised (left), with a lowered hand (center), and the difference (right)
Thus, frame differencing can be used to detect motion in a scene. Listing 4-7 shows how to implement frame differencing with an RGB image:
Listing 4-7. Frame Differencing Algorithm
#include "testApp.h"
int mod = 4;
float threshold = 150;
//--------------------------------------------------------------
void testApp::setup() {
kinect.init();
kinect.setVerbose(true);
kinect.open();
prevImage.allocate(kinect.width/mod, kinect.height/mod, OF_IMAGE_GRAYSCALE);
resultImage.allocate(kinect.width/mod, kinect.height/mod, OF_IMAGE_GRAYSCALE);
ofSetFrameRate(60);
// zero the tilt on startup
angle = 0;
kinect.setCameraTiltAngle(angle);
}
//--------------------------------------------------------------
void testApp::update() {
ofBackground(100, 100, 100);
threshold = ofMap(mouseX, 0, ofGetViewportWidth(), 0, 255, 255);
kinect.update();
if(kinect.isFrameNew()) // there is a new frame and we are connected
{
currentImage.setFromPixels(kinect.getPixels(), kinect.getWidth(), kinect.getHeight(), OF_IMAGE_COLOR, true);
//currentImage.setFromPixels(kinect.getDepthPixels(), kinect.getWidth(), kinect.getHeight(), OF_IMAGE_GRAYSCALE, true);
currentImage.mirror(false, true);
currentImage.setImageType(OF_IMAGE_GRAYSCALE);
currentImage.resize(currentImage.getWidth()/mod, currentImage.getHeight()/mod);
unsigned char * pixels = resultImage.getPixels();
int brightest = 0;
for(int x = 0; x < currentImage.width; x++){
for(int y = 0; y < currentImage.height; y++){
int i = x + y * currentImage.width;
int color = blur(¤tImage, x, y, 5);
int prevColor = prevImage.getPixels()[i];
if((color + threshold <= prevColor || color - threshold >= prevColor)){
                                        pixels[i] = 255;

                                } else {

                                        pixels[i] = 0;

                                }

                        }

                }


                resultImage.update();

                prevImage.setFromPixels(currentImage.getPixels(), currentImage.getWidth(), currentImage.getHeight(), OF_IMAGE_GRAYSCALE, true);

        }

}


//--------------------------------------------------------------

void testApp::draw() {

        ofSetColor(255, 255, 255);

        resultImage.draw(640, 0,

                                320, 240);

        currentImage.draw(320, 0,

                                320, 240);

        prevImage.draw(0, 0,

                                320, 240);

}


//--------------------------------------------------------------

void testApp::exit() {

        kinect.setCameraTiltAngle(0); // zero the tilt on exit

        kinect.close();

}


//--------------------------------------------------------------

float testApp::blur(ofImage* img, int x, int y, int blurSize){

        float greyLevel = 0;

        unsigned char* pixels = img->getPixels();

        int numPixels = 0;

    for(int dx = -blurSize; dx <= blurSize; dx++){

                for(int dy = -blurSize; dy <= blurSize; dy++){


                        int newX = ofClamp((dx + x), 0, img->getWidth()  - 1);

                        int newY = ofClamp((dy + y), 0, img->getHeight() - 1);

                        numPixels++;

                        int i =  (newX + newY * img->getWidth());

                        greyLevel += pixels[i];


                }

    }


    greyLevel = greyLevel/numPixels;

    return greyLevel;
}


//--------------------------------------------------------------

void testApp::keyPressed (int key) {

        switch (key) {

                case OF_KEY_UP:

                        angle++;

                        if(angle>30) angle=30;

                        kinect.setCameraTiltAngle(angle);

                        break;


                case OF_KEY_DOWN:

                        angle--;

                        if(angle<-30) angle=-30;

                        kinect.setCameraTiltAngle(angle);

                        break;

                case OF_KEY_RETURN:

                        prevImage.setFromPixels(currentImage.getPixels(), currentImage.getWidth(), currentImage.getHeight(), OF_IMAGE_GRAYSCALE, true);

                        break;

        }

}


//--------------------------------------------------------------

void testApp::mouseMoved(int x, int y) {

}


//--------------------------------------------------------------

void testApp::mouseDragged(int x, int y, int button)

{}


//--------------------------------------------------------------

void testApp::mousePressed(int x, int y, int button)

{

        cout << threshold << endl;

}


//--------------------------------------------------------------

void testApp::mouseReleased(int x, int y, int button)

{}


//--------------------------------------------------------------

void testApp::windowResized(int w, int h)

{}
However, motion is not the only reason for a change between images. Similar to background subtraction, frame differencing can be confused by changes in lighting conditions. While frame differencing handles gradual changes in lighting conditions more successfully than background subtraction, it can still be fooled by a sudden change in lighting. Frame differencing will be unable to distinguish sudden light changes from motion. A flash from a camera, turning on or off a light, or a screen in the camera's field of view changing from one image to another will all cause a difference in frames resulting from color change unrelated to motion.
Frame differencing will also have issues distinguishing similar colors. If the area of change in the new image is a similar color to the unchanged area, frame differencing will not be able recognize motion in that area. Figure 4-11 shows an example of a frame differencing failure due to a too-close match in foreground and background colors.

Figure 4-11. Frame differencing failing when the user is wearing a white shirt in front of a white background
Fortunately, the Kinect's depth image will not suffer from these issues. Because it does not use visible light, changes in lighting conditions will not cause false motion in frame differencing. What's more, a frame where motion occurs with an object of a similar color to the background will not cause any issues.
Once more, we replace the RGB image with the depth image.
- Comment out this line:
          //greyImage.setFromPixels(kinect.getPixels(), kinect.getWidth(),

kinect.getHeight(), OF_IMAGE_COLOR, true); - Add this one:
          greyImage.setFromPixels(kinect.getDepthPixels(), kinect.getWidth(),

kinect.getHeight(), OF_IMAGE_GRAYSCALE, true);
In Figure 4-12, you can see the results from the depth image do not suffer from the same issues as the results from the RGB image.
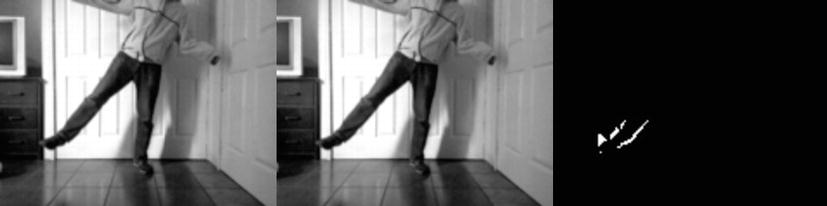
Figure 4-12. Image 1, image 2, and image 3 showing the frame difference using the depth camera
Combining Frame Differencing with Background Subtraction
One issue you may notice with frame differencing is that it finds differences in a moving object's position from one frame to the next. See Figure 4-13 for an example.
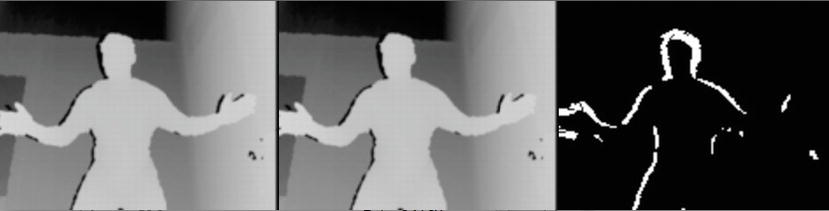
Figure 4-13. Image of a double image with hand
Technically, the double image in Figure 4-13 is correct, as motion occurred where the hand was in the previous frame (it left that area) and where it is in the current frame (it entered that area), but showing this double image is not desirable for all situations. To limit the detection of motion to an object's current location, we can combine background subtraction with frame differencing.
First, as shown in Listing 4-8, we use the same technique for background subtraction as above to create a black and white image of the new elements in the scene. Figure 4-14 shows the resulting image.
Listing 4-8. Background Subtraction Combined with Frame Differencing
currentImage.setFromPixels(kinect.getDepthPixels(), kinect.getWidth(), kinect.getHeight(), OF_IMAGE_GRAYSCALE, true);
currentImage.mirror(false, true);
currentImage.setImageType(OF_IMAGE_GRAYSCALE);
currentImage.resize(currentImage.getWidth()/mod, currentImage.getHeight()/mod);
unsigned char * pixels = resultBgSubImage.getPixels();
for(int x = 0; x < currentImage.width; x++){
for(int y = 0; y < currentImage.height; y++){
int i = x + y * currentImage.width;
int color = blur(¤tImage, x, y, 5);
int prevColor = bgImage.getPixels()[i];
if((color + threshold <= prevColor || color - threshold >= prevColor)){
                                pixels[i] = 255;

                        } else {

                                pixels[i] = 0;

                        }

                 }

        }


        resultBgSubImage.update();


        pixels = resultCombinedImage.getPixels();


        for(int x = 0; x < resultCombinedImage.width; x++){

                for(int y = 0; y < resultCombinedImage.height; y++){

                        int i = x + y * resultBgSubImage.width;


                        int color = resultBgSubImage.getPixels()[x + resultBgSubImage.width * y];

                        int prevColor = prevBgSubImage.getPixels()[i];


                        if((color + threshold <= prevColor || color - threshold >= prevColor)){

                                pixels[i] = 255;

                        } else {

                                pixels[i] = 0;

                        }

                }

        }


                resultCombinedImage.update();

Figure 4-14. Background subtraction combined with frame differencing image
Now, store this image for comparison in the future. Listing 4-9 shows one way in which to do that.
Listing 4-9. Code for Storing an Image as prevFrame
prevBgSubImage.setFromPixels(resultBgSubImage.getPixels(),

resultBgSubImage.getWidth(), resultBgSubImage.getHeight(), OF_IMAGE_GRAYSCALE,

true);
When the next frame comes in, we again apply the background subtraction algorithm to this frame. We then compare that new image with the previous background subtraction image. If a pixel changes from black to white between the previous frame and the current frame, we set it to white, (see Figure 4-15 for an example). Otherwise, we set it to black. This way, only the pixels that have a new object present will be perceived as having motion:

Figure 4-15. Image of combined techniquies
Summary
Several image processing approaches can yield improved results when using the Kinect's depth image. In some cases, using the depth image will provide completely different results from the standard image, which can be useful for tracking different interactions. This chapter presented just a few examples of image processing techniques that can be helpful with your Kinect hacks.
Libraries can also be useful in successfully executing many of these types of image processing techniques. However, it is always good to be able to understand how to do pixel-level image processing yourself. This will not only help you understand how the libraries work, but allow you to write your own versions of image processing that are specifically tailored to the interaction you are attempting to create.