
We'll now add an integration runtime:
- First, we'll go back into our factory, click on Pipelines | Connections, and then click on Integration Runtimes at the top, as shown in the following screenshot:

An Azure integration runtime is present, since the data factory can connect to cloud services by default.
- To add a new integration runtime, we click on the + New icon above the integration runtime Name column. Integration Runtime Setup appears. There are two different integration runtimes that can be created: self-hosted and SSIS.
- Select Lift-and-Shift existing SSIS packages to execute in Azure, and click on Next:

- The first step is to fill in the general settings, as shown in the following screenshot:

Some properties are worth explaining:
- Name and Description: There are no special Azure rules here. We can use the name we want.
- Location: Choose a location that is the same as, or very close to, your SQL Azure database, to minimize cross location traffic, and therefore, costs.
- Node Size: This is the size of the virtual machine that will be created to load the SSIS package(s). In our case, the package is very small; we'll therefore use the smallest available VM size.
- Node Number: This is an important property when we know that our packages can run in parallel. In our case, there is only a single package call. We can therefore set this property to 1. Bear in mind that the more nodes you use, the more VMs will be used, and this has a consequence on the cost of the runtime in Azure.
- Edition/License: This is the SQL Server SSISDB edition. In our case, we'll use the standard edition. If we were using enterprise features like fuzzy lookups in SSIS, we would have to choose the Enterprise Edition.
The last feature asks us whether we want to use our own licenses. If you have SQL Server Software Assurance, you can select this feature. Click Next:
- SQL Settings: We'll tell the integration runtime where to create the SSISDB catalog database. We'll use the database that we created in the first chapter of this book:

- Subscription: The Azure subscription that you use to do the exercises in this book.
- Location: This involves the same recommendations as the previous screen. It should be in the same region as the one chosen for the SSIS integration runtime.
- Catalog Database Server Endpoint: This is your Azure SQL Server, where the SSIS catalog (SSISDB) will be created.
- Use AAD authentication with your ADF MSI: Use this if you have configured AAD (short for Active Directory Admin) login in your database server. In our case, we haven't done it, so we'll specify a user and password instead.
- Admin Username/Password: This is the Azure SQL Server that has admin privileges to create the SSISDB database.
- Catalog Database Service Tier: We use the Basic tier, since we don't foresee a lot of workload when our package executes. We would choose another tier if we had a lot of workload, to reduce contention on our SSISDB database.
Now, click on Test. If everything works well, you should get the message Connection successful, and the Test button should change to Next. Click on Next to get to the advanced settings.
There is not much to configure here:
- Maximum Parallel Execution Per Node: We'll leave the default (1), since we have only a single package to execute. We would use a greater number if we had a bigger workload of packages.
- Custom Setup Container SAS URI: If we wanted to customize our SSISDB deployment, we would specify the location of the script to run.
- Select a VNet...: If we are using a virtual network, we check this property to enter the details of it. In our case, we'll leave it unchecked, since we made our database available in the public network. But, if you cannot do it, check this box, and enter the VNet details.
Click on Finish. The integration runtime creates an integration services catalog on our Azure SQL Server and starts the worker node, as shown in the following screenshot. It may take up to 30 minutes to complete. Once it completes, the status changes to Running:

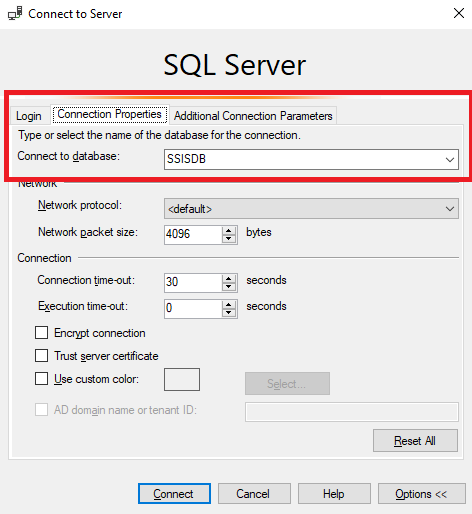
We'll now connect to our Azure SQL Server SSISDB database. Start SSMS, and enter your credentials. Click on Options:

To be able to see the SSIS catalog, we need to tell SSMS that we want to connect to SSISDB. To do so, click on Connection Properties, and type SSISDB in the textbox beside Connect to database. Once this is done, click on Connect:
Now, expand the SSISDB node in the SSMS's object explorer, right-click on it, and choose Create Folder.... Enter the information, as shown in the following screenshot, and click on OK:

The folder gets created.
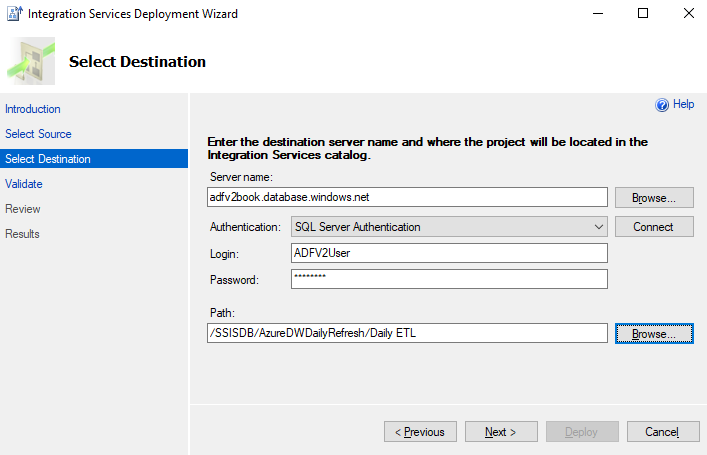
Now, let's switch to SSDT and deploy the project by right-clicking on it and choosing to Deploy. When we get to the Select Destination screen of the wizard, we'll connect to the Azure database where we created the SSIS integration runtime. As shown in the following screenshot, enter the database information, choose SQL Server Authentication as the Authentication method, and click on the Connect button to connect to the Azure database. Then, change the path to which the project gets deployed by using the Browse... button. Once that is done, click on Next:
In the Validate step, we get some warnings, because we are using connections that connect to on-premises databases, as shown in the following screenshot. This means that the wizard cannot validate that the ADF will be able to connect to our on-premises database. We'll take care of this later; for now, click Next:

At the last page of the wizard, click Deploy to deploy the project to the SSIS integration runtime.
We have successfully deployed our project in the SSIS integration runtime. Now, let's test it. We go back to SSMS, and, connected to our Azure database, we enter the following command into the query editor window:
CATALOG.set_execution_credential @user=<Your Windows login user to access the on-premise database>, @domain=<Your domain>, @password=<Your windows login password>
Then, to verify that the information is correctly entered, we can check it by using the following SQL syntax:
SELECT *
FROM CATALOG.master_properties
WHERE property_name = 'EXECUTION_DOMAIN' OR property_name = 'EXECUTION_USER'
This command sets the credentials that will allow the SSIS integration runtime to use Windows authentication with our SQL Server database. Basically, it will get rid of the warning that we had at validation time, when we deployed the project.
We can now test our package deployed in the SSIS integration runtime. In SSMS, navigate to Daily and right-click on Execute. The Execute Package wizard screen appears, as shown in the following screenshot. Click on OK to start the execution:

Click on OK to see the execution report. After 1-2 minutes, the package should finish its execution successfully. If not, look at the messages and fix any errors. From that point, the worst is done (in a sense), and ADF will now call this package using the same credentials.