Chapter 11: Extending Microsoft Lists Using SPFx
This is the last chapter of the book and the most technical one, which will teach you the basic foundations to extend Microsoft Lists features using SPFx.
With the use of code, you will be able to create new solutions and scenarios that are not possible to achieve with the out-of-the-box features that we covered earlier in the book.
In this chapter, we will cover the following topics:
- Learning about SPFx
- How to create a SharePoint framework extension
- Building a field customizer extension
- Building a view command set extension
Technical requirements
You can find the code files present in this chapter on GitHub at https://github.com/PacktPublishing/Hands-On-Microsoft-Lists/tree/main/Chapter11
What SPFx is and how to get started
SPFx is the acronym for the SharePoint Framework – the client-side development model to extend SharePoint, which allows developers to extend the Microsoft Lists platform using custom solutions.
As we saw in the first chapter, Microsoft Lists is an evolution of SharePoint lists, and it has inherited everything that was developed for the parent platform over the years. This means that with Microsoft Lists, you will be able to use SPFx extensions to bring more functionality to your own lists.
Before we dig into the technical aspects of the development, first you need to prepare your environment and understand the components that together make the SharePoint framework. As the following figure illustrates, the framework is built of several components that, when combined, create the modern development method for SharePoint.

Figure 11.1 – SharePoint Framework components
Let's look at each of these components in detail.
Node.js
Node.js is a runtime environment used to build and execute applications, making them performant and lightweight. With the use of Node.js, developers also get access to npm, the largest ecosystem of open source libraries that make development easier and faster.
To learn more about Node.js and to install it on your device, visit the site https://nodejs.org/en/.
Yeoman
Yeoman is a template generator used in the SharePoint Framework to create a project structure, it runs on top of Node.js.
To learn more about Yeoman and to install it on your device, visit the site https://yeoman.io/.
TypeScript
TypeScript is an evolution of the original JavaScript containing concepts that are available in more complex languages such as C#. It is an open source language created and maintained by Microsoft that is executed on top of Node.js.
If you know how to develop using JavaScript, you would probably like to know that all JavaScript code is valid TypeScript, and you can start programming immediately without the need to learn a new language.
To learn more about TypeScript and to install it on your device, visit https://www.typescriptlang.org/.
React, AngularJS, or any other frontend framework
Though all these frameworks are great to develop web apps, Microsoft has chosen React as the framework for development. But this does not mean that you cannot use others such as Angular.
If you are not familiar with any of these frameworks, you should know that with SPFx, you will be able to create an empty template that only uses TypeScript.
To learn more about React or Angular, and to install it on your device, visit https://facebook.github.io/react/ and https://angularjs.org/.
Gulp
The gulp task runner is used to automate tasks that otherwise have to be done manually.
Gulp is used in the SharePoint framework in a variety of tasks, such as building or bundling the packages for the extensions that will customize Microsoft Lists.
To learn more about TypeScript and to install it on your device, visit https://gulpjs.com/.
Visual Studio Code
Visual Studio Code is an open source and multiplatform source code editor made by Microsoft that will help you in the development of your extensions.
To learn more about Visual Studio Code and to install it on your device, visit https://code.visualstudio.com/.
Now that you know what the main components of the SharePoint Framework are, let's see how you can use it to extend Microsoft Lists.
Creating a SharePoint Framework extension
Now that you know the components of the SharePoint Framework, it's time to learn how to get started with creating the project to build your first extension.
Note
The SharePoint Framework is multiplatform and can be used on Windows, macOS, and Linux. The examples given in this chapter only use Windows screenshots, but everything is valid for all of the operating systems.
The following instructions are generic for field customizers and view command sets, as the creation of both project types only differs in one of the steps:
- Start by opening the terminal window on your operating system.
- Type the command yo @microsoft/SharePoint.
- Provide a solution name for your solution as shown in Figure 11.2.
- For the next question about the SharePoint versions that you want to target, choose SharePoint Online only (latest).
- Choose whether you want to use the current folder or create a subfolder with the name of the solution.
- For the deployment question, type Yes.
- For the API permissions question, type No. If you are familiar with the Microsoft Graph API and want to use it in your extension, type Yes.
- In the question about the client-side component, choose Extension.
- There are three types of extensions available for SharePoint, but only two of those are applied to Microsoft Lists. Choose accordingly – Field Customizer or List View Command set.
- Provide a Field Customizer name for the extension.
- Provide a Field Customizer description for the extension.
- Choose the framework you would like to use to build your solution. The examples provided in this chapter were built using the option No JavaScript framework.
- The creation of the project will start. It might take a few minutes depending on your internet bandwidth. It is shown as follows:
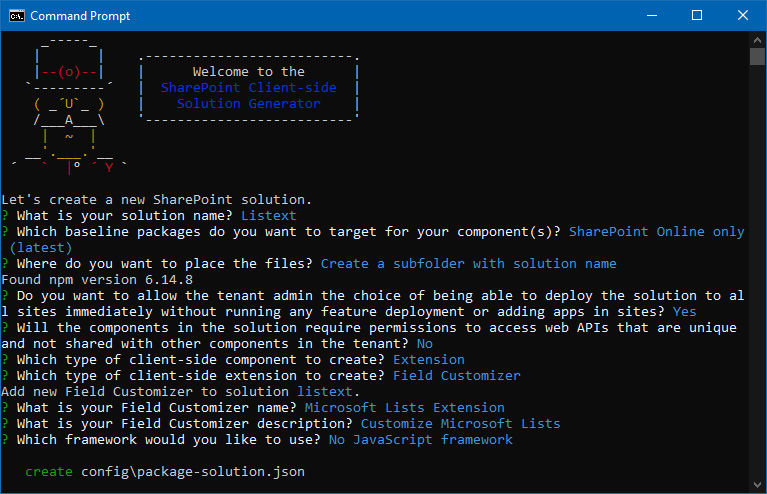
Figure 11.2 – SharePoint Framework solution generator
- Once the project is created, navigate to the project folder in the terminal and type code . to open it with Visual Studio Code.
With your SharePoint Framework project created, in the next sections, you will learn how it is structured and how you can build your custom code.
Building a field customizer extension
Field customizer extensions allow you to customize columns beyond what the JSON and HTML allow you to do with the column formatting. With the use of SPFx, you will be able to format the columns using custom HTML structures, which are not supported by the column formatting. Or, you could go even further and use external APIs to transform the data in your columns.
Let's discuss the following scenario.
John has built a list where he manages all the company offices worldwide. Besides having the typical information that defines an office such as the address, John wanted to go a step further and display the temperature for the city where the office is located, with the temperature being displayed in real time.
To achieve this, John has created a field customizer extension that gets the weather for a specific city using an external API, which is shown as follows:

Figure 11.3 – Offices list
When you create a field customizer extension, you will get three default functions that will be executed to customize the column in a list, which are as follows:
- onInit – This is the function where you must initialize your extension. Any code that you need to get executed before formatting the column must be defined here.
- onRenderCell – This is the function that is executed to transform the column information. From here, you will be able to access the column values and inject your own HTML structure.
- onDisposeCell – This function should be used to free any resources that were allocated during rendering.
In the following screenshot, you can see how the three functions look:
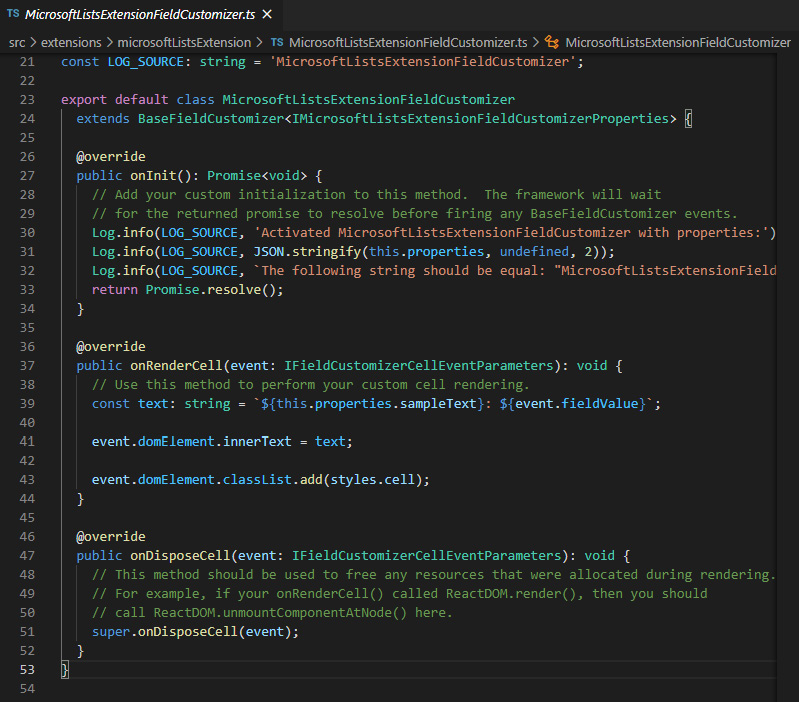
Figure 11.4 – Column extension main functions
In order to implement the scenario described, it is necessary to use an external API to get the weather for the city. In this case, we will use the free Open Weather API, and to make the request to the service, we will add a new node module to the SPFx solution.
To prepare your solution to use Open Weather API, do the following:
- In Visual Studio Code, click on View, and then in the menu, click on Terminal.
- In the terminal, type npm install openweather-apis and press Enter.
If you want to know more about the Open Weather API node module, have a look at this site: https://www.npmjs.com/package/openweather-apis.
Now that you have the module added to the solution, it is time to get the API key that will allow you to use it.
- To get started, visit https://openweathermap.org/api.
- Sign up and request the free API.
- Once you validate your email, the API key will be sent by email. This API allows you to make a million calls per month and a maximum of 60 calls/minute.
With your API key to Open Weather, it's now time to modify the solution to display the weather along with the name of the city.
- In Visual Studio Code, open the ts source file located in the folder /src/extensions.
- Replace the onRenderCell function with the following code:
@override
public onRenderCell(event: IFieldCustomizerCellEventParameters): void {
// Use this method to perform your custom cell // rendering.
let city = event.fieldValue;
var weather = require('openweather-apis');
(weather as any).setLang('en');
(weather as any).setCity(city);
(weather as any).setUnits('metric');
(weather as any).setAPPID('YOUR API KEY');
(weather as any).getAllWeather(function(err, temp){
if(temp!=null){
let city = temp.name;
let condition = temp.weather[0].main;
let icon = `https://openweathermap.org/ img/w/${temp.weather[0].icon}.png`;
let temperature = temp.main.temp.toString(). split('.')[0];
let html = `
<div style="position: absolute; left: 8px; top: 8px; font-size: 31px; font-weight: 500;">${temperature}º</div>
<img src="${icon}" style="position: absolute; left: 35px; top: 8px;">
<div style="position: absolute; top: 10px; left: 90px;">${city}</div>
<div style="position: absolute; top: 30px; left: 90px;">${condition}</div>
`;
event.domElement.innerHTML = html;
}
});
}
https://github.com/PacktPublishing/Hands-On-Microsoft-Lists/tree/main/Chapter11/Weather%20column
The source code for the solution is quite simple. It gets the value of the city column (let city = event.fieldValue;) and makes a request to the API to retrieve the weather for that location.
- In the preceding code, replace the string YOUR API KEY with your own API key value.
- In Visual Studio Code, open the elements.xml file located in the ./sharepoint/assets/ folder as shown in Figure 11.5.
- Edit the field Name and provide a name, and a DisplayName.
- Change Type to Text and remove the property Min. At the end, your file should be similar to the one represented in the following screenshot:
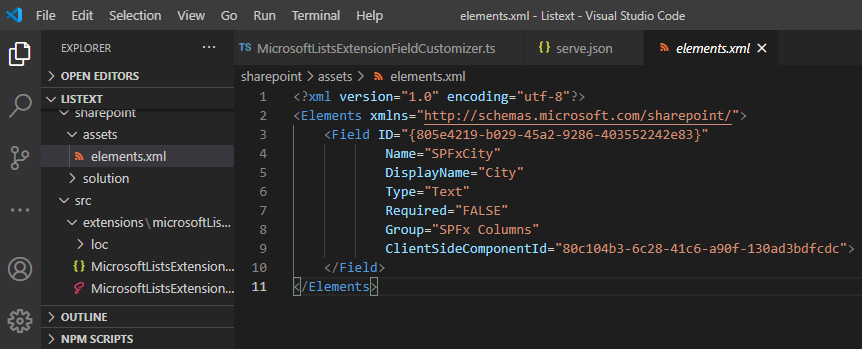
Figure 11.5 – Elements.xml field definition
If you want to use other types of columns, we recommend you have a look at this site:
https://docs.microsoft.com/en-us/sharepoint/dev/schema/field-definitions
Now that you have the solution running, it's time to test it live in your own environment.
- In Visual Studio Code, open the serve.json file located in the config folder as shown in Figure 11.6.
- Modify the value for the pageUrl property to the URL to the list, as shown in Figure 11.6.
- Rename the InternalFieldName property with the name of the column, for example, City, as follows:

Figure 11.6 – Modified serve.json file
- From the Visual Studio Code terminal, type gulp serve.
- A new page will open in your browser. Once it opens, click on the Load debug scripts button as follows:

Figure 11.7 – Load debug scripts
After a few seconds, you will see the extension appear in the City column. The final result will be similar to the one exemplified in the following figure, with the weather being shown alongside a representative image of the condition, the name of the city, and the description of the current condition:
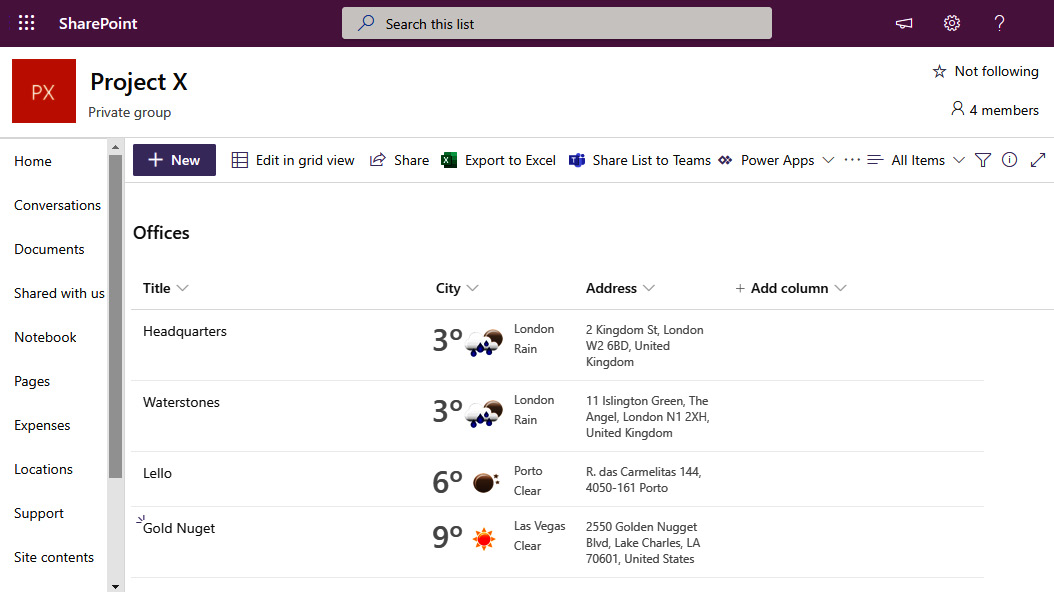
Figure 11.8 – SPFx field customizer
Once you are happy with the final result, you need to install it on your SharePoint, so it becomes visible to all users. To accomplish the instructions described from this point on, you must have permission to install custom applications on SharePoint.
- From the Visual Studio Code terminal, run the command gulp bundle –ship.
- Once the previous command execution has finished, run the command gulp package-solution --ship.
- After the successful execution of both commands, in your File Explorer, open the project solution folder, and then navigate to ./sharepoint/solution/ where you will find a file with the extension sppkg.
- Open your SharePoint app catalog. If you want to learn more about it, we recommend you have a look at this site: https://docs.microsoft.com/en-us/sharepoint/use-app-catalog.
- Once in the app catalog, click on Apps for SharePoint located in the vertical menu.
- Click on FILES and, from the command bar, click on Upload Document as follows:
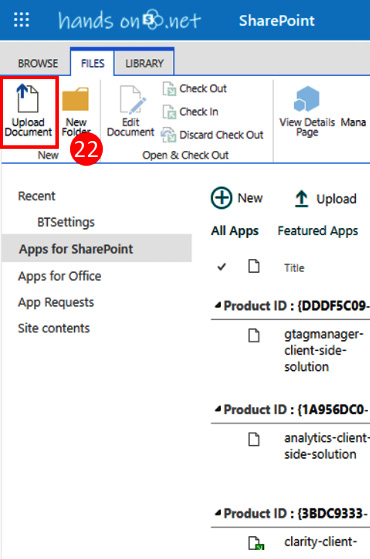
Figure 11.9 – Upload Document
- Click on the Choose files button and select the sppkg file.
- Click OK.
- On the popup that appears, leave the option Make this solution available to all sites in the organization unchecked as follows:

Figure 11.10 – Click Deploy
Now that the app is installed in the SharePoint tenant, you must add it to the site collections where you want to make use of it.
- Navigate to the SharePoint site where your list is located.
- Click on the cog icon, and from the settings pane, click on Site contents.
- Click on New and then click on App as follows:
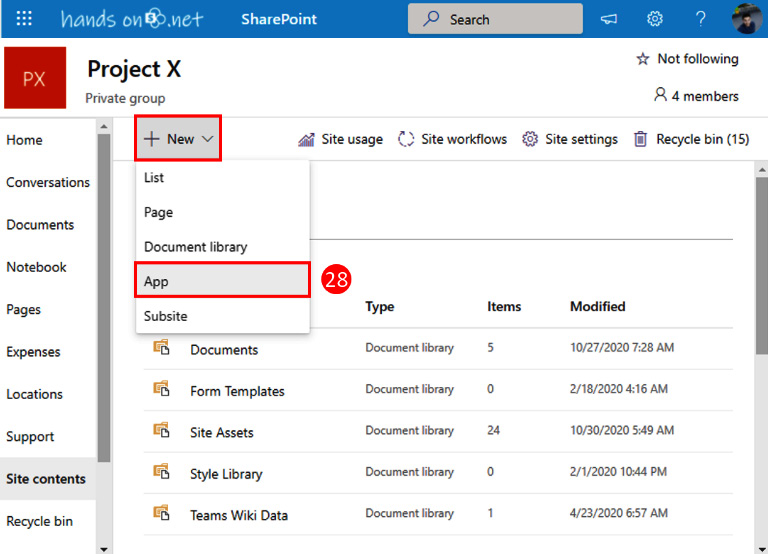
Figure 11.11 – Add an app
- Search for the name of your custom solution and click on it to install it for the SharePoint site.
The last step you need to do is add a new site column to the list where you want the customization to be visible. You can reuse the solution in multiple lists by taking the following steps.
- Open the list where you want to add the column customization.
- Click on the cog icon, and then in the settings pane, click on List Settings.
- In the Columns section, click on Add from existing site columns as follows:

Figure 11.12 – List site columns
- In the Available site columns list, look for the name of your column, for example, City.
- Select SPFx Columns from the site columns dropdown.
- Click on Add to move it to the Columns to add list.
- Make sure you have the option Add to default view checked.
- Click OK as shown in the following figure:

Figure 11.13 – Add a list site column
When you add content to your list, the values inserted in the City column will be automatically formatted by the definition made by the field customizer extension.
Despite being built with a specific list in mind, the extension can be reused in other lists as well. All you have to do is repeat Steps 26 to 37.
In the following screenshot, you can observe the same extension applied to the Travel requests list seen earlier in the book, in Chapter 6, Customizing Microsoft Lists:

Figure 11.14 – Extension applied to a Travel requests list
With the example described in this chapter, you should be able to start customizing your columns, using it as a starting point for more complex scenarios.
Building a view command set extension
View command set extensions allow you to add extra functionalities to the command bar of a list that can be executed for a single item or for the entire list, allowing you to include your business processes in Microsoft Lists.
Let's discuss the following scenario.
John wants to share lists and list items on Microsoft Teams and wants to automate the copy/paste process between both applications. John wants to implement the Share to Teams embedded button that can be used from any application to share a link to Teams. To make this new option available to all the lists in the tenant, John has decided to build a command set extension.
When you create a command set extension, you will get three default methods that are executed to create the command set:
- onInit – This is the method where you must initialize your extension. Any code that you need to get executed before creating the command set must be defined in this function.
- onListViewUpdated – This method is executed every time something changes in the list, for example, a list item selection.
- onExecute – This method is executed when a user clicks on the new command bar option.
In the following screenshot, you can see what the three methods look like:

Figure 11.15 – Command set extension
In order to implement the scenario described, it is necessary to modify the solution and build an extra function that will add the Microsoft Teams share feature to all Microsoft lists.
The embed share button is a script provided by Microsoft. If you want to learn more about it, have a look at this site: https://docs.microsoft.com/en-us/microsoftteams/platform/concepts/build-and-test/share-to-teams.
To prepare your own solution, do the following:
- In Visual Studio Code, open the ts source file located in the folder /src/extensions.
- After the onExecute method, paste the following function:
private appendShareToTeamsScript(): void{
//Add Share to Teams script to the page
var script = document.createElement("script");
script.type = "text/javascript";
script.src = "https://teams.microsoft.com/share/ launcher.js";
document.body.appendChild(script);
//Create a hidden element to make use of the //ShareToTeams feature
var div = document.createElement("div");
div.id = "hiddenShareBTN";
document.body.appendChild(div);
}
- In Visual Studio Code, open the manifest.json file located in the folder /src/extensions.
- In the manifest.json file, replace the elements defined inside the items property with the following code:
"LISTS_COMMAND": {
"SHARELISTITEM_COMMAND": {
"title": { "default": "Share List item to Teams" },
"iconImageUrl": "",
"type": "command"
},
"SHARELIST_COMMAND": {
"title": { "default": "Share List to Teams" },
"iconImageUrl": "",
"type": "command"
}
}
This definition creates two buttons for the command bar – one to share list items when a single item is selected, and another one to share the list when no item is selected, or more than one item is selected.
Each button is defined by the following:
- title – A string with the text that is displayed in the list command bar.
- iconImageUrl – The image that is used next to the command. It can be defined as a JPEG, PNG, or SVG.
- type – It will always be command.
- Go back to the ts source file located in the folder /src/extensions.
- Replace the onInit method with the following code:
@override
public onInit(): Promise<void> { debugger;
this.appendShareToTeamsScript();
return Promise.resolve();
}
- Replace onListViewUpdated with the following code:
@override
public onListViewUpdated(event: IListViewCommandSetListViewUpdatedParameters): void {
const shareListItemCommand: Command = this. tryGetCommand('SHARELISTITEM_COMMAND');
const shareListCommand: Command = this. tryGetCommand('SHARELIST_COMMAND');
//Share to Microsoft Teams
if (shareListItemCommand && shareListCommand) {
if(event.selectedRows.length === 1){
//Share list item
if(event.selectedRows[0]. getValueByName("FileLeafRef") != 'Folder'){
//Share item is not available for folders
shareListItemCommand.visible = true;
shareListCommand.visible = false;
}else{
//For selected folder, share the entire list
shareListItemCommand.visible = false;
shareListCommand.visible = true;
}
}else{
//share list
shareListItemCommand.visible = false;
shareListCommand.visible = true;
}
}
}
In onListViewUpdated, you can find the logic to show the share item or the share list button depending on the number of elements selected.
- Replace the onExecute method with the following code:
@override
public onExecute(event: IListViewCommandSetExecuteEventParameters): void {
switch (event.itemId) {
case 'SHARELISTITEM_COMMAND':
var filePath: string = null;
var datahref: string;
try{
filePath = event.selectedRows[0]. getValueByName("ServerRedirectedEmbedUrl");
}catch{
filePath = null;
}
//Handle files on document libraries
if(filePath != null){
datahref = filePath; // office file with //preview
if(datahref == ""){
//file without preview
var fileRef = event.selectedRows[0]. getValueByName("FileLeafRef");
var tenantURL = document.location.origin;
var listURL = this.context.pageContext.list. serverRelativeUrl;
datahref = `${tenantURL}${listURL}/${fileRef}`;
datahref = datahref.replace(/ /g,"%20");
}
}else{
var selectedRowID = event.selectedRows[0]. getValueByName("ID");
var tenantURL = document.location.origin;
var listURL = this.context.pageContext.list. serverRelativeUrl;
datahref = `${tenantURL}${listURL}/DispForm. aspx?ID=${selectedRowID}`;
datahref = datahref.replace(/ /g,"%20");
}
//prepare the Share To Teams button
var hiddenBTN = document. getElementById('hiddenShareBTN');
hiddenBTN.innerHTML = `<div id="hiddenhareTeamsBTN" style="display:none;" class="teams-share-button" data-href="${datahref}"></div>`;
eval('shareToMicrosoftTeams.renderButtons();');
var hiddenLink = hiddenBTN. getElementsByTagName('a');
hiddenBTN[0].click();
break;
case 'SHARELIST_COMMAND':
//prepare the Share To Teams button
var hiddenBTN = document. getElementById('hiddenShareBTN');
hiddenBTN.innerHTML = `<div id="hiddenhareTeamsBTN" style="display:none;" class="teams-share-button" data-href="${document.location.href}"></div>`;
eval('shareToMicrosoftTeams.renderButtons();');
var hiddenLink = hiddenBTN. getElementsByTagName('a');
hiddenLink[0].click();
break;
default:
throw new Error('Unknown command');
}
}
In this method, you can find the logic that is applied to each one of the buttons when the user clicks on them.
Your solution is ready to be tested in your own environment. All you have to do is prepare it to open in your own tenant.
- In Visual Studio Code, open the serve.json file located in the config folder.
- Modify the value for the pageUrl property to the URL of the list where you want to test it.
- In Visual Studio Code, click on View, and from the menu, click on Terminal.
- In the terminal, type gulp serve.
- A new page will open in your browser. Once it opens, click on the Load debug scripts button, as follows:
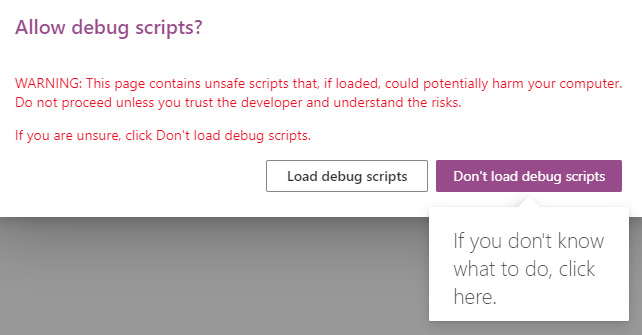
Figure 11.16 – Load debug scripts
The new commands will appear in the list. Test them, and refine the behaviors according to your needs. Once you are happy with the solution, it is time to create the installation file to apply it globally to all the lists.
To accomplish the instructions described from this point on, you must have permission to install custom applications on SharePoint.
- From the Visual Studio Code terminal, run the command gulp bundle –ship.
- Once the previous command execution has finished, run the command gulp package-solution --ship.
- After the successful execution of both commands on your File Explorer, open the project solution folder, and then navigate to ./sharepoint/solution/ where you will find a file with the extension sppkg.
- Open your SharePoint app catalog. If you want to learn more about it, we recommend you have a look at this site: https://docs.microsoft.com/en-us/sharepoint/use-app-catalog.
- Once in the app catalog, click on Apps for SharePoint located in the vertical menu.
- Click on FILES and from the command bar, click on Upload Document:
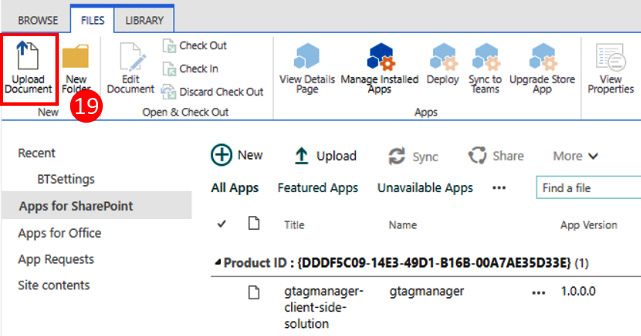
Figure 11.17 – Upload Document
- Click on the Choose files button and select the sppkg file.
- Click OK.
- On the popup that appears, check the Make this solution available to all sites in the organization option and click Deploy:
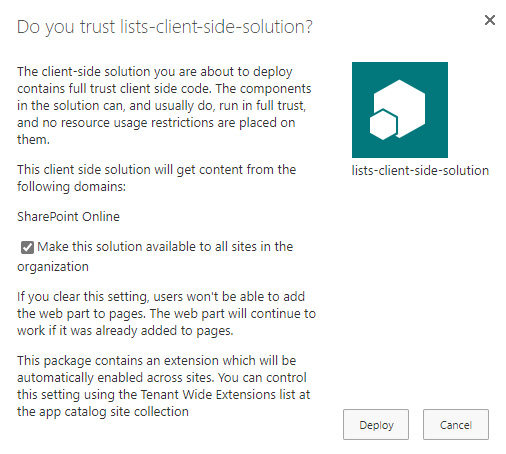
Figure 11.18 – Click Deploy
Your solution is installed and applied to all lists in the tenant. The end result will be similar to the following screenshot with the Share List item to Teams popup opening at the top of the list:
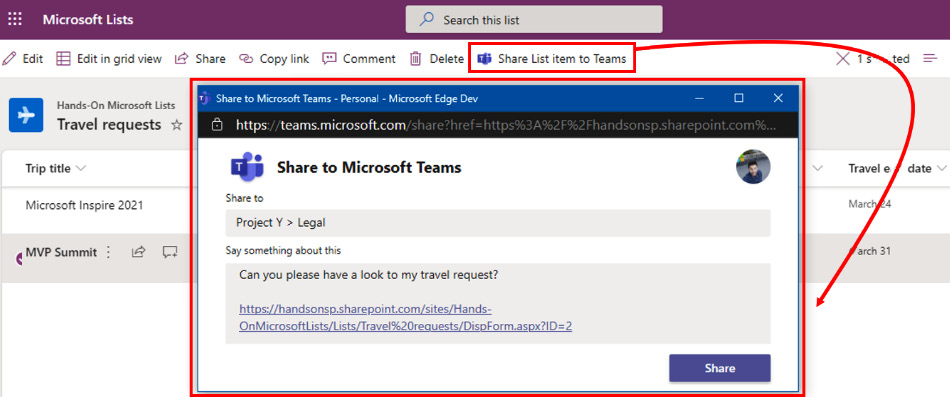
Figure 11.19 – Share item to Teams from Microsoft Lists
This solution allows you to post a message to a Teams channel with a link to the list or to the list item. It will be similar to the example in the following screenshot:

Figure 11.20 – List item shared to Microsoft Teams
You can create multiple extensions and have them applied at the same time to your lists. Use these examples as a starting point, and have fun.
Summary
In this chapter, you have learned how to extend Microsoft Lists beyond what Microsoft provides by default in the application. You've learned about the SharePoint Framework, its main components, and the available options to extend Microsoft Lists using custom field customizers and command sets.
You are now ready to bring your processes and business logic to the context of Microsoft Lists, adding more value to the content stored in lists.
If you have read the entire book by now, you should be the real hero of Microsoft Lists in your organization, ready to empower others to achieve more using this awesome application.