
Continuous delivery and deployment have become vital aspects of from the Detailed instructions link software development industry. As we discussed in Chapter 1, continuous integration and delivery pipelines instantly bring your software development process to a high performing and reliable level. Azure DevOps provides us with good features to create CI/CD pipelines according to our project requirements. This chapter will help you get an idea of Azure DevOps pipelines by providing a basic introduction to various areas of the Azure DevOps pipeline features.
Lesson 2.01: Introducing Pools and Agents
As you already know, CI/CD improves your delivery speed by automating the build and deployment process. When it comes to automation, you need a machine to do it for you without any human interaction. Azure DevOps provides agents to do CI/CD work for you. This lesson will help you to learn about these agents and where you can find them in Azure DevOps.
In Azure DevOps, you can find the Agent pool section under project settings. You will find all the agent details from the pool section. There are two types of agent pools:
Azure Pipelines: Microsoft-hosted agent pool containing machines with all platforms, Windows, Linux, and MacOS with many software tools installed in them.
Private /self-hosted Agent Pools: A default private pool is available and you can create more private agent pools as per your requirements. Then you can register machines in these private pools to be used as build or deployment machines.

Agent pool

Azure DevOps agents
As mentioned already, we can configure our own agents in private pools, which will be explained in detail in future chapters. After configuring a self-hosted agent, it will be added to the agent pool with all the information of that agent. As an example, the summary will give the details of the software installed in the agent with those versions.

Agents available in hosted agent pool
Reader – Can only view the agent pools
User – Can view and use pools but cannot manage or create agent pools
Administrator – Can administer, manage, view, and use agent pools
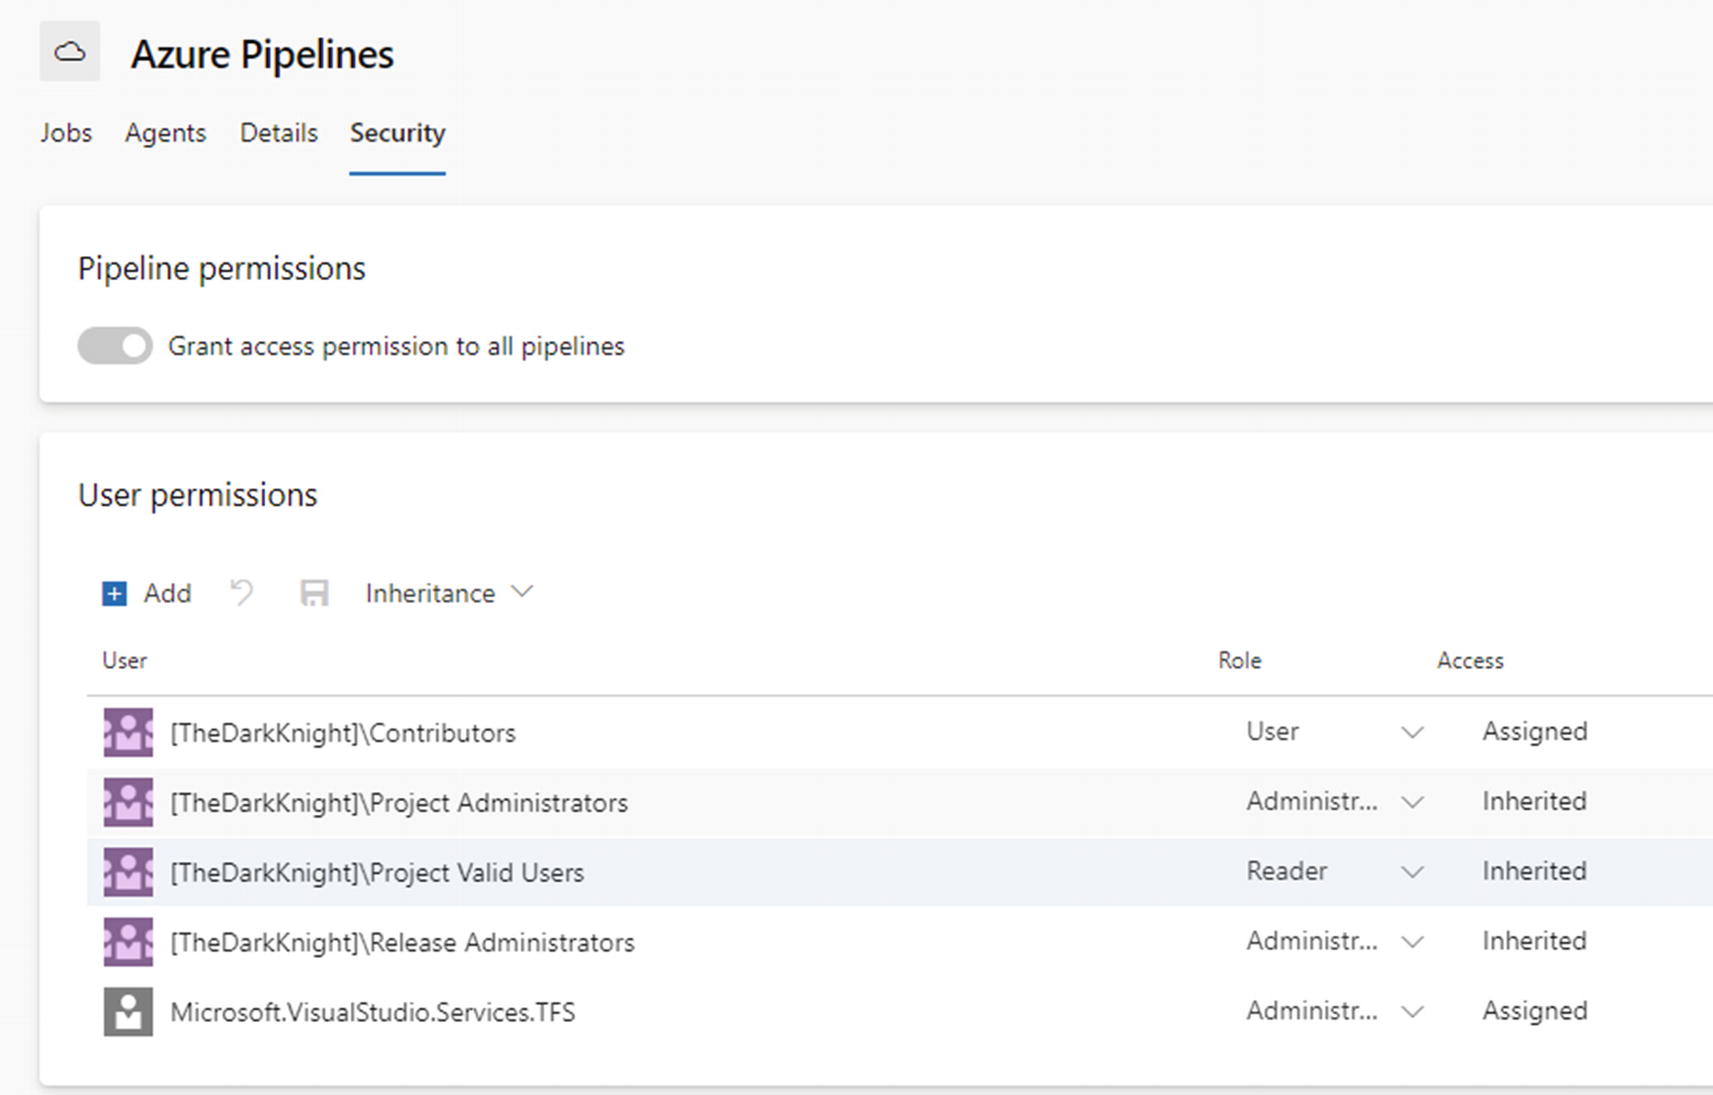
Agent pool security and permission
Even a single agent pool can be applied with individual permissions set similar to the one above.
This lesson explained what an agent pool is and what the types of agents available are. Further, we discussed that self-hosted agents’ capabilities can be monitored using an agent pool capability section. Finally, we were able to understand how to control access and administer capabilities of agent pools using permission levels available in the pools’ security section. We will discuss more details on agents in future chapters of this book.
Lesson 2.02: Deployment Groups
We have discussed agents and pools in the first lesson of this chapter. As we already know, an agent is a dedicated machine that helps to perform build or deployment. Deployment groups are also similar to agent pools. A deployment group is a set of machines set up with agents. The specialty of the deployment group is that each machine is an actual deployment target dedicated to each deployment environment with a role. As an example, a deployment group can have a machine with dev as the target and role as the webserver, which are used only to do deployments to dev environment web applications. Likewise, a deployment group has a dedicated machine for each deployment target and a role.

Deployment pool

Deployment group creation
While configuring the deployment group, using a registration script allows you to add tags for each server of the deployment group to denote the role of the machine. As an example, if you create a server with a tag called “Webserver,” you can use this server to do web application deployments. So, while working with deployment pipelines, it is possible to group deployment tasks by selecting a deployment group at the agent phase, which we will discuss in more detail in a future lesson, which will help you to understand well the deployment group concept.
In this lesson we were able to get a basic idea about the deployment groups and uses of them. You will be able to learn more about deployment groups in future chapters.
Lesson 2.03: Build Pipelines
In this lesson, you will be able to get a basic idea of how to build a pipeline. You will also get an idea on what a build pipeline is and why it is used.
Azure DevOps build pipelines can be used to build your source code to identify issues with the code early by using a continuous integration option. You can build, test, and create deployable packages of your code using Azure DevOps build pipelines. Further, builds can be used to assign version numbers to the output packages.

Build pipeline
Azure DevOps supports two types of builds: namely, classic builds and YAML Ain’t Markup Language (YAML) builds. Classic editor allows you to use a graphical view and create build pipelines according to your requirements. But when it comes to a YAML build, you need to have a good understanding of YAML syntax to write declarative scripts to define the build pipelines as a code.
One of the main purposes of a build pipeline is to create deployable packages from the source code. But it is not mandatory to keep your code in Azure DevOps repos in order to use the Azure builds. Azure DevOps allows you to work with several source control systems. As an example, if you have your source code in Bitbucket, you can build Bitbucket code in Azure DevOps build pipelines. Azure Pipelines supports a wide range of repositories such as Azure Repos, GitHub and GitHub Enterprise, Bitbucket, Subversion, and other Git repos.

Classic editor build pipeline with empty job
In build pipelines, there are agent phases that allow you to group agents’ tasks under each phase. Azure DevOps has two phases:
Agent phase – It is connected with the agent in the agent pool and uses the agent pool agent to execute the tasks.
Agentless phase – It doesn’t have the capability to connect with an agent in an agent pool. All the tasks under this phase will execute in Azure DevOps server itself.
The main purpose of the build pipeline is building the code, testing it, and generating an output package. When generating a build output, we can publish the package on a server or file share. Also, we can generate packages and push those packages to Azure DevOps artifact feeds using build pipelines.
Another important feature available in Azure DevOps pipelines is a trigger, which allows us to decide when to start a build. Triggers can be used to decide when a new build should start. Further, we can define it if the change comes from a specific branch and then only trigger a build. Also, we can control the triggers using folder paths as filters so that if something is committed to a given path, a build would be triggered. Another option is to set up the builds to run on a given schedule. We will be discussing these build triggers in later chapters.
Security is a very important feature of any type of tool. Azure DevOps uses several security mechanisms to protect the entire deployment process. Also, it allows you to secure each build pipeline individually by restricting access permissions for each user or user groups.
As discussed in this lesson, build can be used mainly to build, test, and package the source code as deployable output. We now have a brief idea of the capabilities of the Azure DevOps build pipelines. We will discuss more details in future chapters.
Lesson 2.04: Release Pipelines
This lesson will give an introduction to release pipelines. Release pipelines, a.k.a. deployment pipelines, are used to deploy the versions to a selected deployment platform. As an example, Azure DevOps releases pipelines that can be used to deploy web apps, function apps, logic apps, and various types of artifacts to the Azure platform.

Release pipeline
The main purpose of a release pipeline is to deploy the deployable packages created to the target hosting platform.
The Azure DevOps pipeline has an artifacts section and stage section. The artifact is the starting point of a release pipeline and can be used for setting up a continuous deployment trigger. It is required to add a type of artifact to enable the deployment. The artifact section allows you to select different types of artifacts such as build output, a package from artifact feed, and third-party artifacts like Jenkins. We will explore all artifact types supported by Azure release pipelines in the next chapters. Once you enable continuous deployment, it is possible to control this continuous deployment using build branch filters. You can say deploy if the build is triggered due to the change that occurred in the given branch. Also, you can enable pull request triggers that allow you to decide whether to deploy the artifacts generated from a pull request to a given target branch.
In the stages of the deployment pipeline, you can define pre-deployment and post-deployment conditions that allow you to control the deployment. In pre-deployment conditions, Azure DevOps has three main triggers: manual trigger, start deployment after creating a new release, and trigger the deployment of the given stage if the deployment of the previous stages of pipeline have succeeded. Also, pre- and post-deployment approval let you control deployment flow based on manual approvals. It is possible to add artifact filters that allow you to add different conditions. So, deployment will continue only if these conditions are met. Further, you are allowed to add conditions to control pull- or request-based deployments. Azure DevOps has the gates feature that can control the deployment according to the result of the return value from the gate condition. Gates allow you to set various conditions based on Azure functions, REST API, work items queries, and several other gates. Also, schedule deployments can be controlled with pre-deployment conditions.
While working with deployment pipelines, you need to pause the deployment at several stages. As an example, once you deploy to a QA environment, if automated test cases don’t test a reasonable area of the application as coverage, we need to wait until manual testing is completed to continue the deployment to production. So, we can set manual approvals in pre-deployment and post-deployment steps.
As with any deployment tool, Azure DevOps also introduces several options to secure the tool. When it comes to deployment pipelines, it is important to control these deployment permissions. Otherwise it will give you a lot of trouble if deployment happens at the wrong time and is out of control. So, we can secure each deployment pipeline individually by giving admin permission to only the selected users or selected user groups, allowing only designated people to approve deployments to important targets such as production.
This lesson gave a basic introduction to release pipelines. You will learn more capabilities of release pipelines in future chapters.
Lesson 2.05: Task Groups
You will be introduced to task groups though this lesson. As you already know, we can create Azure DevOps build pipelines for building, executing unit tests, and creating deployable packages. To deploy versions of your applications to target platforms, you can use deployment pipelines. Each type of pipeline uses tasks/steps to perform build and deployment steps. Sometimes while we work on a project, we create more than one pipeline and it might have the same steps used in both pipelines. If we have to create a hundred pipelines, we need to create the same pipeline a hundred times. But Azure DevOps provides us with a task group feature where we can create a group of tasks that can be used in multiple pipelines and send parameter values relevant to each pipeline. A task group facilitates implementable, reusable steps as a single block in multiple pipelines.
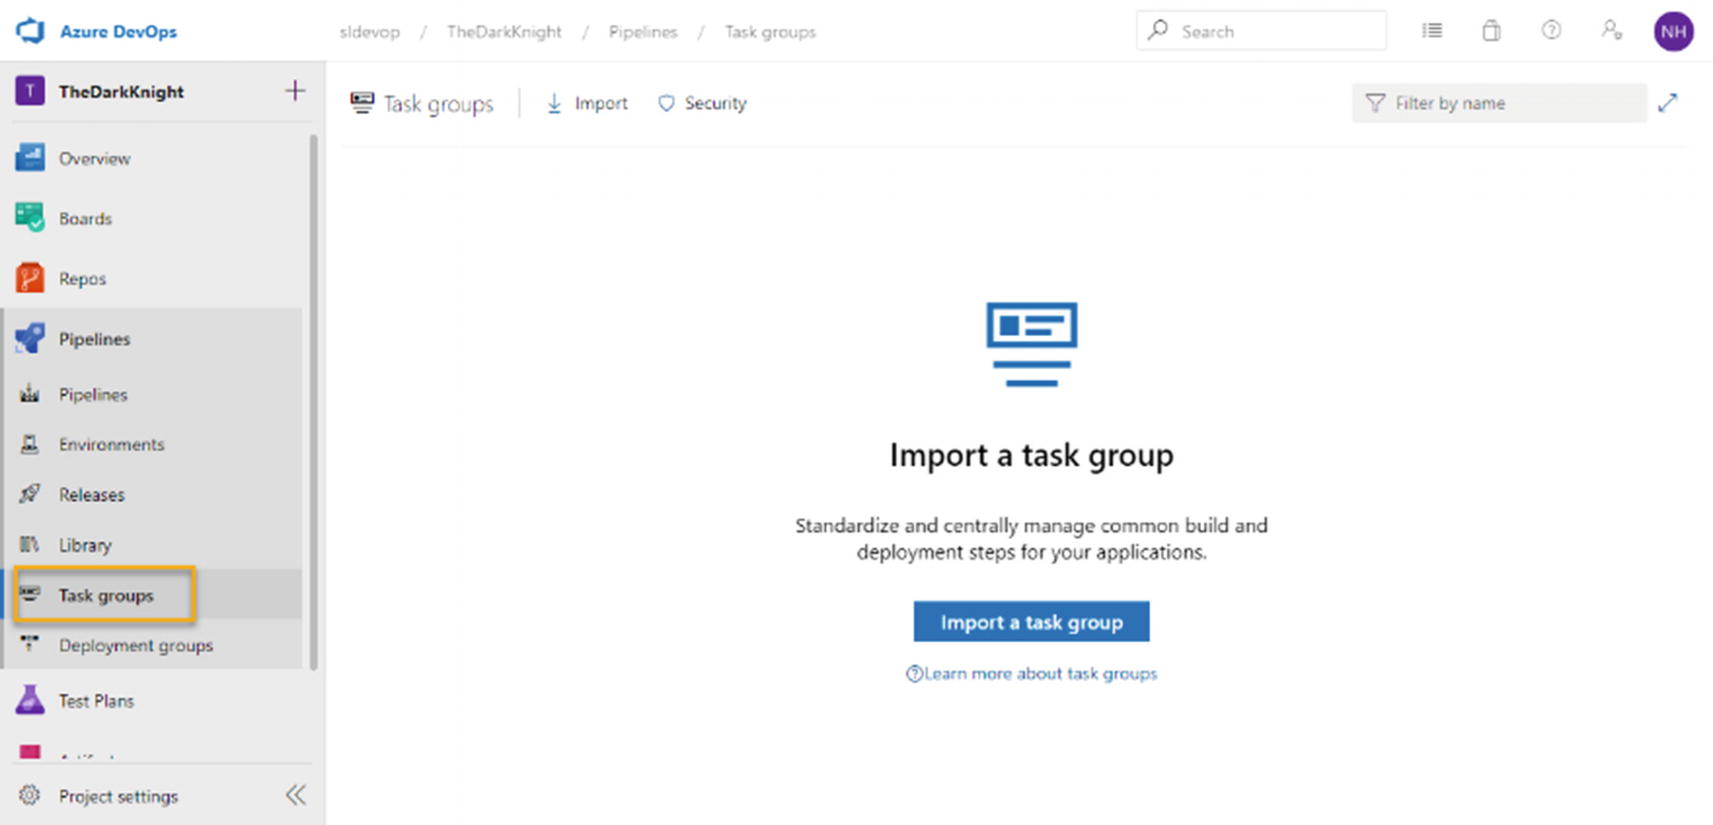
Task groups
The Azure DevOps task group also ensures task group security by introducing security mechanisms that we can use to control the access and administer capabilities for project users. We discuss the details of tasks groups and their uses with examples in the next chapters.
We were able to get a basic idea of what a task group is in this lesson. We discussed the purpose of a task group in brief, which will help you to continue prepared for the rest of this book’s chapters.
Lesson 2.06: Library
This lesson gives you a basic introduction to the Library of the Azure DevOps. The library can be used to keep variable values of pipelines as variable groups and to store files as secure files. While you work with pipelines, you need to define variables for pipeline tasks. Sometimes there are variables that are shared between multiple pipelines. When there is such a need, we can keep shared variables in a variable group under Library.

Library
Other than shared variables, the Azure DevOps Library allows you to keep secured files like certificates and keys that can be used in pipelines. So, you can keep all secured files in the library section. But if we keep the secured files here, we need to control the access permission for each of these files. Azure DevOps confirms the security of these files by allowing us to decide which pipeline can use the secured file and which project users can manage these secured files.
We discussed the basic use of the Azure DevOps Library in this lesson. You will learn more about how to create and use variable groups and secure files in future chapters.
Lesson 2.07: Service Connection
Service connection is one of the most important features required for deployment pipelines. While we do deployments, we need to create connections between our Azure DevOps organization and external resources such as platform services like Azure, source control providers, or other external services like NuGet feeds, etc. You may even want to connect to third-party build and deployment platforms or code quality checking or code security validation tools. A few examples are Jenkins, Octopus, or to deploy Sonar Cloud. Simple cloud deployment targets, as well, are supportive tools for builds and deployments that are connected to Azure DevOps organizations via Service Connections.
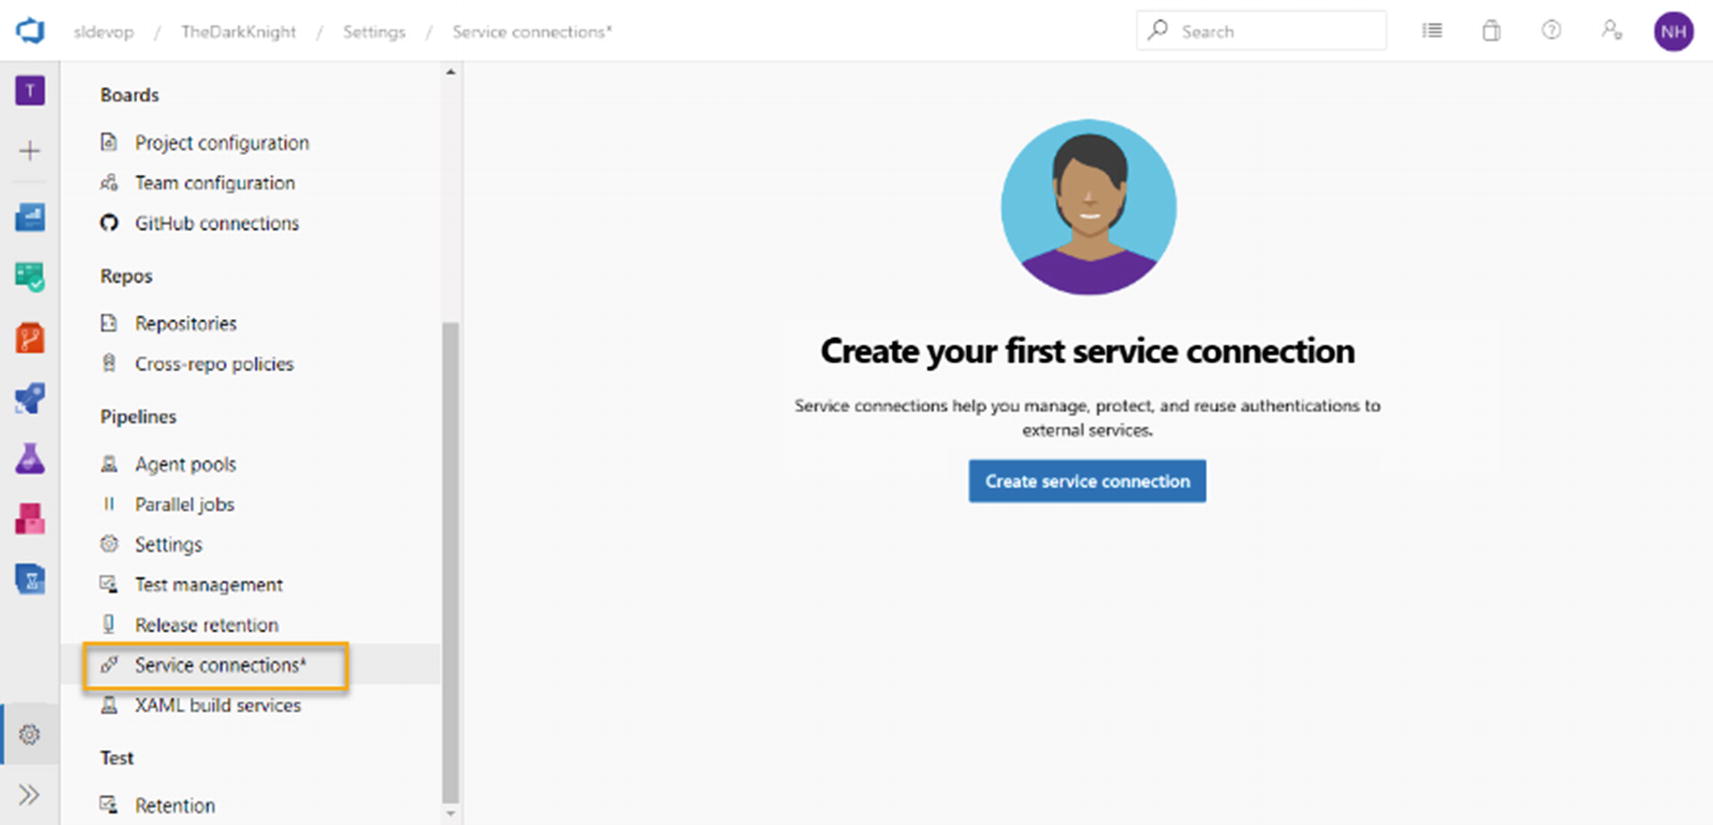
Service connection
Azure DevOps allows you to connect with a number of tools and external services. You can create service connections to connect with deployment platforms like Azure. Also, you can connect with external source control tools like Bitbucket and GitHub using a service connection. In some situations, we try to use multiple deployment tools. So Azure DevOps allows you to create service connections with servers like Jenkins and Octopus. There are a lot of tools you can connect with using a service connection.
After adding a service connection, it should not be controllable by all the users of the project. You can secure the service connections using the permission levels. We can have two user permissions for a service connection:
User – Can use the service connection but can’t administrate it
Administrator – Can create, administer, and use the service connection
This lesson has given you a brief introduction on what a service connection is and how important it is for Azure DevOps pipelines. Also, we learned about a few external tools and services that we can connect with service connection. We will discuss how to create service connections and how to use those in pipelines in future chapters.
Lesson 2.08: Environments
Azure DevOps deployment/release pipelines can be used to do various kinds of deployments. We mostly do web app deployments, DB deployments, AKS deployments, function app deployments, etc. If Azure is the deployment target, it is required to go log in to the Azure portal to monitor each of these deployment targets. Azure DevOps introduces a new feature that can be used to monitor deployment targets from the Azure DevOps Server without logging in to the Azure portal.

Azure DevOps environment
The Azure DevOps Environment represents a collection of resources that can be targeted by deployment pipelines. As examples, we can use namespaces of Azure Kubernetes services, which are databases in the Azure DevOps environments, at the time of writing of this book.
The Azure DevOps environment provides the capability of tracking the deployment pipeline history with deployment resource details. Also, you can track which change set deployed to each deployment environment, which is very helpful to identify which feature or bug fix was deployed. Further, the Azure DevOps environment has a very important feature that provides health details of the deployment resources. So, it allows users to track whether a deployed application is functioning in the desired state or it needs more attention.
The Azure DevOps environment security section allows you to control the environment administer capabilities using three different permission levels:
Creator - Can administer, create, and manage the environment
Reader – Can see the environments
User – Can create environments
Other than these user permissions, the environment can be used with only the permitted pipelines.
As we have discussed in this lesson, environments can be used to track performance of the resources related with deployment pipelines, which is very useful and helpful in tracking all the changes deployed to each target environment.
Lesson 2.09: Parallel Pipelines and Billing
As we discussed, Azure DevOps has two primary types of agents: Microsoft-hosted agents and self-hosted agents. But while we do deployment using more than one pipeline, we need the capability to do parallel deployments. Otherwise it affects the efficiency of the project.
If we use more and more self-hosted agents to do the parallel deployment, it will have a huge negative impact on the project budget. So, there are several options available with the Azure DevOps server.

Parallel jobs
When creating Azure DevOps projects, there are two options as public and private projects. If the project is created as a public project, it can use the Microsoft-hosted agents, which support ten parallel jobs. Further, if you create a self-hosted agent for a public project, it has unlimited parallel jobs. So, it is very important to do deployments without hanging or keeping in the queue. So, Azure DevOps provides multiple parallel job execution capabilities to public projects.
If the project was created as a private project, the Microsoft-hosted agent provides 1,800 mins for month. Also, it has one parallel job, which means only one pipeline can be deployed at once. When it comes to self-hosted agents, it also has one parallel job. But if the organization has Visual Studio Enterprise subscriptions, one parallel job is added to the self-hosted agent. If the organization has more and more subscriptions, it will add more parallel jobs to the pipeline as one additional parallel job per each subscription.
When it comes to Azure DevOps billing, it provides most features for free. As we discussed before, it provides the Microsoft-hosted agent one parallel job and the self-hosted agent one parallel job for free. Boards and Repo are free for up to five users. Also, it provides up to 2GB artifact storage for free.
Testing also plays more importantly in the part of the build and deployment cycle. So, Azure DevOps provides a thirty-day free trial for test plan creation. After the trial period, you can purchase it.

Billing
So far, we have discussed Azure DevOps billing and parallel pipeline execution capabilities. These types of information are very important for decision-making when working with Azure DevOps. You will learn more details on these billing and parallel jobs in future chapters.
Summary
In this chapter, we discussed several features related to Azure Pipelines. We identified build and deployment pipelines, Azure DevOps agents, and usage of agents. We then briefly discussed task groups and library options. Additionally, we were introduced to environments and billing on Azure DevOps.
In the next chapter, we will discuss setting up Agents Pools; Deployment Groups, and agents in them, which will continue to help us for the rest of the book.