We are surrounded by massive amounts of information present in the form of documents, images, blogs, websites, and more. In most cases, we always look for a direct answer instead of reading the entirety of lengthy documents. Question answering systems are generally being used for this purpose. These systems scan through a corpus of documents and provide you with the relevant answer or paragraph. It is part of the computer science discipline in the field of information retrieval and NLP, which focuses on building systems that automatically extract an answer to questions posed by humans or machines in a natural language.
Two of the earliest question answering systems, BASEBALL and LUNAR, have been popular because of their core database or information system. BASEBALL was built for answers to American League baseball questions over a one-year cycle. LUNAR was built to answer questions related to geological analysis of lunar rocks based on data collected from the Apollo moon mission. Such earlier systems concentrated on closed domains where every query must be about the specific domain and the answer text must be from a restricted vocabulary only.
SQuAD : The Stanford Question Answering Dataset (SQuAD) is a reading comprehension dataset that we covered in Chapter 4.
NewsQA : This dataset has been created to help the research community build algorithms that are capable of answering questions requiring human-level comprehension and reasoning skills. By using CNN articles from the DeepMind Q&A dataset, authors have prepared a crowd-sourced machine reading comprehension dataset of 120,000 Q&A pairs.
WikiQA : This publicly available dataset contains pairs of questions and answers. It has been collected and annotated for research on open-domain question answering systems. In addition, the WikiQA dataset also includes questions for which there are no correct answers, enabling researchers to work on negative cases as well to avoid selection of irrelevant answers.
Types of QA Systems
Closed-domain : In closed-domain systems, questions belong to a particular domain. They can answer the questions from a single domain only. As an example, a question answering system for the health care domain cannot answer any IT-related questions. These systems exploit domain-specific knowledge by using a model that has been trained on a domain specific dataset. The CDQA suite can be used to build such a closed-domain QA system.
Open-domain : In open-domain systems, questions can be from any domain, such as health care, IT, sports, and more. These systems are designed to answer questions from any domain. These systems actually mimic human intelligence to answer questions. One example of such a system is the DeepPavlov ODQA system, an ODQA developed by MIPT that uses a large dataset of articles from Wikipedia as its source of knowledge.
Factoid question : A factoid question is about providing concise facts. Answers to factoid questions are based on proven facts. As an example, a learner might be asked to look at a passage, then answer a series of factual questions based on what he or she just read. These types of questions usually start with who, what, when, or where.
Here are some examples of factoid questions.Who is the president of the United States?
Who is the prime minister of India?
Who is the CEO of Google?
All of these questions can be answered from any document or blog if text contains relevant data which is sufficient to answer questions.Non-factoid question : A non-factoid question expects detailed answers about any topic. As an example, a user can ask questions related to mathematical problems, how to run a vehicle, what does temperature mean, and so on. Non-factoid questions usually require multiple sentences as answers, and these answers come from a particular paragraph in a document. Thus, the context of a sentence plays an important role to retrieve the relevant answer.
Here are some examples of non-factoid questions.What is the process of installing Python on Windows?
How can I reset my Microsoft Outlook password?
What do you mean by temperature?
Answers to these questions will be a document, a paragraph, or a definition from a paragraph.
Question Answering System Design Using BERT
This section details how BERT can be used for implementation of a factoid question answering system. For this book, we are using a pretrained model that has been trained on the SQuAD version 1 dataset.
Question: Where was the Football League founded?
Passage: In 1888, The Football League was founded in England, becoming the first of many professional football competitions. During the 20th century, several of the various kinds of football grew to become some of the most popular team sports in the world.
The answer to this question will therefore be England.
Now, we look closer at how this question and passage will be processed using BERT to find the relevant answer. This is all in the context of a question answering system, compared to the text classification approach in Chapter 4.
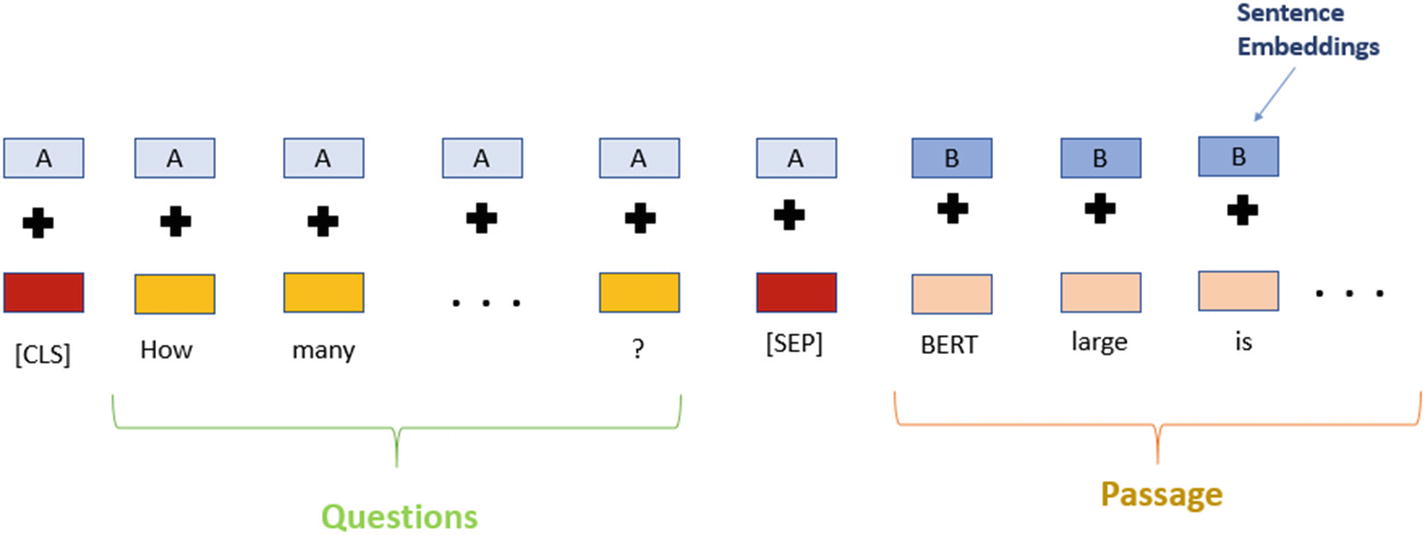
BERT input representation
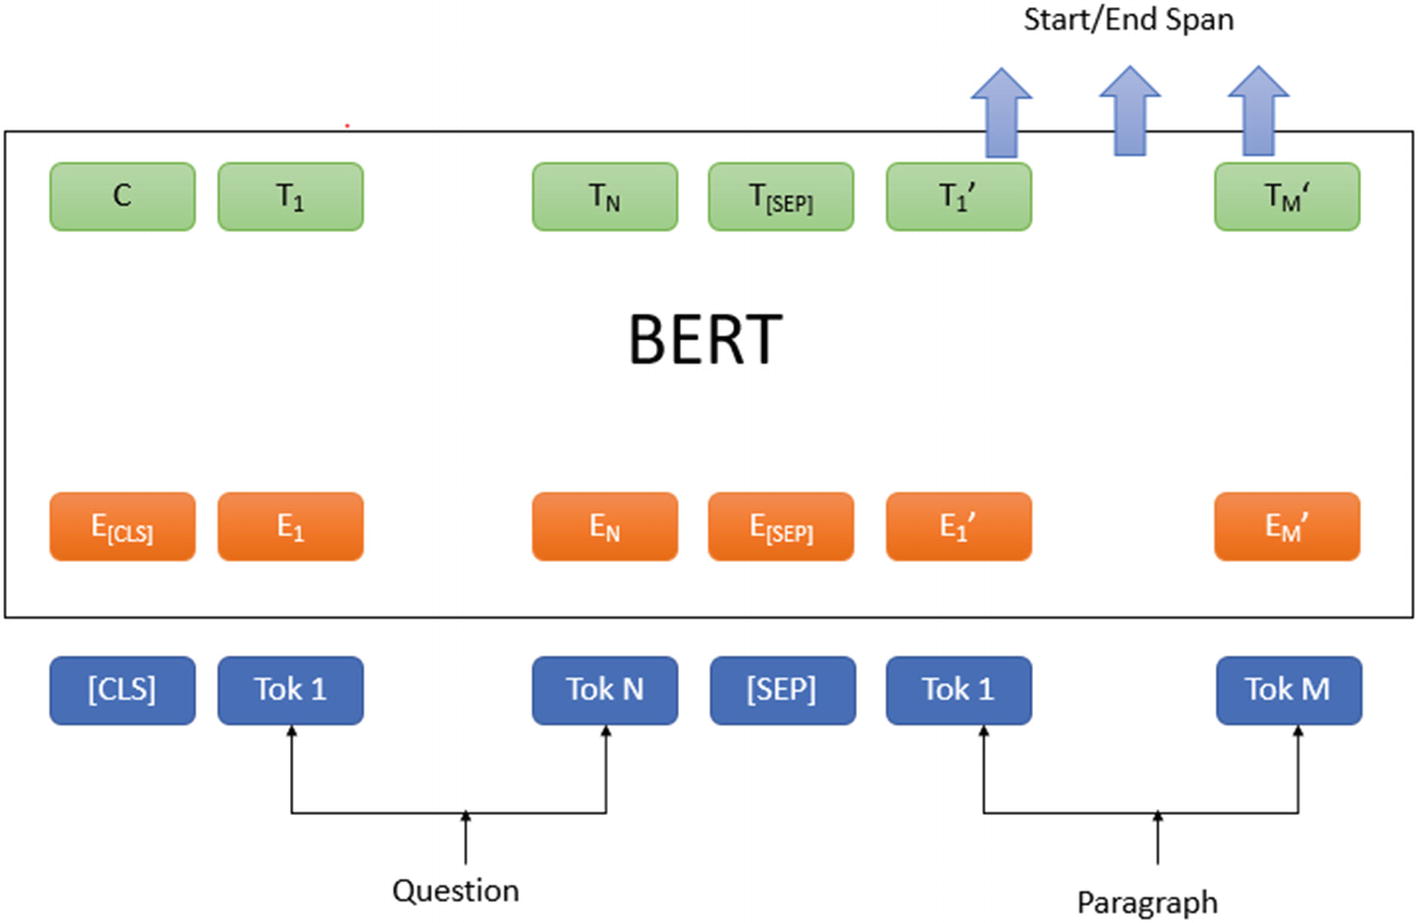
BERT architecture for question answering system
To this point, we have discussed how BERT will process input questions and passages. Next, we will see an implementation of a question answering system using BERT in Python.
- 1.
Make sure Python is installed on your system. Open a command prompt and run the following command to determine if Python is installed, as shown in Figure 5-3.
python
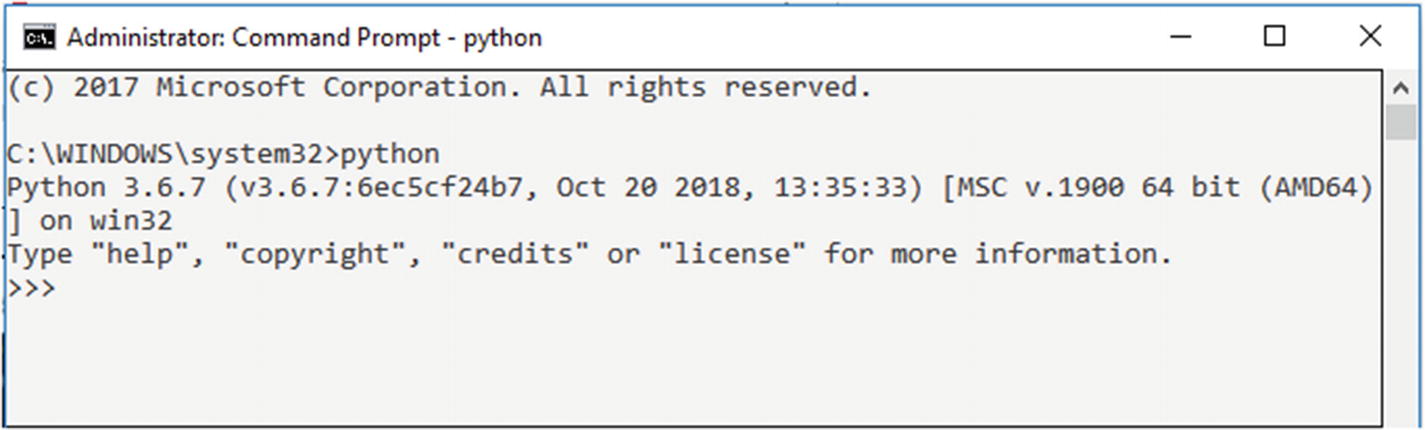 Figure 5-3
Python console
This will open your Python console at the command prompt. If Python is not installed on your system, download and install it as per your operating system from https://www.python.org/downloads/.
- 2.
Next, install Jupyter Notebook, which we will use to code. Open a command prompt and run the following command.
- 3.
Open a command prompt and run the following command to run Jupyter Notebook.
jupyter notebook
The notebook will open in your default browser with the host address as localhost and the port number as 8888, along with a unique token ID. Now, you can start writing code as mentioned in subsequent steps, as shown in Figure 5-4.
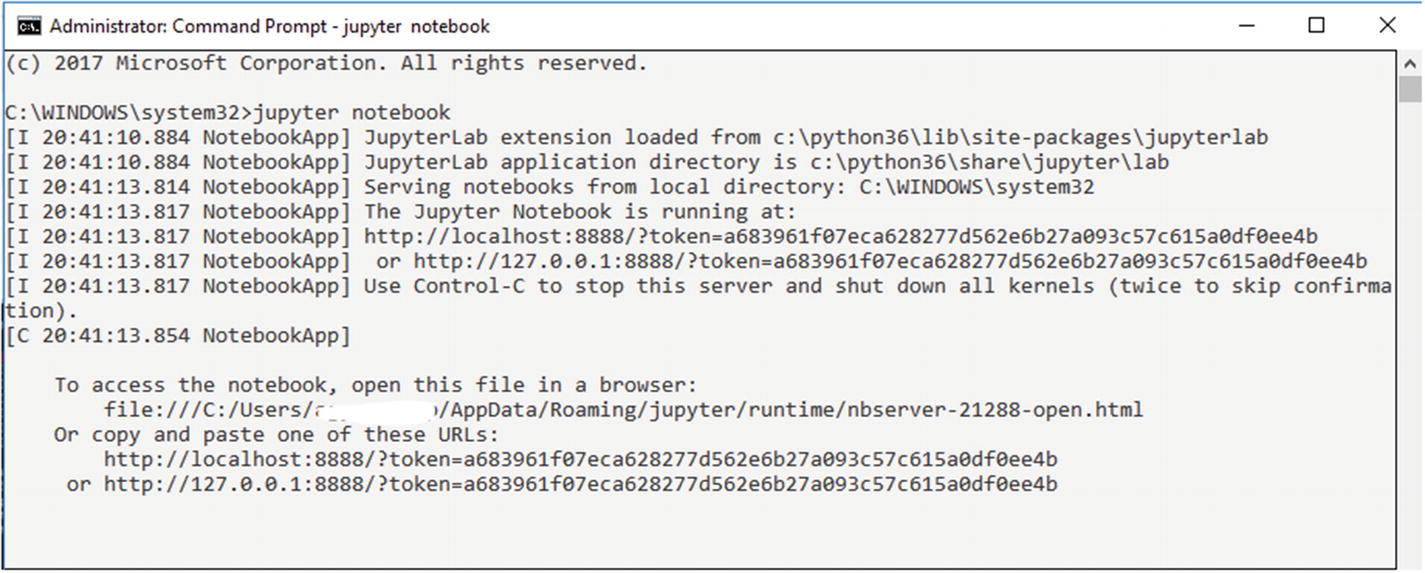
Jupyter Notebook console
- 4.
You can also use Google Colab Notebook for the same purpose. It provides a fast and free environment to run your Python code if your system doesn’t have sufficient resources available. You can also use the GPUs and TPUs for free but for a limited time (12 hours) in Google Colab. You just need a Google account to log in to Google Colab Notebook. For this book, we will be using Google Colab Notebook to demonstrate a question answering system using BERT. Log in to your Google account and click https://colab.research.google.com. You will see the screen shown in Figure 5-5.

Google Colab interface to create or import a notebook
- 5.
To create a new Colab notebook, click New Notebook in the bottom right corner as shown in Figure 5-5.
- 6.
Install the transformers library from Huggingface. Run the following command in your Jupyter Notebook or Colab Notebook.
pip install transformers
- 7.
After successful installation of the transformers library, you should be able to see the output shown in Figure 5-6.

Installing transformers library
- 1.
Import the BertQuestionAnswering and BertTokenizer classes of the transformers library as shown here.
- 2.
Next, load the BERT question answering model fine-tuned on the SQuAD version 2 dataset. It will be a large version of BERT, with 24 layers, 340 million parameters, and an embedding size of 1,024. Along with the BERT model, we have also downloaded a trained model vocabulary set as shown here.
This will take a few minutes, depending on your Internet bandwidth, as the model size is approximately 1.34 GB.
- 3.
Next, it requires a question and candidate paragraph context where an answer to the question would exist. You can find a candidate paragraph using any search engine or document indexer system such as Apache Solr or Watson Discovery Service (WDS). These systems will provide context paragraphs for the question asked by the user.
- 4.
Then , the question, along with the context paragraph, will be passed to the question answering system, where first they will be tokenized based on downloaded vocabulary. As mentioned earlier, these will be concatenated together using a special character [SEP] token in between as shown here (reference text has been taken from a Wikipedia article).
question = "Where was the Football League founded?”reference_text = " In 1888, The Football League was founded in England, becoming the first of many professional football competitions. During the 20th century, several of the various kinds of football grew to become some of the most popular team sports in the world."#Perform tokenization on input textinput_ids = bert_tokenizer.encode(question, reference_text)input_tokens = bert_tokenizer.convert_ids_to_tokens(input_ids) - 5.
Next, we need to concatenate them using segment embedding to differentiate between the question and the context passage. Segment embedding for the question will be added to the token vector of the question and similarly for segment embedding for the context passage. This should be done before even using it as an input to the BERT model. These additions are managed internally by the transformer library, but we need to provide Boolean values (0 or 1) to differentiate for each token as shown here.
#Find index of first occurrence of [SEP] tokensep_location = input_ids.index(bert_tokenizer.sep_token_id)first_seg_len, second_seg_len = sep_location+1, len(input_ids)-(sep_location+1)seg_embedding = [0]*first_seg_len + [1]*second_seg_len - 6.
Now we can pass our example to the model.
#Test model on our examplemodel_scores=bert_model(torch.tensor([input_ids]),token_type_ids=torch.tensor([seg_embedding]))ans_start_loc, ans_end_loc = torch.argmax(model_scores[0]),torch.argmax(model_scores[1])result = ' '.join(input_tokens[ans_start_loc:ans_end_loc+1])result = result.replace(' ##','') - 7.
The model will provide start and end index from context passage as an answer such as start index value as 11 and end index value as 18. The final output will be extracted from context passage using these indexes.
Now, we have seen how a BERT-based question answering system can be used for research purposes. Next, consider a scenario where you need to deploy this feature to be consumed by some website or conversation system to serve the end user who is looking for an answer to his or her query. In this case, you need to release or expose features of the QA system as a REST API. Now, follow below steps to release features of QA system as REST API.
Let’s go through the steps to set up a REST API and public URL for that API (use ngrok to generate a public URL if you are inside the private network) for a question answering system on both Windows and Linux Server.
For Windows Server
Prerequisite: Python 3.6.x and Pip need to be installed on your system.
Creation of REST API
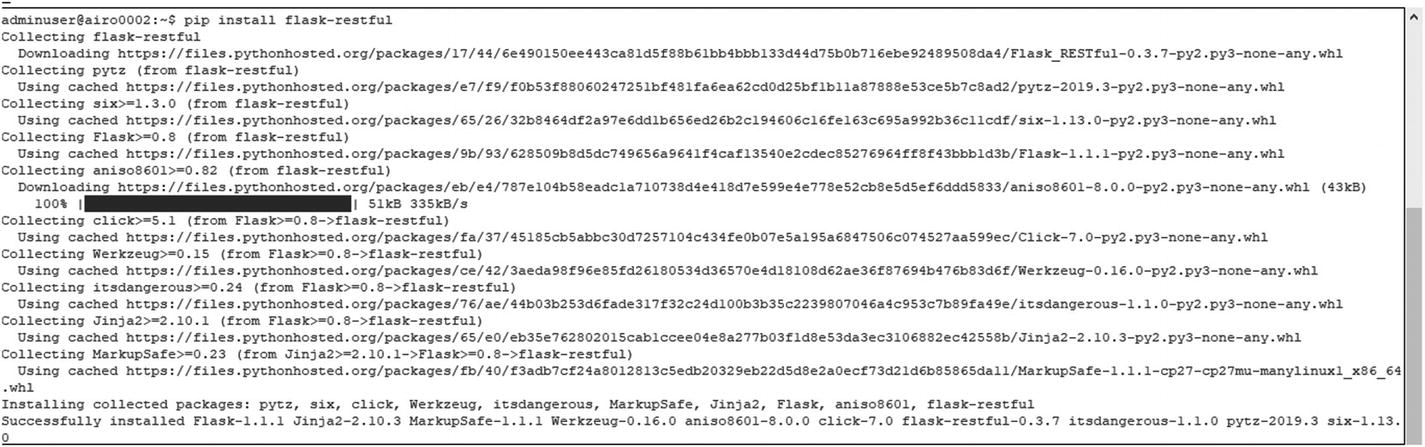
1. Install Flask-RESTful
Flask-RESTful is an extension of the micro-framework Flask for building REST APIs.

Installation of Flask-RESTful
This command will install the package and all its dependencies.
2. Build the REST API
A RESTful API uses HTTP requests to GET and POST data.
First create a QuestionAnswering.py file that will have the question answering code that you have downloaded from GitHub.
3. Deploy Flask REST API
Service deployment
4. Response from REST API
Now the service has been hosted at the URL http://127.0.0.1:5000/getResponse. We want the features of the question answering system to be publicly available. Therefore, we will use ngrok to generate a public URL corresponding to the local URL that we configured earlier.
- 1.
To configure ngrok, download it from https://ngrok.com/download .
- 2.
The public URL is only available when the auth token is downloaded from https://dashboard.ngrok.com after signing up at https://ngrok.com/signup.
- 3.
The auth token must be specified to ngrok so that the client is tied to this account. ngrok saves the auth token in ~/.ngrok2/ngrok.yml so that there is no need to repeat the preceding steps.
- 4.
Unzip the downloaded ngrok folder and run the ngrok.exe application.
- 5.
Copy the auth token from the user account mentioned in the command and run this command on the ngrok terminal prompt, as shown in Figure 5-9.

Token generation
- 6.
After the previous step, authtoken gets saved to the configuration file, as shown in Figure 5-10.

ngrok configuration
- 7.
ngrok is a command-line application, so type ngrok http https://<IP>:<PORT> at this terminal prompt to expose the HTTPS URL. Here the IP and port settings correspond to the question answering API host and port on which the API is hosted, as shown in Figure 5-11.

Generate public URL
- 8.
A new terminal will open after the execution of the command that will show the public URL https://44e2f215.ngrok.io corresponding to the local server URL, as shown in Figure 5-12.

Public URL
For Linux Server
Prerequisite: Python 3.6.x and Pip need to be installed on your system.
Creation of REST API
1. Install Flask-RESTful
Installation of flask-restful
This will install the package and its dependencies.
2. Build the REST API
Create an QuestionAnswering.py file that will have the question answering system code that you downloaded from GitHub.
3. Deploy Flask REST API

Service deployment
4. Response from REST API
Now the service has been hosted at the URL http://127.0.0.1:5000/getResponse. Because we want features of the question answering system to be publicly available, we use ngrok to generate a public URL corresponding to the local URL that we have configured previously.
- 1.
To expose a local HTTPS server, download ngrok for Linux server from https://bin.equinox.io/c/4VmDzA7iaHb/ngrok-stable-linux-amd64.zip.
- 2.
The public URL is only available when the auth token is downloaded from https://dashboard.ngrok.com after signing up at https://ngrok.com/signup.
- 3.
The auth token must be specified to ngrok so that the client is bound to this account. ngrok saves the auth token in ~/.ngrok2/ngrok.yml so that there is no need to repeat this step.
- 4.
To unzip the downloaded ngrok files, run the following command on the terminal as shown in Figure 5-15.

Unzip ngrok
- 5.
Copy the auth token from the user account and add in the command. Run this command at the ngrok terminal prompt, as shown in Figure 5-16.
"ngrok authtoken <AUTHTOKEN>"

ngrok configuration
- 6.
After the previous step the auth token will be saved to the configuration file.
- 7.
ngrok is a command-line application, so type ngrok http https://<IP>:<PORT> at this terminal prompt to expose the HTTPS URL. Here the IP and port settings correspond to the question answering API host and port on which the API is hosted, as shown in Figure 5-17.

Generate public URL
- 8.
After the execution of the command, the terminal will be displayed with the public URL https://44e2f215.ngrok.io corresponding to the local server URL as shown in Figure 5-18.

Public URL
For more details, please refer to the ngrok documentation at https://ngrok.com/docs.
Now, you can use the URL as highlighted in Figure 5-18. That is, <URL>/getResponse Flask is good for a development environment but not for production. For a production environment, the API should be hosted on Apache Server. Refer to the following URL for guidance on deploying a service on Apache Server in Linux.
- 1.
Create a file named QuestionAnsweringAPI.py.
- 2.
Copy the following code and paste it in that file, then save it.
- 3.
That code processes input passed to an API, calls the function get_answer_using_bert, and sends a response from this function as an API response.
- 4.
Open a command prompt and run the following command.
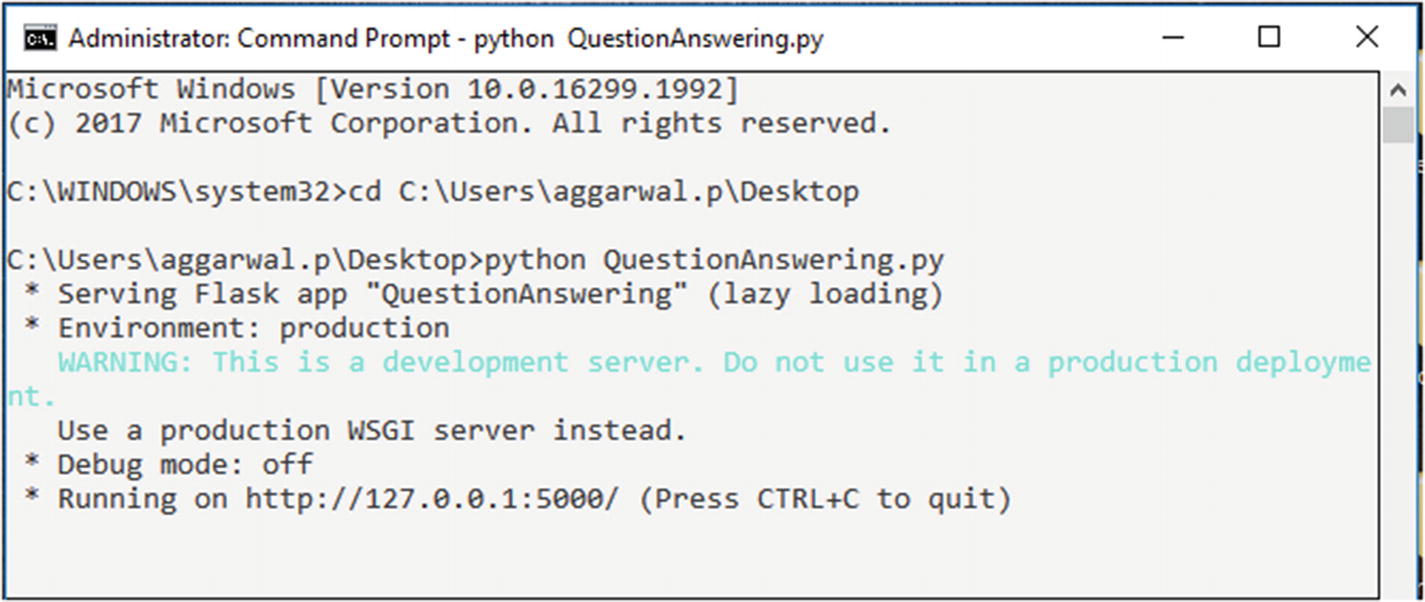
Python QuestionAnsweringAPI.py
This will start a service on http://127.0.0.1:5000/ as shown in Figure 5-19.

Service deployment.
- 5.
Now to test the Rest API, we are going to use Postman. This is a REST API client that is used to test the API URL. We can test any complex HTTP/s requests and can also read their responses. First, go to https://www.postman.com/downloads/ to download the Postman tool and install it on your system.
- 6.
After the installation, test following URL and sample request JSON that is being sent to the question answering API end and response JSON that will be received as a response from the API as shown in Figure 5-20.
URL: http://127.0.0.1:5000/questionAnswering

Calling question answering API
The codebase for this exercise can be downloaded from GitHub at https://github.com/bertbook/Python_code/tree/master/Chapter5/QuestionAnsweringSystem.
Open-Domain Question Answering System
An ODQA system aims to find an exact answer to any question from Wikipedia articles. Thus, for a question, this system will provide a relevant answer. The default implementation of an ODQA system processes a batch of queries as an input and returns the answer.
Model Architecture
The architecture of the DeepPavlov ODQA system consists of two components: a ranker and a reader. To find an answer to any question, the ranker first retrieves a list of relevant articles from the collection of documents, and then the reader scans them to identify an answer.

The DeepPavlov-based ODQA system architecture
- 1.
Create a new Jupyter notebook and run the following command to install the deeppavlov library, as shown in Figure 5-22.
Installing deeppavlov library
- 2.
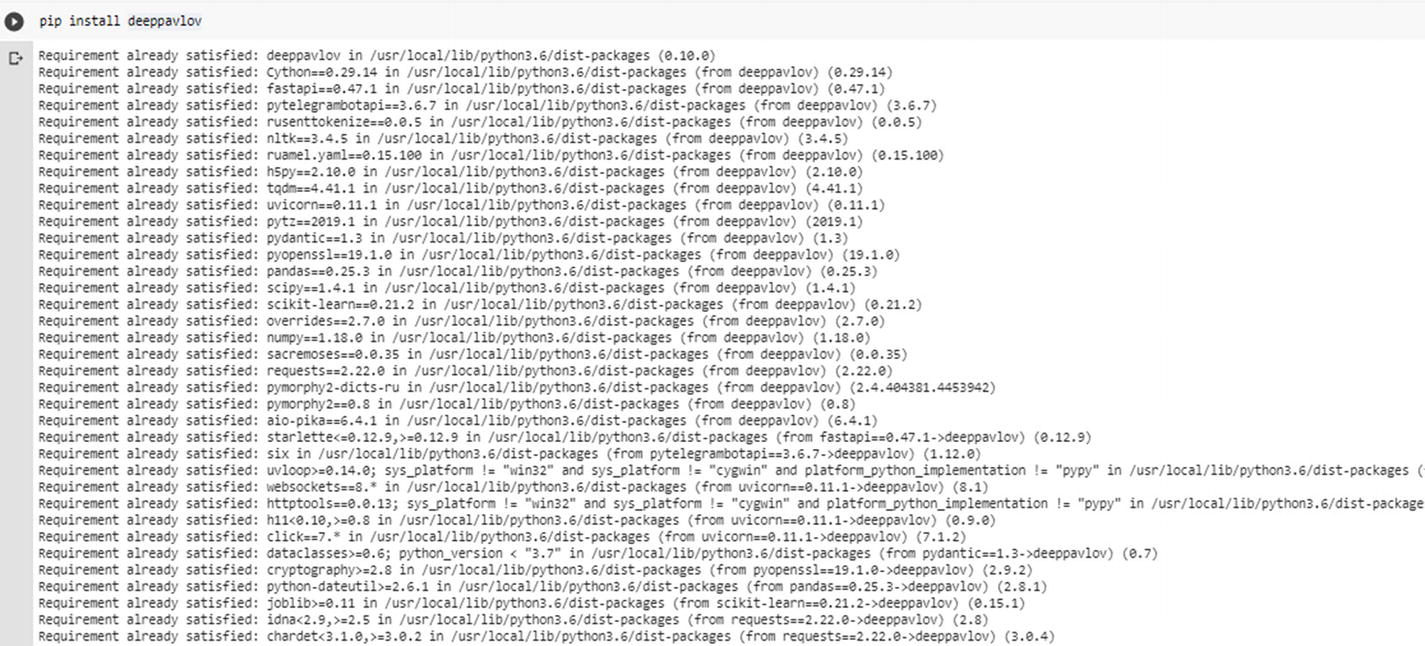
Run the following command to install all required models, vocabulary, and so on, trained on the Wikipedia corpus in the English language, as shown in Figure 5-23.
Please use the ‘!’ symbol before the installation command as just shown if you are working with Colab Notebook.

Installing required packages for deeppavlov
- 3.
Perform the necessary imports required for this implementation as shown here.
- 4.Then we will get an ODQA model using the build_model class of the deeppavlov library. It takes two arguments:
config file path: Define the name of the config file that contains details of the relevant NLP model to be used. For this case, we will use en_odqa_infer_wiki. This name implies the ODQA model from Wikipedia.
download: This will be True if the model needs to be downloaded and False otherwise.
- 5.
Once the ODQA model has been loaded, you can test this model by providing questions such as “Who is Virat Kohli?” as shown here.
- 1.
Create a file named OpenDomainQuestionAnsweringAPI.
- 2.
Copy the following code and paste it in that file, then save it.
- 3.
This code processes input passed to an API, calls a function odqa_deeppavlov, and sends a response from this function as an API response.
- 4.
Open a command prompt and run the following command.
Python OpenDomainQuestionAnsweringAPI.py
This will start a service on http://127.0.0.1:5000/ as shown in Figure 5-24.
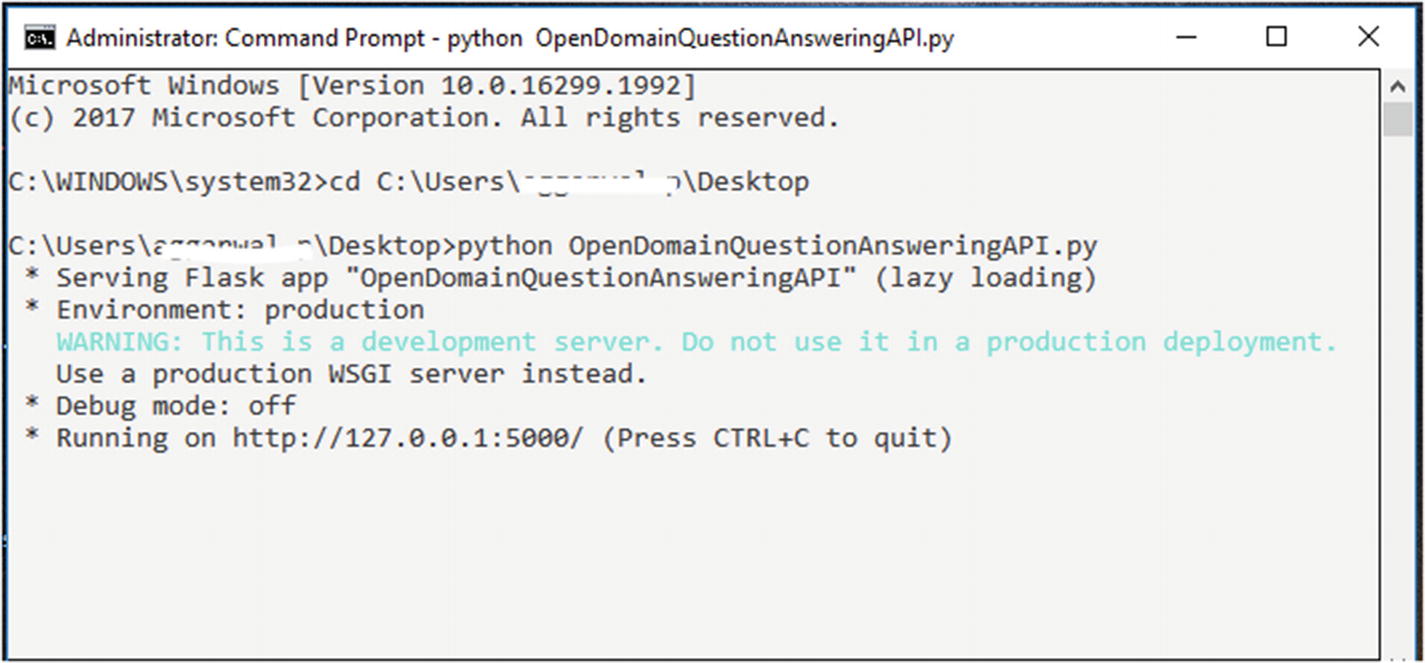
Service deployment
- 5.
Now, to test this API, Postman can be used. Please refer to the following URL and sample request JSON that is being provided to the question answering API and response JSON that will be received as a response from API, as shown in Figure 5-25.
URL: http://127.0.0.1:5000/opendomainquestionAnswering
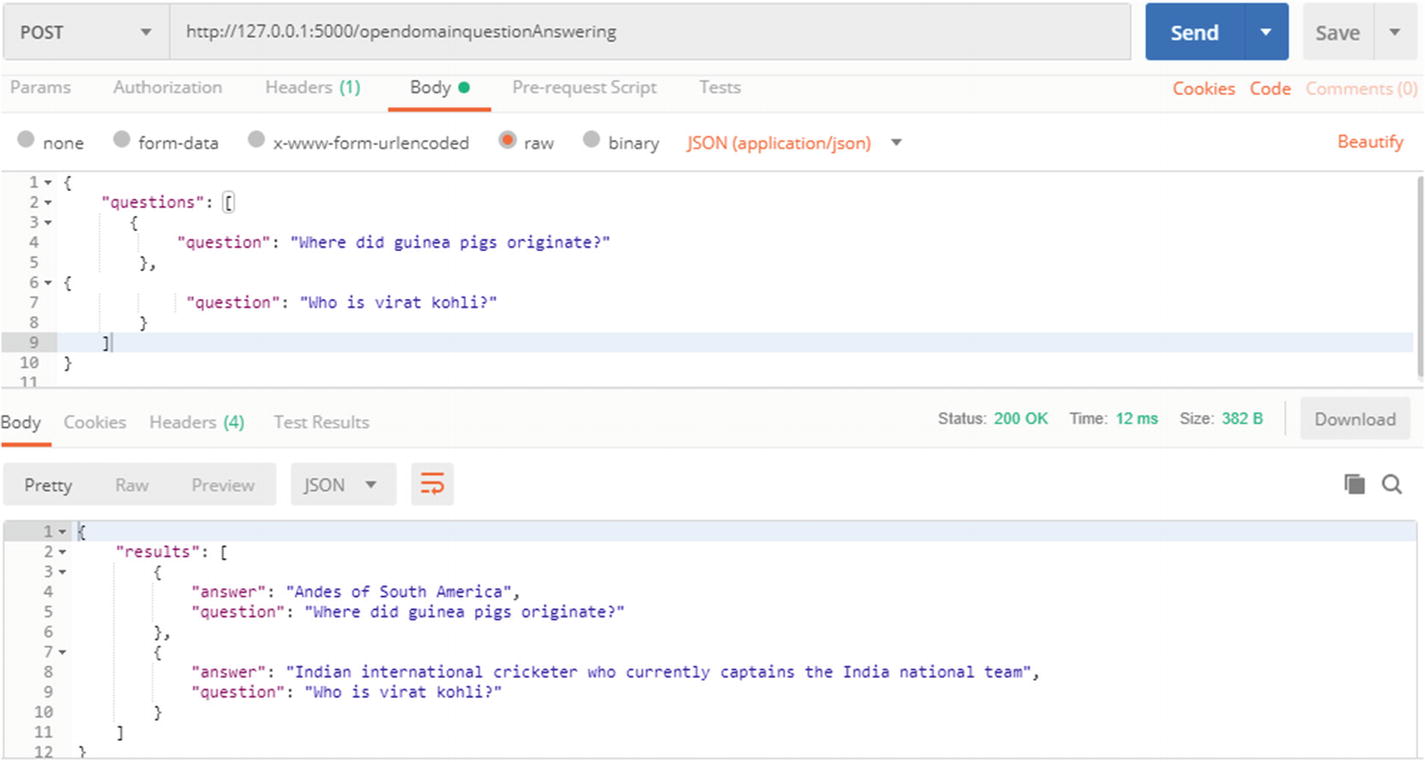
Calling the ODQA system API
The codebase for this exercise can be downloaded from GitHub at https://github.com/bertbook/Python_code/tree/master/Chapter5/OpenDomainQuestionAnsweringSystem.
DeepPavlov QA System
In the previous section , we discussed how an ODQA system that has been trained on Wikipedia documents can be used to answer factoid and non-factoid questions. Next, we look at how DeepPavlov can be used for an implementation of a contextual-based question answering system where an answer to the question exists in context. As an example, consider the following context and question from a Wikipedia article.
Context: In 1888, The Football League was founded in England, becoming the first of many professional football competitions. During the 20th century, several of the various kinds of football grew to become some of the most popular team sports in the world.
Question: In which year was the Football League founded?
Answer: 1888
- 1.
Create a new Jupyter notebook and run the following command to install the deeppavlov library.
- 2.
Run the following command to install all required models, vocabulary, and so on.
Please use the ‘!’ symbol before the installation command as just shown if you are working with Colab Notebook.
- 3.
Import the required packages as shown here.
- 4.Then we will get the BERT model using the build_model class of the deeppavlov library. It takes two arguments:
config file path: Define the name of the config file that contains details of the relevant NLP model to be used. For this case, we will use squad_bert. This configuration contains all details for the specific BERT model that has been trained over the SQuAD dataset.
download: This is True if the model needs to be downloaded and False otherwise.
- 5.
Once the BERT model has been loaded, you can test it by providing a question along with the context to extract an answer, as shown here.
- 6.
The output of this code snippet will be the answer extracted from the context for the question asked.
- 1.
Create a file named DeepPavlovQASystemAPI.
- 2.
Copy the following code and paste in that file, then save it.
- 3.
This code processes input passed to an API, calls a function qa_deeppavlov, and sends a response from this function as an API response.
- 4.
Open a command prompt and run the following command.

Service deployment
- 5.
Now, to test this API, Postman can be used. Please refer to the following URL and sample request JSON that is being provided to the DeepPavlov QA API end and response JSON that will be received as a response from the API as shown in Figure 5-27.
URL: http://127.0.0.1:5000/qaDeepPavlov
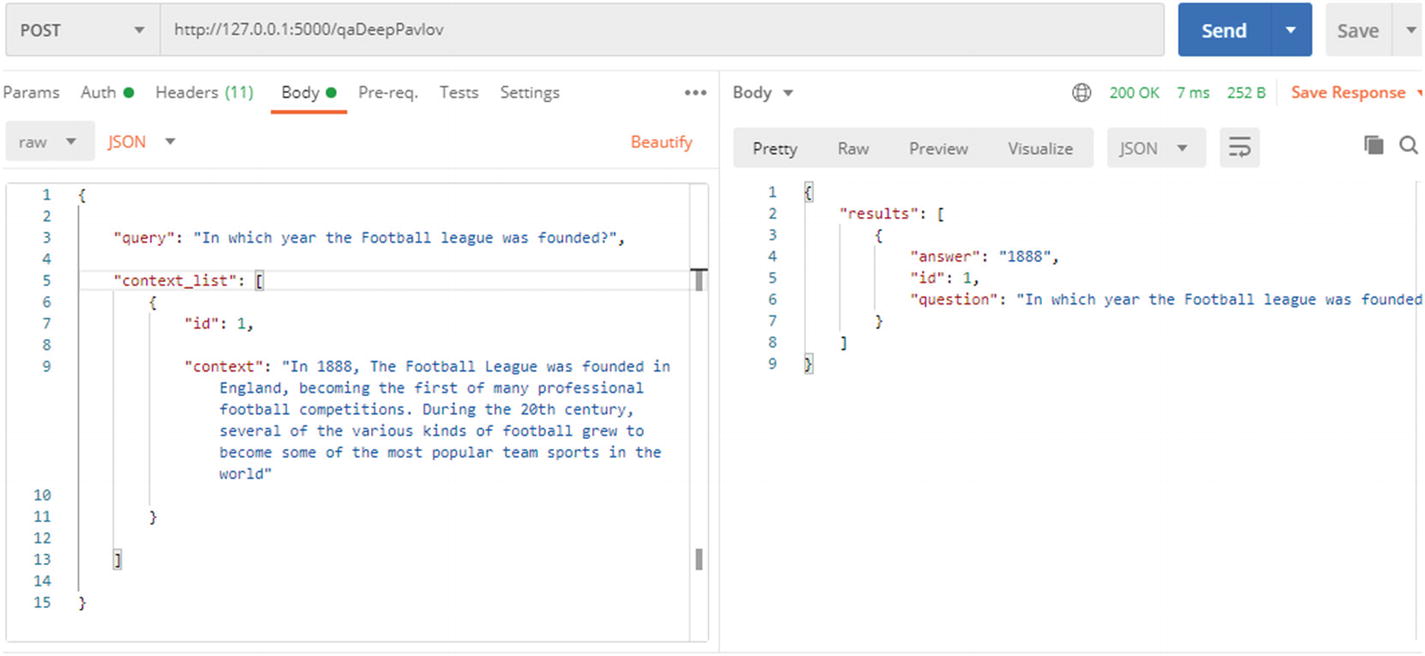
Calling DeepPavlov QA system API
The codebase for this exercise can be downloaded from GitHub at https://github.com/bertbook/Python_code/tree/master/Chapter5/DeeppavlovQASystem.
Conclusion
This chapter covered the question answering system, which is one of the important applications of the BERT model. We learned about types of question answering Systems like CDQA and ODQA. We built a question answering system using BERT and deployed it as an API for use by a third-party system. In the next chapter, we look at how BERT is used in other NLP tasks.