Chapter 11. Project Risk Management: Planning for the unknown

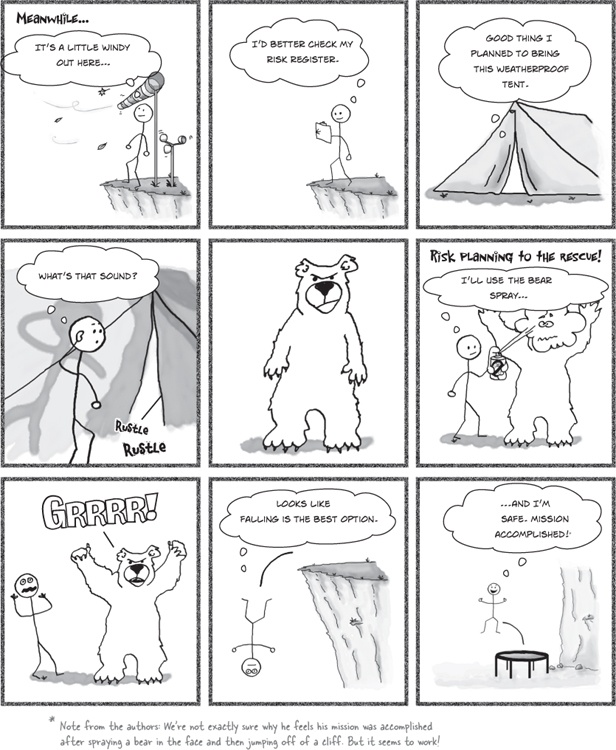
Even the most carefully planned project can run into trouble. No matter how well you plan, your project can always run into unexpected problems. Team members get sick or quit, resources that you were depending on turn out to be unavailable—even the weather can throw you for a loop. So does that mean that you’re helpless against unknown problems? No! You can use risk planning to identify potential problems that could cause trouble for your project, analyze how likely they’ll be to occur, take action to prevent the risks you can avoid, and minimize the ones that you can’t.
What’s a risk?
There are no guarantees on any project! Even the simplest activity can run into unexpected problems. Any time there’s anything that might occur on your project and change the outcome of a project activity, we call that a risk. A risk can be an event (like a fire), or it can be a condition (like an important part being unavailable). Either way, it’s something that may or may not happen...but if it does, you will be forced to change the way you and your team work on the project.
A risk is any uncertain event or condition that might affect your project.
How you deal with risk
When you’re planning your project, risks are still uncertain: they haven’t happened yet. But eventually, some of the risks that you plan for do happen. And that’s when you have to deal with them. There are four basic ways to handle a risk:
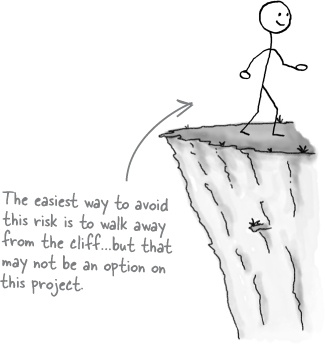
Avoid
The best thing that you can do with a risk is avoid it—if you can prevent it from happening, it definitely won’t hurt your project.
Mitigate
If you can’t avoid the risk, you can mitigate it. This means taking some sort of action that will cause it to do as little damage to your project as possible.
Transfer
One effective way to deal with a risk is to pay someone else to accept it for you. The most common way to do this is to buy insurance.
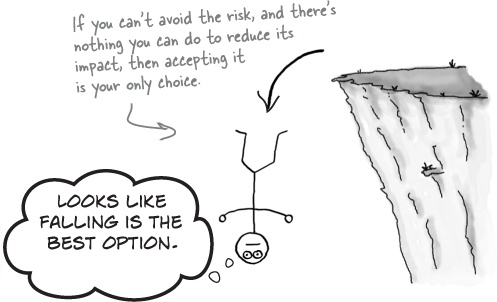
Accept
When you can’t avoid, mitigate, or transfer a risk, then you have to accept it. But even when you accept a risk, at least you’ve looked at the alternatives and you know what will happen if it occurs.


Plan Risk Management
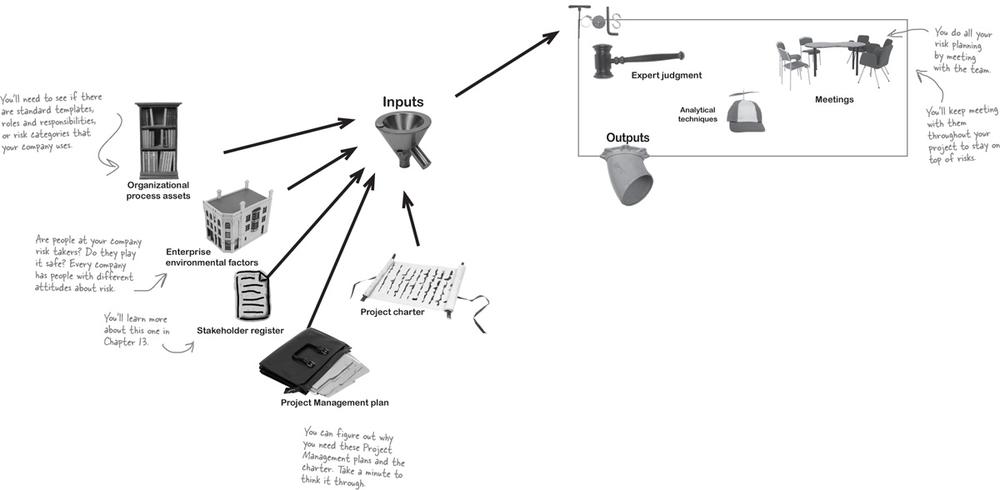
By now, you should have a pretty good feel for how each of the planning processes work. The past few knowledge areas started out with their own planning process, and Risk Management is no different. You start with the Plan Risk Management process, which should look very familiar to you.
Note
By the time a risk actually occurs on your project, it’s too late to do anything about it. That’s why you need to plan for risks from the beginning and keep coming back to do more planning throughout the project.

Planning process group
Watch it!
Are you starting to see a pattern here?
You may get a question on the exam that asks which processes use organizational process assets! Think about why you need them for Plan Risk Management and the other planning processes. That should help you remember which processes need them.
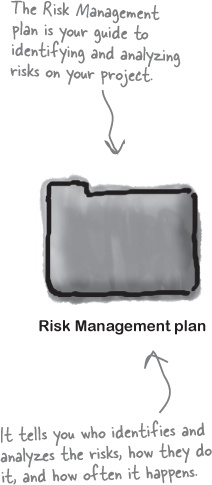
The Risk Management plan is the only output
It tells you how you’re going to handle risk on your project—which you probably guessed, since that’s what management plans do. It says how you’ll assess risk on the project, who’s responsible for doing it, and how often you’ll do risk planning (since you’ll have to meet about risk planning with your team throughout the project).
The plan has parts that are really useful for managing risk:
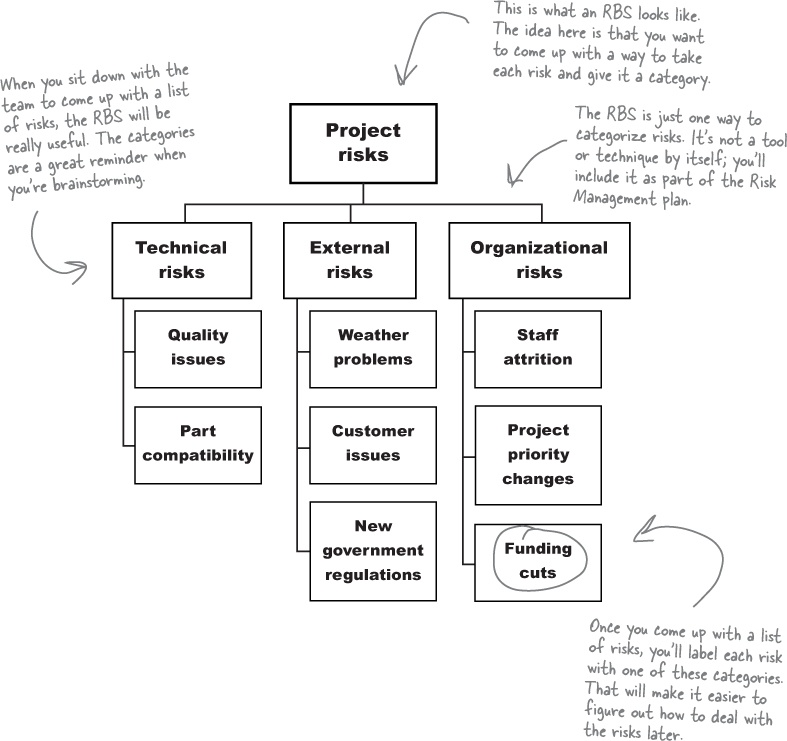
Use a risk breakdown structure to categorize risks
You should build guidelines for risk categories into your Risk Management plan, and the easiest way to do that is to use a risk breakdown structure (RBS). Notice how it looks a lot like a WBS? It’s a similar idea—you come up with major risk categories, and then decompose them into more detailed ones.
Take a look at how each of these project risks is handled and figure out if the risk is being avoided, mitigated, transferred, or accepted.
Stormy weather and high winds could cause very slippery conditions, so you put up a tent and wear slip-resistant footwear to keep from losing your footing.
You buy a surge protector to make sure a lightning strike won’t blow out all of your equipment.
Flooding could cause serious damage to your equipment, so you buy an insurance policy that covers flood damage.
The manufacturer issues a warning that the safety equipment you are using has a small but nonzero probability of failure under the conditions that you’ll be facing. You replace it with more appropriate equipment.
A mud slide would be very damaging to your project, but there’s nothing you can do about it.
A team member discovers that the location you planned on using is in a county that is considering regulations that could be expensive to comply with. You work with a surveying team to find a new location.
Surrounding geological features could interfere with your communications equipment, so you bring a flare gun and rescue beacon in case it fails.
Answers:
Mitigated
Mitigated
Transferred
Avoided
Accepted
Mitigated
Anatomy of a risk
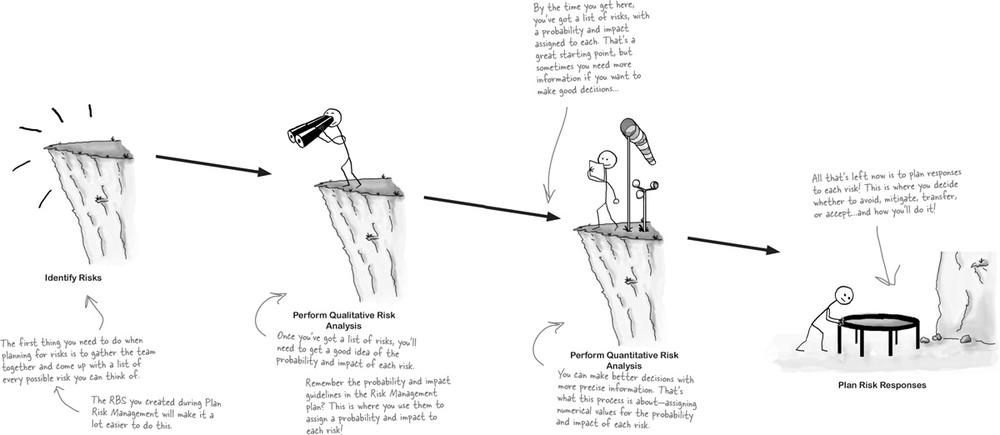
Once you’re done with Plan Risk Management, there are four more Risk Management processes that will help you and your team come up with the list of risks for your project, analyze how they could affect it, and plan how you and your team will respond if any of the risks materialize when you’re executing it.
Note
There are two more Risk Management processes. You already saw Plan Risk Management. There’s also a Monitoring and Controlling process called Control Risks that you use when a risk actually materializes.
All four of these Risk Management processes are in the Planning process group—you need to plan for your project’s risks before you start executing the project.
What could happen to your project?
You can’t plan for risks until you’ve figured out which ones you’re likely to run into. That’s why the next Risk Management process is Identify Risks. The idea is that you want to figure out every possible risk that might affect your project. Don’t worry about how unlikely the risk is, or how bad the impact would be—you’ll figure that stuff out later.
Planning process group
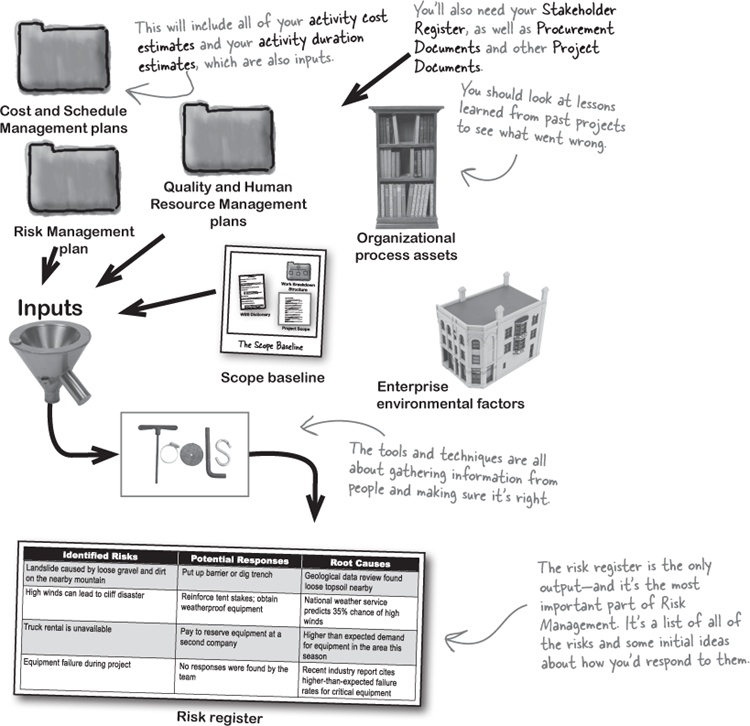
The goal of all of the risk planning processes is to produce the risk register. That’s your main weapon against risk.
Information-gathering techniques for Identify Risks
You probably already guessed that the goal of Identify Risks is to identify risks—seems pretty obvious, right? And the most important way to identify those risks is to gather information from the team. That’s why the first—and most important—technique in Identify Risks is called information gathering techniques. These are time-tested and effective ways to get information from your team, stakeholders, and anyone else who might have information on risks.
Four useful information gathering techniques

There are a lot of different ways that you can find risks on your project. But there are only a few that you’re most likely to use—and those are the ones that you will run across on the exam.
Brainstorming is the first thing you should do with your team. Get them all together in a room, and start pumping out ideas. Brainstorming sessions always have a facilitator to lead the team and help turn their ideas into a list of risks.
Note
The facilitator is really important—without her, it’s just a disorderly meeting with no clear goal.
Interviews are a really important part of identifying risk. Try to find everyone who might have an opinion and ask them about what could cause trouble on the project. The sponsor or client will think about the project in a very different way than the project team.
Note
The team usually comes up with risks that have to do with building the product, while the sponsor or someone who would use the product will think about how it could end up being difficult to use.
The Delphi technique is a way to get opinions and ideas from experts. This is another technique that uses a facilitator, but instead of gathering team members in a room, the facilitator sends questionnaires to experts asking about important project risks. The facilitator will then take those answers and circulate them all to the experts—but each expert is kept anonymous so that they can give honest feedback.
Note
The Delphi technique is always anonymous. People will give more honest opinions if they know their names won’t be attached to them.
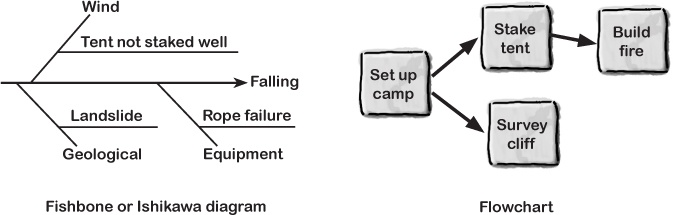
Root cause identification is analyzing each risk and figuring out what’s actually behind it. Even though falling off of the cliff and having your tent blow away are two separate risks, when you take a closer look you might find that they’re both caused by the same thing: high winds, which is the root cause for both of them. So you know that if you get high winds, you need to be on the lookout for both risks!
More Identify Risks techniques
Even though gathering information is the biggest part of Identify Risks, it’s not the only part of it. There are other tools and techniques that you’ll use to make sure that the risk register you put together lists as many risks as possible. The more you know about risk going into the project, the better you’ll handle surprises when they happen. And that’s what these tools and techniques are for—looking far and wide to get every risk possible.
Documentation reviews are when you look at plans, requirements, documents from your organizational process assets, and any other relevant documents that you can find to squeeze every possible risk out of them.
Assumptions analysis is what you’re doing when you look over your project’s assumptions. Remember how important assumptions were when you were estimating the project? Well, now it’s time to look back at the assumptions you made and make sure that they really are things you can assume about the project. Wrong assumptions are definitely a risk.
Note
The team made assumptions during planning to deal with incomplete information...and there’s a risk that each assumption could turn out to be wrong.

Checklist analysis means using checklists that you developed specifically to help you find risks. Your checklist might remind you to check certain assumptions, talk to certain people, or review documents you might have overlooked.
Note
The RBS you created in Plan Risk Management is a good place to start for this. You can use all the risks you categorized in it as a jumping-off point.
SWOT analysis lets you analyze strengths, weaknesses, opportunities, and threats. You’ll start by brainstorming strengths and weaknesses, and then examine the strengths to find opportunities, and you’ll look at the weaknesses to come up with threats to the project.
Diagramming techniques should be pretty familiar to you already. You can use the Ishikawa or fishbone diagrams from Quality Management to help you find the root cause of a risk, just like you did for a defect. You can also use flowcharts to see how parts of your system interact—any place where they get complex or uncertain is a good source of risks.
Expert judgment lets you rely on past experience to identify risks.
Where to look for risks
A good way to understand risks for the exam is to know where they come from. If you start thinking about how you find risks on your project, it will help you figure out how to handle them.
Here are a few things to keep in mind when you’re looking for risks:
RESOURCES ARE A GOOD PLACE TO START.
Have you ever been promised a person, equipment, conference room, or some other resource, only to be told at the last minute that the resource you were depending on wasn’t available? What about having a critical team member get sick or leave the company at the worst possible time? Check your list of resources. If a resource might not be available to you when you need it, then that’s a risk.
THE CRITICAL PATH IS FULL OF RISKS.
Remember the critical path method from Chapter 6? Well, an activity on the critical path is a lot riskier than an activity with plenty of float, because any delay in that activity will delay the project.
”WHEN YOU ASSUME...”
Have you ever heard that old saying about what happens when you assume? At the beginning of the project, your team had to make a bunch of assumptions in order to do your estimates. But some of those assumptions may not actually be true, even though you needed to make them for the sake of the estimate. It’s a good thing you wrote them down—now it’s time to go back and look at that list. If you find some of them that are likely to be false, then you’ve found a risk.
LOOK OUTSIDE YOUR PROJECT.
Is there a new rule, regulation, or law being passed that might affect your project? A new union contract being negotiated? Could the price of a critical component suddenly jump? There are plenty of things outside of your project that are risks—and if you identify them now, you can plan for them and not be caught off guard.
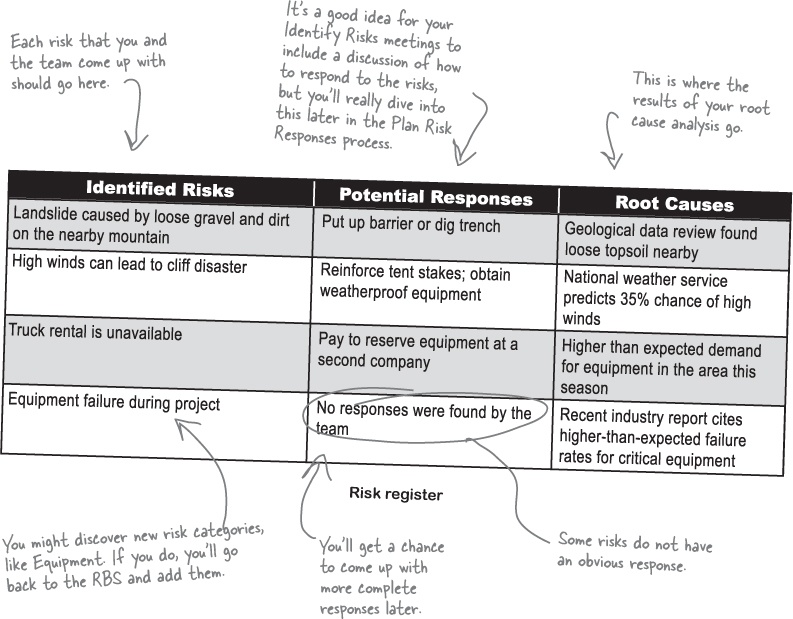
Now put it in the risk register

The point of the Identify Risks process is to...well, identify risks. But what does that really give you? You need to know enough about each risk to analyze it and make good decisions about how to handle it. So when you’re doing interviews, leading brainstorming sessions, analyzing assumptions, gathering expert opinions with the Delphi technique, and using the other Identify Risks tools and techniques, you’re gathering exactly the things you need to add to the risk register.
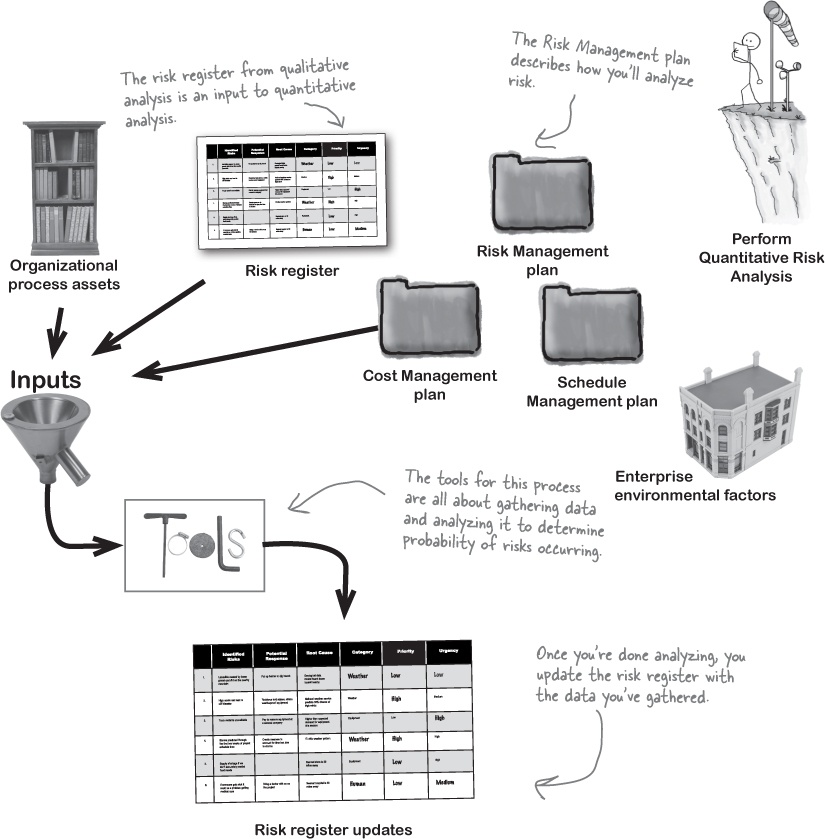
The risk register is built into the Risk Management plan. Updates to the risk register are the only output of the Identify Risks process.
Planning process group
Rank your risks
It’s not enough to know that risks are out there. You can identify risks all day long, and there’s really no limit to the number of risks you can think of. But some of them are likely to occur, while others are very improbable. It’s the ones that have much better odds of happening that you really want to plan for.
Besides, some risks will cause a whole lot of damage to your project if they happen, while others will barely make a scratch...and you care much more about the risks that will have a big impact. That’s why you need the next Risk Management process, Perform Qualitative Risk Analysis—so you can look at each risk and figure out how likely it is and how big its impact will be.

Brain Power
Why do you think enterprise environmental factors are an input to the Perform Qualitative Risk Analysis process?
Tools
Examine each risk in the register
Not all risks are created equal. Some of them are really likely to happen, while others are almost impossible. One risk will cause a catastrophe on your project if it happens; another will just waste a few minutes of someone’s time.
Risk data quality assessment means making sure that the information you’re using in your risk assessment is accurate. Sometimes it makes sense to bring in outside experts to check out the validity of your risk assessment data. Sometimes you can even confirm the quality of the data on your own, by checking some sample of it against other data sources.
Risk urgency assessment is checking out how soon you’re going to need to take care of a particular risk. If a risk is going to happen soon, you’d better have a plan for how to deal with it soon, too.
Expert judgment definitely comes in handy when you’re assessing risks. Who better to help you come up with things that might go wrong than experts who have been through similar projects before?
Risk probability and impact assessment is one of the best ways to be sure that you’re handling your risks properly by examining how likely they are to happen, and how bad (or good) it will be if they do. This process helps you assign a probability to the likelihood of a risk occurring, and then figure out the actual cost (or impact) if it does happen. You can use these values to figure out which of your risks need a pretty solid mitigation plan, and which can be monitored as the project goes on.
Note
Sometimes you’ll find that some risks have obviously low probability and impact, so you won’t put them in the main section of your register. Instead, you can add them to a separate section called the watchlist, which is just a list of risks. It’ll include risks you don’t want to forget about, but which you don’t need to track as closely. You’ll check your watchlist from time to time to keep an eye on things.
Probability and impact matrix is a table where all of your risks are plotted out according to the values you assign. It’s a good way of looking at the data so you can more easily make judgments about which risks require response. The ones with the higher numbers are more likely to happen and will have a bigger impact on your project if they do. So you’d better figure out how to handle those.
Risk categorization is all about grouping your risks so that you can come up with a better strategy for dealing with them. You might group them by the phase of the project where you’ll see them, or by the source of the risk. Or you could come up with a bunch of additional categories that would help you to organize your responses better and be ready for the risk if it should happen.
Perform Qualitative Risk Analysis helps you prioritize each risk and figure out its probability and impact.

Here are some facts about the cliff project that were uncovered during qualitative analysis. Update the risk register on the facing page with the appropriate information.
Risk | Probability | Impact |
1. Landslide | .1 | .9 |
2. Winds | .7 | .9 |
3. No truck | .3 | .7 |
4. Storms | .5 | .3 |
5. Supplies | .1 | .5 |
6. Illness | .1 | .7 |
Note
During the Perform Qualitative Risk Analysis sessions, the team assigned a probability and impact number to each of the risks on the facing page.
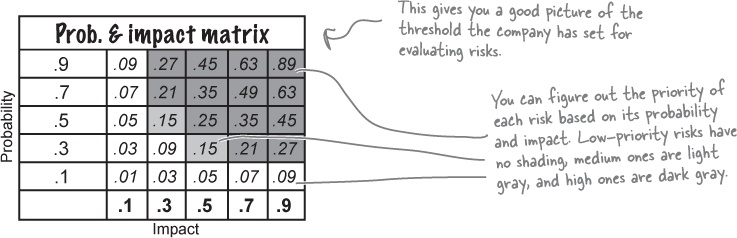
The organizational process assets at your company set a high-priority risk as any risk with a probability and impact score higher than 0.20. Medium-priority risks are those between 0.10 and 0.19, and low-priority are those between 0 and 0.09. Low-priority risks can be monitored on a watchlist, but high and medium ones must have a response strategy.
Fill in the missing values in the Priority and Probability columns in the risk register on the right, using the Probability and Impact matrix to figure out which ones are low, medium, or high. For example, we filled in “High” under Priority for row #3 by looking up risk (“No truck”) in the first table, finding the probability and impact values, and then using the Probability and Impact matrix. The probability is .3 and the impact is .7, so you can find the corresponding box in the matrix. Since it’s dark gray, its priority is high.
After analyzing your data, you came up with three risk categories for the project: natural, equipment, and human. Fill in the missing values in the Category column of the risk register with either “Natural,” “Equipment,” or “Human.” We started you out by filling in a few of them.
For this particular project, you’ll need the equipment at the start of the project, so any equipment risks are considered high urgency. Natural and human risks are all medium urgency, except for ones that have to do with storms, which you consider low urgency for this project because of limited mitigation potential.
Figure out the whether the urgency for each risk is low, medium, or high and fill in the Urgency column in the risk register.
Note
It’s OK for some responses to be blank—you’ll fill them in later during the Plan Risk Responses process.
Identified risks | Potential response | Root cause | Category | Priority | Urgency | |
1. | Landslide caused by loose gravel and dirt on the nearby mountain | Put up barrier or dig trench | Geological data review found loose topsoil nearby | |||
2. | High winds can lead to cliff disaster | Reinforce tent stakes; obtain weatherproof equipment | National Weather Service predicts 35% chance of high winds | Natural | Medium | |
3. | Truck rental is unavailable | Higher-than-expected demand for equipment this season | Equipment | High | ||
4. | Storms predicted through the first two weeks of project schedule time | Create reserves to account for time lost due to storms | El Niño weather pattern | Medium | Low | |
5. | Supply shortage if we don’t accurately predict food needs | Nearest store is 30 miles away | Equipment | |||
6. | If someone gets sick, it could be a problem getting medical care | Bring a doctor with us on the project | Nearest hospital is 50 miles away |
Outputs
Note
Qualitative analysis helps you figure out which risks are most important to your project’s success. When you’ve finished your analysis, you should have a risk register that tells you a lot more about what could go wrong.
The only output of Perform Qualitative Risk Analysis is project documents updates-including updates to the risk register.
Identified risks | Potential response | Root cause | Category | Priority | Urgency | |
1. | Landslide caused by loose gravel and dirt on the nearby mountain | Put up barrier or dig trench | Geological data review found loose topsoil nearby | Natural | Low | Medium |
2. | High winds can lead to cliff disaster | Reinforce tent stakes; obtain weatherproof equipment | National Weather Service predicts 35% chance of high winds | Natural | High | Medium |
3. | Truck rental is unavailable | Higher-than-expected demand for equipment this season | Equipment | High | High | |
4. | Storms predicted through the first two weeks of project schedule time | Create reserves to account for time lost due to storms | El Niño weather pattern | Natural | Medium | Low |
5. | Supply shortage if we don’t accurately predict food needs | Nearest store is 30 miles away | Equipment | Low | High | |
6. | If someone gets sick, it could be a problem getting medical care | Bring a doctor with us on the project | Nearest hospital is 50 miles away | Human | Low | Medium |
Qualitative vs. quantitative analysis
Let’s say you’re a fitness trainer, and your specialty is helping millionaires get ready for major endurance trials. You get paid the same for each job, but the catch is that you get paid only if they succeed. Which of these clients would you take on?
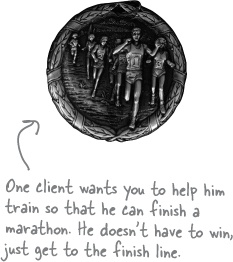

It’s much more likely that you can get even an out-of-shape millionaire to finish a marathon than it is that you can get him to climb Mount Everest successfully.
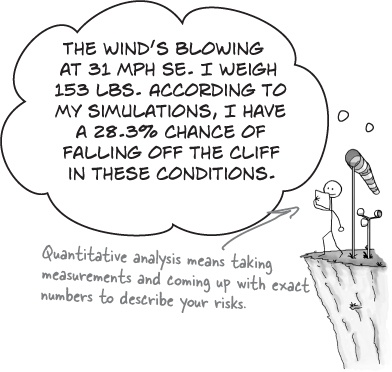
In fact, since the 1950s, 10,000 people have attempted to climb Mount Everest, and only 1,200 have succeeded. 200 have died. Your qualitative analysis probably told you that the climbing project would be the riskier of the two. But having the numbers to back up that judgment is what quantitative analysis is all about.
Perform Quantitative Risk Analysis
Once you’ve identified risks and ranked them according to the team’s assessment, you need to take your analysis a little further and make sure that the numbers back you up. Sometimes you’ll find that your initial assessment needs to be updated when you look into it further.
Planning process group
First gather the data...
Quantitative tools are broken down into three categories: the ones that help you get more information about risks, the ones that help you to analyze the information you have, and expert judgment to help you put it all together. The tools for gathering data focus on gathering numbers about the risks you have already identified and ranked. These tools are called data gathering and representation techniques.

Interviewing
Sometimes the best way to get hard data about your risks is to interview people who understand them. In a risk interview, you might focus on getting three-point cost estimates so that you can come up with a budget range that will help you mitigate risks later. Another good reason to interview is to establish ranges of probability and impact, and document the reasons for the estimates on both sides of the range.

Probability distribution
Sometimes taking a look at your time and cost estimate ranges in terms of their distribution will help you generate more data about them. You probably remember these distribution curves from your probability and statistics classes in school. Don’t worry, you won’t be asked to remember the formal definition of probability distributions or even to be able to create them. You just need to know that they are another way of gathering data for quantitative analysis.

Expert judgment
It’s always a good idea to contact the experts if you have access to them. People who have a good handle on statistics or risk analysis in general can be helpful when you are doing quantitative analysis. Also, it’s great to hear from anybody who has a lot of experience with the kind of project you are creating, too.
... then analyze it
Now that you have all the data you can get about your risk register, it’s time to analyze that information. Most of the tools for analyzing risk data are about figuring out how much the risk will end up costing you. These tools are called quantitative risk analysis and modeling techniques.
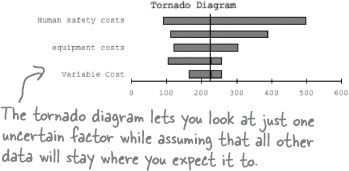
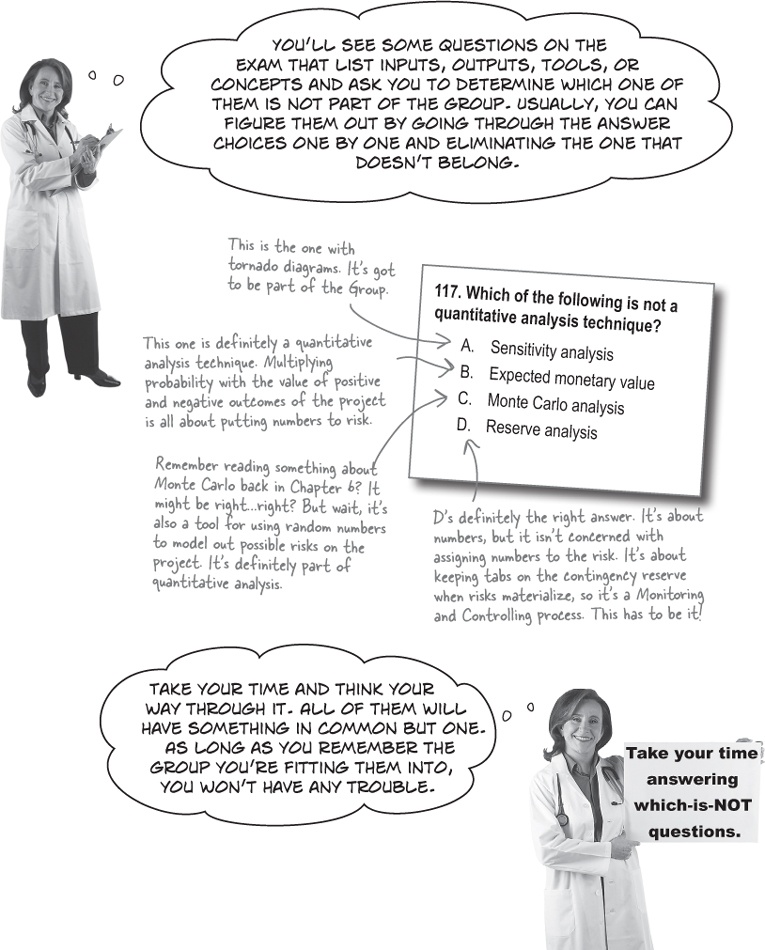
Sensitivity analysis is all about looking at the effect one variable might have if you could completely isolate it. You might look at the cost of a windstorm on human safety, equipment loss, and tent stability without taking into account other issues that might accompany the windstorm (like rain damage or possible debris from nearby campsites). People generally use tornado diagrams to look at a project’s sensitivity to just one risk factor.
Expected monetary value analysis lets you examine costs of all of the paths you might take through the project (depending on which risks occur) and assign a monetary value to each decision. So, if it costs $100 to survey the cliff and $20 to stake your tent, choosing to stake your tent after you’ve looked at the cliff has an expected monetary value of $120.
The main method of expected monetary value analysis you need to know for the test is decision tree analysis. For decision tree analysis, you just diagram out all of the decisions you think you will need to make to deal with risks. Then you add up all that you would need to spend to make each decision.
Modeling and simulation. It’s also a good idea to run your project risks through modeling programs if you can. Monte Carlo analysis is one tool that can randomize the outcomes of your risks and the probabilities of them occurring to help you get a better sense of how to handle the risks you have identified.

Calculate the expected monetary value of your risks
OK, so you know the probability and impact of each risk. How does that really help you plan? Well, it turns out that if you have good numbers for those things, you can actually figure out how much those risks are going to cost your project. You can do that by calculating the expected monetary value (or EMV) of each risk:
Start with the probability and impact of each risk.
Risk
Probability
Impact
High winds
35%
cost $48 to replace equipment
Mudslide
5%
lose $750 in damage costs
Wind generator is usable
15%
save $800 in battery costs
Truck rental unavailable
10%
cost $350 for last-minute rental
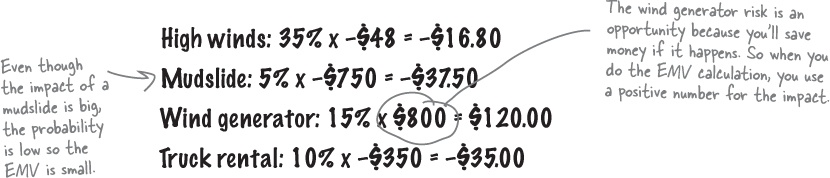
Take the first risk and multiply the probability by the impact. For opportunities, use a positive cost. For threats, use a negative one. Then do the same for the rest of the risks.
Now that you’ve calculated the EMV for each of the risks, you can add them up to find the total EMV for all of them.

You’ll need to know how to do EMV calculations for the test. Give them a shot now—they’re pretty easy once you get the hang of them.
Take a look at this table of risks.
Risk | Probability | Impact |
Navigation equipment failure | 15% | costs $300 due to getting lost |
Unseasonably warm weather | 8% | saves $500 in excavation costs |
Wild animals eat rations | 10% | costs $100 for replacements |
Calculate the EMV for each of these three risks.
If these are the only risks on the project, calculate the total EMV.
The latest weather report came out, and there is now a 20% chance of unseasonably warm weather. What’s the new EMV for the project?
Now the cost of replacement rations goes up to $150. What’s the new EMV for the project?
 Answers in Sharpen your pencil Solution.
Decision tree analysis uses EMV to help you make choices
There’s another way to do EMV—you can do it visually using something called a decision tree. This decision tree shows the hidden costs of whether or not you buy a heavier tent. The tent is more expensive—it costs $350, while the lighter tent costs $130. But the heavier tent has better protection against the wind, so if there are high winds, your equipment isn’t damaged.

What’s the EMV—or how much it’s likely to cost you—of choosing the heavier tent?
Note
If we add the EMV for high winds plus the EMV for low winds to the cost of the tent, we’ll figure out the “real” cost of choosing the heavier tent. So that’s -$16.80 + -$6.50 + -$350 = -$373.30.
Compare that with the EMV of choosing the lighter tent. Which decision makes sense?
Note
We can do the same thing for the bottom two branches of the tree. The “cheaper” tent costs -$130 + -$333.55 + -$9.75 = $473.30. So it’s actually more expensive!
Looking at the decision tree on the facing page, see if you can figure out the expected monetary value depending on the decisions the team makes.
You hear a weather report that says there’s now a 45% chance of high winds. Does it still make sense to buy the heavier tent?
If you don’t buy the heavier tent, then you have room to take along a wind generator that can power your equipment, and that will save you $1,100 in portable batteries if there’s a heavy wind. If there’s still a 45% chance of high winds, does it still make sense to buy the heavier tent?
Answers in Exercise Solution.
Outputs
Update the risk register based on your quantitative analysis results
When you’ve finished gathering data about the risks, you change your priorities, urgency ratings and categories (if necessary), and you update your risk register. Sometimes modeling out your potential responses to risk helps you to find a more effective way to deal with them. That’s why the only output of the Perform Quantitative Risk Analysis is Project Documents Updates.

Your risk register should include both threats and opportunities. Opportunities have positive impact values, while threats have negative ones. Don’t forget the plus or minus sign when you’re calculating EMV.
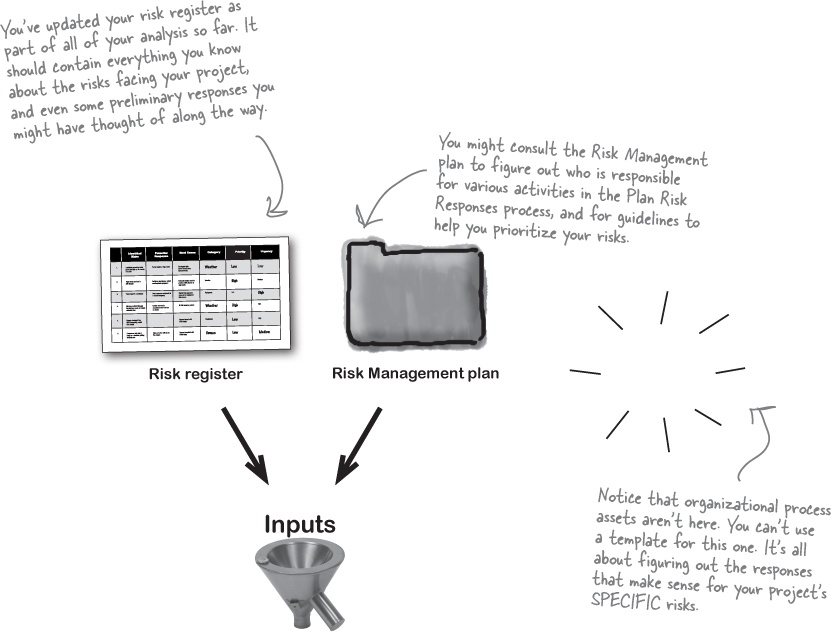
How do you respond to a risk?
After all that analysis, it’s time to figure out what you’re going to do if a risk occurs. Maybe you’ll be able to keep a reserve of money to handle the cost of the most likely risks. Maybe there’s some planning you can do from the beginning to be sure that you avoid it. You might even find a way to transfer some of the risk with an insurance policy.
However you decide to deal with each individual risk, you’ll update your risk responses in the risk register to show your decisions when you’re done. When you’re done with Plan Risk Responses, you should be able to tell your change control board what your response plans are and who will be in charge of them so they can use them to evaluate changes.
Planning process group
Plan Risk Responses is figuring out what you’ll do if risks happen.
It isn’t always so bad
Remember the strategies for handling negative risks—avoid, mitigate, transfer, and accept—from earlier? Well, there are strategies for handling positive risks, too. The difference is that strategies for positive risks are all about how you can try to get the most out of them. The strategies for handling negative and positive risks are the tools and techniques for the Plan Risk Responses process.
Tools
Note
The strategies for negative risks are also tools and techniques for this process. They’re the ones you already learned: avoid, mitigate, transfer, and accept. Acceptance is a technique for both negative and positive risks.
Exploit
This is when you do everything you can to make sure that you take advantage of an opportunity. You could assign your best resources to it. Or you could allocate more than enough funds to be sure that you get the most out of it.
Share
Sometimes it’s harder to take advantage of an opportunity on your own. Then you might call in another company to share in it with you.
Enhance
This is when you try to make the opportunity more probable by influencing its triggers. If getting a picture of a rare bird is important, then you might bring more food that it’s attracted to.
Accept
Just like accepting a negative risk, sometimes an opportunity just falls in your lap. The best thing to do in that case is to just accept it!
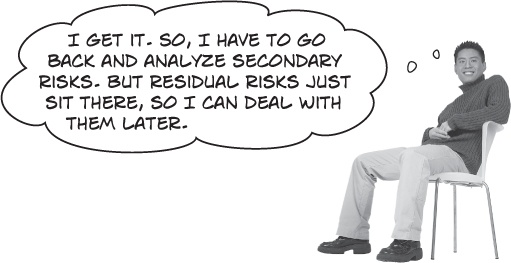
Response planning can even find more risks
Secondary risks come from a response you have to another risk. If you dig a trench to stop landslides from taking out your camp, it’s possible for someone to fall into the trench and get hurt.
Residual risks remain after your risk responses have been implemented. So even though you reinforce your tent stakes and get weatherproof gear, there’s still a chance that winds could destroy your camp if they are strong enough.
Which risk response technique is being used in these situations? Match each technique to its scenario.
Mitigate | If the weather’s good, then there’s a chance you could see a meteor shower. If the team gets a photo that wins the meteor photo contest, you can get extra funding. You have your team stay up all night with their telescopes and cameras ready. |
Avoid | You hear that it’s going to rain for the first three days of your trip, so you bring waterproof tents and indoor projects for the team to work on in the meantime. |
Accept | You read that there’s a major bear problem in the spring on the cliff where you are planning to work. You change your project start date to happen in the fall. |
Transfer | On your way up the cliff, you meet another team that is looking to survey the area. You offer to do half of the surveying work while they do the other half and then trade your findings with each other. |
Exploit | There’s a high probability of water damage to some of your equipment, so you buy insurance to avoid losses. |
Share | There’s always the chance that someone could make a mistake and fall off the cliff. No matter how much you plan for the unexpected, sometimes mistakes happen. |
Enhance | About 10 years ago a really rare bird, the black-throated blue warbler, was seen on this cliff. If you could get a picture of it, it would be worth a lot of money. So, you bring special seeds that you have read are really attractive to this bird, and you set up lookout points around the cliff with cameras ready to get the shot. |
![]() Answers in What my purpose.
Answers in What my purpose.
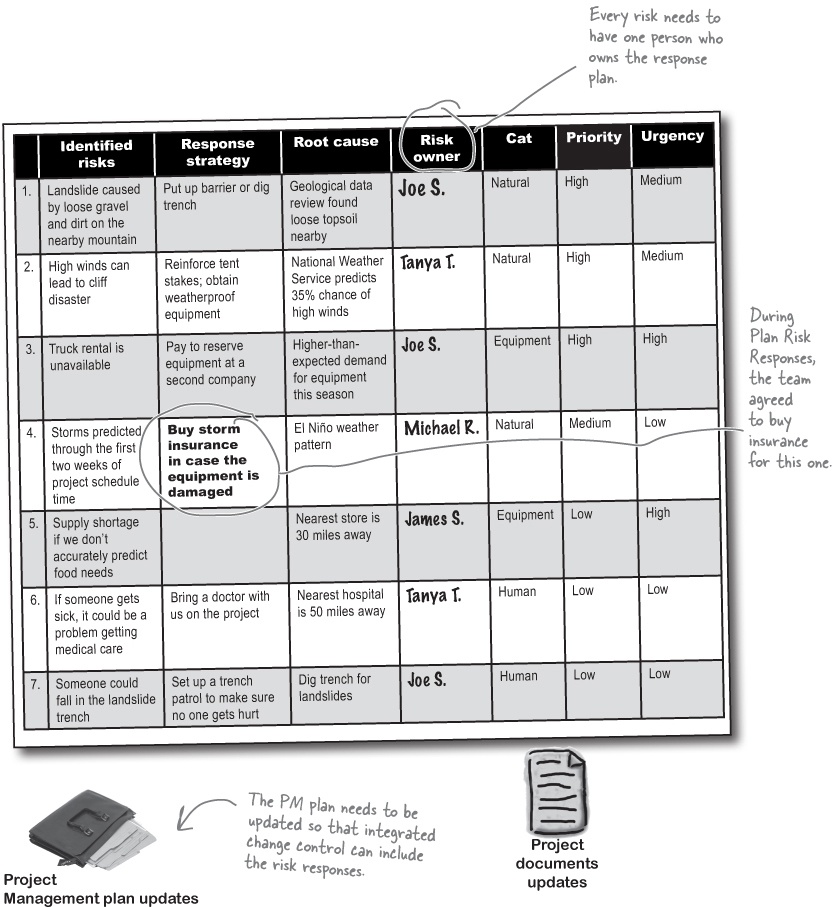
Add risk responses to the register
It’s time to add—you guessed it—more updates to project documents, including the risk register. All of your risk responses will be tracked through change control. Changes that you need to make to the plan will get evaluated based on your risk responses, too. It’s even possible that some of your risk responses will need to be added into your contract.
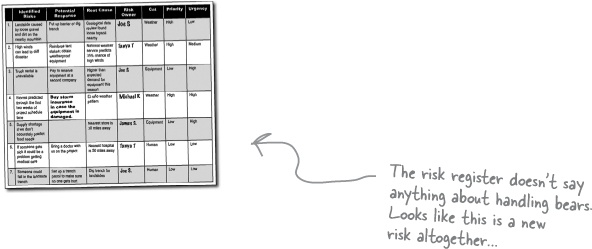
You can’t plan for every risk at the start of the project
Even the best planning can’t predict everything—there’s always a chance that a new risk could crop up that you hadn’t thought about. That’s why you need to constantly monitor how your project is doing compared to your risk register. If a new risk happens, you have a good chance of catching it before it causes serious trouble. When it comes to risk, the earlier you can react, the better for everybody. And that’s what the Control Risks process is all about.

Monitoring & Controlling process group

Control Risks is another change control process
Risk responses are treated just like changes. You monitor the project in every status meeting to see how the risks in the risk register are affecting it. If you need to implement a risk response, you take it to your change control board, because it amounts to a change that will affect your project constraints.
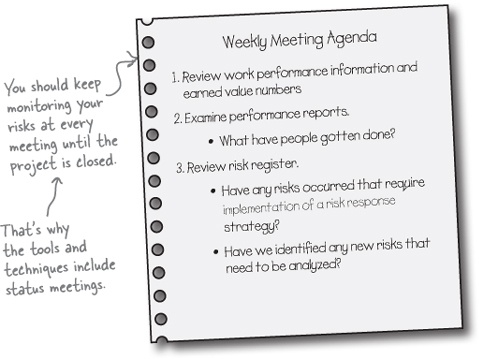
Risk monitoring should be done at every status meeting.
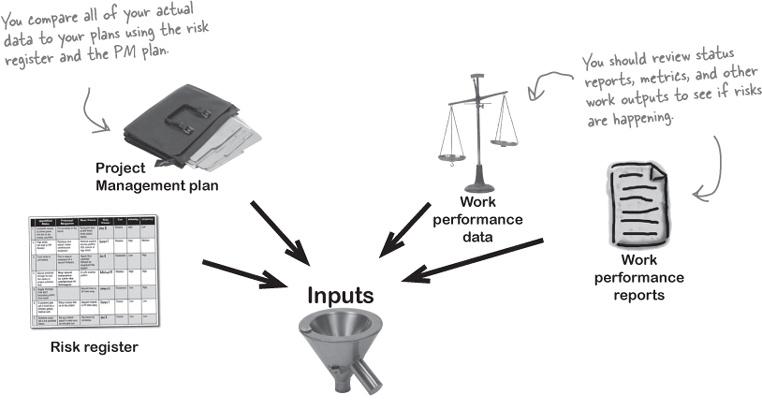
How to control your risks
Controlling risks means keeping your finger on the pulse of the project. If you are constantly reviewing all of the data your project is producing, you will be able to react quickly if a new risk is uncovered, or if it looks like one of your response strategies needs to spring into action. Without careful monitoring, even your best plans won’t get implemented in time to save your project if a risk happens.
Tools
Risk reassessment
You should have some regularly scheduled reassessment meetings to go over all of the information you have to date and see if your risk register still holds true. In a reassessment, your main goal is to find any new risks that have come up. That’s why it’s important to reassess your risk register every so often, and be sure that all of the risks in it are still the right ones.

Variance and trend analysis
Comparing the actual project performance to the plan is a great way to tell if a risk might be happening. If you find that you’re significantly over budget or behind schedule, a risk could have cropped up that you didn’t take into account. Looking for trends in your defects or schedule variance, for example, might show patterns that indicate that risks have occurred before you would have found that out on your own.

Reserve analysis
Just like you keep running tabs on your budget, you should always know how much money you have set aside for risk response. As you spend it, be sure to subtract it so you know if you have enough to cover all of your remaining risks. If you start to see that your reserves are running low and there are still a lot of risks being identified, you might be in trouble. Keeping tabs on your reserves means that you will always know if you need to set aside more funds or make different choices about how to handle risks as they come up.

More control risk tools and techniques
There are just a few more tools in the Control Risks process. They’re all focused on finding new risks if they crop up, dealing with changes to the risks you’ve already planned for, and responding quickly to risks you know how to handle.
Tools
Risk audits are when you have an outside party come in and take a look at your risk response strategies to judge how effective they are. Sometimes risk audits will point out better ways of handling a specific risk so that you can change your response strategy going forward.
Never stop looking for new risks and adapting your strategies for dealing with them.
Technical performance measurement means comparing the performance of your project with its planned performance. So if you expected to hit a specific milestone, you could check performance information on your product at that time to see if it measured up to the plan. If not, that might indicate that there are risks you didn’t plan for.

Meetings are the most important way to keep the team up to date on risk planning—so important that they should happen throughout the entire project. The more you talk about risks with the team, the better. Every single status meeting should have risk review on the agenda. Status meetings are a really important way of noticing when things might go wrong, and of making sure that you implement your response strategy in time. It’s also possible that you could come across a new opportunity by talking to the team.

Here are some risk monitoring and control activities. Can you determine which of the tools is being used in each one?
At every milestone, you do a new round of Identify Risks and make sure that the risks in your risk register still apply to the project.
You check to make sure that you have all of the features developed in your project that you had planned when you reach the “feature complete” milestone. When you find that you are missing one of the planned features, you realize that a new risk has shown up—you missed one of the required features in your functional specification.
You take a look at the number of defects you have found in your project per phase and find that it is higher in your project than it has been in most other projects that the company is doing. You dig a little deeper and find some previously unplanned risks that have been causing trouble on your project.
Your company sends a risk expert in to take a look at your risk response strategies. She finds that you are missing a few secondary risks that might be caused by the responses you have planned. So you update your risk register to include the secondary risks.
You decide to implement a risk response that costs $4,000. You check to make sure that you have enough money to cover the rest of the risks that might happen from here on out in the project.
Answers:
1—Reassessment
2—Technical performance measurement
3—Trend analysis
4—Audit
5—Reserve analysis
The better you prepare for risks, the more secure your project is against the unknown.
By now, you know what comes out of a typical Monitoring and Controlling process. Draw in the missing outputs for Control Risks.


Question Clinic: The “which-is-NOT” question
Which risk response technique is being used in these situations? Match each technique to its scenario.

Sharing is when a project manager figures out a way to use an opportunity to help not just her project but another project or person as well.
Answer: D
Collaborating is a conflict resolution technique.
Answer: A
You use an RBS to figure out and organize your risk categories even before you start to identify them. Then you decompose the categories into individual risks as part of Identify Risks.
Answer: B
Your risk register should include watchlists of low-priority risks, and you should review those risks at every status meeting to make sure that none of them have occurred.
Answer: C
The expected monetary value (or EMV) of the weather risk is the probability (30%) times the cost ($12,000), but don’t forget that since it’s a risk, that number should be negative. So its EMV is 30% x –$12,000 = –$3,600. The building materials opportunity has an EMV of 20% x $5,000 = $1,000. Add them up and you get –$3,600 + $1,000 = –$2,600.
Answer: C
Using the Delphi technique, experts supply their opinions of risks for your project anonymously so that they each get a chance to think about the project without influencing each other.
Susan bought an insurance policy to cover cost overruns due to weather. She transferred the risk from her company to the insurance company.
Answer: B
You wouldn’t want to transfer an opportunity to someone else! You always want to find a way to use that opportunity for the good of the project. That’s why the response strategies for opportunities are all about figuring out ways to use the opportunity to improve your project (or another, in the case of sharing).
Answer: B
A secondary risk is a risk that could happen because of your response to another risk.
Answer: D
The processes of Risk Management are organized around creating the risk register, and updating it as part of project documents updates.
Answer: B
Note
The key to this one is to remember that the money the project makes is positive, and the money it will cost is negative.
$200,000 x 0.70 = $140,000 savings, and $100,000 x 0.30 = -$30,000 expenses. Add them together and you get $110,000.
Answer: B
Contingency reserves are calculated during Perform Quantitative Risk Analysis based on the risks you’ve identified. You can think of a risk as a “known unknown”—an uncertain event that you know about, but which may not happen—and you can add contingency reserves to your budget in order to handle them. Management reserves are part of Cost Management—you use them to build a reserve into your budget for any unknown events that happen.
Answer: D
Risk monitoring and response is so important that you should go through your risk register at every status meeting!
Answer: D
The Probability and Impact matrix is a tool that you use to analyze risks. You might find it in your Project Management plan, but it’s not included in the risk register.
Answer: A
It’s really important that you get the entire team involved in the Identify Risks process. The more people who look for risks, the more likely it is that you’ll find the ones that will actually occur on your project.
Answer: D
Even though this looks a little wordy, it’s just another EMV question. The probability of the risk is 50%, and the cost is –$650, so multiply the two and you get –$325.
Answer: A
This is just the definition of Monte Carlo analysis. That’s where you use a computer simulation to see what different random probability and impact values do to your project.
Answer: D
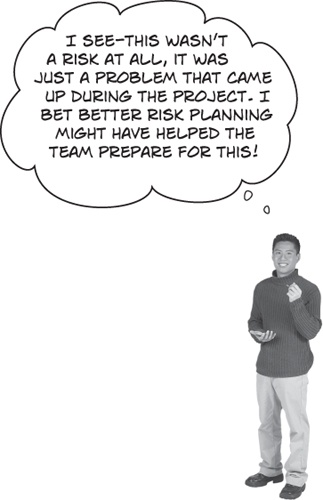
There are some risks that you just can’t do anything about. When that happens, you have to accept them. But at least you can warn your stakeholders about the risk, so nobody is caught off guard.
You’ve got an unplanned event that’s happened on your project. Is that a risk? No. It’s a project problem, and you need to solve that problem. Your Probability and Impact matrix won’t help, because the probability of this happening is 100%—it’s already happened. No amount of risk planning will prevent or mitigate the risk. And there’s no sense in trying to take preventive actions, because there’s no way you can prevent it. So the best you can do is start looking for a new part supplier.
Answer: C
It’s a good idea to bring in someone from outside of your project to review your risks. The auditor can make sure that each risk response is appropriate and really addresses the root causes of each risk.