
|
|
|
|
|
The Force will be with you. Always.
Obi-Wan Kenobi
Designing games is challenging—now more than ever. In addition to the high-end gaming consoles and high-powered desktop graphics cards, there are also low-powered mobile devices and peripherals such as the Oculus Rift and HTC Vive for which to cater. Of course, if you are designing a game for a mobile device, it is not likely that it will be released on a console. Besides considering the different ways in which art assets are delivered, the designer also has the challenge of coming up with a unique gaming experience.
The flood of mobile devices in the pockets of almost every consumer over nine years of age, has recently seen many small and independent game studios pop up, each battling for the casual gamer’s attention.
Human–computer interaction (HCI) technology that once only existed in science fiction is now forefront in the designers’ mind. Whether it be the tapping and dragging of a finger across a tablet screen or the tracking of waving arms and legs in front of a screen, the opportunity to create truly unique user experiences has never been more achievable.
Furthermore, as if the challenge of designing for multiple platforms and a diversity of HCI methods were not enough, multiplayer modes have almost become a necessity. Thanks to Twitter, Facebook, and other social media platforms, today’s players want to share their gaming experience with their friends, even if it is just to tell them that they beat the other’s high score.
This chapter examines the issue of new technologies with relation to game design and development. It examines how to integrate interactive devices, mobile devices, and social networking with your own games.
As the specifications for these external devices are constantly in flux, workshops in this chapter will be kept to a minimum as no printed book can keep up to date with such dynamic content. Instead you will be guided as to the design and use of these technologies, and any exercises given should be taken to be correct at the time of writing and used to further your understanding of how the technology works.
Believe it or not, mobile phones were not originally designed for playing games. However, as games have become more popular on the platform and their hardware and screens have advanced, games that take advantage of all that these devices can offer have grown in numbers. Primarily, these include interacting with touch screens, built-in motion sensors, and location-based services. In this section, these features and how to access them from within Unity will be explained.
Revenue from mobile video games overtook that of consoles in 2015, experiencing 40% growth in the market place. This growth was somewhat due to Google and Apple’s domination of the selling space, which made it easy for anyone (with the appropriate skills) to publish a game. Unity realized the potential of mobile games early on and moved to capitalize on the boom by making mobile game development a streamlined process in their software. Today, over 80% of mobile games in the marketplace have been made with Unity.
Initially, the biggest challenges facing mobile game creators were the lower processing power of the devices and their small screen size. As technology has advanced, however, the processing power is becoming less of an issue and, while it is still important to keep the game highly optimized for performance, the small screen remains.
The design of mobile games is very much focused on HCI, where the player is now coming into direct contact with the game. Without the need for keyboards or controllers, the player is thrust into a gaming experience, in which their haptic senses are able to relate to the environment in a more natural way.
While the principles of design for games and their interfaces, discussed in Chapter 6, still apply for small screens, some elements require more consideration.
Text must be kept to a minimum and always be readable. The smallest acceptable size you should consider is 17 px according to Apple and 18 px as recommended by Google. For forms with very obvious labels, you can get away with 14 px and even 11 px, though this should only be used for single words not paragraphs. Note, however, that pixel size does not equate to an individual font’s point size (pt) that is used to distinguish between font sizes. As illustrated in Figure 8.1 Arial 18 pt and Georgia 20 pt are both 14 px in height. You will not be able to tell exactly what pixel height a specific font is until you try it out. There are several online tools such as Endmemo (http://www.endmemo.com/sconvert/pixelpoint.php) that convert from point to pixel. They can only provide an approximation, but they are a good starting point.

FIG 8.1 Relative font sizes.
In addition to font size being an issue with readability, you also need to consider the style of the font. A font with more flourishes is more difficult to read when it gets smaller. Extra decorative strokes on text are called serifs. In Figure 8.1, the serif font Georgia is illustrated with red lines highlighting some of the extra strokes. A font without these flourishes, such as Arial, is called a sans serif, where sans translates to without. Sans serif fonts work better on small screens and when used at small point sizes, as their simplistic structure will survive reproduction and smearing, whereas serifs will become blurred.
This restriction on the use of text makes the mobile environment ideal for the use of icons and metaphors. If you examine many of the popular mobile games, you will find less text and more icons.
8.2.1.2 Icons and User Interface Elements
Icons provide the designer with appropriate metaphors to communicate a message quickly. As discussed in Chapter 6, a metaphor can be used in place of text as the old adage, “a picture is worth a thousand words,” comes into its own. For example, when there is limited space on the screen, an Information Button takes up much less space than the typed word Information. Furthermore, a well-designed icon can be recognized at quite small pixel sizes, whereas text on buttons can become illegible.
Of course, if icons used as buttons, become too small, they will not be usable. Unlike the accuracy a person can get with a mouse cursor on a screen, on a touch device, selection occurs with a finger. According to Apple’s Human Interface Guidelines for iOS development, the comfortable minimum tappable size is 44 × 44 px. Microsoft suggests that the size can be smaller at 34 px, whereas Nokia recommends 28 px.
Color is also important to consider when designing an icon. Besides its metaphorical nature, you will also want your icons to stand out from the crowd. Taking a look at some of the more popular icons in use today, you will notice that most of them are blue. This includes Facebook, Twitter, Linked-In, Skype, and Digg. These are well-known brands and easily recognizable; however, to make your own icon stand out, you should select colors that contrast with those making up the majority of existing icons. The ones that work best use limited colors with a highly stylized and simple graphic, such as the orange RSS feed icon illustrated in Figure 8.2.
The games dominating the mobile charts are very different from the AAA titles to be found on consoles. Besides the reduction in processing power and screen size, the context in which mobile devices are used dictates the types of games played on them. A person will use his or her mobile device to play games when in transit. This could mean physically moving, such as traveling from one place to another on a train or airplane, waiting for something or someone, or when in-between activities. This means that a mobile game needs to be easy to pick up and play, require little commitment, and have short reward cycles. A look at the top 10 games in the Apple App Store at the time of writing confirms the popularity of these types of casual games. The list includes card games, slot machine games, tile sliding, and matching games, and tower-defense scenarios.
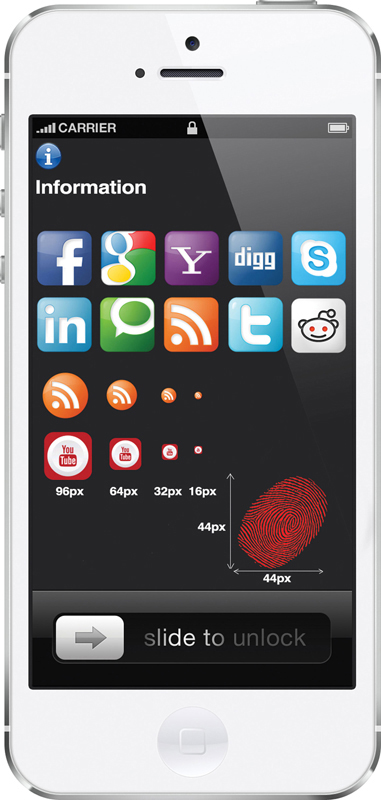
FIG 8.2 Icons, text, and relative sizes on an iPhone 5.
These casual games lend themselves well to the touch mechanic. They do not require tricky manipulation of a player character or complex hand-to-hand combat scenes. It is just tap and slide. This is the very interface mechanic employed by the highly successful Angry Birds franchise.
Such games also make use of icons and 2D art or simplistic cartoon style 3D isometric views. They are cheerful, responsive, charming, and highly polished. They implement the most basic of game mechanics discussed in Chapter 4 using natural human instinct to engage players and keep them coming back. The match-three-in-a-row mechanic employed in Bejeweled and very successfully in the Candy Crush Saga franchise is evidence.
One of the best ways to investigate as many of the new HCI features used in games as possible is to deploy an application to a mobile device. Unity supports both Android and iOS development with the purchase of an extra plugin.
The next workshop demonstrates deployment to the Android platform as the process is far simpler than for iOS.
![]() Unity Hands On
Unity Hands On
Your First Android Application
These are the steps required to build an Android application in Unity and put it onto a mobile device. You can build to an Android Device from both Mac and Windows. Every iOS and Android App requires a Bundle ID (also called Package Name). The format of a Bundle ID is:
com DOT your_name_or_company_name DOT app_name
for example,
• com.holistic3d.arapp
• com.penny.mygame
Unity will require one of these to be entered into your project before it will let you build it out to your device. In the Google Play Store ecosystems the Package ID is used to uniquely identify your app. For now, you can make up your own bundle id. Once you have your Bundle ID it will need to be inserted into your Unity Project in the Player Settings.
Note: Steps 1 to 4 aren’t necessary for Unity versions 2018.3 and higher as these installs are components that can be added to Unity during installation.
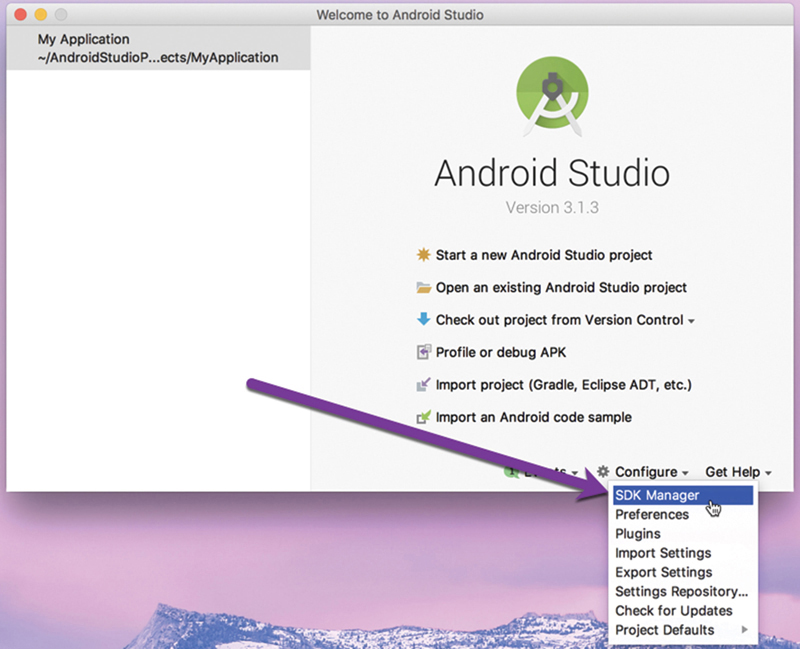
FIG 8.3 The Android Studio SDK Manager.
Step 1: Download the Java Development Kit (Version 8—make sure it is version 8) from https://www.oracle.com/technetwork/java/javase/downloads/jdk8-downloads-2133151.html and install.
Step 2: Install Android Studio by downloading it from here https://developer.android.com/studio/. Follow the instructions from Google for its installation.
Step 3: Open Android Studio and go to the software development kit (SDK) Manager as shown in Figure 8.3.
Step 4: From the Android SDK platforms, select and install the platform you will be building for. In this case, the author’s phone has Android 8.0 (Oreo) installed. Take note of the Android SDK Location, as you will need to provide this to Unity. You can find this as per Figure 8.4.
Step 5: You’ll need to activate the developer options on your mobile device. To do this, on the device under Settings > About phone > Software Information you can find the Android platform information. While you are on this screen on your device you should activate Developer Mode. To do this tap on the Build Number, as shown in Figure 8.5, seven times.
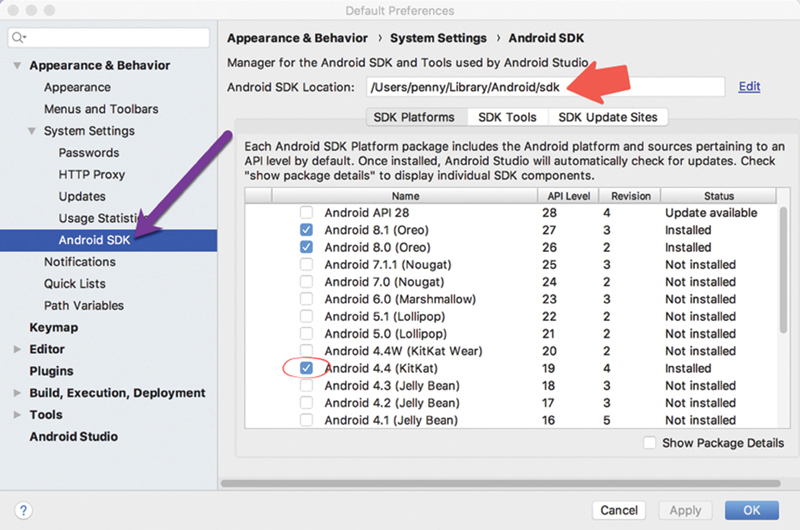
FIG 8.4 Finding the Android SDK installation location.
Step 6: Under Settings on the mobile device there will now be a Developer Options screen. Go into this and scroll down to turn on USB Debugging as shown in Figure 8.6. This will give your computer (and Unity/Android SDK) access to the mobile device. Higher up on this screen is an option to Stay awake. Turn this on to stop the device locking up and going to sleep while you are developing.
Step 7: Download the Android NDK version r13b (64-bit) from https://developer.android.com/ndk/downloads/ or, if you require an older version because Unity insists on it, visit https://developer.android.com/ndk/downloads/older_releases. Extract the android-ndk folder to a directory on your computer and note the location (Figure 8.7).
Step 8: Create a new Unity Project. It can be empty with just the Sample Scene.
Step 9: In Unity from the Main Menu select Unity > Preferences (Mac) or Edit > Preferences (Windows). In the Android section add the directories containing the Android SDK, JDK, and NDK that you’ve just installed.
Step 10: From the Main Menu select File > Build Settings (Figure 8.8a). This will open a Build Settings dialog box where you should ensure the scene/s that you want to build into your app are listed in the top box. If they are not, you can drag them from the Project window (Figure 8.8b). Then select Android in the Platform box (Figure 8.8c). Finally, click on “Switch Platform” (Figure 8.8d).
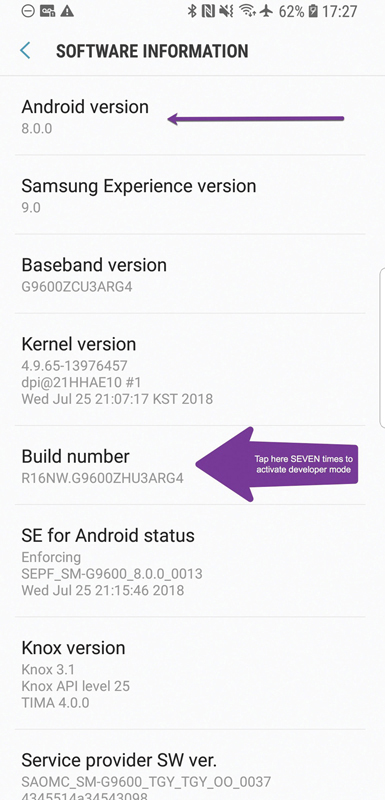
FIG 8.5 Activating Developer Mode on an Android device.
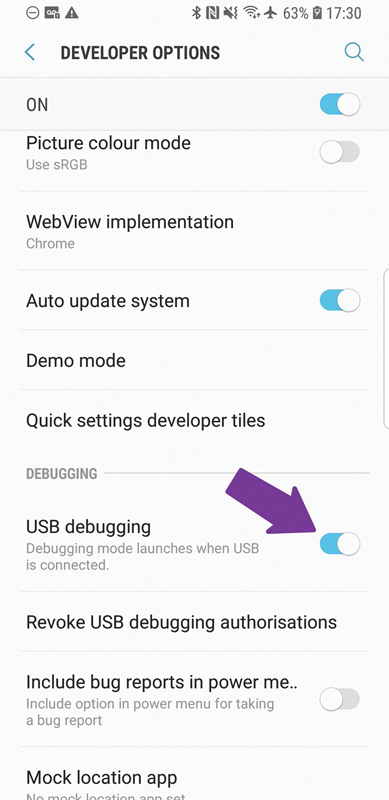
FIG 8.6 Turning on Developer Mode for an Android device.
Switching the platform will be relatively quick with an empty project. If you already have an application and want to switch the platform, Unity will perform some additional compilation and reimports and this could take a little while depending on the size of your application.
Step 11: The platform you are currently set to will be displayed in the top menu bar of Unity as shown in Figure 8.9.
Step 12: Open the Build Settings window again. (Main Menu > Build Settings) This time click on the “Player Settings” button (Figure 8.10a). In the Inspector add a Company Name (Figure 8.10b), Product Name (Figure 8.10c)—this is the name of the app that will appear on the mobile device below the icon and the Package Name (this will be the same as the Bundle ID if you are also building for iOS) otherwise the format is com.yourname.appname (Figure 8.10d). Click on “Build and Run” to deploy to your mobile device.
Step 13: With your mobile device while you do this, or maybe previously when you plugged the mobile into the computer, a screen asking for USB debugging permission will pop up as shown in Figure 8.11. Select OK when you see this. Make sure you keep an eye on your mobile while building for any messages that might need action, because if Unity fails to build you might not see what the issue was.
Step 14: After the build, the application will run on your mobile device (Figure 8.12).

FIG 8.7 Configuring Unity for Android development.
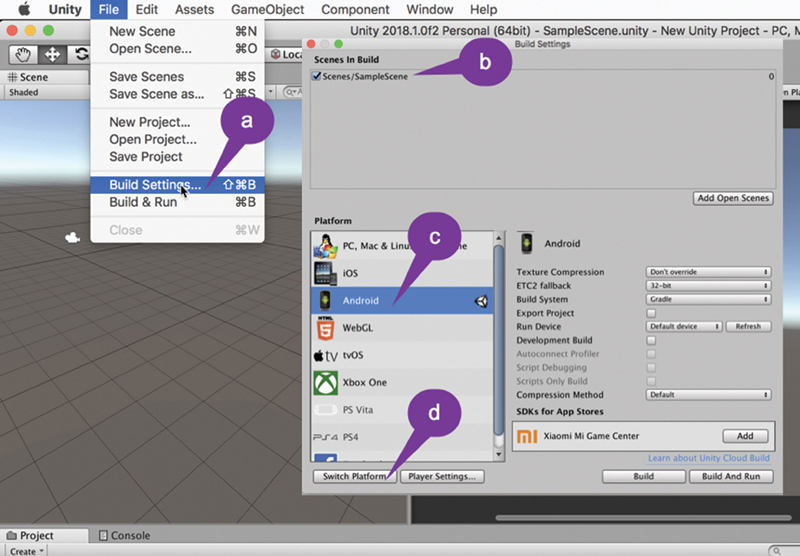
FIG 8.8 Configuring Unity’s build settings and switching to the Android platform.

FIG 8.9 Identifying the platform Unity is set to build to.
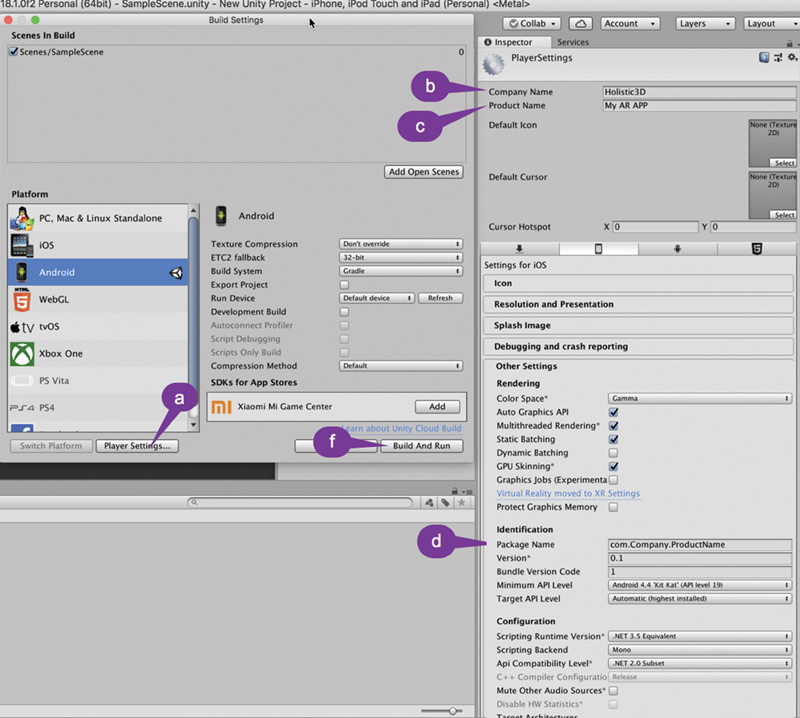
FIG 8.10 Identifying the platform Unity is set to build to.
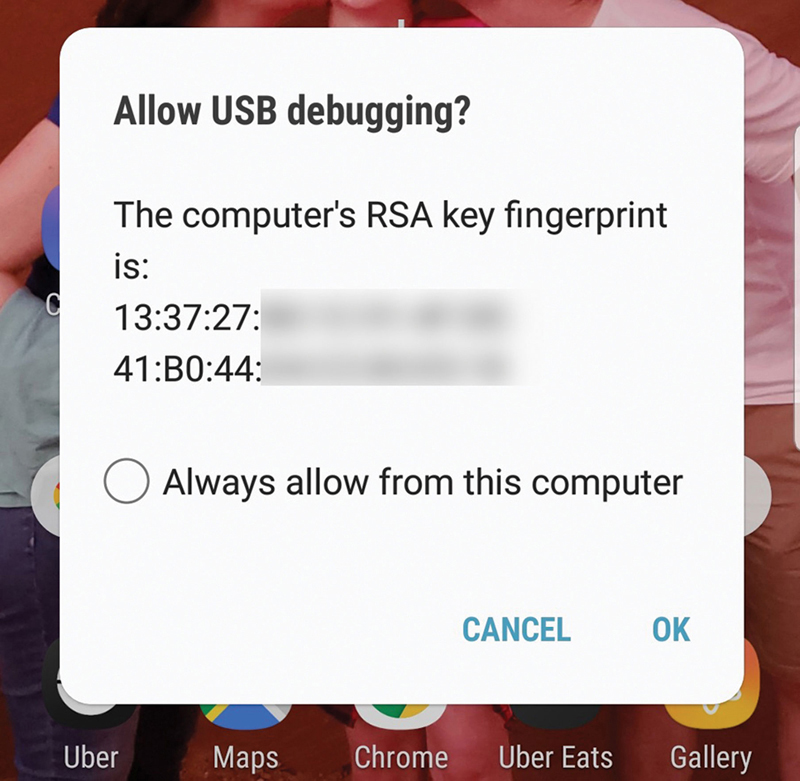
FIG 8.11 Android device prompting for USB debugging privileges.
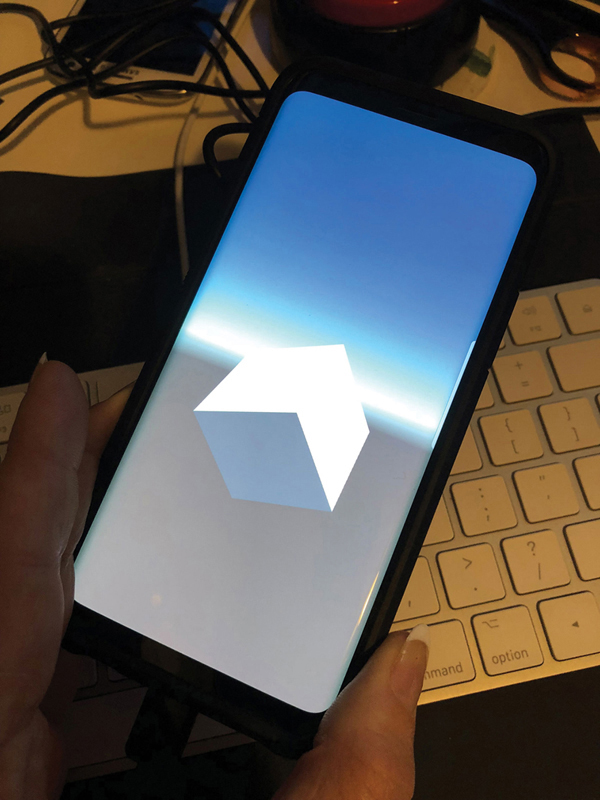
FIG 8.12 An Android device running a simple Unity Project.
What if it doesn’t work or I get strange messages?
1. Make sure your device is plugged in and USB debugging is enabled.
2. Ensure the Android SDK you are building to (on the device) has been downloaded and installed via the SDK Manager in Android Studio.
More Useful Information for Android App Building from Unity
1. https://docs.unity3d.com/Manual/android-sdksetup.html
2. https://docs.unity3d.com/Manual/TroubleShootingAndroid.html
3. https://docs.unity3d.com/Manual/android-BuildProcess.html
The game experience encompasses four facets: physical, mental, social, and emotional. The word haptic derives from the Greek meaning sense of touch, and it is this sense that enhances the gaming experience when more physical interactions are integrated.
Besides touching a screen, keyboard, controller, or mouse, computer games suffer from a lack of touch. Console controllers introduced haptics to games through vibration. Today, this is still the most commonly used force feedback technology and enhances gameplay through the creation of a deeper physical connection with the game environment. Some of the first game-related peripherals to include vibration as a game feedback include the Nintendo 64 Rumble Pak and Sony PlayStation’s Dual Shock analog controller.
![]() Unity Specifics
Unity Specifics
Vibration
You can make an iOS and Android device (with the required capability) vibrate by executing the code:
Handheld.Vibrate();
Accelerometers are electromechanical devices that measure acceleration forces. A circuit board, no bigger than a fingernail, can measure its angle of tilt by detecting the downward force of gravity, and how fast it is traveling by sensing motion and vibration. Modern mobile devices have a microelectromechanical systems (MEMS) accelerometer integrated. These consist of a simple cantilever beam attached to a seismic mass sealed in a gas pocket. The beam acts as a bendable needle that moves under accelerative forces. Imagine the pendulum of a grandfather clock on the back of a truck, and how it would move as the truck accelerates. The accelerometer is, in principle, the same. The movement of the beam is measured and reported as acceleration.
These same types of accelerometer are also found in the Nintendo Wii Remote and its Nunchuk and the PlayStation 3 Dual Shock 3 controller.
Data from accelerometers can be used in games to change the screen orientation, for example, turning a controller on its side, giving movement commands such as bowling or batting in Wii Sports games, or moving a character around in an environment, to name a few. The iPhone version of Spore Origins, for example, allows the player to navigate their creature around in the primordial slime by tilting and rotating the device.
Accelerometers report movement in 3D. In the case of Android, while holding the device in upright portrait with the screen facing you, an x acceleration will be registered if you tilt the phone forward and back, a y acceleration will be registered as the phone is swiveled around its vertical midpoint, and a z acceleration registered when the phone is brought toward and away from you. This is illustrated in Figure 8.13.
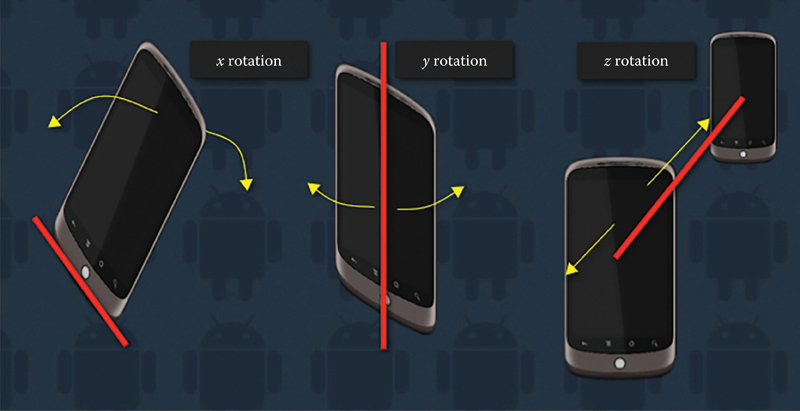
FIG 8.13 The acceleration axes of the Google Nexus One HTC mobile phone.
![]() Unity Specifics
Unity Specifics
Measuring Acceleration
To access a device’s acceleration data from within Unity, the Input class is used. When played on an iOS or Android enabled device (with an accelerometer) Input.acceleration will return the device’s acceleration as a Vector3 value. The code in Listing 8.1 can be added to its own C#, attached to the Main Camera, and deployed to a mobile device to display the current acceleration values on the screen. The x, y, and z values obtained in this example could be used to change the transform data of a game object and thus its position in the game world. Be careful though! The X, Y, and Z of the device do not automatically match the X, Y, and Z of your game world.
Listing 8.1 Unity C# to report on mobile device acceleration
float speed = 10.0f;
Vector3 dir = Vector3.zero;
void OnGUI()
{
GUI.Label (new Rect (10, 10, 100, 20), “x: “+ dir.x);
GUI.Label (new Rect (10, 30, 100, 20), “y: “+ dir.y);
GUI.Label (new Rect (10, 50, 100, 20), “z: “+ dir.z);
}
void Update ()
{
if(Mathf. Abs(Input.acceleration.x) > 1)
dir.x = Input.acceleration.x;
if(Mathf. Abs(Input.acceleration.y) > 1)
dir.y = Input.acceleration.y;
if(Mathf. Abs(Input.acceleration.z) > 1)
dir.z = Input.acceleration.z;
}
As previously revealed, the accelerometer in a device also measures its orientation. As the accelerometer is fixed with respect to the device, it is assumed that its orientation is the same. A device can register one of the following six orientations: facing up, facing down, upright portrait, upright landscape, upside down portrait, and upside down landscape.
![]() Unity Specifics
Unity Specifics
Measuring Orientation
As in the previous section, device orientation can be gathered from the Input class. The orientation value is found in Input.deviceOrientation. Each of the six orientation positions are catered for with the values DeviceOrientation.FaceDown, DeviceOrientation.FaceUp, DeviceOrientation.PortraitUpsideDown, DeviceOrientation.LandscapeLeft, DeviceOrientation.LandscapeRight and DeviceOrientation. Portrait. These orientations relate to the Google Nexus One HTC mobile as shown in Figure 8.14.
Adding the script in Listing 8.2 to a new C# file, attaching it to the Main Camera, and deploying the application to a mobile device will illustrate the reporting of orientation from within Unity. The orientation can then be used to move characters and/or flip the player’s view.
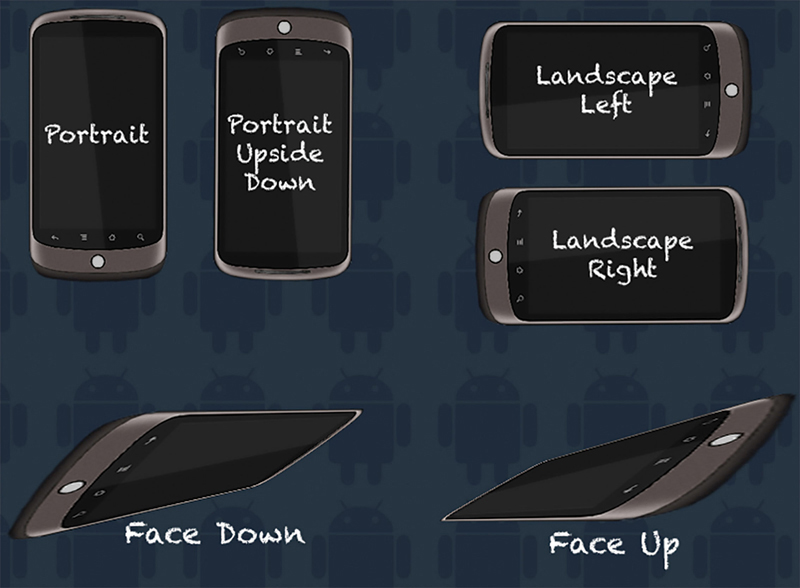
FIG 8.14 The orientations of a Google Nexus HTC mobile phone.
Listing 8.2 Unity C# to report on device orientation
using System. Collections;
using System. Collections. Generic;
using UnityEngine;
public class Orient : MonoBehaviour {
string orientString = “Unknown”;
Vector2 pivotPoint = new Vector2(200,200);
float rotAngle = 0;
void OnGUI()
{
if (Input.deviceOrientation == DeviceOrientation. FaceDown)
{
orientString = “Face Down”;
rotAngle = 0;
}
if (Input.deviceOrientation == DeviceOrientation. FaceUp)
{
orientString = “Face Up”;
rotAngle = 0;
}
if (Input.deviceOrientation == DeviceOrientation. Portrait)
{
orientString = “Portrait”;
rotAngle = 0;
}
if (Input.deviceOrientation == DeviceOrientation. PortraitUpsideDown)
{
orientString = “Portrait Upside Down”;
rotAngle = 180;
}
if (Input.deviceOrientation == DeviceOrientation. LandscapeLeft)
{
orientString = “Landscape Left”;
rotAngle = 90;
}
if (Input.deviceOrientation == DeviceOrientation. LandscapeRight)
{
orientString = “Landscape Right”;
rotAngle = −90;
}
GUI.BeginGroup (new Rect (Screen.width / 2 − 200,
Screen.height / 2 − 200, 400, 400));
GUIUtility. RotateAroundPivot (rotAngle, pivotPoint);
GUI.Label (new Rect (0, 0, 400, 400), orientString);
GUI.EndGroup ();
}
}
Access to the Internet is another feature integrated into mobile devices. People use mobile devices to surf the web and to send and receive email. This functionality can be exploited in games to send emails from within a game or to obtain data from a website. For example, extra in-game information may be obtained from a website on as needed. This occurs in Parallel Kingdom, when the player wants to look up further information on a monster or item.
![]() Unity Specifics
Unity Specifics
Calling and Retrieving URLs
Unity provides a WWW() function that can make a URL request retrieving the data. As data can be sent and retrieved in any format, it is quite a powerful feature. For calls to websites, the data is collected in raw HTML. You cannot display the webpage as it appears, but rather gather its HTML code. There are XML and HTML Unity parser packages that can be purchased from the Unity Store, should you wish to display a website inside a Unity application.
![]() Unity Hands On
Unity Hands On
Sending Mail with Device Mail Client
This workshop demonstrates simple methods for sending emails. In the later exercise where a web server is employed, the code could be modified to support the sending of user data to a game server for a multiplayer game. However, WWW calls are notoriously slow with respect to a game server, and this method would not be recommending for live-action games such as real-time car racing.
Step 1: Create a C# file named Interface and add the code shown in Listing 8.3.
Listing 8.3 Sending a simple email message from a Unity app
void OnGUI()
{
if(GUI.Button(Rect(10,10,180,30),”Send”))
{
Application.OpenURL
(“mailto:[email protected]?subject=Test Email&body=from Unity App”);
}
}
Step 2: Attach this code to the Main Camera.
Step 3: This code will not work in the Unity Editor. Build and push the app to a mobile phone.
Step 4: Run the app. When you push the Send button, the email client installed on the device will open with the subject and body lines already included.
Step 5: To send more information from the app to email client, modify Interface.cs to that in Listing 8.4.
Listing 8.4 Prepopulate email data in a Unity app before sending
using System. Collections;
using System. Collections. Generic;
using UnityEngine;
public class SendEmail: MonoBehaviour {
string toEmail = “[email protected]”;
string nameField = “My Name”;
string messageField = “Message”;
void OnGUI()
{
GUI.Label(new Rect(10,10,50,50),”To”);
toEmail = GUI.TextField (new Rect (100, 10, 200, 50), toEmail);
GUI.Label(new Rect(10,60,50,50),”Name”);
nameField = GUI.TextField (new Rect (100, 60, 200, 50),
nameField);
GUI.Label(new Rect(10,120,120,50),”Message”);
messageField = GUI.TextArea(new Rect(100, 120, 200, 200),
messageField);
if(GUI.Button(new Rect(50,350,180,50),”Send”))
{
Application. OpenURL(“mailto:” + toEmail + “?” +
“subject=Test Email&” +
“body=From: “ +
nameField + “ ” + messageField);
}
}
}
Step 6: Play. An email form will be created in the Unity app as shown in Figure 8.15. When Send is pressed, the information entered will be sent to the user’s email client.
![]() Note
Note
The format for a mailto string should be: mailto:email_address?email _information. The question mark always separates the email address of the recipient with the extra data that is divided into a number of headers separated by ampersands. Each header has a name and its own value set with an equals sign. The headers can include:
• subject: the text that will appear in the subject line
• body: the email message
• cc: the email address of others to send a copy of the message
• bcc: the email address of others who will receive the email but not appear in the send email message of the original
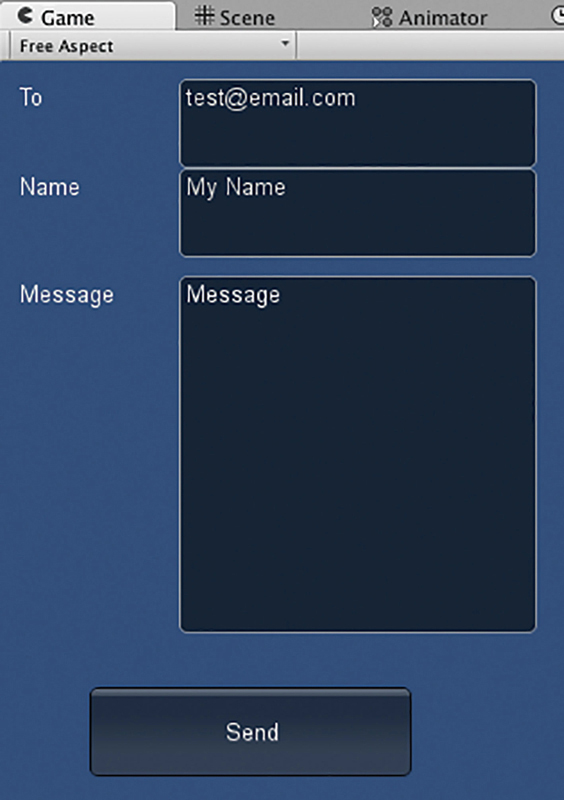
FIG 8.15 A simple email form screen in Unity.
![]() Unity Hands On
Unity Hands On
Sending Mail via a Web Server
This method of sending an email from your app may be preferred, as the application will not close to open the mail app. Data are sent straight from the app to the server. You can also use this method for passing other information to a web server.
Step 1: Create a new Unity Project.
Step 2: Create a C# file called EmailViaServer, and add the code shown in Listing 8.5. Note that in the code, the server URL is shown in bold. This is where you put the URL of your own server.
Listing 8.5 Sending data from a Unity app to a webserver for the purpose of emailing
using System. Collections;
using System. Collections. Generic;
using UnityEngine;
public class Emailer : MonoBehaviour {
string toEmail = “[email protected]”;
string nameField = “My Name”;
string messageField = “Message”;
bool showWebMessage = false;
int emailSuccessful = 1;
void webMessageScreen()
{
GUI.BeginGroup (new Rect (Screen.width / 2 - 50,
Screen.height / 2 - 50, 100, 100));
GUI.Box (new Rect (0,0,100,100),”Email Message”);
if(emailSuccessful == 1)
GUI.Label(new Rect(10,20,100,50),”Sending...”);
if(emailSuccessful == 2)
GUI.Label(new Rect(10,20,100,50),”Email Sent”);
else if(emailSuccessful == 3)
GUI.Label(new Rect(10,20,100,50),”Email Failed”);
if (GUI.Button (new Rect (10,50,80,30), “Ok”))
{
showWebMessage = false;
}
GUI.EndGroup ();
}
IEnumerator sendEmail()
{
emailSuccessful = 1;
showWebMessage = true;
string msgBody = “From: “+ nameField + “ ” + messageField;
WWWForm form = new WWWForm();
form. AddField(“to”, toEmail);
form. AddField(“subject”, “Email Subject”);
form. AddField(“body”, msgBody);
WWW w = new WWW(“URL OF YOUR PHP SCRIPT”, form);
yield return w;
if (w.error != null)
{
emailSuccessful = 3;
}
else
{
emailSuccessful = 2;
}
}
void OnGUI()
{
GUI.Label(new Rect(10,10,50,50),”To”);
toEmail = GUI.TextField (new Rect (100, 10, 200, 50), toEmail);
GUI.Label(new Rect(10,60,50,50),”Name”);
nameField = GUI.TextField (new Rect (100, 60, 200, 50), nameField);
GUI.Label(new Rect(10,120,120,50),”Message”);
messageField = GUI.TextArea (new Rect (100, 120, 200, 200),
messageField);
if(GUI.Button(new Rect(50,350,180,50),”Send”))
{
StartCoroutine(sendEmail());
}
if(showWebMessage)
{
webMessageScreen();
}
}
}
Step 3: Attach this code to the Main Camera. You can test this application in the Unity Editor as it does not require your mail program. It will send the data to a server, and the server will send the email. Remember to check your spam folder for the test email.
Step 4: The server code is written in PHP. The code is very simple. In this case, emailer.php is given in Listing 8.6.
<?php
$to = $_POST[“to”];
$subject = $_POST[“subject”];
$body = $_POST[“body”];
$headers = ‘From: [email protected]’. “ ”.
’Reply-To: [email protected]’. “ ”.
’X-Mailer: PHP/’. phpversion();
if (mail($to, $subject, $body, $headers))
{
echo(“<p>Message successfully sent!</p>“);
} else
{
echo(“<p>Message delivery failed...</p>“);
}
?>
If you have access to a PHP-enabled web server, try creating your own PHP server file with this code, and redirect your mobile app to it. The full URL of emailer.php should appear in sendEmail() function of Listing 8.5.
![]() Note
Note
Often when working with WebGL applications built out of Unity, a similar method of writing external files by way of a PHP script on a server is required. If you are interested in how this can be achieved, see the series of YouTube videos created by the author beginning at https://youtu.be/4OZqY1Ukj8I.
Today’s smartphones and tablets come with global positioning system (GPS) receivers. These devices calculate their position on the earth by bouncing signals off the GPS satellites. The GPS was developed by the American Department of Defense (DOD) in 1973 with the first satellites being launched in 1978. In 1993, the DOD decided to make it free for civilian use. The official name of the system is navigation system for timing and ranging (NAVSTAR).
The GPS consists of 30 satellites orbiting the earth within a distance of 20,200 kilometers. The satellites are solar powered and circle the globe two times each day. The configuration of the satellites is such that at any location on the Earth’s surface, at least four are visible in the sky.
The GPS receiver in a mobile device calculates its position through analysis of the high-frequency, low-power radio signals emitted by the satellites. It determines its distance from any four of the satellites it is able to detect and works out its position. The process is called trilateration.
Trilateration finds the intersection of a number of circles or spheres. In the case of 3D space and the GPS system, for each detected satellite a sphere can be imagined around each with a radius equal to the distance to the satellite calculated by the GPS device. The location of each satellite is known as the DOD constantly monitors the satellites to ensure they are aligned. With this information from four satellites, and including the earth itself as another sphere in the equation, the location of the GPS device can be restricted to the area in which all spheres intersect. This process is illustrated in Figure 8.16 with just two spheres. The typical accuracy of GPS in mobile devices is around 10 meters.
Possibly the largest GPS-based game is Geocaching. It is a worldwide treasure hunt involving the hiding and locating of small boxes of items placed all around the globe. The GPS positions of geocaches are registered on the web. Using a GPS navigation system, people scour the earth, arriving at the correct coordinates and then searching in the vicinity for a box, canister, or jar cleverly hidden under a pile of sticks, behind a brick, or even inside hollow fence poles. When found, the finders record their presences on the logbook inside and leave a small token or gift. More details about the geocaching phenomena can be found at http://www.geocaching.com.
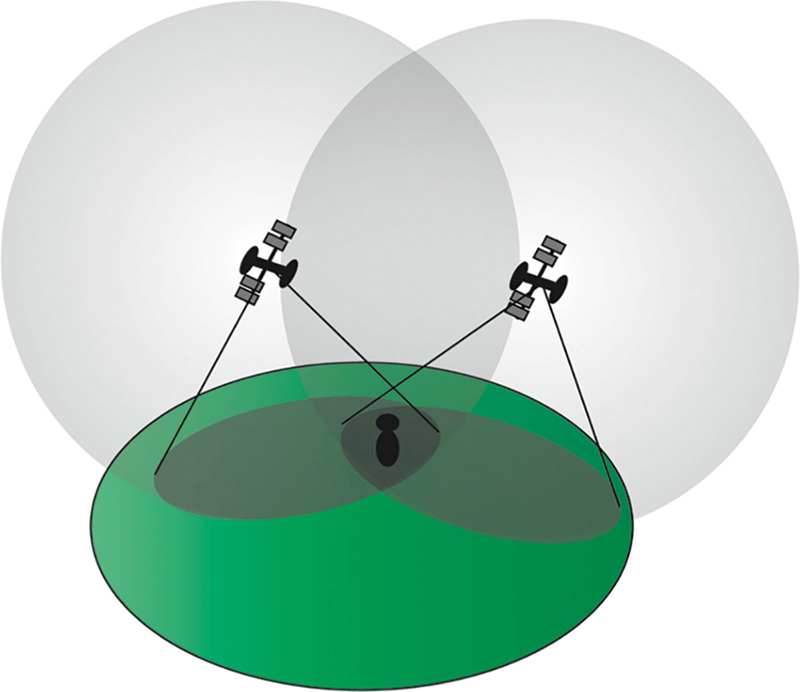
FIG 8.16 Satellite trilateration with two satellites.
The general genre of games that include geocaching are known as location-based games. Most are in the format of a real-world scavenger hunts such as visiting locations for points or virtual artifacts. Tourality (http://www.tourality.com/) is one such game, as shown in Figure 8.17. The goal is to reach as many predefined GPS locations (stored in game sets) in the shortest amount of time. Tourality generates game sets based on the location of the player. It is possible to play in a single player or multiplayer mode.
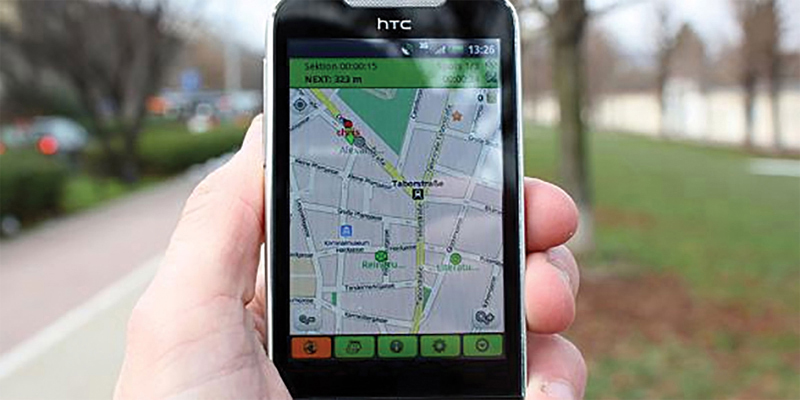
FIG 8.17 Tourality.
Parallel Kingdom by PerBlue is the first location-based mobile massively multiplayer online role-playing game (MMORPG) played in the real world (http://parallelkingdom.com/). It uses a player’s GPS location to superimpose an imaginary fantasy world over the top of a Google Map as shown in Figure 8.18. The player can move around an approximate 1.3 mile radius on the map by tapping on the mobile screen. To move further afield, the player has to physically go to another location in the real world. As with other RPGs, the player fights monsters and collects items while exploring their environment for experience points and leveling up their skills.
My Grove by Kranky Panda is another location-based multiplayer game that creates a virtual world over a map of the real world as shown in Figure 8.19. Players move from one geographical location to another, the goal being to plant and maintain virtual fruit trees to offset carbon emissions. Players compete against each other to be the top fruit producers in their area. They can also sabotage the trees of other players or choose to help other players tend to their trees.
You too can use GPS coordinates in your own games. The next workshop shows you how to obtain a player’s location in Unity iOS and Android.
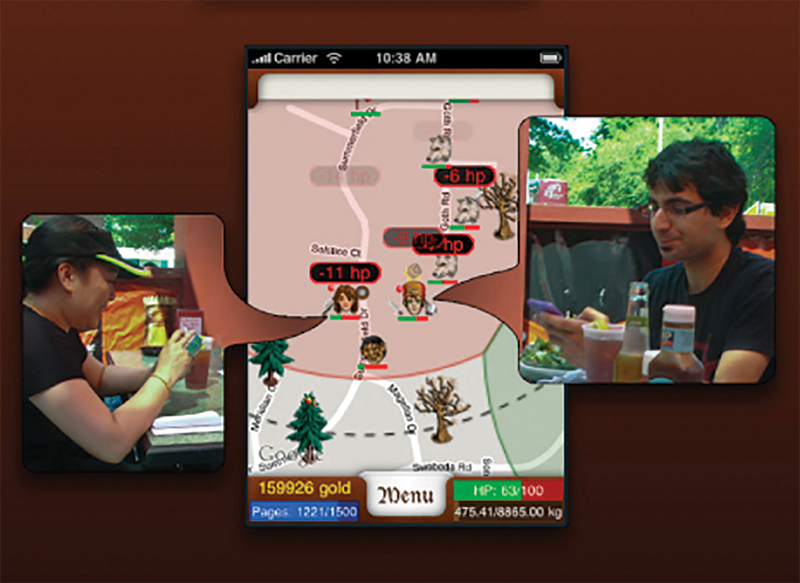
FIG 8.18 Parallel Kingdom.
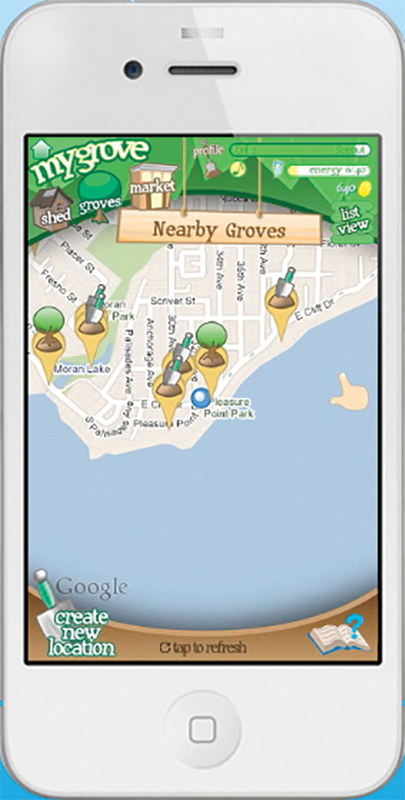
FIG 8.19 My Grove.
![]() Unity Hands On
Unity Hands On
GPS
Step 1: Create a new Unity project. Set it to build for iPhone or Android depending on the device you have.
Step 2: Create a new C# file called GetGPS. Add the code shown in Listing 8.7.
Step 3: Play. If your mobile device can access the satellite data, the screen will contain details of your GPS location.
Listing 8.7 Code to obtain GPS information
using System. Collections;
using System. Collections. Generic;
using UnityEngine;
public class GetGPS : MonoBehaviour {
bool locationFound = false;
IEnumerator GetLocation()
{
Input.location. Start();
int maxWait = 1;
while (Input.location.status == LocationServiceStatus. Initializing &&maxWait > 0)
{
yield return new WaitForSeconds(1);
maxWait--;
}
if (maxWait < 1)
{
yield return null;
}
if (Input.location.status == LocationServiceStatus. Failed)
{
yield return null;
}
else
{
locationFound = true;
}
Input.location. Stop();
}
void Start ()
{
StartCoroutine(GetLocation());
}
void OnGUI()
{
if(locationFound)
{
GUI.Label(new Rect(10,10,200,30),”Latitude: “ + Input.location.lastData.latitude);
GUI.Label(new Rect(10,30,200,30),”Longitude: “ + Input.location.lastData.longitude);
GUI.Label(new Rect(10,50,200,30),”Altitude: “ + Input.location.lastData.altitude);
GUI.Label(new Rect(10,70,200,30),”Accuracy: “ + Input.location.lastData.horizontalAccuracy);
GUI.Label(new Rect(10,90,200,30),”Time: “ + Input.location.lastData.timestamp);
}
else
{
GUI.Label(new Rect(10,10,200,30),
“Could not initialize location services.”);
}
if(GUI.Button(new Rect(10,110,80,50),”Quit”))
{
Application. Quit();
}
}
}
In 2003, Sony released the EyeToy for the PlayStation 2. This is essentially a webcam that attaches to the gaming console. By processing the image taken by the camera, computer vision and gesture recognition algorithms can estimate the movements of a player.
Although the Nintendo Wii took game haptics to a new level with its Wii Remote, it was Microsoft that broke new ground by releasing the Kinect in 2010. Although the player does not feel the game environment with a sense of touch, they are still kinesthetically interacting with it and therefore experiencing a level of immersion not previously experienced in earlier games. The Kinect provides full-body 3D motion capture through by continually projecting an infrared laser in front of the screen in a pixel grid. Depth data are gathered from a monochrome sensor gathering information about the reflections of the laser. Currently, the Kinect is capable of tracking six people simultaneously. The Kinect is also able to perform facial and voice recognition tasks.
The Kinect differs from the PlayStation Move, a game controller wand with built-in accelerometers and light on top, by sensing the actual 3D data. The Move, also released in 2010, uses a combination of motion sensing with visual recognition from the PlayStation Eye (the successor of the EyeToy) to recognize player movements.
There are numerous groups attempting to make access to the Kinect open source and cross platform, such as OpenKinect (http://openkinect.org/wiki/Main_Page).
OpenKinect is a community of developers bringing free programming interfaces for the Kinect to Windows, Linux, and Mac so independent application developers and researchers can implement their own Kinect-based games and applications. The links to their source code and tutorials for installation and use can be found on their website.
Succeeding the technology of the Kinect are systems such as the Stage System by Organic Motion (https://tracklab.com.au/organic-motion/). Currently used for real-time motion capture, this system has the potential to make games that are projected onto all the walls of a room where the player is positioned right in the center of the action. The Stage System has the ability to capture true full body 3D surround motion and structure with the use of its six cameras. It differs from the Kinect in that the Kinect only captures distances from the device itself to whatever is in front of it and tracks for key human features such as the hands, feet, and head. Technologies such as these are driving games toward full-body immersive systems reminiscent of Star Trek’s holodeck.
Besides the full body detection systems, simple mouse and finger swiping gestures have been used in games from the magic casting of Black & White to the mobile gesture-based battle against evil in Darklings. Matching the swiping action to a specific gesture is an exercise in machine learning. There are numerous methods for recognizing gestures, including Bayesian and neural networks and complex artificial intelligence techniques. In the next hands-on exercise, we will examine a very simple and effective method called the $1 Unistroke Recognizer (http://depts.washington.edu/madlab/proj/dollar/index.html). The recognizer uses a nearest neighbor classifier with Euclidean scoring. In short, this means that it takes a set of known patterns and then determines how closely each coordinate of a new gesture matches any of the known patterns using a distance function.
![]() Unity Hands On
Unity Hands On
Gesture Recognition
Step 1: Download the starter project Chapter 8/Gestures and open the gestureRibbon scene.
Step 2: Add an empty game object to the Hierarchy by right clicking in the Hierarchy window and selecting Create Empty. Rename the new object Ribbon.
Step 3: With the Ribbon selected in the Inspector, use the Add Component button to add an Effect > Trail Renderer. Set the values for Time, Start Width, and End Width to 1, 5, and 5, respectively. Attach the provided script swipeTrail to the Ribbon, and set its material to white as shown in Figure 8.20.
Step 4: Play. You will be able to draw a white Ribbon on the screen using the mouse. This Ribbon will also work on a mobile device if you build out to one.
Step 5: If you examine the Main Camera, you will notice a script called gestureRecon attached. This script contains all the coordinates for known gestures. These gestures can be seen by examining the trained.png file included in the project. We now need to link the gestures of the Ribbon with this code. This means capturing all the points on the screen that the Ribbon passes through and giving them to the recognition algorithm. To begin, create a new script called DetectMotion.cs, and add the code in Listing 8.8.
using System. Collections;
using System. Collections. Generic;
using UnityEngine;
using UnityEngine. UI;
public class DetectMotion : MonoBehaviour {
bool isDown = false;
bool startPointRecording = false;
Vector2 lastMousePos = new Vector2(-1,-1);
ArrayList points = new ArrayList();
string patternDetected = “”;
Text patternDisplay;
void OnGUI()
{
if(isDown && Input.mousePosition.x != lastMousePos.x &&
Input.mousePosition.y != lastMousePos.x)
{
points. Add(new Vector2(Input.mousePosition.x,
–Input.mousePosition.y));
lastMousePos = new Vector2(Input.mousePosition.x,
Input.mousePosition.y);
}
}
void Update ()
{
if(Input. GetMouseButtonDown(0))
{
isDown = true;
startPointRecording = true;
points = new ArrayList();
}
else if(Input. GetMouseButtonUp(0))
{
isDown = false;
startPointRecording = false;
Result result = this.
GetComponent<GestureRecon>().Detect(points);
patternDetected = result. Rname + “” + result. Rscore;
patternDisplay.text = patternDetected;
}
}
}
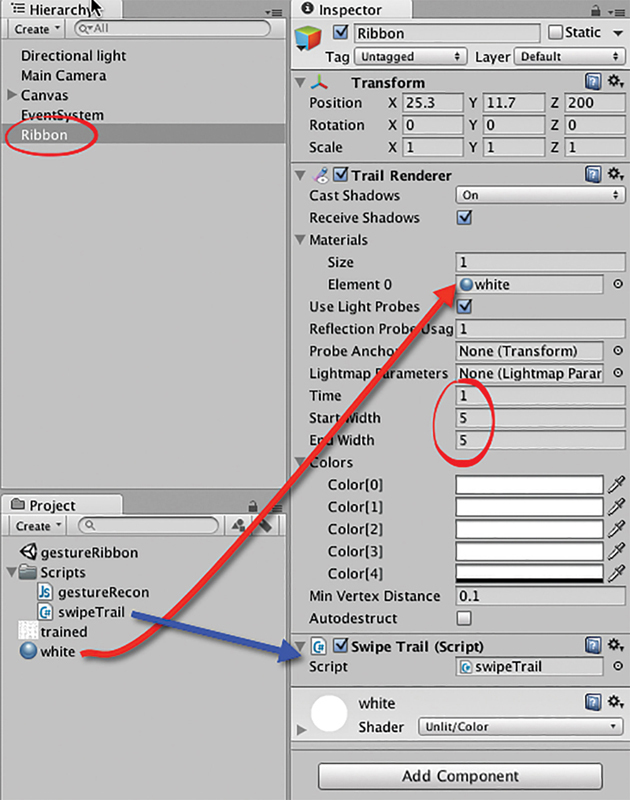
FIG 8.20 Setup for a Ribbon.
Step 6: Save the code and attach the script to the Main Camera.
Step 7: To see which gesture the algorithm has detected, you will need to link up the text on the screen (that currently says Pattern) with the DetectMotion script. With the camera selected, locate the Pattern Display property of the script and drag and drop the existing text element from the Hierarchy onto it as shown in Figure 8.21.
Step 8: Save, run, and swipe. The algorithm will read your gestures and the closest match will be determined and displayed.
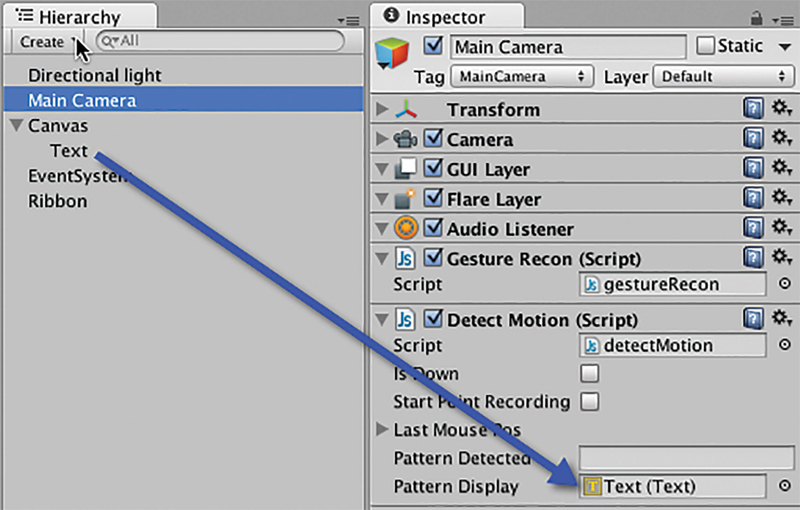
FIG 8.21 Assigning an on-screen text object to display recognized gesture.
Viewing virtual objects in three dimensions, otherwise known as stereoscopy or stereoscopics, is a technology that has been around since the beginning of the twentieth century.
The earliest displays worked by showing a pair of 2D images in a stereogram. By providing each eye with a different image taken from a slightly different point of view, the brain can be fooled into perceiving depth. This technique for stereoscopy is called side-by-side. One such stereogram is shown in Figure 8.22. The individual images of a stereogram are taken at slightly different angles and distances replicating the natural positioning of our eyes—that is, 15 centimeters apart.
To assist with the viewing process of side-by-side images, a stereoscope is employed to keep the individual eyes focused on the appropriate image. A popular form stereoscope from the nineteenth century, the Holmes stereoscope, is shown in Figure 8.23.
In 2014 Google engineers, David Coz and Damien Henry, revealed a low-cost stereoscope called Google Cardboard. The 3D viewer (shown in Figure 8.24), constructed primarily from cardboard, is an origami project for the game designer wanting to experiment with real-time virtual stereograms.
It employs a mobile device to deliver the interactive 3D content by splitting the screen in two and delivering one half to each eye. The virtual environment being displayed requires two cameras sitting side-by-side and projecting individual images in a split-screen-type configuration.

FIG 8.22 ”The early bird catches the worm” Stereograph published in 1900 by North-Western View Co. of Baraboo, Wisconsin, digitally restored. Public Domain.

FIG 8.23 A Holmes stereoscope. Public Domain.
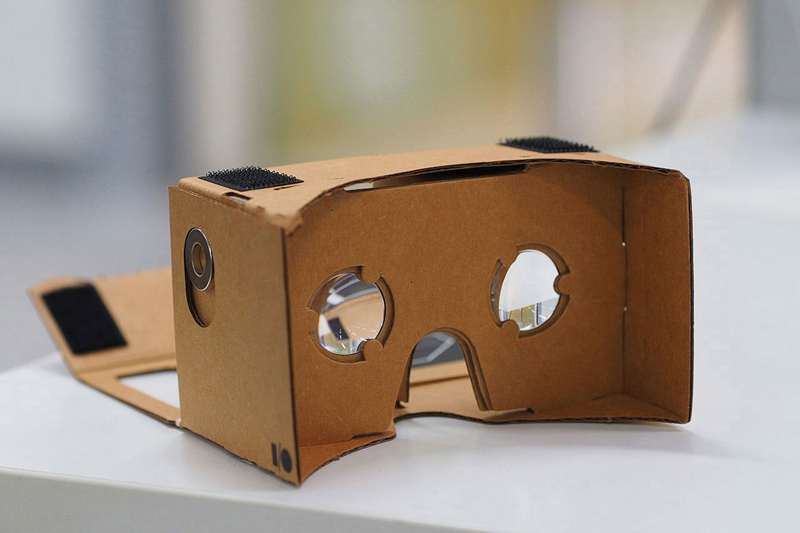
FIG 8.24 Google Cardboard. Creative Commons.
![]() Unity Hands On
Unity Hands On
A Google Cardboard Experience
In this activity, we will explore the Google Cardboard plugin for Unity and create a simple environment to view in 3D. To view the final product, you will need a Google Cardboard viewer. These are widely available for purchase on eBay, or you could make your own.
Instructions for building your own virtual reality (VR) experience with Google Cardboard and Unity are available at: https://developers.google.com/vr/develop/unity/get-started-android.
Another method for producing stereoscopic images was developed in 1853 by W. Rollmann. The anaglyph is an image constructed by overlaying two offset photographs: one filtered with red and one filtered with cyan. When viewed with red/cyan glasses, each eye perceives a different photograph, thus producing a 3D effect.
The Unity plugin for creating anaglyphs sets up two cameras in the environment and filters one with red and one with cyan. The images from the cameras—which are set 0.04 apart in the X and rotated toward each other by slightly less than one degree to simulate the positions and rotations of the human eyes—are then overlaid. The resulting image from the sample provided with the plugin is displayed in Figure 8.25.
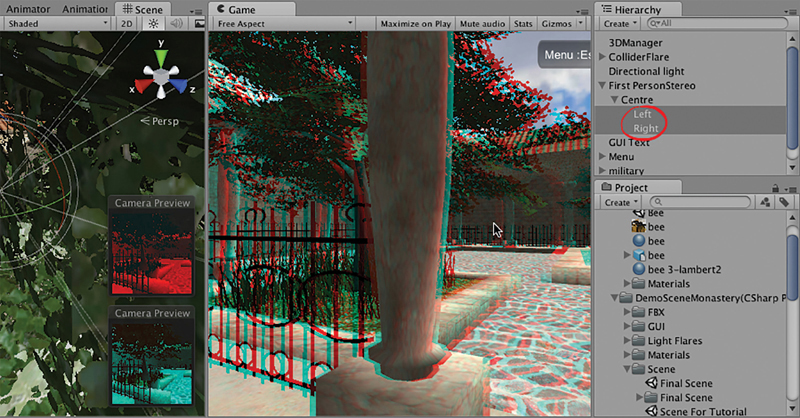
FIG 8.25 A screenshot of the Unity 3D Anaglyph System plugin shows the two cameras and color filters.
In more recent times, head-mounted displays (HMDs) have become popular for 3D viewing. The first commercially available HMDs were the Forte VFX-1 and Sony’s Glasstron, which was used in the game MechWarrior 2 allowing players to see the game world through their own eyes inside their craft’s cockpit. Today, the hottest HMD gaining traction in gaming is the Oculus Rift. The Rift was a Kickstarter crowdfunding campaign that saw the release of a developer kit in 2012 (shown in Figure 8.26), with the commercial version released in March 2016. Oculus have also partnered with Samsung to develop the VR Gear, a HMD based on their technology that integrates with smartphone technology.
The Rift (like the other HMDs) works by delivering slightly offset virtual images to each eye. The brain processes them as it does the stereograms and anaglyphs and provides the viewer with the perception of depth. The images are delivered via active screens placed in front of the viewer’s eyes. In the case of the second generation Rift, the screens are the same as those in a Samsung Galaxy Note 3.
As is the case with the 3D anaglyph systems, the Rift Unity plugin uses a double camera system to split the perspective of the virtual scene for each eye. When developing, the scene is displayed on the screen showing what each eye is viewing. This is illustrated in Figure 8.27.
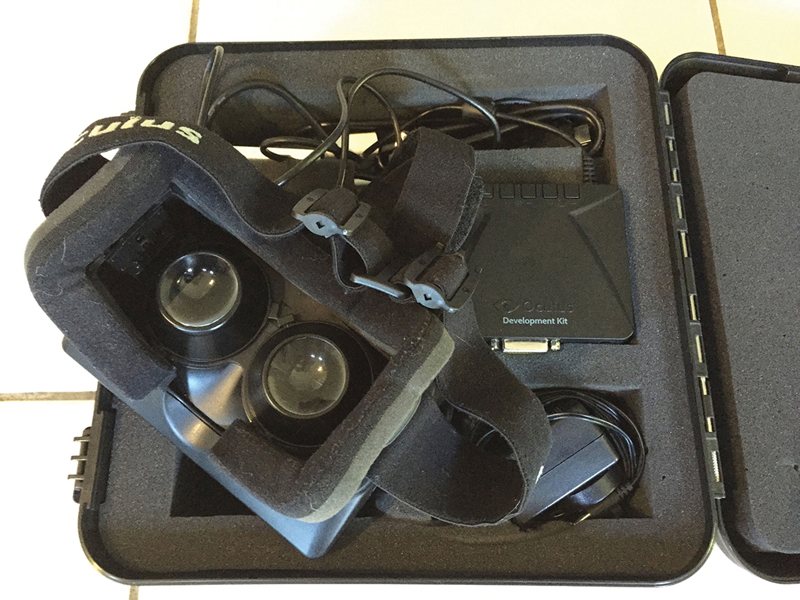
FIG 8.26 The original Oculus Rift developer kit.

FIG 8.27 A view of the Tuscan demo running inside Unity. This was one of the original Oculus Rift demos.
Although augmented reality (AR) technology has been available since 1968, it has only been in the past five or so years that applications have become popular. This is primarily due to the availability of webcams with desktop and laptop computers and cameras coupled with increased processing power in hand-held devices and mobile phones. Technology from the domain of 3D gaming is particularly key with respect to AR, as it allows efficient and seamless integration of high-quality animated virtual objects with AR applications.
AR has slowly been creeping into the field of computer games. Some interactive applications of note include the Sony PlayStation EyeToy and the EyePet and the Nintendo 3DS Nintendogs. In these games, players see their real world streamed via a camera onto the screen and superimposed with virtual game characters. The characters are positioned such that they appear to exist in the real world. The player almost feels like they could reach out and touch them.
AR is a multidisciplinary field based on computer science with the goal of providing a viewer with an environment containing both real and virtual objects. With the use of mobile devices with cameras, computer-generated images are projected on top of the physical environment. To ensure correct positioning of virtual objects in the real world, hardware and software are required to determine the viewer’s location and orientation (point of view, POV) accurately. The POV can be matched with the location of a camera in a virtual model of the physical location and augmented objects and information projected onto the real-world image. Alternatively, a visual symbol in the real world known as a fiduciary marker can have its position relative to the POV determined and used as the location and orientation of a virtual object. It is this latter AR technique that we will examine in this section, as such applications can easily be created for Android mobile devices with Unity and the Vuforia (https://www.vuforia.com/) or Wikitude SDKs (https://www.wikitude.com/).
One very famous AR (and location-based) game created with Unity is Pokémon Go (Figure 8.28). It was first released in July 2016 and downloaded some 500 million times by the end of the year. In the game, players must hunt down 150 types of Pokémon that are located somewhere in the real world. By moving to the correct geographical location, the Pokémon is revealed through the use of AR on the player’s mobile phone.
Wearable devices that allow virtual content to be projected atop a vision of the real world have been prototyped since the late 1960s; however, the earliest devices required reprocessing of video from the real world with the virtual on top. This same technique is still used for AR on smartphones. A big breakthrough has come about with see-through lenses that only need to process the virtual. Such devices include Google Glass and the Microsoft HoloLens.
Google Glass was released in 2013 as a prototype headset and removed from production in 2015. It consists of a standard pair of glasses with the lenses replaced by a heads-up display as shown in Figure 8.29. Virtual content can be projected onto the lenses, while the user continues to view the real world and thus creating an AR.
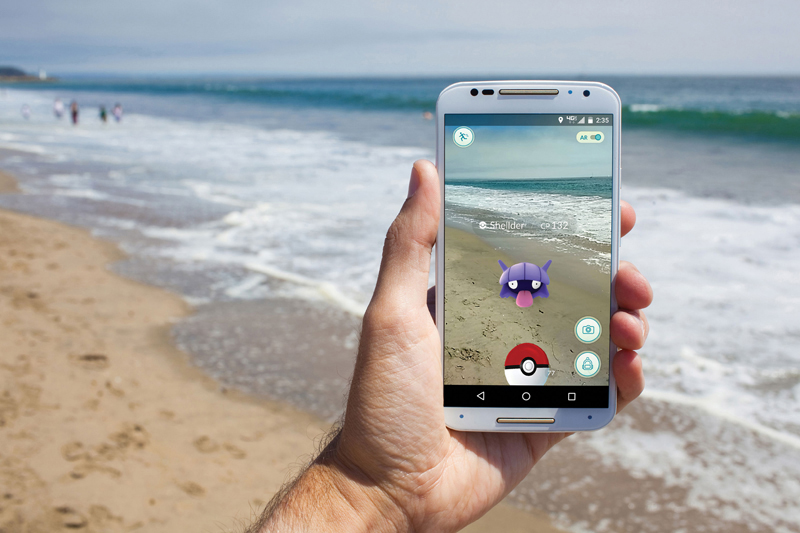
FIG 8.28 Pokémon Go.
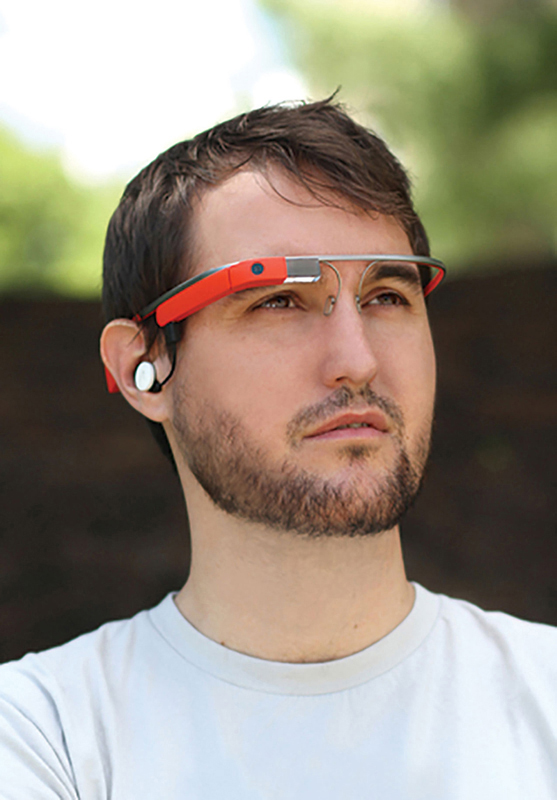
FIG 8.29 Man wearing a Google Glass prototype.
Microsoft’s HoloLens is a similar device to Google Glass. The HoloLens projects virtual content atop the real world and provides interactive holographic experiences (illustrated in Figure 8.30). The device includes a microphone, camera for taking photographs and video, as well as an accelerometer, gyroscope, and other haptic interactive technologies.
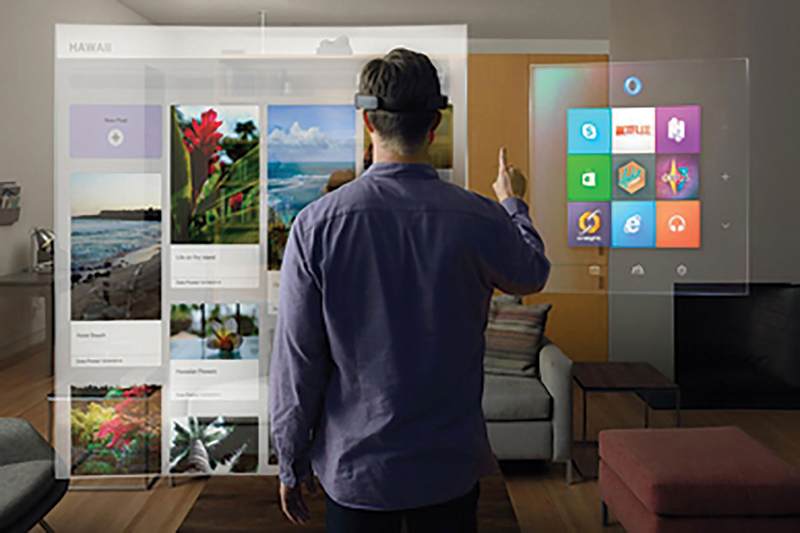
FIG 8.30 A mock-up of the mixed-reality interface provided by Microsoft’s HoloLens.
Without access to such technology, AR development can still be experienced on desktop machines and smartphones. The next hands-on session will introduce you to an easy to use and freely available development kit for creating AR experiences with Unity.
![]() Unity Hands On
Unity Hands On
Augmented Reality in Unity with Wikitude SDK
With the Wikitude SDK you can be up and running with your own Augmented Reality application in less than five minutes (Figure 8.31). Follow along with the author’s own YouTube tutorial found at https://youtu.be/Dt3q2URF6b4.
For readers of this book, there’s also a special discount coupon for an entire online AR course developed by the author at https://www.udemy.com/augmented_reality_with_unity/?couponCode=H3DGAMEDEVBOOK.
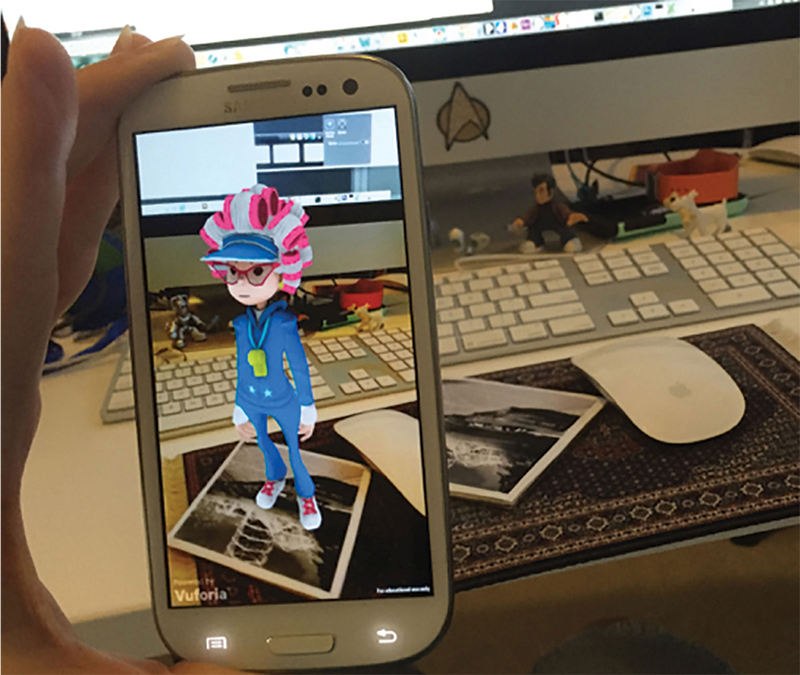
FIG 8.31 Augmented reality in action showing a virtual character projected onto a fiduciary marker.
Whether you are playing a game on a mobile device, desktop computer, or console, nowadays it is difficult to escape the social element. From creating personalized 3D avatars on Xbox live to inviting friends to farm virtual pastures in Facebook, the opportunity to boast about your fortunes (or misfortunes) in computer games now expands much farther than your immediate family and friends. Most computer games proudly display the Twitter, Facebook, OpenFeint, and other icons on their menu screens, encouraging you to share your gaming experiences with the wider community.
As online social networks have been developed by other parties, it is not always an easy process to integrate your game with their system. Fortunately, many developers provide application programming interfaces (APIs) for you to use in your own code. These are plug and play functions that you can call in your script to access their system’s functionality.
This section looks at two popular social network APIs and how they integrate with Unity. However, before these are covered, an overview of the data encryption process used by these, as well as the Apple App Store and Google Play, will be examined to put the process of connecting Unity apps to an external service in context.
8.6.1 External Application Security Matters
When dealing with Apple, Google, or other external services such as Facebook and Twitter, you will come up against what might seem like a very convoluted system for transferring data back and forth. However, these companies employ such techniques to ensure the safety and validity of the data. First of all, the company needs to give you permission to access their data and services, then you need to prove that you are who you say you are (each time you access their services), and then you should be able to send data securely between your application and theirs. This is where encryption is applied.
Encryption is a method of taking a message and transforming it so that it is incomprehensible. A very simple method is to assign numbers to each of the letters in the alphabet and then to rewrite a text message replacing the alphabetical letters with their numerical equivalents. For example, if A = 1, B = 2 up to Z = 26, then “holistic” encrypted would be “8 15 12 9 19 20 9 3.” Such an encoded string is referred to as cipher text. Taking the string of numbers and translating them back into the word is the process of decryption. What is known as a key is used to encrypt and decrypt the cipher text. To communicate using this method, the first party would use the key to encrypt the original message. On receipt of the encrypted message, the receiver uses the same key to decrypt and reveal the true meaning and content of the original message. This is not the most secure way to transmit sensitive information, as anyone in possession of the key—for example, someone intercepting it—could also decipher the message. If the key is used to encrypt the message, when the key itself is being communicated to the recipient, it is vulnerable. This particular process is referred to as symmetric cryptography and illustrated in Figure 8.32.
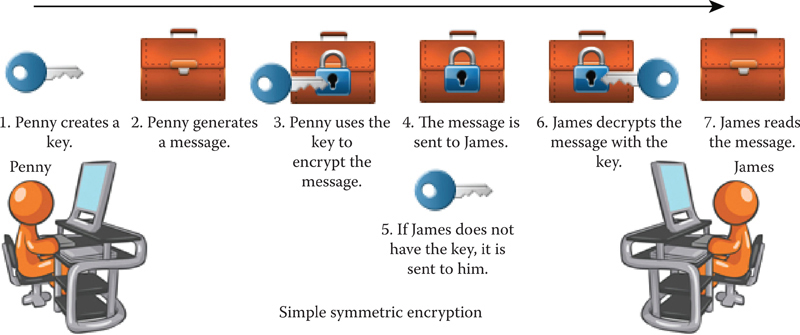
FIG 8.32 Symmetric cryptography.
A more secure technique for encryption is through the use of an asymmetric key algorithm known as public-key cryptography, in which there are two keys: a public key and a private key. The private key, you will see in many applications, is referred to as the secret key. The original sender generates both keys mathematically. The public key can decrypt messages encrypted with the private key, and the private key can decrypt messages encrypted with the public key. The private key remains with the original sender and is used to encode messages to be sent. The public key travels with the message and is used to decipher the message at the other end. As with symmetric cryptography, this specific part of the transaction is not secure. However, the recipient can then use the public key that they received to then encrypt a message intended for the original sender. Only the original sender can decrypt the message with their private key as it was created with their own public key. This process is illustrated in Figure 8.33. This is what sets public-key cryptography apart from symmetric cryptography.
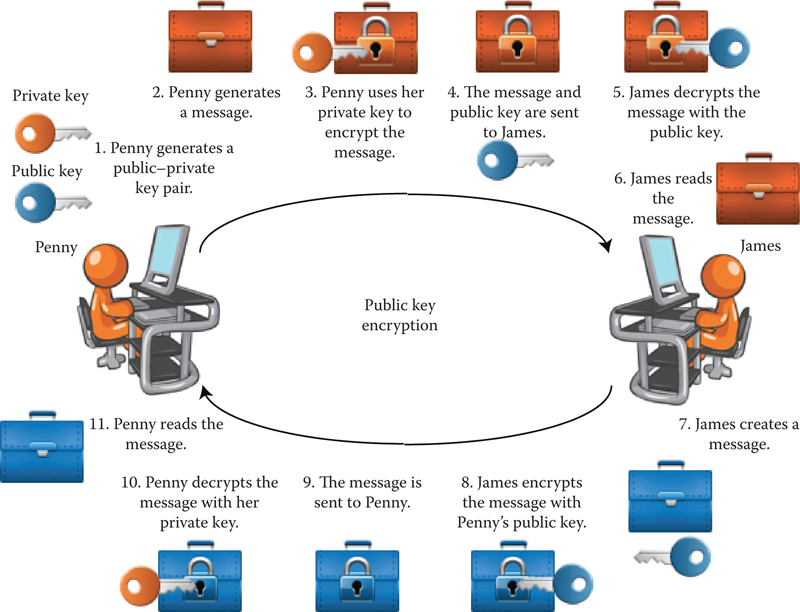
FIG 8.33 Public-key cryptography.
Because the original message and public key can be intercepted during transmission, it is difficult for the receiver to validate the authenticity of the original message. To partially solve this issue, public-key infrastructures exist in which third parties known as certificate authorities validate key pairs.
Public key encryption is used to create digital signatures. A digital signature is not that dissimilar to a handwritten signature or a wax seal on an envelope. In the case of the wax seal analogy, the private key used to sign the document is the sender’s seal stamp: it remains the private property of the sender. However, when the document reaches its destination, the wax seal can be used to identify the sender. An actual digital signature goes one step further, ensuring the integrity of the original message has not been altered. This would be like a protective covering on the wax-sealed document that turned the entire thing purple should someone try and modify the contents.
Before a sender can use a digital signature, they must have a digital identity. This identity consists of a public–private key pair and a digital certificate. The digital certificate proves the sender’s credentials and is provided by an independent certificate authority. The process is synonymous with having to produce your passport to prove your identity. The passport is a certificate, and the certificate authority, in this case, would be your country’s government. In the case of the wax-sealed letter, the sender who owns the seal would also have to produce an official document provided by, say, the king, to prove that their seal did in fact belong to them.
Twitter is a web service allowing people to post a message 280 characters long to a website. The message is not for anybody in particular, though Twitter allows other subscribers to follow the messages of another. In a way, it is a method for posting your thoughts at any time into cyberspace for nobody or everybody to read about. The Twitter.com website was founded by Jack Dorsey and launched in July 2006. Since then, it has grown to over 325 million users posting around 500 million messages (called tweets) a day.
Posting messages to Twitter on behalf of a user is a complex process. There are three authentication steps to which you need to adhere. The first step is to send Twitter a message from your application asking for permission to access the user’s account. The user’s web browser then opens, asking them if it is ok for the application that they are using to access their Twitter account. If the user permits this access, they receive a PIN number. The user enters this PIN number into the application. Following this, the application sends another message to Twitter telling Twitter that the application has the PIN. Once Twitter determines this PIN is correct, it sends personalized authority tokens back to the application. These tokens can be stored inside the application so the user doesn’t have to go through the authorization process again. With the tokens, the application can post tweets to the user’s Twitter account.
The process of user authentication with Facebook is similar to Twitter. Facebook also supplies programming interfaces in C++ and C# for XCode and Visual Studio programming.
The process of authorizing the player’s account is done through a series of web-based calls, as is the case with Twitter. Facebook, however, is a far bigger beast, and the amount of data you can obtain is very large. These data are organized into the Facebook Graph. In brief, it is a data network that links your own profile with that of your friends and their friends and their friends.
![]() Note
Note
As Twitter and Facebook control their own APIs and security, they are constantly in flux, which makes the job of keeping your application up to date an arduous task if you’ve written your own code to hook into their APIs. It is the author’s recommendation that if you are keen to explore working with Twitter and Facebook from inside your own Unity application that you check out the following links where more information is available on the process and plugins.
• https://developers.facebook.com/docs/unity/
• https://developer.twitter.com/en/docs/publisher-tools/twitterkit/overview.html
8.7 Platform Deployment: The App Store, Android Market, and Consoles
In the past, publishing a game was an exercise in self-publicity and tenacity. Small independent developers would have to approach the big publishing houses with their dreams of grandeur, convince the publishers to invest in their game, and then stick to strict milestones and release deadlines, for, in the end, what might amount to 7% royalties. While this situation is still possible nowadays and could lead a small development company to much fame and fortune via the publishers’ vast network of marketing resources, small independent developers do have many more options available to them.
8.7.1 Publishing for the App Store and Android Market
The App Store delivers developers’ games directly to the consumer, cutting out the middleman. Applications for iOS and Mac OSX+ are listed in the store, and the buyer can purchase over the Internet and download directly to their desktop computer or mobile device.
Applications written for the App Store must be developed with an XCode component. For example, Unity builds its code via XCode when pushing the application to the iPhone or iPad.
Developers wishing to put content in the App Store or on iOS devices must register as an Apple Developer. At the time of writing, this costs $99 per year. For this, the developer gets access to the Apple Development Network, beta releases of Mac operating system updates, and authentication protocols to build and push applications for testing to their mobile devices.
Once a game is ready for deployment, it is submitted to Apple for approval. This process can take up to 2 weeks. Apple has a checklist of the things they look for when approving an application, and it is prudent to check these off yourself before submitting. If there is something wrong with your application, you will have to fix it and resubmit for approval again.
Apple has a fixed pricing scale for all apps. The fees taken by Apple are different in different countries but equate to approximately 30%. For the latest information on the exact procedures, visit http://developer.apple.com/.
The Android Market has a more relaxed approach to app publishing. It currently requires a Gmail account and a small once-off fee of $25 to start selling apps. To get started, visit http://developer.android.com/index.html.
You will require the Android SDK to build applications. It is constantly being updated for new versions of Android, and to ensure your applications are compatible, it is best to update frequently.
To create an Android game, Unity functions in the same way as for iOS. The game is created in the Unity editor, and the final product is built via the Android SDK on its way to the mobile.
The different game console providers—including Microsoft, Nintendo, and Sony—have a variety of rules and regulations as to who can and cannot publish on their platforms. In the case of Nintendo, a games studio must complete an application form to be authorized as an official developer (http://www.warioworld.com/).
Microsoft supplies the free XNA Game Studio development kit for the creation of Xbox and Windows 7 desktop and mobile games. Independent developers can submit their game to the AppHub (https://dev.windows.com/en-us/develop) for listing in the Xbox Live Marketplace. Access to the AppHub costs $99 per year. All games submitted are peer reviewed, and those listed and sold receive 70% of the revenue.
To become an official developer for PlayStation or Xbox (which means your titles get published on DVD and marketed by the respective publishers) is quite a big hurdle. The application process involves proving to the publishers that you have a quite experienced team and around five AAA published titles under your belt. The development kits start from around $10,000 each.
For the reader interested in pursuing console development, here are some URLs worth checking out:
Microsoft: https://www.xbox.com/en-US/Developers/Home
Sony PlayStation: http://www.scedev.net/
Nintendo: https://developer.nintendo.com/
8.7.3 Download Direct to Player
Last but not least there is the option to self-publish and make your desktop playable game available for download on your own website or via a download client such as Steam or Direct2Drive.
A download client allows players to search through a multitude of titles online and purchase, download, and install directly onto their computer, much in the same way the App Store and Android Market work.
Steam is a platform consisting of a software client that runs on desktop computers and manages distribution, management rights, and multiplayer functionality. It was developed by Valve Corporation (the famous developers of the Half-Life games series) and released in 2003. Steam currently manages 781 million titles and has over 75 million active users. It manages games for both large publishing houses and small independent developers. Information on steam readying your game can be found at https://partner.steamgames.com/.
Direct2Drive is one of a number of online game stores with their own download clients. They are always looking to list and manage new game titles, even from small, unknown developers. They provide a digital shop front in numerous countries and manage player purchases. Like Steam, they too retain purchase records, so a player can download their game at any time. This is a useful service that means the player is not misplacing DVDs and jewel cases with serial numbers on them. It is all stored online and available as needed. Details of how to distribute through Direct2Drive is at their website: http://www.direct2drive.com/.
In this chapter we have examined some of the external mechanics and forces that drive game development in certain directions. If you are an independent developer, there has never been a better time to get your game out into the world on desktop computer, mobile device, or in the Xbox Live Marketplace. Relatively inexpensive high-quality tools, such as Unity, are bringing power to the people and allowing small, inexperienced teams to take their first steps. Online stores are also cutting out the publisher and allowing a more direct line to the consumer. While publishing someday with one of the big three might be your dream, there is no reason why your baby steps cannot start now.
The availability of SDKs and game engines that access all the hardware functionality features of new mobile and peripheral devices also means, as a game designer, that you can let your mind run wild. Finding clever new ways to interact kinesthetically with the virtual world could just give you the next big thing in computer games.
Whichever path you decide to take, know that the face of game design and development has taken a bigger turn in the last ten years than it ever did in the previous 50, and you no longer need to be a computer scientist to work with the technology and create really amazing and visually exciting games.
As I write this, Unity has endured for over ten years. It has grown considerably from a small Apple Mac–based games engine into a successful multi-operating system, cross-platform game development tool. Much of this success can be attributed to the way in which design and code are integrated in the software as a seamless mechanism enabling both artists and programmers to produce exciting content.
Games have become ubiquitous. They are everywhere, on every device and played by everyone. If this final chapter has illustrated anything, it is that technology is growing at break-neck speed. Developing games is no longer a matter of punching out some code and simple graphics. The processes have to change to consider a multitude of platforms and display types. As game artists and programmers, it is imperative that a single technology is never the focus of our efforts or learning. A strong foundation in theory has and always will be critical to see you adapt to the next hardware or software revolution thrown your way.
It is hoped that through the contents of this book you have gained a level of understanding that transcends technology and even the Unity game engine. It is your job now to put this knowledge to work and create the next generation of games and interactive experiences beyond all your teachers’ expectations.