
Chapter 7. Connectivity
Hacks 55–59
So, you’ve purchased all this equipment, and now it’s time to hook it all up. That’s going to involve cables—lots and lots of cables. And because every component serves a largely distinct function, you’ll need lots of different cables. Some carry multichannel audio; others transmit video; still others work best for single-channel audio. Getting good sound and video, though, involves more than just picking a cable that fits into the desired hole and plugging it in.
Cable Basics
Understand what makes a good cable, and understand which is the best cable for the job.
The manufacturers include cables with their equipment, but I suggest using these cables only temporarily until you can pick up something of decent quality. I usually recommend the RadioShack Gold Series cables as a good starting point, but you can work you way up to higher-quality cables from there. Before you go out and purchase these cables, though, you need to know what types of cables you require, what they’re called, and exactly what they are used for. I’ll be describing these cables based on the type of connector used and the actual design of the cable itself.
Tip
You’ll notice that every cable shown in this section is from Better Cables (http://www.bettercables.com). Although you might choose to go with a lower-end cable, such as ones from RadioShack, I can’t recommend Better Cables strongly enough. That company offers amazing cables, at very fair prices, and they are the only kinds of cables I buy for my own system at home.
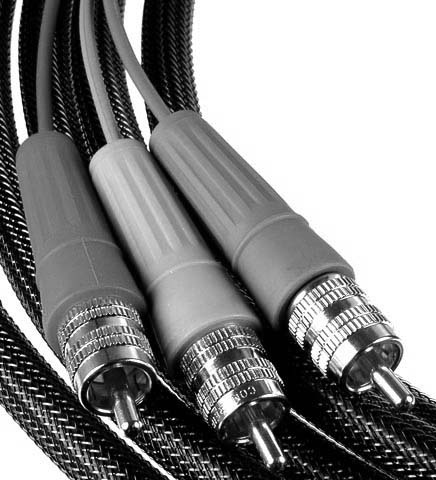
RCA-Analog Audio
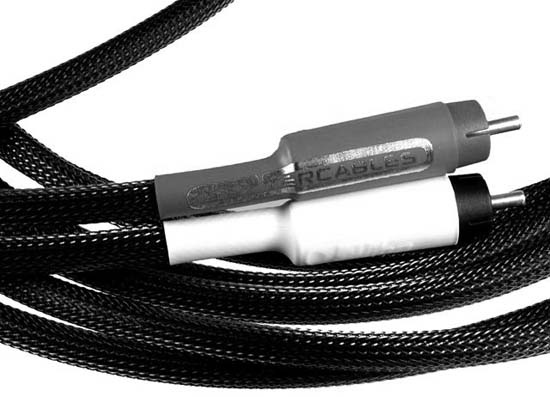
The most commonly used cables are analog audio cables, with RCA connectors on each end. These are the cables normally used to connect a tape deck, turntable, CD player, etc., to your receiver. They usually are color-coded with a red connector for the right channel and a white connector for the left channel (see Figure 7-1). There are also some multichannel sources which have an analog audio connection for each channel: left, right, center, surround left, surround right, and subwoofer.
RCA-Digital Audio
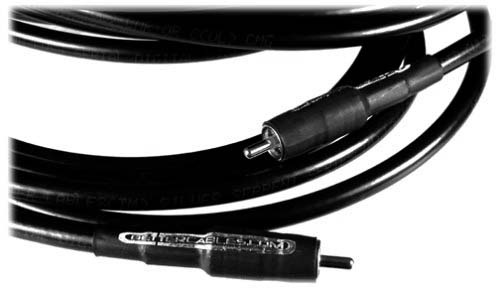
This also uses an RCA connector, but the cable itself is very different. Most DVD players have both analog and digital connections, but the digital connection is what is required to transmit Dolby Digital and DTS signals. The digital signal is meant to be carried by a 75-ohm RCA coaxial cable, which has a bandwidth of 6 MHz (see Figure 7-2).
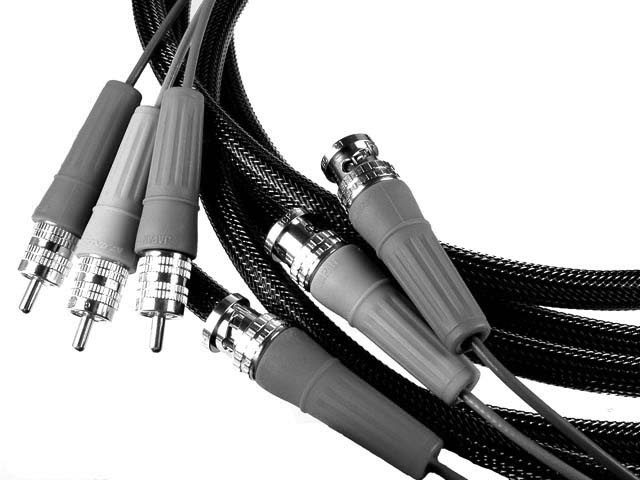
RCA-Composite Video
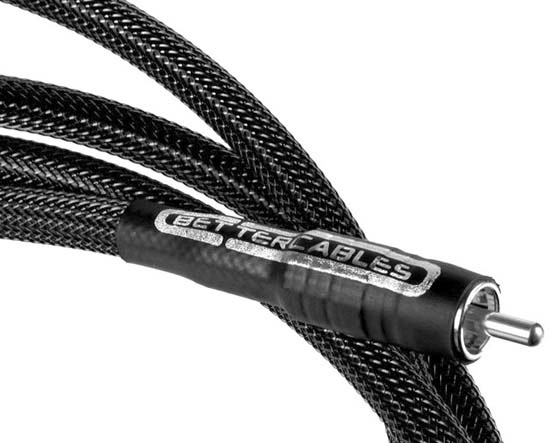
As you probably have noticed by now, the little RCA connector (see Figure 7-3) gets around a bit. It is used not only for audio connections, but also for video connections. In this case, it’s a single analog video connection. This cable, like the digital audio cable, should be a high-quality, 75-ohm coaxial RCA cable. Still, composite video is considered to be the lowest-quality video signal. S-Video connections are a noticeable improvement over composite, while component video connections are even better still.
S-Video
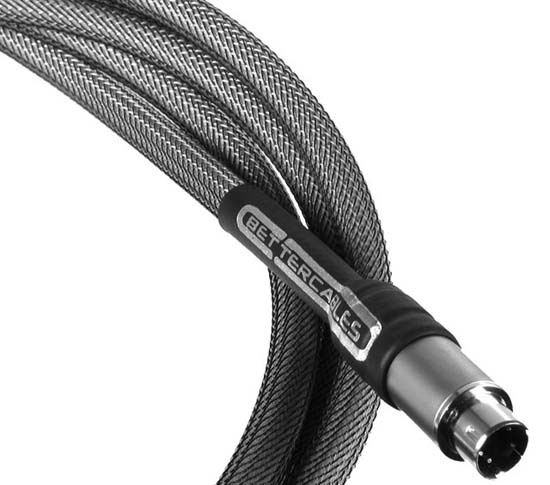
Another common video option is S-Video. Most midrange DVD players and TVs offer S-Video connectivity, and it is far superior to composite video. This is also the first of the newer cables that have a different connector. If you can, always use S-Video over composite (although you usually can improve by another order of magnitude if you’ve got the ability to use component video cables, detailed next). Figure 7-4 shows an example of this type of connector.
RCA-Component Video
I’m just about finished with the RCA connector, but before I move on, I need to talk about component video signals, which are the highest-quality analog video signals. These signals are divided among several cables (see Figure 7-5) and separated into multiple elements including the red, green, and blue color information, along with chrominance and synchronization information. On most consumer gear you’ll see these connections handled by three RCA connectors. They most commonly are labeled Y, Pb, and Pr. Y is the luminance, containing black and white information as well as brightness. The Pb and Pr signals carry color difference signals: Pb indicates the amount of blue relative to luminance, and Pr indicates the amount of red relative to luminance. Because the total brightness is supplied by the Y signal, the amount of green (which would be labeled Pg, I suppose) can be figured out from the difference between the blue and red and the total luminance. Once again, these signals should be handled by high-quality, 75-ohm video coaxial cable.
BNC
Although you can use BNC connectors for both composite and component video cables, you normally will find them only on professional video equipment. They are much more rugged, and actually lock into place when attached to the connection point on the equipment (see Figure 7-6). If it were up to me, these would be standard on consumer equipment because they offer a better connection than RCA connectors (used in both composite and component video cables). They also are easier to attach and remove than most of the standard coaxial F-connectors on TVs and VCRs. Keep in mind that any advantages of BNC are purely in connectivity rather than quality.
Tip
Some audiophiles argue that a better connection makes for better signal transfer. Although this is true, the connectivity improvement of BNC is largely about convenience; it won’t result in, say, the wires carrying more of the signal. I find no sound improvement in BNC versus composite or component video, although the usability is much better.
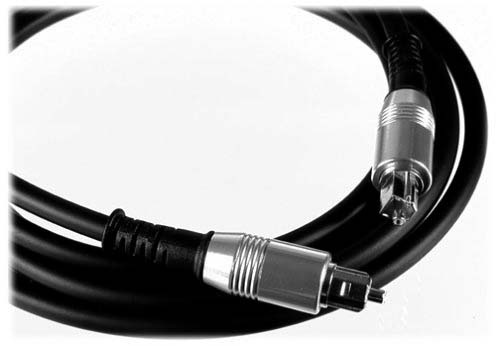
Optical
This cable is used in home theater for digital audio. It is often referred to as a Toslink cable, which refers to the type of connector found on each end of the cable (see Figure 7-7). This cable is used for the same application as the RCA digital cable described earlier. The major difference is that it is used to send optical signals via fiber optics. The positive side of these cables is that they aren’t susceptible to radio frequency or electromagnetic interference. The negative side is that they are much more susceptible to being damaged by being kinked or bent too sharply. As a result, the RCA digital cable is my choice for a digital interconnect whenever possible.
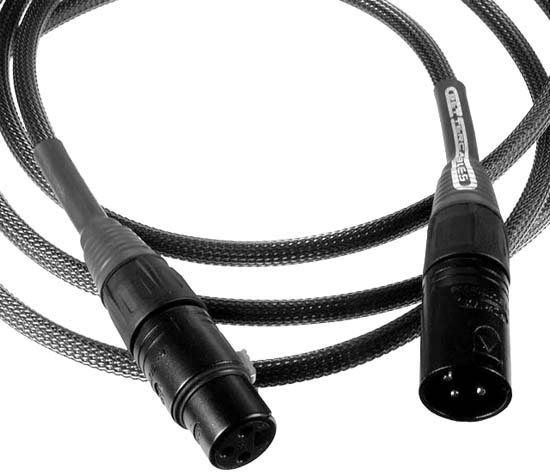
XLR
Higher-end audio processors often will allow for a balanced connection between the preamplifier/processor and the outboard amplifier. In these cases, you’ll need XLR cables, as shown in Figure 7-8. These are generally the very high end in terms of gear, so even midrange components won’t need these.
F-Connector
Most of you are familiar with this type of connector. It is the old screw-on coax cable connector that has been used to hook up cable TV and DBS satellite dish systems for years. In the past it was used solely for analog audio and video, but today it also can carry digital audio and video information.
— Brian Bunge
Watch Out for Entertainment Centers
There’s a tendency to want to load expensive equipment into expensive containers—usually a high-dollar, all-wood entertainment center. Watch out, though, as this could cost you time, energy, and all kinds of frustration.
Furniture manufacturers leapt into the home stereo and then home theater business early, and with both feet, with a wealth of “entertainment center” offerings.
Unfortunately, these attractive pieces of furniture can cause as many problems for your home theater as they solve. I’ll list some of the problems, and some of the solutions that you can undertake.
Problem #1: Overheated Equipment
Many home entertainment centers offer totally enclosed cabinets that are supposed to hold the electronics for the home theater. They even can include a solid set of doors for the front. But where does the heat get out? Amplifiers—and receivers in particular—generate a lot of heat, and totally enclosed shelves often result in an early death for your equipment due to heat stroke or stress.
Here are a few solutions to Problem #1:
Cut large openings in the back of any closed equipment enclosures, and don’t place the entertainment center right against the wall. This way hot air can escape out the back.
Remove any solid doors for equipment cabinets so that the heat can escape out the front (of course, this might ruin the very thing you liked about the entertainment center in the first place!).
Problem #2: Impossible Wiring Access
Fully enclosed equipment spaces also make it very difficult to wire a home theater. Sometimes the entertainment center manufacturers teasingly provide a few small holes or thin slots that are completely inadequate for the number of cables that usually have to be connected.
Here’s a solution to Problem #2:
Problem #3: Unusable Remote Controls
Doors that close over equipment shelves can sometimes block the signals from the remote controls.
Here are some solutions to Problem #3:
Remove the doors! Now the remote control can get to the equipment, and the equipment runs cooler, too.
Choose an entertainment center with doors that are transparent to the remote control signal.
Choose an entertainment center with no doors.
Choose an entertainment center with doors that hide away inside the cabinet when opened.
Problem #4: Bad Sound from the Speakers
Putting speakers into hollow wooden boxes (the spaces in the entertainment center where the manufacturer wants you to put the speakers) can often muffle the sound, much like cupping your hands over your mouth while talking.
Here are some solutions to Problem #4:
Mount the speakers on separate stands outside the entertainment center.
Buy a low entertainment center that only sits underneath the television and speakers, with the speakers on short stands to place them evenly centered about the height of the center of the television screen.
Place a good-quality, sound-absorbent material in the back of the enclosures where the speakers sit to kill the resonance of the enclosure so that the enclosure does not alter the sound of the speaker too much.
Make sure the speaker front edges are lined up with—or even slightly in front of—the front edge of the entertainment center.
Problem #5: Bad Stereo Separation
Stereo speakers or the left and right channels of a surround sound system setup must be placed an equal distance from either side of the television screen. As a starting point, the distance between the speakers typically should be slightly more than the distance between the viewer and the television screen.
Tip
Dolby Digital—equipped home theaters might be able to lessen this distance due to the excellent channel separation between the left, right, and center channels.
Entertainment centers can force you to place speakers in locations that violate these guidelines.
Here are a few solutions to Problem #5:
Modify any barriers or dividers in the entertainment center that prevent you from keeping speakers centered on the television.
Mount the speakers beyond the outside edges of the entertainment center using shelf brackets or similar hardware. Make sure the front of the speakers is not behind the front edge of the cabinet.
Mount the speakers on their own stands on either side of the entertainment center at the proper spacing.
Problem #6: Inflexible or Unmovable (or Both!)
People usually buy the entertainment center to “just fit” the television and other equipment they currently own. Then they’re stuck when they want to upgrade to something with different dimensions—particularly to a larger display! Large entertainment centers with no wheels also make it a nightmare to get behind the unit to do the original wiring or to rewire it later.
Here are some solutions to Problem #6:
Get a unit with some designed-in flexibility.
Get a unit with good wheels or casters.
Problem #7: Inconveniently Low Access
Some entertainment centers force you to place the electronic equipment all the way down near the floor. This places the equipment closer to the dirt, splashes, vacuum cleaner activities, and (heaven help us) very small children. It’s no fun having to get down on your hands and knees to push buttons, to put in a disk or videotape, or to remove a peanut-butter-and-jelly sandwich from the VCR.
Here are some solutions to Problem #7:
Buy an entertainment center that provides at least some equipment shelves at a convenient height.
Place the equipment that you need to reach most often at a location somewhere between waist and chest height. Place the other equipment that you don’t have to mess with very often down in the lower areas of the cabinet.
Problem #8: Speaker Blockage
The doors on some entertainment centers swing out in such a way that they block the sound of the speakers from getting to the audience. Even if they don’t block the sound completely, they can re-create the undesirable “hands cupped around the mouth” situation mentioned earlier. Subwoofers set next to an entertainment center also can get blocked by open doors.
Here are a few solutions to Problem #8:
Choose an entertainment center without doors or with doors that swing out of the way.
Remove the doors (are you detecting a theme here?).
Place speakers so that the doors don’t block them when the doors are open.
If you use small speakers and you have doors that open out to the left and right on either side of the entertainment center, consider trying to actually mount the speakers on the inside of the doors so that when the doors swing open, the speakers are in a good position.
Conclusion
If you get the impression that I am not in love with home entertainment centers, you have got it right! I feel the best compromise for folks with conventional TVs is a sturdy, somewhat low, open set of shelves which are high enough to put the television screen at a good viewing height with the TV sitting on top of the shelves, as shown in Figure 7-9.
That said, Ginni Designs (http://www.ginnidesigns.com/) offers some products that address some of the problems I mentioned. If you must have a “Nice Piece of Furniture” to justify all the money you are blowing on your home theater gear, consider the Ginni Designs products as a starting point. You also should consider going with equipment racks [Hack #7], or building your own TV stand [Hack #76].
— David Gibbons

Don’t Be Swindled into Buying Overly Expensive Cables
Many salespeople will try and get you to spend thousands of dollars—just on cables! Often this is just modern-day snake oil, so be wary of what you hear.
Wiring and cabling are the plumbing of your home theater. If a plumbing salesperson came to your house and told you that all your plumbing was inadequate and had to be replaced with $1,000-per-running-foot, gold-plated, high-pressure, 6-inch-diameter piping, you would tell him to go and (insert your favorite impolite phrase here).
Don’t be hustled by audio/video salespeople trying to sell you overspecified and superexpensive wiring and cabling. Here’s some information to help you understand what is important and unimportant about wiring and cabling.
About Wires and Electricity
Let’s start with a little bit about wires and electricity. Wires and electricity go together much like pipes and water go together. For plumbing, pipe is chosen on the basis of the pressure of the water, and how much water has to flow through the pipe. Corrosion resistance also is important. This is common sense; plus, there are lots of building codes to make sure the right type of pipe is chosen and installed in your home. The material, thickness, and diameter all need to be correct so that the water stays inside the pipe, and so that enough water can get to where it needs to go.
The same things are true of wires and electricity. Electricity is not exactly the same as water, but the same sort of ideas apply.
Water pressure=electrical voltage.
A pipe has to hold the pressure of the water inside it. A wire has to handle the voltage that is applied to it.
The highest voltage in home theater system cables and wires is actually the voltage on the AC main power cords. All the other voltages are much, much lower, and super-fancy insulation is therefore not required.
Water flow=electrical current.
A pipe has to be big enough to carry the desired flow of water. A wire has to be big enough to carry the desired flow of electricity.
The highest current flow in home theater system cabling and wiring is usually the speaker wire current. It is not much current, and thumb-thick copper conductors aren’t required.
Water’s sudden change in direction=electrical frequency/signal
Water doesn’t like to stop or change direction suddenly. You can prevent this effect, called water hammer, by putting together the piping correctly.
The direction of flow of electrical current can be changed very rapidly. However, cables, wires, and connectors that carry that electricity must be designed to handle the rate of change of flow of electricity (frequency) they are carrying. If these items aren’t designed and manufactured correctly, they can foul up the proper change of flow of electricity through them.
As the frequency increases, the cable and connector design and material must be able to carry the flow without problems. Almost any sort of solid connection works for audio frequencies. The frequencies coming from a broadcast cable system these days can be more than 100,000 times higher than the highest audio frequencies, and connectors and cables suited to handle those frequencies are required. Video frequencies are intermediate to the previous two, and thus cables for video frequencies need not be quite as good as the cabling required for broadcast cable wiring.
Pipes/corrosion resistance=wires and cables/corrosion resistance
Corrosion or contamination of a water pipe can cause either a blockage or a leak. Corrosion or contamination of a wire or cable can reduce the amount of flow of electricity, or mess up the proper change of flow of electricity through that wire or cable.
Pipe/watertightness=cables/shielding
A shield wrapped around a cable’s center conductor keeps the signal on the cable free from interference, and also keeps the cable’s signal from leaking out and interfering with other equipment. The low frequency and high power level in the speaker wires make shielding unnecessary for those wires. All other connections require shielded cables.
About electrical signals
An electrical signal is just a change in flow and/or direction of electricity, which is used to carry a message. You even can simulate this in a plumbing system:
Water on = the message “yes”
Water off = the message “no”
Because electricity is a lot neater and faster than water, we use it to carry signals in our home theater rather than water.
The Truth About “Wiring Upsell”
Let’s go back to that plumbing salesperson who was trying to sell you a pipe-upgrade job for your house. He told you 6-inch-diameter, gold-plated pipe will never corrode, will be sure to carry all the water you’ll ever need, and will never affect the taste of your water. He’s telling you the truth!
So, why did you tell this salesperson to take a hike? Because you know the plumbing you have is good enough. You know it would be better to spend your plumbing upgrade money on a better bathtub or a better sink. The exact same principle applies for wiring and cabling on home theaters!
For the ordinary home theater, money spent on extra-fancy cabling and speaker wires is a waste. The salesperson in the home theater store will try to sell you wires and cables that are the electrical equivalent of the insanely expensive pipe mentioned in the earlier example. Yes, the wire he’s trying to sell you will carry lots of electricity. Yes, the cable is more corrosion-resistant and will carry high-frequency signals better. He even will show you articles in fancy home theater or audio magazines that praise the wire or cable the salesperson is trying to sell you.
Tip
Ask yourself where those magazines get their advertising dollars. Ask how profitable the “high-end” wire and cable can be for the home electronics stores.
You need to remember the phrase “gold-plated pipes” when reading or listening to these pitches.
Wiring Recommendations
Enough theory; I’m going to make some recommendations on the right amount of quality you should pay for in the wiring and cables for your home theater.
Speaker wires.
Type SPT lamp cord is plenty good for speaker wire. Eighteen-gauge is heavy enough, unless you have long runs—say, more than 30 feet. Then you could use 16-gauge wire. I specify this type of wire because it is very durable. You can step on it, set furniture on it, and bend it back and forth a lot before the wire will fail. You can buy good-quality, type SPT lamp cord in bulk at your local hardware or electrical store for only around 15 cents per foot.
Warning
Really cheap stuff sold as “speaker wire” is typically inflexible and will fail quickly if it is bent back and forth a few times. Further, the insulation quality of “speaker wire” is sometimes poor, and can actually contribute to wire corrosion. Stay with the type SPT cord.
Reliability can be a problem where the speaker wire attaches to the amplifier and the speaker. Putting connectors [Hack #44] on the ends of the wires can help.
You can buy expensive hook-up connectors of various types, but inexpensive crimp-type solderless spade tongue terminals are available at your local hardware store and will work well to make a good connection to the terminals on the speakers and amp. Get a matching crimp tool from the hardware store and securely crimp a connector on each wire end, taking care that no bare wire is exposed outside of the crimp connector. Having no exposed bare wire avoids short circuits.
Tip
If your equipment has the little spring-clamp-type connectors, you can cut off one of the two prongs on a spade tongue terminal and stick the remaining prong into the hole where the wire goes. However, Thomas & Betts makes a crimp terminal especially suited for connecting speaker wires: ask for the Thomas & Betts type TV14-18BL blade crimp terminal at electrical supply houses.
Banana-type connectors are a somewhat more expensive, but convenient, option where the speaker and amplifier terminals will accept them. Again, look for ordinary ones, such as those sold by Pomona Electronics, and avoid the gold-plated “high-end” versions. Whatever connections you make, ensure they are clean and tight.
Audio “line-level” signal cables.
Audio frequencies don’t require fancy cables either. Good-quality shielded cabling with decent RCA connectors will do the job. Gold plating is not required, although these days you might not be able to avoid it. L-com (http://www.web sitesL-coml-com.com) offers excellent value in its RCA cable assemblies, found in the Video/Monitor cable section of the company’s web site. RadioShack is probably the nearest local place to get the cables you need to carry the audio signals between the different pieces of gear in your system.
Video signal cables
We are caught in an interesting situation on the subject of the cables and connectors used to carry the video signals used in home theater systems. A long time ago some unknown engineer, probably working for RCA, designed a little connector for connecting cables to (it is said) phonographs. Supposedly, this is why RCA connectors also are known as phono connectors. This type of connector is inexpensive, and is not a precision connector designed to carry radio frequency signals. Unfortunately, the manufacturers of television and consumer audio/video equipment some-how ended up using this inexpensive connector for carrying low-level video signals.
The phono connector obviously works. Millions of home theaters have them carrying video signals. People get decent pictures. Still, audio/video cable marketers tell us that if we spend lots of money on fancy cables to carry the video signals, our pictures will be much better.
The problem is that every piece of wire and connector between a radio frequency signal source and a radio frequency signal receiver affects the signal. When I talk about a signal source, I am talking about the actual integrated circuit buried inside your DVD player that is creating the video signal. When I talk about the signal receiver, I am talking about the integrated circuit in your receiver which takes the video signal from your DVD so that it can be passed on to the TV. The circuit board traces, jumper wires, jacks, plugs, interconnect cabling, etc., all affect the signal going from one integrated circuit to the other.
Think of a chain: the weakest link determines the strength of the chain. If you increase the strength of most of the links in the chain, the chain is not much stronger. With the RCA connector being what it is, spending big dollars on a fancy cable that connects to those connectors might not be the best use of your money.
Once again, using regular L-com or RadioShack RCA cables to carry the video between the different pieces of gear in your home theater will deliver very good pictures. If you would rather spend $300 just for one video cable (solid silver conductors, triple shielding, super-duper connectors, etc.), go for it. However, spending the $300 to help buy a new television that costs $280 more than the one you were going to buy and a plain $20 video cable probably will improve your picture far more.
Antenna/broadcast cable connections
As with the video signals, various problems make interconnect cable replacement with top-dollar cables an unlikely route to a perfect picture. Consider all the following (negative) statements:
The quality of the signal provided by a rooftop antenna is typically so-so, at best.
What passes for a signal coming from your local cable company is usually just that: passable.
The F-connector that is used to connect the so-called “RF” signal to your set top box, VCR, receiver, or television is a poor conductor.
In these cases, super-duper connection cables again might not make a big improvement, except to the bank accounts of the people who make and sell those types of cables.
Even so, let’s look a little at the F-connector, as it does perhaps justify considering somewhat better cable assemblies for more reliable connections. Even more than the phono connector, the F-connector is a miserable consumer-grade connector.
Due to the low performance of the typical F-connector, the best inter connect cables in the world won’t fix all the F-connector’s problems. That being said, a somewhat better interconnect cable with better connectors featuring properly shaped gold-plated center pins can improve contact reliability. Of course, F-connectors mounted on televisions and VCRs have a cheap internal center contact that is prone to damage and corrosion, so even then you’re still fighting your own equipment. Once again, L-com offers very good RG-6 cable assemblies fitted with better-quality F-connectors at good prices.
Here are some final thoughts on cables:
The quality of the cable shielding, and the quality of the soldered or crimped connections that join the cables to the connectors, probably matters the most for long-term reliability and signal quality. Single-braided or foil shielding is good, particularly for the video and the antenna/broadcast cable connections.
Unscrew the cable connector covers if you can, and inspect the actual connections inside the connector. Are crimps tight? Are no loose parts or unsoldered strands of wire floating about? Great cables cannot make up for a connector that is poorly assembled.
Are plugs firmly seated when connected to the jacks? The plug’s firm grip on the outer, shielded part of a phono connector is important for good shielding.
A true performance nut would replace all the phono-type video jacks and the F-connectors on the back of all his home theater equipment with different connectors, which would perform excellently at the required frequencies.
I guess it would be an interesting electronics project, even if it voided the warranty, chanced damaging the equipment, and didn’t make a big improvement in the picture. Then again, I bet you could find someone who would charge you an arm and a leg to do it for you!
If you think very expensive connectors and cables make your system sound and look great, I won’t argue with you. I’m talking to the ordinary person who wants to make the most of a limited home theater budget.
Here’s to spending your home entertainment dollars wisely!
— David Gibbons
Use Your Receiver for Video Switching
Run all your theater’s non-component video sources through your receiver, and switch devices through the receiver.
One of the most frustrating situations in home theater is hooking up all your components and getting no picture from a particular device. It’s a big shock to install a new home theater receiver and hear great sound, but see no video. Video cables are running to the receiver, one cable connects that receiver to your TV, yet you can see no picture.
The problem here is that most receivers will not switch video signals from one type of cable to another. For example, a VCR that is connected to your receiver with RCA cables will not display a picture on a TV connected to that receiver with S-Video. The receiver is incapable of converting an RCA signal (from the VCR) to S-Video (which runs to the TV). It’s only in the very high-dollar ranges that this is a feature of receivers and processors.
To avoid this problem, use S-Video cables to connect all devices to your receiver. Your DVD player(s), cable and satellite receivers, and even your gaming systems should all have S-Video outputs. Some older VCRs don’t have S-Video outputs, but you can buy an inexpensive composite-to-S-Video adapter from RadioShack (part #15-1242) to provide an S-Video output. The quality isn’t great, but you aren’t going to get good quality from a composite video signal in the first place. This solution ensures that all video coming into your receiver is in the S-Video format.
Then connect your receiver to your TV with an S-Video cable. Now all your devices will properly display on your TV, in S-Video format. Of course, you also might want to use component video (and you should, if at all possible). You can use the component switching of your receiver [Hack #59], combined with your TV’s component inputs, to handle these inputs. Finally, train your family and friends to use your receiver as the brain of your system, switching audio and video sources with the receiver remote. As long as you’ve got proper ventilation, this will not wear out your receiver, and you’ll have your audio and video tied together through the receiver.
— Robert McElfresh
Understand Component Video Switching
One of the most frustrating things in home video is running all your component video-capable devices into your video output. Get around the limitations of your processor and monitor with a little knowledge about component video bandwidth requirements.
If you’ve got a DVD player, HDTV cable or satellite receiver, PlayStation 2, and Xbox, you’re probably running short of component video inputs. This turns out to be one of the major problems in home theater, albeit one that you can solve easily if you get past the (inaccurate) assumptions made at the local water cooler. Most home theater enthusiasts will insist that running your component video cables through the inputs on your receiver, processor, or even an A/V switch will cause the signal to deteriorate. Instead, they’ll tell you, everything should be connected straight to your TV or projector. Because most display devices have only two, or possibly three, component inputs, this can be a real problem, but most people are afraid to use their processor’s component video switching abilities. However, that’s precisely the right way to get around a lack of inputs on your monitor.
Use the component switching on your receiver or processor for all your higher-end components, such as DVD players and HDTV receivers. Most processors will have at least two component video inputs, and some even have three these days. Then, use an A/V switch (see Table 7-1) when you need additional component inputs for gaming or additional video devices.
|
Manufacturer |
Unit/part number |
Functionality |
Price |
Comments |
|
RadioShack |
15-1976 |
Four input, one output, manual switch |
$40 |
Not rated for HD, but works well for folks on a budget. |
|
RadioShack |
15-1977 |
Four input, one output, remote-controlled switch |
$60 |
Not rated for HD, but works well for folks on a budget. |
|
RadioShack |
15-1987 |
Six input, two output, remote-controlled switch |
$150 |
Not rated for HD, but works well for folks on a budget. Ideal for gamers with multiple systems. |
|
JVC |
JSX111 AV |
Three input, one output, manual switch, with S-Video jacks |
$100 |
Not rated for HD. |
|
AV-Toolbox |
AVT-5842 |
Four input, two output, IR-controlled switch |
$90 |
HD-rated. Bright green color might not be com color might not be complementary to other equipment. |
|
Inday |
RGB4X-R |
Four input, one output, remote-controlled switch |
$149 |
Excellent HD-rated unit. |
|
Audio Authority |
1154 |
Four input, one output, manual switch |
$200 |
One of the best HD-rated units. |
|
Zektor |
HDS4 |
Four input, one output, IR-controlled switch with coaxial and optical inputs and conversion |
$300 |
One of the best HD-rated units. Built like other high-end components, providing extra stability. |
Many of these switches are built with the same components that go into midrange, and particularly high-end, receivers and processors. Avoid the misconception that you need a standalone box just to prove to your friends that you’ve spent the most money. The switches in Table 7-1 are great if you don’t have enough component inputs on your receiver, but they aren’t needed as a replacement for your receiver.
— Dr. Robert A Fowkes, Robert McElfresh, and Brett McLaughlin