
Chapter 10. Remote Controls
Hacks 84–89
Imagine the joy of inviting over your closest friends to check out your new home theater system. You’ve got the expensive sconce lights dimmed, the curtains drawn over your projector screen, and all your gear elegantly tucked away into cabinets that match the wood veneers of your speakers. Your 7.1-channel processor is glowing, and speakers are all around. Your friends sit down, ready to see and hear something special…
…and they’re greeted with the sounds of you fumbling around in a drawer. They begin to snicker as you pull out first one remote, and then another, and then yet another. Ten minutes later, you’ve managed to get the curtains open and the sound working, but instead of Stargate, the picture on the screen is of a little cartoon girl with her monkey friend, apparently saying something about a backpack. You’ve been completely embarrassed by the smallest, but arguably the most important, part of your home theater system—the remote control.
No matter how sophisticated your home theater system is, your remote has to be more so. In fact, as this little anecdote illustrates, your remote better be able to handle everything your system has to offer, without a hitch and without needing a stand because it’s huge and unwieldy. Welcome to the world of remote controls.
Add a Programmable Remote
Once you have your basic home theater components, you need to buy a good programmable universal remote. It’s worth more than luxury seating, theater lighting, and great cabinets combined.
There’s nothing as annoying as walking into a $20,000 home theater, sitting down in a plush leather chair, and noticing six or seven remote controls strewn about the room; it’s one of the ultimate turnoffs in home theater today. To avoid just such a situation, purchase a good programmable remote control for your home theater. But be warned: these units aren’t super-cheap, and often, so-called bargains turn into full-fledged disasters.
First, avoid the $20 “universal remote” at all costs. The typical universal remote (which is not the same as a programmable remote) has hundreds of brand codes, for all types of different devices, built into it. Although this might sound like what you want, realize that it is limited by the specific codes input into it when it left the factory. These become out-of-date very quickly, and often don’t contain codes for higher-end brands anyway. A much better idea is to buy a programmable remote, which allows you to program your existing remote control codes into it. This means that as long as you have a remote or infrared (IR) code, a good programmable remote can learn it and can operate devices in your theater. This is the ultimate insurance that your remote won’t go out of style, even as you upgrade and change equipment.
Tip
As proof of this, I’ve been into home theater for almost 10 years now, and I still own and use my very first programmable remote, the Marantz RC5000. Although I bought a color unit for my theater, my Marantz still happily runs both my bedroom and living room setups.
Before diving into specifics, you need to know a few important terms.
- Macros
Macros are sets of commands strung together under one heading (or, in the case of remotes, one button). A typical macro would be
Watch TV, which might change a receiver input, select an aspect ratio on the TV, and power up the satellite receiver.- Activity-based remotes
Activity-based remotes are macro-based, allowing for one-touch operation of complex functions. Additionally, these remotes respond to a specific activity by displaying options relevant to that activity; so,
Watch TVmight result in channel buttons being displayed, and DVD and VCR controls being disabled or hidden.- Touch-screen remotes
Touch-screen remotes operate based on the user touching a graphical icon rather than pushing a physical button. These often are preferred because you can customize the “buttons” of a touch-screen remote with fancy icons and animations to interact with and illustrate what is going on in the home theater system.
Although many good programmable remotes are available, home theater enthusiasts have settled on a few select models as the standards. You’ll find that high-end devices even come with preprogrammed setups and codes for these specific remotes, so you’d do well to go mainstream instead of blazing a trail and trying to be different in this area. Determining which of these remotes to get becomes largely a matter of budget, as Table 10-1 details.
Tip
Marantz typically produces rebranded versions of the Philips TSU remotes; for example, the RC5000 and RC5000i are rebranded versions of Philips’ TSU1000 line of remotes. There is no functional difference, and these devices are interchangeable.
Most home theater users settle on either the monochrome or color Philips TSU models because they are a great blend between power and value, and ProntoEdit is a killer software application [Hack #85] . If you’ve got a tight budget, the Harmony Remote (http://www.logitech.com/harmony) is a great buy, and for those who insist on the very best, the Crestron certainly won’t disappoint.
Program Your Remote with ProntoEdit
Download and set up the ProntoEdit software for programming your Marantz and Philips remote controls.
If you’ve got a programmable remote control, don’t even bother with the instructions detailing how you can program the remote by hand. That process is incredibly time-consuming and frustrating, and doesn’t make available even half of the remote’s true capabilities. Instead, head on over to the Mecca of remote control web sites: Remote Central (http://www. remotecentral.com). There, you can find files and utilities for every conceivable remote control, and especially for the Marantz and Philips units. The program you’re looking for to get the most out of those models is called ProntoEdit, and you can find it by clicking the Files link in the top menu bar of the Remote Central web site. (Drill down into Phillips Pronto & Pronto Pro, then into Original PC Software, and select Philips Pronto Series.)
Tip
Mac users are out of luck; as of this writing, there are no Mac-friendly versions of ProntoEdit, and Remote Central provides only PC-compatible software.
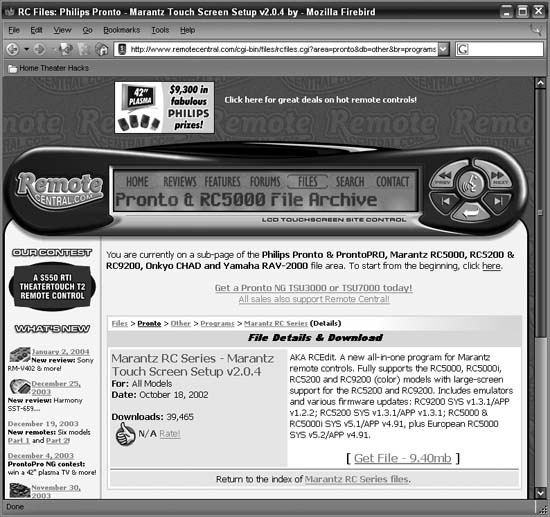
When the Files area comes up, select your brand of remote control. The Philips Pronto and ProntoPro as well as the Marantz RC5000 lines use the same program. If you’ve got a newer model, such as the Philips TSU3000, there is a separate link; you’ll also find a number of other remote controls represented, along with utilities and setup files. Still, if you’ve got a unit that works with ProntoEdit, you won’t want to look elsewhere. On that page, scroll down and select Original PC Software, select your brand and model number, and download the latest version of ProntoEdit. As an example of what to expect, Figure 10-1 shows the final screen before downloading ProntoEdit for a Marantz RC5000i.
Tip
Most of these remotes come with software on a CD. Don’t bother with the CD; the software is often out of date, and you’re always better off going straight to Remote Central.
Once you download the software, you can install it and fire it up. Select the version of the remote that you have to avoid memory problems when programming and uploading files.
You’ll also need the remote-to-serial-port connection cable that came with your remote (shown in Figure 10-2).

Connect one end of this cable to your remote and the other to your computer. Now you can upload and download configurations, as well as update your remote control’s firmware.
Updating Your Firmware
Keeping your remote control’s firmware up to date is an important part of home theater maintenance. You’ll find that with the latest software, your remote behaves better, and often will even have a longer battery life than with older software.ProntoEdit (and RCEdit, Marantz’s branded version of the same program) makes this update easy via an automated update (and download) process.
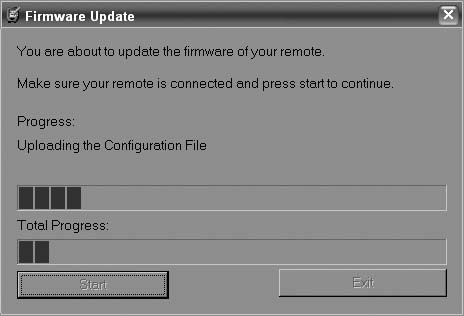
Start up the editor, select Tools → Update Firmware, and then choose your remote’s model. You’ll get a progress screen, and then you can click to start the update (shown in Figure 10-3). You also can choose whether you want to keep your old configuration file (you generally will).
Create Custom Graphics for Color Remotes
Most high-end color remotes allow you to create custom graphics and icons. These can turn a decent-looking setup into a killer one and really spruce up your control system.
Once you’ve gotten a good programmable remote such as the ProntoPro [Hack #84] , you’ll soon find that working with the default icon set is really limiting. If your remote interfaces with your computer [Hack #85] , though, you can remedy this easily with a decent graphics program and some creativity. Most of these programs allow you to create custom graphics, load them into the program, and then use those graphics in your remote control’s layouts.
That said, the purpose of this hack is not to tell you how to design your Philips ProntoPro or aid you in coming up with an original layout, but rather, to assist you in obtaining graphics of the best possible quality, regardless of your artistic abilities. There’s no reason why your remote shouldn’t look the best it can! Most graphic artists or web developers will already know many of these tricks, but for anyone who is new to bitmap editing or who has not yet designed a graphical remote control, there are some important techniques that you might not be aware of.
This hack focuses specifically on the ProntoPro in terms of working with the software. However, the guidelines for icon design are useful for any color remote (and probably black-and-white remotes as well).
Tip
ProntoEdit uses CCF files for its layouts (e.g., theater.ccf) so, when you see CCF, it refers to an entire layout complete with commands, graphics, and macros.
The graphics I used in my CCF file I created as vector artwork in CorelDRAW 10, then converted to ProntoEdit-ready bitmaps via Corel-PHOTO-PAINT 10. Although I have experience with these programs, almost any vector and bitmap-editing software have similar capabilities— and limitations.
Choose Colors That Work
Naturally, ProntoPro isn’t as graphically capable as your desktop PC. This is a given with the obviously limited black-and-white Pronto, but might need clarification on the color ProntoPro: the word color doesn’t actually imply a PC-quality interface. First, most computer desktops are set to run in 64,000 or 16.7 million colors, which results in photorealistic images. The ProntoPro can display 256 colors—a far cry from millions, or even tens of thousands, of colors. Two hundred and fifty six colors might still sound like a lot, until you work out exactly how many shades of red, yellow, blue, orange, green, purple, black, etc., are possible.
Thus, when designing, it’s always a good idea to first test out how your graphics will look when converted to a limited color set. The color bars in Figure 10-4 demonstrate this issue. On the left side of each bar is a 24-bit, 16.7-million-color gradation, as your computer would normally display, and on the right side of each bar is an 8-bit, 256-color image as the ProntoPro would display. You can see how much rougher the bars are on the right. What this amounts to is a limitation to how much fine detail the remote can reproduce faithfully. For instance, green might not be the best color choice if your design involves a lot of small, detailed buttons because the end result would be fairly crude. Finally, never start off working in 8-bit color; for best results always use 24-bit color and convert down to 8-bit later.

Another consideration in color choice involves what ProntoPro’s screen can actually show. The “passive matrix” LCD in most color remotes doesn’t reproduce colors exactly like your computer. What looks great in ProntoProEdit might not look quite as good on the actual remote. Remember that colors on the remote will be more washed out. Dark colors will tend to fade out to black, while very light colors will disappear into white. For best results, always use strongly contrasting colors to differentiate your buttons from the background and the text labels from your buttons. Avoid using similarly toned colors; for instance, don’t place medium-red buttons on a medium-blue background.
Smooth Out Images with Antialiasing
Simply put, antialiasing is a method of smoothing out the edges of images, eliminating what are commonly referred to as jaggies. This is a technique similar to Windows’ built-in font smoothing, which makes screen fonts easier to read. For example, instead of creating a black object solely out of black, the edges of the object are filled in with different shades of gray (see Figure 10-5). So, a small circle appears as a smooth, even curve rather than a jagged stack of Lego bricks.
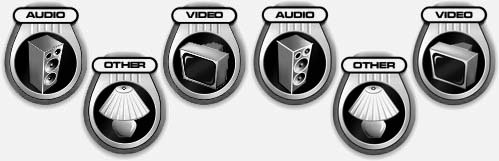
You can use this professional technique for a lot more than just sharply contrasting objects. For instance, look at the two examples in Figure 10-6. The one on the left was created without antialiasing, while the one on the right was created with antialiasing. You’ll notice that the right-side graphic appears to have greater detail and is more pleasant to look at. Thus, when importing or creating graphics for your remote, always ensure that the “antialiasing” or “smoothing” option is enabled. This will give your remote’s user interface a truly refined look.

If such an option isn’t available, you might be able to emulate this function by resizing a larger image to a smaller one; keep reading for more on this approach.
Think Big, Finish Small
Although this might seem like a strange idea, it’s always better to start off with an image larger than you need. To be specific, if you start off with an image at least four times bigger than the finished piece will be, the end result will be that much better.
Over the years, I’ve found that creating graphics at a ratio of 1:1 (actual size)—although resulting in decent-quality images—just isn’t quite as good as starting off larger and then resizing to a smaller size afterward. I imported all the images in my ProntoPro layout from vector artwork four or eight times as large as I wanted them, then shrunk them down to the proper dimensions. This allows the software’s resizing algorithms, which generally are better than the import or creation algorithms, to refine larger amounts of detail and come up with the best-looking image.
Compare the two examples in Figure 10-7 closely. The one on the left was originally imported at 250 pixels wide with antialiasing enabled, while the one on the right was created at 1,000 pixels wide, then resampled down to 250 pixels with antialiasing. Look closely at the television, the text, and the vertical lines immediately below the text.
Even if you’re not starting off with a vector-based file and instead are working solely in a bitmap-editing program, you still can obtain better results, especially from special-effects filters, if you work on a larger file.
Convert to the Right Colors
As already mentioned, ProntoPro is capable of displaying 256 colors (8-bit). However, those colors can’t be any 256 of your choosing; you must work with the remote’s preset palette. Although specifications claim that the remote uses a 215-color “web-safe” palette, this isn’t completely accurate. The first 215 colors of ProntoPro’s palette are indeed made up of 215 “web-safe” colors; however, an additional 41 colors are specified—mostly pinks, blues, and grays. So, because this doesn’t match up with any default palette, this presents a tricky issue: exactly how can you take advantage of these “hidden” colors?
If you merely convert an image to the 215-color “web-safe” palette, you’ll be losing out on a lot of color—particularly gray shades. Some users have found that the default “Windows system” palette that many programs include uses the “web-safe” palette and adds an additional number of gray shades; however this still doesn’t make use of everything that your remote is capable of. To find out what colors are valid, load up the default configuration in ProntoEdit and start the ProntoProEmulator. Take a screen capture by pressing Print Screen, then start up your favorite bitmap-editing program and load the capture. Most programs will allow you to take the color palette stored in that file and save it to disk for use later in converting 24-bit “true-color” images.
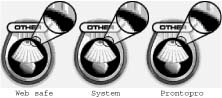
Take a look at the three examples in Figure 10-8. The one on the left was converted to the “web-safe” palette. The graphic in the center uses the “system” palette, while the one on the right uses the true "ProntoPro” palette. The enlarged sections show the difference that some additional gray shades can make. One of the reasons my layout uses a lot of blues and grays is because that’s what ProntoPro’s color palette leans toward. Note that most of these additional colors aren’t mentioned anywhere in ProntoProEdit, and can be discovered only by the method outlined earlier.
Dithering Is a Must
Something that goes hand in hand with using the right color palette is a technique called dithering. Dithering is a method of alternating a limited number of colors to emulate an even greater number. Remember those strong, stepped colors in Figure 10-4? You can “smooth these out,” as it were, by using dithering. Although quite a few automated dithering techniques have been created over the years, I can only suggest using one of the randomized versions (often called error diffusion) to convert your image from 24 to 8 bits.
Observe the differences between the examples in Figure 10-9. Both images use the ProntoPro color palette and antialiasing. The image on the left uses no dithering, while the image on the right employs diffused dithering. You might think the differences are negligible, but it’s these small touches that take “good” to “professional.”
The green bar in Figure 10-10 demonstrates the difference between 24-bit true color (left bar), ProntoPro normal (middle bar), and ProntoPro dithered (right bar). Although ProntoEdit can do some image conversion, it does a poor job of color selection and dithering. You always are better off doing this beforehand, even for the black-and-white Pronto remotes.


Tweak, Hack, Play
Even if you employ all of these techniques, there’s often still a need for manual editing. Some dithered pixels might be in places you don’t want them to be; a small bit of text might not be quite readable; you might find that part of an image looks good with dithering while the rest doesn’t. A little bit of hand editing can go a long way toward a perfect layout. Figure 10-11 shows two examples. One uses all the suggestions made earlier, while the other uses none. Quite a difference!
Learn IR Codes the Smart Way
When you just can’t get your programmable remote to learn that certain code from the manufacturer’s remote, you might have to do things manually. There are tons of tricks to get to harder IR codes.
If you’ve ever tried using your programmable remote [Hack #84] to learn infrared codes off of myriad remotes, chances are you’ve hit upon a few trouble-some buttons. There are those that your programmable remote just wouldn’t learn properly, and those that, once learned, don’t seem to work as they should. Although there might be some very good reasons why a particular IR code can’t be taught, there are a few special learning techniques you can try before pulling out your hair.
Press or Hold?
The most accepted method of teaching another remote an infrared code is by holding down the original button until the programmable remote finishes capturing the code. In fact, this is how the process usually is described in manuals. Continually sending a signal allows the remote to sense its auto-repeating portion and store it once, properly.
Tip
There are some situations where a particular remote requires a different learning technique; if you experience problems, be sure to read your remote’s original documentation.
Even when following directions, often one or two buttons from a particular remote will simply refuse to learn. It’s even been reported that codes for entire brands can experience problems. In these cases, it’s worthwhile to try pressing the button just once, briefly. You might want to experiment by pressing for different lengths of time, but generally a good solid push is all that’s required.
The reason this “single-push” technique is not normally recommended is because learning remotes are generally unable to sense repeating codes when buttons aren’t held down (repeating codes are needed for commands such as Volume Up and Fast Forward to work properly). Plus, the remote might store the signal one and a half or even two times, wasting valuable memory. But when you simply must learn a particular button, this technique can be helpful.
Proper Spacing
The sensitivity of your learning remote’s eye (the IR sensor) can play a large part in determining how far apart your remotes should be from each other when learning commands. Though most manuals recommend 4 to 6 inches, certain original remotes can send a particularly strong signal that can overwhelm the target remote’s circuitry. By placing the remotes further apart, often more than 1 foot, you provide a weaker, easier signal to learn. Conversely, remotes with faint IR beams might need to be placed as little as 1 or 2 inches away. Finally, you can try placing the remotes at a 45° angle if you continue to have problems.
Replace the Batteries
Yes, your original remote might appear to still work...but if you’re having trouble learning from it, its signal strength might be too weak or erratic to be picked up properly. Simply installing brand-new batteries can solve your difficulties. If you use NiCads, you might find you need to recharge them more frequently than you would have to replace alkalines because NiCads tend to lose their charge at a fairly fast rate, even when sitting idle.
Weak batteries also generate poor-quality signals with fluctuating code structuring and frequency. The original remote might still work with your devices, but these unreliable signals can cause serious issues when captured and then reproduced.
Lights Out!
Attempting to learn codes in a dark or near-dark room can help with some difficult remotes or buttons. In particular, some fluorescent light fixtures emit a fair amount of IR interference at 50 or 60 Hz that can confuse your learning remote. Incandescent bulbs and plasma televisions also can throw off great quantities of infrared light that can overwhelm sensitive learning remotes.
Software or Hardware?
If you own a Philips Pronto, Home Theater Master MX-700, or other computer-programmable remote control, you have the option to program your remote through a personal computer. Although this is usually the best option, you might find certain codes that the software reports as properly learned don’t, in fact, work during testing. The software might even filter or process codes in a way dissimilar to the hardware, causing certain protocols to fail completely.
Something that you might want to try in situations such as these (particularly with the Pronto) is to use the learning function of only the hardware. Unplug the remote from your PC, and learn everything through the built-in menus. In many cases, codes that don’t work through the software are captured perfectly. Alternatively, if you are having a similar problem with one of these remotes but aren’t using the PC software, you might want to try it.
If your remote’s computer software has a Test button to transmit an infrared signal through a connected remote, don’t rely on this to test learned signals. Instead, to test codes, download your complete configuration to the remote and use the buttons on the remote, not your software simulator.
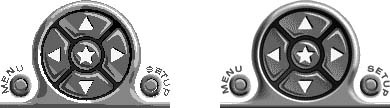
Right Side Up
Can’t figure out why not even one command will learn? Something that has stumped more than a few users is that the learning eye on certain popular remote controls is not at the front of the unit, but is instead on the bottom.
Two-Way Confusion
Two-way IR equipment is gear that sends infrared signals back to the remote when activated. This is common in components that have higher-end displays and want to indicate state to the remote. If you use two-way IR equipment, such as many high-end receivers or DVD jukeboxes, you might find that infrared signals sent from the device back to the remote can interfere when attempting to learn codes. To provide a clean IR environment, you instead should learn codes in another room, out of sight of the original equipment.
IR Reflections
Sometimes, learning signals on a glossy or reflective table surface can produce IR reflections that confuse the learning remote. Instead, try learning codes on a matte or soft surface, or try placing the remote you are learning to slightly off the table’s edge, and then hand-holding the remote you are learning from.
Duck Blind
In the rare case that none of the previous tips works, you might want to try another, more complicated, method. When placing both remotes head-to-head, place a book or magazine in between them. Make sure the book is of sufficient size to block the infrared signal completely. Then, start pressing the button you want to learn on the original remote and continue to hold it down. Set the target remote to learn mode and, while continuing to press, remove the magazine. This blocks off the initial burst of code and, in situations where that burst confuses the learning remote, can sometimes allow a remote to pick up the remaining important parts.
This method also is handy when trying to learn a particular segment of code from a “hardcoded macro” button. For instance, many Sony receivers have input source selection buttons that perform various steps besides changing the receiver’s inputs; they also can turn on the TV and change its video input. The problem with this is that the code becomes too long to be learned, and so the whole thing is rejected. The idea is to remove the magazine and put it back so that only the short portion of code you desire is seen by the learning remote. This might take many tries before you can claim success, but it could be worth it. This also works with some “system on” and “system off” buttons, and can work with other mysteriously long infrared sequences.
The Flutter Effect
Is nothing working? Then you might want to try "fluttering” the code. To do this, set your learning remote ready to capture, and then quickly and repeatedly press the source button as many times as you can in one second, effectively sending brief “bursts” of the command to the remote. You might want to experiment with exactly how quickly you flutter the button.
Flyboy
Here’s one final method you can try: set your learning remote ready to capture, but this time start with the source remote a distance away—perhaps 6 to 8 feet. Start pressing the source button and then, while continuing to hold down the button, quickly move the original remote closer to your learning remote. Although this is effectively similar to the duck blind technique (see the section “Duck Blind”), it has helped in rare situations. You might want to try combining this with the flutter effect (see the section “The Flutter Effect”).
Out of Memory?
Another explanation as to why your remote won’t learn a particular code could be that its memory is full. Some remotes have the capability to store only a few codes—15 or 20—though most should be able to hold many more. Low-memory remotes include the Marantz RC2000, Sony RM-AV2000, almost anything from One For All or RadioShack, and many “learning” remotes that ship with televisions or receivers.
To save space, try to use preprogrammed codes first, and use the learning function only to fill in holes for other unsupported devices. Plus, remember to use the “Hold” method detailed in the section “Press or Hold?” because quite a bit of space can be wasted if you unnecessarily use the “Press” method. If all else fails, try resetting the remote and starting over from scratch, being careful not to make too many mistakes that can fragment memory on older, less advanced models, and reduce their overall capacity.
—Daniel Tonks, Remote Central
Work around Proprietary Remote Systems
Sometimes you’ll find that even the trickiest tricks won’t get your remote codes to work correctly. In these cases, you might have a proprietary system that just won’t play nicely. Learn how to work around even these problem children of the remote control world.
In the rare cases where you have a component that doesn’t respond to any other IR trickery [Hack #87] , you might have stumbled onto one of the so-called proprietary systems of the remote control world. These are products from manufacturers who, for one reason or another, just don’t play nicely with programmable remotes [Hack #84] . This is pretty annoying, so here’s what to look out for and (in most cases) how to work around the problem.
Sony VisionTouch
Folks with an older Sony receiver who have just purchased a brand-new learning remote might ask, “Why won’t my new universal remote learn any codes from my receiver?”
The very first thing you should check is your receiver. See if the word VisionTouch is printed on the faceplate, if the model number ends with G, or if it came with the Air-Egg remote. If any of these items is true, chances are you are the proud owner of one of Sony’s infamous VisionTouch (also known as CAV) controlled systems. The short answer to your problem is that almost no learning remote can work with a VisionTouch receiver (nice surprise, huh?).
A longer explanation is that the VisionTouch system uses a 455-kHz carrier frequency which uses a completely unique IR protocol that is unlearnable by almost every universal remote to date, including the Philips Pronto and Sony’s own models. In fact, you can’t use “normal” Sony remotes or IR codes to control the receiver; even the Sony RM-AV3000 won’t work.
Affected models include the STR-DA90ESG, STR-DE805G, STR-DE815G, STR-DE905G, STR-DE1015G, STR-D760Z, STR-G1ES, STR-G3, STR-GA9ESG, TA-VE800G, and TA-VE810.
If you own one of these models, your options are:
Buy a One For All remote and mail it in to the manufacturer for its new June 2003 preprogrammed code set.
Continue using the original remote alongside a universal for the rest of life of the system.
Buy a new receiver.
Buy a Philips Pronto, build a special IR demodulator cable, and download the VisionTouch CCF file.
Spend the money on an RTI TheaterTouch T2, which is the absolute only remote that can learn and transmit VisionTouch codes directly.
High-Frequency IR Systems
Several brands of equipment feature IR systems that operate at frequencies much higher than normal. Though the overwhelming majority of IR remotes operate in the 30– to 40-kHz range, several brands and components don’t. Equipment from Bang & Olufsen, some Kenwood equipment, and some lighting control systems use a 455-kHz frequency. More unusual and difficult to work with are the Pioneer and Pioneer Elite components built around 1997 that use a 1.125-MHz carrier frequency.
The only remote that can begin to cover all those frequencies is the Marantz RC2000 MkII, featuring IR coverage up to 1.125 MHz (the original RC2000 will not work). Pioneer owners also can use regular 40-Hz codes from older and newer equipment.
The Philips Pronto models [Hack #85] are capable of learning up to only about 56 kHz, although they have the ability to send at much higher frequencies. However, Philips has devised a way in which its remotes can capture certain high-frequency Bang & Olufsen and Kenwood codes through a trick whereby the remote “guesses” what the code should be via information received at a low frequency, and then matches it up to a high-frequency database version. Codes not previously decoded by Philips can’t be learned as well, however.
If you need only 455-kHz coverage for Bang & Olufsen devices, most of Sony’s newer remotes (such as the RM-AV3000, RM-AV2100, RM-VL900, and RM-VL700) are capable of capturing up to 500 kHz.
Pace Cable Boxes
Having trouble getting your Pace cable box to operate with your snazzy new learning universal remote control? Well, you might have one of Pace’s infamous IRDA boxes. For its 1000 and 2000 series digital cable boxes, Pace designed a remote control using a protocol not actually designed for remote control use. The IRDA variant it used was intended for high-speed data transfer over short distances (such as from a laptop to a printer) instead of using the slow-speed/long-distance standard for remote controls. The IRDA standard specifically includes a format for remote controls; Pace just decided to ignore it.
Trying to learn such codes is much like asking an AM radio to receive FM signals—it simply isn’t possible. At this time, the only remote controls that can offer even partial functionality are certain models from One For All, and even then you’ll most likely have to ship the remote to the factory for these codes to be added. Apparently, TiVo also is releasing a converter for control of these devices. More recent—and older—Pace models aren’t affected by this problematic protocol.
Parity Bits
A somewhat common problem is when a device (such as a cable box) will accept a learned code once, but not twice in a row. For instance, you can enter the channel 12, but not 33. This is not the fault of your new remote, but rather, a very-hard-to-work-with design employed by your equipment.
In these situations, your original remote tacks on a parity bit to the end of each code. So, the first time it sends the code (say, a 3), it follows up that code with a 0. The next time it sends the code (another 3), it ends the code with 1. So, your equipment wants to get the code for 3 followed by a 0, and then the code for 3 followed by a 1, to recognize 33.
The problem is that a learning remote can learn or send the signal only one way: the way it learned it. That will be either 3 with the 0 at the end, or 3 with the 1 at the end, never both. Your equipment, unfortunately, will not accept the repeated code unless that code ends with a new parity bit or you send a different code to clear the memory buffer.
The Philips Pronto is the only remote I am aware of that can learn codes with alternating parity bits in the method required for several (but not all) brands of equipment. Using this approach, your button for 3 would send the 3 code followed by another special code to clear the buffer.
But what should that code be? Anything the equipment senses as a real code but doesn’t affect operation. So, if you can find a “do-nothing” code, you’re in business. However, it might be next to impossible to find such a code for many devices. So, even with the Pronto, you’ve got a problem that might not have a solution.
RF Satellites
For anyone attempting to consolidate all their remotes into a single unit, satellite systems can pose a potentially major problem: radio frequency (or RF) through-the-wall controls. As satellite receivers are the only mainstream audio/visual devices manufactured today using this technology, IR universal remotes don’t include RF support.
Satellite receivers come with either an RF-only remote, or an RF and IR remote. In the former case, you should contact your manufacturer to determine if your model still has IR capability (most do today), in which case you can purchase a new remote or capture the codes from another preprogrammed model. For the latter, you might have to make a choice between RF and IR; most receivers can’t operate with both activated at the same time. You can find this adjustment in the receiver’s setup screens and you probably will have to toggle it to IR before the remote will transmit IR signals.
Tricking Sony DSS receivers.
A trick is available for the Sony SAT-A2, A3, and A4 receivers that will allow use of both RF and IR at the same time:
Ensure you’re already in RF mode.
Press MENU, 9 (SETUP), 1 (REMOTE).
Select REMOTE CODES, which will bring up a list of various devices.
Now select TV CODES to bring up the list of TV codes.
Press EXIT.
Your DSS receiver now should be in a mode where it will respond to both IR and RF codes at the same time. However, you might encounter two problems with this setup. First, if you use the RF remote in the same room as the receiver, it might respond to both RF and IR signals at the same time, as though you pressed the button twice, although this doesn’t occur very often. Second, if you have another similar DSS receiver, you can’t use this trick, as it always appears to default to the same RF security code (001), meaning that both RF remotes end up controlling both receivers.
If your receiver doesn’t include infrared support, you will need to continue controlling it via the original remote (you can up-fit older RF-only DISH receivers with IR).
Other RF Equipment
All other RF equipment, such as most Bose systems, can’t be controlled by any universal remote currently in existence. Don’t be confused by remotes advertising RF capability; this is not for the control of RF devices, but rather, for controlling IR components from other rooms. The remote sends an RF signal to a base station in the same room as your equipment, which then rebroadcasts it as infrared. There is no way to consolidate control of an RF-only device into a third-party remote, learning or otherwise.
X10 Automation
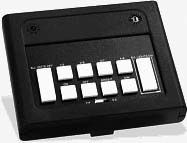
If you’re currently using a wireless remote to control your X10 home automation system, it’s most likely transmitting via RF signals to a transceiver. The transceiver plugs into the wall and resends commands as actual X10 signals through the house wiring. If you want to use a universal remote to control your system you will need to purchase an IR-to-X10 transceiver, which takes IR signals from your remote and rebroadcasts them directly as X10.
The only such economical device that I’m aware of is the IR543, shown in Figure 10-12. It is a small, black console unit with white buttons on the top for manual control of up to eight devices on a particular house code. Note that the console can control only one house code at a time and that the IR codes remain the same no matter which code it is set to, making it nearly impossible to work with more than one house code at a time.
Many inexpensive preprogrammed remotes include compatible X10 codes. Pronto users can download a complete X10 CCF file for control of a full 16 modules. Owners of other learning remotes might want to purchase an inexpensive X10 IR remote direct from their X10 dealer to capture codes. Though more expensive and complicated home automation systems exist— some, such as those by JDS Technologies, also can work via IR remotes— the price of the IR543 can’t be beat.
Remember that X10 is not an RF-based technology. You can control it via a radio frequency remote, just as you can with an infrared one. X10 actually sends commands through the electrical wiring in your house. This means that any X10 transmitter plugs into the wall, including the IR543 IR-to-X10 controller mentioned earlier, as well as RF-to-X10 and manual pushbutton-to-X10 consoles.
European owners of the Philips Pronto NG RU950 remote controls are in a special situation. Because the RF frequencies of the RU950 and X10 RF transceivers are identical, it’s possible to use the built-in RF section of the RU950 to operate those transceivers (thus avoiding the purchase of an IR transceiver). An appropriate PCF file with codes is available on Remote Central (http://www.remotecentral.com). This is absolutely the only exception to the “can’t control RF devices” rule, and it will absolutely not work with the TSU3000 in North America.
—Daniel Tonks, Remote Central
Disable NetCommand for Faster Response
For users with a NetCommand remote control and Mitsubishi TV, certain functions can be extremely slow. Disabling NetCommand can help out, and it’s easy if you know the right code sequence.
I recently had to recalibrate a Mitsubishi TV set on which I had already recentered the picture [Hack #31] once before. That first time, it took forever to get the fine convergence done; however, it was time-consuming because I had to wait for the TV to respond to the remote, not because it was an overly complex task.
When I came back to calibrate the set again, I realized the TV’s remote control had NetCommand (http://www.mitsubishi-tv.com/netcommand.html), which is, of course, enabled by default. NetCommand, unique to Mitsubishi TV sets, attempts to control all your devices with a graphical user interface, all through the TV. Although that sounds pretty cool, it results in most commands taking a while to execute, as one command might attempt to perform multiple functions, on multiple devices, throughout your system.
When you’re calibrating your TV, or working with one particular unit, this extra functionality doesn’t help you; in fact, it can drastically slow you down (like my calibration attempts the first time around). The easy fix is to just turn off NetCommand. Go into another room, so your TV won’t pick up commands, and follow this sequence:
Press and hold the Power button.
While holding down Power, press 0, then 0 again, and then 0 once more.
Release the Power button.
This turns off NetCommand. In my case, I was able to go back into the TV room and cruise through calibration in no time. To turn NetCommand back on, again leave the room and use this sequence:
Press and hold the Power button.
While holding down Power, press 9, then 3, and then 5.
Release the Power button.
You’ll be amazed at how much time this will save you!
—Robert Jones, Image Perfection