2
Basic Commands and Directory Hierarchy

This chapter is a guide to the Unix commands and utilities you’ll encounter throughout this book. This is preliminary material, and you may already know a substantial amount of it. Even if you think you’re up to speed, take a few moments to flip through the chapter just to make sure, especially when it comes to the directory hierarchy material in Section 2.19.
Why Unix commands? Isn’t this a book about how Linux works? It is, of course, but Linux is a Unix flavor at heart. You’ll see the word Unix in this chapter more than Linux because you can take what you learn straight over to BSD and other Unix-flavored systems. I’ve attempted to avoid covering too many Linux-specific user interface extensions, not only to give you a better background for using the other operating systems, but also because these extensions tend to be unstable. You’ll be able to adapt to new Linux releases much more quickly if you know the core commands. In addition, knowing these commands can boost your understanding of the kernel, as many correspond directly to system calls.
2.1 The Bourne Shell: /bin/sh
The shell is one of the most important parts of a Unix system. A shell is a program that runs commands, like the ones that users enter into a terminal window. These commands can be other programs or built-in features of the shell. The shell also serves as a small programming environment. Unix programmers often break common tasks into smaller components and use the shell to manage tasks and piece things together.
Many important parts of the system are actually shell scripts—text files that contain a sequence of shell commands. If you’ve worked with MS-DOS previously, you can think of shell scripts as very powerful .BAT files. Because they’re important, Chapter 11 is devoted entirely to shell scripts.
As you progress through this book and gain practice, you’ll add to your knowledge of manipulating commands using the shell. One of the best things about the shell is that if you make a mistake, you can easily see what you typed to find out what went wrong, and then try again.
There are many different Unix shells, but all derive features from the Bourne shell (/bin/sh), a standard shell developed at Bell Labs for early versions of Unix. Every Unix system needs a version of the Bourne shell in order to function correctly, as you will see throughout this book.
Linux uses an enhanced version of the Bourne shell called bash or the “Bourne-again” shell. The bash shell is the default shell on most Linux distributions, and /bin/sh is normally a link to bash on a Linux system. You should use the bash shell when running the examples in this book.
2.2 Using the Shell
When you install Linux, you should create at least one regular user to be your personal account. For this chapter, you should log in as the regular user.
2.2.1 The Shell Window
After logging in, open a shell window (often referred to as a terminal). The easiest way to do so from a GUI like Gnome or KDE is to open a terminal application, which starts a shell inside a new window. Once you’ve opened a shell, it should display a prompt at the top that usually ends with a dollar sign ($). On Ubuntu, that prompt should look like name@host:path$, and on Fedora, it’s [name@host path]$, where name is your username, host is the name of your machine, and path is your current working directory (see Section 2.4.1). If you’re familiar with Windows, the shell window will look something like a DOS command prompt; in macOS the Terminal application is essentially the same as a Linux shell window.
This book contains many commands that you will type at a shell prompt. They all begin with a single $ to denote the shell prompt. For example, type this command (just the part in bold, not the $) and press enter:
$ echo Hello there.Now enter this command:
$ cat /etc/passwdThis command displays the contents of the /etc/passwd system information file and then returns your shell prompt. Don’t worry about what this file does right now; you’ll learn all about it in Chapter 7.
Commands usually begin with a program to run and may be followed by arguments that tell the program what to operate on and how to do so. Here, the program is cat, and there is one argument, /etc/passwd. Many arguments are options that modify the default behavior of a program and typically begin with a dash (-). You’ll see this shortly in the discussion of ls. There are some exceptions that don’t follow this normal command structure, however, such as shell built-ins and the temporary use of environment variables.
2.2.2 cat
The cat program is one of the easiest in Unix to understand; it simply outputs the contents of one or more files or another source of input. The general syntax of a cat command is as follows:
$ cat file1 file2 ...When you run this command, cat prints the contents of file1, file2, and any other files that you specify as arguments (denoted by ... in the preceding example), and then exits. The program is called cat because it performs concatenation when it prints the contents of more than one file. There are many ways to run cat; let’s use it to explore Unix I/O.
2.2.3 Standard Input and Standard Output
Unix processes use I/O streams to read and write data. Processes read data from input streams and write data to output streams. Streams are very flexible. For example, the source of an input stream can be a file, a device, a terminal window, or even the output stream from another process.
To see an input stream at work, enter cat (with no arguments) and press enter. This time, you won’t get any immediate output, and you won’t get your shell prompt back because cat is still running. Now type anything and press enter at the end of each line. When used like this, the cat command repeats any line that you type. Once you’re sufficiently bored, press ctrl-D on an empty line to terminate cat and return to the shell prompt.
The reason cat adopts an interactive behavior here has to do with streams. When you don’t specify an input filename, cat reads from the standard input stream provided by the Linux kernel rather than a stream connected to a file. In this case, the standard input is connected to the terminal where you run cat.
Standard output is similar. The kernel gives each process a standard output stream where it can write its output. The cat command always writes its output to the standard output. When you ran cat in the terminal, the standard output was connected to that terminal, so that’s where you saw the output.
Standard input and output are often abbreviated as stdin and stdout. Many commands operate as cat does; if you don’t specify an input file, the command reads from stdin. Output is a little different. Some programs (like cat) send output only to stdout, but others have the option to send output directly to files.
There is a third standard I/O stream, called standard error. You’ll see it in Section 2.14.1.
One of the best features of standard streams is that you can easily manipulate them to read and write to places other than the terminal, as you’ll learn in Section 2.14. In particular, you’ll learn how to connect streams to files and other processes.
2.3 Basic Commands
Now let’s look at some more Unix commands. Most of the following programs take multiple arguments, and some have so many options and formats that an unabridged listing would be pointless. This is a simplified list of the basic commands; you don’t need all of the details just yet.
2.3.1 ls
The ls command lists the contents of a directory. The default is the current directory, but you can add any directory or file as an argument, and there are many useful options. For example, use ls -l for a detailed (long) listing and ls -F to display file type information. Here is a sample long listing; it includes the owner of the file (column 3), the group (column 4), the file size (column 5), and the modification date/time (between column 5 and the filename):
$ ls -l
total 3616
-rw-r--r-- 1 juser users 3804    May 28 10:40  abusive.c
-rw-r--r-- 1 juser users 4165    Aug 13 10:01  battery.zip
-rw-r--r-- 1 juser users 131219  Aug 13 10:33  beav_1.40-13.tar.gz
-rw-r--r-- 1 juser users 6255    May 20 14:34  country.c
drwxr-xr-x 2 juser users 4096    Jul 17 20:00  cs335
-rwxr-xr-x 1 juser users 7108    Jun 16 13:05  dhry
-rw-r--r-- 1 juser users 11309   Aug 13 10:26  dhry.c
-rw-r--r-- 1 juser users 56      Jul  9 15:30  doit
drwxr-xr-x 6 juser users 4096    Feb 20 13:51  dw
drwxr-xr-x 3 juser users 4096    Jul  1 16:05  hough-stuff
You’ll learn more about column 1 of this output in Section 2.17. You can ignore column 2 for now; it’s the number of hard links to the file and is explained in Section 4.6.
2.3.2 cp
In its simplest form, cp copies files. For example, to copy file1 to file2, enter this:
$ cp file1 file2You can also copy a file to another directory, keeping the same file name in that directory:
$ cp file dirTo copy more than one file to a directory (folder) named dir, try something like this example, which copies three files:
$ cp file1 file2 file3 dir2.3.3 mv
The mv (move) command works much like cp. In its simplest form, it renames a file. For example, to rename file1 to file2, enter this:
$ mv file1 file2You can also use mv to move files to other directories in the same way as cp.
2.3.4 touch
The touch command can create a file. If the target file already exists, touch doesn’t change the file, but it does update the file’s modification timestamp. For example, to create an empty file, enter this:
$ touch fileThen run ls -l on that file. You should see output like the following, where the date and time indicate when you ran touch:
$ ls -l file
-rw-r--r-- 1 juser users 0  May 21 18:32  file
To see a timestamp update, wait at least a minute and then run the same touch command again. The timestamp returned by ls -l will update.
2.3.5 rm
The rm command deletes (removes) a file. After you remove a file, it’s usually gone from your system and generally cannot be undeleted unless you restore it from a backup.
$ rm file2.3.6 echo
The echo command prints its arguments to the standard output:
$ echo Hello again.
Hello again.
The echo command is very useful for finding expansions of shell globs (“wildcards” such as *) and variables (such as $HOME), which you will encounter later in this chapter.
2.4 Navigating Directories
The Unix directory hierarchy starts at /, also called the root directory. The directory separator is the slash (/), not the backslash (). There are several standard subdirectories in the root directory, such as /usr, as you’ll learn in Section 2.19.
When you refer to a file or directory, you specify a path or pathname. When a path starts with / (such as /usr/lib), it’s a full or absolute path.
A path component identified by two dots (..) specifies the parent of a directory. For example, if you’re working in /usr/lib, the path .. would refer to /usr. Similarly, ../bin would refer to /usr/bin.
One dot (.) refers to the current directory; for example, if you’re in /usr/lib, the path . is still /usr/lib, and ./X11 is /usr/lib/X11. You won’t have to use . very often because most commands default to the current directory if a path doesn’t start with / (so you could just use X11 instead of ./X11 in the preceding example).
A path not beginning with / is called a relative path. Most of the time, you’ll work with relative pathnames, because you’ll already be in or near the directory you need.
Now that you have a sense of the basic directory mechanics, here are some essential directory commands.
2.4.1 cd
The current working directory is the directory that a process (such as the shell) is currently in. In addition to the default shell prompt in most Linux distributions, you can see your current directory with the pwd command, described in Section 2.5.3.
Each process can independently set its own current working directory. The cd command changes the shell’s current working directory:
$ cd dirIf you omit dir, the shell returns to your home directory, the directory where you started when you first logged in. Some programs abbreviate your home directory with the ~ symbol (a tilde).
2.4.2 mkdir
The mkdir command creates a new directory dir:
$ mkdir dir2.4.3 rmdir
The rmdir command removes the directory dir:
$ rmdir dirIf dir isn’t empty, this command fails. However, if you’re impatient, you probably don’t want to laboriously delete all the files and subdirectories inside dir first. You can use rm -r dir to delete a directory and its contents, but be careful! This is one of the few commands that can do serious damage, especially if you run it as the superuser. The -r option specifies recursive delete to repeatedly delete everything inside dir. Don’t use the -r flag with globs such as a star (*). And above all, always double-check your command before you run it.
2.4.4 Shell Globbing (“Wildcards”)
The shell can match simple patterns to file and directory names, a process known as globbing. This is similar to the concept of wildcards in other systems. The simplest of these is the glob character *, which tells the shell to match any number of arbitrary characters. For example, the following command prints a list of files in the current directory:
$ echo *The shell matches arguments containing globs to filenames, substitutes the filenames for those arguments, and then runs the revised command line. The substitution is called expansion because the shell substitutes all matching filenames for a simplified expression. Here are some ways to use * to expand filenames:
at*expands to all filenames that start withat.*atexpands to all filenames that end withat.*at*expands to all filenames that containat.
If no files match a glob, the bash shell performs no expansion, and the command runs with literal characters such as *. For example, try a command such as echo *dfkdsafh.
Another shell glob character, the question mark (?), instructs the shell to match exactly one arbitrary character. For example, b?at matches boat and brat.
If you don’t want the shell to expand a glob in a command, enclose the glob in single quotes (''). For example, the command echo '*' prints a star. You will find this handy for a few of the commands described in the next section, such as grep and find. (You’ll learn more much about quoting in Section 11.2.)
There is more to the shell’s pattern-matching capabilities, but * and ? are what you need to know now. Section 2.7 describes glob behavior with those funny files that start with a dot.
2.5 Intermediate Commands
This section describes the most essential intermediate Unix commands.
2.5.1 grep
The grep command prints the lines from a file or input stream that match an expression. For example, to print the lines in the /etc/passwd file that contain the text root, enter this:
$ grep root /etc/passwdThe grep command is extraordinarily handy when operating on multiple files at once because it prints the filename in addition to the matching line. For example, if you want to check every file in /etc that contains the word root, you could use this command:
$ grep root /etc/*Two of the most important grep options are -i (for case-insensitive matches) and -v (which inverts the search—that is, prints all lines that don’t match). There is also a more powerful variant called egrep (which is just a synonym for grep -E).
grep understands regular expressions, patterns that are grounded in computer science theory and are very common in Unix utilities. Regular expressions are more powerful than wildcard-style patterns, and they have a different syntax. There are three important things to remember about regular expressions:
.*matches any number of characters, including none (like the*in globs and wildcards)..+matches any one or more characters..matches exactly one arbitrary character.
2.5.2 less
The less command comes in handy when a file is really big or when a command’s output is long and scrolls off the top of the screen.
To page through a big file like /usr/share/dict/words, you can use the command less /usr/share/dict/words. When running less, you’ll see the contents of the file one screenful at a time. Press the spacebar to go forward in the file and press b (lowercase) to skip back one screenful. To quit, press q.
You can also search for text inside less. For example, to search forward for a word, you can type /word, and to search backward, you can use ?word. When you find a match, press n to continue searching.
As you’ll learn in Section 2.14, you can send the standard output of nearly any program directly to another program’s standard input. This is exceptionally useful when you have a command with a lot of output to sift through and you’d like to use something like less to view the output. Here’s an example of sending the output of a grep command to less:
$ grep ie /usr/share/dict/words | lessTry this command out for yourself. You’ll probably find many similar uses for less.
2.5.3 pwd
The pwd (print working directory) program simply outputs the name of the current working directory. You may be wondering why you need this when most Linux distributions set up user accounts with the current working directory in the prompt. There are two reasons.
First, not all prompts include the current working directory, especially because you may want to get rid of it in your own prompt because it takes up a lot of space. If you do so, you need pwd.
Second, the symbolic links that you’ll learn about in Section 2.17.2 can sometimes obscure the true full path of the current working directory. Use pwd -P to eliminate this confusion.
2.5.4 diff
To see the differences between two text files, use diff:
$ diff file1 file2Several options can control the format of the output, and the default output format is often the most comprehensible for human beings. However, most programmers prefer the output from diff -u when they need to send the output to someone else, because automated tools have an easier time with this format.
2.5.5 file
If you see a file and are unsure of its format, try using the file command to see if the system can guess it:
$ file fileYou may be surprised by how much this innocent-looking command can do.
2.5.6 find and locate
It’s frustrating when you know that a certain file is in a directory tree somewhere but you just don’t know where. Run find to find file in dir as follows:
$ find dir -name file -printLike most programs in this section, find is capable of some fancy stuff. However, don’t try options such as -exec before you know the form shown here by heart and understand why you need the -name and -print options. The find command accepts special pattern-matching characters such as *, but you must enclose them in single quotes ('*') to protect the special characters from the shell’s own globbing feature. (Recall from Section 2.4.4 that the shell expands globs before running commands.)
Most systems also have a locate command for finding files. Rather than searching for a file in real time, locate searches an index that the system builds periodically. Searching with locate is much faster than find, but if the file you’re looking for is newer than the index, locate won’t find it.
2.5.7 head and tail
The head and tail commands allow you to quickly view a portion of a file or stream of data. For example, head /etc/passwd shows the first 10 lines of the password file, and tail /etc/passwd shows the last 10 lines.
To change the number of lines to display, use the -n option, where n is the number of lines you want to see (for example, head -5 /etc/passwd). To print lines starting at line n, use tail +n.
2.5.8 sort
The sort command quickly puts the lines of a text file in alphanumeric order. If the file’s lines start with numbers and you want to sort in numerical order, use the -n option. The -r option reverses the order of the sort.
2.6 Changing Your Password and Shell
Use the passwd command to change your password. You’ll be asked for your old password and then prompted for your new password twice.
The best passwords tend to be long “nonsense” sentences that are easy to remember. The longer the password (in terms of character length), the better; try for 16 characters or more. (In the very old days, the number of characters you could use was limited, so you were advised to add strange characters and such.)
You can change your shell with the chsh command (to an alternative such as zsh, ksh or tcsh), but keep in mind that this book assumes you’re running bash, so if you make a change, some of the examples may not work.
2.7 Dot Files
Change to your home directory if you’re not already there, type ls to take a look around, and then run ls -a. Do you see the difference in the output? When you run ls without the -a, you won’t see the configuration files called dot files. These are files and directories whose names begin with a dot (.). Common dot files are .bashrc and .login, and there are dot directories, too, such as .ssh.
There’s nothing special about dot files or directories. Some programs don’t show them by default so that you won’t see a complete mess when listing the contents of your home directory. For example, ls doesn’t list dot files unless you use the -a option. In addition, shell globs don’t match dot files unless you explicitly use a pattern such as .*.
2.8 Environment and Shell Variables
The shell can store temporary variables, called shell variables, containing the values of text strings. Shell variables are very useful for keeping track of values in scripts, and some shell variables control the way the shell behaves. (For example, the bash shell reads the PS1 variable before displaying the prompt.)
To assign a value to a shell variable, use the equal sign (=). Here’s a simple example:
$ STUFF=blahThe preceding example sets the value of the variable named STUFF to blah. To access this variable, use $STUFF (for example, try running echo $STUFF). You’ll learn about the many uses of shell variables in Chapter 11.
An environment variable is like a shell variable, but it’s not specific to the shell. All processes on Unix systems have environment variable storage. The main difference between environment and shell variables is that the operating system passes all of your shell’s environment variables to programs that the shell runs, whereas shell variables cannot be accessed in the commands that you run.
You assign an environment variable with the shell’s export command. For example, if you’d like to make the $STUFF shell variable into an environment variable, use the following:
$ STUFF=blah
$ export STUFF
Because child processes inherit environment variables from their parent, many programs read them for configuration and options. For example, you can put your favorite less command-line options in the LESS environment variable, and less will use those options when you run it. (Many manual pages contain a section labeled ENVIRONMENT that describes these variables.)
2.9 The Command Path
PATH is a special environment variable that contains the command path (or path for short), a list of system directories that the shell searches when trying to locate a command. For example, when you run ls, the shell searches the directories listed in PATH for the ls program. If programs with the same name appear in several directories in the path, the shell runs the first matching program.
If you run echo $PATH, you’ll see that the path components are separated by colons (:). For example:
$ echo $PATH
/usr/local/bin:/usr/bin:/bin
To tell the shell to look in more places for programs, change the PATH environment variable. For example, by using this command, you can add a directory dir to the beginning of the path so that the shell looks in dir before looking in any of the other PATH directories:
$ PATH=dir:$PATHOr you can append a directory name to the end of the PATH variable, causing the shell to look in dir last:
$ PATH=$PATH:dir2.10 Special Characters
When discussing Linux with others, you should know a few names for some of the special characters that you’ll encounter. If you’re amused by this sort of thing, see the “Jargon File” (http://www.catb.org/jargon/html/) or its printed companion, The New Hacker’s Dictionary, 3rd edition, by Eric S. Raymond (MIT Press, 1996).
Table 2-1 describes a select set of the special characters, many of which you’ve already seen in this chapter. Some utilities, such as the Perl programming language, use almost all of these special characters! (Keep in mind that these are the American names for the characters.)
Table 2-1: Special Characters
| Character | Name(s) | Uses |
* | star, asterisk | Regular expression, glob character |
. | dot | Current directory, file/hostname delimiter |
! | bang | Negation, command history |
| | pipe | Command pipes |
/ | (forward) slash | Directory delimiter, search command |
| backslash | Literals, macros (never directories) |
$ | dollar | Variables, end of line |
' | tick, (single) quote | Literal strings |
` | backtick, backquote | Command substitution |
" | double quote | Semi-literal strings |
^ | caret | Negation, beginning of line |
~ | tilde, squiggle | Negation, directory shortcut |
# | hash, sharp, pound | Comments, preprocessor, substitutions |
[ ] | (square) brackets | Ranges |
{ } | braces, (curly) brackets | Statement blocks, ranges |
_ | underscore, under | Cheap substitute for a space used when spaces aren’t wanted or allowed, or when autocomplete algorithms get confused |
2.11 Command-Line Editing
As you play with the shell, notice that you can edit the command line using the left and right arrow keys, as well as page through previous commands using the up and down arrows. This is standard on most Linux systems.
However, it’s a good idea to forget about the arrow keys and use control key combinations instead. If you learn the ones listed in Table 2-2, you’ll find that you’re better able to enter text in the many Unix programs that use these standard keystrokes.
Table 2-2: Command-Line Keystrokes
| Keystroke | Action |
| ctrl-B | Move the cursor left |
| ctrl-F | Move the cursor right |
| ctrl-P | View the previous command (or move the cursor up) |
| ctrl-N | View the next command (or move the cursor down) |
| ctrl-A | Move the cursor to the beginning of the line |
| ctrl-E | Move the cursor to the end of the line |
| ctrl-W | Erase the preceding word |
| ctrl-U | Erase from cursor to beginning of line |
| ctrl-K | Erase from cursor to end of line |
| ctrl-Y | Paste erased text (for example, from ctrl-U) |
2.12 Text Editors
Speaking of editing, it’s time to learn an editor. To get serious with Unix, you must be able to edit text files without damaging them. Most parts of the system use plaintext configuration files (like the ones in /etc). It’s not difficult to edit files, but you will do it so often that you need a powerful tool for the job.
You should try to learn one of the two de facto standard Unix text editors, vi and Emacs. Most Unix wizards are religious about their choice of editor, but don’t listen to them. Just choose for yourself. If you choose one that matches the way that you work, you’ll find it easier to learn. Basically, the choice comes down to this:
- If you want an editor that can do almost anything and has extensive online help, and you don’t mind doing some extra typing to get these features, try Emacs.
- If speed is everything, give vi a shot; it “plays” a bit like a video game.
Learning the vi and Vim Editors: Unix Text Processing, 7th edition, by Arnold Robbins, Elbert Hannah, and Linda Lamb (O’Reilly, 2008), can tell you everything you need to know about vi. For Emacs, use the online tutorial: start Emacs, press ctrl-H, and then type T. Or read GNU Emacs Manual, 18th edition, by Richard M. Stallman (Free Software Foundation, 2018).
You might be tempted to experiment with a friendlier editor when you first start out, such as nano, Pico, or one of the myriad GUI editors out there, but if you tend to make a habit out of the first thing that you use, you don’t want to go this route.
2.13 Getting Online Help
Linux systems come with a wealth of documentation. For basic commands, the manual pages (or man pages) will tell you what you need to know. For example, to see the manual page for the ls command, run man as follows:
$ man lsMost manual pages concentrate primarily on reference information, perhaps with some examples and cross-references, but that’s about it. Don’t expect a tutorial, and don’t expect an engaging literary style.
When programs have many options, the manual page often lists the options in some systematic way (for example, in alphabetical order), but it won’t tell you what the important ones are. If you’re patient, you can usually find what you need to know in the man page. If you’re impatient, ask a friend—or pay someone to be your friend so that you can ask him or her.
To search for a manual page by keyword, use the -k option:
$ man -k keywordThis is helpful if you don’t quite know the name of the command that you want. For example, if you’re looking for a command to sort something, run:
$ man -k sort
--snip--
comm (1) - compare two sorted files line by line
qsort (3) - sorts an array
sort (1) - sort lines of text files
sortm (1) - sort messages
tsort (1) - perform topological sort
--snip--
The output includes the manual page name, the manual section (see below), and a quick description of what the manual page contains.
Manual pages are referenced by numbered sections. When someone refers to a manual page, they often put the section number in parentheses next to the name, like ping(8). Table 2-3 lists the sections and their numbers.
Table 2-3: Online Manual Sections
| Section | Description |
| 1 | User commands |
| 2 | Kernel system calls |
| 3 | Higher-level Unix programming library documentation |
| 4 | Device interface and driver information |
| 5 | File descriptions (system configuration files) |
| 6 | Games |
| 7 | File formats, conventions, and encodings (ASCII, suffixes, and so on) |
| 8 | System commands and servers |
Sections 1, 5, 7, and 8 should be good supplements to this book. Section 4 may be of marginal use, and Section 6 would be great if only it were a little larger. You probably won’t be able to use Section 3 if you aren’t a programmer, but you may be able to understand some of the material in Section 2 once you’ve read more about system calls in this book.
Some common terms have many matching manual pages across several sections. By default, man displays the first page that it finds. You can select a manual page by section. For example, to read the /etc/passwd file description (as opposed to the passwd command), you can insert the section number before the page name like so:
$ man 5 passwdManual pages cover the essentials, but there are many more ways to get online help (aside from searching the internet). If you’re just looking for a certain option for a command, try entering a command name followed by --help or -h (the option varies from command to command). You may get a deluge (as in the case of ls --help), or you may find just what you’re looking for.
Some time ago, the GNU Project decided that it didn’t like manual pages very much and switched to another format called info (or texinfo). Often this documentation goes further than a typical manual page does, but it can be more complex. To access an info manual, use info with the command name:
$ info commandIf you don’t like the info reader, you can send the output to less (just add | less).
Some packages dump their available documentation into /usr/share/doc with no regard for online manual systems such as man or info. See this directory on your system if you find yourself searching for documentation—and, of course, search the internet.
2.14 Shell Input and Output
Now that you’re familiar with basic Unix commands, files, and directories, you’re ready to learn how to redirect standard input and output. Let’s start with standard output.
To send the output of command to a file instead of the terminal, use the > redirection character:
$ command > fileThe shell creates file if it does not already exist. If file exists, the shell erases (clobbers) the original file first. (Some shells have parameters that prevent clobbering. For example, you can enter set -C to avoid clobbering in bash.)
You can append the output to the file instead of overwriting it with the >> redirection syntax:
$ command >> fileThis is a handy way to collect output in one place when executing sequences of related commands.
To send the standard output of a command to the standard input of another command, use the pipe character (|). To see how this works, try these two commands:
$ head /proc/cpuinfo
$ head /proc/cpuinfo | tr a-z A-Z
You can send output through as many piped commands as you wish; just add another pipe before each additional command.
2.14.1 Standard Error
Occasionally, you may redirect standard output but find that the program still prints something to the terminal. This is called standard error (stderr); it’s an additional output stream for diagnostics and debugging. For example, this command produces an error:
$ ls /fffffffff > fAfter completion, f should be empty, but you still see the following error message on the terminal as standard error:
ls: cannot access /fffffffff: No such file or directoryYou can redirect the standard error if you like. For example, to send standard output to f and standard error to e, use the 2> syntax, like this:
$ ls /fffffffff > f 2> eThe number 2 specifies the stream ID that the shell modifies. Stream ID 1 is standard output (the default), and 2 is standard error.
You can also send the standard error to the same place as stdout with the >& notation. For example, to send both standard output and standard error to the file named f, try this command:
$ ls /fffffffff > f 2>&12.14.2 Standard Input Redirection
To channel a file to a program’s standard input, use the < operator:
$ head < /proc/cpuinfoYou will occasionally run into a program that requires this type of redirection, but because most Unix commands accept filenames as arguments, this isn’t very common. For example, the preceding command could have been written as head /proc/cpuinfo.
2.15 Understanding Error Messages
When you encounter a problem on a Unix-like system such as Linux, you must read the error message. Unlike messages from other operating systems, Unix errors usually tell you exactly what went wrong.
2.15.1 Anatomy of a Unix Error Message
Most Unix programs generate and report the same basic error messages, but there can be subtle differences between the output of any two programs. Here’s an example that you’ll certainly encounter in some form or other:
$ ls /dsafsda
ls: cannot access /dsafsda: No such file or directory
There are three components to this message:
- The program name,
ls. Some programs omit this identifying information, which can be annoying when you’re writing shell scripts, but it’s not really a big deal. - The filename,
/dsafsda, which is a more specific piece of information. There’s a problem with this path. - The error
No such file or directoryindicates the problem with the filename.
Putting it all together, you get something like “ls tried to open /dsafsda but couldn’t because it doesn’t exist.” This may seem obvious, but these messages can get a little confusing when you run a shell script that includes an erroneous command under a different name.
When troubleshooting errors, always address the first error first. Some programs report that they can’t do anything before reporting a host of other problems. For example, say you run a fictitious program called scumd and you see this error message:
scumd: cannot access /etc/scumd/config: No such file or directoryFollowing this is a huge list of other error messages that looks like a complete catastrophe. Don’t let those other errors distract you. You probably just need to create /etc/scumd/config.
2.15.2 Common Errors
Many errors you’ll encounter in Unix programs result from things that can go wrong with files and processes. Quite a few of these errors stem directly from conditions that kernel system calls encounter, so you can learn something about how the kernel sends problems back to processes by looking at them.
No such file or directory
This is the number one error. You tried to access a file that doesn’t exist. Because the Unix file I/O system doesn’t discriminate much between files and directories, this error message covers both cases. You get it when you try to read a file that doesn’t exist, when you try to change to a directory that isn’t there, when you try to write to a file in a directory that doesn’t exist, and so on. This error is also known as ENOENT, short for “Error NO ENTity.”
File exists
In this case, you probably tried to create a file that already exists. This is common when you try to create a directory with the same name as a file.
Not a directory, Is a directory
These messages pop up when you try to use a file as a directory, or a directory as a file. For example:
$ touch a
$ touch a/b
touch: a/b: Not a directory
Notice that the error message applies only to the a part of a/b. When you encounter this problem, you may need to dig around a little to find the path component that is being treated like a directory.
No space left on device
You’re out of disk space.
Permission denied
You get this error when you attempt to read or write to a file or directory that you’re not allowed to access (you have insufficient privileges). This error also shows when you try to execute a file that does not have the execute bit set (even if you can read the file). You’ll read more about permissions in Section 2.17.
Operation not permitted
This usually happens when you try to kill a process that you don’t own.
Segmentation fault, Bus error
A segmentation fault essentially means that the person who wrote the program that you just ran screwed up somewhere. The program tried to access a part of memory that it was not allowed to touch, and the operating system killed it. Similarly, a bus error means that the program tried to access some memory in a way it shouldn’t have. When you get one of these errors, you might be giving a program some input that it did not expect. In rare cases, it might be faulty memory hardware.
2.16 Listing and Manipulating Processes
Recall from Chapter 1 that a process is a running program. Each process on the system has a numeric process ID (PID). For a quick listing of running processes, just run ps on the command line. You should get a list like this one:
$ ps
  PID TTY STAT TIME COMMAND
  520 p0  S    0:00 -bash
  545  ?  S    3:59 /usr/X11R6/bin/ctwm -W
  548  ?  S    0:10 xclock -geometry -0-0
 2159 pd  SW   0:00 /usr/bin/vi lib/addresses
31956 p3  R    0:00 ps
The fields are as follows:
PIDThe process ID.TTYThe terminal device where the process is running. More about this later.STATThe process status—that is, what the process is doing and where its memory resides. For example,Smeans sleeping andRmeans running. (See the ps(1) manual page for a description of all the symbols.)TIMEThe amount of CPU time in minutes and seconds that the process has used so far. In other words, the total amount of time that the process has spent running instructions on the processor. Remember that because processes don’t run constantly, this is different from the time since the process started (or “wall-clock time”).COMMANDThis one might seem obvious as the command used to run the program, but be aware that a process can change this field from its original value. Furthermore, the shell can perform glob expansion, and this field will reflect the expanded command instead of what you enter at the prompt.
2.16.1 ps Command Options
The ps command has many options. To make things more confusing, you can specify options in three different styles—Unix, BSD, and GNU. Many people find the BSD style to be the most comfortable (perhaps because it involves less typing), so that’s what we’ll use in this book. Here are some of the most useful option combinations:
ps xShow all of your running processes.ps axShow all processes on the system, not just the ones you own.ps uInclude more detailed information on processes.ps wShow full command names, not just what fits on one line.
As with other programs, you can combine options, as in ps aux and ps auxw.
To check on a specific process, add its PID to the argument list of the ps command. For example, to inspect the current shell process, you can use ps u $$ ($$ is a shell variable that evaluates to the current shell’s PID). You’ll find information on the administration commands top and lsof in Chapter 8. These can be useful for locating processes, even when you’re doing something other than system maintenance.
2.16.2 Process Termination
To terminate a process, you send it a signal—a message to a process from the kernel—with the kill command. In most cases, all you need to do is this:
$ kill pidThere are many types of signals. The default (used above) is TERM, or terminate. You can send different signals by adding an extra option to kill. For example, to freeze a process instead of terminating it, use the STOP signal:
$ kill -STOP pidA stopped process is still in memory, ready to pick up where it left off. Use the CONT signal to continue running the process again:
$ kill -CONT pidThe kernel gives most processes a chance to clean up after themselves upon receiving signals (with the signal handler mechanism). However, some processes may choose a nonterminating action in response to a signal, get wedged in the act of trying to handle it, or simply ignore it, so you might find a process still running after you try to terminate it. If this happens and you really need to kill a process, the most brutal way to terminate it is with the KILL signal. Unlike other signals, KILL cannot be ignored; in fact, the operating system doesn’t even give the process a chance. The kernel just terminates the process and forcibly removes it from memory. Use this method only as a last resort.
You should not kill processes indiscriminately, especially if you don’t know what they’re doing. You may be shooting yourself in the foot.
You may see other users entering numbers instead of names with kill—for example, kill -9 instead of kill -KILL. This is because the kernel uses numbers to denote the different signals; you can use kill this way if you know the number of the signal that you want to send. Run kill -l to get a mapping of signal numbers to names.
2.16.3 Job Control
Shells support job control, a way to send TSTP (similar to STOP) and CONT signals to programs by using various keystrokes and commands. This allows you to suspend and switch between programs you’re using. For example, you can send a TSTP signal with ctrl-Z and then start the process again by entering fg (bring to foreground) or bg (move to background; see the next section). But despite its utility and the habits of many experienced users, job control is not necessary and can be confusing for beginners: It’s common for users to press ctrl-Z instead of ctrl-C, forget about what they were running, and eventually end up with numerous suspended processes.
If you want to run multiple programs, run each in a separate terminal window, put noninteractive processes in the background (as explained in the next section), and learn to use the screen and tmux utilities.
2.16.4 Background Processes
Normally, when you run a Unix command from the shell, you don’t get the shell prompt back until the program finishes executing. However, you can detach a process from the shell and put it in the “background” with the ampersand (&); this gives you the prompt back. For example, if you have a large file that you need to decompress with gunzip (you’ll see this in Section 2.18), and you want to do some other stuff while it’s running, run a command like this one:
$ gunzip file.gz &The shell should respond by printing the PID of the new background process, and the prompt should return immediately so that you can continue working. If the process takes a very long time, it can even continue to run after you log out, which comes in particularly handy if you have to run a program that does a lot of number crunching. If the process finishes before you log out or close the terminal window, the shell usually notifies you, depending on your setup.
The dark side of running background processes is that they may expect to work with the standard input (or worse, read directly from the terminal). If a program tries to read something from the standard input when it’s in the background, it can freeze (try fg to bring it back) or terminate. Also, if the program writes to the standard output or standard error, the output can appear in the terminal window with no regard for anything else running there, meaning that you can get unexpected output when you’re working on something else.
The best way to make sure that a background process doesn’t bother you is to redirect its output (and possibly input) as described in Section 2.14.
If spurious output from background processes gets in your way, learn how to redraw the content of your terminal window. The bash shell and most full-screen interactive programs support ctrl-L to redraw the entire screen. If a program is reading from the standard input, ctrl-R usually redraws the current line, but pressing the wrong sequence at the wrong time can leave you in an even worse situation than before. For example, entering ctrl-R at the bash prompt puts you in reverse isearch mode (press esc to exit).
2.17 File Modes and Permissions
Every Unix file has a set of permissions that determine whether you can read, write, or run the file. Running ls -l displays the permissions. Here’s an example of such a display:
-rw-r--r--1 1 juser somegroup 7041 Mar 26 19:34 endnotes.htmlThe file’s mode 1 represents the file’s permissions and some extra information. There are four parts to the mode, as illustrated in Figure 2-1.

Figure 2-1: The pieces of a file mode
The first character of the mode is the file type. A dash (-) in this position, as in the example, denotes a regular file, meaning that there’s nothing special about the file; it’s just binary or text data. This is by far the most common kind of file. Directories are also common and are indicated by a d in the file type slot. (Section 3.1 lists the remaining file types.)
The rest of a file’s mode contains the permissions, which break down into three sets: user, group, and other, in that order. For example, the rw- characters in the example are the user permissions, the r-- characters that follow are the group permissions, and the final r-- characters are the other permissions.
Each permission set can contain four basic representations:
rmeans that the file is readable.wmeans that the file is writable.xmeans that the file is executable (you can run it as a program).-means “nothing” (more specifically, the permission for that slot in the set has not been granted).
The user permissions (the first set) pertain to the user who owns the file. In the preceding example, that’s juser. The second set, group permissions, are for the file’s group (somegroup in the example). Any user in that group can take advantage of these permissions. (Use the groups command to see what group you’re in, and see Section 7.3.5 for more information.)
Everyone else on the system has access according to the third set, the other permissions, which are sometimes called world permissions.
Some executable files have an s in the user permissions listing instead of an x. This indicates that the executable is setuid, meaning that when you execute the program, it runs as though the file owner is the user instead of you. Many programs use this setuid bit to run as root in order to get the privileges they need to change system files. One example is the passwd program, which needs to change the /etc/passwd file.
2.17.1 Modifying Permissions
To change permissions on a file or directory, use the chmod command. First, pick the set of permissions that you want to change, and then pick the bit to change. For example, to add group (g) and world (o, for “other”) read (r) permissions to file, you could run these two commands:
$ chmod g+r file
$ chmod o+r file
Or you could do it all in one shot:
$ chmod go+r fileTo remove these permissions, use go-r instead of go+r.
You may sometimes see people changing permissions with numbers, for example:
$ chmod 644 fileThis is called an absolute change because it sets all permission bits at once. To understand how this works, you need to know how to represent the permission bits in octal form (each numeral represents a number in base 8, 0 through 7, and corresponds to a permission set). See the chmod(1) manual page or info manual for more.
You don’t really need to know how to construct absolute modes if you prefer to use them; just memorize the modes that you use most often. Table 2-4 lists the most common ones.
Table 2-4: Absolute Permission Modes
| Mode | Meaning | Used for |
644 | user: read/write; group, other: read | files |
600 | user: read/write; group, other: none | files |
755 | user: read/write/execute; group, other: read/execute | directories, programs |
700 | user: read/write/execute; group, other: none | directories, programs |
711 | user: read/write/execute; group, other: execute | directories |
Directories also have permissions. You can list the contents of a directory if it’s readable, but you can only access a file in a directory if the directory is executable. You need both in most cases; one common mistake people make when setting the permissions of directories is to accidentally remove the execute permission when using absolute modes.
Finally, you can specify a set of default permissions with the umask shell command, which applies a predefined set of permissions to any new file you create. In general, use umask 022 if you want everyone to be able to see all of the files and directories that you create, and use umask 077 if you don’t. If you want to make your desired permissions mask apply to new windows and later sessions, you need to put the umask command with the desired mode in one of your startup files, as discussed in Chapter 13.
2.17.2 Working with Symbolic Links
A symbolic link is a file that points to another file or a directory, effectively creating an alias (like a shortcut in Windows). Symbolic links offer quick access to obscure directory paths.
In a long directory listing, symbolic links look like this (notice the l as the file type in the file mode):
lrwxrwxrwx 1 ruser users 11 Feb 27 13:52 somedir -> /home/origdirIf you try to access somedir in this directory, the system gives you /home/origdir instead. Symbolic links are simply filenames that point to other names. Their names and the paths to which they point don’t have to mean anything. In the preceding example, /home/origdir doesn’t need to exist.
In fact, if /home/origdir does not exist, any program that accesses somedir returns an error reporting that somedir doesn’t exist (except for ls somedir, a command that stupidly informs you that somedir is somedir). This can be baffling because you can see something named somedir right in front of your eyes.
This is not the only way that symbolic links can be confusing. Another problem is that you can’t identify the characteristics of a link target just by looking at the name of the link; you must follow the link to see if it goes to a file or directory. Your system may also have links that point to other links, which are called chained symbolic links and can be a nuisance when you’re trying to track them down.
To create a symbolic link from target to linkname, use ln -s as follows:
$ ln -s target linknameThe linkname argument is the name of the symbolic link, the target argument is the path of the file or directory that the link points to, and the -s flag specifies a symbolic link (see the warning that follows).
When making a symbolic link, check the command twice before you run it, because several things can go wrong. For example, if you accidentally reverse the order of the arguments (ln -s linkname target), you’re in for some fun if linkname is a directory that already exists. If this is the case (and it quite often is), ln creates a link named target inside linkname, and the link will point to itself unless linkname is a full path. If something goes wrong when you create a symbolic link to a directory, check that directory for errant symbolic links and remove them.
Symbolic links can also cause headaches when you don’t know that they exist. For example, you can easily edit what you think is a copy of a file but is actually a symbolic link to the original.
With all these warnings about symbolic links, you might be wondering why anyone would want to use them. As it turns out, their pitfalls are significantly outweighed by the power they provide for organizing files and their ability to easily patch up small problems. One common use case is when a program expects to find a particular file or directory that already exists somewhere else on your system. You don’t want to make a copy, and if you can’t change the program, you can just create a symbolic link from it to the actual file or directory location.
2.18 Archiving and Compressing Files
Now that you’ve learned about files, permissions, and possible errors, you need to master gzip and tar, two common utilities for compressing and bundling files and directories.
2.18.1 gzip
The program gzip (GNU Zip) is one of the current standard Unix compression programs. A file that ends with .gz is a GNU Zip archive. Use gunzip file.gz to uncompress <file>.gz and remove the suffix; to compress the file again, use gzip file.
2.18.2 tar
Unlike the ZIP programs for other operating systems, gzip does not create archives of files; that is, it doesn’t pack multiple files and directories into a single file. To create an archive, use tar instead:
$ tar cvf archive.tar file1 file2 ...Archives created by tar usually have a .tar suffix (this is by convention; it isn’t required). For example, in the previous command, file1, file2, and so on are the names of the files and directories that you wish to archive in <archive>.tar. The c flag activates create mode. The v and f flags have more specific roles.
The v flag activates verbose diagnostic output, causing tar to print the names of the files and directories in the archive when it encounters them. Adding another v causes tar to print details such as file size and permissions. If you don’t want tar to tell you what it’s doing, omit the v flag.
The f flag denotes the file option. The next argument on the command line after the f flag must be the archive file for tar to create (in the preceding example, it is <archive>.tar). You must use this option followed by a filename at all times, except with tape drives. To use standard input or output, set the filename to a dash (-).
Unpacking .tar Files
To unpack a .tar file with tar use the x flag:
$ tar xvf archive.tarIn this command, the x flag puts tar into extract (unpack) mode. You can extract individual parts of the archive by entering the names of the parts at the end of the command line, but you must know their exact names. (To find out for sure, see the table-of-contents mode described next.)
Using Table-of-Contents Mode
Before unpacking, it’s usually a good idea to check the contents of a .tar file with the table-of-contents mode by using the t flag instead of the x flag. This mode verifies the archive’s basic integrity and prints the names of all files inside. If you don’t test an archive before unpacking it, you can end up dumping a huge mess of files into the current directory, which can be really difficult to clean up.
When you check an archive with the t mode, verify that everything is in a rational directory structure; that is, all file pathnames in the archive should start with the same directory. If you’re unsure, create a temporary directory, change to it, and then extract. (You can always use mv * .. if the archive didn’t create a mess.)
When unpacking, consider using the p option to preserve permissions. Use this in extract mode to override your umask and get the exact permissions specified in the archive. The p option is the default when you’re working as the superuser. If you’re having trouble with permissions and ownership when unpacking an archive as the superuser, make sure that you’re waiting until the command terminates and you get the shell prompt back. Although you may only want to extract a small part of an archive, tar must run through the whole thing, and you must not interrupt the process because it sets the permissions only after checking the entire archive.
Commit all of the tar options and modes in this section to memory. If you’re having trouble, make some flash cards. This may sound like grade school, but it’s very important to avoid careless mistakes with this command.
2.18.3 Compressed Archives (.tar.gz)
Many beginners find it confusing that archives are normally found compressed, with filenames ending in .tar.gz. To unpack a compressed archive, work from the right side to the left; get rid of the .gz first and then worry about the .tar. For example, these two commands decompress and unpack <file>.tar.gz:
$ gunzip file.tar.gz
$ tar xvf file.tar
When starting out, it’s fine to do this one step at a time, first running gunzip to decompress and then tar to verify and unpack. To create a compressed archive, do the reverse: run tar first and gzip second. Do this frequently enough, and you’ll soon memorize how the archiving and compression process works. But even if you don’t do it all that often, you can see how tiresome all of the typing can become and you’ll start looking for shortcuts. Let’s take a look at those now.
2.18.4 zcat
The method just shown isn’t the fastest or most efficient way to invoke tar on a compressed archive, and it wastes disk space and kernel I/O time. A better way is to combine archival and compression functions with a pipeline. For example, this command pipeline unpacks <file>.tar.gz:
$ zcat file.tar.gz | tar xvf -The zcat command is the same as gunzip -dc. The -d option decompresses and the -c option sends the result to standard output (in this case, to the tar command).
Because it’s so common to use zcat, the version of tar that comes with Linux has a shortcut. You can use z as an option to automatically invoke gzip on the archive; this works both for extracting an archive (with the x or t modes in tar) and creating one (with c). For example, use the following to verify a compressed archive:
$ tar ztvf file.tar.gzHowever, try to remember that you’re actually performing two steps when taking the shortcut.
2.18.5 Other Compression Utilities
Two more compression programs are xz and bzip2, whose compressed files end with .xz and .bz2, respectively. While marginally slower than gzip, these often compact text files a little more. The decompressing programs to use are unxz and bunzip2, and the options of both are close enough to their gzip counterparts that you don’t need to learn anything new.
Most Linux distributions come with zip and unzip programs that are compatible with the ZIP archives on Windows systems. They work on the usual .zip files as well as self-extracting archives ending in .exe. But if you encounter a file that ends in .Z, you have found a relic created by the compress program, which was once the Unix standard. The gunzip program can unpack these files, but gzip won’t create them.
2.19 Linux Directory Hierarchy Essentials
Now that you know how to examine files, change directories, and read manual pages, you’re ready to start exploring your system files and directories. The details of the Linux directory structure are outlined in the Filesystem Hierarchy Standard, or FHS (https://refspecs.linuxfoundation.org/fhs.shtml), but a brief walkthrough should suffice for now.
Figure 2-2 offers a simplified overview of the hierarchy, showing some of the directories under /, /usr, and /var. Notice that the directory structure under /usr contains some of the same directory names as /.
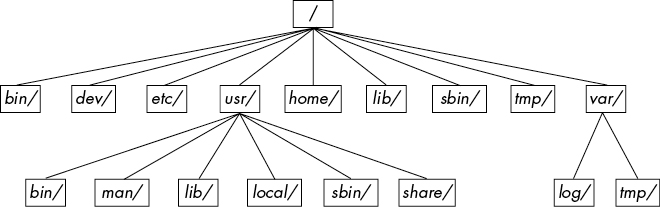
Figure 2-2: Linux directory hierarchy
Here are the most important subdirectories in root:
- /bin Contains ready-to-run programs (also known as executables), including most of the basic Unix commands such as
lsandcp. Most of the programs in /bin are in binary format, having been created by a C compiler, but some are shell scripts in modern systems. - /dev Contains device files. You’ll learn more about these in Chapter 3.
- /etc This core system configuration directory (pronounced EHT-see) contains the user password, boot, device, networking, and other setup files.
- /home Holds home (personal) directories for regular users. Most Unix installations conform to this standard.
- /lib An abbreviation for library, this directory holds library files containing code that executables can use. There are two types of libraries: static and shared. The /lib directory should contain only shared libraries, but other lib directories, such as /usr/lib, contain both varieties as well as other auxiliary files. (We’ll discuss shared libraries in more detail in Chapter 15.)
- /proc Provides system statistics through a browsable directory-and-file interface. Much of the /proc subdirectory structure on Linux is unique, but many other Unix variants have similar features. The /proc directory contains information about currently running processes as well as some kernel parameters.
- /run Contains runtime data specific to the system, including certain process IDs, socket files, status records, and, in many cases, system logging. This is a relatively recent addition to the root directory; in older systems, you can find it in /var/run. On newer systems, /var/run is a symbolic link to /run.
- /sys This directory is similar to /proc in that it provides a device and system interface. You’ll read more about /sys in Chapter 3.
- /sbin The place for system executables. Programs in /sbin directories relate to system management, so regular users usually do not have /sbin components in their command paths. Many of the utilities found here don’t work if not run as root.
- /tmp A storage area for smaller, temporary files that you don’t care much about. Any user may read to and write from /tmp, but the user may not have permission to access another user’s files there. Many programs use this directory as a workspace. If something is extremely important, don’t put it in /tmp because most distributions clear /tmp when the machine boots and some even remove its old files periodically. Also, don’t let /tmp fill up with garbage because its space is usually shared with something critical (the rest of /, for example).
- /usr Although pronounced “user,” this subdirectory has no user files. Instead, it contains a large directory hierarchy, including the bulk of the Linux system. Many of the directory names in /usr are the same as those in the root directory (like /usr/bin and /usr/lib), and they hold the same type of files. (The reason that the root directory does not contain the complete system is primarily historic—in the past, it was to keep space requirements low for the root.)
- /var The variable subdirectory, where programs record information that can change over the course of time. System logging, user tracking, caches, and other files that system programs create and manage are here. (You’ll notice a /var/tmp directory here, but the system doesn’t wipe it on boot.)
2.19.1 Other Root Subdirectories
There are a few other interesting subdirectories in the root directory:
- /boot Contains kernel boot loader files. These files pertain only to the very first stage of the Linux startup procedure, so you won’t find information about how Linux starts up its services in this directory. See Chapter 5 for more about this.
- /media A base attachment point for removable media such as flash drives that is found in many distributions.
- /opt This may contain additional third-party software. Many systems don’t use /opt.
2.19.2 The /usr Directory
The /usr directory may look relatively clean at first glance, but a quick look at /usr/bin and /usr/lib reveals that there’s a lot here; /usr is where most of the user-space programs and data reside. In addition to /usr/bin, /usr/sbin, and /usr/lib, /usr contains the following:
- /include Holds header files used by the C compiler.
- /local Is where administrators can install their own software. Its structure should look like that of / and /usr.
- /man Contains manual pages.
- /share Contains files that should work on other kinds of Unix machines with no loss of functionality. These are usually auxiliary data files that programs and libraries read as necessary. In the past, networks of machines would share this directory from a file server, but today a share directory used in this manner is rare because there are no realistic space restraints for these kinds of files on contemporary systems. Instead, on Linux distributions, you’ll find /man, /info, and many other subdirectories here because it is an easily understood convention.
2.19.3 Kernel Location
On Linux systems, the kernel is normally a binary file /vmlinuz or /boot/vmlinuz. A boot loader loads this file into memory and sets it in motion when the system boots. (You’ll find details on the boot loader in Chapter 5.)
Once the boot loader starts the kernel, the main kernel file is no longer used by the running system. However, you’ll find many modules that the kernel loads and unloads on demand during the course of normal system operation. Called loadable kernel modules, they are located under /lib/modules.
2.20 Running Commands as the Superuser
Before going any further, you should learn how to run commands as the superuser. You may be tempted to start a root shell, but doing so has many disadvantages:
- You have no record of system-altering commands.
- You have no record of the users who performed system-altering commands.
- You don’t have access to your normal shell environment.
- You have to enter the root password (if you have one).
2.20.1 sudo
Most distributions use a package called sudo to allow administrators to run commands as root when they are logged in as themselves. For example, in Chapter 7, you’ll learn about using vipw to edit the /etc/passwd file. You could do it like this:
$ sudo vipwWhen you run this command, sudo logs this action with the syslog service under the local2 facility. You’ll also learn more about system logs in Chapter 7.
2.20.2 /etc/sudoers
Of course, the system doesn’t let just any user run commands as the superuser; you must configure the privileged users in your /etc/sudoers file. The sudo package has many options (that you’ll probably never use), which makes the syntax in /etc/sudoers somewhat complicated. For example, this file gives user1 and user2 the power to run any command as root without having to enter a password:
User_Alias ADMINS = user1, user2

ADMINS ALL = NOPASSWD: ALL

root ALL=(ALL) ALL
The first line defines an ADMINS user alias with the two users, and the second line grants the privileges. The ALL = NOPASSWD: ALL part means that the users in the ADMINS alias can use sudo to execute commands as root. The second ALL means “any command.” The first ALL means “any host.” (If you have more than one machine, you can set different kinds of access for each machine or group of machines, but we won’t cover that feature.)
The root ALL=(ALL) ALL simply means that the superuser may also use sudo to run any command on any host. The extra (ALL) means that the superuser may also run commands as any other user. You can extend this privilege to the ADMINS users by adding (ALL) to the second /etc/sudoers line, as shown here:
ADMINS ALL = (ALL) NOPASSWD: ALL2.20.3 sudo Logs
Although we’ll go into logs in more detail later in the book, you can find the sudo logs on most systems with this command:
$ journalctl SYSLOG_IDENTIFIER=sudoOn older systems, you’ll need to look for a logfile in /var/log, such as /var/log/auth.log.
That’s it for sudo for now. If you need to use its more advanced features, see the sudoers(5) and sudo(8) manual pages. (The actual mechanics of user switching are covered in Chapter 7.)
2.21 Looking Forward
You should now know how to do the following at the command line: run programs, redirect output, interact with files and directories, view process listings, view manual pages, and generally make your way around the user space of a Linux system. You should also be able to run commands as the superuser. You may not yet know much about the internal details of user-space components or what goes on in the kernel, but with the basics of files and processes under your belt, you’re on your way. In the next few chapters, you’ll be working with both kernel and user-space system components using the command-line tools that you just learned.