

Installation
This chapter provides information about the distribution and installation of IBM Spectrum Archive Enterprise Edition (EE). It describes the following main aspects:
This section describes how to install the IBM Spectrum Archive EE program on a Linux system (in our example, we use a Red Hat-based Linux server system). It describes the installation routine step-by-step and reviews the prerequisites, such as verification of the Linux preinstallation packages and the installation of the IBM tape device driver under Linux.
This optional section provides some background information about how to upgrade the tape library or tape drive firmware for use with the IBM Spectrum Archive EE.
This section provides a quick guide about how to create a logical library in an IBM TS3500 tape library, how to assign and configure the tape devices for this logical library, and how to set up the physical tape media.
This chapter includes the following topics:
4.1 Installing IBM Spectrum Archive EE on a Linux system
The first part of this chapter describes how to install the IBM Spectrum Archive EE program on a Linux server system. In our lab setup for writing this book, we used a Red Hat-based Linux system. All the examples in this chapter are based on that release.
Although IBM Spectrum Archive EE is based on the IBM Linear Tape File System (LTFS) standard components as IBM Spectrum Archive (LTFS) and the IBM Spectrum Archive Library Edition (LE), these components are all included with the IBM Spectrum Archive EE installation package.
Before you can start with the installation routines, you must verify the following installation prerequisites:
•Installation prerequisites (See 4.2, “Installation prerequisites for IBM Spectrum Archive EE” on page 62.)
This section describes the tasks that must be completed before installing IBM Spectrum Archive EE.
•Installing IBM Spectrum Archive EE on a Linux server (See 4.3, “Installing IBM Spectrum Archive EE” on page 69.)
This section describes how to install the IBM Spectrum Archive EE package on a Linux server.
4.2 Installation prerequisites for IBM Spectrum Archive EE
This section describes the tasks that must be completed before installing
IBM Spectrum Archive EE.
IBM Spectrum Archive EE.
Ensure that the following prerequisites are met before IBM Spectrum Archive EE is installed. For more information, see the other topics in this section if needed.
•Verify that your computer meets the minimum hardware and software requirements for installing the product. For more information, see Chapter 3, “Planning” on page 45.
•Verify that your user ID meets the requirements for installing the product (such as you are working with the root user ID or have the root administration permissions).
•Ensure that you reviewed all of the planning information that is described in Chapter 3, “Planning” on page 45.
•If the standard IBM Spectrum Archive LE is already installed, it must be uninstalled before IBM Spectrum Archive EE is installed. For more information, see 11.4, “IBM Spectrum Archive EE interoperability with IBM Spectrum Archive products” on page 390.
•Ensure that all prerequisite software is installed, as described in 4.2.1, “Installing the host bus adapter and device driver” on page 63.
•Ensure that the host bus adapter (HBA) and device driver are installed, as described in 4.2.1, “Installing the host bus adapter and device driver” on page 63.
•Ensure that the IBM tape device driver is installed, as described in 4.2.3, “Installing the IBM tape device driver” on page 63.
•Determine the distribution package for IBM Spectrum Archive EE that is required for your system. For more information, see 4.2.2, “IBM Spectrum Archive EE distribution of packages for Linux” on page 63.
•For IBM Spectrum Scale prerequisites, see 3.3, “Hardware and software setup” on page 48.
4.2.1 Installing the host bus adapter and device driver
This section describes how to install the HBA and its device driver for use with IBM Spectrum Archive EE.
To install the HBA and its device driver, see the documentation that is provided by the HBA manufacturer.
If the HBA attached to the tape library is an Emulex adapter, add the following line to the /etc/modprobe.d/lpfc.conf file:
options lpfc lpfc_sg_seg_cnt=256
Then, restart the server system for the change to take effect.
For more information about fixes and updates for your system’s software, hardware, and operating system, see this website:
4.2.2 IBM Spectrum Archive EE distribution of packages for Linux
IBM Spectrum Archive EE is available in pre-compiled binary packages (rpm) for Red Hat Enterprise Linux Server 7.2 (x86_64). See 3.1, “System requirements” on page 46 for all supported operating systems.
The installation package is distributed by IBM through an installation DVD that includes all versions for the various Linux operating systems.
|
Tip: For a no-charge trial version of the IBM Spectrum Archive EE, contact your local IBM sales representative.
|
4.2.3 Installing the IBM tape device driver
This section describes how to install the IBM tape device driver for use with the integrated LTFS function and later on for the actual IBM Spectrum Archive EE. In our examples, we refer to a Red Hat-based Linux server system that we used for writing this book and creating the examples. Always check the IBM Fix Central website for the current version of the IBM tape device driver, as shown in the following steps. The drivers that were used during the time of the development of the book might have newer updates available.
Before you install the IBM Linux tape device driver, ensure that the following tasks are completed:
•The HBA and its device driver are installed.
•The tape drive and HBA are connected.
•The tape library is powered on.
•The tape drives in the library are powered on.
•The following tape library and tape drives are configured correctly:
– A logical library was created and configured.
– Tape drive and control path are assigned to the logical library.
– Physical media is assigned to the logical library.
|
Tip: Section 4.6, “Creating a logical library and defining tape drives” on page 85 provides a quick guideline about how to complete this task. For more information about these tasks, see IBM Tape Library Guide for Open Systems, SG24-5946.
|
•The Linux server for this installation is powered on.
Complete the following steps to download the packages and documentation to install the IBM tape device driver:
|
Important: The IBM Fix Central portal is the preferred location for IBM tape device driver downloads and should replace any FTP sites that are used for the same purpose.
|
1. Download the most recent version of the Linux tape device driver from the IBM Fix Central portal by completing the following steps:
a. Open the following URL in your web browser:
b. Click Product Group → Storage Systems.
c. Click Product Family → Tape Systems.
d. Click Product Type → Tape device drivers and software.
e. Click Product → Tape device drivers.
f. Select your operating system from the Platform menu.
g. Click Continue.
h. (Optional) Narrow down the search of available downloads according to your criteria.
i. Select the version of the IBM tape device driver that you want to download (ensure that you select the correct operating system, the correct release and fix level, and the appropriate support for 32- or 64-bit).
j. Follow the instructions on the Fix Central download page to download the new version.
|
Important: See the readme files that are provided within the IBM tape device driver package you downloaded to check for other required software and recently added information that might apply to this specific release.
|
2. Complete the following steps to download the .pdf document IBM Tape Device Drivers Installation and User's Guide, GC27-2130, from the IBM Support portal:
a. Open the following URL in your web browser:
b. Enter the guide name in the Search support field and then click the blue button.
c. Click IBM Tape Device Drivers Installation and User’s Guide.
d. Click Device_Driver_IUG.pdf to download the user’s guide.
e. Follow the procedures in the guide to install the tape device driver.
The following steps show you how to install the IBM Linux tape device driver lin_tape (64-bit, for Red Hat Linux Release 7) during our setup of the equipment when writing this book:
1. Download the appropriate level of the lin_tape source rpm package to a directory of your choice on the Linux server system for which you want to install it (for more information, see 4.2.3, “Installing the IBM tape device driver” on page 63).
2. Run the rpmbuild --rebuild <filename> command where <filename> is the name of the source rpm file. This command creates an installable binary rpm package for your specific kernel from the source rpm package, as shown in the following example:
rpmbuild --rebuild lin_tape-3.0.3-1.src.rpm
The command output is shown in Example 4-1.
Example 4-1 Run rpmbuild - rebuild against the lin_tape source rpm package
# rpmbuild --rebuild lin_tape-3.0.3-1.src.rpm
Installing lin_tape-3.0.3-1.src.rpm
Executing(%prep): /bin/sh -e /var/tmp/rpm-tmp.3Io0cI
+ umask 022
+ cd /root/rpmbuild/BUILD
+ cd /root/rpmbuild/BUILD
+ rm -rf lin_tape-3.0.3
+ /usr/bin/gzip -dc /root/rpmbuild/SOURCES/lin_tape-3.0.3.tgz
+ /usr/bin/tar -xf -
+ STATUS=0
+ '[' 0 -ne 0 ']'
+ cd lin_tape-3.0.3
+ /usr/bin/chmod -Rf a+rX,u+w,g-w,o-w .
+ exit 0
Executing(%build): /bin/sh -e /var/tmp/rpm-tmp.YUOVQP
+ umask 022
+ cd /root/rpmbuild/BUILD
+ cd lin_tape-3.0.3
++ echo x86_64-redhat-linux-gnu
++ cut -f 1 -d -
+ p=x86_64
+ '[' x86_64 == i386 ']'
+ '[' x86_64 == i586 ']'
+ '[' x86_64 == i686 ']'
+ '[' x86_64 == ppc64 ']'
+ '[' x86_64 == powerpc ']'
+ '[' x86_64 == powerpc64 ']'
+ '[' x86_64 == s390 ']'
+ '[' x86_64 == s390x ']'
+ '[' x86_64 == ia64 ']'
+ '[' x86_64 == x86_64 ']'
+ proc=AMD
+ make KERNEL=3.10.0-229.el7.x86_64 PROC=x86_64 driver
make -C /lib/modules/3.10.0-229.el7.x86_64/build SUBDIRS=/root/rpmbuild/BUILD/lin_tape-3.0.3 PWD=/root/rpmbuild/BUILD/lin_tape-3.0.3 clean
make[1]: Entering directory `/usr/src/kernels/3.10.0-229.el7.x86_64'
make[1]: Leaving directory `/usr/src/kernels/3.10.0-229.el7.x86_64'
mkdir bldtmp
make KERNEL=3.10.0-229.el7.x86_64 compileclean lin_tape.ko
make[1]: Entering directory `/root/rpmbuild/BUILD/lin_tape-3.0.3'
export PWD
make -C /lib/modules/3.10.0-229.el7.x86_64/build SUBDIRS=/root/rpmbuild/BUILD/lin_tape-3.0.3 PWD=/root/rpmbuild/BUILD/lin_tape-3.0.3 modules
make[2]: Entering directory `/usr/src/kernels/3.10.0-229.el7.x86_64'
CC [M] /root/rpmbuild/BUILD/lin_tape-3.0.3/lin_tape_scsi_config.o
CC [M] /root/rpmbuild/BUILD/lin_tape-3.0.3/lin_tape_scsi_tape.o
CC [M] /root/rpmbuild/BUILD/lin_tape-3.0.3/lin_tape_scsi_trace.o
CC [M] /root/rpmbuild/BUILD/lin_tape-3.0.3/lin_tape_ioctl_tape.o
CC [M] /root/rpmbuild/BUILD/lin_tape-3.0.3/lin_tape_ioctl_changer.o
CC [M] /root/rpmbuild/BUILD/lin_tape-3.0.3/lin_tape_extra_ioctl.o
LD [M] /root/rpmbuild/BUILD/lin_tape-3.0.3/lin_tape.o
Building modules, stage 2.
MODPOST 1 modules
CC /root/rpmbuild/BUILD/lin_tape-3.0.3/lin_tape.mod.o
LD [M] /root/rpmbuild/BUILD/lin_tape-3.0.3/lin_tape.ko
make[2]: Leaving directory `/usr/src/kernels/3.10.0-229.el7.x86_64'
make[1]: Leaving directory `/root/rpmbuild/BUILD/lin_tape-3.0.3'
mv lin_tape.ko bldtmp/lin_tape-3.10.0-229.el7.x86_64.ko
+ exit 0
Executing(%install): /bin/sh -e /var/tmp/rpm-tmp.jejgYx
+ umask 022
+ cd /root/rpmbuild/BUILD
+ '[' /root/rpmbuild/BUILDROOT/lin_tape-3.0.3-1.x86_64 '!=' / ']'
+ rm -rf /root/rpmbuild/BUILDROOT/lin_tape-3.0.3-1.x86_64
++ dirname /root/rpmbuild/BUILDROOT/lin_tape-3.0.3-1.x86_64
+ mkdir -p /root/rpmbuild/BUILDROOT
+ mkdir /root/rpmbuild/BUILDROOT/lin_tape-3.0.3-1.x86_64
+ cd lin_tape-3.0.3
+ rm -rf /root/rpmbuild/BUILDROOT/lin_tape-3.0.3-1.x86_64
+ install -D -m 644 bldtmp/lin_tape-3.10.0-229.el7.x86_64.ko /root/rpmbuild/BUILDROOT/lin_tape-3.0.3-1.x86_64/lib/modules/3.10.0-229.el7.x86_64/kernel/drivers/scsi/lin_tape.ko
++ uname -m
+ PROC=x86_64
+ p=x86_64
+ '[' x86_64 == i386 ']'
+ '[' x86_64 == i586 ']'
+ '[' x86_64 == i686 ']'
+ install -D -m 700 lin_tape /root/rpmbuild/BUILDROOT/lin_tape-3.0.3-1.x86_64/etc/init.d/lin_tape
+ cp IBM_tape.h /usr/include/sys
+ cd /root/rpmbuild/BUILDROOT/lin_tape-3.0.3-1.x86_64
+ ln -sf /etc/init.d/lin_tape /usr/sbin/rclin_tape
+ cd -
/root/rpmbuild/BUILD/lin_tape-3.0.3
+ /usr/lib/rpm/check-buildroot
+ /usr/lib/rpm/redhat/brp-compress
+ /usr/lib/rpm/redhat/brp-strip /usr/bin/strip
+ /usr/lib/rpm/redhat/brp-strip-comment-note /usr/bin/strip /usr/bin/objdump
+ /usr/lib/rpm/redhat/brp-strip-static-archive /usr/bin/strip
+ /usr/lib/rpm/brp-python-bytecompile /usr/bin/python 1
+ /usr/lib/rpm/redhat/brp-python-hardlink
+ /usr/lib/rpm/redhat/brp-java-repack-jars
Processing files: lin_tape-3.0.3-1.x86_64
Executing(%doc): /bin/sh -e /var/tmp/rpm-tmp.Al6QJg
+ umask 022
+ cd /root/rpmbuild/BUILD
+ cd lin_tape-3.0.3
+ DOCDIR=/root/rpmbuild/BUILDROOT/lin_tape-3.0.3-1.x86_64/usr/share/doc/lin_tape-3.0.3
+ export DOCDIR
+ /usr/bin/mkdir -p /root/rpmbuild/BUILDROOT/lin_tape-3.0.3-1.x86_64/usr/share/doc/lin_tape-3.0.3
+ cp -pr lin_tape.ReadMe /root/rpmbuild/BUILDROOT/lin_tape-3.0.3-1.x86_64/usr/share/doc/lin_tape-3.0.3
+ cp -pr lin_tape_daemon.ReadMe /root/rpmbuild/BUILDROOT/lin_tape-3.0.3-1.x86_64/usr/share/doc/lin_tape-3.0.3
+ cp -pr COPYING /root/rpmbuild/BUILDROOT/lin_tape-3.0.3-1.x86_64/usr/share/doc/lin_tape-3.0.3
+ cp -pr COPYING.LIB /root/rpmbuild/BUILDROOT/lin_tape-3.0.3-1.x86_64/usr/share/doc/lin_tape-3.0.3
+ exit 0
Provides: lin_tape = 3.0.3-1 lin_tape(x86-64) = 3.0.3-1
Requires(interp): /bin/sh /bin/sh /bin/sh /bin/sh
Requires(rpmlib): rpmlib(FileDigests) <= 4.6.0-1 rpmlib(PayloadFilesHavePrefix) <= 4.0-1 rpmlib(CompressedFileNames) <= 3.0.4-1
Requires(pre): /bin/sh
Requires(post): /bin/sh
Requires(preun): /bin/sh
Requires(postun): /bin/sh
Conflicts: IBMtape lin_tape < 3.0.3
Obsoletes: IBMtape
Checking for unpackaged file(s): /usr/lib/rpm/check-files /root/rpmbuild/BUILDROOT/lin_tape-3.0.3-1.x86_64
Wrote: /root/rpmbuild/RPMS/x86_64/lin_tape-3.0.3-1.x86_64.rpm
Executing(%clean): /bin/sh -e /var/tmp/rpm-tmp.WpXVHJ
+ umask 022
+ cd /root/rpmbuild/BUILD
+ cd lin_tape-3.0.3
+ rm -rf /root/rpmbuild/BUILDROOT/lin_tape-3.0.3-1.x86_64
+ exit 0
Executing(--clean): /bin/sh -e /var/tmp/rpm-tmp.dJk1Lt
+ umask 022
+ cd /root/rpmbuild/BUILD
+ rm -rf lin_tape-3.0.3
+ exit 0
3. The output from the binary build is shown. Near the end of the output, there is a line that indicates the file name and location of your binary rpm file on your Linux server (see Example 4-1 on page 65), as shown in the following example:
Wrote: /root/rpmbuild/RPMS/x86_64/lin_tape-3.0.3-1.x86_64.rpm
4. To install the lin_tape driver from the binary package as the next step, run the rpm -ivh <filename> command against the .rpm file that was created in step 2 on page 65, as shown in the following example:
rpm -ivh /root/rpmbuild/RPMS/x86_64/lin_tape-3.0.3-1.x86_64.rpm
The command output is shown in Example 4-2.
Example 4-2 Install the binary lin_tape device driver
# rpm -ivh /root/rpmbuild/RPMS/x86_64/lin_tape-3.0.3-1.x86_64.rpm
Preparing... ########################################### [100%]
1:lin_tape ########################################### [100%]
Starting lin_tape:
lin_tape loaded
5. The final package in this section is to install the lin_taped daemon. Download the binary rpm package to your Linux file system. This daemon comes directly as the binary rpm package and has no need for prior compilation with its source rpm package. Run the rpm -ivh command on the daemon rpm file, as shown in the following example:
rpm -ivh lin_taped-3.0.3-1-rhel7.x86_64.rpm
The output of the command is shown in Example 4-3.
Example 4-3 Installing the binary lin_taped daemon
# rpm -ivh lin_taped-3.0.3-1-rhel7.x86_64.rpm
Preparing... ########################################### [100%]
1:lin_taped ########################################### [100%]
Starting lin_tape:
lin_tape loaded
6. Finally, you can confirm the successful installation and list the found and configured IBM tape libraries and tape device by running the following Linux command:
cat /proc/scsi/IBM*
Example 4-4 shows you an output of a Linux system that had many tape devices attached to it and the tape library was partitioned to several logical partitions.
Example 4-4 Run the Linux cat command to display the attached tape devices and libraries
# cat /proc/scsi/IBM*
lin_tape version: 3.0.3
lin_tape major number: 245
Attached Changer Devices:
Number model S/N HBA SCSI FO Path
0 3573-TL 00L4U78A5815_LL0 qla2xxx 2:0:0:1 NA
1 3573-TL 00L4U78A5815_LL0 qla2xxx 2:0:1:1 NA
2 03584L22 0000078A42740401 qla2xxx 2:0:3:1 NA
3 3573-TL 00L4U78B1694_LL1 qla2xxx 2:0:4:1 NA
4 3573-TL 00L4U78B1694_LL0 qla2xxx 2:0:5:1 NA
5 03584L32 0000078A42740407 qla2xxx 2:0:6:1 NA
6 03584L22 0000078A42740401 qla2xxx 2:0:7:1 NA
7 03584L22 0000078A42740403 qla2xxx 2:0:8:1 NA
8 03584L22 0000078A42740403 qla2xxx 2:0:9:1 NA
9 03584L32 0000078A42740409 qla2xxx 2:0:11:1 NA
10 03584L32 0000078A42740407 qla2xxx 2:0:12:1 NA
11 03584L32 0000078A42740409 qla2xxx 2:0:13:1 NA
12 3573-TL 00L4U78C6680_LL0 qla2xxx 2:0:14:1 NA
13 3573-TL 00L4U78C6680_LL0 qla2xxx 2:0:16:1 NA
14 03584L32 0000078A42740405 qla2xxx 2:0:19:1 NA
15 03584L22 0000078A42740402 qla2xxx 2:0:20:1 NA
16 03584L32 0000078A42740405 qla2xxx 2:0:21:1 NA
17 03584L22 0000078A42740402 qla2xxx 2:0:22:1 NA
18 03584L22 0000078A42740401 qla2xxx 2:0:23:1 NA
19 03584L22 0000078A42740401 qla2xxx 2:0:24:1 NA
20 03584L22 0000078A42740401 qla2xxx 2:0:25:1 NA
lin_tape version: 3.0.3
lin_tape major number: 245
Attached Tape Devices:
Number model S/N HBA SCSI FO Path
0 ULT3580-TD5 00078A218E qla2xxx 2:0:0:0 NA
1 ULT3580-TD5 1168001144 qla2xxx 2:0:1:0 NA
2 ULT3580-TD6 1013000068 qla2xxx 2:0:2:0 NA
3 03592E07 0000013D0485 qla2xxx 2:0:3:0 NA
4 ULT3580-TD5 00078A1D8F qla2xxx 2:0:4:0 NA
5 ULTRIUM-TD5 9A700L0077 qla2xxx 2:0:5:0 NA
6 ULT3580-TD6 00013B0037 qla2xxx 2:0:6:0 NA
7 03592E07 001013000652 qla2xxx 2:0:7:0 NA
8 03592E07 0000078DDAC3 qla2xxx 2:0:8:0 NA
9 03592E07 001013000255 qla2xxx 2:0:9:0 NA
10 03592E07 0000013D0734 qla2xxx 2:0:10:0 NA
11 ULT3580-TD5 1068000073 qla2xxx 2:0:11:0 NA
12 ULT3580-TD6 00013B0084 qla2xxx 2:0:12:0 NA
13 ULTRIUM-TD5 9A700M0029 qla2xxx 2:0:13:0 NA
14 ULT3580-TD5 1068000070 qla2xxx 2:0:14:0 NA
15 ULT3580-TD5 1068000016 qla2xxx 2:0:16:0 NA
16 ULT3580-TD5 00078AC0A5 qla2xxx 2:0:19:0 NA
17 03592E07 0000013D0733 qla2xxx 2:0:20:0 NA
18 ULT3580-TD5 00078AC08B qla2xxx 2:0:21:0 NA
19 03592E07 0000078DDBF1 qla2xxx 2:0:22:0 NA
20 03592E07 0000013D0483 qla2xxx 2:0:23:0 NA
21 03592E07 0000013D0485 qla2xxx 2:0:24:0 NA
22 03592E07 0000078D13C1 qla2xxx 2:0:25:0 NA
|
Linux cat command: You use the Linux cat command again in a later section to identify the tape devices and medium changer you use for the setup of the LTFS EE installation and configuration.
|
4.3 Installing IBM Spectrum Archive EE
This section describes the process that is used to install IBM Spectrum Archive EE package. This installation package is provided by IBM to you on a DVD.
Consider the following important notes:
•Information that is contained in the readme file and installation file that are provided with the IBM Spectrum Archive EE distribution package supersedes information that is presented in this book and the online IBM Knowledge Center.
•The IBM Spectrum Archive EE license does not entitle customers to use any other Tivoli Storage Manager components or products. All components that are needed to migrate data to the LTFS file space are integrated into IBM Spectrum Archive EE. They also are part of the provided installation package and IBM Spectrum Archive EE license and are to be used only in this context.
•If IBM Spectrum Archive LE is already installed, it must be uninstalled before IBM Spectrum Archive EE is installed.
If IBM Spectrum Archive EE is installed (such as an older version), it must be uninstalled before the latest version of IBM Spectrum Archive EE is installed. To update the EE package, an installation script (ltfsee_install) is provided that does the automatic uninstallation during the software update. The next sections show you how to use this IBM Spectrum Archive EE installation script for different purposes and maintenance.
It also is possible to install, upgrade, or uninstall IBM Spectrum Archive EE manually. For more information, see 11.4, “IBM Spectrum Archive EE interoperability with IBM Spectrum Archive products” on page 390.
4.3.1 Extracting binary rpm files from an installation package
This first task lists the necessary steps to perform before binary rpm files are extracted. It also presents the available methods for extracting binary rpm files from an installation package for IBM Spectrum Archive EE on a Linux server system.
Interactive console mode is the method that is used for extracting binary rpm files from an installation package.
Before you use any of these methods to extract the IBM Spectrum Archive EE binary rpm files, you must confirm or set the run permission of the installation package.
|
Important: The ltfsee-1.2.4.0-[revision].[architecture].bin installation package includes rpm files for the revision and supported platforms.
|
Before the IBM Spectrum Archive EE binary rpm files are extracted from an installation package, complete the following steps:
1. Confirm the run permission of ltfsee-1.2.4.0-[revision].[architecture].bin by running the following command:
# ls -l ltfsee-1.2.4.0-[revision].[architecture].bin
2. If it is not already set, set the run permission by running the following command:
# chmod +x ltfsee-1.2.4.0-[revision].[architecture].bin
3. Proceed with the extraction of the binary IBM Spectrum Archive EE rpm files by selecting one of the procedures that are described next.
In the lab setup that was used for this book, we used the interactive console mode method, which is the option most users likely decide to use.
Extracting binary rpm files in interactive console mode
This section describes how to extract binary rpm files from the IBM Spectrum Archive EE installation package by using the interactive console mode.
|
Important: The steps in this section extract binary rpm files to your local disk only. To complete the installation process, more steps are required. After you complete the extraction of the binary rpm files, see “Installing, upgrading, or uninstalling IBM Spectrum Archive EE automatically” on page 73 or 4.5, “Upgrading the IBM tape library or tape drive firmware” on page 83 for more information.
|
To extract IBM Spectrum Archive EE binary rpm files in interactive console mode, complete the following steps:
1. Run IBM Spectrum Archive EE on the system by running the appropriate command for your environment:
– If your operating system is running on the command-line interface (CLI), run the following command:
#./ltfsee-1.2.4.0-[revision].[architecture].bin
– If your operating system is running on the GUI (X Window System), run the following command:
#./ltfsee-1.2.4.0-[revision].[architecture].bin -i console
The messages in Example 4-5 are displayed.
Example 4-5 Extract binary rpm files in interactive console mode
Preparing to install...
Extracting the installation resources from the installer archive...
Configuring the installer for this system's environment...
Launching installer...
|
Important: You cannot select the installation and link folders with the console installer. They are created in the ~/LTFSEE/ directory, which is the default folder of the installer that extracts the required files.
The installation script ltfsee_install for the command-line installation is found under the ~/LTFSEE/rpm.[revision] folder, for example, the ~/LTFSEE/rpm.1220_10326/ subfolder.
|
2. Read the International Program License Agreement. Enter 1 to accept the agreement and press Enter to continue, as shown in Example 4-6.
Example 4-6 IBM Spectrum Archive EE International Program License Agreement
===============================================================================
IBM Spectrum Archive Enterprise Edition (created with InstallAnywhere)
-------------------------------------------------------------------------------
Preparing CONSOLE Mode Installation...
===============================================================================
International License Agreement for Early Release of Programs
Part 1 - General Terms
BY DOWNLOADING, INSTALLING, COPYING, ACCESSING, CLICKING ON AN
"ACCEPT" BUTTON, OR OTHERWISE USING THE PROGRAM, LICENSEE AGREES TO
THE TERMS OF THIS AGREEMENT. IF YOU ARE ACCEPTING THESE TERMS ON
BEHALF OF LICENSEE, YOU REPRESENT AND WARRANT THAT YOU HAVE FULL
AUTHORITY TO BIND LICENSEE TO THESE TERMS. IF YOU DO NOT AGREE TO
THESE TERMS,
* DO NOT DOWNLOAD, INSTALL, COPY, ACCESS, CLICK ON AN "ACCEPT" BUTTON,
OR USE THE PROGRAM; AND
* PROMPTLY RETURN THE UNUSED MEDIA, DOCUMENTATION, AND PROOF OF
ENTITLEMENT TO THE PARTY FROM WHOM IT WAS OBTAINED FOR A REFUND OF THE
AMOUNT PAID. IF THE PROGRAM WAS DOWNLOADED, DESTROY ALL COPIES OF THE
PROGRAM.
1. Definitions
Press Enter to continue viewing the license agreement, or enter "1" to
accept the agreement, "2" to decline it, "3" to print it, or "99" to go back
to the previous screen.:
3. An Installing... message displays while the files are extracted to the ~/LTFSEE/ installation folder, as shown in Example 4-7. You can monitor the progress by watching the text-animated progress bars.
Example 4-7 IBM Spectrum Archive EE installation of the binary files
===============================================================================
Installing...
-------------
[==================|==================|==================|==================]
[------------------|------------------|------------------|------------------]
When the files are successfully extracted, the text-based installer completes.
|
Important: The following symbolic links are created in your home directory:
•A link to the rpm folder that keeps the extracted rpm files.
•A link to the “Change IBM Linear Tape File System Enterprise Edition Installation” executable file that uninstalls IBM Spectrum Archive EE.
|
4. Go to the rpm.[version]_[revision] folder under the installation folder to locate the rpm folder and access the installation file. If you created symbolic links, click the rpm symbolic link or use the Linux operating system cd ~/rpm command to open the rpm folder.
|
Important: Two files, INSTALL_EE.[revision] and README_EE.[revision], are placed in the rpm folder. Folders that correspond to the supported platforms are created in the rpm folder as well. The specific rpm files for the supported platform are in the platform subdirectory.
|
When you successfully finish, continue to “Installing, upgrading, or uninstalling IBM Spectrum Archive EE automatically” on page 73 to complete the installation. If you prefer to install manually, see 4.5, “Upgrading the IBM tape library or tape drive firmware” on page 83.
4.3.2 Installing, upgrading, or uninstalling IBM Spectrum Archive EE
This section describes how to install, upgrade, or uninstall binary rpm files for IBM Spectrum Archive EE after extracting them from the installation package, as described under 4.3.1, “Extracting binary rpm files from an installation package” on page 70.
IBM Spectrum Archive EE can be automatically installed, upgraded, or uninstalled.
IBM Spectrum Archive EE nodes communicate by using several TCP/UDP ports. Because some ports are assigned dynamically within a wide range, you must disable any firewall program that runs on these nodes.
|
Important: On Red Hat Enterprise Linux 7, managing system services is done with the systemctl command.
To stop the firewall service, run the systemctl stop firewalld command.
To prevent the firewall service from being automatically started at start time, run the systemctl disable firewalld command.
In addition, you can mask the firewalld service to prevent it from being started manually or by another service by running the systemctl mask firewalld command.
These commands should be run on every power cycle of the server.
|
During this installation for the IBM Spectrum Archive EE rpm files, there is also an MIB file that is provided if you plan to use SNMP for monitoring of your IBM Spectrum Archive EE setup. SNMP monitoring software usually requires such an MIB file to manage the various SNMP traps sent to it. The IBM Spectrum Archive EE MIB file is in the /opt/ibm/ltfsee/data/IBMSA-MIB.txt directory.
Installing, upgrading, or uninstalling IBM Spectrum Archive EE automatically
This section describes how to install, upgrade, or uninstall binary rpm files for IBM Spectrum Archive EE automatically after extracting them from the installation package. We used this method during our lab setup to write this book and document the examples.
The automated method is based on a utility (a shell script), which is provided by the IBM Spectrum Archive EE installation package. The script is named ltfsee_install and can be found after extracting the binary installation files in the ~/LTFSEE/rpm.[revision] directory with the IBM Spectrum Archive EE rpm files (such as /root/LTFSEE/rpm.1220_10326/).
The following prerequisite conditions must be met before you proceed with this task:
•Required software:
– For more information about installing the required software on a Linux system, see 4.2.1, “Installing the host bus adapter and device driver” on page 63.
– For more information about installing the IBM tape device driver, see 4.2.3, “Installing the IBM tape device driver” on page 63.
•IBM Spectrum Scale settings:
– The node must belong to an IBM Spectrum Scale cluster.
– The GPFS daemons must be started.
– For more information about how to set up the IBM Spectrum Scale node, see the IBM Spectrum Scale Cluster products at IBM Knowledge Center:
ltfsee_install utility
Use the ltfsee_install command-line utility to install rpm packages automatically to the system. You must have root user authority to use this command.
For more information, see “Installing, upgrading, or uninstalling IBM Spectrum Archive EE automatically” on page 73.
The ltfsee_install <option> command installs the following rpm packages to the system:
•IBM Spectrum Archive LE+ component
•Integrated customized Tivoli Storage Manager for Space Management with IBM Spectrum Archive EE
•IBM Spectrum Archive Migration Driver
The command includes the following options:
•--install
Installs rpm packages. If rpm packages are already installed, the installation is stopped.
•--upgrade
Upgrade installed rpm packages.
•--clean
Uninstall rpm packages.
•--verify
Verify the prerequisite conditions and IBM Spectrum Archive Enterprise Edition package installation only. No installation will be performed.
•--check
Check the prerequisite conditions only. No installation will be performed.
Verify that these conditions are met by logging on to the operating system as a root user and running the following command:
# ./ltfsee_install --check
If the conditions are met, the following message is shown as the last line of an output to the screen:
The prerequisites checking is completed successfully.
Example 4-8 shows the complete output.
Example 4-8 Screen output for the ltfsee_install --check command
./ltfsee_install --check
Checking rpm installation and version.
The prerequisites checking is completed successfully.
The ltfsee_install file installs or upgrades all required rpm packages on the server node. It can also uninstall those rpm packages from the node if needed.
|
Important: The ltfsee_install command procedures in this topic automatically perform all operations from 4.5, “Upgrading the IBM tape library or tape drive firmware” on page 83, except for installing optional TIVsm language packages in case they are needed.
|
Complete the following steps to automatically install, upgrade, or uninstall IBM Spectrum Archive EE by running the ltfsee_install command:
1. Log on to the operating system as a root user.
2. On each node in the cluster, complete the set of tasks for the action you want to take:
a. Installing IBM Spectrum Archive EE on the node:
i. Run the following command:
# ./ltfsee_install --install
Example 4-9 shows you the complete output of the ltfsee_install --install command.
ii. Verify that the command completed successfully. Check for the following success message in the command output:
All rpm packages are installed successfully.
Example 4-9 Output for the ltfsee_install --install command
# ./ltfsee_install --install
Checking rpm installation and version.
The prerequisites checking completed successfully.
Preparing... ########################################### [100%]
1:ltfsle ########################################### [100%]
/sbin/ldconfig: /lib/ld-linux.so.2 is not a symbolic link
Preparing... ########################################### [100%]
1:ltfsle-library ########################################### [100%]
/sbin/ldconfig: /lib/ld-linux.so.2 is not a symbolic link
Preparing... ########################################### [100%]
1:ltfsle-library-plus ########################################### [100%]
/sbin/ldconfig: /lib/ld-linux.so.2 is not a symbolic link
Preparing... ########################################### [100%]
1:gskcrypt64 ########################################### [100%]
Preparing... ########################################### [100%]
1:gskssl64 ########################################### [100%]
Preparing... ########################################### [100%]
1:TIVsm-API64 ########################################### [100%]
Preparing... ########################################### [100%]
1:TIVsm-BA ########################################### [100%]
Preparing... ########################################### [100%]
1:TIVsm-HSM ########################################### [100%]
Deactivating failover operations on the node.
-------------------------------------------------------
IBM Tivoli Storage Manager
Command Line Space Management Client Interface
Client Version 7, Release 1, Level 6.3
Client date/time: 12/08/2016 19:47:28
(c) Copyright by IBM Corporation and other(s) 1990, 2016. All Rights Reserved.
TSM The node failover option is now disabled.
-------------------------------------------------------
Stopping the space management daemon.
-------------------------------------------------------
IBM Tivoli Storage Manager
Command Line Space Management Client Interface
Client Version 7, Release 1, Level 6.3
Client date/time: 12/08/2016 19:47:35
(c) Copyright by IBM Corporation and other(s) 1990, 2016. All Rights Reserved.
-------------------------------------------------------
Stopping the HSM service.
-------------------------------------------------------
hsm: unrecognized service
-------------------------------------------------------
Terminated the space management daemon.
Preparing... ########################################### [100%]
1:ltfs-mig ########################################### [100%]
ldconfig: /lib/ld-linux.so.2 is not a symbolic link
Starting the HSM service.
-------------------------------------------------------
hsm: unrecognized service
-------------------------------------------------------
Starting the space management daemon.
-------------------------------------------------------
IBM Tivoli Storage Manager
Command Line Space Management Client Interface
Client Version 7, Release 1, Level 6.3
Client date/time: 12/08/2016 19:47:48
(c) Copyright by IBM Corporation and other(s) 1990, 2016. All Rights Reserved.
-------------------------------------------------------
IBM Tivoli Storage Manager
Command Line Space Management Client Interface
Client Version 7, Release 1, Level 6.3
Client date/time: 12/08/2016 19:47:49
(c) Copyright by IBM Corporation and other(s) 1990, 2016. All Rights Reserved.
TSM The node failover option is now enabled in mode ENABLED.
All rpm packages are installed successfully.
Complete the configuration using /opt/ibm/ltfsee/bin/ltfsee_config command.
iii. Complete the configuration by running the /opt/ibm/ltfsee/bin/ltfsee_config command, as described in 6.2, “Configuring IBM Spectrum Archive EE” on page 118.
b. Upgrading the rpm files to the latest versions:
|
Note: To avoid any unexpected failures during a multi node system upgrade, run ltfsee_install --upgrade on one node at a time and wait until the process completes before running the upgrade on the next node.
|
i. Run the ltfsee stop command.
ii. Run the pidof mmm command and wait until there are no processes returned.
iii. Run the pidof ltfs command on every EE node and wait until there are no processes returned.
To perform the upgrade process, run the following command:
# ./ltfsee_install --upgrade
[root@ltfsml1 rpm.1220_10326]# ./ltfsee_install --upgrade
Force installation option is selected.
This option uninstalls the following preinstalled packages before installation:
- LE+ component
- HSM component
- LTFS Migration Driver
These packages will be upgraded to the version that IBM Spectrum Archive Enterprise Edition provides.
Do you want to continue? (y/n) y
iv. Verify that the command completed. Check for the following success message in the command output:
All rpm packages are installed successfully.
c. Uninstalling IBM Spectrum Archive EE from the node:
i. Run the following command:
# ltfsee_install --clean
ii. Verify that the command completed. Check for the following success message in the command output:
Uninstallation is completed.
3. Verify that the installation or uninstallation completed successfully by running the following command:
# ltfsee_install --verify
If the installation was successful, the following message is shown:
Module installation check is completed.
4.4 Installing a RESTful server
This section describes how to install the IBM Spectrum Archive EE REST API after extracting the installation package, as described under 4.3.1, “Extracting binary rpm files from an installation package” on page 70 and installing IBM Spectrum Archive EE as described under 4.3.2, “Installing, upgrading, or uninstalling IBM Spectrum Archive EE” on page 72. This section should be followed after IBM Spectrum Archive EE has been installed.
The rest service can be installed on any node within the cluster that has IBM Spectrum Archive EE installed. To begin with the installation some software requirements need to be met before the rpm can be installed.
The following are the required software applications:
•IBM Spectrum Archive V1.2.4 or later
•httpd
•mod_ssl
•mod_wsgi
•Python 2.4 or later, but earlier than 3.0
•Flask
Example 4-10 shows how to perform the installs for the necessary required software to run REST.
Example 4-10 Required software for rest installation
[root@ltfseesrv1 ~]# yum install -y httpd mod_ssl mod_wsgi
Loaded plugins: langpacks, product-id, rhnplugin, search-disabled-repos, subscription-manager
This system is receiving updates from RHN Classic or Red Hat Satellite.
Resolving Dependencies
--> Running transaction check
---> Package httpd.x86_64 0:2.4.6-45.el7 will be installed
--> Processing Dependency: httpd-tools = 2.4.6-45.el7 for package: httpd-2.4.6-45.el7.x86_64
--> Processing Dependency: /etc/mime.types for package: httpd-2.4.6-45.el7.x86_64
---> Package mod_ssl.x86_64 1:2.4.6-45.el7 will be installed
---> Package mod_wsgi.x86_64 0:3.4-12.el7_0 will be installed
--> Running transaction check
---> Package httpd-tools.x86_64 0:2.4.6-45.el7 will be installed
---> Package mailcap.noarch 0:2.1.41-2.el7 will be installed
--> Finished Dependency Resolution
Dependencies Resolved
=====================================================================================================================
Package Arch Version Repository Size
=====================================================================================================================
Installing:
httpd x86_64 2.4.6-45.el7 rhel-x86_64-server-7 1.2 M
mod_ssl x86_64 1:2.4.6-45.el7 rhel-x86_64-server-7 105 k
mod_wsgi x86_64 3.4-12.el7_0 rhel-x86_64-server-7 76 k
Installing for dependencies:
httpd-tools x86_64 2.4.6-45.el7 rhel-x86_64-server-7 84 k
mailcap noarch 2.1.41-2.el7 rhel-x86_64-server-7 31 k
Transaction Summary
=====================================================================================================================
Install 3 Packages (+2 Dependent packages)
Total download size: 1.5 M
Installed size: 4.4 M
Downloading packages:
(1/5): httpd-2.4.6-45.el7.x86_64.rpm | 1.2 MB 00:00:00
(2/5): httpd-tools-2.4.6-45.el7.x86_64.rpm | 84 kB 00:00:00
(3/5): mailcap-2.1.41-2.el7.noarch.rpm | 31 kB 00:00:00
(4/5): mod_ssl-2.4.6-45.el7.x86_64.rpm | 105 kB 00:00:00
(5/5): mod_wsgi-3.4-12.el7_0.x86_64.rpm | 76 kB 00:00:00
---------------------------------------------------------------------------------------------------------------------
Total 467 kB/s | 1.5 MB 00:00:03
Running transaction check
Running transaction test
Transaction test succeeded
Running transaction
Warning: RPMDB altered outside of yum.
Installing : mailcap-2.1.41-2.el7.noarch 1/5
Installing : httpd-tools-2.4.6-45.el7.x86_64 2/5
Installing : httpd-2.4.6-45.el7.x86_64 3/5
Installing : mod_wsgi-3.4-12.el7_0.x86_64 4/5
Installing : 1:mod_ssl-2.4.6-45.el7.x86_64 5/5
Verifying : httpd-tools-2.4.6-45.el7.x86_64 1/5
Verifying : mod_wsgi-3.4-12.el7_0.x86_64 2/5
Verifying : mailcap-2.1.41-2.el7.noarch 3/5
Verifying : 1:mod_ssl-2.4.6-45.el7.x86_64 4/5
Verifying : httpd-2.4.6-45.el7.x86_64 5/5
Installed:
httpd.x86_64 0:2.4.6-45.el7 mod_ssl.x86_64 1:2.4.6-45.el7 mod_wsgi.x86_64 0:3.4-12.el7_0
Dependency Installed:
httpd-tools.x86_64 0:2.4.6-45.el7 mailcap.noarch 0:2.1.41-2.el7
Complete!
If pip is not installed on the designated node (pip is installed by default if the version of Python is 2.7.9 or greater), it can be installed by running the following commands:
curl “https://bootstrap.pypa.io/get-pip.py” -o “get-pip.py”
python get-pip.py
Once pip is installed, run the following command to install flask:
pip install flask
Example 4-11 shows how to install flask.
Example 4-11 Install flask V0.12
[root@ltfseesrv1 ~]# pip install flask
Collecting flask
Downloading Flask-0.12.2-py2.py3-none-any.whl (83kB)
100% |¦¦¦¦¦¦¦¦¦¦¦¦¦¦¦¦¦¦¦¦¦¦¦¦¦¦¦¦¦¦¦¦| 92kB 513kB/s
Collecting click>=2.0 (from flask)
Downloading click-6.7-py2.py3-none-any.whl (71kB)
100% |¦¦¦¦¦¦¦¦¦¦¦¦¦¦¦¦¦¦¦¦¦¦¦¦¦¦¦¦¦¦¦¦| 71kB 1.4MB/s
Collecting Jinja2>=2.4 (from flask)
Downloading Jinja2-2.9.6-py2.py3-none-any.whl (340kB)
100% |¦¦¦¦¦¦¦¦¦¦¦¦¦¦¦¦¦¦¦¦¦¦¦¦¦¦¦¦¦¦¦¦| 348kB 1.0MB/s
Collecting Werkzeug>=0.7 (from flask)
Downloading Werkzeug-0.12.2-py2.py3-none-any.whl (312kB)
100% |¦¦¦¦¦¦¦¦¦¦¦¦¦¦¦¦¦¦¦¦¦¦¦¦¦¦¦¦¦¦¦¦| 317kB 1.3MB/s
Collecting itsdangerous>=0.21 (from flask)
Downloading itsdangerous-0.24.tar.gz (46kB)
100% |¦¦¦¦¦¦¦¦¦¦¦¦¦¦¦¦¦¦¦¦¦¦¦¦¦¦¦¦¦¦¦¦| 51kB 5.0MB/s
Collecting MarkupSafe>=0.23 (from Jinja2>=2.4->flask)
Downloading MarkupSafe-1.0.tar.gz
Building wheels for collected packages: itsdangerous, MarkupSafe
Running setup.py bdist_wheel for itsdangerous ... done
Stored in directory: /root/.cache/pip/wheels/fc/a8/66/24d655233c757e178d45dea2de22a04c6d92766abfb741129a
Running setup.py bdist_wheel for MarkupSafe ... done
Stored in directory: /root/.cache/pip/wheels/88/a7/30/e39a54a87bcbe25308fa3ca64e8ddc75d9b3e5afa21ee32d57
Successfully built itsdangerous MarkupSafe
Installing collected packages: click, MarkupSafe, Jinja2, Werkzeug, itsdangerous, flask
Found existing installation: MarkupSafe 0.11
Uninstalling MarkupSafe-0.11:
Successfully uninstalled MarkupSafe-0.11
Successfully installed Jinja2-2.9.6 MarkupSafe-1.0 Werkzeug-0.12.2 click-6.7 flask-0.12.2 itsdangerous-0.24
After all the required software has been installed, in the same directory the IBM Spectrum Archive EE was extracted to, there is a RHEL7 directory which has a file called .ibmsa-rest-[build]-[revision].x86_64.rpm. To install the restful service, run yum install on this file as outlined in Example 4-12.
Example 4-12 Installing IBM Spectrum Archive Rest service
[root@ltfseesrv1 RHEL7]# yum install -y ibmsa-rest-1.2.4.0-12441.x86_64.rpm
Loaded plugins: langpacks, product-id, rhnplugin, subscription-manager
This system is receiving updates from RHN Classic or Red Hat Satellite.
Examining ibmsa-rest-1.2.4.0-12441.x86_64.rpm: ibmsa-rest-1.2.4.0-12441.x86_64
Marking ibmsa-rest-1.2.4.0-12441.x86_64.rpm to be installed
Resolving Dependencies
--> Running transaction check
---> Package ibmsa-rest.x86_64 0:1.2.4.0-12441 will be installed
--> Finished Dependency Resolution
Dependencies Resolved
=====================================================================================================================
Package Arch Version Repository Size
=====================================================================================================================
Installing:
ibmsa-rest x86_64 1.2.4.0-12441 /ibmsa-rest-1.2.4.0-12441.x86_64 51 k
Transaction Summary
=====================================================================================================================
Install 1 Package
Total size: 51 k
Installed size: 51 k
Downloading packages:
Running transaction check
Running transaction test
Transaction test succeeded
Running transaction
Installing : ibmsa-rest-1.2.4.0-12441.x86_64 1/1
##############################################################
# ibmsa-rest have been installed successfully.
# Please restart or reload httpd to enable REST server.
##############################################################
Verifying : ibmsa-rest-1.2.4.0-12441.x86_64 1/1
Installed:
ibmsa-rest.x86_64 0:1.2.4.0-12441
Complete!
At the bottom of a successful installation it will say the install was successful and that a restart of the httpd service is required to enable the rest server. To restart the service, execute the following command:
systemctl restart httpd
When this is all done, to quickly test that the rest service has been successfully installed, execute the following command:
curl -i -X GET ‘http://localhost:7100/ibmsa-rest/v1’
Example 4-13 shows using a test curl command to see if the install was successful.
Example 4-13 Test curl command
[root@ltfseesrv1 ~]# curl -i -XGET 'http://localhost:7100/ibmsa/v1'
HTTP/1.1 200 OK
Date: Wed, 12 Jul 2017 22:03:00 GMT
Server: Apache/2.4.6 (Red Hat Enterprise Linux) OpenSSL/1.0.1e-fips mod_wsgi/3.4 Python/2.7.5
Content-Length: 83
Content-Type: application/json
{"message":"IBM Spectrum Archive REST API server is working.","status_code":"200"}
The default port is on 7100 and the default protocol to use is http. If SSL is required, uncomment SSLEngine, SSLCertificateFile, SSLCertifcateKeyFile and provide the direct path to both the certificate file and the certificate key file in the following file:
/etc/httpd/conf.d/ibmsa-rest-httpd.conf
For an overview of IBM Spectrum Archive EE Rest API and commands, see 7.29, “IBM Spectrum Archive REST API” on page 229.
4.5 Upgrading the IBM tape library or tape drive firmware
This section describes how to upgrade tape library firmware or tape drive firmware for use with IBM Spectrum Archive EE.
This section describes the following aspects of the process:
•Downloading the IBM operator guides for tape libraries and drives
•Upgrading the TS3500 tape library firmware
•Upgrading the IBM tape drive firmware
|
Note: In the lab setup for this book, we used a TS3500 tape library together with IBM Spectrum Archive EE. The following tape library examples are based on this IBM tape library mode. To perform the task on an IBM TS4500 tape library, see IBM Knowledge Center at:
You also can see the IBM TS4500 R3 Tape Library Guide, SG24-8235.
|
4.5.1 Downloading operator guides for IBM tape libraries and drives
This section describes how to download IBM operator guides or access IBM Knowledge Centers for the IBM tape libraries and drives. These are the preferred resources to get information about the various IBM products. The guides are available for download in standard .pdf format through the IBM FixCentral portal, which is available at this website:
To download operator guides for your tape library and drive, complete the following steps:
1. To download the applicable tape library guide, complete the following steps:
a. Browse to the following website:
b. Click Product Group → Storage Systems.
c. Click Product Family → Tape Systems.
d. Click Product Type → Tape autoloaders and libraries.
e. Click Product → TSxx00 Tape Library (your targeted TS3500 tape library).
f. Click Platform → All.
g. Click Continue to find a link to a targeted tape library guide.
2. To download the applicable tape drive guide, complete the following steps:
a. Browse to the following website:
b. Click Product Group → Storage Systems.
c. Click Product Family → Tape Systems.
d. Click Product Type → Tape drives.
e. Click Product → TSxxx0 Tape Drive (your targeted tape drive).
f. Click Platform → All.
g. Click Continue to find a link to a targeted tape library guide.
3. To access the TS3500 tape library IBM Knowledge Center, browse to the following website:
4.5.2 Upgrading the TS3500 tape library firmware
Download the tape library operator guide or see the TS3500 tape library IBM Knowledge Center. For more information, see 4.5.1, “Downloading operator guides for IBM tape libraries and drives” on page 83.
Follow the instructions for upgrading the tape library firmware, which are described in the TS3500 tape library IBM Knowledge Center, which is available at this website:
|
Important: The TS3500 tape library firmware can be upgraded while the library is online. The update process is concurrent.
|
4.5.3 Upgrading IBM tape drive firmware
The procedure to update tape drive firmware automatically power cycles the drive. For drives that are used with IBM Spectrum Archive EE, it can be necessary to perform prerequisite steps before the drive is powered down and postrequisite steps after power is restored to the drive.
To upgrade tape drive firmware, complete the following steps:
1. If the tape library is mounted, you must prepare the library before a tape drive is powered down. See Turning a tape drive on and off while mounting the IBM Spectrum Archive EE library in the IBM Spectrum Archive EE IBM Knowledge Center and complete the appropriate prerequisite step based on your configuration before you proceed to the next step here. If the tape library does not have a tape that is mounted, proceed to the next step.
2. Download the required IBM tape library operator guide or see the TS3500 tape library IBM Knowledge Center. For more information, see 4.5.1, “Downloading operator guides for IBM tape libraries and drives” on page 83.
3. Upgrade the tape drive firmware by following the instructions that are described at this website:
After the firmware installation completes, the tape drive restarts automatically.
4. After power is restored to the tape drive, see Turning a tape drive on and off while mounting the LTFS EE library in the LTFS EE IBM Knowledge Center and complete the appropriate postrequisite step based on your configuration. This enables LTFS to recognize the tape drive.
4.6 Creating a logical library and defining tape drives
This section describes the process that is used to prepare the IBM tape library (in this example, it is the TS3500) for use and integration with IBM Spectrum Archive EE. IBM Spectrum Archive EE requires access to a tape library, tape drives, and media to operate. In a typical environment, a TS3500 tape library is in place. You must complete the following tasks:
•Create a logical library for IBM Spectrum Archive EE.
•Assign tape drives to the IBM Spectrum Archive EE logical library.
•Assign the Control Path devices.
•Assign tape media for IBM Spectrum Archive EE within the logical library.
For more information about the operation and management of the TS3500 tape library, see the TS3500 tape library IBM Knowledge Center, which is available at this website:
4.6.1 Creating a logical library for IBM Spectrum Archive EE
You can create or remove a logical library from the TS3500 tape library by using the Tape Library Specialist web interface, but not by using the operator panel at the physical TS3500 tape library L-Frame. You can remove a logical library only if you reassign all associated tape cartridges and remove all associated drives, move them to another logical library, or change them to unassigned drives.
To create or remove a logical library, complete the following steps:
1. From the Work Items navigation pane, click Library → Logical Libraries. The Manage Logical Libraries window opens.
2. Perform one of the following tasks:
– To add a logical library, use the drop-down menu and select Create, then select Go. Follow the on-screen instructions to enter a logical library name of up to 15 characters (duplicate names are not allowed). Select the media type for this logical library and click Apply.
– Select a logical library to remove it. From the drop-down menu, select Remove, then select Go. The library displays the message “Are you sure you want to remove this logical library?”
3. Click OK. The Success window opens.
4. Click Close. The Manage Library window reopens with the new data.
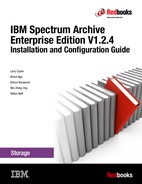
Figure 4-1 shows you where to find the window that is used to create a logical library within the TS3500 Tape Library Specialist web interface.

Figure 4-1 TS3500 web GUI window to create a logical library
Figure 4-2 shows you the window in which you must enter the name and media type of the new logical library.

Figure 4-2 Create Logical Library window
4.6.2 Assigning tape drives to the IBM Spectrum Archive EE logical library
Certain guidelines exist for adding a tape drive to a logical library.
|
Important: In a TS3500 tape library with the Advanced Library Management System (ALMS), all encryption-enabled drives within a logical library must be managed the same way: by library-managed, application-managed, or system-managed. Encryption-enabled drives cannot be shared.
|
To add a tape drive to a logical library, complete the following steps:
1. From the Work Items navigation pane from the TS3500 Tape Library Specialist web interface, click Drives → Drive Assignment. The Logical Drive Assignment Filter window opens, as shown in Figure 4-3.
2. Follow the on-screen instructions to select a drive or logical library, and then select Continue.
The Drive Assignment window opens, as shown in Figure 4-3.

Figure 4-3 TS3500 Drive Assignment window
This window includes the following components:
– Drive column
When you select the link to each drive, the Drive Details window displays the drive’s worldwide node name, type (LTO or 3592), physical location (frame and row), type of interface, SCSI or Loop ID, status of contents, and type of encryption method.
– Logical Library column
Up to 192 columns for the logical libraries that you can create.
– Totals of dedicated and shared drives
At the bottom of the window.
– Cancel option
When you select Cancel, the firmware deletes the changes that you made to the drives and refreshes the Drive Assignment window with the previous entries (the same occurs if you leave the Drive Assignment window before you select Assign; all of the changes that you made are lost and the previous entries are restored).
3. For each drive that you want to add, select the check box in the Logical Library column, as shown in Figure 4-4.
4. Select the options for all of the drives that you want to assign. From the Select Action drop-down menu, select Apply, then select Go. The Drive Assignment Operation in Progress window opens, followed by a Success window, which indicates that the changes are complete, as shown in Figure 4-4.
5. Select Close. The Drive Assignment window opens and shows the new assignments.

Figure 4-4 TS3500 Drive Assignment filter
4.6.3 Assigning the control path tape devices
After you add one or more drives to a logical library in the TS3500 tape library, you can enable or disable a control path. You can use this function to choose multiple control paths for a single library, or multiple pairings of control paths and logical libraries. A logical library must contain at least one control path.
To enable or disable a control path in a logical library, complete the following steps:
1. From the Work Items navigation pane, click Drives → Drive Assignment. The Drive Assignment window opens.
2. In the Drive column, select the drive that you want to enable or disable as the control path drive.
3. Locate the intersection of the logical library column and drive row that you want, then select the control path icon to the left of the check box, as shown in Figure 4-5.

Figure 4-5 Define the control path devices
4. From the Select Action menu, select Apply, then click Go. The Operation in Progress window opens, followed by a Success window that indicates that the changes are complete.
5. Click Close. The Drive Assignment opens and shows the new assignments.
4.6.4 Assigning tape media for IBM Spectrum Archive EE within the logical library
There are different ways to assign physical tape media to a logical library. For example, you can pre-assign a Cartridge Assignment Policy (CAP) for a specific VOLSER range. This assignment automatically ensures that whenever tape cartridges from this range are inserted into the library or are unassigned because they are not used in a different logical partition, they are assigned to the targeted logical library, for example, the library for IBM Spectrum Archive EE.
Another method that can be used is to assign tape cartridges manually through the appropriate TS3500 web GUI windows whenever it is needed. You can also reassign previously assigned tape cartridges from another logical library. These tape cartridges must be reformatted because they still might contain data from the previous use that you do not want to be detected. For more information about how to prepare and format tape cartridges for use by IBM Spectrum Archive EE, see Chapter 7, “Operations” on page 143.
For more information about assigning tape media to a TS3500 logical library partition, see the TS3500 tape library IBM Knowledge Center at the following website:
Figure 4-6 shows that you can search for currently unassigned tape cartridges and how you can select them to make a new assignment. You can access this window from the TS3500 Tape Library Specialist web interface by clicking Cartridges → Data Cartridges.

Figure 4-6 TS3500 assignment of unassigned tape cartridges
4.7 Quick installation guide for IBM Spectrum Archive EE
This section summarizes the overall installation process of IBM Spectrum Archive EE:
1. Ensure that all prerequisite software (Linux packages) and HBA driver are installed.
2. Ensure that the IBM Spectrum Scale file system daemon is started by running the following command:
mmstartup -a
3. Install the IBM tape device driver lin_tape.
Download the appropriate level of the source rpm package for IBM lin_tape and the lin_tape daemon rpm package from this website:
To install the lin_tape device driver, run the following commands:
– rpmbuild --rebuild lin_tape-3.0.3-1.src.rpm
– rpm -ivh /root/rpmbuild/RPMS/x86_64/lin_tape-3.0.3-1.x86_64.rpm
– rpm -ivh lin_taped-lin_tape-3.0.3-1.rhel6.x86_64.rpm
4. Extract the binary rpm files from an IBM Spectrum Archive EE installation package by running the following command:
./ltfsee-1.2.2.2-10326.x86_64.bin
5. Install IBM Spectrum Archive EE automatically by using the ltfsee_install tool. Use --check for pre-installation check, --install for the installation, and --verify for a postinstallation verification, as shown in the following commands:
– ~/LTFSEE/rpm.[revision]/ltfsee_install --check
– ~/LTFSEE/rpm.[revision]/ltfsee_install --install
– ~/LTFSEE/rpm.[revision]/ltfsee_install --verify
..................Content has been hidden....................
You can't read the all page of ebook, please click here login for view all page.