

Installing and setting up IBM Spectrum Discover
This appendix describes installing and setting up IBM Spectrum Discover. We show you how to acquire the free IBM Spectrum Discover 90-day trial code, deploy it in a VMware virtualization environment, and then configure and implement it.
|
Note: For a single node trial setup, a minimum of 8 logical processors and 64 GB of memory is needed.
|
For more information about IBM Spectrum Discover documentation, see IBM Knowledge Center.
This appendix includes the following topics:
A.1 Free 90-day trial download
A free 90-day trial version of IBM Spectrum Discover is available on the IBM website.
At the website, register for a new IBM ID or log in with your existing ID. An Open Virtualization Format (OVF) archive with the extension *.ova is available for download directly from the trial web page, as shown in Figure A-1.

Figure A-1 IBM website with free 90-day trial
Click IBM Spectrum Discover to start the download. You are prompted to provide a destination for saving the *.ova image, as shown in Figure A-2.

Figure A-2 Downloading the *.ova image from the IBM web page
A.1.1 Deploying the *.ova file in VMware environment
Deploying the *.ova image can be done with by using a vCenter infrastructure or directly on a VMware ESXi server. Create a virtual machine by clicking Create/Register VM, as shown in Figure A-3.

Figure A-3 Deploy *.ova image
Make sure to clear the Power on automatically option, as shown in Figure A-4. After the *.ova image is deployed, some adjustments must be made before the virtual machine can be powered on.

Figure A-4 Clearing the Power on automatically option
Configure the CPU and memory settings for the virtual machine according to Table A-1. For a single node trial setup, a minimum of 8 logical processors and 64 GB of memory is needed. Single node trial deployments with less than the recommended value of memory and logical processors cannot scale to index 2 billion documents. The use of 64 GB of RAM does not allow indexing of more than 25 million files into IBM Spectrum Discover.
Table A-1 CPU and memory requirements for single node trial
|
Specification
|
Minimum value
|
Recommended value
|
|
Logical processors
|
8
|
24
|
|
Memory
|
64 GB
|
128 GB
|
After deploying the *.ova image, we add two hard disks, as shown in Figure A-5. The first hard disk is attached to SCSI Controller 0 and contains the persistent message queue. The second hard disk is attached to SCSI Controller 1 and is storage for the IBM DB2® Warehouse. See Table A-1 on page 108 to verify the required changes to the deployed *.ova image.

Figure A-5 Adding a hard disk
See Table A-2 to verify the required changes to the deployed *.ova image.
Table A-2 Virtual machine configuration changes
|
Hard disk
|
Controller location
|
Specifics
|
|
Hard disk 1
|
SCSI Controller 0
|
Exists after *.ova deployment, no changes needed
|
|
Hard disk 2
|
SCSI Controller 0
|
Add this disk with default settings
|
|
Hard disk 3
|
SCSI Controller 1
|
Add this disk with default settings
|
Start the virtual machine after all of the reconfiguration tasks are complete, as shown in Figure A-6 on page 110. You can log on to the system with the credentials that are listed in Table A-3.
Table A-3 Virtual machine log on credentials
|
Username
|
Password
|
|
moadmin
|
Passw0rd
|

Figure A-6 Starting the reconfigured virtual machine
A.1.2 Logging on to and configuring the IBM Spectrum Discover virtual machine
Log on to the IBM Spectrum Discover virtual machine, as shown in Example A-1. The IBM Spectrum Discover welcome message is displayed.
Example A-1 IBM Spectrum Discover welcome message
log in as: moadmin
[email protected]'s password:
Last login: Thu Jun 13 16:41:51 2019 from laptop-kf101s3s.tucson.ibm.com
___ ___ __ __
|_ _| _ ) / |
| || _ |/| |
|___|___/_| |_| _ ___ _
/ __|_ __ ___ __| |_ _ _ _ _ _ __ | (_)___ __ _____ _____ _ _
\__ '_ / -_) _| _| '_| || | ' | |) | (_-</ _/ _ V / -_) '_|
|___/ .__/\___\__|\__|_| \_,_|_|_|_| |___/|_/__/\__\___/\_/\___|_|
|_|
2.0.1-13
Please configure the machine by running:
cd /opt/ibm/metaocean/configuration/
sudo ./mmconfigappliance
[moadmin@discover ~]$
Follow the instructions and change the working directory, as shown in Example A-2.
Example A-2 Change the working directory
cd /opt/ibm/metaocean/configuration/
Run the mmconfigappliance command, as shown in Example A-3.
Example A-3 Run the mmconfigappliance tool
sudo ./mmconfigappliance
Table A-4 lists the installation information. This information is the minimum information that is needed to successfully run the mmconfigappliance command.
Table A-4 Installation information cheat sheet
|
Information
|
Value
|
|
Fully Qualified Domain Name (FQDN)
|
Client defined
|
|
IP address
|
Client defined
|
|
Adapter
|
Available adapters shown in the User Interface (UI)
|
|
Netmask
|
Client defined
|
|
Gateway IP
|
Client defined
|
|
DNS IP
|
Client defined
|
|
NTP IP or NTP hostname
|
Client defined
|
Follow the instructions from the mmconfigappliance command and enter the requested information. A summary is shown after the required information is provided. Review and confirm the configuration and enter “y” to continue with the implementation (see Example A-4).
Example A-4 Mmconfigappliance command overview
sudo ./mmconfigappliance
Enter in the Fully Qualified Domain Name (FQDN) of this system:
discover.sle.kelsterbach.de.ibm.com
Enter in the IP address of this system:
9.155.115.215
Enter in the adapter to assign the IP:
Available adapters are:
ens160
ens160
Enter in the netmask:
255.255.240.0
Enter in the gateway IP:
9.155.112.1
Enter in the DNS IP:
9.155.115.152
Enter in the NTP IP or hostname:
9.155.114.100
Is this a single or multi node installation? [single/multi]
single
You're ready to install. Would you like to proceed with the following settings? [y/n]
Hostname: discover.sle.kelsterbach.de.ibm.com
IP: 9.155.115.215
Adapter: ens160
Netmask: 255.255.240.0
Gateway: 9.155.112.1
DNS: 9.155.115.152
NTP: 9.155.114.100
Mode: single
y
The mmconfigappliance configuration tool starts and configures the network environment and NTP configuration, as shown in Example A-5. Enter a new password for the command line user moadmin. Press Enter to continue with the mmconfigappliance tool. This process runs for some time.
Example A-5 Mmconfigappliance command starts
Configuring network
[INFO] [19/06/13-02:16:39] Configuring interface ens160 with IP address 9.155.115.215
[INFO] [19/06/13-02:16:40] Successfully pinged the gateway IP: 9.155.112.1
[INFO] [19/06/13-02:16:40] Configuring ansible hosts file with master ip 9.155.115.215
Configuring NTP
[INFO] [19/06/13-02:16:40] Configuring system NTP 9.155.114.100
Launching ansible
Please enter a new password for moadmin:
confirm Please enter a new password for moadmin:
PLAY [master] **************************************************************************************
[…]
Depending on your environment, the NTP server set-up process might hang. If such a hang occurs, end the mmconfigappliance configuration by pressing CTRL-C and complete the following steps:
Example A-6 Edit ntp.conf
sudo vi /etc/ntp.conf
2. Locate the lines that are shown in Example A-7.
Example A-7 Original ntp.conf file contents
# Use public servers from the pool.ntp.org project.
# Please consider joining the pool (http://www.pool.ntp.org/join.html).
server 0.centos.pool.ntp.org iburst
server 1.centos.pool.ntp.org iburst
server 2.centos.pool.ntp.org iburst
server 3.centos.pool.ntp.org iburst
3. Edit the ntp.conf file by commenting out the NTP server settings and adding your own NTP server. In our lab example, we used the settings that are shown in Example A-8.
Example A-8 Changed ntp.conf file contents
# Use public servers from the pool.ntp.org project.
# Please consider joining the pool (http://www.pool.ntp.org/join.html).
# server 0.centos.pool.ntp.org iburst
# server 1.centos.pool.ntp.org iburst
# server 2.centos.pool.ntp.org iburst
# server 3.centos.pool.ntp.org iburst
server 9.155.114.100 iburst
4. Run the mmconfigappliance configuration tool again to configure the network environment and NTP configuration, as shown in Example A-5. Enter a new password for the command line user moadmin. Press Enter to continue with the mmconfigappliance tool. This process runs for some time.
The mmconfigappliance tool presents a summary report of the successfully completed installation, as shown in Example A-9. Review the information.
Example A-9 mmconfigappliance command ends
[…]
PLAY RECAP *****************************************************************************************
9.155.115.215 : ok=162 changed=114 unreachable=0 failed=0
Thursday 13 June 2019 03:42:27 +0000 (0:00:26.160) 0:26:56.819 *********
===============================================================================
db2wh : Wait for DB2WH to initialise ------------------------------------------------------ 912.74s
db2wh_dist : Load DB2WH image into Docker cache ------------------------------------------- 312.13s
db2wh_liquibase : Give DB2 extra time to be ready to handle queries ----------------------- 120.04s
reports : Wait for all pods to come up ----------------------------------------------------- 61.13s
db2wh_liquibase : Create MetaOcean tables with Liquibase ----------------------------------- 39.16s
reports : Post sample reports -------------------------------------------------------------- 26.16s
db2wh : Loop until the database is live again ---------------------------------------------- 19.71s
db2wh_liquibase : Liquibase 2.0.1.0 Upgrades [This can take several hours!] ---------------- 14.02s
db2wh : Stop DB2 Db ------------------------------------------------------------------------- 9.00s
reports : Copy sample reports --------------------------------------------------------------- 6.32s
reports : Get token ------------------------------------------------------------------------- 6.24s
db2wh_liquibase : Liquibase 2.0.0.3 Upgrades ------------------------------------------------ 6.10s
icp_post : Uninstall Fluentd ---------------------------------------------------------------- 6.03s
db2wh_liquibase : Liquibase 2.0.0.1 Upgrades ------------------------------------------------ 4.61s
mo_namespace : Log into the cluster --------------------------------------------------------- 4.12s
icp_post : Log into the cluster ------------------------------------------------------------- 3.90s
db2wh : Start DB2 Db ------------------------------------------------------------------------ 3.66s
db2wh : Set password ------------------------------------------------------------------------ 2.43s
db2wh : Install license --------------------------------------------------------------------- 2.27s
db2wh : Set password ------------------------------------------------------------------------ 2.15s
[moadmin@metaocean-x configuration]$
A.1.3 Managing the IBM Spectrum Discover system by using the web UI
Log on to the web UI of the newly configured IBM Spectrum Discover system (see Figure A-7). After the successful completion of the mmconfigappliance command, the web UI is available on the configured connection details.

Figure A-7 IBM Spectrum Discover web UI welcome window
Log on to the web UI by using the credentials that are listed in Table A-5.
Table A-5 Web UI credentials
|
Username
|
Password
|
|
sdadmin
|
Passw0rd
|
The IBM Spectrum Discover web UI welcome window is displayed, as shown in Figure A-8. The newly configured system does not yet contain data connections; therefore, the web UI is “empty”.

Figure A-8 Welcome to the IBM Spectrum Discover UI window
A.2 Creating Data Source Connections
Data source connections are needed to connect IBM Spectrum Discover to the systems for scanning and indexing. The supported types are: IBM Cloud Object Storage, Network File System, IBM Spectrum Scale, and Amazon Simple Storage Service (S3).
A.2.1 Creating an IBM Spectrum Scale Data Source Connection
Complete the following steps:
1. Log on to the IBM Spectrum Discover system by using a user that has admin rights.
2. Click Admin → Data Connections to open the Data Connections window.
3. Click Add Connection and select Spectrum Scale as the Data Source Connection type (see Figure A-9).
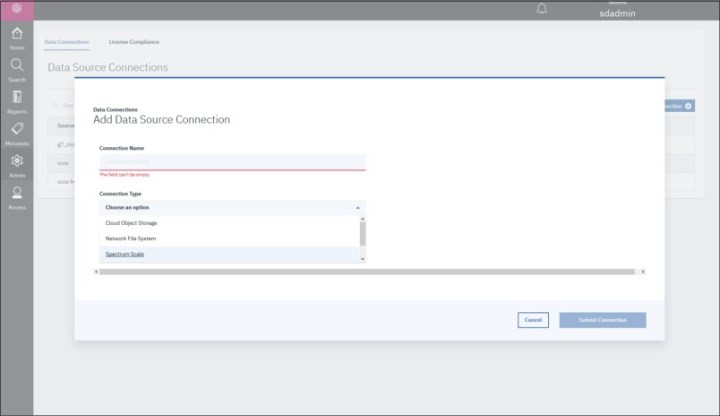
Figure A-9 Add Connection
It is helpful to open an administrative command line session with the IBM Spectrum Scale system now to gather the needed information to create the Data Source Connection for IBM Spectrum Discover.
Collecting IBM Spectrum Scale Data Source Connection information
You must collect information regarding the systems and environment you are using to create an IBM Spectrum Scale Data Source Connection.
The Add Data Source Connection window that is shown in Figure A-10 on page 118 is where you enter the information to create the connection.
In this section, we describe the fields that must be completed to create the connection. For the purposes of this IBM Redpaper publication, the fields are completed with information about the figures and examples that we used for our lab test environment.

Figure A-10 Add Data Source Connection window
The following information is needed to successfully create an IBM Spectrum Scale Data Source Connection. We highlight the names that were used in our lab test environment to map back to the fields that are shown in Figure A-10:
•Connection Name
Choose a meaningful name for your Data Source Connection. This information is shown in the IBM Spectrum Discover welcome window.
Lab test value: g7_cluster
•Connection Type
Connection Type field is completed by using information from the previous window when we chose Spectrum Scale as our type.
Lab test value: Spectrum Scale
•User
This user is the account the IBM Spectrum Discover system can use to connect to the IBM Spectrum Scale system. The IBM Spectrum Scale Data Source Connection is implemented in an “agent-less” fashion. Therefore, this account is used to import the scanner scripts into the IBM Spectrum Scale system.
Lab test value: root
•Password
This password belongs to the User account. Together, this information is used to import the scanner scripts into the IBM Spectrum Scale system.
Lab test value: Passw0rd
•Working Directory
This directory on the IBM Spectrum Scale system is where the scanner scripts are deployed. It is suggested to choose a directory outside of the directory that is to be scanned. You must make sure that this directory exists,
Lab test value: /workdir
•Scan Directory
This directory is scanned for IBM Spectrum Discover.
You can use the mmlsnsd command on the IBM Spectrum Scale system to see the file system name of the IBM Spectrum Scale file system (see Example A-10).
Example A-10 Run mmlsnsd command
[root@g7_node1 ~]# mmlsnsd
File system Disk name NSD servers
---------------------------------------------------------------------------
group7fs nsd1 g7_node1,g7_node2
group7fs nsd2 g7_node2,g7_node1
With this information, you can use the mount command to display the mount point of the IBM Spectrum Scale file system, as shown in the following example:
[root@g7_node1 ~]# mount | grep group7fs
group7fs on /ibm/group7fs type gpfs (rw,relatime)
Enter the directory you want to scan; for example, enter /ibm/group7fs to scan the entire IBM Spectrum Scale file system.
You also can enter /ibm/group7fs/data if you want to scan only the data directory that is inside the IBM Spectrum Scale file system (see Example A-11).
Example A-11 run ls -la command
[root@g7_node1 group7fs]# ls -la /ibm/group7fs
total 259
drwxr-xr-x 6 root root 262144 Jun 11 23:46 .
drwxr-xr-x 3 root root 22 Mar 25 13:56 ..
drwxr-xr-x 4 root root 4096 Mar 25 14:00 ces
drwxr-xr-x 2 root root 4096 Jun 14 00:14 data
drwxr-xr-x 2 root root 4096 Mar 25 14:01 ganesha
drwxr-xr-x 4 root root 4096 Mar 25 14:01 ha
dr-xr-xr-x 2 root root 8192 Jan 1 1970 .snapshots
Lab test value: /ibm/group7fs
•Site (Optional)
Optional input to attach a physical location to all records that are found in a scan of this data source.
Lab test value: Kelsterbach
•Cluster
Enter the IBM GPFS cluster name information from the mmlscluster command that is run on the IBM Spectrum Scale system (see Example A-12).
Example A-12 Run mmlscluster command
[root@g7_node1 group7fs]# mmlscluster
GPFS cluster information
========================
GPFS cluster name: g7_cluster.local
GPFS cluster id: 6097632966527733229
GPFS UID domain: g7_cluster.local
Remote shell command: /usr/bin/ssh
Remote file copy command: /usr/bin/scp
Repository type: CCR
Node Daemon node name IP address Admin node name Designation
--------------------------------------------------------------------
1 g7_node1 192.168.0.85 g7_node1 quorum-manager-perfmon
2 g7_node2 192.168.0.86 g7_node2 quorum-manager-perfmon
3 g7_node3 192.168.0.87 g7_node3 quorum-manager-perfmon
In Example A-12, the GPFS cluster name is g7_cluster.local. Enter this information.
Lab test value: g7_cluster.local
•Host
Enter the IP of a node that belongs to the IBM Spectrum Scale cluster that was identified in Example A-12. This node must have python 2.7.5 or newer installed. This node also must allow an SSH login from the user ID and password that was specified.
Lab test value: 9.155.114.85
•Filesystem
Enter the IBM Spectrum Scale filesystem name. The output of the mmlsnsd command shows the filesystem name.
Lab test used: group7fs
•Node List
A comma-separated list of nodes or node classes within the IBM Spectrum Scale cluster that participate in the scan.
Lab test: all
Now that all of the fields are completed, click Submit Connection, as shown in Figure A-10 on page 118 to create the IBM Spectrum Scale Data Source Connection.
Select Scan Now to start a metadata scan of the newly created data source.
A.2.2 Creating an IBM Cloud Object Storage Data Source Connection
Log on to the IBM Spectrum Scale system with a user that has admin rights. Click Admin → Data Connections to open the Data Connections window. Click Add Connection and select Cloud Object Storage as the Data Source Connection type (see Figure A-11).

Figure A-11 Add Connection
You must collect information regarding the systems and environment that you are using to create an IBM Cloud Object Storage Data Source Connection. The Add Data Source Connection window that is shown in Figure A-12 on page 122 is where you enter the information to create the connection.
In this section, we describe the fields that must be completed to create the connection. For the purposes of this IBM Redpaper publication, the fields are completed with information about the figures and examples that we used for our lab test environment.
It is helpful to open an administrative logon to the IBM Cloud Object Storage web UI now to gather the needed information to create the Data Source Connection for IBM Spectrum Discover.

Figure A-12 IBM Cloud Object Store Data Source Connection
IBM Cloud Object Storage Data Source Connection information
The following information is needed to successfully create an IBM Cloud Object Storage Data Source Connection. We highlight the names that were used in our lab test environment to help map to the fields that are shown in Figure A-12:
•Connection Name
Choose a meaningful name for your Data Source Connection. This name is shown in the IBM Spectrum Discover welcome window.
Lab test value: vcos-hvault
•Connection Type
Connection Type field is completed by using information from the previous window when we choose Cloud Object Storage as our type.
Lab test value: Cloud Object Storage
•Manager Api User
This account is used by the IBM Spectrum Discover system to connect to the IBM Cloud Object Storage System. This account is the Api interface that allows IBM Spectrum Discover to list vaults and gather vault information of the IBM Cloud Object Storage System. This account does not have vault access to read the actual data.
Lab test value: admin
•Manager Api Password
This password belongs to the Manager Api User account. Together, this information is used to import the scanner scripts into the IBM Spectrum Scale system.
Lab test value: Passw0rd
•UUID
This UUID of the IBM Cloud Object Storage System is scanned.
Log on to the web UI of the IBM Cloud Object Storage System and click Help → About this system, as shown in Figure A-13.

Figure A-13 Help - About this system
The UUID is displayed as shown in Figure A-14.

Figure A-14 About this system
Lab test value: 1aae559c-3723-7e12-10ae-5f49e3577242
•Manager Host
This node is the IBM Cloud Object Storage System manager node. Enter the connection information here.
Lab test value: 9.155.115.166
•Vault
Enter the name of the vault that is to be scanned.
Click Vaults in the IBM Cloud Object Storage System manager UI to display a list of your vaults (see Figure A-15).
Lab test value: harald-test

Figure A-15 Vaults
•Accessor Host
Enter the IP of an accessor node of the IBM Cloud Object Storage System. This host is used to scan the data.
Lab test value: 9.155.115.167
•Accessor Access Key
Enter the Accessor Access Key of the IBM Cloud Object Storage System. Although the Manager Api User cannot access data, this credential must have read access to the data that is to be scanned.
Click the Security tab of the IBM Cloud Object Storage System manager UI and get the information, as shown in Figure A-16 on page 126. An Access Key ID is needed for a user that has read access to the vault that is to be scanned.
Lab test value: vm7MJW2TOuz5YjXBYS7h
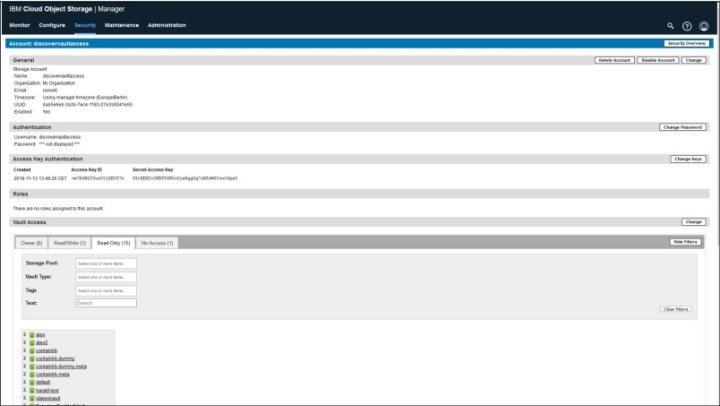
Figure A-16 Security
•Accessor Secret Key
The Secret Access Key for the IBM Cloud Object Storage System user that is used to scan the data. The credentials that allow log on for the Accessor Access Key.
Lab test value: S91HEKCoYNBFS9BUcGjxHggGq7oMfsW6Yrw06px5
•Site (Optional)
Optional input to attach a physical location to all records found in a scan of this data source.
Lab test value: Kelsterbach
Now that all of the fields are completed, click Submit Connection (see Figure A-12 on page 122) to create the IBM Cloud Object Storage Data Source Connection.
Select Scan Now to start a metadata scan of the newly created data source.
A.2.3 Creating a Network File System Data Source Connection
In this example, we show how to add a Network File System (NFS) Data Source Connection with the example of an NFS server running on Linux. The example NFS server is configured with an /etc/exports file, as shown in Example A-13.
Example A-13 /etc/exports of the example NFS server
/nfs *(ro,no_root_squash,no_subtree_check)
/nas *(ro,no_root_squash,no_subtree_check)
|
Note: Verify connectivity between the IBM Spectrum Discover system and the NFS server. A firewall might block your access to the NFS share.
|
Complete the following steps:
1. Log on to the IBM Spectrum Scale system with a user that has admin rights.
2. Click Admin → Data Connections to open the Data Connections window.
3. Click Add Connection and select Network File System as the Data Source Connection type (see Figure A-17).

Figure A-17 Add NFS Data Source Connection
You must collect information regarding the systems and environment that you are using to create an NFS Data Source Connection. The Add Data Source Connection window that is shown in Figure A-18 on page 128 is where you enter the information to create the connection.
In this section, we describe the fields that must be completed to create the connection. For the purposes of this IBM Redpaper publication, the fields are completed with information about the figures and examples that we used for our lab test environment.
It is helpful to open an administrative logon to the NFS server now to gather the needed information to create the NFS Data Source Connection for IBM Spectrum Discover.

Figure A-18 NFS Data Source Connection
NFS Data Source Connection information
The following information is needed to successfully create an NFS Data Source Connection. We highlight the names that are used in our lab test environment to help map to the fields that are shown in Figure A-18:
•Connection Name
Choose a meaningful name for your Data Source Connection. This name is shown in the IBM Spectrum Discover welcome window.
Lab test value: vnfs
•Connection Type
Connection Type field is completed by using information from the previous window when we choose Network File System as our type.
Lab test value: Network File System
•Datasource
The name of the NFS file system that is represented by this Data Source Connection.
Lab test value: vnfs
•Export Path
The export path of the NFS file system. Use the Linux command showmount to query the value in your environment, as shown in Example A-14 on page 129.
Example A-14 Run showmount -e
showmount -e 9.155.115.213
Export list for 9.155.115.213:
/nas *
/nfs *
Lab test value: /nfs
•Host
The hostname or IP address of a node that exports this filesystem.
Lab test value: 9.155.115.213
•Site (Optional)
Optional input to attach a physical location to all records that are found in a scan of this data source.
Lab test value: Kelsterbach
Now that all of the fields are completed, click Submit Connection (as shown in Figure A-18 on page 128) to create the NFS Data Source Connection.
Select Scan Now to start a metadata scan of the newly created data source.
A.3 LDAP/Active directory
Complete the following steps to create connections to Authentication Domains to integrate the IBM Spectrum Discover user management into an Active Directory/LDAP infrastructure:
1. Open the IBM Spectrum Discover web UI and click Add Domain Connection in the Access → Authentication Domains tab, as shown in Figure A-19.

Figure A-19 Authentication Domains
2. Enter the Domain Connection information, as shown in Figure A-20. Pay special attention to the forward-slash and back-slash nature of the input.

Figure A-20 Add Domain Connection
3. Use the Table A-6 as an example of valid values to configure an Authentication Domain connection to an Active Directory server.
Table A-6 LDAP Connection
|
Information
|
Example
|
|
Name
|
sle
|
|
Host
|
sle.kelsterbach.de.ibm.com
|
|
Port
|
389
|
|
User
|
sleldap
|
|
Password
|
Passw0rd
|
|
Suffix/Base DN
|
DC=sle,DC=kelsterbach,DC=de,DC=ibm,DC=com
|
|
Group name Attribute
|
sAMAccountName
|
|
Group ID Attribute
|
N/A
|
|
Group Object Class
|
group
|
|
Group Tree DN
|
OU=SLE-Employee-Groups,DC=sle,DC=kelsterbach,DC=de,DC=ibm,DC=com
|
|
Username Attribute
|
sAMAccountName
|
|
User Object Class
|
user
|
|
User Tree DN
|
OU=SLE-Employee-UserIDs,DC=sle,DC=kelsterbach,DC=de,DC=ibm,DC=com
|
With a successfully created LDAP connection, the Groups and Users window is pre-populated with data from your environments LDAP server (see Figure A-21).

Figure A-21 Groups tab with LDAP integration
The Users tab shows the pre-populated data from your environments LDAP server (see Figure A-22).

Figure A-22 Users tab with LDAP integration
The user data management now allows you to assign one or multiple roles to groups or users from locally or LDAP-defined IDs. Figure A-23 shows the assignment of the roles admin, dataadmin, and datauser to the LDAP user ID mdefiebr.

Figure A-23 Multi-role assignment to LDAP user
After assigning the respective roles, you can log on to the IBM Spectrum Discover web UI with the user, as shown in Figure A-24.

Figure A-24 Log on with LDAP user to web UI
|
Note: Some actions within the IBM Spectrum Discover web UI require the role of admin while other actions require the dataadmin role. For example, adding data connections requires admin role while running metadata queries requires dataadmin or datauser roles.
|
A.4 Backing up IBM Spectrum Discover
To protect your IBM Spectrum Discover system, multiple backup interfaces are supported. Configure an automated daily backup to an IBM Spectrum Protect server, IBM Cloud Object Storage System, or secure FTP target server.
If you want to use the IBM Spectrum Protect interface, you must install the IBM Spectrum Protect client executable to the IBM Spectrum Discover system.
Complete the following steps:
1. Log on to the IBM Spectrum Discover system with secure sell.
2. Change directory to some working directory with enough free space, as shown in the following example:
cd /tmp
3. Download the IBM Spectrum Protect client executable to the system:
wget
4. Extract the downloaded file to prepare the IBM Spectrum Protect client installation (see Example A-15).
Example A-15 Extract the IBM Spectrum Protect client executable
[moadmin@spectrumdiscover tmp]$ tar -xvf 8.1.6.1-TIV-TSMBAC-LinuxX86.tar
README.htm
README_api.htm
TIVsm-API64.x86_64.rpm
TIVsm-APIcit.x86_64.rpm
TIVsm-BA.x86_64.rpm
TIVsm-BAcit.x86_64.rpm
TIVsm-BAhdw.x86_64.rpm
TIVsm-JBB.x86_64.rpm
TIVsm-filepath-source.tar.gz
gskcrypt64-8.0.55.2.linux.x86_64.rpm
gskssl64-8.0.55.2.linux.x86_64.rpm
update.txt
5. Run sudo yum install TIVsm-API64.x86_64.rpm TIVsm-BA.x86_64.rpm gskcrypt64-8.0.55.2.linux.x86_64.rpm gskssl64-8.0.55.2.linux.x86_64.rpm to install the IBM Spectrum Protect client (see Example A-16).
Example A-16 Run sudo yum install TIVsm-API64.x86_64.rpm
[moadmin@discover tmp]$ sudo yum install TIVsm-API64.x86_64.rpm TIVsm-BA.x86_64.rpm gskcrypt64-8.0.55.2.linux.x86_64.rpm gskssl64-8.0.55.2.linux.x86_64.rpm
Examining TIVsm-API64.x86_64.rpm: TIVsm-API64-8.1.6-1.x86_64
Marking TIVsm-API64.x86_64.rpm to be installed
Examining TIVsm-BA.x86_64.rpm: TIVsm-BA-8.1.6-1.x86_64
Marking TIVsm-BA.x86_64.rpm to be installed
Examining gskcrypt64-8.0.55.2.linux.x86_64.rpm: gskcrypt64-8.0-55.2.x86_64
Marking gskcrypt64-8.0.55.2.linux.x86_64.rpm to be installed
Examining gskssl64-8.0.55.2.linux.x86_64.rpm: gskssl64-8.0-55.2.x86_64
Marking gskssl64-8.0.55.2.linux.x86_64.rpm to be installed
Resolving Dependencies
[…]
6. Change the directory to the IBM Spectrum Protect client directory to configure the dsm.sys and dsm.opt configuration files:
cd /opt/tivoli/tsm/client/ba/bin/
7. Create dsm.sys and dsm.opt configuration files from the provided examples. Edit these configuration files to allow the IBM Spectrum Protect client to interface with an IBM Spectrum Protect server. A working configuration should allow you to run a dsmc command, as shown in the following example:
sudo cp dsm.sys.smp dsm.sys
sudo cp dsm.opt.smp dsm.opt
8. Run the initialSetup.py command to configure the IBM Spectrum Protect integration of IBM Spectrum Discover (see Example A-17).
Example A-17 Run the initialSetup.py command
cd /opt/ibm/metaocean/backup-restore
Change directory to the "backup-restore" directory.
sudo python initialSetup.py
Please select storage type (cos, spectrum, or sftp): spectrum
Please enter the maximum number of backups to retain (1-999) (defaults to 30 successful backups): 3
Fri, 14 Jun 2019 19:05:18 INFO Setup is successful, maximum of 3 backups will be retained in storage.
Fri, 14 Jun 2019 19:05:18 INFO Please continue running backup or restore scripts as root user.
Fri, 14 Jun 2019 19:05:18 INFO To set up recurring automated backups, please run the 'automated_backup.py' script.
[moadmin@discover backup-restore]$
Example A-18 Running backup.py
sudo python /opt/ibm/metaocean/backup-restore/backup.py
Fri, 28 Jun 2019 01:35:33 INFO No earlier checkpoints found, starting script afresh...
Fri, 28 Jun 2019 01:35:33 INFO Suspending writes on container (d9412114fb1f)...
Fri, 28 Jun 2019 01:35:46 INFO Creating snapshot 2019-06-28T01.35.32_snapshot...
Fri, 28 Jun 2019 01:35:47 INFO Snapshot 2019-06-28T01.35.32_snapshot created.
Fri, 28 Jun 2019 01:35:47 INFO Resuming writes on container (d9412114fb1f)...
Fri, 28 Jun 2019 01:35:51 INFO Converting snapshot to tar
Fri, 28 Jun 2019 01:39:37 INFO Snapshot tar /gpfs/gpfs0/2019-06-28T01.35.32_snapshot.tar created
Fri, 28 Jun 2019 01:39:37 INFO Archiving Snapshot /gpfs/gpfs0/2019-06-28T01.35.32_snapshot.tar to IBM Spectrum Protect Server
Fri, 28 Jun 2019 01:58:28 INFO Upload of file /gpfs/gpfs0/2019-06-28T01.35.32_snapshot.tar complete.
Fri, 28 Jun 2019 01:58:29 INFO Beginning cleanup...
Fri, 28 Jun 2019 01:58:29 INFO Checking for existing checkpoints...
Fri, 28 Jun 2019 01:58:29 INFO Deleted existing checkpoint
Fri, 28 Jun 2019 01:58:29 INFO Checking for existing snapshots and tar files...
Fri, 28 Jun 2019 01:58:30 INFO Deleted snapshot 2019-06-28T01.35.32_snapshot
Fri, 28 Jun 2019 01:58:30 INFO Deleted tar /gpfs/gpfs0/2019-06-28T01.35.32_snapshot.tar
Fri, 28 Jun 2019 01:58:34 INFO Deleted /gpfs/gpfs0/2019-05-24T10.00.01_snapshot.tar from IBM Spectrum Protect Server.
Fri, 28 Jun 2019 01:58:34 INFO Backup procedure is complete.
Example A-19 Run the automatedBackup.py command
sudo python /opt/ibm/metaocean/backup-restore/automatedBackup.py
Please enter (yes) or (y) if you want to schedule an automated cron job for backup? : yes
Please enter (yes) or (y) if you want to set up a non-default automated cron job for backup.
Choosing (n) would result to default setup (Default is a daily at 12AM) : yes
Please enter frequency you want to run backup
1. Daily
2. Weekly
3. Monthly
Enter your choice (1/2/3): 1
Please Enter the hour of the day 0 - 23 to run the backup: 3
A cron job setup is successful.
[moadmin@spectrumdiscover ~]$
Example A-20 Run the crontab -l command
[moadmin@spectrumdiscover ~]$ sudo crontab -l
@daily python /opt/ibm/metaocean/backup-restore/backup.py
0 3 * * * python /opt/ibm/metaocean/backup-restore/backup.py
[moadmin@spectrumdiscover ~]$
..................Content has been hidden....................
You can't read the all page of ebook, please click here login for view all page.