What kind of consumer are you? Are you the kind who buys a new product off the shelf, takes it home, carefully unpacks the product and accessories, and then begins to meticulously read through the instructions or user manual? No, of course not. That’s a rare person, one who should be watched closely and not trusted with sharp objects.
Most of us react to the purchase of a new product much the way a four-year-old reacts to a freshly wrapped present on Christmas morning: We tear right into it. And so you may find yourself sitting on top of a newly installed defect-tracking system, proud of your team’s accomplishment, but still a bit foggy on how the thing actually works. So, let’s walk through some of the basics of ClearQuest navigation.
By no means is this chapter a comprehensive list of all the features and functions and doodads included in your ClearQuest release; rather, this is just a quick overview of the major activities you’ll need to know to move around the inside of the application.
ClearQuest is a customizable defect- and change-tracking system, designed for working within a dynamic environment that requires steady workflows but also offers the ability to change on the fly. However, using the application itself is not too complicated. ClearQuest can manage every kind of change activity associated with software development—even with the base install.
As you grow familiar with its capabilities, you can begin to customize the application and realize its full potential. It shortens development lifecycles by unifying your entire team around a single process for defects, enhancements, and artifact modifications, as shown in the following examples.
Development engineers can identify and prioritize action items that deal with their sections of the code.
Test engineers can track the status and resolution of change requests to verify software quality.
Project managers can get an overview of the effort, allowing them to better allocate development resources, streamline workflow, and accurately determine release dates.
Administrators can integrate with ClearCase or another existing tool and customize it to fit the organizational needs.
For a complete and comprehensive overview of how to use ClearQuest, you’re going to need to break the plastic seal on your user manual and commit yourself to some in-depth (and viscerally stimulating) reading. Or you can trap your team’s ClearQuest administrator in the hallway and grill him or her for answers to all of your problems (most of which should probably relate to ClearQuest).
For the four-year-olds at heart, grab a bar of chocolate and settle down to read this chapter. At least it will provide you with the basics, and then you can move on to more complex topics at your leisure.
[T.4.1] As you’ve probably already discovered, ClearQuest includes multiple interfaces into your data repository, for streamlined and consistent submission of change requests and easy access to the data within the underlying databases. With any standard installation, your system will include a complete change request lifecycle solution, which will allow your team to get up and running quickly. Right out of the box, ClearQuest allows you to immediately begin tracking your critical activities, such as assignment of tasks, prioritization of enhancements, and the all-important allocation of your limited resources.
[A.4.1] For those of you with a more robust set of applications in your change management ecosystem, ClearQuest also provides integration with those critical applications and management systems, such as ClearCase and Unified Change Management (UCM). Whether you are accessing ClearQuest from Windows, UNIX, or the web client, the basic capabilities remain the same: Users can submit change requests, view and modify existing records, and create and run queries.
Digging a little deeper into the mechanics, ClearQuest uses a three-tier architecture, as shown in Figure 4-1.
The first tier includes the various ClearQuest clients. Of course, for the web component, you will need to use a supported web browser. For the e-mail client, your administrator will need to configure the environment to allow ClearQuest requests through your e-mail server. To allow the ClearQuest e-mail reader to pull information into the systems, you’ll also need to set up a dedicated e-mail account for ClearQuest. (ClearQuest supports Apache/Rational Web Server.)
The second tier includes the core ClearQuest functions, including application logic and business rules. These APIs implement your specified business rules and regulate all access to the ClearQuest database.
The third tier is a relational database where ClearQuest stores change requests and metadata, such as user tables.
Future chapters provide more information on how to link existing systems to ClearQuest and how to further integrate ClearQuest within your change management ecosystem.
One important concept to understand, before we dig deeper into the system, is that of the change request lifecycle. The first step in understanding this concept is to know the difference between an action and a state. An action is a step you take to resolve a request (open, close, assign, postpone, reject, validate, or duplicate). A state is a definition of where the change request is within the lifecycle (opened, closed, assigned, postponed, rejected, resolved, submitted, or duplicated).
Actions and states represent all of the various lifecycle variables your change requests can encounter within your process.
The standard ClearQuest training materials contain a great model, shown in Figure 4-2, that outlines each step of a basic software defect.

Let’s introduce some additional terminology that you may find important as you navigate through ClearQuest.
In a relational database, you’re probably familiar with the use of tables to organize your data. In ClearQuest, these tables are called record types. For example, defects and enhancements are two record types. There are two different kinds of record types: state-based and stateless. State-based records have a state transition model to represent their lifecycles in the defect- and change-tracking process; a stateless record type does not have these transitions. Once a user submits a new record of a stateless record type, it will stay in the database forever until it is explicitly removed. In other words, the stateless record type is suitable for records that do not require lifecycle tracking. The relationship between different record types is known as referencing.
As outlined in the ClearQuest manuals (see Introducing Rational ClearQuest, IBM Rational Software), ClearQuest consists of several components that work in a client-server environment. Table 4-1 describes these components.
Table 4-1. ClearQuest Components
Component | Used By | Use To |
|---|---|---|
Client Tools | ||
ClearQuest for Windows | Everyone | Submit, modify, and track change requests; analyze project progress by creating and updating queries, charts, and reports |
ClearQuest for UNIX | Everyone | Submit, modify, and track change requests; support project analysis by creating and updating queries |
ClearQuest Web | Everyone | Access ClearQuest across multiple platforms using Netscape Navigator or Microsoft’s Internet Explorer to submit, modify, and track change requests; support project analysis by creating and updating queries and reports |
Administrator Tools | ||
ClearQuest Designer | ClearQuest administrator | Customize ClearQuest; manage ClearQuest schemas and databases; administer users and user groups |
ClearQuest Import Tool | ClearQuest administrator | Import data, including records, history, and attachments from other change request systems and between ClearQuest databases |
ClearQuest Export Tool | ClearQuest administrator | Export ClearQuest data from one ClearQuest user database to another user database |
ClearQuest Maintenance Tool | Everyone | Set up and connect to the schema repository during installation and when upgrading to a new ClearQuest version |
Rational E-Mail Reader | ClearQuest administrator | Enable ClearQuest users to submit and modify records by e-mail |
ClearQuest includes predefined schemas that provide ready-to-use change- and defect-tracking processes, as well as standard integrations with various IBM Rational software products. You can use ClearQuest schemas out of the box or customize them to fit into your organization’s workflow depending on your specific requirements.
ClearQuest provides the following support for your software development environment:
Supports Microsoft Access, Sybase SQL Anywhere, Microsoft SQL Server, Oracle relational databases, and IBM DB2
Integrates with IBM Rational ClearCase and Microsoft Visual SourceSafe so you can associate change requests directly with changes in your evolving software
Integrates with Rational TeamTest, VisualTest, and the products now bundled as Rational PurifyPlus (Purify, PureCoverage, and Quantify), allowing you to submit change requests to ClearQuest directly from these testing tools.
Works with Business Objects’ Crystal Reports so you can create custom reports from ClearQuest data
Allows you to integrate with other standard Windows tools, such as Microsoft Excel and Word, through an advanced Common Object Model (COM) interface
Provides access to the Rational Unified Process (RUP) through the ClearQuest extended help menu
Supports integration with all tools in the Rational Team Unifying Platform (TUP) [1]
Provides seamless integration of ClearQuest into the Eclipse environment, through the ClearQuest client for Eclipse [2]
For more ClearQuest user questions, all the information you will need can be found in the ClearQuest online help on the IBM Rational website. Administrators, however, will want to track down copies of the following: ClearQuest Release Notes, Installing Rational ClearQuest, Administering Rational ClearQuest, ClearQuest Designer Tutorial, the online help for ClearQuest Designer, and the ClearQuest API Reference.
We will offer just a couple of quick thoughts on installation. An important part of the installation process is the creation and configuration of the user databases for your implementation. Once added, the names of these databases then appear in the dropdown list of databases when users log in to ClearQuest. As the administrator, you will use ClearQuest Designer to set up user login accounts and to define user access privileges.
[T.4.2] The first step is to log into the application, for which you must have a ClearQuest user account. When you reach the login screen, you must then select a database from the dropdown list. You’ll have access only to those databases to which you are a subscriber. The administrator will control which databases you’ll have access to and also help resolve any problems with your user account.
The ClearQuest main window appears once you open the application (Figure 4-3).

The Public Queries folder in the Workspace contains all of the standard ClearQuest queries, charts, and reports, as well as any custom items created by your administrator. The beauty of ClearQuest for the common user is that you can drag and drop any query, chart, or report from the Public Queries folder over to your Personal Queries folder, and from there modify it to suit your own individual requirements. More about that in a minute.
The first action you might take in ClearQuest is to submit a change request. This creates a record in the user database that everyone on the team can view and track within the system. Within the Submit Defect form (Figure 4-4), you will describe the change request in detail and then attach any relevant code fragments and other supporting information that will help define the problem or suggestion and help the development team reach a quick and appropriate solution.
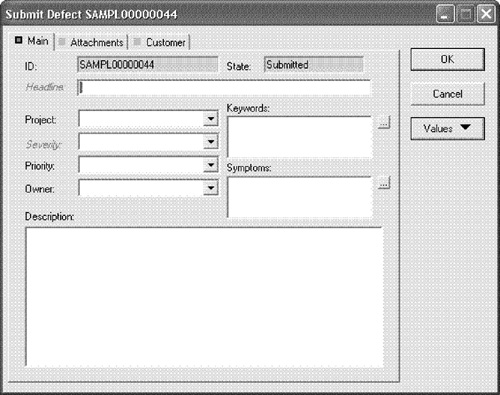
[S.4.1] Users can save frequently used field values as defaults so they won’t have to reenter them each time they submit a change request. In addition, users can submit change requests directly into ClearQuest from Rational TeamTest, Purify, PureCoverage, Quantify, and VisualTest. Or, they can submit and modify change requests by e-mail. It all depends on your existing or planned development processes—the system is fairly flexible.
When you submit a new change request, you will be prompted to select a record type. If you know the record type of your change request (e.g., you know it’s a defect, or maybe it’s a new product enhancement coming from someone on the product management team), then make the appropriate selection. If you’re not sure how to define your request off the top of your head, just click the arrow and choose from the defined record types within the database you’re accessing.
By this point, you’ve probably noticed that ClearQuest uses forms for data entry and display. The Submit Defect form is your primary window for submitting change requests; the slightly less intuitive Record form is where you’ll review your change request records. In general, the Record form includes more information than does the Submit Defect form because the Record form is where all of the entered information is posted and summarized, whereas the Submit Defect form is a simple input screen. Take heart, however; your administrator can designate one of the forms to be both the Submit Defect form and the Record form, which will simplify the process by making one form represent both. So, no worries.
[S.4.2] Attachments are an important part of helping a user or customer describe an issue or enhancement. In fact, when dealing with external customers, the attachments (screenshots, documentation, and so forth) can be the one factor that helps development resolve an issue. ClearQuest allows you to attach any file to a record—that’s right, it supports any format. Your attachments are stored directly in the database, and you can attach as many as needed. (All attachments can be seen as icons on the Attachments window within the Submit Defect form.)
One other important feature: Although it’s not required, you can add keywords and symptoms to help define your change request. You can also select them from a dynamic pick list. Adding keywords and symptoms will help you search for your request and related records later when creating reports or searching for patterns in your change requests.
The ClearQuest administrator can also create additional record types. For example, you might want to separate different record types, such as hardware defects from software defects and enhancement requests. Again, the application is flexible enough to allow you to set up your processes to suit your needs. You can also customize Record forms, including adding tabs and fields and defining associated behaviors.
One concern with any change management system is whether or not people will log in and use it. A great automation feature, and one that helps alleviate this concern, is the ability for your administrator to configure ClearQuest to automatically send e-mail to various team members when a change request is submitted or changed. To take advantage of automatic e-mail notification, all ClearQuest users must set up their e-mail options.
You work with change request records by moving them through various states. In each state, you can perform actions such as modifying a record or moving it to another state. The Actions menu lists the actions that you can perform on the record while it is in any given state, including assigning, modifying, and opening and resolving change requests.
Your ClearQuest administrator can restrict actions to specific user groups. For example, the administrator might allow everyone on a team to resolve a change request, but restrict the verify action to members of the quality assurance group.
ClearQuest queries make it easy for everyone on your team to track change request records as they move through your system. This is done primarily through personal queries and public queries.
Any queries, charts, and reports created by a user are stored in that user’s Personal Queries folder. (See the next section for a discussion of charts and reports.) The ClearQuest Query Wizard will walk you through the process of building a custom query. It will prompt you on the fields you want to display, as well as all of the fields and corresponding values you want to use as query filters. To modify an existing query, first drag the query to your Personal Queries folder and then use the Edit Filter and Edit Display Field Wizards. (See Editing an Existing Query in Chapter 9, page 163.)
Certain ClearQuest packages also include ready-to-use queries that help you locate records by project or component, by assigned engineer, by level of severity, and so on. The ClearQuest Administrator can save queries to the Public Queries folder and can assign this privilege to other users. ClearQuest users with admin access can copy any of their personal queries into the Public Queries folder to make those queries available to anyone with access to the appropriate user database.
[S.4.3, S.4.4] A change management solution is only as good as the data it generates to let you manage your development processes. Certain ClearQuest packages provide predefined charts and reports that you can run on Windows and on ClearQuest Web to view the status of your project at a glance. You can also create your own customized reports and charts.
ClearQuest charts display record data graphically. Distribution charts show the current status of data; trend and aging charts show historical information. ClearQuest also includes reports and report formats that you can use to create reports from ClearQuest data. You can also use Crystal Reports Professional Edition to create new report formats. You can save these formats in your Personal Queries folder and use them to format ClearQuest reports. Remember that the ClearQuest online help contains detailed information to assist you every step of the way.
Obviously, this section does not cover all of the capabilities of a standard ClearQuest installation. We’re just attempting to jump-start the process and show you how easy it is to navigate through the basic features of ClearQuest. Please check your user manual if you have more specific questions.
For complete information about administering ClearQuest, including a description of how to get your users up and running, see Administering IBM Rational ClearQuest, which you should have received with your software. (You can also pull the manual from the IBM website.) Either way, you’ve got a lot of reading to do. The following subsections provide a summary of the tasks ahead of you.
[A.4.2] Now we’re starting to get into the nuts and bolts of your change management system. A ClearQuest schema contains the metadata that defines the process for how users work with records in ClearQuest. The schema includes the following:
Record type definitions
Forms used to submit and modify a record
Field definitions and behavior
States a record can be in
Actions used to modify or change the state of a record
Hooks written in VBScript or Perl that further customize fields and actions
ClearQuest includes several predefined schemas that you can use as provided or customize to fit your workflow; you can also create and implement your own schemas. What you do depends on your development processes and your comfort level with the system. If you’re relatively new to the system, your best bet is to implement the standard ClearQuest configuration out of the box and then slowly modify the system as your users and administrator grow more comfortable with the system.
ClearQuest stores schemas in a schema repository. A ClearQuest installation usually consists of one schema repository and one or more user databases, depending on how you segment your user population. You can have separate user databases for each project or group several projects together in one database. Something important to consider, however, is that if you want to generate reports and charts across several projects, you will want to put the projects in the same database.
Another important note: Projects that share a database must use the same schema; once a database is associated with a schema, it can be upgraded only with a newer version of that same schema. In other words, the database cannot use an older version of the schema or a completely different schema—so plan accordingly.
A ClearQuest schema defines the process of working with a record, along with the Record form and relevant fields. Records have a variety of different states. The defect record begins in the Submitted state; from there you can change the state of the record to Closed, or you can modify the record without changing its state. However, to further automate your system, the administrator will use ClearQuest Designer to make targeted changes to the overall schema. Again, you can start with the standard schema and make changes after everyone feels more comfortable with the application.
At this point, you will want to do some customizations. Here are some of the steps and activities.
Check out the schema. To customize a schema, you must first check it out of the schema repository.
Add a new state. The ClearQuest Designer State Transition Matrix shows the various states that a record can be in and the actions that move the record from one state to another.
Add a new action. The Actions grid shows all of the actions that can be performed on a record. To add a new action, you first add the action to the Actions grid and then associate it with the appropriate states.
Create a new field. To create a new field, open the Fields grid. This grid shows all of the fields on the Record form, their types, and their default values.
Define the behavior of the new field. The Behaviors grid shows how fields behave when the associated record is in each state. You can define whether a field is read-only, mandatory, or optional in each state, or define default behavior for all states. You can also create a user behavior that restricts user access to the field. Open the Behaviors grid, then right-click on the field and use the popup menu to define the behavior of the field.
Add a new field to the Record form. After creating a field, you must add it to the Record form.
Create an action hook. A hook is a trigger for pieces of code that ClearQuest executes at specified times to more fully implement your workflow. ClearQuest provides many predefined hooks that you can easily modify to suit your needs. You can also use the ClearQuest API to write hook code in Microsoft VBScript or Perl.
ClearQuest supports four types of hook code.
Field hooks provide a way to validate the contents of a field or to assign field values.
Action hooks implement tasks at key points in the lifecycle of a record.
Record scripts allow you to associate a hook with a control, such as a pushbutton or a shortcut menu option, on a single record.
Global scripts allow you to reuse hook code within other hooks.
Use the ClearQuest Script Editor to edit the hook so that it initializes the value of the associated field.
Check in the schema. At any time while working on a schema, you can test your work in progress. This upgrades the test database with your latest changes, which provides a quick way to test your changes in the ClearQuest client without affecting your production user database.
When you’re satisfied that your schema changes are working correctly, check the schema into the schema repository. Once the schema is checked in, you can use it to upgrade your user database. ClearQuest prompts you to back up the schema repository and the database before upgrading.
Select a ClearQuest schema. Table 4-2 shows a list of the predefined schemas included in ClearQuest (see Introducing Rational ClearQuest). ClearQuest schemas consist of various packages that provide specific functionality. You can add individual packages to an existing ClearQuest schema or to your own customized schema. For a full list of schemas and descriptions, see Administering Rational ClearQuest.
Table 4-2. Predefined Schemas
Schema | Description |
|---|---|
AnalystStudio | Is compatible with Rational Suite AnalystStudio. Contains customization for use with Rational RequisitePro. |
Blank | Contains only system fields. Use this schema to create a schema from scratch. |
Common | Contains metadata that is common to all of the ClearQuest schemas. |
DefectTracking | Contains the fields necessary to start using ClearQuest to track defects in a software development environment. |
DevelopmentStudio | Is compatible with Rational Suite DevelopmentStudio. Contains fields and rules that work with Rational Purify, Quantify, and PureCoverage. |
Enterprise | Is used with Rational Suite EnterpriseStudio. Contains fields and hooks that work with all Rational products. |
TestStudio | Is compatible with Rational Suite TestStudio. Contains fields and rules that work with Rational TeamTest, RequisitePro, Purify, Quantify, and PureCoverage. |
UnifiedChangeManagement | Supports the UCM process by providing integration with Rational ClearCase. |
You should now have a basic understanding of how to navigate your way through the application and perform some of the more important administration functions. Obviously we’ve taken great liberties to remove all of the specific information about how to accomplish your tasks and replaced them with general information and pretty pictures. We’re hoping that you get the gist of it and are ready to move forward. Feeling confident? For detailed information on what we’ve just covered, please review the ClearQuest Designer help index. Otherwise, let’s now move on to some more complex topics.
[1] For more information about TUP, see http://www-306.ibm.com/software/awdtools/team/.
[2] For more information about the ClearQuest Client for Eclipse, see http://www-128.ibm.com/developerworks/rational/library/04/r-3089/.