[A.8.1] As you start to get more comfortable with ClearQuest and begin to look for ways to customize, you’ll need to have a deeper understanding of the different components that make up the schema.
Records can be mapped directly to the classes you developed as a result of your analysis and design. Just remember that each record corresponds with a record in the database.
There are two basic record types: state-based and stateless. State-based records have associated state nets. Stateless records have no state, but they have additional information that is valuable to using the tool. Examples of stateless records include attachments, users, history, and integration records.
To create a record type family that allows a ClearQuest user to run a single query across multiple record types, you can simply group two or more state-based record types that have common fields. However, there are two things to keep in mind.
Record type families must contain one or more common fields (fields that are the same in each record type). These common fields are the only ones that can be used to query the family.
Because record types and record type families appear in the same window when a ClearQuest user clicks Query → New Query, you should use a naming convention that helps users distinguish individual record types from record type families.
To create a record type family, you will first add a family and then create common fields. You can also remove members from a family and rename or remove the family.
Fields map to attributes and relationships in the class designs you generated when you worked on your system design. (If you haven’t designed your system yet, winging it will make your experience with ClearQuest horrible.) Before we tell you how to add a new field, though, let’s explore the characteristics of a field, as shown in Figure 8-1.

The characteristics, from left to right, are as follows.
Field Name: This is the name of the field you are adding. This should be the same as the attribute name of the relationship role from your design.
Type: This is the database type associated with the field. This does not map directly to the type of attribute in your design, but it comes pretty close. Table 8-1 shows the valid values defined in the ClearQuest Designer’s Guide for this field and their uses.
Table 8-1. Type Values
Data
Description/Comments
ATTACHMENT_LISTA value that allows records to store files related to the record.
DATE_TIMESQL date and time.
INTA SQL integer.
MULTILINE_STRINGA variable-length string of unlimited size.
REFERENCEA reference to a unique key in a record type. For
REFERENCEtype fields, you must select a state-based or stateless record type to refer to. You can also enter an optional back-reference field to create a link from the referenced record back to this field’s record. Also, you can specify that the referenced record type is under security control.REFERENCE_LISTMultiple references to unique keys in record types.
REFERENCE_LISTfields allow you to reference multiple records within a field. You can useREFERENCE_LISTfields with a parent/child control to link related records.For
REFERENCE_LISTtype fields, you must select a state-based or stateless record type to refer to. You can also enter an optional back-reference field to create a link from the referenced record back to this field’s record.SHORT_STRINGA variable-length character string with a 254-character maximum. You set the length in the Properties dialog box when defining the field. Enter a value between 1 and 254 in the Maximum Length field. When a user enters a value in a field of type
SHORT_STRING, ClearQuest automatically trims any leading or trailing spaces.Default Value: This is the default value that ClearQuest will assign to this field when it creates the record. The options here are None, Constant, or Script; you can use the latter to specify a script that ClearQuest can call to create a default value on the fly. (The hook for the default value of the field is called at the beginning of a submit action.)
Permission: You can select None, or you can specify a script to permit the user to change this field. If you write a script, it must return one of the
BehaviorTypeconstants that indicate the user’s access to the field. Use this hook to force workflow and/or security. (See the online API Reference for Rational ClearQuest for enumerated constants.) If you add a permission hook to a field, you must modify the Behaviors grid so that at least one of the field’s behaviors is set toUSE_HOOK. Failure to do this will result in a validation error.Value Changed: You can select None, or you can specify a script for ClearQuest to call when the value is changed. Use this hook to trigger updates for other fields. This can be used to modify dynamic lists or change system behavior. After running this hook, ClearQuest will validate any field that has changed as a result of running this script.
Validation: ClearQuest will call the routine you specify here in order to validate the user’s input before changing the value. You can specify None.
Choice List: If you want the user to select from a list, you can change this value to a constant list or use the scripting language to generate a list.
The following subsections describe various aspects of ClearQuest choice lists.
Given a class design, you can easily create an object reference to implement a relationship with another object. There are two types of references: REFERENCE, which is for relationships whose cardinality is 0..1, and REFERENCE_LIST, for cardinality of 0..n.
For either type of field, you must provide information that specifies the record type to which the field refers. You can fill this in by using the property dialog for the field in the record (Figure 8-2) and then using the Reference To choice list to select the record type to reference.

The given field can refer to either a state-based or stateless record type. (Note that you need to create the record type before it will appear in the choice list.) Typically, you’ll want to create all of your records first and then come back to define your relationship-based fields.
If the relationship has the ability to navigate in both directions, you can specify a back-reference value (Figure 8-3).

ClearQuest will create a new field with the specified name (Figure 8-4).
Sometimes you want to restrict the user to multiple choices for a field value. You can do this by selecting the field and then selecting the type of choice list you wish to use. You have the following options.
SCRIPTS allows users to write a BASIC or Perl script that returns a lists of choices.
CONSTANT provides a set of values that don’t change.
DYNAMIC is convenient for lists that you want to change frequently because it enables you to update the list values without changing the schema. See the next section for information about how to do this.
DEFAULT is useful for both
REFERENCEandREFERENCE_LISTtypes.
Select NONE if you don’t want the user to have a choice list.
You can also specify a script that will return a list of choices for the user. When you select a script, a dialog will appear and ask you to choose one of these options.
[A.8.2] Recalculate Choice: ClearQuest will recalculate the list with the script each time the user asks to populate the field. A word of warning with regard to this option: This will cause the script to run much more often than you might think. Any time any field value changes, the choice lists for other fields will be recalculated if this option is checked. This is a major contributor to schema performance problems, so use this option carefully. Another option is to explicitly use the
InvalidateChoiceListAPI call properly to force the ChoiceList script to run only when necessary.Limit to List: This option will limit the list to the values returned by the script; it does not allow the user to enter any other value.
[S.8.1, S.8.2] Your script can be written in BASIC or Perl. The following script is written in VBScript. Note that the name of the sub is the <fieldName>_ChoiceList, where <fieldName> is the name of the field for which the choice list script is written.
Sub fieldName_ChoiceList(fieldname, choices)
    ' fieldname As String
    ' choices As Object
    choices.AddItem("Blue")
    choices.AddItem("Red")
    choices.AddItem("Yellow")
    choices.AddItem("Green")
End Sub
The following is the Perl equivalent.
sub fieldName_ChoiceList {
     my($pFieldName) = @_;
     my @returnChoices;
     push @returnChoices, "Blue";
     push @returnChoices, "Red";
     push @returnChoices, "Yellow";
     push @returnChoices, "Green";
     return @returnChoices;
}
[A.8.3] Dynamic list field hooks are convenient for lists that you want to change frequently because they enable you to update the list values without changing the schema.
Before you can use a dynamic list choice for a field, you must first create a dynamic list in the database schema.
First, right-click on Dynamic List Names within your database schema workspace, and then select Add from the popup menu that appears (Figure 8-5).

Then type the name of the list in the new list item. Now you can use this dynamic list in connection with any field’s choice list, as shown in Figure 8-6.

Simply go to the list for any field, and then select Dynamic List. A dialog box opens (Figure 8-7). Select which dynamic list you wish to use.

Now, you’re probably asking yourself, “What about the values in the list?” You actually use a dynamic list in the ClearQuest client application without changing the schema. Please note, though, that you must have schema designer, dynamic list administrator, or superuser privileges to edit a dynamic list. To change or add values to a dynamic list in the ClearQuest client, select Edit → Named Lists and select the list you want to edit.
[A.8.4] Before you begin working with states, make sure that you have state nets designed for each class in your design. Otherwise, specifying states within ClearQuest can quickly become a confusing exercise.
Setting up states, actions, and transitions for your classes (records) is typically a two-step process: Add the states, and then add the transitions. Note that you shouldn’t add a single state and then its transitions because the tool wasn’t designed to work in this fashion, and you will quickly become frustrated. It’s best to add all of the states first, then put in the transitions, and specify the actions last.
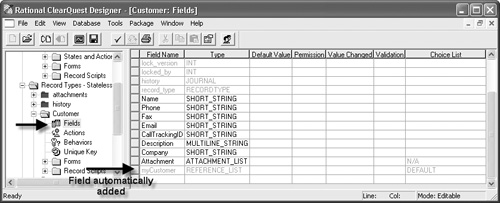
The first step is to open the record to which you want to add states, and then open States and Actions → State Transition Matrix (Figure 8-8).
To add a state, click on the empty box to the left-hand side of the spreadsheet, and then type a name for the state (Figure 8-9).

Go ahead and do this for each of the states in your state net.
Now we’re ready to add the transitions for each state. (ClearQuest Designer allows the addition of transitions only between states that already exist.)
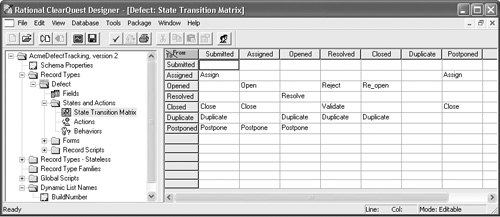
To add a transition, go to the Actions item (Figure 8-10).
Now, right-click on the left column, or on the Actions item itself, and then select Add Action (Figure 8-11).
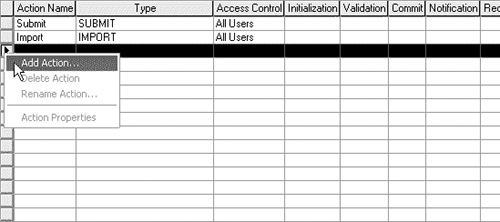
You will need to give your transition a name, which can come from your design. Figure 8-12 shows the dialog box.

If you have an unnamed transition, now is a good time to name it. This name should be a verb phrase. You also need to set the type to Change_state.
Now select the State tab. You should see a list of source states and destination states. Look in your design to see if there is more than one state that this transition can come from, and select all of the associated source states (Figure 8-13).

This is how you would map the given state net to the state source and destination values.
Now the transition should be defined. To check this, click on the State Transition Matrix icon; you should see your action show up as a transition between the given states, as shown in Figure 8-14.

You should be able to define the rest of your transitions the same way. When you’re done, make sure that everything matches your state net diagrams.
Actions can be used for more than just transitions. For example, if an action is performed on a given record, that action doesn’t change the record’s state. Actions generally map to the operations on the classes within your design.
ClearQuest Designer allows for several different types of actions. The list in Table 8-2, which was taken directly from the ClearQuest Designer’s Guide, shows the various types and what they can be used for.
Table 8-2. Actions
Action Type | Description/Comments |
|---|---|
Base | A Base action is a secondary action that runs as a side effect of every other action. Base actions let you write an action hook only once, but use it with multiple actions. Each time an action fires, the Base action checks to see if the hook criterion is met; if it is, the base action completes its process. For example, you can add a Notification action hook to a Base action to have the Base action automatically send e-mail notification when a Close action (a Change_state action type that moves the record to the Closed state) occurs. Base actions do not appear in the list of actions in the ClearQuest client. |
Change_state | Change_state actions are available only for state-based record types. A Change_state action moves a record from a source state to a destination state. A Change_state action can reference many source states, but only one destination state. Change_state actions appear in the list of actions in the ClearQuest client only if the current record is one of the source states. |
Delete | Delete lets users delete a record from the database. Delete actions appear in the list of actions in the ClearQuest client. |
Duplicate | Duplicate is available only for state-based record types. A Duplicate action links the record to another record that contains similar information. Duplicate actions appear in the list of actions in the ClearQuest client only if the current record is one of the source states. |
Import | Import lets ClearQuest import records from another source. During Import, ClearQuest validates the contents of imported records. However, ClearQuest does not perform field-level validation during Import. In addition, when a set of state-based records is imported, ClearQuest assigns them to a state specified in the data files without verifying whether they could have legally transitioned to that state. Import actions do not appear in the list of actions in the ClearQuest client. |
Modify | Modify lets users modify field values in a record without moving the record between states. Modify actions appear in the list of actions in the ClearQuest client. |
Record_script_alias | Record_script_alias lets you associate an action with a record script. Record_script_alias actions appear in the list of actions in the ClearQuest client; this gives you the flexibility to run basically any script you want and associate it with a record in the database. |
Submit | Submit enters a new record into the ClearQuest user database. For state-based records, Submit assigns a destination state; the action does not require a source. Each record type can have only one action whose type is Submit. |
Unduplicate | Unduplicate is available for state-based record types. Unduplicate removes the link between duplicate records. |
Forms are a mechanism that allows the designer to create user interface elements. The number of forms per record and when they’re available can be derived from the user interface design discussed in Chapter 6.
Open the record for which you want to add a form from the schema browser on the left side of the workspace editor. Select Forms, and then right-click and select Add (Figure 8-15).

The window shown in Figure 8-16 should appear.
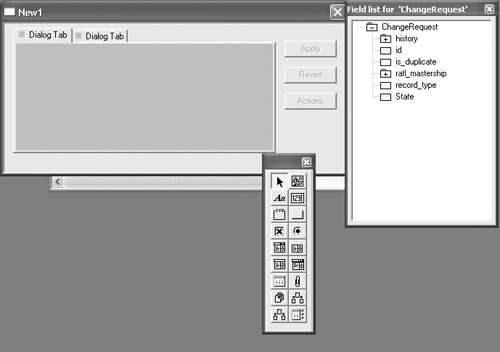
ClearQuest provides a graphical user interface editor that you can use to add controls, fields for input or display, restrictive views, and tabs for categorizing information.
Before you start filling in your user interface design, go back and look at your use cases again. Specifically, determine which users have access to what records. Then look inside the use cases for the classes being used.
Permissions to view and edit the user interface are limited to the tabs of the individual forms that you create. In order to use this feature, you need to create user groups; this will help you set the permissions on the individual tabs. (See Working with Users and Roles in Chapter 7 for information about user groups.)
To set permissions for a tab, click on the tab, then right-click and select Tab Properties (Figure 8-17).

A window appears showing the properties of the given tab. You can change the permissions for the tab using this window, as shown in Figure 8-18.
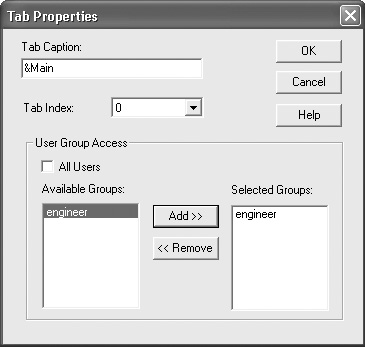
Choose All Users if you want to allow all users to have access to this tab; otherwise, choose only those groups for which you want to provide access.
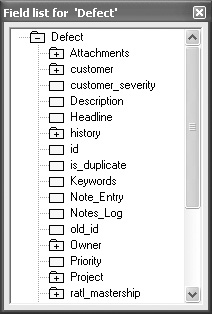
Tabs are not useful without any associated information or controls. So, you may want to add fields from the given record for this tab. Looking at the use cases again, you can easily find which tabs you need to create and what fields you need to put on each tab. The fields available for the tab are found in the Field List popup, as shown in Figure 8-19.
Basically, you can drag and drop the fields from the Available Tab Fields popup onto the drawing area for the tab. The type of field will dictate what kind of field input control will be used. Each field that you add comes with an input text box and a label. Depending on the type of field, ClearQuest will change different properties of the text input. The best way to see and change the text input field is to double-click on the input box, as shown in Figure 8-20.
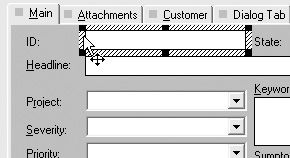
Double-clicking will cause ClearQuest to display the dialog box shown in Figure 8-21.

Notice that there are four tabs for the properties of the text box for the given field. The General tab also contains the name of the field and the name of the label for the text box.
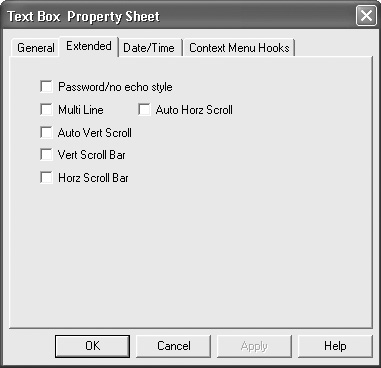
Now click on the Extended tab (Figure 8-22). This tab displays information about the text box and allows you to establish different characteristics.
Now click on the Date/Time tab (Figure 8-23). If the field is a date/time field, then the Date and Time check boxes should already be checked. You can select what type of date format to use.

Now click on the Context Menu Hooks tab (Figure 8-24). This tab lets you add shortcuts to hooks (in other words, record hooks to the context menu of a control). This means that at runtime, a user can execute these hooks by right-clicking the control and selecting the hook.
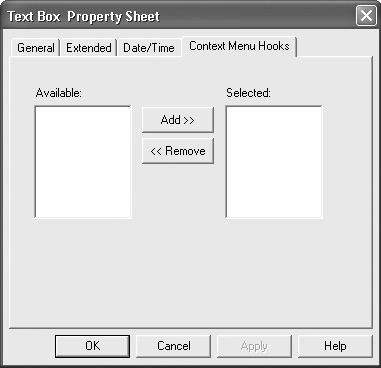
You can associate as many hooks as are available with the control. To associate a hook, simply select the hook in the Available list and click Add. To remove a hook, select it from the Selected list and click Remove.
Fields are not the only things that you can add to a tab. You can add several different controls for the sake of user assistance. Table 8-3 presents the controls available in ClearQuest, as listed in the ClearQuest Designer’s Guide.
Table 8-3. ClearQuest Controls
Form Control | Description |
|---|---|
ActiveX | Incorporates any registered ActiveX control into a form. You write the initialization record script and the action record script. |
Attachment | Displays a list of attached files and includes a set of controls that allow users to add, remove, or view attached files. |
Check Box | Is a two-value control used for Boolean values or any field that has only two values. To specify the two values, right-click the control on the form and select Properties. |
Combo Box | Combines an editable text field with a list box. |
Dropdown Combo Box | Combines an editable text field with a dropdown list box. |
Dropdown List Box | Displays a list of possible values for a particular field. |
Duplicate Box | Displays the ID of the record of which this record is a duplicate. |
Duplicate Dependent | Displays the IDs of any records that are duplicates of this record. |
Group Box | Visually groups one or more other controls. |
History | Displays information about the actions that have been applied to a record. |
List Box | Displays a list of possible values for a particular field. List boxes include an additional control for selecting one or more items from a choice list. |
List View | Allows you to display the records associated with a field of the |
Option Button | Is used in groups to represent a set of mutually exclusive choices. Option buttons allow the selection of only one option in a group. |
Parent/Child | Allows you to set up a form to link associated records. These are used with the |
Picture | Allows you to display a static image on your form. |
Pushbutton | Initiates specific tasks related to the record. You can associate pushbuttons with record hooks or with list views. |
Static Text | Displays an uneditable text string. |
Text Box | Displays a field’s value as an editable text string. |
Each control also has properties specific to it. You can find details about these controls in the ClearQuest Designer’s Guide.
Many times you will want to validate the input the user has given. You want to make sure that the presented value is within a specific range of valid values, is in the correct format, or matches a list of items in the database.
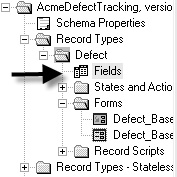
You can perform many kinds of validation on fields on a form. The thing to realize here is that the validation is not done on the actual user interface element but on the field itself. First, in the schema browser, select the Fields item (Figure 8-25).
As you can see in Figure 8-26, to the right, you can select the Validation box for the individual field for which validation should be written.

Next, you need to choose the language in which you would like to write the validation script. When you do this, an editor with the chosen language will appear.
The general rule on the script languages is to return a string when the field value change is not valid and to return an empty string if the input value is valid.
Here is an example written in BASIC:
Function resolution_Validation(fieldname)
   ' fieldname As String
   ' resolution_Validate As String
   Dim value
   Set value = GetFieldValue(fieldname)
   If Len(value.GetValue > 10 Then
      resolution_Validation = "Must be smaller than 10
        characters"
   End If
End Function
And here is one written in Perl:
sub resolution_Validation
{
  my ($pFieldName) = @_;
  my $theRetVal;
  my $theValue = $entity->GetFieldValue($pFieldName)
    ->GetValue();
  if(length($theValue) > 10)
  {

     $theRetVal = "Must be smaller than 10 characters";
  }
  return $theRetVal;
}
[S.8.3–S.8.11] It is important to understand where and how to use the hooks that ClearQuest provides the designer. To completely cover this topic would require a book of its own. So we’ll just cover the basic concepts of what you can do with hooks—just what is important for your initial deployment. There are two basic types of hooks: action hooks and field hooks.
[A.8.5] Action hooks are used to initiate actions that occur for transitions, and also for other general actions. There are several areas where hooks can be called as a result of certain actions being called. Table 8-4, culled from the ClearQuest Designer’s Guide, presents a list of hooks for specific actions.
Table 8-4. Action Hooks
Action Hook | Operation | When Run |
|---|---|---|
Access control | Returns a Boolean indicating whether the specified user can initiate the specified action on a record. This hook is called before the user performs the action. | When the action is about to start |
You can write an access control hook as a VBScript or Perl subroutine. | ||
Note: To run a primary action (modify, submit, delete, import), the current user must be in the access control list for the primary action as well as for all the base actions. | ||
Initialization | Sets initial field values (or any task you specify). | When the action starts |
Allows complex initialization of a record. | ||
You can use this hook to set up field values before ClearQuest begins an action. This hook is called after the action has been initialized but before the contents of the record are displayed in a form. | ||
You must write an initialization hook as a script subroutine. | ||
Validation | Validates the field values you specify. If the user types invalid data, ClearQuest prompts the user for valid data. | When the user commits the action |
You can use this hook to check conditions that are difficult to verify inside the individual field validation hooks. For example, you can use this hook to verify information across a group of fields. ClearQuest runs this hook before committing any changes to the database. | ||
Validation hooks must use a script. | ||
Commit | Links an action on multiple records into a single transaction (e.g., resolving all the duplicates of a change request when the original is resolved). | Just before Clear-Quest commits the transaction to the database |
Updates a set of external data sources so that they stay parallel with the database contents. This hook is called after changes are added to the database but before those changes are committed. | ||
You can write a commit hook as a VBScript or Perl subroutine. | ||
Notification | Starts a postcommit action that notifies users when an action is performed. | After ClearQuest commits the transaction |
Notification hooks must use a script. |
[S.8.12–S.8.16] Field hooks are used to work with fields such as validation, value changes, and pretty much anything else that has to do with fields. Table 8-5, also based on information in the ClearQuest Designer’s Guide, shows just when and how to use these hooks.
Table 8-5. Field Hooks
Field Hook | Description |
|---|---|
Choice list | Returns a set of legal values. Use this hook with fields that are displayed using a list-type control, such as a list box or combo box. |
You can also provide values without scripting by using a constant or a dynamic list. | |
Default value | Sets the initial value of the field. This hook is called at the beginning of a Submit action. |
You can write a default value hook with a script subroutine. You can also assign a constant value as the default value. | |
Permission | Returns one of the |
If you add a permission hook to a field, you must modify the Behaviors grid so that at least one of the field’s behaviors is set to | |
Validation | Validates the contents of the field. This hook is called when the value changes, to provide the user with immediate feedback regarding the validity of the field’s contents before committing the record to the database. |
Value changed | Responds to changes in the value of a field. Use this hook to trigger updates for other fields (e.g., dependent lists). |
After executing this hook, ClearQuest validates any field the script has modified by calling the field’s validation hook (if any). |
[T.8.1] Our good friend Tom Milligan over at IBM, upon reviewing the first draft of this book, reminded us that when you are defining a schema for ClearQuest, you will probably need to take into account any existing change request data. This data needs to be imported into ClearQuest. No matter what kind of schema you create, you need to ensure that the right data types are created and assigned for all of the data you import. Make the wrong assignments or mislabel your data types, and your data import will most likely fail.
Tom wrote a nice little utility to help with the data type assignment process, which you can find online at http://www-128.ibm.com/developerworks/rational/library/4332.html/.
Thanks for pointing that out, Tom!