
C H A P T E R 7
![]()
ASP.NET MVC 4
ASP.NET MVC 4 contains improved project templates, a new API for serving up different views under certain conditions, a number of tweaks to Razor syntax, better support for async scenarios, and improved integration with Entity Framework.
![]() Note We won’t be discussing the new ASP.NET Web API in this chapter (a brand-spanking new way of building RESTful services) since it has its very own chapter because we thought it was so awesome. Head over to Chapter 8 for more information.
Note We won’t be discussing the new ASP.NET Web API in this chapter (a brand-spanking new way of building RESTful services) since it has its very own chapter because we thought it was so awesome. Head over to Chapter 8 for more information.
Upgrading to MVC 4
MVC 4 will happily run alongside ASP.NET MVC version 3 and .NET 4/VS2010. You can thus experiment and create MVC 4 projects without fear of breaking your old applications. But when the time comes to move to the juicy new v4 stuff, how do you migrate your existing v3 projects to MVC 4?
There are three main methods of upgrading to MVC 4:
- Copy existing content into a new MVC 4 project
- Manually upgrade the project
- Utilize the MVC 4 NuGet package
![]() Note For the latest information on the upgrade process, please refer to http://www.asp.net/whitepapers/mvc4-release-notes.
Note For the latest information on the upgrade process, please refer to http://www.asp.net/whitepapers/mvc4-release-notes.
Copy Existing Content into a New MVC 4 Project
To upgrade your application by copying content, simply perform the steps below:
- Create a new MVC4 project ensuring you match the existing project name, namespace options, etc.
- Copy all the code, content, controllers, views, and scripts (plus any pictures of cats!) you may have into the new project.
- Add additional project and assembly references.
- Copy any
web.configchanges you have made.
The main advantage of upgrading with this method is that it’s very straightforward. The downside, however, is that by creating a completely new project, you will lose file change history in source control systems and will probably upset various build processes you may have set up. If these things are important to you, then you are probably better off performing a manual upgrade so let’s look at how to do that now.
Manually Upgrade the Project
To perform a manual upgrade is a bit more involved than the previous method (and a little tedious).
First, we need to make some changes in web.config to tell our site to reference the new ASP.NET MVC 4 assemblies.
Open up all the web.config files in your project and replace any lines that read as the following:
System.Web.Mvc, Version=3.0.0.0

System.Web.WebPages, Version=1.0.0.0

System.Web.Helpers, Version=1.0.0.0

System.Web.WebPages.Razor, Version=1.0.0.0
With their MVC 4 counterparts:
System.Web.Mvc, Version=4.0.0.0

System.Web.WebPages, Version=2.0.0.0

System.Web.Helpers, Version=2.0.0.0,

System.Web.WebPages.Razor, Version=2.0.0.0,
Now open the root web.config file and update the webpages:Version appSettings key to the string “2.0.0.0”:
<appSettings>

  <add key="webpages:Version" value="2.0.0.0" />

<appSettings>
In the root web.config file, add a new PreserveLoginUrl key entry:
<appSettings>

  <add key="webpages:Version" value="2.0.0.0" />

  <add key="PreserveLoginUrl" value="true" />

<appSettings>
Now delete any references to System.Web.MVC (v3). In Solution Explorer, remove the following assembly references:
System.Web.Mvc(v3.0.0.0)System.Web.WebPages(v1.0.0.0)System.Web.Razor(v1.0.0.0)System.Web.WebPages.Deployment(v1.0.0.0)System.Web.WebPages.Razor(v1.0.0.0)
Now add references to the new versions of these assemblies:
System.Web.Mvc(v4.0.0.0)System.Web.WebPages(v2.0.0.0)System.Web.Razor(v2.0.0.0)System.Web.WebPages.Deployment(v2.0.0.0)System.Web.WebPages.Razor(v2.0.0.0)
In Solution Explorer, unload your MVC project as we are going to make some changes to the project file; this won’t work if the solution is open (and kittens will die!).
- Open the project file (it should be called
YourProjectName.csproj) and replace any references of the ProjectTypeGuidsE53F8FEA-EAE0-44A6-8774-FFD645390401withE3E379DF-F4C6-4180-9B81-6769533ABE47. - Save the changes you have made and reload the project.
- Finally, if your application or its references uses any assemblies compiled against the previous version of MVC, tell these to use MVC4 by adding binding redirect entries such as the following:
<configuration>


  <runtime>

    <assemblyBinding xmlns="urn:schemas-microsoft-com:asm.v1">

      <dependentAssembly>

        <assemblyIdentity name="System.Web.Helpers"

             publicKeyToken="31bf3856ad364e35" />

        <bindingRedirect oldVersion="1.0.0.0" newVersion="2.0.0.0"/>

      </dependentAssembly>

      <dependentAssembly>

        <assemblyIdentity name="System.Web.Mvc"

             publicKeyToken="31bf3856ad364e35" />

        <bindingRedirect oldVersion="1.0.0.0-3.0.0.0" newVersion="4.0.0.0"/>

      </dependentAssembly>

      <dependentAssembly>

        <assemblyIdentity name="System.Web.WebPages"

             publicKeyToken="31bf3856ad364e35" />

        <bindingRedirect oldVersion="1.0.0.0" newVersion="2.0.0.0"/>

      </dependentAssembly>

    </assemblyBinding>

  </runtime>

</configuration>
Utilize the MVC4 NuGet Package
You can upgrade MVC 3 projects by applying the AspNetMvc package. To do this simply run the following command from NuGet Package Manager Console: Install-Package AspNetMvc (please refer to the appendix for more information on NuGet). For more information on this package please refer to http://nuget.org/packages/aspnetmvc.
Razor Enhancements
Microsoft has made some welcome tweaks to the Razor engine that simplify some common scenarios and make code a little more readable, which can only be a good thing, right?
Tilde Syntax (~)
The first change allows you to use the tilde (that weird ~ character) in URL paths to avoid the need to use path-mapping helper methods such as Url.Content. This change means that if you wanted to create a link to a JavaScript file instead of writing the reference, use the Url.Content helper method:
<script src="@Url.Content("~/MyScripts/Something.js")"></script>
You can now simply write:
<script src="~/Scripts/Site.js"></script>
Much nicer!
Razor will resolve this syntax with all standard HTML attributes.
Null and Boolean Handling
The second syntax change simplifies the scenario where you don’t want to write something at all when a model property is null—it’s harder than you might think!
<div @{if (Model.myTestProperty != null)

   { <text>class=not-null</text> } }>

   Content

</div>
It’s actually pretty common to need to do this as you might only want to add a CSS class to an element if a model property is not null.
With MVC 4, this can now be written as the following:
<div class="@Model.myTestProperty">Content</div>
The syntax also works with boolean types so if a value is false, the checked attribute will not be generated as in the example below:
<input checked="@Model.IsSelected" type="checkbox" />
It is worth noting that in the final release, Microsoft plans to render empty strings when writing values into data attributes as the .NET team feels this would be the expected behavior.
Razor and Bundle Syntax
Razor has added new syntax for referencing minified CSS and JavaScript files:
@Styles.Render("~/Content/pinkPoodleStyle/css")

@Scripts.Render("~/MyScripts/js")

@Styles.Render("~/Content/pinkPoodleStyle/css", "~/Content/MellowYellow/css")
An advantage of using this syntax, in addition to readability, is that Razor will ensure that just one version of the file is referenced even if the scripts are referenced multiple times, for example, in separate partial views.
New Default Project Templates
The screenshot below shows the default ASP.NET MVC site template you are probably very familiar with:
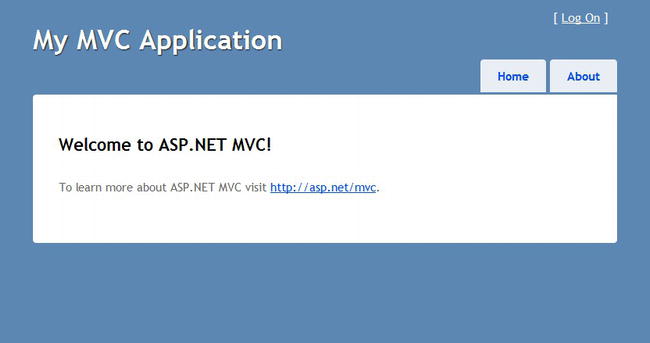
Figure 7-1. MVC 3 default design template
MVC 4 has completely revamped this template:
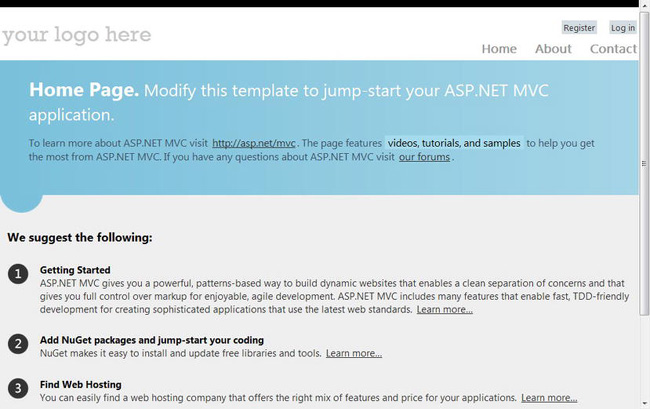
Figure 7-2. New MVC default project template
In addition to a much better-looking design, there are a number of other interesting aspects to take note of:
- Microsoft Ajax script references have been removed. (I think we can all now agree the Microsoft Ajax libraries are pretty much on their way out.)
- jQuery libraries have been updated to latest version (at the time of writing anyway!).
knockout.js(a way of binding data) and Modernizr libraries (tests support for different features) are now included.- Semantic markup is used.
- The template utilizes a viewport meta tag that makes it display better on mobile devices.
- The template is easier to customize due to use of razor sections.
- JavaScript is used to provide a superior user experience for logging in and registration.
- The markup and styling ensure site looks good in various resolutions or mobile devices (see below screenshot where I have reduced the browser window’s size).
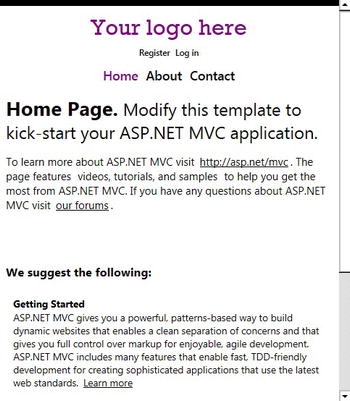
Figure 7-3. The new project templates looks good even under smaller resolutions.
Improved Support for Mobile Development
Mobile optimized sites are likely to become increasingly important with many businesses and analysts predicting that mobile visitors will soon exceed desktop users for many sites:
The browsing experience of smart phones continues to improve with advances in technology and speed of access. We believe that it’s very likely that mobile devices could become the preferred method of accessing the Internet in the future. Morgan Stanley predicts that by 2014 access from mobile devices will exceed that of the desktop.
www.morganstanley.com/institutional/techresearch/pdfs/Internet_Trends_041210.pdf
In fact, Google believes mobile development is so important that whenever they develop a new product, they first develop a mobile version (http://venturebeat.com/2010/04/12/eric-schmidt-mobile-first/). Thus, it’s quite likely, even if you are not doing any mobile design work now, that you will have to at some point in the future.
ASP.NET MVC has always been a good choice to develop a mobile site with the ability to have full control over the HTML generated and its extensible nature. ASP.NET MVC 4 contains a number of enhancements aimed at mobile development that improves this even further.
But before we delve into the MVC specific features, let’s review quickly some of the issues around mobile development as these will put some of these changes in context.
Developing a Mobile-optimized Site
Generally, a website developed for the desktop will not look very good when viewed on a mobile device. With a few simple modifications, however, these sites can display rather well on mobile devices. Let’s take a look at some common techniques and methods.
Utilize Flow Layouts and Responsive Design Practices
Explaining flow layout and responsive design techniques and practices could easily fill a book (a good start is http://www.abookapart.com/products/responsive-web-design). At a basic level, you can think of flow layout techniques as not using fixed width and heights so a site scales well at different screen sizes and resolutions and thus also hopefully different devices.
Media queries are a CSS3 feature that allows you to specify rules that should only be applied if the browser matches certain conditions such as minimum and maximum screen sizes. Media queries are commonly used on mobile-optimized sites to override default rules that don’t look right on smaller screens and to apply landscape/portrait versions of pages.
The below example shows a media query that only applies a width to elements with the class content and only on screens less than 600 pixels wide:
@media screen and (max-width: 600px) {

        .content {

        width: 500px;

        }

}
You can also use media queries on your style sheet references:
<link rel="stylesheet" media=" (min-device-width: 800px)" href="example.css" />
There are a number of options for media queries; please consult https://developer.mozilla.org/en/Mobile/Viewport_meta_tag for further examples.
![]() Note Media queries are a good (and the only!) alternative for creating landscape/portrait versions of sites for mobile Internet Explorer browser.
Note Media queries are a good (and the only!) alternative for creating landscape/portrait versions of sites for mobile Internet Explorer browser.
Addition of Viewport Meta Tag
By default, most mobile devices will display a page in zoomed-out mode that probably isn’t what the majority of your visitors are going to want. For example, a site displayed in zoomed-out mode on a mobile device might look something like the screenshot below:

Figure 7-4. Website before viewport meta tag added
Hmm … not so good! We can fix this problem by adding a special viewport meta tag to tell devices not to zoom out the display of the web page, and it will instead look like this:
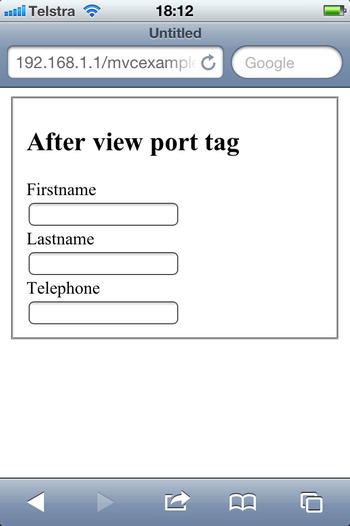
Figure 7-5. Website after viewport meta tag added
Following is an example viewport meta tag that will tell mobile browsers not to zoom out when displaying the content:
<meta name="viewport" content="width=device-width" />
These techniques are employed within the new MVC template files.
Limitations of Responsive Design, Flow Layout, and Viewport Meta Tags
These techniques can greatly assist making a site usable on a mobile device, but they have their limitations:
- Very complex screens won’t display very well on a mobile device so you might want to present information differently to mobile-device users.
- Some designs may be too complex to be overridden.
- You might need to display different content depending on device type. (For example, for low-end devices just plain text, whereas cutting-edge smart phones get a much more interesting version.
- You might want to give users the option to display both desktop and mobile-optimized versions.
There are thus times when you are really going to want to serve up an entirely different UI for mobile users. MVC makes this relatively easy to do.
In previous versions of MVC, it was possible to override MVC’s default view engine to allow you to serve different views for the same action depending on certain conditions. This could then allow you to give mobile users different views and potentially make use of the same controller and models. I have seen and used this technique on a number of projects, and it worked very successfully. For more information on this and a possible implementation, please refer to: http://www.hanselman.com/blog/ABetterASPNETMVCMobileDeviceCapabilitiesViewEngine.aspx.
MVC 4 improves on this further as it now has this feature out of the box with an easy to use API. Let’s take a look at the new DisplayMode functionality.
DisplayMode
The DisplayMode functionality allows you to serve different views dependent on specific conditions and saves you from having to implement this functionality yourself (see above). This API is ideal to allow you to create a mobile version of a specific site, but don’t think you are restricted to this purpose as it could also be used wherever you want to serve up a different layout to users—e.g., to create different site themes or layouts.
We will now create a simple example that displays a different view depending on the browser’s user-agent string. The user-agent string is sent as part of every HTTP request and describes the user’s browser (and generally OS).
Below is the user-agent that Chrome (v16) sends a webserver from my machine:
User-Agent: Mozilla/5.0 (Windows NT 6.1; WOW64) AppleWebKit/535.7 (KHTML, like Gecko)

Chrome/16.0.912.77 Safari/535.7.
If you look at the above example, it might surprise you to see that it also contains names of other browsers/rendering engines. Historically, some browser manufacturers would do this as some (bad) site developers would perform simple string matches when checking for a browser and redirect users that didn’t use the specific browser targeted. The browser manufacturers knew this and wanted to avoid this scenario so they added additional entries.
![]() Note Keep this example in mind when you are writing your DisplayMode API matching rules—writing simple user-agent string matching code probably won’t work that well. Instead if you are using this technique for mobile development, you will probably want to use a device database for identifying individual devices/sets of devices. You could, for example, use a product from a company such as 51 degrees (http://51degrees.mobi/).
Note Keep this example in mind when you are writing your DisplayMode API matching rules—writing simple user-agent string matching code probably won’t work that well. Instead if you are using this technique for mobile development, you will probably want to use a device database for identifying individual devices/sets of devices. You could, for example, use a product from a company such as 51 degrees (http://51degrees.mobi/).
However, in order to keep things simple, we will just check for the presence of testbrowser in the user-agent string.
Open up Global.asax and in the Application_Start method, add the following code:
DisplayModeProvider.Instance.Modes.Insert(0, new DefaultDisplayMode("testbrowser")

            {

                ContextCondition = (context => context.Request.UserAgent.IndexOf

                    ("testbrowser", StringComparison.OrdinalIgnoreCase) >= 0)

            });
Now we need to create a separate view for our testbrowser users. MVC follows a convention when determining which view to serve for which display mode it is operating in:
ViewName.DisplayModeName.cshtml
Thus, if you had created a display mode called testbrowser and met the conditions for this mode, MVC would serve you the view index.testbrowser.cshtml in preference to index.cshtml. If you haven’t created a separate testbrowser version of a view, then the default will be displayed. MVC will also use this model when working with partial views and layout files. For example partial views @Html.Partial("_MyPartial") will render _MyPartial.testbrowser.cshtml and Layout files will render _Layout.testbrowser.cshtml.
Let’s continue with our example by creating a new view called index.testbrowser.cshtml and add some text to indicate this is the testbrowser view and not the standard one.
Something like “hey idiot this is the testbrowser view” will do just fine!
![]() Note MVC also contains inbuilt support for serving mobile views using ASP.NET’s mobile detection features. To use, simply create views in the format
Note MVC also contains inbuilt support for serving mobile views using ASP.NET’s mobile detection features. To use, simply create views in the format ViewName.Mobile.cshtml, and you don’t even need to set up the display mode as above! It should be noted the inbuilt ASP.NET mobile detection features don’t work so well with some mobile-device emulators so the Display Mode API could be a good fix of these limitations.
Changing Browser User-Agent
To demonstrate the new display mode, we will need the ability to change our browser’s user-agent string. In Internet Explorer 9, you can modify the user-agent string using IE’s inbuilt development tools (instructions below). There are also a number of extensions for other browsers:
- https://addons.mozilla.org/en-US/firefox/addon/user-agent-switcher/ (Firefox)
- http://spoofer-extension.appspot.com/ (Chrome)
Modifying User-Agent in Internet Explorer 9
Let’s create a new user-agent string in IE9:
- Open IE9 (good start!).
- Press F12 to bring up the development tools.
- Go to the Tools menu and then select Change user agent string Custom.
- Add “testbrowser” as the name and value of the new
user-agentstring.

Figure 7-6. Adding a new user-agent in IE9 dev tools
We are all set to test our new display mode, so run up the MVC site and the “standard” view should be shown.
Now use the user-agent switcher in IE9 to change the user-agent, refresh the screen, and you should see this overridden view is instead shown—hurray!
Browser Overriding
MVC 4 contains a number of APIs to allow you to pretend a specific device was accessing the site. These APIs could be useful for allowing the user to switch to a non-mobile view or for testing your application. Note that using these APIs only has an effect on layout, views, and partial views and will not affect any other ASP.NET Request.Browser related functionality.
The overridden browser is stored in a cookie. (Note: According to documentation, you can replace the BrowserOverrideStores.current provider—sorry no information yet.)
I have listed the override methods below. (Note: these are contained within the System.Web.WebPages
namespace as extension methods on HttpContextBase.)
HttpContext.SetOverriddenBrowser()- allows you to set the user-agent string to a specific valueHttpContext.GetOverriddenUserAgent()– gets the overridden value (or actual if not overridden)HttpContext.GetOverriddenBrowser()- returnsHttpBrowserCapabilitiesBaseobject of overridden browser that can be used with ASP.NET APIs such asIsMobileHttpContext.ClearOverriddenBrowser()– removes any overridden user agent for current request
New Mobile Application Project Template and jQuery Mobile
MVC4 contains a new mobile site template utilizing the popular jQuery mobile framework (JQM to its friends) and containing important settings such as the viewport meta tag described earlier.
The below screenshot shows the default template accessed from my iPhone:
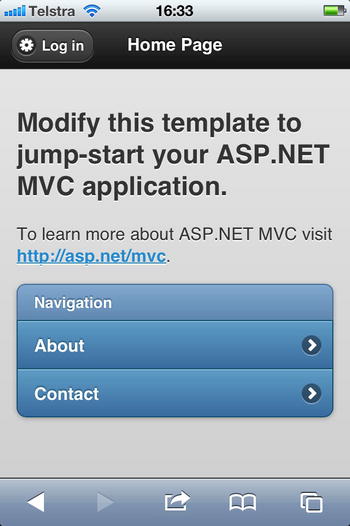
Figure 7-7. Mobile Application ASP.NET MVC default template
As you can see, this is a great way of beginning to explore mobile site development and jQuery mobile. But why would you use such a framework in the first place? Well, you certainly don’t have to (and in many cases probably shouldn’t!), but JQM (and don’t think that this is the only mobile framework around) provides the following features:
- Tries to take care of various niggly display issues across various types of devices
- Provides an abstraction over various device actions such as a user rotating a device, swiping, and other gestures
- Hijacks the loading of links and performs these calls with AJAX, which makes for a nicer experience
- Takes care of browser history management—this becomes more complex when Ajax is used to load pages as you want to present an intuitive experience to your users
- Contains various controls such as sliders and buttons similar in look and feel to those on an iPhone (because in my experience most clients seem to think a mobile site should look like an iPhone app—websites are different from iPhone native apps!).
jQuery.Mobile.MVC
As we’ve seen, JQM is a framework for making mobile development easier. Microsoft has released a NuGet package to allow you to easily set up jQuery mobile in your MVC4 applications.
To install the package, simply run the following command from the NuGet package console window (Tools ![]() Other Windows
Other Windows ![]() NuGet package console):
NuGet package console):
Install-Package jQuery.Mobile.MVC
Installing the package will make a number of changes including registering different mobile display modes, creating a view switcher component, and installing of JQM specific views.
Async Controller Actions
In previous versions of ASP.NET MVC, you could avoid tying up ASP.Net threads by using Async controllers. For more information on why you might want to do this, please refer to the async section in the ASP.Net chapter (Chapter 6).
Prior to MVC 4, if you wanted to create an async controller action, you had to change your controller to inherit from AsyncController and write code similar to the following (the following downloads and outputs the HTML from Google’s home page):
public class TestController : AsyncController

    {

        public void DoSomethingAsync()

        {

            AsyncManager.OutstandingOperations.Increment();

        var wc = new WebClient();

            wc.DownloadStringCompleted += (s, e) =>

            {

                if (!e.Cancelled && e.Error == null)

                {

                   AsyncManager.Parameters["html"] = e.Result;

                }
                AsyncManager.OutstandingOperations.Decrement();

            };

            wc.DownloadStringAsync(new Uri("http://www.google.com"));

        }

        public ActionResult DoSomethingCompleted(string html)

        {

            return Content(html);

        }

   }
Bit verbose, eh? MVC 4 makes this very much easier (and more readable) and allows you to write controller actions that return Task<ActionResult>, which works well with .NET 4.5’s async functionality:
public class NewController : Controller

    {

        public async Task<ActionResult> Index()

        {

            var webClient = new WebClient();

            string html = await webClient.DownloadStringTaskAsync("http://www.google.com");

            return Content(html);

        }

    }
Much nicer!
EF Database Migration Support
MVC4 contains inbuilt support for Entity Framework (EF) database migration features that were introduced in Entity Framework 4.3. The database migration features make it very easy to keep track of database schema changes and programmatically apply them. Let’s see how this integrates with ASP.NET MVC.
- Create a new ASP.NET MVC 4 project.
- Create a new class called
Personin themodelsfolder with the following code:public class Person
{
public int Id { get; set; }
public string FirstName { get; set; }
} - Right-click on the
controllersfolder and select Add Controller. - Change the template to MVC controller with read/write actions and views, using Entity Framework as in Figure 7-8 below:
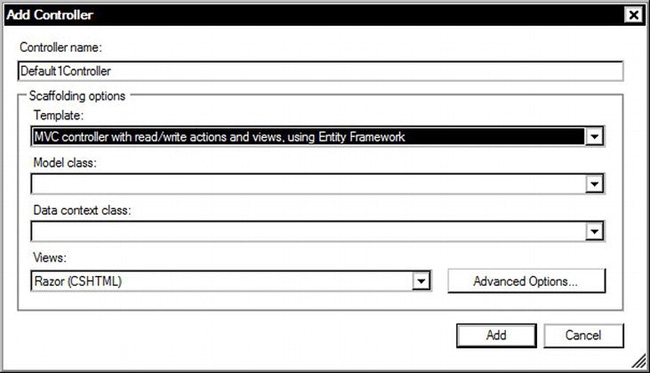
- Select
Personas the model class. - On data context, select <New data context..> and rename it to
PersonContext. - Click OK.
MVC will generate scaffolding create, update, and delete views and controller code for the Person class.
Now open the Package Manager console (View ![]() Other windows
Other windows ![]() Package manager console) and run the following command:
Package manager console) and run the following command:
Enable-Migrations
This will create a new Migrations folder within your application containing a file called configuration.cs. At the time of writing, configuration.cs will contain something similar to the following:
protected override void Seed(MvcApplication10.Models.PersonContext context)

        {

            //  This method will be called after migrating to the latest version.


            //  You can use the DbSet<T>.AddOrUpdate() helper extension method

            //  to avoid creating duplicate seed data. E.g.

            //

            //    context.People.AddOrUpdate(

            //      p => p.FullName,

            //      new Person { FullName = "Andrew Peters" },

            //      new Person { FullName = "Brice Lambson" },

            //      new Person { FullName = "Rowan Miller" }

            //    );

            //

        }
Now compile and run the project and Visual Studio will create a database in the project's App_data directory based on this class.
Now let’s add a new property to the Person class:
public string LastName { get; set; }
OK, time to apply this change to our database. Open the Package Manager console and enter the following command:
add-migration LastName
Entity Framework will generate update code for the property added in the Migrations folder with the format todaysdate_migrationname.
You can then apply your migration by running the update-database command from the Package Manager console.
Azure Support
ASP.NET MVC 4 supports the Azure 1.6 SDK and has been updated to deploy the required assemblies automatically. It also contains updated membership, profile, and session providers for use with Azure.
Miscellaneous Enhancements
MVC 4 contains the following other enhancements:
- The MVC JSON serializer has been replaced with the popular open source Json.NET serializer
- New
App_Startdirectory contains routing, bundling, and filter configuration (see ASP.net chapter for further details) - Controllers can be added to any folder rather than the standard structure from the IDE.
- New AllowAnonymous attribute that allows you to secure a controller with the Authorize attribute but still expose individual methods to anonymous users
- HTML.TextBox has additional overload that accepts a format parameter and calls String.Format
- HTML.Label related methods now allow you to specify html attributes as a parameter
- New URL helper methods for working with Web API (URL.HttpRouteURL)
- New properties on controller class – Profile & ViewEngineCollection (and a few Async related properties)
- New HTML.Value, HTML.ValueFor & HTML.ValueForModel methods
Future Enhancements
At the time of writing, ASP.NET MVC 4 has not been officially released, but Microsoft says it is planning to make a number of other changes that I want to make you aware of (for the most up-to-date list of changes, please consult: http://aspnet.codeplex.com/wikipage?title=ASP.NET%20MVC%204%20RoadMap).
- Editor, display templates, and HTML helpers will have improved HTML5 support, e.g.,
TextBoxForwhen used with aDateTimemodel property will render an input element with the type set to date. - Project templates will be updated to support logging into sites such as Facebook using oAuth and OpenID.
- Project creation will be speeded up (it’s a bit slow as of the RC!).
- There will be a new empty MVC project template (similar to ASP.NET empty project).
- New Entity Framework Scaffolding for Web API will be added.
Single Page Applications and Recipes
During the beta release, Microsoft released a preview of a project type called Single Page Application (SPA). SPA is a way of structuring applications using a single page and loading content dynamically with the aim of an improved user experience, and it is often used on mobile sites. SPA is not expected to be included with MVC 4 release, but it will be available separately as a NuGet package. For more details, please refer to: http://www.asp.net/single-page-application.
Microsoft also released a preview of a feature called Recipes. Recipes was designed for automate tedious tasks. For more information, please refer to: http://haacked.com/archive/2011/09/21/writing-a-recipe-for-asp-net-mvc-4-developer-preview.aspx and http://channel9.msdn.com/events/BUILD/BUILD2011/TOOL-803T.
Microsoft indicates that it doesn’t intend to release Recipes feature with MVC4, and it’s likely to change considerably from the preview. So, for now, simply be aware you are likely to have a method to automate some tedious tasks programmatically in the future.
Conclusion
MVC developers will have no difficulty getting a grip on ASP.NET MVC4’s new features. These features help further cement ASP.NET MVC’s place as the choice of platform for future Microsoft web development.