ASP.NET is the successor of Active Server Pages or ASP. ASP was a classic server-side framework from Microsoft that was released in 1996. The first version of ASP.NET was released in 2002. It was, and still is, built on the .NET Framework CLR, allowing .NET developers to write web applications with .NET.
ASP.NET Core is a complete rewrite of ASP.NET meant to modernize the platform using the latest programming techniques. It greatly increased speed and ease-of-use. As of ASP.NET Core, the framework is open sourced; the source code can be found at https://github.com/dotnet/aspnetcore.
For the rest of this chapter, I will be using the term ASP.NET instead of ASP.NET Core. Remember when you read ASP.NET, I mean the latest .NET 6-based version.
Model-View-Controller
Model-View-Controller, or MVC, was first described in SmallTalk back in the 1970s. It did take until the late 1980s for the MVC pattern to be described in an article by which it started to gain adoption across languages. Today MVC is a well-known design pattern that has a default implementation in quite a lot of languages. Besides being well adopted, it also became the base of many other design patterns like Model-View-Presenter and Model-View-ViewModel. ASP.NET comes with its own implementation of the MVC pattern.
Figure 7-1
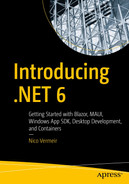
The MVC pattern
Just like with any framework within .NET, ASP.NET also ships with a couple of project types and templates. One of the most used templates is the Model-View-Controller, or MVC, template. The MVC template is built around the Model-View-Controller design pattern. The core strength of the MVC project template in ASP.NET lies in its great tooling, base classes, and convention-based way of working. But before we dive into the template itself, let’s look at the design pattern.
The MVC pattern consists of three building blocks: the view, the controller, and the model. By splitting an application into these blocks, we can separate the concerns of the applications and apply loose coupling. By doing this, we create a code base that is easier to read, easier to maintain, and easier to learn for developers who are new to the team.
View: the view renders the UI to the user.
Controller: the controller responds to user input and acts as the glue between the view and the model.
Model: maintaining state, storing, and retrieving data.
Our view consists of HTML pages since we are developing web applications. HTML is still to this day a very static markup language that cannot understand data and how to shape it, unless modified by JavaScript libraries or when generated by server-side logic. That is where the controller layer comes into play. The controller takes data that was requested by the user, and it takes a form of HTML template that optionally contains some C#-based logic. The controller executes the logic contained in the template using the data as datasource; this is called inflating the template. The result is an HTML page with hard coded data. That snippet is sent back to the client and rendered in the browser.
Now that we know what the Model-View-Controller design pattern is about, let’s explore how Microsoft implemented this in ASP.NET.
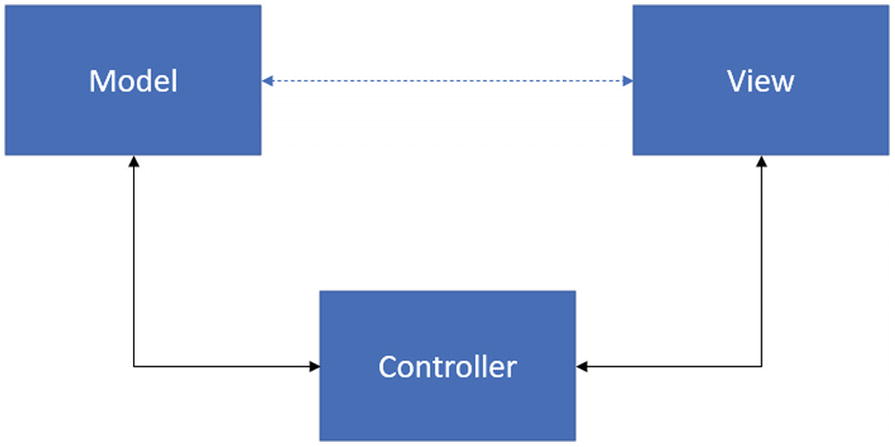
Figure 7-2 shows the different templates available for ASP.NET:
Figure 7-2
ASP.NET Core templates
ASP.NET offers different templates for different purposes, and there are many more than the ones we see here. Since we can’t talk about all of them, we’ll go over the Model-View-Controller, the Web API, and the minimal Web API templates. We’ll start with ASP.NET Core Web App (Model-View-Controller). Visual Studio might also show ASP.NET templates without the Core moniker. These are the templates for the traditional .NET framework up to version 4.8; the templates for .NET Core, .NET 5, or .NET 6 are all called ASP.NET Core.
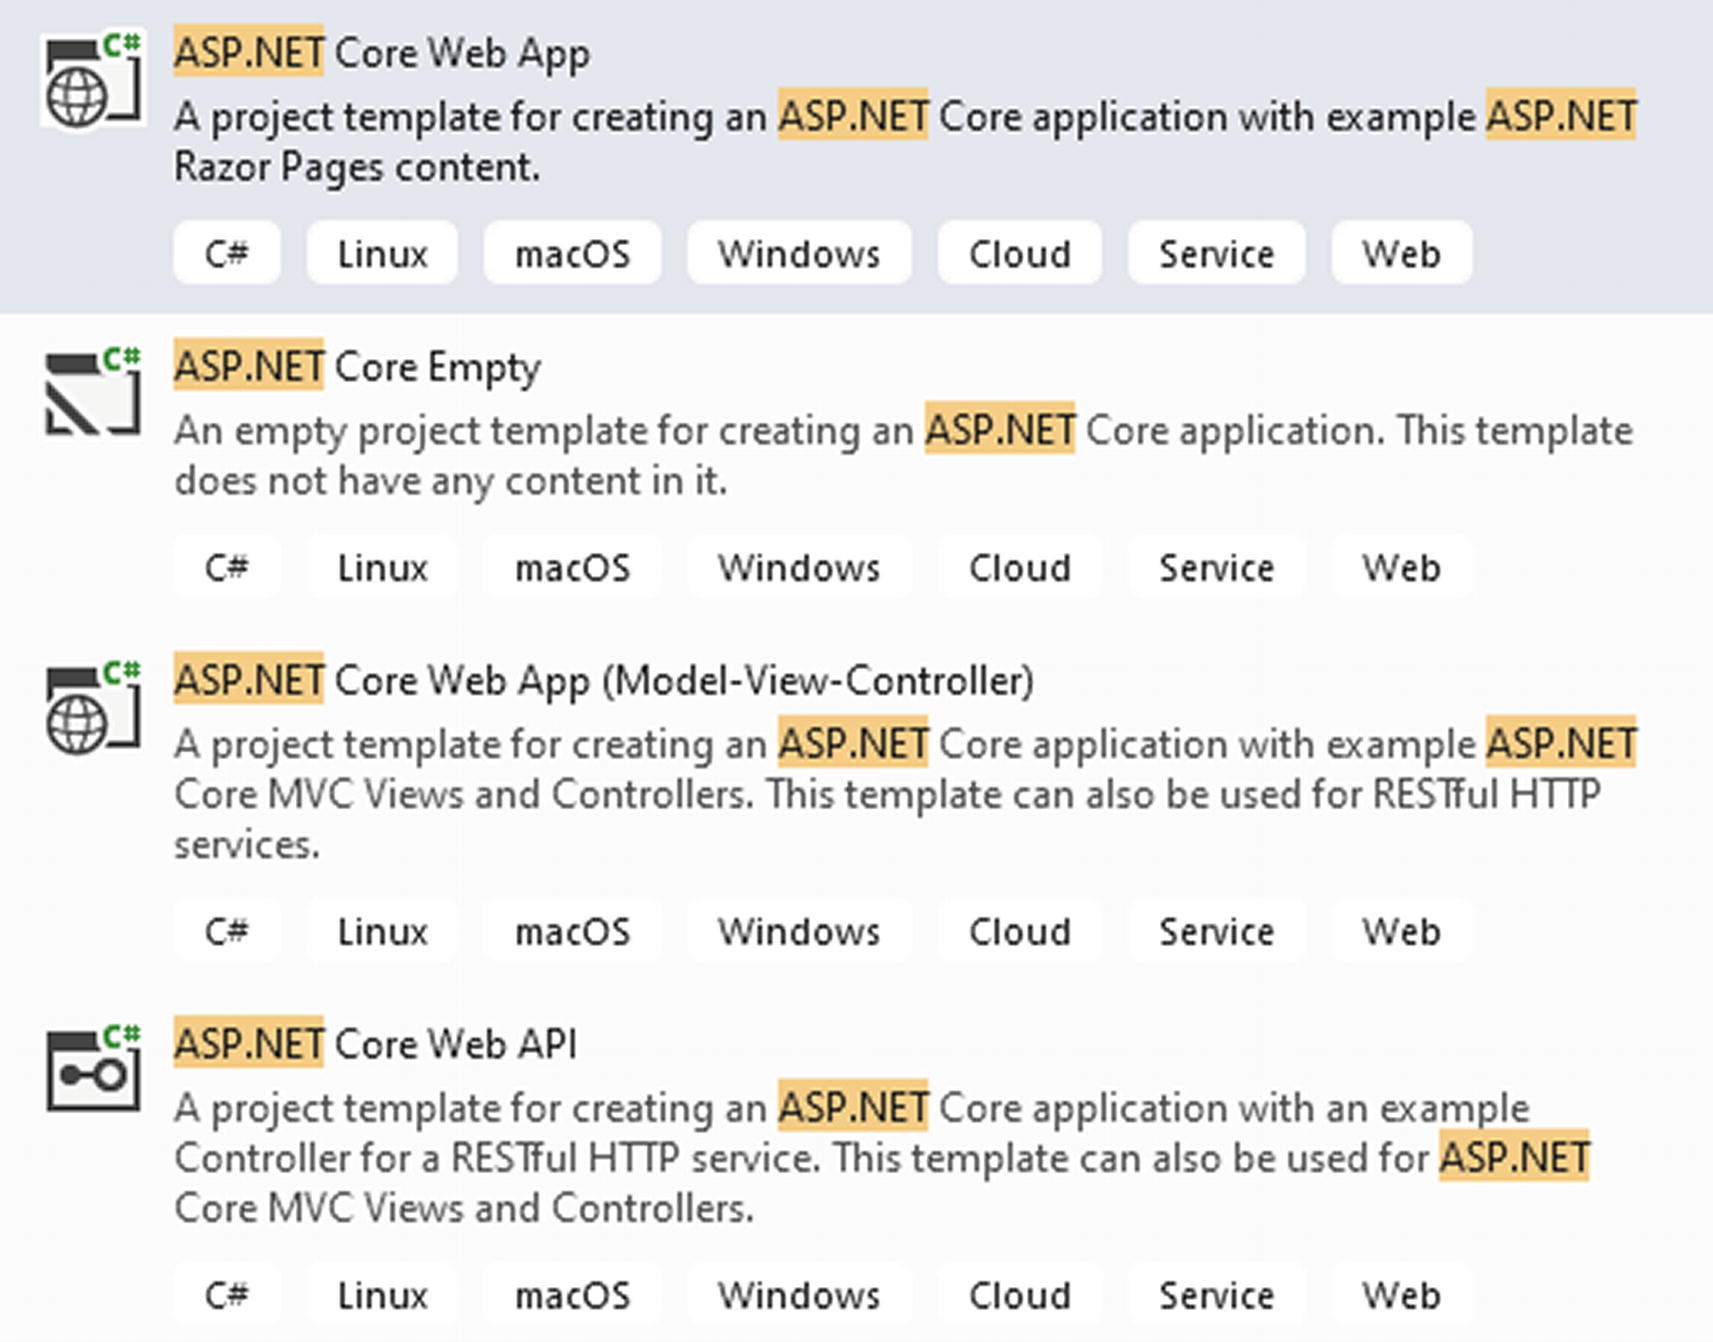
After selecting the ASP.NET Core Web App (Model-View-Controller) template, Visual Studio asks for some extra information. We can select the version of .NET to use, .NET 6 in this case. We can specify an authentication type; the options are None, Microsoft Identity Platform, or Windows. By default, None is selected, but when an option is selected for Authentication Type, the project will be bootstrapped with a login/registration system based on ASP.NET Identity. You can find more information on that topic on https://docs.microsoft.com/en-us/aspnet/core/security/authentication/identity?view=aspnetcore-6.0&tabs=visual-studio. Configure for HTTPS is selected by default; this will add redirect logic so that all HTTP requests are automatically redirected to HTTPS. Enable Docker adds a Docker file containing everything needed to run this application in a Docker container. Both Windows and Linux Docker containers are supported since .NET 6 also has a Linux runtime: https://docs.microsoft.com/en-us/dotnet/core/install/linux.
Figure 7-3
Project wizard
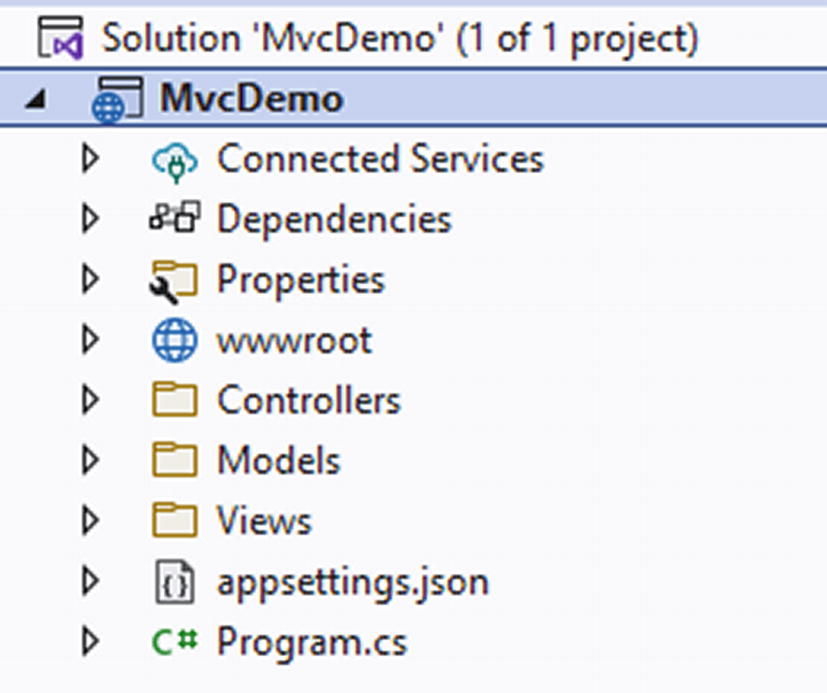
After creating a project with all default settings, we get the project structure shown in Figure 7-4.
Figure 7-4
MVC project
The folder structure in the project clearly shows the Model-View-Controller structure. We’ll go over the project folder by folder but just like with every .NET 6 project, everything starts with Program.cs.
Program.cs is another top-level class. Just like before, we are using implicit usings and top-level statements, new features in C#10. It combines what used to be two methods in previous versions of ASP.NET, Configure and ConfigureServices. Not only that, but it also combines Startup.cs and Program.cs, no more trying to remember what goes where. The entire application startup and configuration happens in these less than 30 lines of code.
var builder = WebApplication.CreateBuilder(args);
// Add services to the container.
builder.Services.AddControllersWithViews();
var app = builder.Build();
Listing 7-1
Configuring the WebApplication builder
The first part of the class is what used to be Program.cs. It configures a WebApplicationBuilder. A WebApplicationBuilder is a factory for creating a WebApplication instance; a WebApplication contains the pipeline and routing configuration for the running application. ASP.NET Core comes with a lot of helper methods to get everything up and running fast; one of those is AddControllersWithViews. This method registers all MVC controllers and views in the built-in Inversion of Control (IoC) container. Methods like this that help configure the application are usually extension methods on IServiceCollection or IApplicationBuilder. Listing 7-2 shows the signature of the AddControllersWithViews method.
public static IMvcBuilder AddControllersWithViews(this IServiceCollection services)
Listing 7-2
AddControllersWithViews method
The IServiceCollection is the Inversion of Control mechanism in .NET 6 and lives in the Microsoft.Extensions.DependencyInjection namespace.
After the AddControllersWithViews call where we can register dependencies ourselves, we will dive into an example soon but for now we keep everything default. The final thing that happens is calling the Build method on the WebApplicationBuilder; this will create the WebApplication instance.
Now that the WebApplication is configured, we are ready to configure the HTTP request pipeline.
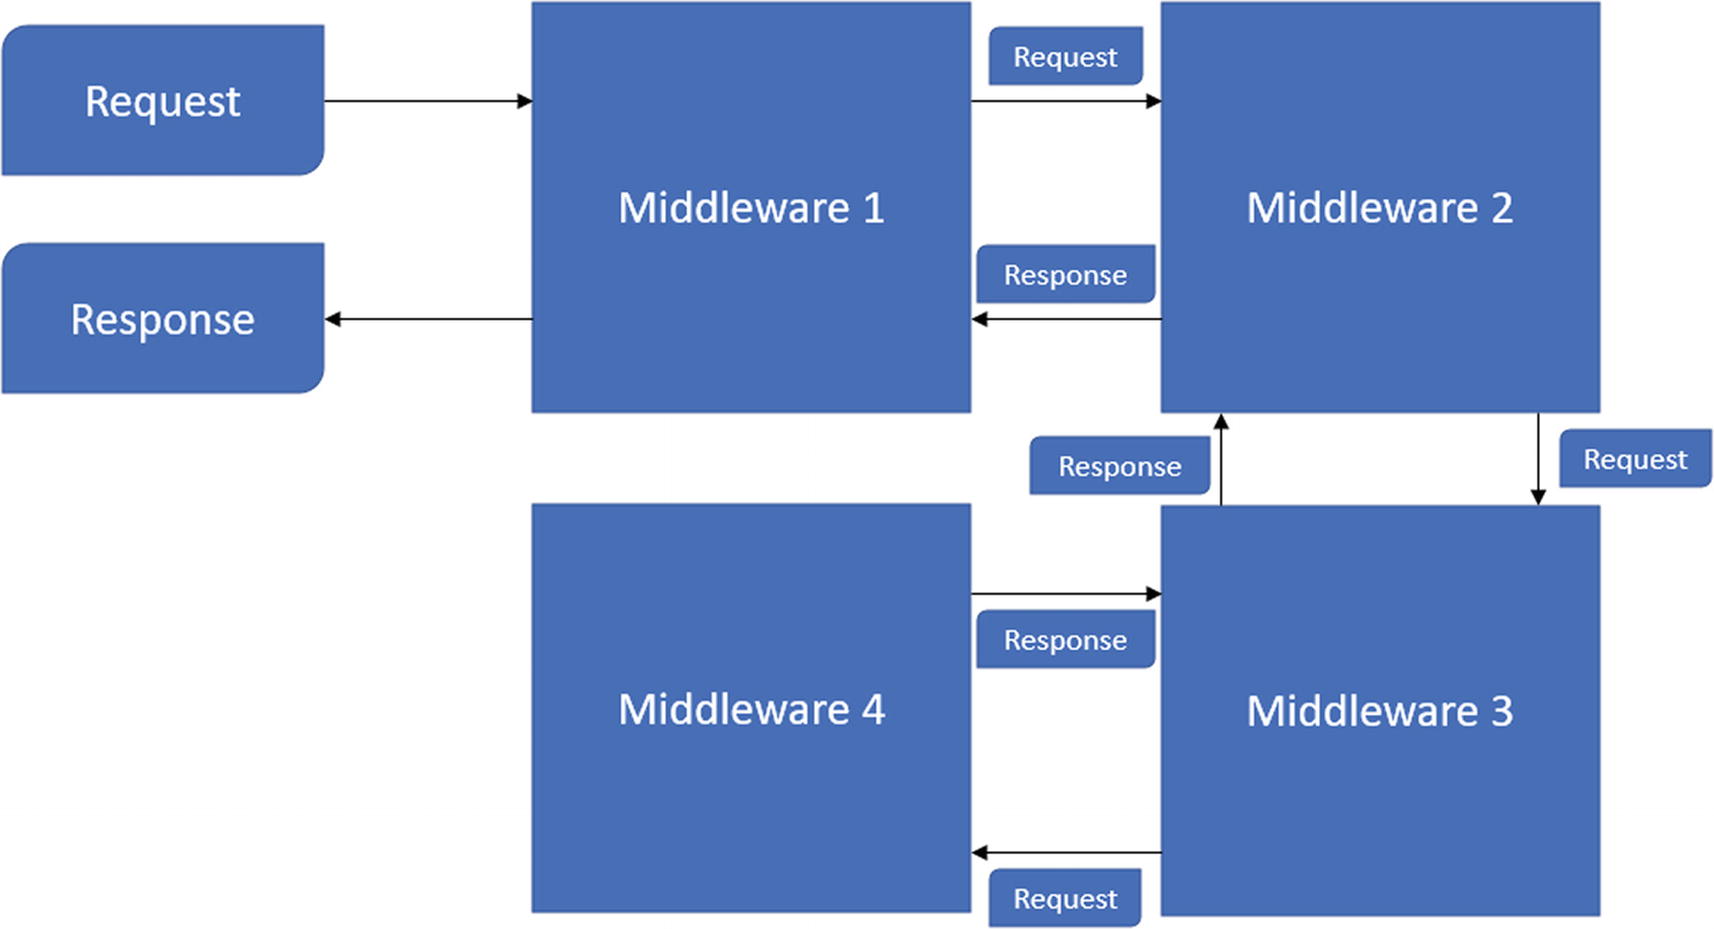
ASP.NET Core works with a pipeline. Every request that comes in gets routed through a series of connected middleware systems that we call a pipeline. The middlewares pass the request forward until it reaches the end of the pipeline or gets short-circuited by a middleware. Once it reaches the end, the result is passed back through the pipeline the other way around. Once finished, the request is handled and the result passed back to the user. Examples of these middlewares are authentication, authorization, routing, and so on.
Figure 7-5
HTTP Request pipeline
Listing 7-3 shows the default pipeline configuration in an MVC project.
// Configure the HTTP request pipeline.
if (!app.Environment.IsDevelopment())
{
app.UseExceptionHandler("/Home/Error");
// The default HSTS value is 30 days. You may want to change this for production scenarios, see https://aka.ms/aspnetcore-hsts.
The first configuration is configuring the default exception page, but only when not running in development. This is an example of where we use middleware components in the pipeline. Whether or not we are running in development mode depends on the profile we use for launching the application. In our MVC project is a Properties folder containing a launchsettings.jsonfile. This file holds the configuration for every profile. By default there are two profiles, one to launch our application using IIS and one for Kestrel. These profiles are reflected in Visual Studio’s Debug target selector.
As you can see in Listing 7-4, we can set whatever value we want to the ASPNETCORE_ENVIRONMENT variable. “Development” is by convention the value used when running locally. When running or debugging locally, we usually want to see the stack trace when an unexpected exception occurs, but when running on a deployed environment we want to hide that information from our users, hence the difference in registering error handlers.
After setting the exception handler, we configure HTTP Strict Transport Security, or HSTS when not in development. HSTS is an optional security enhancement. It adds a specific response header to a web application. The browser sending requests to that application will receive the header; from that moment on, all traffic will happen over HTTPS without the possibility to use untrusted or invalid certificates. By using HSTS, we can effectively prevent man-in-the-middle attacks since traffic can no longer be intercepted by using an invalid certificate. The default template only enables HSTS when not running in development; that is because when we want to debug an ASP.NET application, we use a development certificate that HSTS would deem invalid. After configuring environment-specific options, we enable HTTPS redirection by calling app.UseHttpsRedirection, meaning that all requests sent to HTTP will automatically redirect to HTTPS. UseStaticFiles enables the web server to serve files without trying to interpret them, not calling this method means that the web server will interpret everything and won’t be able to serve static files. UseRouting enables the routing system, more about that in the next section. UseAuthorization allows us to secure specific pieces of the application by hiding it behind a login system; we have mentioned ASP.NET Identity in the beginning of the chapter. More information can be found here https://docs.microsoft.com/en-us/aspnet/core/security/authentication/identity?view=aspnetcore-6.0&tabs=visual-studio. MapControllerRoute sets the default route; we can add more routes here if needed. And finally we run the application to execute the request. The pipeline is now configured, and every request that comes in will be piped through the pipeline before being executed. Keep in mind that the order we configure the middleware components is exactly the order they will be executed in whenever a request passes through the pipeline.
Routing
As mentioned before, ASP.NET MVC works by convention; this is particularly visible in the routing system. Routing is not done on a file bases as it is in default HTML; instead, it is done by the concept of controllers and actions. Listing 7-3 showed us a default routing path; Listing 7-5 repeats that path.
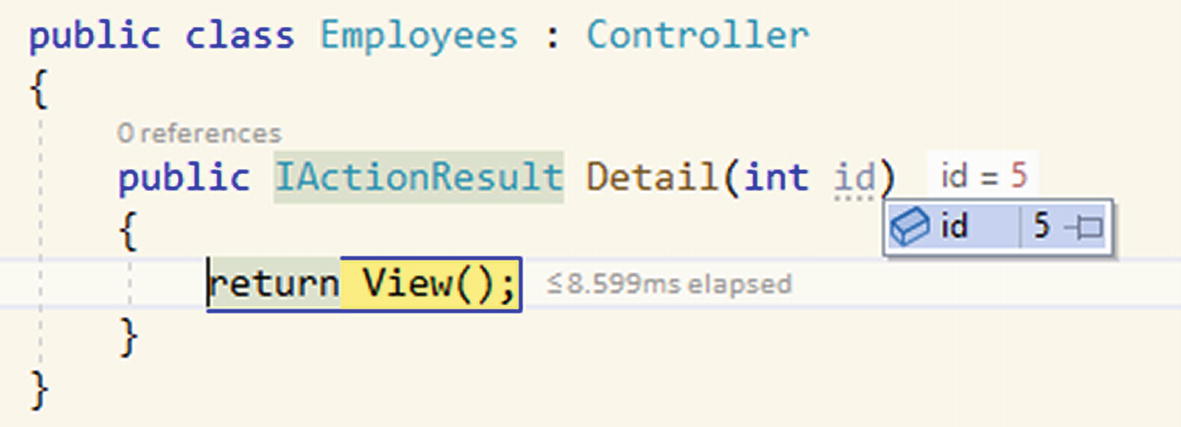
This is the default routing set bij ASP.NET, but we are always free to change it when needed. For now let’s keep it at default. Let’s take https://localhost:5001/Employees/Detail/5 as an example. When routing this URL into our ASP.NET MVC application, it will break it apart and try to map it onto a controller route. The route called “default” is the one it will usually try, unless we specify a specific one. The pattern in the route breaks into three parts, controller/action/optional id. If we look at the URL, passed the base address, we also notice three parts, Employees/Detail/5. The route will map Employees as a controller, meaning it will search for an EmployeesController class. It will do this because, by convention, a controller ends in “Controller.” The second part is the action, in our case Detail. The system will look for a public function called Detail that returns an IActionResult and lives in the EmployeesController. Finally, because we pass in an id, the Detail method also needs to accept a parameter. Figure 7-6 shows the code for our Detail method and that the parameter of the method gets filled in through the routing system. We are getting an integer into our parameter; note that this is not a nullable int even though it looks like one in the routing template. Marking it with a question mark in the routing template just means that it is optional; the methods receiving the parameter do not need to match the optional or nullable notation; as long as the datatype matches, we should be fine.
Figure 7-6
Parameter passed from url to variable
From here, the matching view is found and inflated and passed back to the user in the form of HTML.
Views
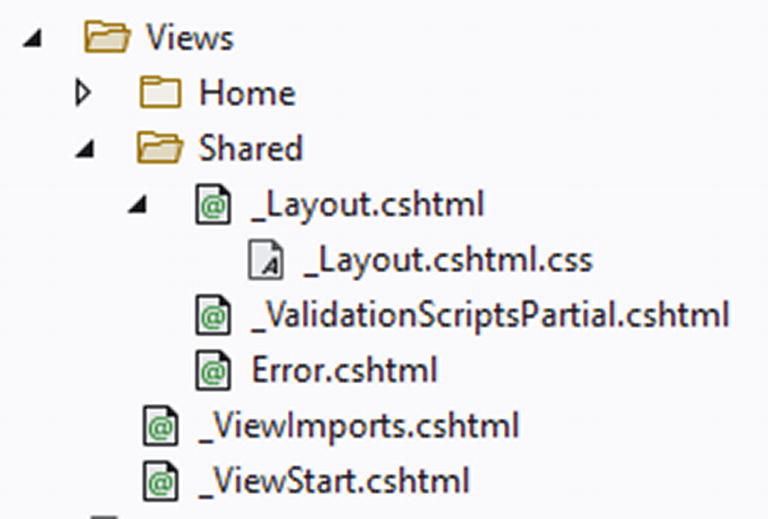
The views in an MVC scenario are the actual pages that a user gets to see on his monitor. In ASP.NET, views are built using an HTML-like syntax called Razor. Figure 7-7 shows the views in a default ASP.NET MVC template.
Figure 7-7
Views in ASP.NET MVC
Another one of ASP.NET MVC’s conventions dictates that for every controller, there is a folder containing its views. By default, we get a HomeController, so we also get a Home folder containing the views. Views are files with the *.cshtml, or *.vbhtml extensions, depending on the language we are using to write the application in. The Shared folder contains components that are reused across multiple views. Those shared components are usually prefixed with an underscore.
Razor works with master layouts; the default one is in the Shared folder and is called _Layout.cshtml. In the _Layout.cshtml file, we can declare our root html element, include the necessary CSS and JS files, and set up the navigation and structure of our application. In .NET 6, the ASP.NET team has also added scoped CSS files, meaning that the _Layout.cshtml file looks like it has a sort of code-behind file in the tree structure visible in the Solution Explorer in Visual Studio. This is a partial CSS file where the styles defined are only applied to the content of the file they are attached to. Adding a scoped CSS file to a cshtml file is as simple as creating a new CSS file with the same name as the cshtml file. Somewhere in the layout file you can find the snippet shown in Listing 7-6.
<div class="container">
<main role="main" class="pb-3">
@RenderBody()
</main>
</div>
Listing 7-6
Rendering the body of the application
Razor might look like generic HTML but we can add .NET code to it by prefixing a one line statement with an @ or an entire code block with @{ //code here }. The @RenderBody method is the place where your Razor views will be rendered inside of the template. Putting some labels around the RenderBody method shows exactly what I mean.
<main role="main" class="pb-3">
<h2>My Components</h2>
@RenderBody()
<h2>/My Components</h2>
</main>
Listing 7-7
Labels around RenderBody
Figure 7-8
Rendering components in the template
As you can tell from the placement of the h2 elements, it really is only the actual content that comes from the different views. The general styling and layout of the application is done from the main layout file. Listing 7-8 shows the default Index.cshtml view. This is the Index.cshtml file in the Home folder.
@{
ViewData["Title"] = "Home Page";
}
<div class="text-center">
<h1 class="display-4">Welcome</h1>
<p>Learn about <a href="https://docs.microsoft.com/aspnet/core">building Web apps with ASP.NET Core</a>.</p>
</div>
Listing 7-8
Home/Index view
The default home component does little more than welcome the user to the application and link to the ASP.NET documentation. But, it does start with a code block setting a value in the ViewData. ViewData is a specific sort of typed dictionary that can transfer data for a specific model type from the controller to the view, but not the other way around. It lives for the duration for the request; for any next requests, new ViewData instances are created. In this example, we are setting the KeyValue pair with key “Title” to what we want to be the title of this page. We do want that value to be reflected in the main layout, in the Title tag. All of this ViewData code then gets executed when a controller method is creating an HTML response to a request. Remember that ASP.NET MVC always creates the entire page as a response, and while creating the static HTML for a page, the system has time to evaluate all the ViewData logic.
Rendering the title through ViewData in _Layout.cshtml
The rest of Index.cshtml is basic HTML code; we’ll go through some more exciting views in a minute.
Controllers
Controllers are the glue in an MVC application; they are the connector between the data and the view. As we have seen, the routing system brings us from a url straight into a controller method. In general, that method will load data from somewhere, optionally using any parameters passed into the method; it will inflate a view, execute all .NET code in that Razor view so that we end up with static generated HTML code, and send that back to the user. ASP.NET is a client-server framework; all .NET-based logic is executed on a server, and only the result, in the shape of HTML, is sent back to the client. This is simply because browsers do not understand .NET by default. Silverlight fixed this by installing an add-in in browsers so they could run compiled .NET code, but the add-in system is not ideal in today’s world of mobile browsers and devices. The next best thing is running the code on the server and sending only the result back. In short, it is very important to realize that everything in ASP.NET MVC runs on the server; only the result of a request, which is generated HTML code based on Razor files, is sent back to the client.
Let’s go through the flow of creating a new controller, method, and view to clear up how MVC and its built-in tooling work. We’ll build a controller for the Apress book collection.
First we start with the model. Listing 7-10 shows the Book class.
public class Book
{
public Book(int id, string title, string description, string author)
{
Id = id;
Title = title;
Description = description;
Author = author;
}
public int Id { get; set; }
public string Title { get; set; }
public string Description { get; set; }
public string Author { get; set; }
}
Listing 7-10
The Book class
We’re keeping things pretty basic for sake of the example. I’ve created a dummy BookCatalogService that returns a hardcoded list of books. We won’t go into the code for that specific service, but if you are interested you can find it on the book’s GitHub repository. For now it is just important to know that the service is registered in ASP.NET’s DI container by calling builder.Services.AddSingleton<IBookCatalogService, BookCatalogService>() in Program.cs. Now that we have our data source and DI setup, it’s time to add the controller. A controller is a class that inherits from Controller. Keep in mind that we are registering the service as singleton so that we can abuse it as an in-memory datastore.
Be very careful with this in real applications; singleton means not only that you will get the same instance every time but that same instance is also shared across all your users.
Listing 7-11 shows the implementation of the BookController. The constructor takes the dummy BookCatalogService as a parameter. The parameter will be filled in by ASP.NET’s ServiceCollection. The Index method fetches an array of books from the service and passes that array into a method called View.
The method called Index will be called by ASP.NET MVC’s routing system when we navigate to https://<url>:<port>/book. In case you are wondering why we don’t have to specify Index in the url, that is because Index is set as the default action when no action is provided.
The View method that is called in the Index method comes from the Controller base class. It is used to select the correct view, depending on the name of the controller and the action method, and inflate it.
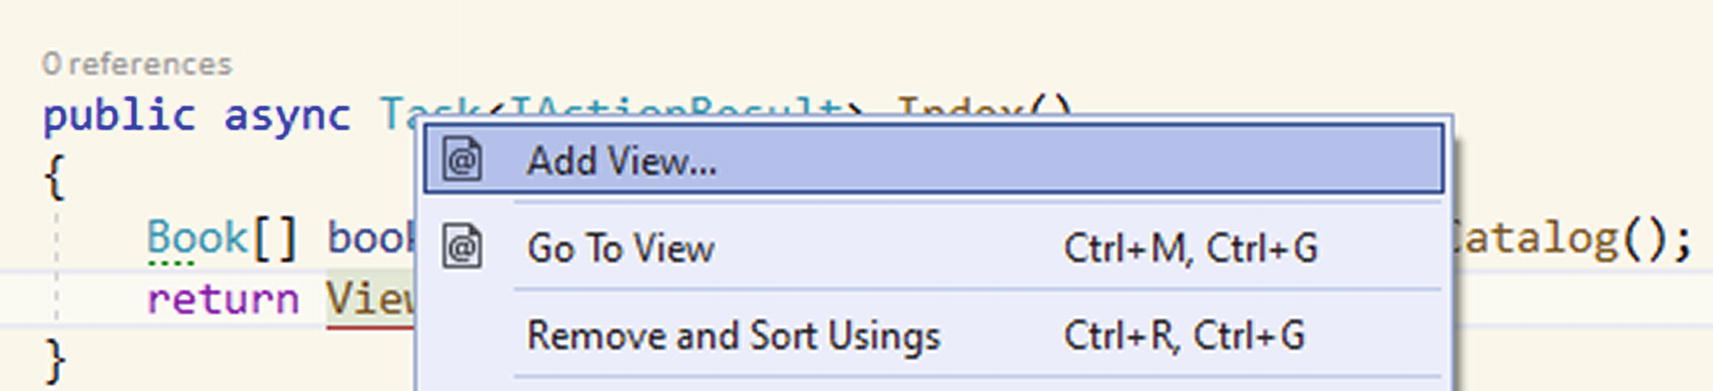
Now that we have a controller, it is time to add a view. Visual Studio provides tooling to easily add views. Adding a view can be done through right-clicking the call to View and selecting Add View.
Figure 7-9
Adding a view through tooling
Second step is selecting what type of view we want to generate, an empty Razor View or a scaffolded one. Scaffolding in ASP.NET is done by the Microsoft.VisualStudio.Web.CodeGeneration.Design NuGet package. The first time you launch a scaffolding command in Visual Studio this package will get added to the project. With scaffolding, we can easily generate entire parts of the application, from controller to view, including all the actions and even database operations. We will select the Razor View template. A dialog pops up where we can specify what model class we want to generate a view for, what it should be called, and what template to use. The name for the view is prefilled with the same name of the method we were just working on; the template is basically a list of basic create–read–update–delete or CRUD screens that we can take as a base for our view. Figure 7-10 shows the settings that we used for this example.
Figure 7-10
Scaffolding a view using a template
When scaffolding is done, you will notice a new folder in the Views folder called Book, containing an Index.cshtml file.
@model IEnumerable<MvcDemo.Models.Book>
@{
ViewData["Title"] = "Index";
}
<h1>Index</h1>
<p>
<a asp-action="Create">Create New</a>
</p>
Listing 7-13
Model declaration and ASP tags
Listing 7-13 shows the top of the generated page. A Razor view can specify a model class, in this case an IEnumerable of Book. I would advise to switch from IEnumerable to a more specific interface as soon as possible, since having it as an IEnumerable has no added value whatsoever. In this case we can go with an ICollection<Book> if we wanted to. With this model attribute set, we get access to a property called Model, which is of the type we just specified using the model attribute. The anchor tag contains an asp-action attribute. It is not the default HTML anchor tag; in this case, it is an ASP.NET tag helper, an extension of existing HTML tags. The asp-action attribute takes the name of a controller action and transforms that into a correct url using the routing system in ASP.NET MVC.
The generated view is meant to be a list of books. In the Razor view template, this is an HTML table. But tables are static, just like HTML is. Using Razor we can, on the server, generate all static HTML and send it back to the client. Listing 7-14 shows how it is done for a table. As I just mentioned, we get a Model property that is an IEnumerable<Book>; we can loop over that IEnumerable and generate a table row for every book in the collection.
@foreach (var item in Model) {
<tr>
<td>
@Html.DisplayFor(modelItem => item.Id)
</td>
<td>
@Html.DisplayFor(modelItem => item.Title)
</td>
<td>
@Html.DisplayFor(modelItem => item.Description)
</td>
<td>
@Html.DisplayFor(modelItem => item.Author)
</td>
<td>
@Html.ActionLink("Edit", "Edit", new { /* id=item.PrimaryKey */ }) |
@Html.ActionLink("Details", "Details", new { /* id=item.PrimaryKey */ }) |
@Html.ActionLink("Delete", "Delete", new { /* id=item.PrimaryKey */ })
</td>
</tr>
}
Listing 7-14
Generating a table in Razor
For the book information, we use the Html.DisplayFor tag helper. This helper generates HTML content based on the model property we specify using a lambda. The generated HTML from DisplayFor is based on a default template that could be overwritten if needed, but that goes beyond the scope of this book. The Razor template also specifies action links to edit or delete the book or to load the details of a specific book. Those links are generated using Html.ActionLink, which is quite similar to the ASP.NET anchor TagHelper we just saw. An action link takes in a label that it will show on the actual page, a controller action, and an optional controller name for when the action we want to execute is in another controller than the one this view is linked to and some optional parameters like, for example, the id of the entity we want to delete. In the generated view code, the id is not set in the route values as the system can’t decide for us what the unique identifier is. There is commented code in the Details and Delete links that we can use to set our id.
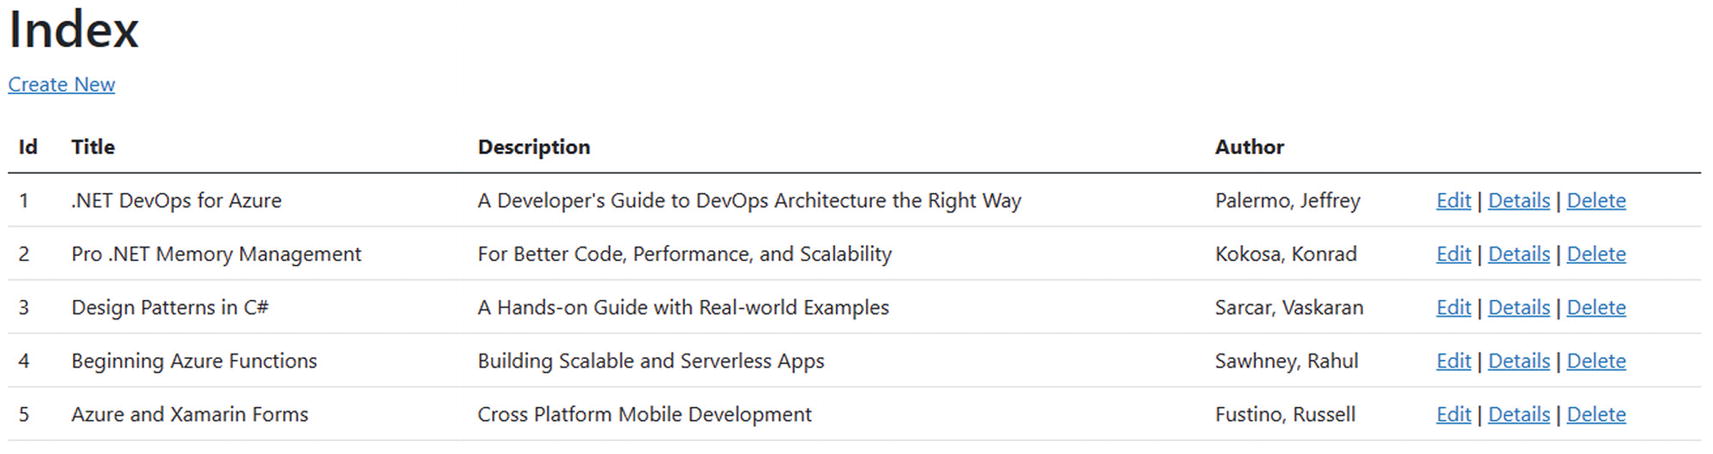
Let’s have a look at the result of the generated page.
Figure 7-11
The generated list view
The generated Razor view uses the default CSS from the ASP.NET MVC template and looks rather nice. We get a good looking table, nicely listing our books and showing the generated actions. Do note that the scaffolding does not include any logic to hide primary keys or IDs from the user. So always adjust the scaffolded code to hide that information. In our case the first column in the table is the book IDs, that is, internal information that should not be leaked on screen.
Listing data on screen is quite easy; we only need to pull data from the datastore, shape it according to what we need on screen, and display it. There is a bit more work involved if we want to edit or create data. For example, let’s create the logic to add extra books to the list.
We’ll start by adding two methods to the BookController. We need two methods this time, one to prepare a book instance to ready the fields on the create form and one to actually receive the entered data and store it in our data store.
[HttpGet]
public IActionResult Create()
{
return View(new Book());
}
[HttpPost]
public async Task<IActionResult> Create(Book book)
{
await _bookCatalogService.AddBook(book);
return RedirectToAction("Index");
}
Listing 7-15
Creating a new Book
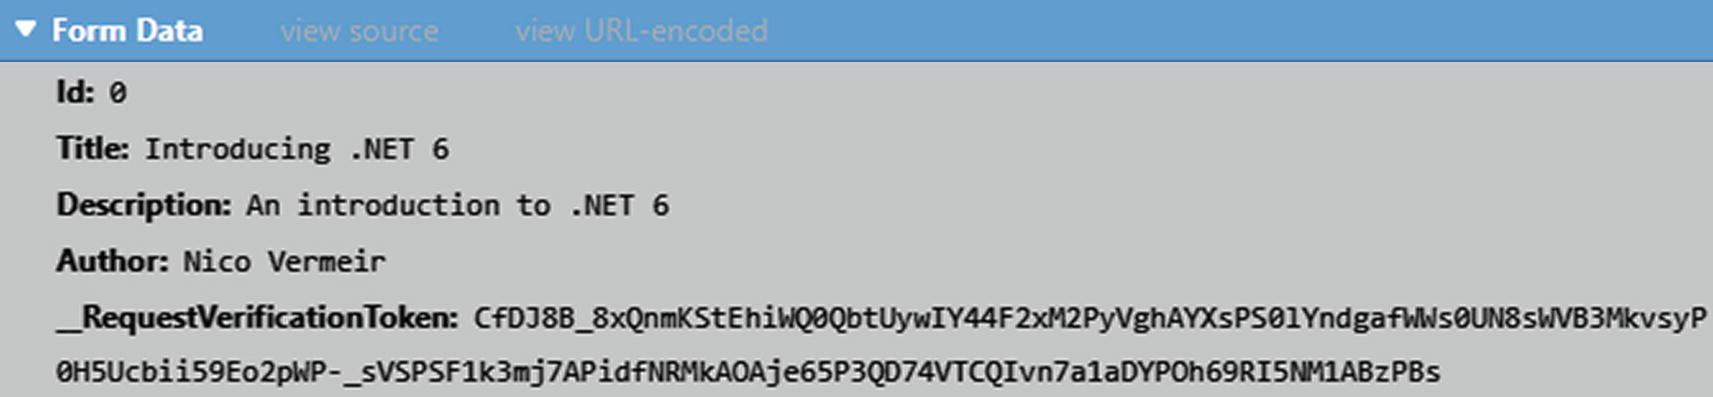
Both methods have the same name, but they have different purposes. The Create method without parameters is the one that will be called to open the form in the application. It is decorated with an HttpGet attribute, telling the MVC pipeline that this method can only be reached with a GET request. GET is the default for controller actions in MVC; however, I like to explicitly decorate the method in this case to avoid confusion. The second Create method is decorated with the HttpPost attribute so that it will only be reached via a POST method that will receive the data entered on the form. Since our form is in the shape of a book, data-wise, the ASP.NET MVC pipeline can safely bind the received value to a Book instance. If we inspect the request, we can see that the only thing that is going over the wire is basic HTML form data.
Figure 7-12
Inspecting a create request
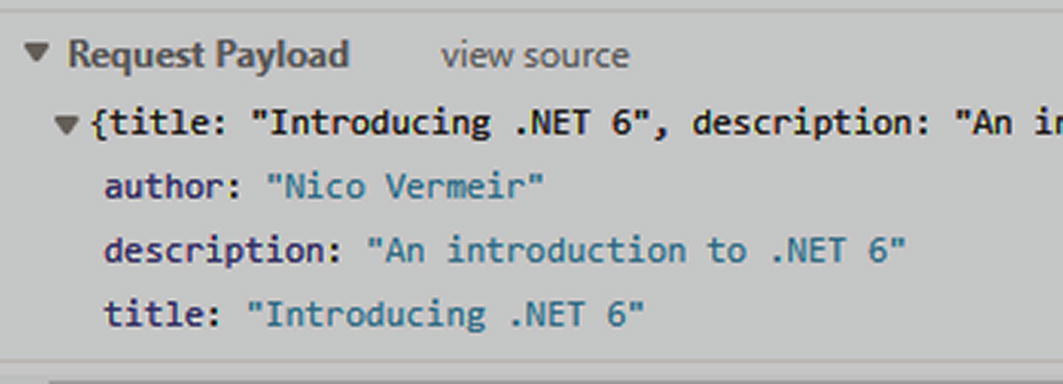
As you can see, the data going over the wire is in the shape of a book, but there is no notice of it being a book. The _RequestVerificationToken is an extra security token added by ASP.NET to verify that the received data on the server was not manipulated by a man-in-the-middle attack.
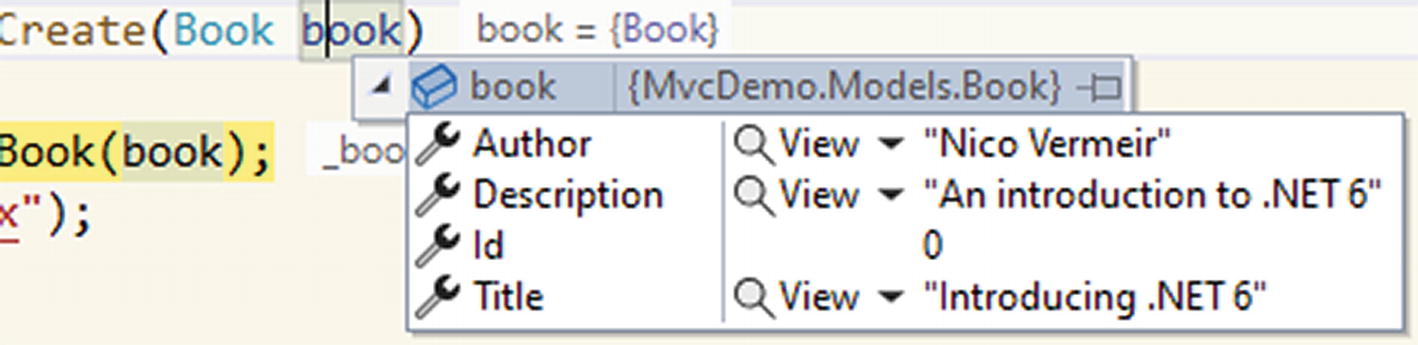
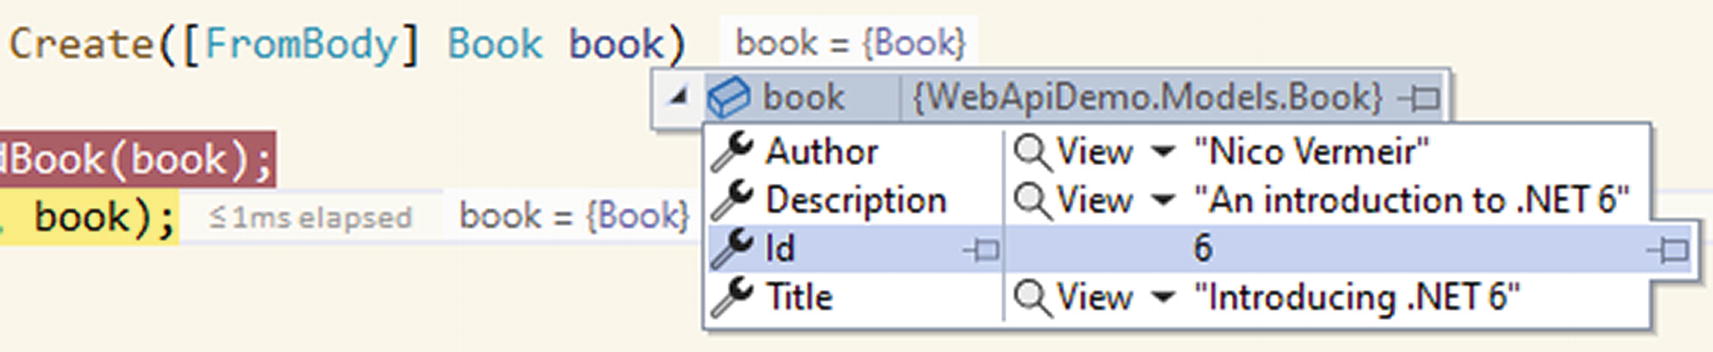
If we inspect the POST Create method, we can see that the parameter is filled in with an instance of Book, containing all the values we just entered on the form.
Figure 7-13
Parsed data in the controller method
In a real application, we of course need to do data validation before storing the data in the datastore. For the sake of the demo, we can assume that this validation happens in the service. Once the book is added in the datastore, we redirect from the Create action to the Index action so that we end up on the list of books, including our freshly created book.
Once again, we can let ASP.NET generate a view for us. This time we are selecting the Create template. I have already removed the entry for ID since we are not allowing our users to choose their own primary keys.
A form is a basic HTML form containing an action where the data in the form can be posted to. We are once again using ASP.NET taghelpers to generate the correct url based on controller and action names. For every property we want our users to fill in, three elements are generated, one that serves as the label. By default, the property name is shown as label but this can be overwritten. The second element is the actual input field; ASP.NET’s source generation will try to pick the correct input field based on the datatype. For a string we’ll get a text field, Boolean will give us a checkbox and so on. The third element is a placeholder for when client-side validation fails. Figure 7-14 shows the form with failed validations.
Figure 7-14
Failed validations
So, where are these validations coming from? There are some basic validations based on datatype such as fields being required if they are not nullable. However, in this case, I have added validation rules directly on the Book class using data annotations from the System.ComponentModel.DataAnnotations namespace. Listing 7-17 shows these data annotations, together with a way to make the validation error message a bit more user-friendly instead of bombarding our users with terms like string and array.
public class Book
{
public Book(int id, string title, string description, string author)
{
Id = id;
Title = title;
Description = description;
Author = author;
}
public int Id { get; set; }
[MinLength(5, ErrorMessage = "The title needs to have at least 5 characters")]
public string Title { get; set; }
public string? Description { get; set; }
[Required]
public string Author { get; set; }
}
Listing 7-17
Book class with validation rules
Using data annotations, we can specify required fields, minimum and maximum length, and much more.
The rest of the operations that can be generated by ASP.NET work in a very similar way so we won’t go into any more detail here. Instead, let’s have a look at another member of the ASP.NET family.
Web API
ASP.NET WebAPI is Microsoft’s version of a REST-based service. API is an industry term that stands for Application Programming Interface. In short, an API provides endpoints that, instead of HTML, return just a set of data. The collection of endpoints that provide data we call a contract. WebAPI is a RESTful API, meaning that it conforms to a set of guidelines. The term guidelines is very important here. REST is not set in stone, the rules of a REST service are not enforced in any way, and it is up to the developer to comply to the guidelines according to their skills and needs. ASP.NET WebAPI provides us with a set of helper methods and classes to guide us through the guidelines of REST to help us provide an API that complies to the guidelines as much as possible.
Before .NET 6, WebAPI was largely based on the MVC principle. We had models and controllers, but no view. Instead of inflating an HTML template and returning HTML, the controllers took the data, serialized them into JSON, and returned that. It gave us a very familiar way to build RESTful services. Meanwhile, the world of APIs evolved, and setting up a quick and easy API to consume some data became very easy in technologies like NodeJS but was often found bloated and involved in ASP.NET WebAPI. To counter this, the .NET team introduced minimal APIs in .NET 6. Figure 7-15 shows both a default WebAPI project next to a minimal API project to show the difference in project structure.
Figure 7-15
Minimal API vs. WebApi
As you can tell, the minimal APIs are, well, more minimal. The entire API, which consists of one demo call in the default template, is set in Program.cs. Before we dig deeper into minimal APIs, let’s start with the traditional WebAPI project.
Controller-Based APIs
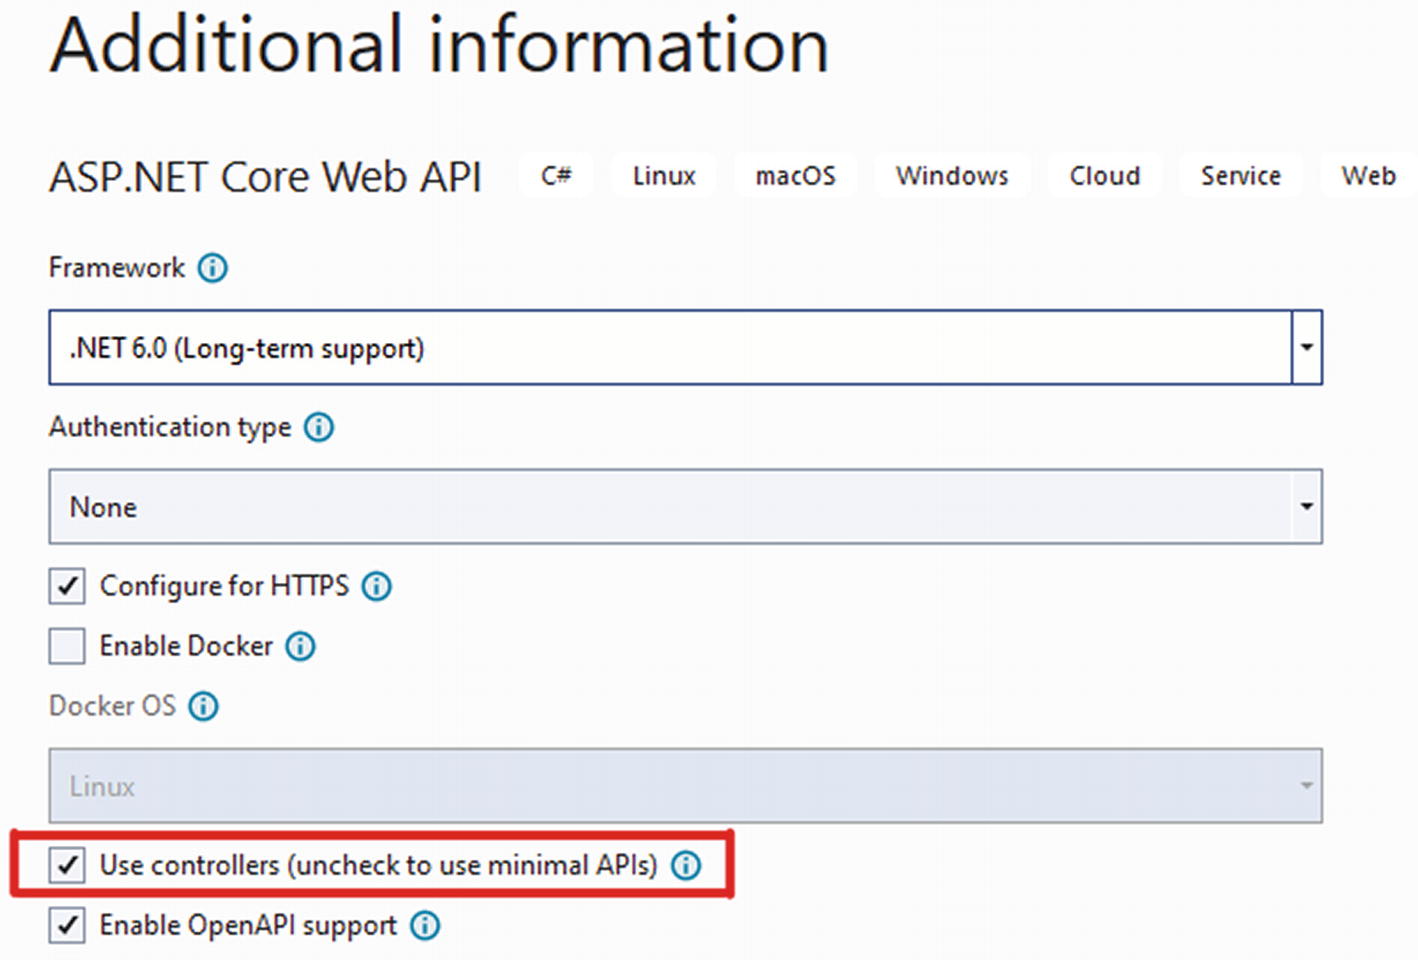
The type of project that you end up with depends on a specific checkbox during project creation. The project type we need is ASP.NET Core Web API. Once selected, we get a popup similar to the one we got when creating an ASP.NET MVC application.
Figure 7-16
Creating a new WebAPI project
Figure 7-16 shows the checkbox that will determine whether or not we end up with a minimal API project. By checking that we want to use controllers, we end up with an MVC-like template, except for the views. Listing 7-18 shows a snippet from the demo controller that is part of the template.
[ApiController]
[Route("[controller]")]
public class WeatherForecastController : ControllerBase
{
[HttpGet(Name = "GetWeatherForecast")]
public IEnumerable<WeatherForecast> Get()
{
return Enumerable.Range(1, 5).Select(index => new WeatherForecast
Our REST controller inherits from ControllerBase; an MVC controller inherits from Controller, which in turn inherits from ControllerBase. So both flavors of ASP.NET are using the same base classes. The difference is that the Controller class from MVC inflates the HTML templates, something we do not need in WebAPI, so there is no need for an extra layer in between.
REST controllers are decorated with the ApiController attribute. This attribute enables a couple of things:
Controllers need to explicitly define their routes; classic routing by convention like in ASP.NET MVC does not work here. Some conventions, like ending a controller name with Controller, are still valid.
The framework will automatically validate incoming data and request and generate HTTP 400 responses where needed. We talk more about HTTP responses a bit further in this chapter.
Incoming data can be bound to parameters in the action methods.
The third bullet is one of the things that make WebAPI easy to use. The framework can automatically parse incoming request data to parameters. Let’s clarify with an example. We will take the book example we used in the MVC part of this chapter and build a REST service for the books. I have copied the BookCatalogService and Book model to a WebAPI project. The Program.cs looks very similar to the Program.cs from MVC with a few important differences.
Listing 7-19 shows a snippet from Program.cs. The differences with MVC are AddEndpointsApiExplorer, AddSwaggerGen, UseSwagger, and UseSwaggerUI. All of these are used to configure Swagger in the project. Swagger is a third-party tool that works according to the OpenAPI Specification, or OAS. Let’s take a step back for a moment to clarify some things.
The OpenAPI Initiative (OAI) is an initiative run by a consortium of industry expert. Their aim is to describe a standardized way of how APIs should be structured. The OAI is part of the Linux Foundation, meaning it is run out in the open and completely vendor neutral. Their website is found at https://www.openapis.org/; the OAS itself is at https://spec.openapis.org/oas/latest.html
The OAS describes what the response of an API should look like, what datatypes can be used, how error messages should be structured, and so on.
Since we have an official, albeit optional, specification for our APIs, we can start building and using tools that leverage the structure the OAS described. Swagger is one of those tools; in fact, it was the people behind Swagger who drafted the first version of a Swagger Specification and donated that specification to the OAI who continued to build their version with the Swagger Specification as a solid basis. Later versions of Swagger stepped away from their Swagger Specification and started leveraging the OAS.
So, where is the power in this specification? Why is it useful? Circling back to our WebAPI about books, we have successfully set up and configured Swagger. If we run the application, Swagger will go through our controllers and actions and create a JSON file that describes our entire API surface according to the OAS. Listing 7-20 shows the JSON for our books API.
{
"openapi": "3.1.0",
"info": {
"title": "WebApiDemo",
"version": "1.0"
},
"paths": {
"/api/Book": {
"get": {
"tags": [
"Book"
],
"responses": {
"200": {
"description": "Success"
}
}
}
}
},
"components": {}
}
Listing 7-20
OAS compatible JSON
The JSON starts with declaring what version of OAS it is using. It shows information about our API and its title and version, and it lists the paths or endpoints. Here we can see that we have a /api/book endpoint that is a GET operation and it can return an HTTP 200; this information is generated from our new book controller, added in the next paragraph. The more we work on our API, the more information will show in this JSON.
Listing 7-21 shows our BookController. Notice the specified route on the controller. That route is the path described in the JSON. The GET request maps to the Index method in this controller by convention; if we have multiple methods decorated with the HttpGet attribute, the system will map to the correct one based on the parameters. The Index method fetches an array of books and calls the Ok method, passing in the array of books. The Ok method is one of many helper methods in WebAPI. It creates a response object containing the data and sets the HTTP response to HTTP 200 – OK. By using those methods, we can make sure that we are respecting the OAS.
HTTP 400-499: client error (not found, bad request, …)
HTTP 500-599: server error
The most famous status code is no doubt HTTP 404 – Not Found. The 500 range usually means that there was an unexpected error on the backend that should be handled by the developers.
Let’s get some more information in our generated JSON API description. We can decorate the Index method with an attribute detailing what we can expect as an HTTP status code and what the return type will be.
Looking at the JSON now, we can find some extra information; Listing 7-23 shows a snippet.
"/api/Book": {
"get": {
"tags": [
"Book"
],
"responses": {
"200": {
"description": "Success",
"content": {
"text/plain": {
"schema": {
"type": "array",
"items": {
"$ref": "#/components/schemas/Book"
}
}
},
"application/json": {
"schema": {
"type": "array",
"items": {
"$ref": "#/components/schemas/Book"
}
}
}
Listing 7-23
Extended JSON information
Notice the $ref that refers to a book? Our JSON schema knows what a book is now and describes it.
"components": {
"schemas": {
"Book": {
"required": [
"author",
"title"
],
"type": "object",
"properties": {
"id": {
"type": "integer",
"format": "int32"
},
"title": {
"minLength": 5,
"type": "string"
},
"description": {
"type": "string",
"nullable": true
},
"author": {
"type": "string"
}
},
"additionalProperties": false
}
}
}
Listing 7-24
Model in JSON
This JSON can be imported in different tools to, for example, generate client implementations that consume this API. There are even tools that do this as part of the build pipeline process. A tool included in .NET 6 is Swagger UI. Swagger UI takes the JSON and generates a visual test client for testing the API endpoints. Enabling Swagger UI in ASP.NET Core 6 is done in Program.cs by calling app.UseSwaggerUI() after app.UseSwagger().
Figure 7-17
Testing a REST call with Swagger UI
Using Swagger UI can really speed up the dev cycle; it gives a nice overview of all endpoints, allows entering parameters, and shows the status code and errors.
Let’s look at another example. Listing 7-25 shows the controller method for fetching a book detail.
Book? book = await _bookCatalogService.FetchBookById(id);
if (book == null)
{
return NotFound(id);
}
return Ok(book);
}
Listing 7-25
Fetching a book detail
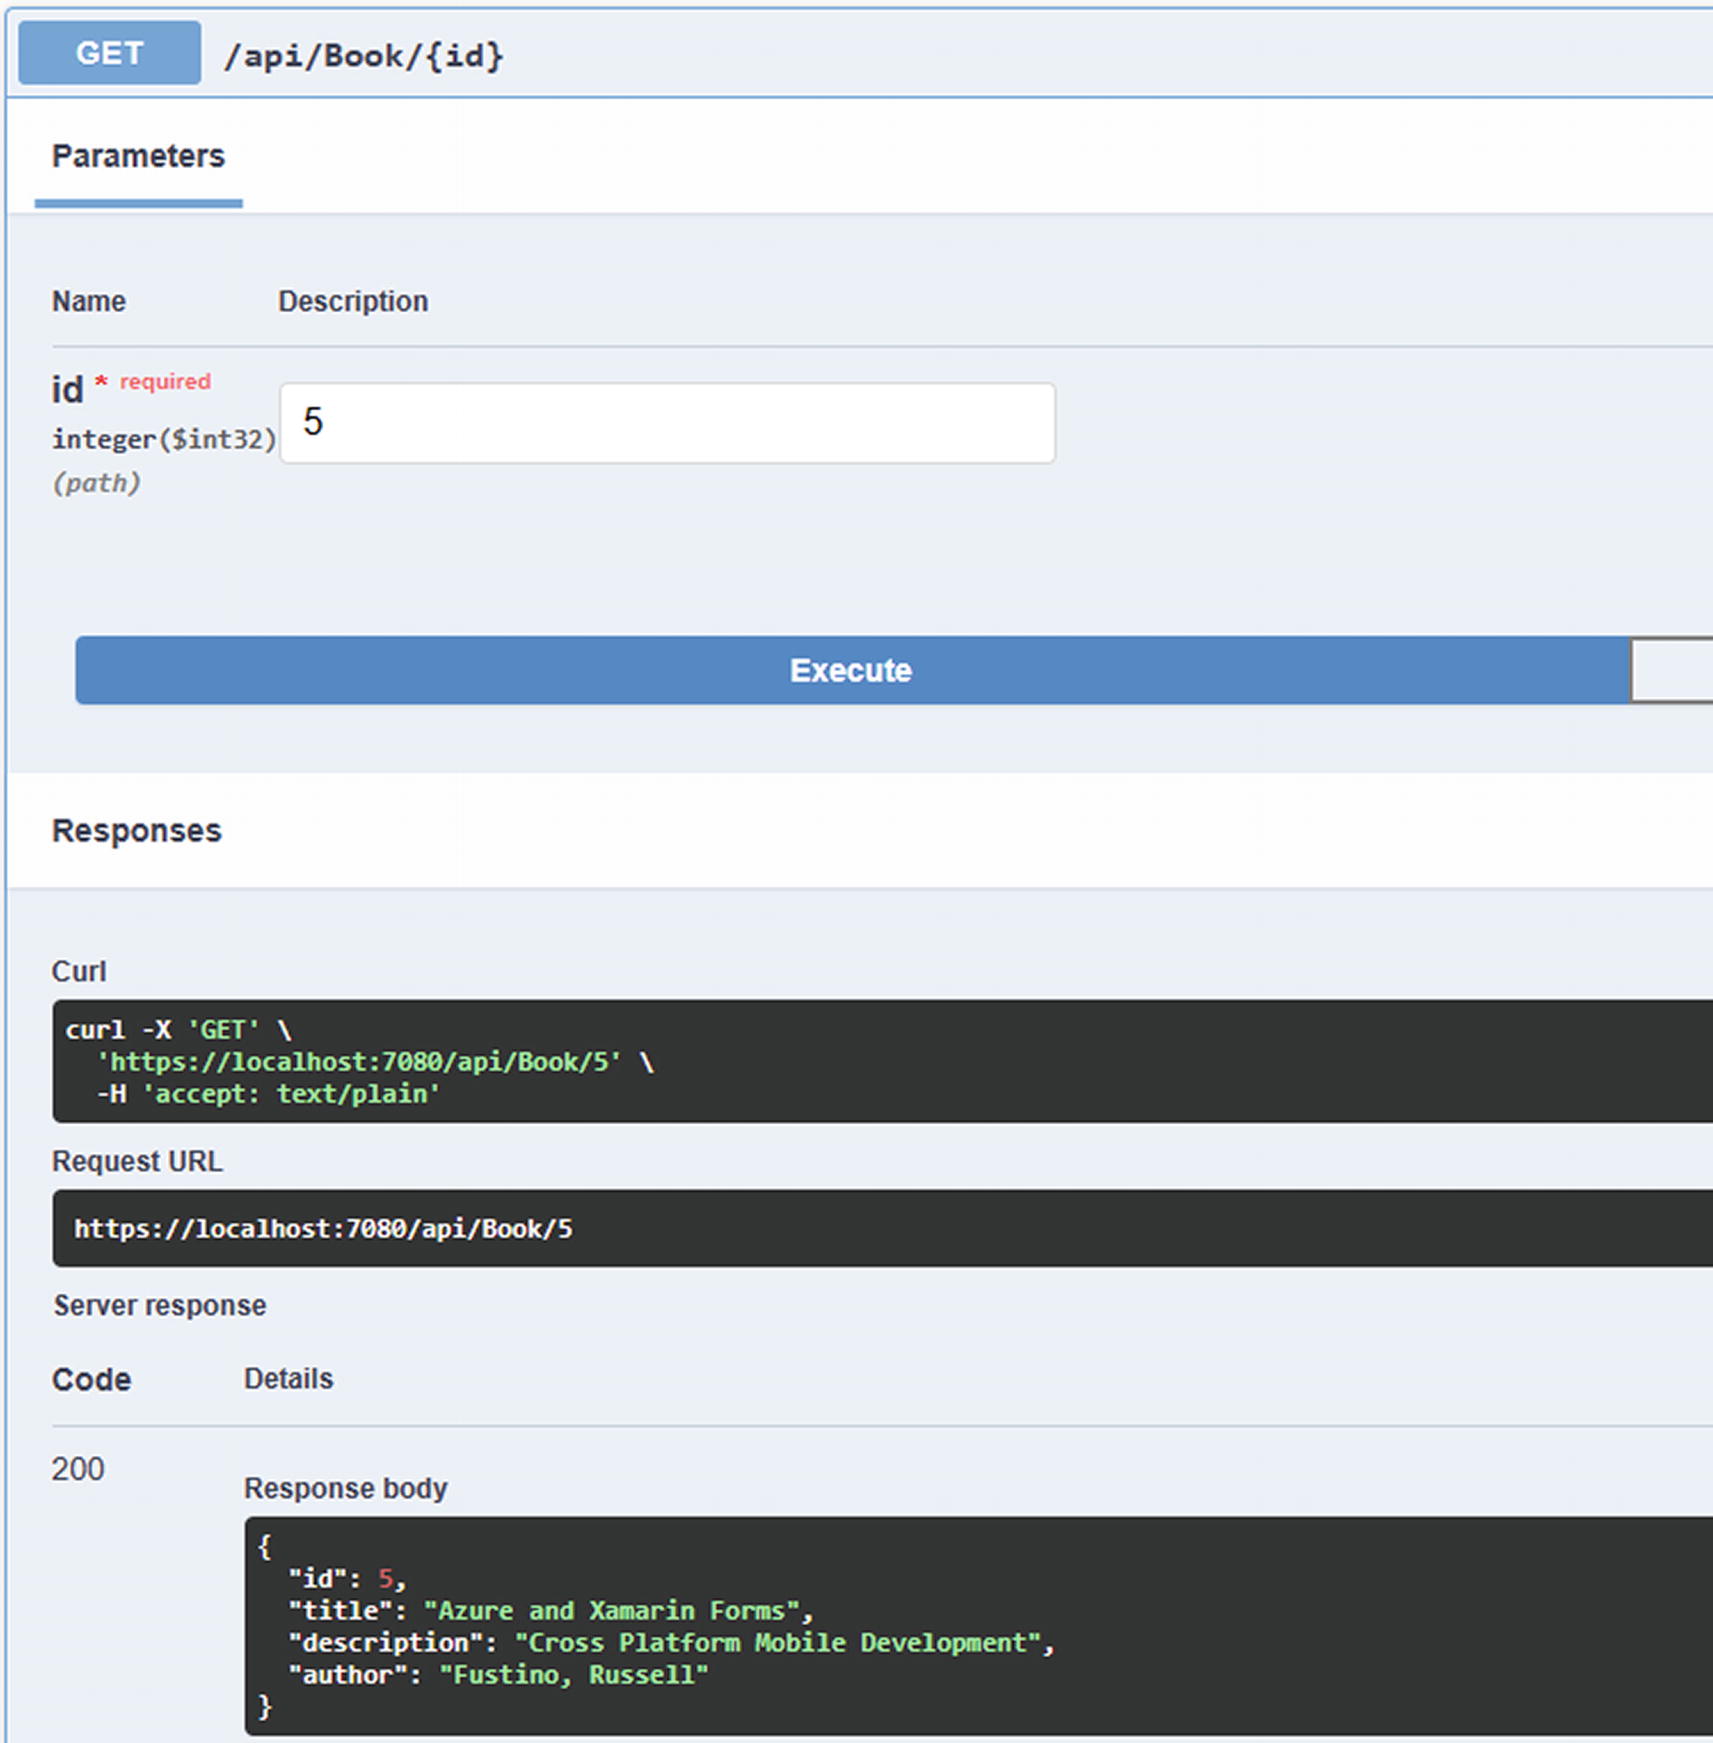
We once again have a GET method; there is a route attribute on the Details method. This route will combine with the route set on the controller to get, for example, https://<hostname>:<port>/api/book/5. The 5 will be inserted as value into the id parameter of the method; it is very important to have same name for the parameter and the placeholder in the route. The method can produce two expected response types, an HTTP 200 – OK or an HTTP 404 – NOT FOUND. According to the logic in the BookCatalogService, when passing in the id, we get either a book instance or NULL back. We create the correct HTTP response using the NotFound or Ok helper methods. Swagger UI picks these changes up quite nicely, based on the two ProducesResponseType attributes we have added.
Figure 7-18
Parameters in Swagger UI
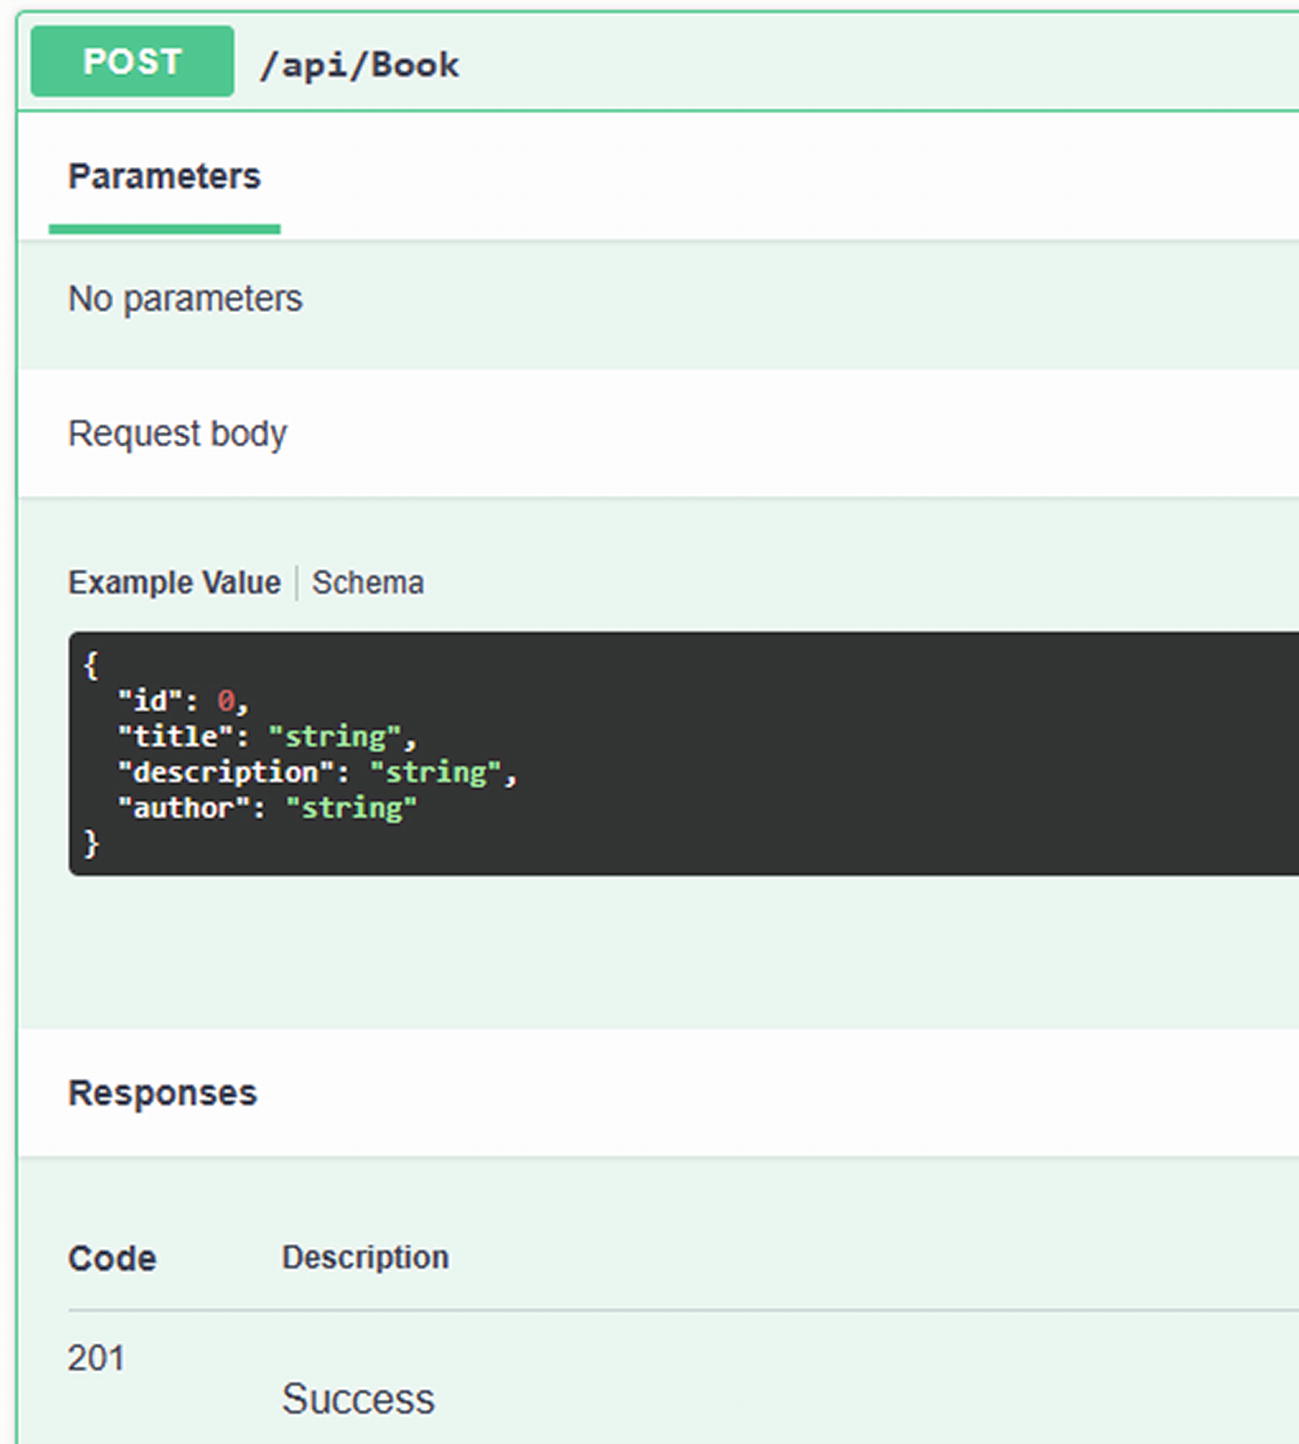
As a final example, let’s see what a POST request looks like. Listing 7-26 shows the controller action for adding a book to the collection.
public async Task<IActionResult> Create([FromBody] Book book)
{
await _bookCatalogService.AddBook(book);
return Created($"/{book.Id}", book);
}
Listing 7-26
Adding a book
A couple of new things here. Instead of a GET request, we are now doing a POST, which is the typical verb to create a new record. The HTTP status code to return is HTTP 201 – Created, which is generated by calling the Created method. The Created method needs an endpoint where the details of the newly created book can be requested and it sends the created book back as the response body, according to the OpenAPI Specification. The parameter of the method is decorated with the FromBody attribute. The attribute ApiController on controller level enables these attributes. The FromBody attribute parses the form data in the request body to the type of the parameter. Figure 7-19 shows the resulting entry in Swagger UI.
Figure 7-19
POST request in Swagger UI
Notice the color? POSTs are green, GETs are blue, DELETE will be red, and so on. Every HTTP verb is color coded in Swagger UI. Table 7-1 shows the complete list of HTTP verbs.
Table 7-1
List of HTTP verbs
Verb
Description
GET
Fetch data
POST
Create new data
PUT
Update data by sending back a complete, updated object
PATCH
Update data by sending back a patch document with only the updated properties
DELETE
Delete data
If we fill in some values in Swagger UI, set a breakpoint in the Create action on the controller; hit the Execute button and you will see that the breakpoint is hit and the parameter is nicely filled in with the values we entered in Swagger.
Figure 7-20
HTTP Request captured by the browser
Figure 7-21
ID generated and parameter parsed from HTTP form data
Minimal APIs
As mentioned in the introduction of this chapter, minimal APIs are Microsoft’s answer to fast REST API development as can be found in frameworks like NodeJS, where you can put the entire API surface in one file. Looking at minimal APIs, we effectively have one file containing everything. From application setup to the actual endpoints, and even better: Swagger and Swagger UI know how to interpret this new style of .NET REST APIs.
I have implemented the same book API in minimal API; a quick count of lines of code shows the following result:
Controller-based API: 78 lines of code
Minimal API: 57 lines of code
Lines of code are the bootstrap logic in Program.cs and the book endpoints, so not counting any models or services. That is 25% less code. But less code is not always better. Listing 7-27 shows the first part of Program.cs that sets up the application.
var builder = WebApplication.CreateBuilder(args);
// Add services to the container.
// Learn more about configuring Swagger/OpenAPI at https://aka.ms/aspnetcore/swashbuckle
Almost identical to controller-based APIs, except for the builder.Services.AddControllers call, we have no controllers in a minimal API, so no need to add them to the ServiceCollection.
The next part of Program.cs is the endpoints; after defining the endpoints, there is a small line of code that says app.Run(). These few characters make the API launch and be useful. Do not remove this call or nothing will work.
Listing 7-28 shows the action to fetch an array of books.
Creating API endpoints is done on the WebApplication object that is also used for configuring the application as seen in Listing 7-27. WebApplication has different Map methods depending on the type of HTTP verb you want to create an endpoint for. In this example, we are creating a GET request. The first parameter of the method is the path on which the endpoint is reachable. The second parameter is the delegate that is called whenever the endpoint is called. This delegate can be placed in a separate method, but I personally prefer the anonymous method style. In a minimal API, we can’t do constructor injection since we don’t have a constructor. Instead, we can use the FromServices attribute to decorate a parameter in the delegate. The ServiceCollection will inject the instance right there. In controller-based APIs, we could use helper methods like Ok and NotFound from the controller base class. We don’t have a base class in a minimal API, but we can use the static class Results that exposes the same methods. Finally we have some configuration methods; these are mostly used for generating the OpenAPI JSON and for Swagger UI. WithName sets a name for this endpoint. Produces sets the possible HTTP status codes and the type of data we can expect. In this example, we are not explicitly setting a status code; HTTP 200 will be used as default.
app.MapGet("/api/book/{id}", async ([FromServices] IBookCatalogService bookCatalogService, int id) =>
{
Book? book = await bookCatalogService.FetchBookById(id);
if (book == null)
{
return Results.NotFound(id);
}
return Results.Ok(book);
})
.WithName("GetBookById")
.Produces<Book>()
.Produces((int)HttpStatusCode.NotFound);
Listing 7-29
Parameters in a minimal API endpoint
The API call for fetching book details looks very similar. The major difference is that we are expecting a parameter, the book ID, to be passed in. Passing parameters is done by setting a placeholder between curly braces in the route and creating a method parameter in the delegate with the same name as the placeholder. The framework will take care of mapping the passed in parameter to the .NET parameter, very similar to the way routing works as we have seen in ASP.NET MVC. This example also shows defining two possible results. The method can either produce a book with HTTP 200 – OK or it can produce an empty result with HTTP 404 – Not Found.
app.MapPost("/api/book", async ([FromServices] IBookCatalogService bookCatalogService, [FromBody] Book book) =>
Creating a POST endpoint is very similar; we just use the MapPost method instead of MapGet. Using the FromBody attribute, we can get the posted HTTP form data as a .NET object passed into the delegate. The return type is HTTP 201 – Created.
If you like this style of API programming but you don’t want a large Program.cs once all your endpoints are defined, you can use extension methods to split your endpoint definitions in separate files.
public static class BookEndpoints
{
public static void MapBookEndpoints(this WebApplication app)
I have only added one endpoint in Listing 7-31 for brevity. The full method with the three endpoints can be found on the book’s GitHub page. With this extension method in place, we can shorten Program.cs by calling app.MapBookEndpoints instead of defining all endpoints there.
Wrapping Up
ASP.NET has been a popular choice for building enterprise web applications or services for years, and the framework keeps evolving. MVC is easy to use and familiar for those coming from other languages since it largely depends on the Model-View-Controller pattern. WebAPI uses the same design pattern to provide easy to build and use RESTful APIs. In .NET 6, we got minimal APIs, which is a brand-new member of the ASP.NET family. With minimal APIs, we can start building APIs faster than ever before, but we do give up a bit of structure. It is a trade-off. Controller-based APIs are built using a very well-known design pattern, but for smaller APIs, it is easy to get lost in the large amount of files in a project. With minimal APIs, there is a minimal amount of files or code required, but structure might get lost quickly. So choose wisely and use extension methods to group your endpoints together.