
If you are reading this chapter, chances are that you do not have an end-to-end understanding of the intrinsic value of databases and why they are so popular and necessary for every business. Many database technologies and platforms exist, but few have stood the test of time like Microsoft Access, perhaps the most important and extensive desktop database in the world. It has been evolving since it was first released in 1992, and it is included with Microsoft Office 2019 Personal and Home editions for free.
This chapter will introduce the types of files accessed by computers; you will also learn why databases are so critical and how they are created. In addition, you will learn about relational databases, the object types they can contain, and how Microsoft Access implements them. We will also discuss the differences between an Excel spreadsheet and an Access table. After reading this chapter, you will have a foundational understanding of the Microsoft Access interface and recognize the building blocks of any Access database file and implementation.
Types of File Access
Sequential file access : This is when the data in files can be accessed in an ordered, sequential manner. Files that provide this type of access are created by the most commonly used programs and include image files (JEPG files from digital cameras), text documents (created with Notepad or Microsoft Word), vector files (created by design programs such as CorelDraw or Adobe Illustrator), worksheet files (created by Microsoft Excel), and so on.
Direct or random file access : This is when the data in files can be accessed in a random, nonsequential manner. Files that provide this type of access are created by database programs such as Microsoft Access. The files have a precise register structure—and length—that is capable of accessing any desired register at any time.
The basic difference between a sequential and a direct or random-access file is that whenever you open a sequential access file, you load all its content into memory (more or less), manipulate the content in memory, and then save the content to the file again. If something bad happens between the time you change the file and before you save it again—like a power failure, for example—all the changes made to the file will be lost.
However, when you open a direct or random-access file (a database file, like the ones created by Microsoft Access), you make an access point to one of its tables, access one or more of its records (or rows), and manipulate one record at a time. In other words, you do not need to load all its records into computer memory.
You also do not have to save a database file or any of its tables after they are created. In fact, database programs such as Access do not have a “Save as” menu command: you open a table, access a single record, change any record field, and save the record to the file (and just that record!).
Even if you take advantage of a computer’s speed to manipulate thousands of records at a time, whenever you use a database file, you will always change and save registers one by one. If something happens between the time you change a record and before you save it, you will lose just that single change made to that last updated record.
Access Tables vs. Excel Spreadsheets Files

The same data set stored as a Microsoft Access table (top) and a Microsoft Excel spreadsheet (bottom)
When observing the table structure that both applications use to manipulate data, you may think that they seem to be the same. However, the Microsoft Access table doesn’t have the row and column headers shown in the Microsoft Excel file, while a Microsoft Access table shows the table record count at it bottom (“Record 1 of 8790”).
Most important, the data in these two tables is manipulated differently by its host application. The Excel spreadsheet operates on the entire file. Any change on any of its cells will be saved if you save the Excel workbook file. The changes will be disregarded if the file is not saved before the application closes. By contrast, the Microsoft Access table can operate on one record at a time and cannot be saved as a whole, meaning every change on any of its cells information will be automatically saved to disk every time another row is selected. Remember, a database table is operated on by a direct or random-access file that cannot be saved; just its records (or rows) can be.
How to Build a Database
To create a database, first you need to know what information should be stored in it. Database developers use a technique called system analysis, defined as collecting and interpreting facts, identifying problems, and decomposing a system into components with the aim of studying a system or its parts in order to identify its objectives.”1 Database developers use system analysis so they can create the database tables needed to store and process the information they are working with. To understand how system analysis works, you’ll need to understand terms such as primary table, related table, primary key, relationship, and referential integrity.
Consider, for example, the problem of creating a database capable of controlling a person’s daily food intake by storing some personal and other information related to each meal eaten in a single day.
You may be tempted to store all this information in an Excel spreadsheet, storing each row of the spreadsheet as a record and each column of the spreadsheet as a field record, where the desired information, such as person data (name, address, mobile phone), meal information (meal date, meal time, meal name), and food consumed (food name, food category, quantity consumed) will be entered.
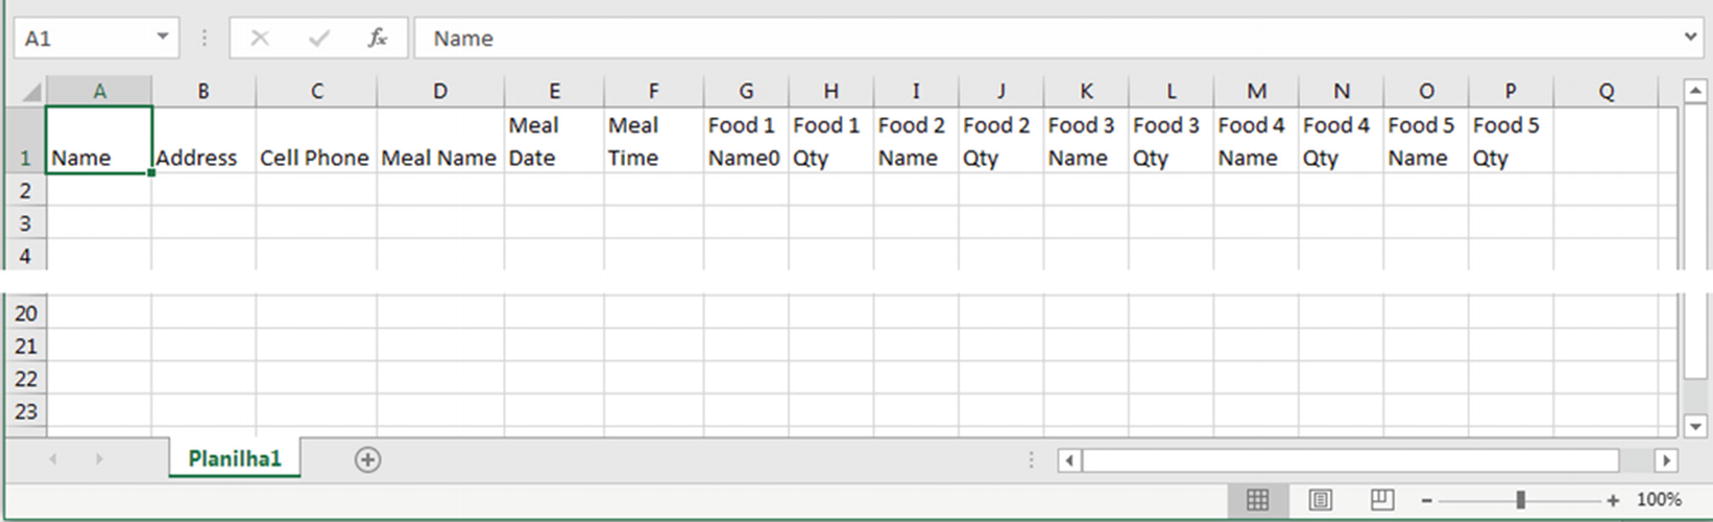
A Microsoft Excel spreadsheet with column names to store food information
Each spreadsheet row is used to store a person’s meal, with up to five food items.
Any other meal eaten on the same day will need another spreadsheet row, which will duplicate information already used in previous rows, such as the name, address, cell phone, and meal date.
Although Microsoft Excel is smart enough to repeat pre-inserted information in the same column, each time you insert repeated information (such as a person’s name), this information is duplicated inside the file, which will force the file size to grow exponentially as new information is inserted.
If any person needs to insert six or more food item on a single meal, the spreadsheet needs to be updated to accommodate this new design.
There is no space to store a food item’s nutritional data such as calories per food item. Although such column information can be inserted, it will be necessary to use one new spreadsheet column to type each food item’s calories.
You must scroll through the worksheet to insert each new record (spreadsheet row), which can be time-consuming.
Most columns need to be wide or high enough to show the information typed on a single row (or record), which will force you to horizontally scroll the worksheet to insert data into the columns.
The spreadsheet size will be restricted by your current system memory, and every time you store information in it, you will need to save it—or run the risk of losing the spreadsheet when you suffer a power or system failure!
It seems obvious that a single spreadsheet that stores data information on a row and column basis is not the right solution to solve this simple problem. You will need to use what is called a relational database.
If you are interested in learning more about how to emulate a database on a Microsoft Excel spreadsheet using a macro-enabled workbook, take a look at Chapter 9 of Programming Excel with VBA, also published by Apress. That solution requires extensive knowledge of Visual Basic for Application (VBA) and has storage limitations since it requires continuous file access that needs to be loaded into memory and saved to disk.
Relational Databases
A relational database can automatically propagate one (or more) table field from one table record in the primary table into one (or more) field of another table record—known as the related table. This means that both tables are related, and just the primary table field value is necessary to associate all the records fields of these two tables.
The primary table must have a field, called the primary key, that uniquely identifies each record.
The related table must have a field, called the foreign key, of the same data type of the primary table’s primary key field.
The related table foreign key must not be the table’s primary key (although in some database designs it can be)—allowing more than one related table record to have the same field value.
One-to-one relationship : For each record on the primary table, there can be only one record on the related table. Both primary and related tables fields are unique among all record values (they are both tables’ primary keys).
One-to-many relationship : For each record on the primary table, there can be many records on the related table. The primary table’s field is the table’s primary key, while the relational table field’s foreign key is not unique, meaning that it is not the table’s primary key, allowing its value to be repeated on many records from the related table.
Many-to-many relationship : Each record in the primary and related tables can relate to any number of records (or no records). To accommodate such a relationship, the database requires a third table, known as the associated or linking table.
Referential Integrity
To guarantee that no records are lost on the related table (records not associated to a unique record on the primary table), the database engine can impose what is called referential integrity .
Referential integrity is “the property of a relational database that enforces valid relationships between tables, such that no foreign key can contain a value that does not match a primary key in the corresponding table,” according to https://www.yourdictionary.com.
Cascade updated related fields: The database engine will automatically update changes on the related table records, based on any change on the primary table record (for example, if the primary key value changes to another unique value, all related fields will be automatically updated).
Cascade deleted related records: By deleting a record from the primary table, all related records will be automatically deleted.
Whenever you try to impose referential integrity between any two database tables, the database engine will verify whether there are any inconsistent records on the many side of the relationship (meaning one or more record with no association with any record on the one side). If any are found, the database will not be capable of imposing such an integrity rule due to it breaking the golden rule of referential integrity that states: “…no foreign key can contain a value that does not match a primary key in the corresponding table.”
Tips to Build a Database from Scratch
Before you begin to lay out a database (meaning, deciding which tables will be needed), it is important that you make a careful system analysis of the human tasks you want to automate. This analysis requires experience, practice, and inevitably significant interaction with the people who will manipulate the application and whose data is stored by the database.
Explain that it is necessary for you to understand what they are trying to achieve in the software application.
Ask to see their data to figure out where the one-to-many table relationships are.
Note all the information needed, such as the type of information (text, date, number) and the maximum size required for each of type. You need this information to create the fields of your database tables.
Try to replicate a hard-copy layout in the software application.
Verify whether there is any software solution already working, and if so, ask what the problem is with it.
Ask for the complex jobs that need to be done with the click of a button—you will be surprised about how people want simple things done faster.
Don’t try to replicate the work as it was already done. Whenever you find is necessary, impose your personality to show that some tasks can be made simpler by a computer.
Try to implement the solution one step at a time, giving yourself time to redo each step.
Don’t insert in your solution more than what is asked of you. You will be responsible for whatever you offer, even if they don’t ask for it.
Creating a Database for Food Intake Control
Quickly insert and retrieve a person’s data.
Quickly insert any person’s food intake behavior on a daily basis, using common daily meal names (breakfast, snack, lunch, dinner etc.) to identify each meal eaten on any given day.
Insert the same meal more than once on a single day (some people eat the same food twice a day).
Quickly select and insert food items on these meals.
Quickly verify how any calories were ingested during each meal, on any day, or between any two dates, to take the appropriate nutritional actions.
After doing some system analysis on this problem, one can easily see that to correctly store all this information—some of it to be inserted only once—you need to store it in different tables, which is exactly what a database does.
Persons: A person’s data will be stored only once (name, address, phone number, e-mail etc.)
Persons Meals: Each person’s meal data will be stored (meal name, meal date, meal time).
Persons Meals Foods: Each meal’s food information will be stored, including the food name, food quantity, and any other nutritional food information needed.
So, how will these tables relate to one another?
Relating the Tables
To relate these three tables, you need to create a primary key field on each table to uniquely identify each of its records and propagate this field value on the related table’s foreign key field—which must be of the same data type.
The Persons table (the primary table) can have a primary key field called ID (a numeric type) that uniquely identifies each of its records, while the Persons Meals table (the related table) must have a field called Persons ID (with the same numeric type) that can receive each Persons table’s ID value, relating both tables by a unique, common value.
Since the Persons table’s ID field is the table’s primary key (meaning it does not repeat within the records) and the Persons Meals table’s Persons ID field is not (it can be repeated among records), those two fields can be used to create a one-to-many relationship between these two tables.

A simple diagram identifying the relationship between two table records
The 1 and ∞ characters identify which table is the primary table (the “one” side of the relationship) and which is the related table (the “many” side of the relationship). Note in Figure 1-3 that the ID field in the Persons table is presented in bold (meaning it’s the table’s primary key), while the Persons ID field in the Persons Meals table is not (meaning that it is not unique). Both tables are related with referential integrity imposed, and that is why the ID field has a 1 on its right (the “one” side of the relationship), below the relationship line, while Persons ID has a ∞ on its left (the “many” side of the relationship).

A simple diagram identifying the relationship between three tables proposed to store data for a nutritional application
By using such approach, each person’s record (Person Name, Address, Phone, Email, etc.) can be recorded once and have as many Persons Meal records as necessary. Also, each person’s meal can be recorded just once and have as many Persons Meals Foods records as necessary. Brilliant, isn’t it?
The lesson is quite simple: you must create the database tables, relate them, and impose referential integrity before any record is inserted into your database!
Now let’s see how Microsoft Access deals with its databases.
Microsoft Access Databases
Microsoft Access is a single-file interface program, meaning that each of its instances—windows opened—can deal with just one database at a time. If you want to open two Microsoft Access databases, you will need to open another Microsoft Access instance to achieve these tasks.
*.MDB: Produced by Microsoft Access 2003 or older files
*.ACCDB: Produced by Microsoft Access 2007 or newer files
Every file has a name and an extension. The name can have up to 256 characters (in Windows 10 it can be up to 32.767 characters), while the extension can have between 1 and 4 characters. While the filename identifies the file content for the user, the extension name sets the file type and identifies it for the Windows operating system. By default, file extensions are hidden so that you don’t incidentally change them and make the file unassociated—or unable to be opened. To show file extensions on your system, select File ➤ Options to open the Folder Options dialog, go to the View tab, and uncheck the “Hide extensions for known file types” option.
There is a big difference between them: the older *.MDB format is faster on record access, while the *.ACCDB format that Microsoft Access 2007 uses offers new field types (such as Big Number and Attachment). The good news is that you can use any *.MDB file in Access 2007 or newer versions, which gives you a lot of flexibility.
Be advised that any Microsoft Access database can be considered a folder, in other words, a place where many files are stored. This means the database is easy to store and back up. And as a folder, the database uses sequential file access to store most of its objects and allows random file access to retrieve its records.
Any Microsoft Access database file can have many different types of files stored in it, such as tables, queries, forms, reports, macros, and modules. Since a database file can store and manage different kinds of file types in a single database, it can occasionally be corrupted, which is why you must do some backups and periodical maintenance.
Any Microsoft Access database has a size limitation of 2 gigabytes, which is quite high for data, not considering images and attachments. There is no limitation on the number of records in a table, allowing you to store millions of records in each table. Do a Google search for Microsoft Access specifications to get a big picture of its amazing capabilities.
Let’s look at each of these objects in more detail to better understand the Microsoft Access database structure.
I have used Microsoft Access files for more than two decades, and I’ve never had any corruption—although I have already witnessed some file corruption and a loss of information on huge tables (with more than a million records). Always make a backup of your database files to avoid such problems, which may be impossible to solve.
There is some third-party software that can recover a corrupted Microsoft Access file. Do a Google search for Microsoft Access recovery to find some of them.
Tables
Tables are the heart of any database, because this is where you will store the data that makes a database so special.
A Microsoft Access database can store all the tables you need, although a well-designed database will not need many of them and will have a limit on how many tables can be opened at a time (2,048 tables), with each one having up to 255 fields.
Fields
Each table you create needs to be defined in terms of fields—which is where the information is stored. Each field must have a defined type, which indicates the kind of information it contains.
Microsoft Access 2019 Supported Data Types (Using 8-Bit Bytes)
Data Type | Usage | Size |
|---|---|---|
AutoNumber | Unique numeric value generated by Access for each new record primary key. | 4 bytes. |
Number | Numeric data. | 1, 2, 4, 8, or 16 bytes. |
Currency | Monetary data, using up to four decimal places of precision. | 8 bytes. |
Large Number | Numeric data. | 8 bytes. |
Replication ID | Numeric data. | 8 bytes. |
Date/Time | Dates and times. | 8 bytes. |
Yes/No | Boolean 0 for false and -1 for true. | 1 byte. |
Short Text | Alphanumeric data (formerly known as Text). | Up to 255 characters. |
Lookup | Used for Number or Short Text fields; shows a wizard that allows you to create a personalized list of items. | |
Long Text | Large amounts of alphanumeric data (formerly known as Memo). | Up to about 1 gigabyte (GB), but form controls can show only the first 64,000 characters. |
OLE Object | Pictures, graphs, or other ActiveX objects from another Windows-based application. | Up to about 2 GB. |
Hyperlink | A link address to a document or file on the Internet, on an intranet, on a local area network (LAN), or on your local computer. | Up to 8,192 characters long (each part of a Hyperlink data type can contain up to 2048 characters). |
Attachment | Files attached as pictures, documents, spreadsheets, or charts. This is not available in MDB file formats. | Up to about 2 GB. |
Calculated | Formula used to show relations among record fields. This is not available in MDB file formats. | Short Text data: up to 243 characters long.Long Text, Number, Yes/No, and Date/Time should match their respective data types. |
Numeric field: Use the smallest possible number, remembering that they are considered 8-bit bytes (an 8-bit byte number can have a value up to 28 – 1 = 255). Any Numeric field can be an integer (Byte, Integer, and Long Integer) or real number (Single, Double, Replication ID, Decimal). Table 1-2 shows each possible Numeric field along with its scope.
Numeric Data Types Allowed on a Microsoft Access Table Field (Using 8-Bit Bytes)
Numeric Type | Numeric Type | Bytes | Scope |
|---|---|---|---|
Integer | Byte | 1 | 0 to 255 (28 – 1). |
Integer | 2 | -32,768 to 32,767 | |
Long Integer | 4 | -2,147,483,648 to +2,147,483,647 | |
AutoNumber | 4 | -2,147,483,648 to +2,147,483,647 | |
Large Number | 8 | -9.223,372,036,854,775,808 to +9.223,372,036,854,775,807 | |
Real numeric floating-point values | Currency (scaled Integer) | 8 | -922,337,203,685,477.5808 to +922,337,203,685,477.5807 |
Single | 4 | -3.402823E38 to -1.401298E-45 +1.401298E-45 to +3.402823E38 | |
Double | 4 | -1.79769313486231E308 to -94065645841247E-324 +4.94065645841247E-324 to +1.79769313486232E308 | |
Decimal | 12 | +/-79,228,162,514,264,337,593,543,950,335 with no decimal point.+/-7.9228162514264337593543950335 with 28 places to the right of the decimalSmallest nonzero number is+/-0.0000000000000000000000000001 | |
Replication ID | 16 | Store a globally unique identifier required for replication (not supported by *.accdb files) |
Yes/No: Use this to store binary values that may have up to three different states: Null (not set), -1 = Yes or True, and 0 = No or False.
Text fields: Use the smaller possible size needed for the field. (For example, for a person’s name, the size recommended is about 80 characters).
Some values such as SSID, phone number, IP address, etc., appear to be a number field, but they are not: they are numeric text and must be stored in a text field. The rule is, whenever a numeric value does not have any arithmetic operation on it, it must be considered as a text.
Memo fields: Now called Long Text, this is a special field that allows you to insert a large amount of text. Use it for field types that do not have a size limit, like an Observation or History field.
Date fields: Use this to store dates and times. The Date field is a real number, where its integer part stores the date and the decimal part stores the time (if any).
OLE Object: Use this to store pictures of any kind.
Attachment: Use this to store documents (Microsoft Word, Excel, or PowerPoint; Adobe Acrobat PDF files; etc.).
Field Properties
Besides defining the field type, each field can have many different properties that you can set. These properties relate to the field data type and will be mentioned throughout this book whenever be necessary.
Name: The field name, which identifies the value stored on it
Field | Size: The field data type
Required: The force field value insertion before saving the record
Indexed: Indicates if the field has an index
Field Indexes
The Indexed property is one of the most important properties because it is the one responsible for creating the table’s primary key and for accelerating the file access to the table records by creating an index for the field values.
No: Removes any index on the field
Yes (No duplicates): Creates a unique index on the field, creating the table primary key
Yes (Duplicates OK): Creates a nonunique index on the field, meaning that the field value can be duplicate among table records
Whenever you set the Indexed property to Yes (No duplicates) or Yes (Duplicates OK), Microsoft Access will internally create a hidden file where each field value is stored. And it will use such a hidden file to impose the table’s primary key.
If it is the table’s primary key (Microsoft Access automatically defines this for you)
If it is the table foreign key—set to Yes (Duplicates OK) on the foreign key field to allow a one-to-many relationship type
For any field that you want to use as criteria for a search (or a query, as you will see later)
By creating an index on a field, the access to the table values will become faster—and your database application will be more efficient.
Multiple Fields Index

In the Indexes window you will see all indexes a table has and can also create a multiple fields index
Although you can create different multiple fields indexes for any table, Access allows you to use them in VBA code only, which is behind the scope of this book.
- 1.
On the Indexes Name column of the Indexes window, enter the name of the multiple field index.
- 2.
On the Field Name column, select the desired table field.
- 3.
On the Sort Order column, select the desired sort order for this field.
- 4.
Select the empty row below the one that has the index name filled in, leave the Index Name cell empty, and select another field and sort order.
- 5.
Repeat step 4 for every other field that you want to use on the multiple fields index.
It is advised that a multiple field index must be named using the names of the fields that are used to compose it, concatenated with no spaces.
Queries
A query is Structured Query Language (SQL) code that is defined in a graphical way and stored as an object in your database.
By creating a query, you will be able to select which table files you want to see, relate different tables, and recover special database information that is needed to build your database application interface.
Queries are important because they allow you to select specific record fields from different tables and present them in various ways. Using queries is a great way to learn about SQL, because you can design a query using a graphical interface and then view the SQL code created by Microsoft Access to execute the query.
Query Types, Icons, and Usage
Icon | Query Type | Usage |
|---|---|---|
| Select | The most basic query, allowing you to access information stored in the database. This allows you to read data from and write data to tables. |
| Make table | A select query that can be used to create another table based on the query results. |
| Append | A select query that can be used to select records and append them on another table. |
| Update | A select query that can be used to select records and change field values to a new value on a single operation. |
| Crosstab | A totals query that can summarize data by grouping it and presenting a totals columns based on a certain field. |
| Delete | A select query that can be used to select records and delete them from the desired table on a single operation. |
| Union | A SQL instruction that unites two or more queries on a single query result. This can’t be represented in a graphical interface; it must be created manually, requiring some SQL knowledge. |
| Passthrough | A SQL instruction used to access tables from enterprise databases using other types of SQL (such as Transact-SQL from SQL Server). |
| Data Definition | A query that uses the Data Definition Language (DDL), which allows you to change table and field properties. |
Right-click the All Access Objects area in the Database window and select View ➤ Icon to change the size of Access object icons.
Parameter query: This is the same as a select query, but it allows you to define a parameter that will be prompt the user for field values, so it can dynamically define the query criteria. It can read and write values to tables.
Totals query: This is a select query that can group and summarize data using different mathematical functions (such as sum, average, variance, standard deviation, etc.). It returns read-only values.
You will learn more about Microsoft Access queries in Chapter 3.
Forms and Reports
A form or report is a window where you can gather and present information from a database table or query using controls. A report can show information from one or more tables or from a query. By using subforms or subreports (a form or report inserted as a control inside another form or report), you can present one-to-many relationship information to the user.
Reports are a core part of building database applications, constituting the main object used to create your application interface.
Forms and reports have different structures and properties that control their behavior, and both depend on the control types you can insert on them to present information to the user. And of course, each control type has its own set of properties. We will talk more about them later in this book.
Macros
A macro is an automatic way to execute predefined steps that you select in a window. In other words, you can create macros to perform certain actions that automate your database solution.
Macros have a set of instructions that can mimic a formal programming language (like Visual Basic for Applications), but they don’t require the user to type code and verify it. You just select the macro instructions from a list, putting them in a sequence to be executed one by one. This allows you to automate your database solutions and create applications with the least effort possible.
Modules
A module is a place where you can use VBA to program your database, which is beyond the scope of this book. Using modules, you can extend Microsoft Access and give your applications a professional touch.
Naming Conventions
Although Microsoft Access allows you to use names with spaces to identify its objects and field tables, I do not recommend doing that. Instead, I propose you follow a simple rule that states that if any object of a field needs more than one word to correctly identify it, these words must have no spaces but begin with a capital letter. For example, if a table needs to be called Persons Meals (with a space between words), it will be named as PersonsMeals (no spaces, with each word beginning with uppercase).
If you name an object of a field with more than one word and spaces between the words, whenever you need to refer to these objects in a query, form report, or macro, you will need to enclose the name in brackets. For example, to refer to the Persons Meals table name, you will need to use [Persons Meals], or Microsoft Access will not be able to find it.
Since a Microsoft Access database can have different types of objects (or files stored in it), this book will use some conventions to easily distinguish them, based on international code conventions. The convention is to name each database object with a three-letter lowercase prefix that better identifies it, especially when you use macros and modules to automate your solution.
Rules for Database Objects Naming Convention
Object Type | Name Prefix |
|---|---|
Table | tbl |
Query | qry |
Form | frm |
Report | rpt |
Macro | mcr |
Module | bas |
obj: This is the three-letter prefix that identifies the object type.
ObjectName: This is the name you want to give to the object.
This means that a table used to store person information should be named as tblPersons (the plural of each person record). But to keep things simple—and break the rules—this book will not prefix table names. Instead, any table will be named with the plural of the records it represents. For example, if a table records individual person data, it will be called Persons. If it stores food items, it will called Foods, and the tables cited in Figure 1-4 to store Persons Meals and Persons Meals Foods will be called PersonsMeals and PersonsMealsFoods, respectively.
The international name rules also apply to table field types, which will not be used throughout this book.
Queries will be prefixed with the qry prefix. For example, if a query returns records from the PersonsMeals table, it will be named qryPersonsMeals, which will clearly differentiate it from another.
Microsoft Access does not allow tables and queries to have duplicate names.
We’ll do the same with forms and reports. A Persons by Phone Number form will be named frmPersonsByPhoneNumber, while the related report will be named rptPersonsByPhoneNumber.
A macro that is used to open a given form object, like frmPersonMeals, will be named mcrOpenfrmPersonsMeals.
Now you need to understand how Microsoft Access works so you can access all of these objects!
The Microsoft Access Interface
The best way to learn how Microsoft Access works is by observing an existing database structure. Since you are probably a novice with using this software interface, your best bet is to use one of its many templates to create a new database.

The Microsoft Access 2019 New from Template window, from where you can select different types of templates to explore the many ways of using a database
I have no intention of commenting on the quality of the Microsoft Access templates. We’ll use the “Asset tracking” template so you can better follow the explanations of this book.
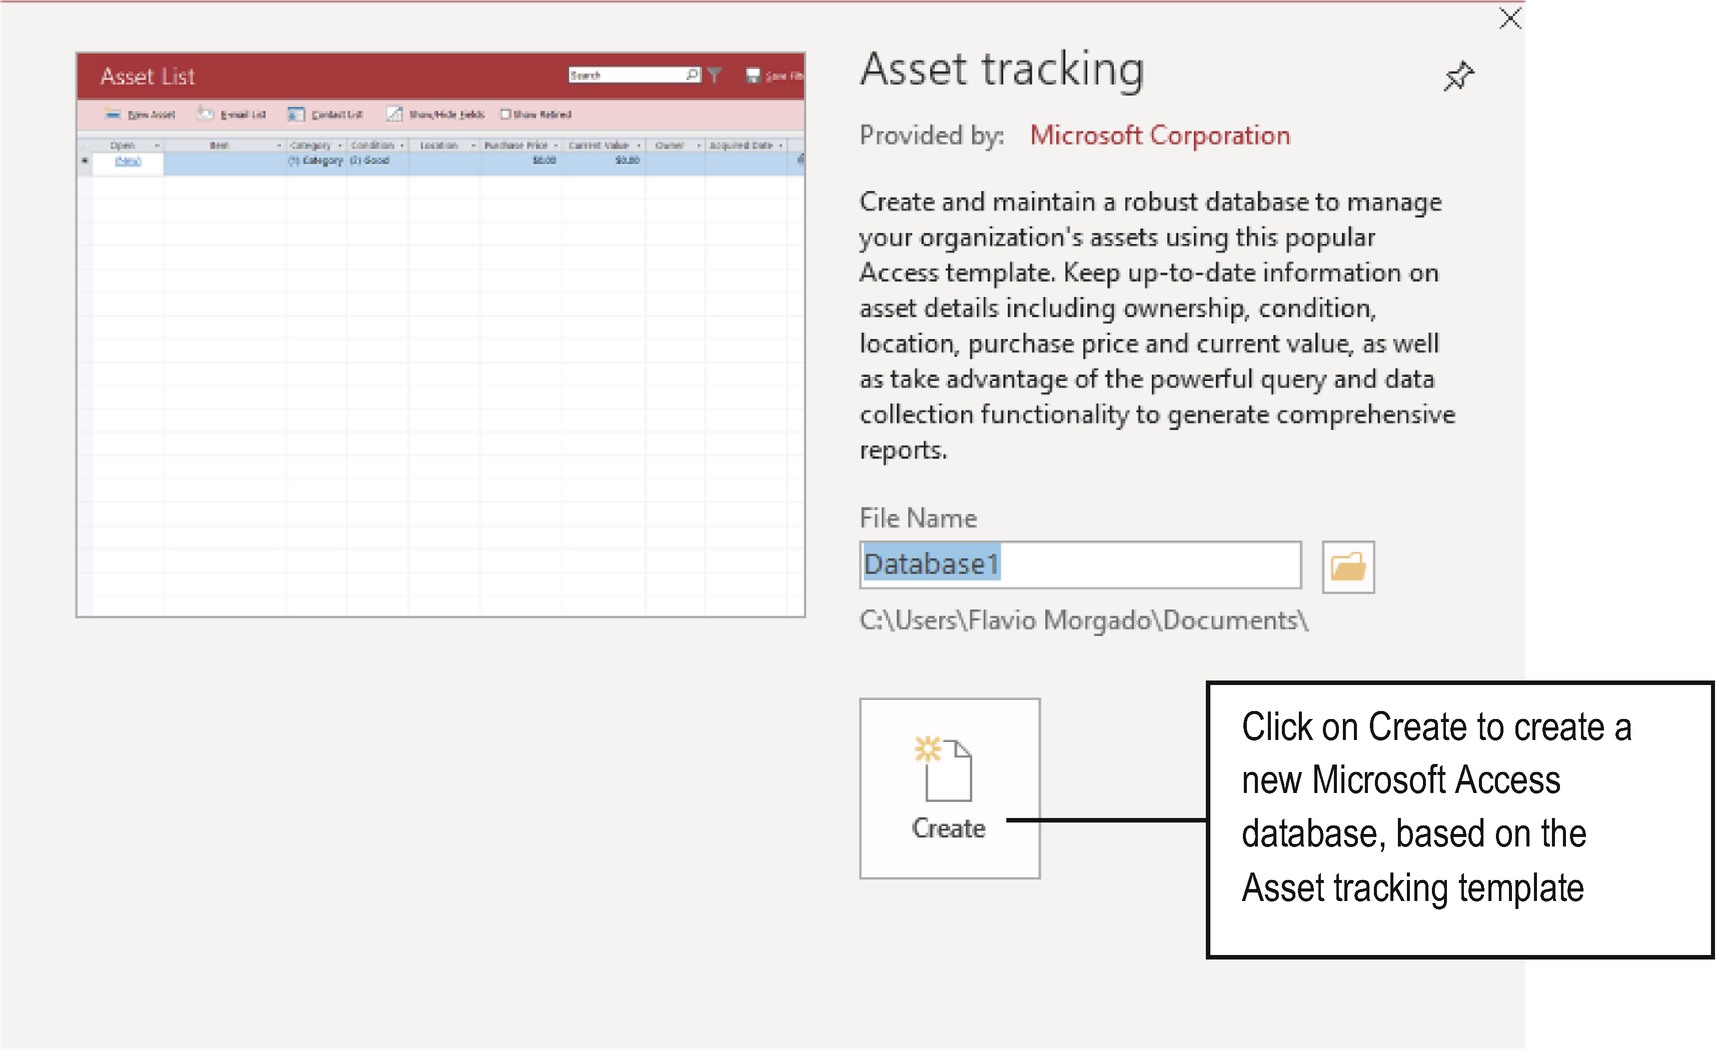
Presentation window for the “Asset tracking” Microsoft Access database template
When you click the Create button in any Microsoft Access presentation’s Template window, Microsoft Access will show you a small window with a running progress bar while it creates a new database in your Documents folder.
Some Microsoft Access templates ask you for the folder and filename that should be used to create the new database. This is not the case with the “Asset tracking” template, which will automatically create the databasen.accdb file in your Documents folder (where n refers to the next number in the series of database files whose name is prefixed by database). If you want to give the database a better filename (like the Asset Tracking.accdb file, you will need close Microsoft Access (or close the database) and edit the filename.
Most of the databases created by Microsoft Word templates show a default Form object waiting to receive its first record, along with a Welcome window offering assistance (the “Need help?” or “Like this or Want more?” links) and possibly a link to an Internet-stored video explaining how to use the template.
It is strongly suggested that you watch the “Asset tracking” template presentation so you become acquainted with some important Microsoft Access concepts, such as adding and deleting records and laying out a form to deal with database records.

This is the “Asset tracking” database’s Welcome window, from where you get help, watch a small video about how this database works, or click the Get Started button to gain access to the Microsoft Access interface and the opened database objects
When you open the database, a macro called AutoExec launches the Asset List Form object in the Welcome screen. You can find this macro in the Database window’s Macro area.
Any macro named AutoExec will automatically run when the database is opened. To avoid such behavior, hold down the Shift key when opening the database.
The Welcome window is also a Microsoft Access Form object, with specific controls that add help (like the links and the presentation) and a Command Button control (Get Started). It also has no border and floats above the Microsoft Access interface. The window is locked in place until it is closed—which is called a modal form. You will learn more about form types in later chapters.
The Database Window

This is the Microsoft Access database interface for the database1.accdb file created by the “Asset tracking” template and stored in the Documents folder (see the Microsoft Access title bar). It shows by default the Asset List Form object
The navigation buttons are the small buttons located on the bottom left of a table, query, form, or report that allow you to select the first, previous, next, or last record (or a page in a report). The rightmost button—the one with a yellow asterisk—allows you to select a new record and is enabled whenever the object allows you to insert a new record. The small text box between these buttons will show the record or page number, and you can click it and type a value to go straight to it.
Every Microsoft Access up to version 2003 presents the Database window as a floating window that can be sized, minimized, or maximized inside the program interface. Since Access 2007, it has become a docked window that loses part of its functionality, and you can’t get rid of it. You can just shrink it to the application window’s left border by clicking the right-pointing double arrow located in the Database window’s top-right corner so that it doesn’t occupy too much of the program interface.
Note in Figure 1-9 how the Database window for the “Asset tracking” template shows database objects grouped by type—under Tables, Queries, Forms, and Reports—each one with its own colored icon.
The Database window can be collapsed or expanded by pressing the F11 key.
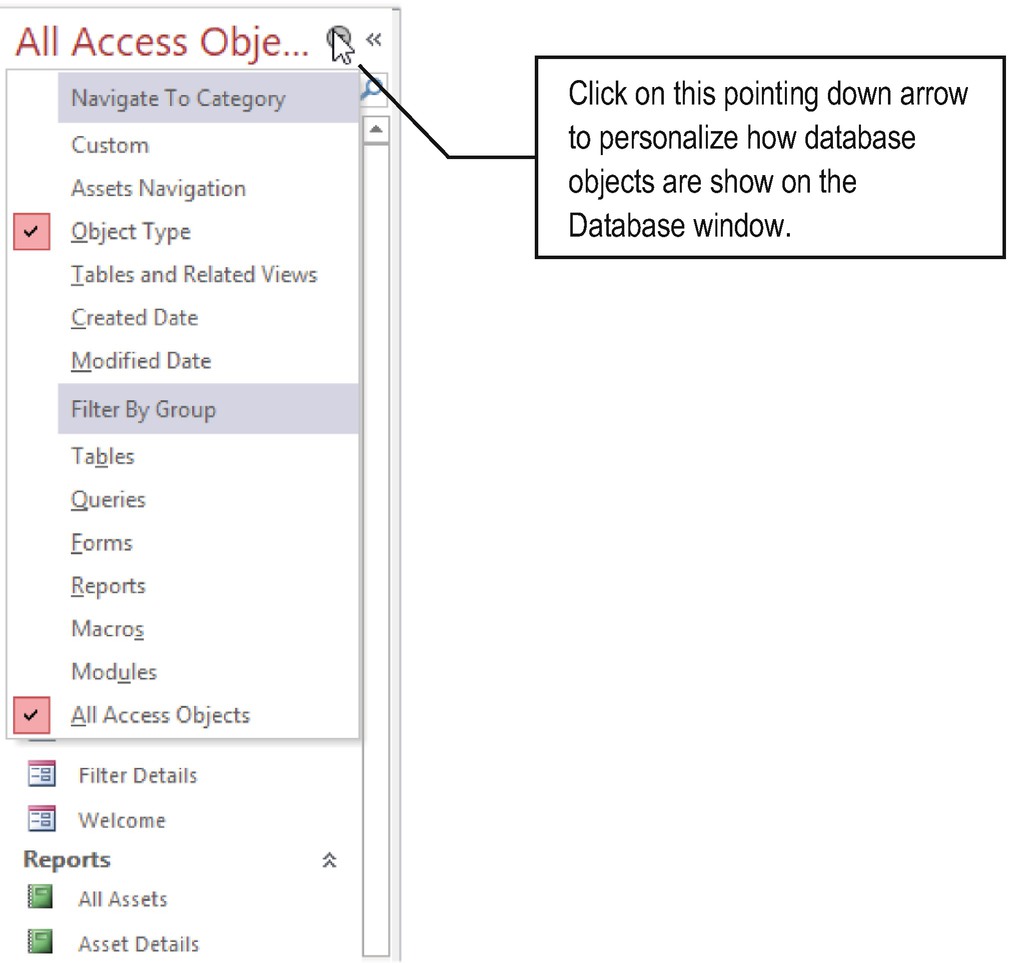
The Database window menu for database objects display configuration
The default view is Object Type with the Filter By Group option selected, which shows each object type inside its own group. As your database grows and new objects are needed to keep it running (especially new queries, forms, and reports), you may need to change the object order to Created Date so you can easily find recently created objects and interact with them.
Microsoft Access specifications allow up to 32,768 objects inside a database. Most objects have no upper limit (although VBA allows just 100 Module objects, which is the interface limit to this object type). Do a Google search for Access specifications for more information about the limits.
The Relationship Window
Also shown in Figure 1-9, the “Asset tracking” database template creates a database that has four table objects: Asset, Contact, Filter, and Settings.
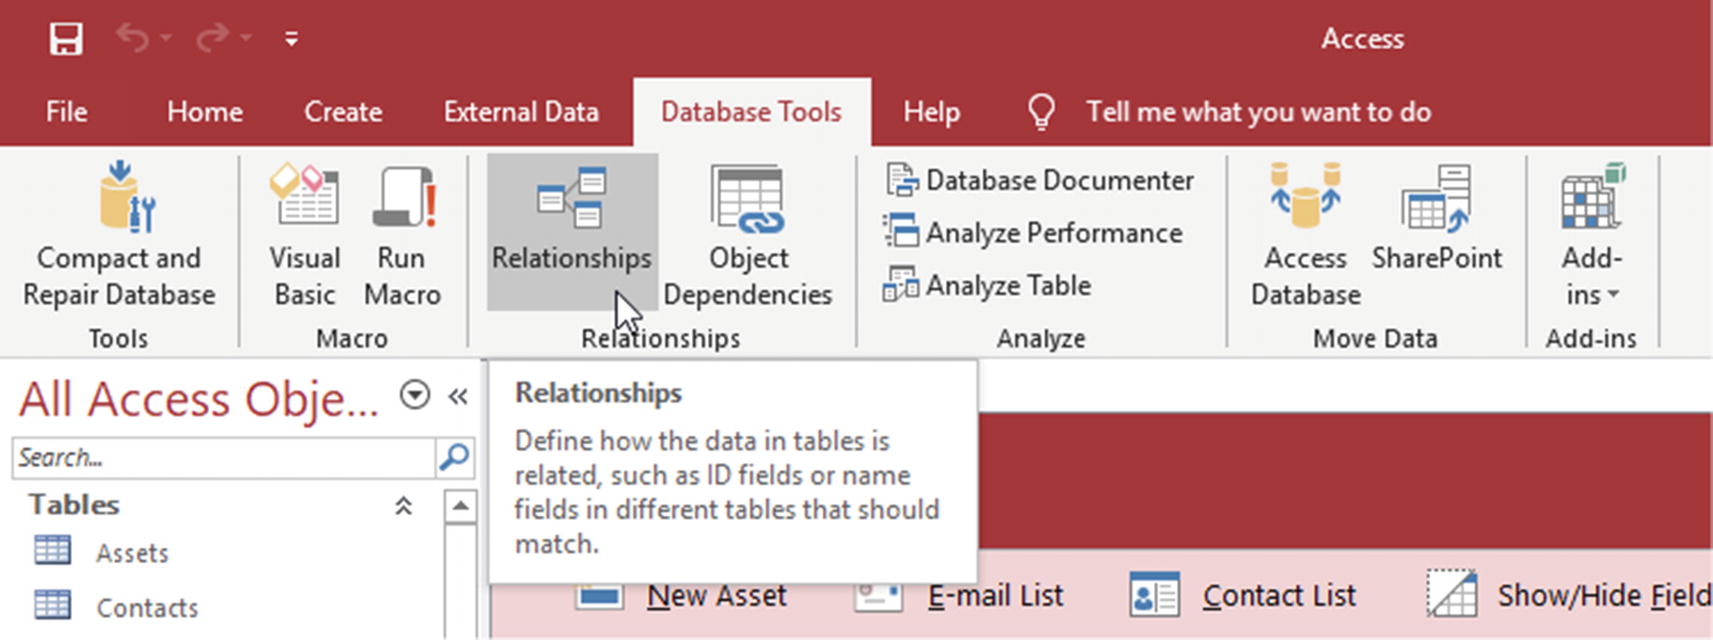
Click the Relationships button to open the Relationships window
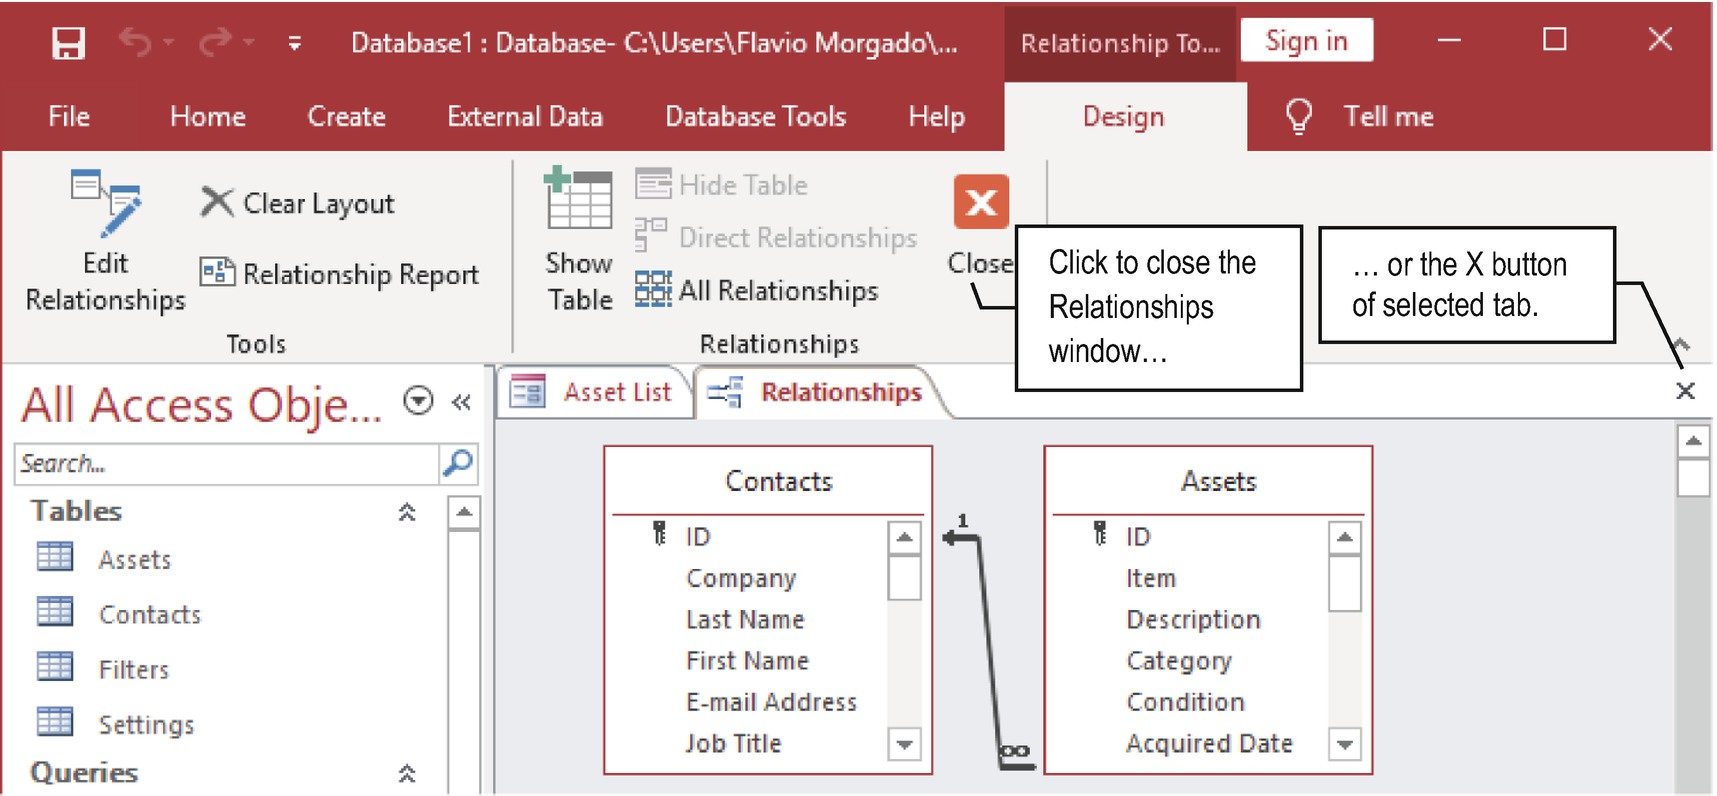
Microsoft Access Relationships window for the “Asset tracking” template database, showing a relation between the Contacts and Assets tables
Note in Figure 1-12 that both the Contacts and Asset tables have an ID field with a small key located on the right—meaning that this field is the corresponding table’s primary key field—so its values are never repeated among the records.
Also note that there is a one-to-many relationship between the Contacts table (1) and the Assets table (∞). The related Assets table field is not shown by default; you must scroll down in the Assets table to show the related field name.
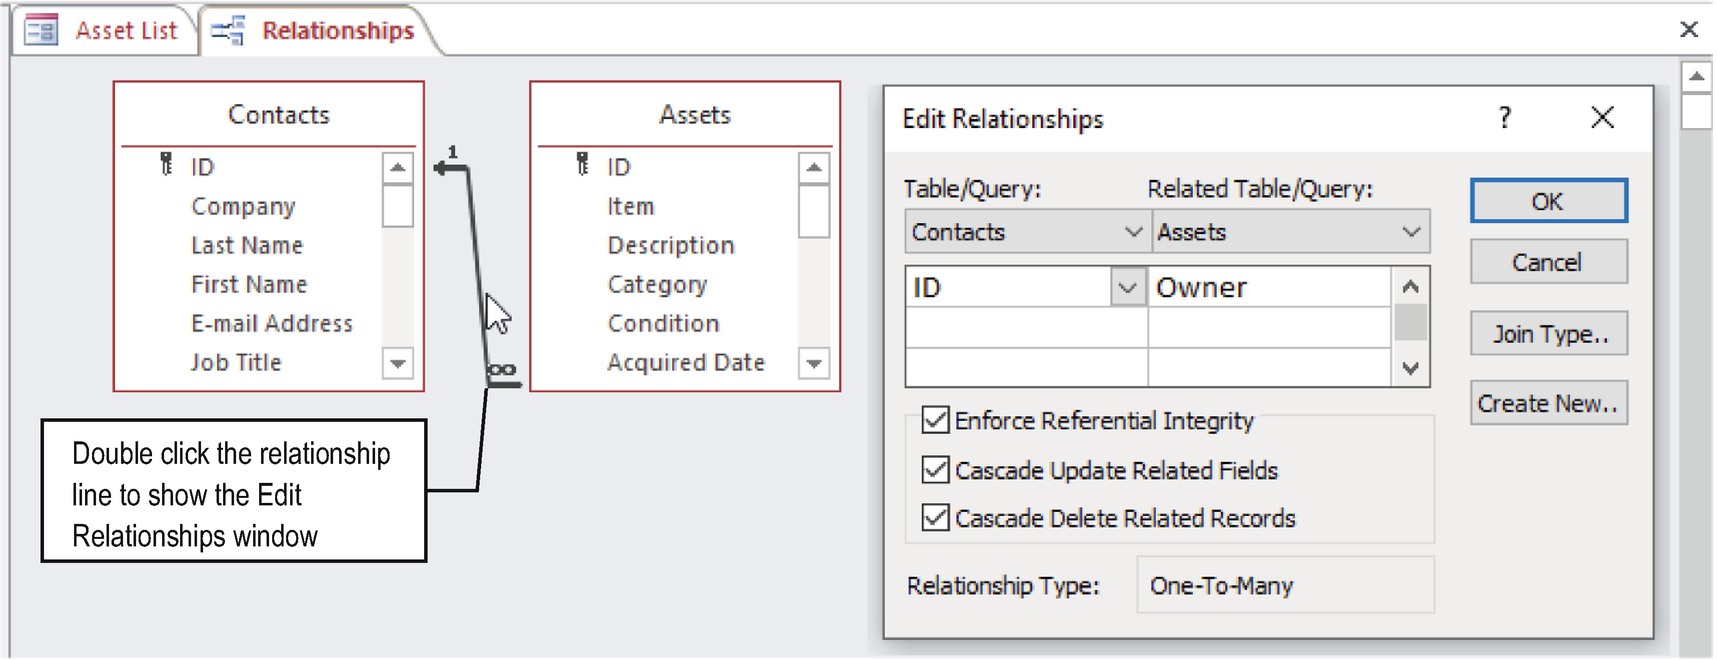
Double-click the relationship line that joins two tables in the Relationships window to show the Edit Relationships dialog and verify the relationship type imposed
As you can see, the Edit Relationships window indicates that the Contacts ID field (the table’s primary key) is related to the Assets Owner field (the table’s foreign key) and that it has enforced referential integrity between these two tables, using the Cascade Update Related Fields and Cascade Delete Related Records settings. This means that whenever the Contacts Record ID field changes, all the related records on the Assets table’s Owner field will be automatically updated to reflect these changes. Also, if any contact record is deleted, every related record on the Assets table will be automatically deleted. In other words, there will never be an Assets record without a contact owner.
You are now becoming acquainted with database syntax!
Opening, Closing, and Displaying Database Objects
Look again to Figures 1-9, 1-12, and 1-13 and note that each opened window (Asset List and Relationships) has its own, docked tab in the Microsoft Access interface, and on the right of the tab list, there is a small close button (with an X) that allows you to close the selected tab.
Double-click any table (Assets, Contacts, Filters, or Settings) and they will appear on tabs in the order they were opened.
This type of interface is the default Microsoft Access way to show its opened objects, but it is also a property of this database called Show Tabbed Documents that is available in the Microsoft Access 2007 version.
You can change this interface to give your database applications a more Windows-like interface, where any opened window appears floating, one on top of another, as expected by many users around the word.

To give a default Windows appearance to your applications, you can change any database appearance to Overlapping Windows, which will make Access dock any open windows on a tabbed interface
Select Overlapping Windows to allow Access shows floating windows instead of docked ones
Although there is no problem with the tabbed design proposed by Microsoft Access as the default interface to its databases, you will learn more about forms—and will produce better interfaces—if you change the default document window options to Overlapping Windows, as will be explained in the next chapters of this book.

Access needs to close and reopen the current database whenever you make a change to its default document window options in the Access Options dialog

This is how the “Asset tracking” database will look whenever you change your default document window options to Overlapping Windows, allowing each object to have its own window, with its own title bar and maximize, restore, and close buttons
Summary
Microsoft Access is a relational database management system full of features that allow you to create data tables using different field types and relate them using referential integrity rules.
Access uses a single database file storage system that can contain different types of objects (tables, indexes, queries, forms, reports, macros, and modules), allowing you to explore the data stored in it in many different ways. You can use queries to relate its tables, forms to create a user interface, reports to create printouts, and use macros and modules to automate the interface.
In the next chapter, you will learn how you can create a database from scratch.