This chapter provides tips and tricks about how to keep your Revit project file running smoothly. Listed here are some pointers to keep you from getting into trouble, along with some solutions in case you do. Topics we'll cover include:
Optimizing performance
Using best practices
Dealing with file corruption
Getting started in Revit
Finding additional resources
It should make sense that a small file on a good network runs the quickest. "Typical" file sizes can vary widely. We've seen file sizes that range from 30 MB to 200 MB. Much of that variation depends on the level of detail you've put into your model, the presence of imported files (like other 3D files or CAD files), and the overall complexity of your model. Your hardware configuration is also a factor. There are a number of things you can do to be proactive about keeping your model performance optimized. Here are a few we recommend:
- Use the 3 GB switch.
Revit now supports Microsoft XP's 3 GB switch. Use of this setting will give your machine more RAM to draw from before it goes to virtual memory. Windows XP allows any given application access to only 2 GB of RAM at a given time; if the application needs more, it gets the rest from virtual memory. Microsoft's switch (which is available in XP Service Pack 2) allows you to change that 2 GB limit to 3 GB. To find out how to do this, visit
www.autodesk.com/support, choose Revit Architecture from the menu, and read the support article on enabling 'The 3 GB switch and Revit'. Of course, you need more than 2 GB of RAM in your workstation for this switch to do you any good.More information on RAM and virtual memory can be found at the Autodesk knowledge website. Visit this site for details:
http.//usa.autodesk.com/adsk/servlet/ps/item?siteID=123112&id=8018971&linkID=9243099.As another option, Revit supports 64-bit operating systems like Windows XP 64-bit and Windows Vista. This allows you to tap into even more RAM and go well beyond 3 GB.
- Don't explode imported CAD files.
A CAD file imported into Revit is a collection of objects that is managed as a single entity. If you explode a CAD file, the single object immediately becomes many — and becomes that much more data that Revit needs to track and coordinate. If you're unfortunate enough to explode a hatch pattern, one object becomes many thousands. If you're importing DWG files, leave them unexploded as much as possible. If you need to hide lines, use the Visibility/Graphic Overrides dialog box to turn layers on and off. Explode only when you need to change the imported geometry, and start with a partial explode. Figure 15.1 shows the tools available in the Options bar when you select an imported or linked DWG file. Also note that lines smaller than 1/32″ are not retained with CAD files that are exploded. This can result in unusable imports.
Another option is to change the DWG file directly in CAD by deleting lines and layers you don't need, then reimporting the file into Revit.
As a final option, if you feel like you need to edit the linework in Revit directly, import your CAD file into a 2D Detail Component family, edit the linework there, and import that Detail Component into your project file. This is a great way to keep the CAD file editable but also keep the number of objects in your project file minimized.
- Delete or unload unused DWGs.
Often, you import a DWG as a reference, but then you don't need it later in the project lifecycle. It's easy to forget, but if you no longer need an import, go ahead and delete it by selecting it in the view, right-clicking it, choosing Select All Instances from the context menu, and deleting it. This will delete the import in all views.
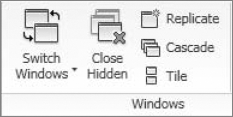
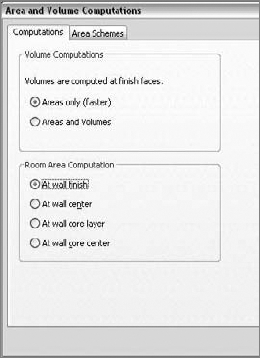
Figure 15.2. Close hidden windows that you're not using
- Close unused views.
Keeping the number of open views to a minimum helps the model's performance. Choose Close Hidden Windows from the View ribbon often (Figure 15.2), because it's easy to have many views open at once, even if you're concentrating on only a few views. Once you reduce your open views to just two or three, you can take advantage of the view switch toggle: press Ctrl+Tab, and you'll cycle through your open views. Press Ctrl+Shift+Tab to reverse the view cycle.
- Turn on volume computation only when necessary.
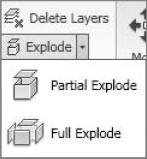
You can turn on room volume calculation by choosing Area and Volume Computations from the Room flyout on the Home ribbon. Check Areas and Volumes under Volume Computations (shown in Figure 15.3) only if you need room tags or a schedule to display volumetric information. Don't forget to switch off this option after you print or view the information. Otherwise, the volumes will recalculate each time you edit something in the model, and this can affect the overall performance of your file dramatically.
The following best practices will not only help you keep your project files running smoothly but will also keep frustration levels with poorly performing files low.
- Workshared files: Make a new local copy once a week.
Sometimes in a workshared environment, your local copy can begin to perform poorly but others on your team don't share the same problems. If this is the case, we recommend that you make a new local file. Local files can become problematic because of any of the things that commonly cause issues with large files in a networked environment. As a general practice, it's a good idea to make a new local copy once a week.
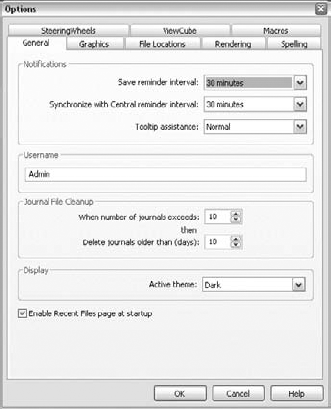
- Use graphics card options to improve drawing performance.
In the Application Menu → Options → Graphics tab make sure you have both Use OpenGL Hardware Acceleration and Use Overlay Planes to Improve Display Performance checked (Figure 15.4). Deselecting the overlay planes check box can cause significant degradation in performance — we recommend you never deselect this option.
- Import or link DWGs in one view only.
Importing in all views can seriously affect performance. Figure 15.5 shows the Link (Instead of Import) check box in the Import or Link dialog box. Linking is better than importing if you don't need to edit the geometry.
- Watch out for imported geometry.
Although Revit has the ability to import files from a number of other sources, you should exercise caution when doing so. If you're importing a 60 MB NURBS-based Rhino file into your model, expect your Revit model to grow in size and react a bit slower than it did before the import. Delete unneeded imports or convert them to Revit content to reduce file size and improve overall performance.
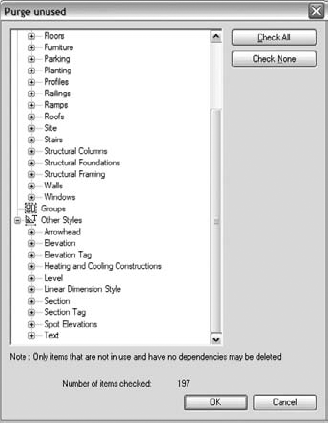
- Purge unused elements.
Revit has a built-in tool that allows you to purge unused families and content. This is a good way to reduce file size, improve performance, and minimize the list of things you need to search through when adding content in the project. Loaded but unused families can make your file grow quickly. To purge, choose Purge Unused from the Manage tab. If your file is very large, it may take a few minutes to run this command before you see the dialog box shown in Figure 15.6. Here, you can opt to keep or purge families individually.
This is typically not a good idea at the beginning of a project, because your template may contain families that you intend to use but haven't yet inserted (such as wall types).
- Manage the amount of information shown in views.
Learn to manage the amount of information needed in your views. Don't show more than you need to show in a view either in depth or in your level of detail. Here are a few easy ways to keep your views opening and printing smoothly:
- Minimize the level of detail.
Set your detail level (in the View Control bar) relative to the scale you're viewing. For example, if you're working on a 1/32″(1:50) plan, you probably don't need Detail Level set to Fine — it will cause your view performance to suffer needlessly.
- Minimize view detail.
This goes along with the level of detail, but this tip is more user based than tool based. If you're printing a 1/32″(1:50) drawing, make sure you're showing the proper level of detail in the view. Even if Detail Level is set to Coarse, do you really need to show balusters in an elevation on your railing at that scale? They will print as a thick, black line. Turning them off in this view will help improve not only your printing speed but also the quality of the resulting printed sheet
- Minimize view detail in component families.
Along these lines, make sure that component families only display what needs to be shown with regard to orientation. Minimizing detail is a practice that will result in good performance through many aspects of Revit. When creating families, use the view levels to control the amount of detail you can see in a family.
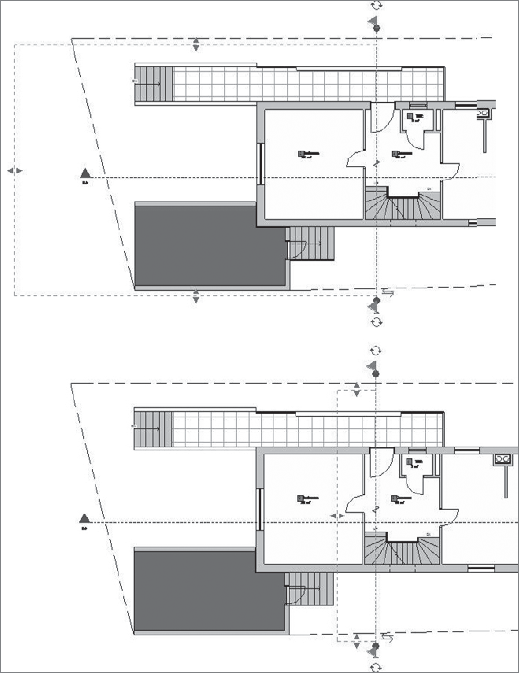
- Minimize view depth.
View depth is a great tool to enhance performance. It's especially valuable in section views. A typical building section is shown in Figure 15.7. The default behavior causes Revit to regenerate all of the model geometry the full depth of that view every time you open the view. To reduce the amount of geometry that needs to be redrawn, drag the section's far clip plane (the green dashed line when you highlight the section) in close to the cutting plane.
- Turn off shadows.
Shadows can help you make beautiful presentations, give a sense of depth in façades, and show the effect of the sun in a site plan view; however, shadows are performance intensive and can significantly slow a view's time to open, print, or regenerate as you pan and move around in it. Make sure you turn off shadows whenever you don't need them.
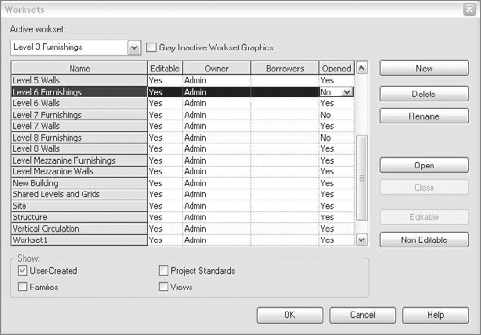
- Open only what you need.
One of the benefits of having worksets is that you don't have to turn them all on at once. When you open the project, go to the Workset dialog box. There, you can highlight a workset and click the Close button (see Figure 15.8). Doing so drops that workset from active memory and gives you better performance. Remember, if worksets are closed, you can't do anything with them. If a workset isn't visible, it won't print. To print a current copy of the whole model, you'll need to turn the worksets back on.
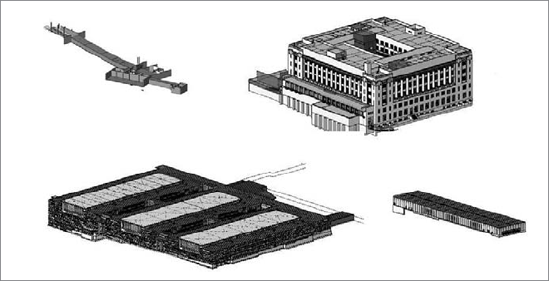
- Break up your model.
For larger projects, or campus-style projects, you can break up your model into smaller submodels that are referenced together. You can also do this on a single building. If you decide to divide your project, make your cuts along lines that make sense from a holistic-building standpoint. Don't think of the cuts as you would in CAD, but think about how the actual assemblies will interact in the building. As an example, don't cut between floors 2 and 3 on a multistory building unless you have a significant change in building form or program. Here's a list of some good places to split a model. See Figure 15.9 for an example:
At a significant change in building form or massing
At a significant change in building program
Between separate buildings on the site
At the building site
- Consider printing paper sheets from DWFs or PDFs.
Printing big Revit files can sometimes take a long time. Enabling raster printing speeds up printing, although there is a trade-off compared to the quality that vector printing offers. Depending on the printer, you may get better line quality by going to a DWF or PDF first, then printing your physical sheets. Experiment on a few sheets to see what your printer responds to best before sending your entire set. Printing a digital set first will also give you a record copy of what you have just printed as well as a quick way to make additional copies later if needed.
- Model just what you need.
Don't fall into the trap of overmodeling. Just because you can doesn't mean you should. Be smart about the level of detail you choose to model based on the complexity and size of your project. Some data is just easier and better to show in a 2D detail rather than as 3D model data. The amount of information you model or do not model should be based on your project size and complexity, your time frame, and your comfort level with the software.
- Ask yourself three simple questions when detailing.
Many people who understand the principles of modeling in Revit struggle with the changes in methodology when actually creating a set of construction documents. When moving from modeling to detailing, you will find that you are creating and modifying families to add details specific to the current state of the design. When doing this, it always begs the question, "How much do I model?" As a rule of thumb, here are three simple questions to help you make the right decision:
Scale: What scale will this detail be seen in? If it's a very small-scale detail, it might be simpler to just draft it in a drafting view.
Repetition: How many times will this detail appear in the drawing set? If it will appear only in one location, it might be easier again to just draft it in 2D rather than try to model the element. If it will appear in several locations, modeling is probably the better solution.
Quality: How good at modeling families in Revit are you? Don't bite off more than you can chew. If you're new to Revit, keep it simple and use 2D components. The more projects you complete in Revit, the better you'll begin to understand the change to a BIM workflow.
- Don't overconstrain.
User-defined relationships and constraints are important to embed in the design to help keep important dimensions constant. However, if you don't need to lock a relationship, don't. Even though the option to lock all alignments is available, it's often not necessary to do so. Overconstraining the model can cause problems later in the project process when you want to move or modify an element and you need to figure out (or remember) what you locked and where to allow the particular element to be moved or modified.
- Assign proper view detail.
It is possible to create families in Revit with a seemingly infinite amount of detail. Use the Visibility tool found in the Family Editor to set the appropriate level of detail for when the element is viewed in plan, elevation, or section. Setting elements to Coarse, Medium, or Fine can also keep your families from looking like blobs in Coarse view and small scales as well as quicken your screen-refresh times.
- Fix an overconstrained object.
If you keep encountering a dialog box telling you the model is overconstrained and this is impeding your workflow, you can delete the constraint. If it is a simple element (such as a wall with no openings or sections), it might be easier to simply delete and redo the troubled object.
- Close Revit with an empty view.
To avoid long opening times for really large files, establish an office standard that you always close your last view as a drafting view or legend that is empty, or maybe contains only some text with the project name. This way, when Revit first opens the project it will need much less processing time. By default, Revit always opens with the view from when the project was last saved. We've seen some nice-looking "project pages" made with a drafting view using text and some simple instructions.
- Upgrade to new versions.
Many CAD workflows required you to use the same version of CAD over the lifecycle of the project. So, a project started in CAD 2000 would stay in CAD 2000. With each new release of Revit, many changes have been put in place to make large files easier to manage, to make saving faster, and to improve overall performance.

If your file becomes corrupted and begins to crash frequently, there are a few things you can do to help fix the problem before you call Revit Support in a panic. To proactively avoid this issue, focus on the previous tips before you begin having problems. Otherwise, here are some suggestions on what to do when you get into trouble:
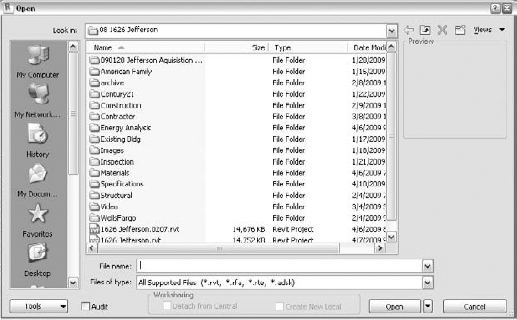
- Audit the file.
Auditing the file will review the data structures and correct problems that are found within the model. An audited file won't look any different when the audit is completed; however, it should (ideally) not crash. This is not a cure-all, by any means, but it can help you get out of a tight spot when necessary.
Get everyone out of any worksets and local files, and have them relinquish their permissions. Open the file using application button → Open. The resulting Open dialog box lets you browse to a project location. Select your project and before clicking the Open button to open the file, select the Audit check box in the lower-right corner (shown in Figure 15.10). Revit gives you a warning before performing an audit on your file. The audit itself can take several minutes to complete. When this process is finished, save the project with a new name or in a new file location; don't save this file over the old Revit file. Saving over an existing Revit file can sometimes lead to instability. When you're finished, have everyone make a new local file, and you can get back to work.
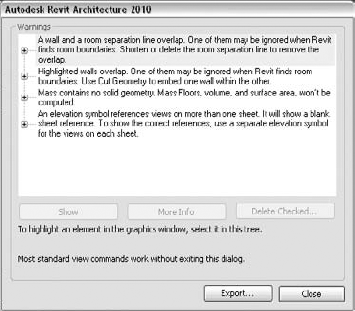
- Review warnings.
Each time you create something that Revit considers a problem, a warning is issued. Warnings will accumulate if left unresolved. Think of all these errors as unresolved calculations. The more there are, the more your computer will have to struggle to resolve them, and eventually you will have performance issues or file instability. Revit provides an interface where you can review all the warnings in the project and fix problems.
Try to read and react to all warnings that Revit sends. You don't have to do it when you're under a tight deadline or when doing so will interrupt your work. But once a week, you should spend 30 minutes reviewing the warnings, as this can improve your model's overall performance. You can find the list of warnings in your file on the Manage tab → Review Warnings (Figure 15.11).
- Purge unused elements.
We referred to this earlier in the "Best Practices" section. Purge can also be used to get rid of poorly built families that might be wreaking havoc in your file.
Knowing how and where to begin your journey can be a challenge, and we want to give you a few pointers to help you get started. Although this list isn't complete by any means, it should help steer you in the right direction:
- Begin with the end in mind.
Planning is always a good way to start a project. Regardless of your project, when working with Revit it's always harder to go back and modify the model to fit a new goal than to build to suit the goal along the way. You can set yourself up for a successful implementation from the beginning by using a bit of forethought about your process, workflow, and desired outcome. If you are using Revit for the first time, set some reasonable limits for how far you plan to take the modeling and detail process. This will help guide the development of families along the way. If you are trying to push into some higher-level BIM challenges like 4D, costing, or energy modeling using Revit model geometry, set those goals at the beginning of the project process as each will require you to focus on aspects of the BIM model you might not have typically considered.
- Get your project and office standards in place early.
As design professionals, we have a tendency to develop unique graphic conventions and styles for our documents. This is a specific area where good planning leads to a good project. If possible, get your standards in place before you begin a project. Revit does an excellent job of getting you started with a good template of graphic standards to work with. However, if you're like most architects, an application right out of the box is never quite nice enough. Revit provides a good starting point for customization, and with some up-front time, you soon can have your project and office standards up and running. Once you nail down your standards, they can be easily applied to your project using Transfer Project Standards.
- Remember that the first project you do in Revit will require a change in methodology.
You're leveraging technology to help you change the way you approach design and documentation. Don't expect the process to have the same workflow as it did in a CAD-based system. Try to stay flexible in your expectations and schedule and allow yourself time to adapt to the change.
- Don't try to conquer the world on the first project.
There are many advantages to using BIM as a design and documentation methodology. As this process becomes more mainstream within the industry, those benefits will only increase. All of these things and more are possible with the use of Revit, but it will take a couple of projects to get there. Tailor the use of BIM to the project, and use the features that will maximize the benefits of using BIM. Choose your goals realistically based on the expertise of your project team, and plan ahead so those goals can be met successfully. Consider a project that is less complex for your initial pilot.
- Model correctly from the beginning.
We can't stress this enough. As you refine your design, it's critical to model correctly right from the beginning, so you don't have to fix things later. What does this mean? As an example, think of a wall. Does it sit on the floor, or does the floor attach to the wall? If you can begin to think about how your project will be assembled, it will save you a lot of time at the end. It's good practice to plan ahead, but remember that Revit will allow you to make major changes at any stage in the process and still maintain coordination. If you are still in the early phase of design and do not know the exact wall type, use generic walls to capture your design intent; changing these later will be simple.
- Get information into the project as soon as it is known.
A key advantage of using Revit is the ability to change your project schedule. In a traditional design process, most of the effort on a project is realized during the construction-document phase. At that time, a typical project has the most staff working on the project, and it can be fairly difficult to implement major changes to the project design. This is due to the complexity of the documents by this time and the amount of effort for the team to redraw all the changed information. You'll find that with Revit, design change is largely managed by the software itself. This gives you a great deal of flexibility in both your design and documentation. Take advantage of this shift in the process, and add information to your model early. It can be in the form of more detailed content or showing the material construction of your wall system. Remember that you can change all this information much more quickly and easily than you ever could in CAD, so don't assume you're locked into the information you displayed early in the design process.
- Plan for good communication among team members early in the process.
Communication within a team is critical for understanding a project and documenting it successfully. One of the downfalls inherent in a CAD-based system is that there is no connection among the different files that make up the drawing set. This phenomenon carries through to the project team and is a function of project workflow and project management. In CAD, it's possible for team members to work in some degree of isolation. They aren't forced to immediately reconcile their changes with changes made by their teammates. Revit's single-file environment forces a much higher degree of team communication between not only the architects but also your structural and mechanical engineers.
- Don't try to model everything.
Most of us have drafted in a 2D environment until now. Moving to a 3D world is a significant change. Do you have to model every single screw? Every mullion? Every stud? That's a good question. The simple answer is no, you don't have to, and in fact you should not attempt to do so. Like any BIM system, Revit isn't 100 percent 3D information. Standard computer workstations aren't capable of handling all the data of a building in model form. Additionally, few projects have the time in their schedule to model the screws in a sheet of gypsum board or the sealant around all the windows; some of that information is best presented in 2D or in the specifications. This still leaves you with a wide range of options for modeling. In the beginning, err on the side of simplicity. It's far easier to add complexity to your model later on as you gain experience and confidence than it is to troubleshoot overconstrained parameters early in the process. Start with the big ideas: walls, openings, roofs, and so forth. Work your way down to a comfortable level of detail for both you and your computer.
- Organize your team.
A BIM project team includes three basic technical roles. These roles are interchangeable, especially on smaller projects with fewer team members. However small the team, it's useful to make sure all these roles are filled:
- Building designer
This is the person or team whose primary responsibility is to figure out what the project will look like and how it will be made. They create walls, floors, and roofs, and locate windows, doors, and other building elements.
- Content/family creator
The family creator's primary role is to create the parametric content in the Revit model. This is typically someone with 3D experience who also has a firm understanding of Revit and Revit families. The families, as you'll see later, have parameters that can control visibility, size, color, proportion, and a number of other things.
- Documenter
This role supplies the bulk of the documentation. It consists of drafting some of the 2D line work over portions of the 3D model to show detail, adding annotations and keynotes, and creating details.
If you get stuck along the way, don't assume you're alone. There are myriad resources in the help file, in books, or on the Web to help you find a specific solution to your problem. Chances are, someone has tried the same thing before. In our digital age, a wealth of information is available online; powerful communities of passionate users are out there willing to help. So before you spend hours trying to work through a particular problem on your own, try tapping some of the existing resources:
- Revit Help menu
Your first stop, if or when you get stuck, should be the Revit Help menu. It's one of the easier and more robust help menus out there, and it can give you a lot of useful information very quickly. It's also the most accessible help source. As with most applications, it's at the far right of the menu bar.
- Subscription Support
If you have bought Revit on subscription, Revit Subscription Support offers an exemplary web-based support system. Their responses are speedy, and their advice is top-notch. If you need information more quickly, Revit also has an online knowledge base of FAQs that is available without a subscription. Both of these resources can be accessed at
www.autodesk.com/revit.- AUGI
Autodesk User Group International (AUGI) is also an excellent source for tips and tricks. It's an online user community free to participate in, ask questions, get answers, and share families and examples. To get the benefit of this fantastic online resource, go to
www.augi.comand look for Revit Architecture as a product. If you've never logged in, you will have to register once; from then on it's easy!- Revit City
Looking for content and families? Revit City, another free online service, has a growing database of free families posted by other users. Its address is
www.revitcity.com.- Autodesk Discussion Groups
These pages offer insightful discussions and some great Q&A threads:
http.//discussion.autodesk.com/.- AECbytes
This website is dedicated to following and reporting on the trends in the AEC industry, with a strong focus on BIM, technology, and the direction of the industry — put together by Lachmi Khemlani:
www.aecbytes.com.- Blogs
There are numerous blogs from passionate, experienced Revit aficionados. Here are some of them in no particular order:
http://revit4you.blogspot.com (Philippe Drouant [French])
http://insidethefactory.typepad.com (Tom Vollaro, Revit Product Designers)
http://revitoped.blogspot.com (Steve Stafford)
http://revitnorge.blogspot.com (Håvard Vasshaug [English and Norwegian])
http://designreform.net (Dave Fano)
http://www.allthingsbim.blogspot.com (James Vandezande)
http://architechure.blogspot.com (Phil Read)
http://irevit.blogspot.com (Craig Barbieri)
http://dorevit.blogspot.com (Robert Manna)
http://do-u-revit.blogspot.com (David Baldacchino)
http://malleristicrevitation.blogspot.com (Aaron Maller)
http://www.bimx.blogspot.com (Laura Handler)
http://www.revitbeginners.blogspot.com (Bradley Hartnagle)
http://revitbeginners.blogspot.com (David Duarte)
http://www.revitcoaster.blogspot.com (Troy Gates)
http://revitit.blogspot.com (Daniel Hurtubise)
http://revitrocks.blogspot.com (Daryl Gregoire)
http://www.revitfamilies.blogspot.com (Shaun Van Rooyen)
http://www.revit-alize.blogspot.com (Bruce Gow)
http://www.revitrants.blogspot.com (Chris Price)
http://blog.reviteer.com (Tom Dorner)
http://www.revitlution.blogspot.com (Christopher Zoog)
http://www.revit-up.blogspot.com (The PPI Group's Revit evangelist)
http://www.greenrevit.blogspot.com (Beau Turner and Bradley Hartnagle)
http://www.revitup.co.za (Justin Taylor)
http://gmcdowelljr.wordpress.com (Greg McDowell, Jr.)
http://www.autodesk-revit.blogspot.com (David Light)
http://www.auservice-bim.blogspot.com (Simone Cappochin [Italian])
http://www.cmotion.net/products/revit-tools.html (Siggi Pfundt and Gotthard Lanz [German and Italian])