
![]()
Using SQLite with Core Data (iOS and OS X)
Although SQLite is integrated tightly with PHP, Android, and iOS/OS X, the integration strategies differ somewhat. In a way, they form a logical progression. PHP supports SQLite as an extension to the language (no longer optional as of this writing). When you write your PHP code for SQLite, today’s best practice is to use the PHP data object (PDO) class. However, the rest of your code may very well be traditional procedural code: there is no assumption that you will be writing object-oriented code throughout.
Android represents a slightly different approach to the idea of creating a general-purpose class (android.database). In the case of Android, a specific subclass database provides SQLite support (android.database.sqlite) along with the generalized data management support in android.database.
It’s reasonable to think of SQLite in Android as a more object-oriented implementation than that of PHP. (This is a generalization and is not meant to ignore—or fan—arguments.) Despite these differences in approach, the SQLite code that you’ve seen in this book and other places is visible both in PHP and in Android in many cases. You’ll find familiar SQLite commands in the source code for PHP and Android apps—commands such as SELECT, DELETE, INSERT INTO, DELETE FROM, and so forth.
Over in the world of iOS and OS X, the object-oriented approach goes deeper. Under normal circumstances, you as a developer don’t even see SQLite code. As is the case with PDO and android.database, there are common classes that are customized for various databases, but the SQLite code is placed inside these common classes and is rarely visible to you. This means that you’re not writing statements or commands such as SELECT, DELETE, and so forth. Instead, you’re writing code that interacts with the common classes and their subclasses for your app.
Furthermore, there is one really critical distinction between the implementation in PDO and android.database when compared to iOS and OS X. That difference has to do with relationships which are conceptually exactly the same as they are in any other SQL environment, but they are implemented in a very different way which you’ll see in this chapter.
Finally, there’s a key point that is critical to Core Data but doesn’t apply in the same way to the other environments. PDO and android.database wrap specific databases and provide access to them. Core Data works with a variety of databases, but its database accesses go through Core Data itself: the underlying database is not exposed. Some people think of Core Data itself as a database, but it is not. Technically, it is an object graph and persistence framework. It uses a database (or, in the case of SQLite, a database library), but it is not a database itself. Its job is to hide the database so you can work with the objects that Core Data manages based on data in the database it uses.
![]() Note Core Data can work with a variety of databases including SQLite, but in wrapping those databases in its own framework classes, it provides some consistency across different database types. Thus, although in the most common uses of Core Data on iOS and OS X it is SQLite that is the underlying database, you can’t simply slide an existing SQLite database into Core Data. If you have an existing database (SQLite or any other) and want to move it to Core Data, the simplest way is to unload it and reload it into the Core Data model that you create. You can do this using utilities for the unload in many cases; the reloading may require a brief section of code to interact with Core Data. Having the facilities to unload and reload databases of any type is a best practice in all cases. It can come in handy not only for moving from one database manager to another but also for debugging, auditing, and other needs.
Note Core Data can work with a variety of databases including SQLite, but in wrapping those databases in its own framework classes, it provides some consistency across different database types. Thus, although in the most common uses of Core Data on iOS and OS X it is SQLite that is the underlying database, you can’t simply slide an existing SQLite database into Core Data. If you have an existing database (SQLite or any other) and want to move it to Core Data, the simplest way is to unload it and reload it into the Core Data model that you create. You can do this using utilities for the unload in many cases; the reloading may require a brief section of code to interact with Core Data. Having the facilities to unload and reload databases of any type is a best practice in all cases. It can come in handy not only for moving from one database manager to another but also for debugging, auditing, and other needs.
This chapter focuses on the common framework that uses SQLite for OS X and iOS and shows you how to work with it.
Introducing the Core Data Framework
The common code that is (very) roughly analogous to PDO and android.database is the Core Data framework. It consists of a number of classes—this chapter describes the key classes along with the graphical editor for a data model.
WHERE CORE DATA CAME FROM
Core data is a framework—a collection of classes that work together and can be installed together in your app. It is used with Cocoa (the user interface (UI) framework for OS X) and Cocoa Touch (the UI framework for iPad, iPod touch, and iPhone). It’s also used with tvOS and watchOS. It provides a fully object-oriented interface to standard databases. It was originally written at NeXT in 1994 as Enterprise Objects Framework (EOF), and it supported Oracle, Sybase, Informix, and ODBC-compliant servers along with OpenBase Lite. Today, it supports the built-in SQLite library on all the platforms as well as XML on Mac.
Core Data descends from EOF, but it is very different in many ways. Among the major similarities that remain are the graphical user interface for describing relational data. Today, it is part of Xcode as Data Model Inspector and Xcode Core Data model editor.
- Both are totally object-oriented with the stored objects and their properties being represented graphically in the Xcode Core Data model editor although you can write code to manage them if you want. If you do write code, it is standard Objective-C or Swift code rather than SQL or SQLite.
- In addition to the stored objects and properties themselves, the graphical user interface used to design the data, its objects, and their relationships descends directly from EOF tools. You can write code to manage the data and its objects, but that code is Swift or Objective-C and not SQL or SQLite.
Perhaps the most important aspects of both EOF and Core Data are very much related.
There are three aspects of Core Data that matter to you as a developer.
- The graphical user interface for building and maintaining a data model including relationships. This is the Xcode Core Data model editor. It runs inside Xcode.
- The runtime objects that make Core Data work for you. They are collectively referred to as the Core Data stack.
- Other objects that you frequently use with Core Data.
This chapter addresses the first one. Chapter 9 discusses the second and third.
Using the Core Data Model Editor
Start with an Xcode project either from a built-in Xcode template or from your own project. Many of the built-in templates have an option to use Core Data when you set up the project. If you have chosen this option, you have a data model already in your project. Otherwise, you need to add a data model to your project. Use File->New->File to open the sheet shown in Figure 8-1 and select Data Model from the Core Data section for iOS, watchOS, tvOS, or OS X as appropriate.

Figure 8-1. Add a new data model to your project
![]() Note Data Model editor is built into Xcode, the integrated development environment for Apple projects. This chapter assumes you know the basics of Xcode. If you don’t, visit developer.apple.com to find the documentation and download Xcode. It’s also available for free in the Mac App Store.
Note Data Model editor is built into Xcode, the integrated development environment for Apple projects. This chapter assumes you know the basics of Xcode. If you don’t, visit developer.apple.com to find the documentation and download Xcode. It’s also available for free in the Mac App Store.
You start from an empty data model as shown in Figure 8-2.

Figure 8-2. Start from a new data model
The center of the Core Data model editor lets you create your data model. There are two styles you can use for the editor: a table style and a graph style (you’ll see both later in this section). When you are working on a data model, there’s a Data Model inspector available at the right of the editing window. It will contain relevant data for anything that you have selected in the Core Data model editor. (In the case of Figure 8-2, nothing is selected that has additional information.)
At the left of the Data Model editor, you have three sets of objects you can manage.
- Entities are SQLite tables behind the scenes.
- Fetch requests are prepared queries similar to those you can create in SQLite. They can contain variables that are substituted at query time.
- Configurations are used internally. For basic development, you don’t need to do anything because the default configuration will work.
To add a new object to the Core Data model editor, you can use the + button at the lower left of the window. The small down-pointing triangle next to the + lets you choose to add an entity, fetch request, or configuration. Your choice is sticky—this means that after you’ve chosen to add a fetch request, the + will add other fetch requests until you change the default.
Using Entities
After you add a new entity, it will appear in the center of the editing window with its three sections (see Figure 8-3):
- Attributes are SQLite columns behind the scenes.
- Relationships are the logical relationships you’re used to in SQL. In Core Data, they have a fundamental difference which is explained in “Managing Relationships” later in this chapter.
- Fetched properties allow you to fetch properties from a different persistent store. They are for advanced users and aren’t covered in this introduction to Core Data.

Figure 8-3. Add a new entity
Perhaps the most important aspect of an entity is that, when you fetch it at runtime, it is fetched as an instance of NSManagedObject (or a subclass thereof). As a result of that fetch, the entity becomes a class instance, and its attributes become properties of the instance. You’ll see how to create subclasses in Chapter 9.
![]() Note Actually, when you fetch an object with Core Data, it is initially fetched as a fault. That’s not an error. It represents the absolutely bare minimum of information that Core Data needs to proceed. Basically, it is an instance of NSManagedObject or a subclass thereof but without the persistent properties filled in. This means that you can use it in some ways, but when you actually need the data, the fault is said to fire, and the data is filled in. When the fault has fired and the data has been filled in, the fault is said to be realized. This happens behind the scenes, so you don’t need to be aware of it except that in looking at debugging statements, get used to recognizing that in the context of Core Data, “fault” doesn’t mean an error. Faulting is one of the ways in which Core Data optimizes performance.
Note Actually, when you fetch an object with Core Data, it is initially fetched as a fault. That’s not an error. It represents the absolutely bare minimum of information that Core Data needs to proceed. Basically, it is an instance of NSManagedObject or a subclass thereof but without the persistent properties filled in. This means that you can use it in some ways, but when you actually need the data, the fault is said to fire, and the data is filled in. When the fault has fired and the data has been filled in, the fault is said to be realized. This happens behind the scenes, so you don’t need to be aware of it except that in looking at debugging statements, get used to recognizing that in the context of Core Data, “fault” doesn’t mean an error. Faulting is one of the ways in which Core Data optimizes performance.
When you select an entity in the sidebar, you see its details in the center of the editing window. You can add new attributes using the + below the attributes table. Initially, each attribute will have a placeholder name such as attribute or attribute1. To add details to your entity (or to any other object selected in the Core Data model editor), select it and open the Data Model inspector at the right of the window as shown in Figure 8-4.

Figure 8-4. Use the Data Model inspector
You can rename the entity. You can also provide additional details that are useful in using it with your code. There are more details on this topic in Chapters 9 and 10.
Working with Attributes
You can (and should) rename your attributes using meaningful names. (See sidebar “Naming Core Data Model Objects.”)
NAMING CORE DATA MODEL OBJECTS
By convention, Core Data entity names begin with a capital letter. Furthermore, they are typically singular. Thus, an entity that keeps track of users would typically be called User and an entity that keeps track of scores for users would typically be called Score.
If you have a to-many relationship from User to Score so that one user can have many scores, the relationship is named scores (plural).
These have been conventions for some time in Core Data (and they’re not unlike conventions and best practices in other environments. With Xcode Core Data, this convention has become a requirement: you can’t name an entity user (lowercase), and you can’t name an attribute in that entity to Name (uppercase).
Note that although the Core Data conventions are similar to conventions in other environments, that similarity extends to the existence of standards for capitalization, number (plural/singular), and so forth. The details such as whether or not to capitalize do vary.
Each attribute must have a type. The types that are available in Core Data are as follows:
- Integer16, Integer32, and Integer64
- Decimal
- Double
- Float
- String
- Boolean
- Binary Data
- Transformable
There is an initial Undefined value, but when you try to save the data model, you’ll be required to change it to an appropriate value.
![]() Tip These types apply to Core Data no matter what data management tool you use to manage its persistent stores. If you compare this list to the list of types in SQLite, you can see that because these types don’t provide a one-to-one match to SQLite types, Core Data itself must provide the mapping. In practice, this means that type checking is done in Core Data, and it is stricter than SQLite libraries alone where one of the guiding principles is that “any column can still store any type of data” (www.sqlite.org/datatype3).
Tip These types apply to Core Data no matter what data management tool you use to manage its persistent stores. If you compare this list to the list of types in SQLite, you can see that because these types don’t provide a one-to-one match to SQLite types, Core Data itself must provide the mapping. In practice, this means that type checking is done in Core Data, and it is stricter than SQLite libraries alone where one of the guiding principles is that “any column can still store any type of data” (www.sqlite.org/datatype3).
The Transformable data type is just what its name implies: you can transform one type to another. It’s typically used to store data types such as images and other resources that can be stored as a generic data type and then used by the app directly as the resource type with Core Data providing the transformation in both directions behind the scenes.
Figure 8-5 shows attributes and their types for an entity. Note that when first created, it is called Entity. You can rename it by double-clicking it in the sidebar.

Figure 8-5. Name and set the type for each attribute
Managing Relationships
When you design a relational database, you set up relationships among your data objects. There are many ways of drawing these relationships on paper, on white boards, or in various graphical relational data editors. These relationships are implemented in queries when you write a clause such as
WHERE department.employee_name = corporate.manager_name
In Core Data, relationships are part of the data model. Core Data manages them (it generates the WHERE clauses as needed). This means you don’t have to write the WHERE clauses yourself (in part because you don’t write SQLite syntax yourself so there’s no place to write them). Once you have two entities created in your data model, you can build a relationship between them using the Xcode Core Data model editor. (Yes, you can create self-joins within a single table, but that’s a more advanced topic.)
The easiest way to create a relationship is to switch to the graph style (using the Editor Style controls at the lower right of the editing area). You may have to rearrange the entities so that it’s easy to see the two you care about at the same time. Then, control-drag from one entity to the other as shown in Figure 8-6.

Figure 8-6. Create a relationship
New relationships are given default names: double-click to change the name. You need to specify details of the relationship, so open the Data Model inspector at the right of the window as shown in Figure 8-7. This is another place to change a relationship name rather than double-clicking it in the table or graph editor.

Figure 8-7. Refine your relationships
Relationships are bidirectional, but you configure each side of the relationship in the graph view and then modify it in the Data Model inspector. Figure 8-7 shows the scores relationship highlighted. The most important item in the Data Model inspect is the name. You can change it here or by double-clicking it in the graph view.
You frequently want to change the Type setting, switching between To One and To Many. As you do, you’ll see the arrows at the end of the relationship change from single to double arrows (this is standard relational diagram notation).Type is sometimes referred to as cardinality.
Figure 8-8 shows a new relationship from User to Score that is a to-many relationship (note the double arrows); the inverse is a to-one relationship (note the single arrow on the User side).

Figure 8-8. Specify the cardinality of relationships
In configuring relationships, people often switch back and forth between the graph view and the table view using the control at the bottom right of the window. Figure 8-9 shows the table view.
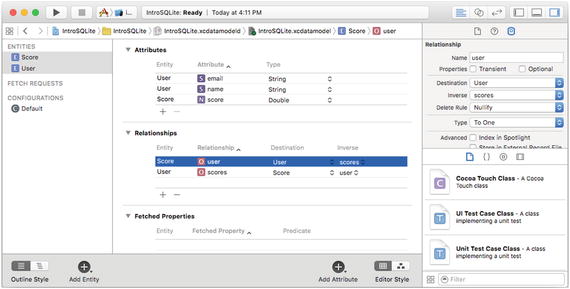
Figure 8-9. Use the table view for relationships
Delete rules let you specify what happens when you try to delete one end of the relationship. In brief, you can specify that deleting the source of a relationship can have any of these outcomes:
- Cascade. Deleting one end of the relationship deletes all related objects.
- Nullify. Deleting one end of the relationship, causes references to it in the remaining object(s) to be set to null.
- Deny. You can’t delete one end of the relationship. You have to work your way up to it by deleting the child objects so that there are no related objects left, but you must write your own code to implement that.
- No Action. You can delete one end of the relationship even if it creates dangling pointers.
Summary
This chapter provides an introduction to Core Data, the framework that implements access to SQLite for OS X, iOS, watchOS, and tvOS. You’ve seen how to build your data model using Xcode Data Model editor, and how to build relationships that are implemented for you when Core Data creates the appropriate WHERE clauses in the SELECT statements it produces and runs.
Compared to PHP and Android, this aspect of SQLite data modeling is much more graphical than text oriented. However, if you like writing traditional code, have no fear. Chapters 9 and 10 show the Objective-C and Swift code to implement your SQLite data model.