
![]()
Using the Simple Database with a PHP Web Site
This book is an introduction to SQLite, but, even though it’s just an introduction, the basics of SQLite (and SQL itself which is a key component) aren’t particularly complex. True, as you start to build more and more complex apps with more and more features (and more and more robust error checking), your code will get lengthier and more complex. What’s attractive to many people about the world of relational databases is that the basic elements are just that—basic. You use and reuse them in various combinations to build more and more powerful apps.
These last two chapters of the Introducing SQLite provide you with two apps that are built on SQLite. In this chapter, you’ll see how you can build a PHP-based app on SQLite, and in Chapter 12 you’ll see how to build a roughly comparable app for iOS.
The app in this chapter has been selected because it demonstrates a number of the features that people want to use as they integrate PHP and SQLite. In particular, you’ll see how to retrieve and enter data through the PHP code and SQLite, and you’ll see how to handle the integration of SQLite database data with PHP such as in building a drop-down menu (the HTML SELECT element) based on data retrieved from the database.
Reviewing the Database
The data in this chapter is the same relational data that’s been used previously in this book, but there are a few tweaks you should be aware of. They are described in this section.
The database consists of three tables that can be used to track values for people. The naming here suggests that they may be used to track scores for users, but that’s only one possibility. If you reuse these tables, feel free to rename the properties as you wish. Also, note that by and large attribute, property, column, and field are used interchangeably to refer to the data stored in a database. Attribute is often used in databases, and property is used to refer to objects in object-oriented programming. Column is used in the context of relational tables, and the use of field dates back to paper forms.
![]() Note The biggest change in this chapter from previous versions is standardization on capitalization: table names are capitalized, and the names of properties and attributes as well as relationships are not. Where a table contains multiple entries (such as users in the User table), the table name is capitalized and singular. These are styles that are enforced in Apple’s Core Data framework, and they are consistent with best practices that many people use. "Many" does not mean all: particularly with regard to whether a table of users is called User or Users, there are two logical approaches to take, and there are many people who argue vehemently for one or the other. Adopting one approach or the other isn’t really a solution for many people because we don’t work on isolated projects. When client A insists on singular names and client B insists on plural names you often take the most practical approach (use the style that each client wants)
Note The biggest change in this chapter from previous versions is standardization on capitalization: table names are capitalized, and the names of properties and attributes as well as relationships are not. Where a table contains multiple entries (such as users in the User table), the table name is capitalized and singular. These are styles that are enforced in Apple’s Core Data framework, and they are consistent with best practices that many people use. "Many" does not mean all: particularly with regard to whether a table of users is called User or Users, there are two logical approaches to take, and there are many people who argue vehemently for one or the other. Adopting one approach or the other isn’t really a solution for many people because we don’t work on isolated projects. When client A insists on singular names and client B insists on plural names you often take the most practical approach (use the style that each client wants)
The first table, User, tracks information for people. As set up in this demo, it consists of names and e-mail addresses. It uses a unique rowid for each row. rowid is generated by SQLite. It is shown in Table 11-1.
Table 11-1. User Table
rowid | Name | |
|---|---|---|
1 | Rex | |
2 | Anni | |
3 | Toby |
The Score table keeps track of values for a user. It references the user in question with the userid attribute. This matches the rowid attribute of the relevant record in User. In that way, you can join the Score and User tables to get both the score and name for an individual (see Table 11-2).
Table 11-2. Score Table
userid | score |
|---|---|
1 | 10 |
2 | 20 |
3 | 30 |
When the Score and User tables are related based on the userid/rowid relationship, a table like the one shown in Table 11-3 can be created. Note that this is created using WHERE clauses in a SELECT statement: the table only exists at runtime.
Table 11-3. Related Users and Scores Tables
Name | Score |
|---|---|
Rex | 10 |
Anni | 20 |
Toby | 30 |
If you want to build your table with a tool such as SQLPro for SQLite, the database will look like Figure 11-1 when the Score table is highlighted so you can see its rows (userid and score). rowid (the SQLite-generated primary key) is not shown by default in this display. Also, note that the tables are presented in alphabetical order.

Figure 11-1. Score table and its rows
In Figure 11-2, you see the User table and its rows.
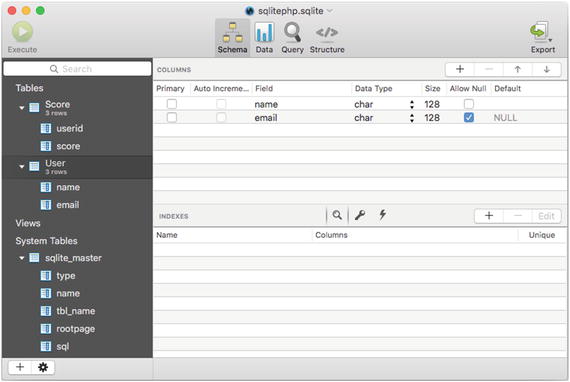
Figure 11-2. The User table and its rows
Previewing the Web Site
This chapter shows how you can build a PHP web site to query and update the database. It’s a simple process, but it covers many of the most commonly used aspects of integrating PHP and SQLite. First, you can see a simple page (with diagnostics which will be explained in this chapter). The heart of it is the drop-down list, which lets you select a user. This is implemented with an HTML SELECT element, and the values for the drop-down list come from the database.
Figure 11-3 shows what the app will look like. It contains diagnostic messages. (You’ll see the code later in this chapter and you can download it as described in the Introduction.)

Figure 11-3. Creating a drop-down list from the database
In Figure 11-4, you see the data in the table at this point. (Those values of 99 are used for debugging. You’ll provide your own data.)

Figure 11-4. Displaying the data
In Figure 11-4 you can see a button to let you add more data. Figure 11-5 shows the result. (Don’t worry, the code is shown later in this chapter: there’s a lot going on behind the scenes to support that confirmation of adding data.)

Figure 11-5. You can add new data
Because the web is designed as a state-less structure, each web page is self-contained. Today, there are many strategies for building continuity into web sites, not the least of which are PHP sessions, cookies, or passing data from one PHP page to another (often with a POST request), but basically each page is still a state-less entity. That means that when you go to a page (i.e., when you run the PHP code that generates the page), the page is generated from data that’s in the PHP file and, possibly, retrieved from a database. In the typical pattern, the user clicks a button or uses another interface element to load a new page from PHP code. In order to do this, key data is passed from the first page to the second, or, as noted, relevant data may be cached in cookies or passed in parameters.
![]() Note The example used here is called phpsql. The various files are numbered 1, 2, and 3. If you are reading on a mobile device, depending on the font you are using, it may not be clear that the file names are a combination of phpsql followed by a number. In some fonts, it may look like phpsq followed by a two-digit number (the letter L sometimes looks like number 1).
Note The example used here is called phpsql. The various files are numbered 1, 2, and 3. If you are reading on a mobile device, depending on the font you are using, it may not be clear that the file names are a combination of phpsql followed by a number. In some fonts, it may look like phpsq followed by a two-digit number (the letter L sometimes looks like number 1).
Thus, there are three PHP files used in this example.
- phpsql1.php builds the page shown in Figure 11-3. It uses a SQLite database call to retrieve the values for the drop-down menu. When you click Submit, key values (in this case, the selected user) are passed on to the next page.
- phpsql2.php builds the page shown in Figure 11-4. It receives the selected user and then queries the database to get the value for the user. As you’ll see, this query joins Table 11-1 (User) and Table 11-2 (Score). The name comes from User and the score comes from Score. This join is handled by matching rowid in User to userid in Score (you’ll see this later in this chapter). If you click the Add a score button, control passes to the next page.
- phpsql3.php adds data for the user selected in Figure 11-3. In order for this to happen, phpql2.php passes the selected userid/rowid to phpsql3.php. Because User and Score have been joined on rowid in User and userid in Score, they have the same value so it doesn’t matter which one is passed to phpsql3.php. Each of the files is described in the following sections. You’ll find the full code first and then a discussion of the key components.
Looking at the Basic PHP/SQLite Structure
You’ll use the same basic structure for all of your PHP/SQLite files. Depending on your preferences, you may use different PHP syntax particularly when it comes to entering HTML that will be passed through (the choice is staying in the world of PHP and using echo or leaving PHP for a section and just using HTML until you need to come back to PHP). Many people use both styles.
Here’s the basic structure. (Obviously you’ll typically add your own code for the HEAD element and other such parts of the file.) Diagnostics are left in this file. It’s easiest to leave them in until you’re certain you’ve got the control flow correct. (Also, remember that the or die syntax is a placeholder for robust error catching with a good user interface.)
<html>
 <head>
 </head>

 <body>
 <?php

  $db = ’sqlite:sqlitephp.sqlite’;
This should be customized to the name of your database. sqlite: is part of the PHP data object (PDO) syntax. It must precede the file name.
$sqlite = new PDO($db) or die ("<h1>Can’t open database</h1>");
echo "<p>Success on PDO</p>";

$query = $sqlite->prepare // insert your query here
This should be customized with the query you want to run. At the end of this chapter, you’ll see another pattern you can use. Instead of prepare and execute, you can simply execute a single query with the PDO query statement.
echo "<p>Success on prepare</p>";
$query->execute() or die ("Can’t execute");
echo "<p>Success on execute</p>";

$result  = $query->fetchAll() or die ("Can’t fetchAll");
echo "Success on fetchAll<br />"; // for debugging
Remember that fetchAll fetches all the data for the query—not all the data from the table.
// Do something with the results. The foreach is just an example.
foreach ($result as $row) {
  echo $row[’rowid’], " , ",  $row[’name’];
}
This section definitely needs to be customized for each use. Here you see a diagnostic that just repeats the data that’s been retrieved. It’s often useful to use code like this at this point.
?>

<h1>Select the user</h1>

<form method="post" action="phpsql2.php">
Customize this with the name of the next PHP file in the chain (the next page for the user).
<?php
  // Here is where you integrate PHP and SQLite – customize as you wish.

  echo ’<input type="submit" value="Submit">’;
  echo ’</form>’;
If you are using a form, make certain you terminate it and add the Submit button. Note that you can start the form in HTML and finish it in PHP as shown here.
 ?>

 </body>
 </html>
Building the Drop-Down Selection List (phpsql1.php)
Here is the full listing of phpsqlite.php. Comments and description are interspersed, but remember to refer to the previous section “Looking at the Basics PHP/SQLite Structure” for general details. This code builds the page shown in Figure 11-3.
<html>
 <head>
 </head>
 <body>
 <?php

  $db = ’sqlite:sqlitephp.sqlite’;
  $sqlite = new PDO($db) or die ("<h1>Can’t open database</h1>");
  echo "<p>Success on PDO</p>";

  $query = $sqlite->prepare ("select name, rowid from User;")
    or die ("<h1>Can’t prepare</h1>");
The query will be:
SELECT name, rowid FROM User;

  echo "<p>Success on prepare</p>";

  $query->execute() or die ("Can’t execute");
  echo "<p>Success on execute</p>";

  $result  = $query->fetchAll() or die ("Can’t fetchAll");
  echo "Success on fetchAll<br />";

?>

<h1>Select the user</h1>

<form method="post" action="phpsql2.php">

<?php
  echo "<select name=’userid’>";
  foreach ($result as $row) {
    echo "<option value = ".$row[’rowid’].">".$row[’name’]."</option>";
  }

   echo ’<input type = "hidden" name = "name" value = ’.$row["name"].’>’;
The hidden field is very important: it’s the link to the next PHP file (phpsql2.php). The value of name will be retrieved from the POST variables at the beginning of that file. userid is passed in from the SELECT element under the name of userid, and username (used in a title on the next page) is passed in here. The SELECT is visible to the user, but this hidden field is not.
echo ’</select> <br >’;
echo ’<input type="submit" value="Submit">’;
echo ’</form>’;
The name of the SELECT element is userid. When the next file unwraps the POST values, it will be the key for the item chosen in the drop-down menu. You may want to customize the Submit button.
?>

</body>
</html>
Showing the Selected Data (phpsql2.php)
This is the code to build the page shown in Figure 11-4.
<html>
<head>
</head>
<body>
<?php
print "POST values<br/>";
foreach ($_POST as $key => $value) {
echo "$key   $value <br />";
}
print "--end POST values<br/>";
$name = $_POST[’name’];
print "name = $name <br/>";
This code is useful for debugging: it prints out all of the POST keys and values. Remove it when you’re happy with the code. Setting the local variable $name is not for debugging. The print statement that follows is, but you need to pick up the username from the hidden field on the previous page to show it in a title on this page. You could pick it out of the POST variables when you need it, but many people prefer to unload the POST variables at the beginning of a file.
$db = ’sqlite:sqlitephp.sqlite’;
$sqlite = new PDO($db) or die ("<h1>Can’t open database</h1>");
echo "<p>Success on PDO</p>";

echo "userid  ".$_POST["userid"];
$useridToFind = $_POST[’userid’];
echo "useridToFind = $useridToFind";

$query = $sqlite->prepare ("select name, score from Score s, User u where s.userid =
  u.rowid and $useridToFind = s.userid ORDER BY Score;") or die
  ("<h1>Can’t prepare</h1>");
echo "<p>Success on prepare</p>";

$query->execute() or die ("Can’t execute");
echo "<p>Success on execute</p>";

$result  = $query->fetchAll() or die ("Can’t fetchAll");
echo "Success on fetchAll<br />"; // for debugging

foreach ($result as $row) {
  echo "<h1>Scores for ".$row[’name’]." </h1>";
      $userName = $row[’name’];
      echo $row[’name’], " - ",  $row[’score’];
}

echo ’<form method="post" action="phpsql3.php">’;
echo "<input type=’hidden’ name=’userid’ value=$useridToFind>";
This is another hidden field — this time passing userid forward to the next PHP file.
  echo ’<input type="submit" value="Add a score">’;
  echo ’</form>’;

?>
</body>
</html>
Adding New Data (phpsql3.php)
Now it’s time to add new data to the file. It’s a matter of combining basic SQLite syntax for INSERT with the same type of code you’ve used in previous PHP pages. You should be getting used to this: using PHP and SQLite is the same pattern over and over again.
Following is the code for phpsql3;php:
<html>
  <head>
  </head>
  <body>

<?php

print "POST values<br/>";
  foreach ($_POST as $key => $value) {
        echo "$key  $value <br />";
  }
  print "--end POST values<br/>";
  $userid = $_POST["userid"];
  print $userid;
This is the same code that provides diagnostics showing all of the POST variables with their keys. Also, note that $userid is set here to be used later in this file. It’s the hidden field passed from the previous file copied to a local variable.
$db = ’sqlite:sqlitephp.sqlite’;
$sqlite = new PDO($db) or die ("<h1>Can’t open database</h1>");
echo "<p>Success on PDO</p>";

$query = $sqlite->prepare ("INSERT INTO Score (’score’, ’userid’) VALUES (99,
  $userid);") or die ("<h1>Can’t prepare</h1>");
echo "<p>Success on prepare</p>";
This is the heart of the code. Note that 99 is used for debugging. Somewhere in this file you would place your user interface code to provide the actual value. You can do it here, or you can provide the user interface in the previous file (phpsql2.php) in conjunction with the Add a score button. It could bring up a dialog, or it could pick up a value from the current game, or anything that makes sense to you and the user. If you get the value from the previous file, store it in a hidden field and pass it forward as is done with userid and name in other places.
$query->execute() or die ("Can’t execute");
echo "<p>Success on execute</p>";

//$result  = $query->fetchAll() or die ("Can’t fetchAll");
//echo "Success on fetchAll<br />";
This code is commented out as a reminder that it’s used in cases where you are retrieving data and is not needed here. The execute succeeds or fails, but there’s no separate result.
?>

<h1>New score added</h1>

 </body>
 </html>
Using Try/Catch Blocks with PHP and PDO
The testing for success used in this file uses traditional PHP and PDO coding. You can use more modern coding with try/catch blocks. (The or die code used as placeholders earlier in this chapter can well be converted to this style.) Following is the general pattern:
try {
  $sqlite->query("DELETE FROM Score WHERE rowid = $rowIDToDelete");
} catch (PDOException $e) {
  echo $e->getMessage();
}
This code assumes that the Delete button passes the rowid of the score to delete in a hidden field. Remember that rowid is provided by SQLite unless you choose to provide a primary key. Most of the time, you’ll find that using the default SQLite rowid is useful for situations like this where you have to delete a given row.
Note, too, that for single queries, this syntax rather than prepare and execute may be simpler to write. When you need to reuse a query, prepare and execute are usually better.
Summary
This chapter provides a simple model for using a SQLite database with PHP. The process is simple.
- Let the user select data to see.
- Show the requested data.
- Allow the user to add new data.
The last step is not required in all cases, but another step often is: allowing the user to delete the requested data that is shown in step 2. You would add a Delete button on that page. Place it inside a form and pass control to another page that does the delete. The delete will look very much like phpsql3.php except that instead of an INSERT, you’ll be using DELETE. (There’s an example of a DELETE statement in the previous section, “Using Try/Catch Blocks with PHP and PDO.”)