
E. Quick-Start: Gradle Build System
When programming Android applications, you’re most likely to create many files that include numerous lines of source code. The question remains—how does all that source code you just wrote actually become an Android application? The answer—the Gradle build system. Gradle is an open-source tool used to automate the building, running, testing, and packaging of your Android application. Gradle is built directly into Android Studio and you’re also able to run Gradle from the command-line.
Gradle, by itself, is an extremely powerful tool, but when it is combined with Android Studio, you are able to manage complex Android application builds. Gradle is important to learn because when you want to create different builds of the same application—for example, a free version and a paid version—rather than creating two separate Android Studio projects, you can create and manage the building of both applications from within one Android Studio project. In this appendix, you are going to learn about Gradle, the different builds files included with your application, the syntax for scripting your build files, and you will learn more about the options available for including in your build files. By the end of this appendix, you should be comfortable managing a more complex Android application build using Android Studio and Gradle.
![]() Tip
Tip
Many of the code examples provided in this appendix are taken from the SimpleGradleBuild application. The source code for this application is provided for download on the book’s website (http://introductiontoandroid.blogspot.com).
Gradle Build Files
Your Gradle build files are the files named build.gradle. Depending on how you’ve set up your project, you will have two or more build.gradle files. One build.gradle file is for global project build configuration settings and resides in your project root directory. The other build.gradle file(s) will be found in your application module(s), one per module.
The build.gradle files are plain text files that rely on Groovy syntax, which is a powerful domain-specific language (DSL) that can be used for creating readable build and automation scripts. You use the Groovy syntax to define how you would like your project built by declaring reserved elements and providing attributes and values. The elements you declare, and the attributes and values you give them, determine how your project and application modules will be built. To learn more about Groovy, see the groovy language website at http://www.groovy-lang.org.
Figure E.1 shows the various ways to access the Gradle build files. On the left, you will notice the Project view displaying the file system hierarchy of the SimpleGradleBuild project, and you should notice that the Gradle files are scattered throughout the project directories. On the right, you will notice the Android symbolic view showing a Gradle Scripts section that groups all the Gradle files together.
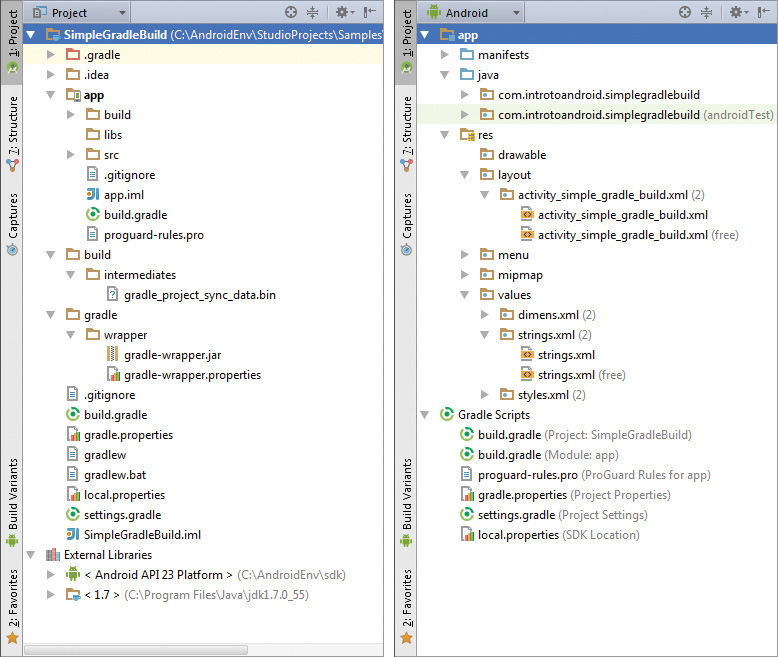
Figure E.1 In the Project view on the left, notice various Gradle files scattered throughout the directory structure of your application; in the Android view on the right, notice the section named Gradle Scripts that groups the important Gradle files for your application project.
Project Settings
The build.gradle project file is for defining global build settings that are common to all application modules and subprojects. The file starts with the build script declaration, which defines the repository to use. The repositories available to choose from are J Center, Maven Central, and Ivy.
![]() Note
Note
You define the path to the Android SDK using the ANDROID_HOME environment variable on your system or by setting the sdk.dir in the local.properties file. For example, to set the location of the SDK on Windows using the sdk.dir setting, simply write this code:
sdk.dir=C:\path\to\sdk
To set the location on Mac OS X, write this code:
sdk.dir=/Applications/Android Studio.app/sdk
Below, you’ll see the top-level project configuration settings of the build.gradle file of the Simpl e GradleBuild project.
buildscript {
repositories {
jcenter()
}
dependencies {
classpath 'com.android.tools.build:gradle:1.3.0'
// NOTE: Do not place your application dependencies here; they belong
// in the individual module build.gradle files
}
}
allprojects {
repositories {
jcenter()
}
}
![]() Note
Note
The location for including application modules in Android Studio projects is defined in the settings.gradle file. To include a module, simply include the named module. For example, to include a module named app, simply type:
include ':app'
Module Settings
You will spend most of your time marking up the build.gradle file of your application modules. The module settings are where you configure particular Android SDK settings such as the compileSdkVersion and buildToolsVersion. These settings are placed inside the android element. You also include defaultConfig settings and buildTypes. Here is a breakdown of some elements for a module build file:
![]() Applying the Android Gradle Plugin: The first line of your
Applying the Android Gradle Plugin: The first line of your build.gradle file is used for including the android plug-in. You do so by including the following line: apply plugin: 'com.android.application'
![]() Android Settings: The
Android Settings: The compileSdkVersion and buildToolsVersion are used for declaring the appropriate version numbers for your requirements.
![]() Default Configurations: The
Default Configurations: The defaultConfig element is used for providing an applicationId, minSdkVersion, targetSdkVersion, versionCode, and versionName
![]() Product Flavors: The
Product Flavors: The productFlavors element is where you define different versions of your application.
![]() Build Types: The
Build Types: The buildTypes element is where you configure ProGuard settings, application signing, version suffixes, and various other build properties.
![]() Dependencies: The
Dependencies: The dependencies element is where you configure local, remote, and module dependencies.
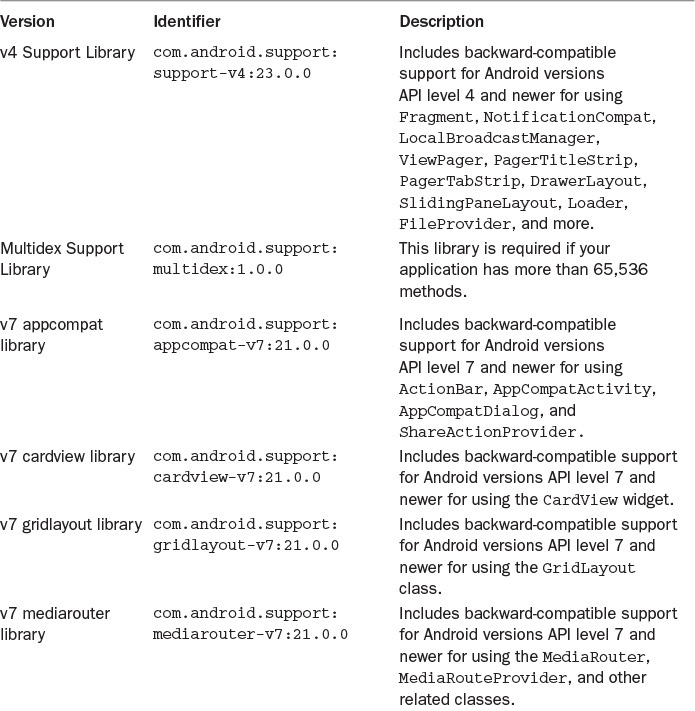
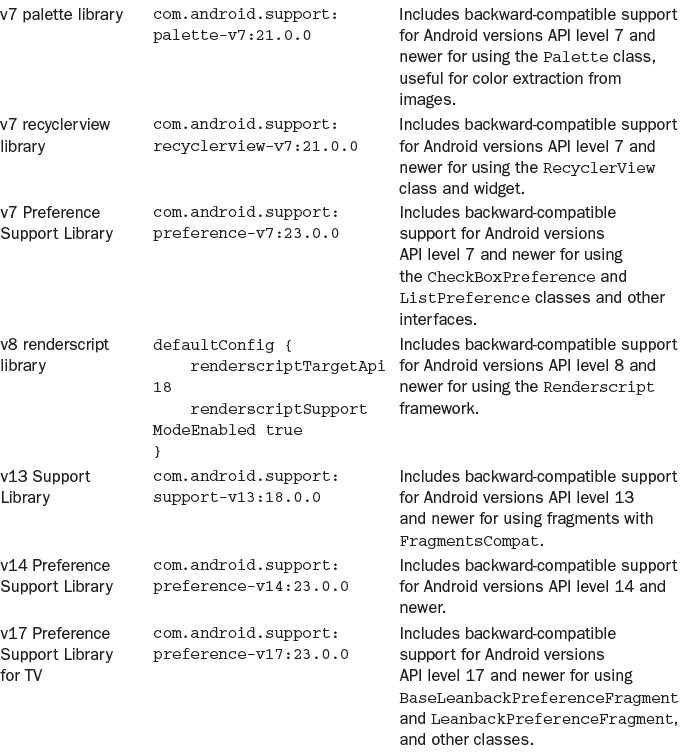
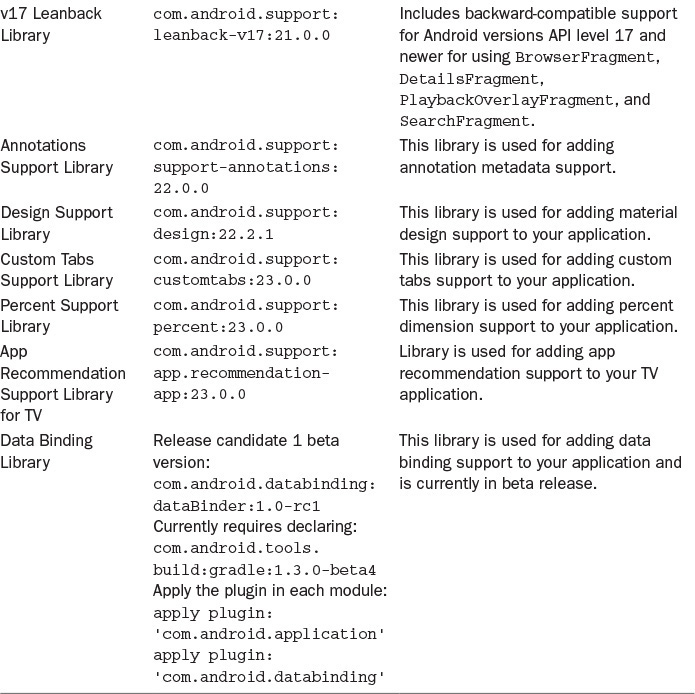
Support Library Dependencies
One type of dependency you will most likely use frequently will be the support libraries. The dependencies element is where you would include a particular support library. Later in this appendix, we show you how to include support library dependencies in your project, but first let’s take a look at some important Android support libraries (see Table E.1) that you should be aware of.
Understanding the Gradle Wrapper
The Gradle wrapper can be found in the gradle/wrapper/ directory relative to your project root and includes the gradle-wrapper.jar file and the gradle-wrapper.properties file. There is also the gradlew shell script for Windows, Mac, and Linux, which can be found in your project root. Rather than installing Gradle on your system, you should use the Gradle wrapper included in your project. If you try to build your application using different Gradle wrapper files or a locally installed version of Gradle, your application may not build correctly.
![]() Warning
Warning
Never use Gradle wrapper files or Java .jar files from sources that you do not trust as they could be intended to harm your computer.
You may be wondering if you should include the Gradle wrapper in your source control repository such as GitHub. You should always include Gradle wrapper files to ensure that your application will build properly.
Using Android Studio to Configure Your Builds
You can edit your build configuration files directly by editing the text or you can use the built-in module setting dialog for configuring your build.gradle file through user interface controls and form fields. This section covers using Android Studio and the project’s module settings for configuring your build.gradle file.
Syncing Your Project
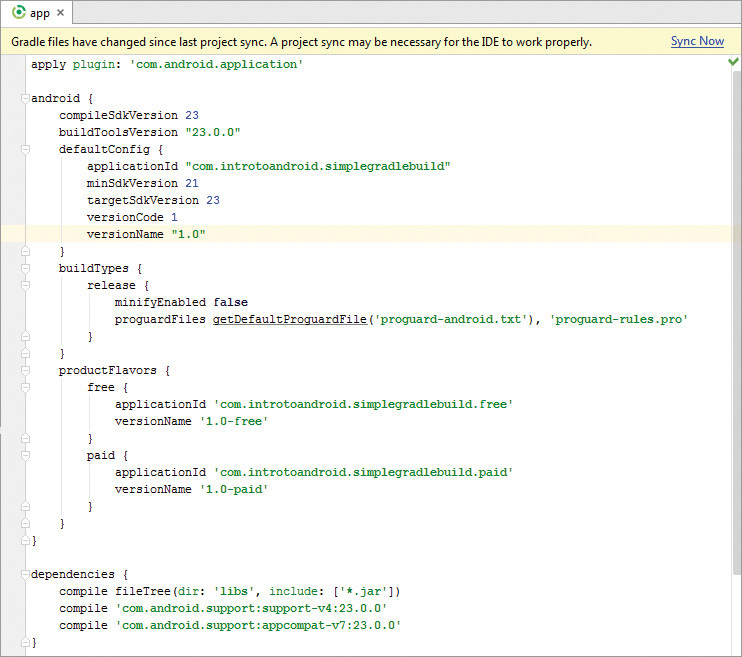
Every time you update your Gradle files, Android Studio prompts you to perform a Sync Now operation to update the configuration changes you’ve made. To avoid hunting down nonexistent bugs in your code, always make sure your files are in sync, otherwise your project may display errors if your build configuration is out of sync. Figure E.2 shows the app module build.gradle file requiring project sync and it displays the link for the Sync Now task.
Configuring the Android Properties
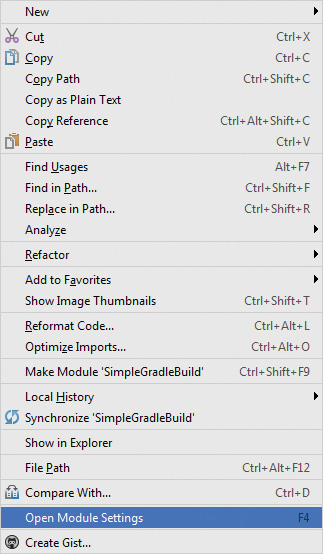
In order to configure the Android properties of the build.gradle file using a graphical user interface, you first need to open the Project Structure dialog. To open the Project Structure dialog, right-click the project root directory and a menu appears. You will see an Open Module Settings selection at the bottom of the menu. Click the Open Module Settings. Figure E.3 shows the menu presented upon right-clicking with the Open Module Settings option highlighted.
Once the Project Structure dialog has been opened, you should see the Project Structure dialog like that shown in Figure E.4. This dialog provides an overview of your Project Structure and displays, at the far left, any application modules your project has listed under the Modules section. Make sure a module is selected to edit the build.gradle file here. The Properties tab allows you to configure the android properties of the build.gradle file.
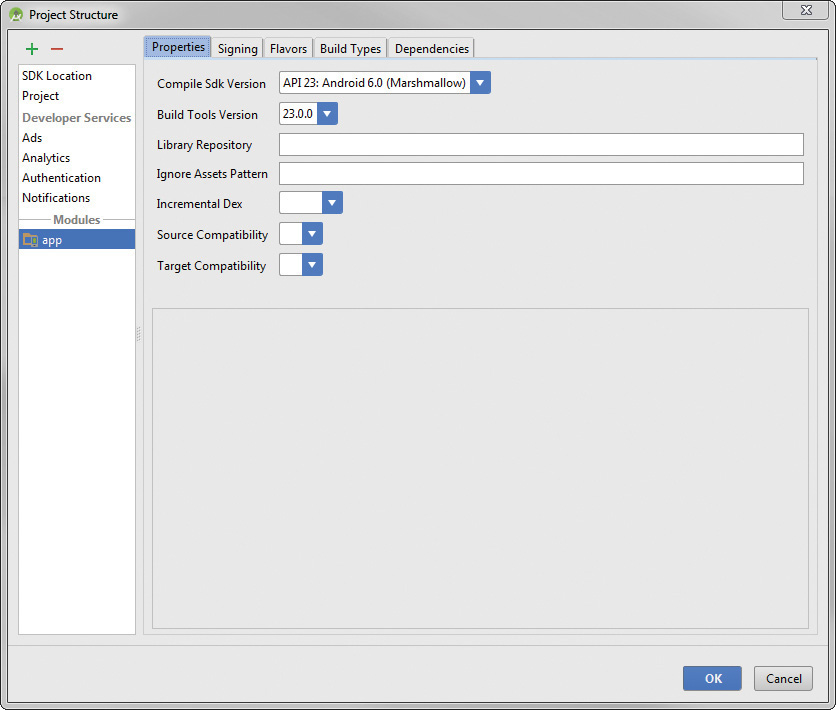
The code below shows the same options specified as those configured on the Properties tab of the Project Structure dialog (Figure E.4):
android {
compileSdkVersion 23
buildToolsVersion "23.0.0"
...
}
Working with Signing Options
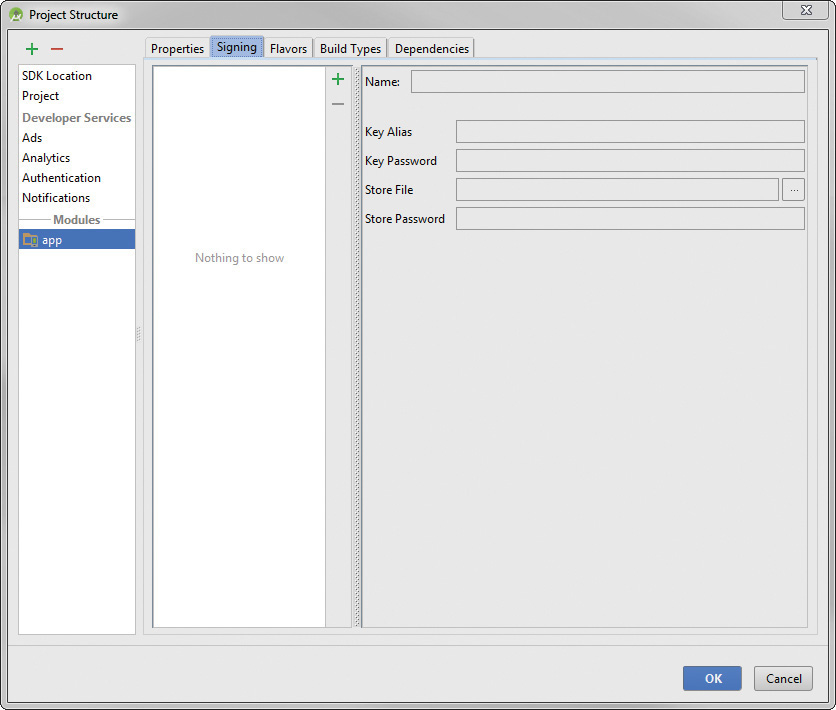
When working with the debug version of your application, you are not required to provide a secure certificate for signing your application. If you’re working with the release version of your application, you will need to provide a release key for signing your application. Figure E.5 shows the Signing tab of the Project Structure dialog. You can add signing settings on this tab.
Configuring Different Build Flavors
The Flavors tab of the module settings allows you to add, remove, and configure different productFlavors for creating different versions of your app—for example, both a free and a paid version. You are also able to configure the defaultConfig options on the Flavors tab. Figure E.6 shows the Flavors tab with the defaultConfig option showing, along with a free and paid flavor option.
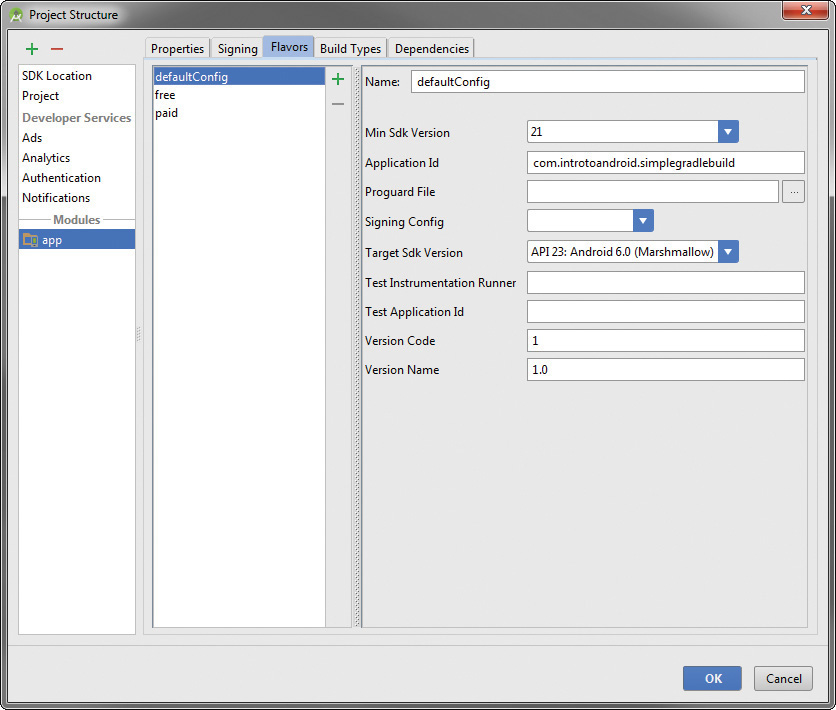
The code below shows the defaultConfig, free, and paid elements specified as those configured on the Flavors tab of the Project Structure dialog:
...
defaultConfig {
applicationId "com.introtoandroid.simplegradlebuild"
minSdkVersion 21
targetSdkVersion 23
versionCode 1
versionName "1.0"
}
...
productFlavors {
free {
applicationId 'com.introtoandroid.simplegradlebuild.free'
versionName '1.0-free'
}
paid {
applicationId 'com.introtoandroid.simplegradlebuild.paid'
versionName '1.0-paid'
}
}
...
Configuring Different Build Types
The Build Types tab allows you to add, remove, and configure different build types such as debug and release. Figure E.7 shows the debug build type displaying the available options for configuration.
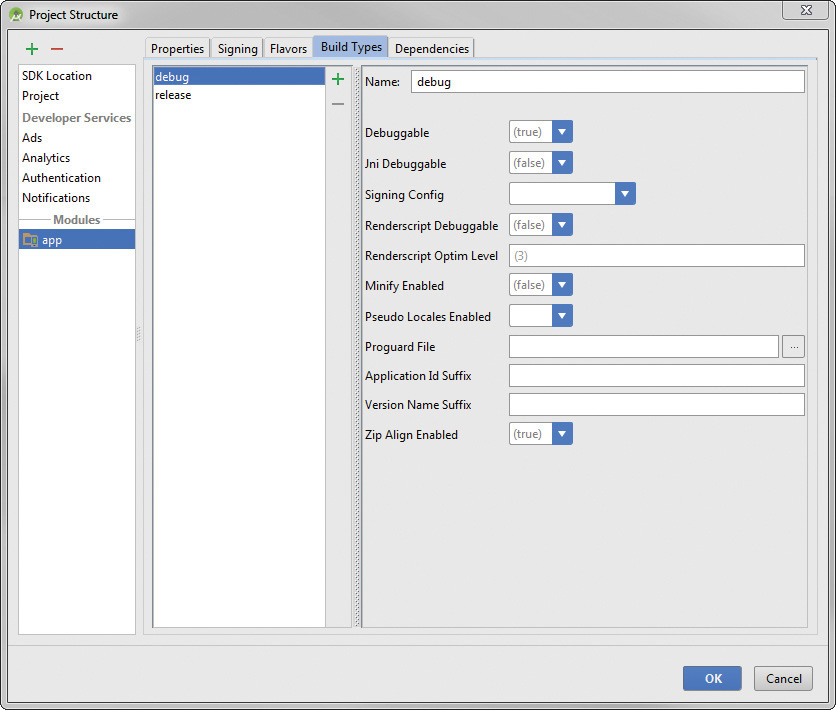
When editing the Build Types from the Project Structure dialog, you will notice both a debug and release entry, but when editing the build.gradle file directly, you will not see the debug entry listed under the buildTypes section.
buildTypes {
release {
minifyEnabled false
proguardFiles getDefaultProguardFile('proguard-android.txt'),
'proguard-rules.pro'
}
}
If you would like to see the debug entry listed in the buildTypes section, you need to enter it manually. The following code shows a debug entry:
buildTypes {
release {
minifyEnabled false
proguardFiles getDefaultProguardFile('proguard-android.txt'),
'proguard-rules.pro'
}
debug {
debuggable true
}
}
Configuring Application Dependencies
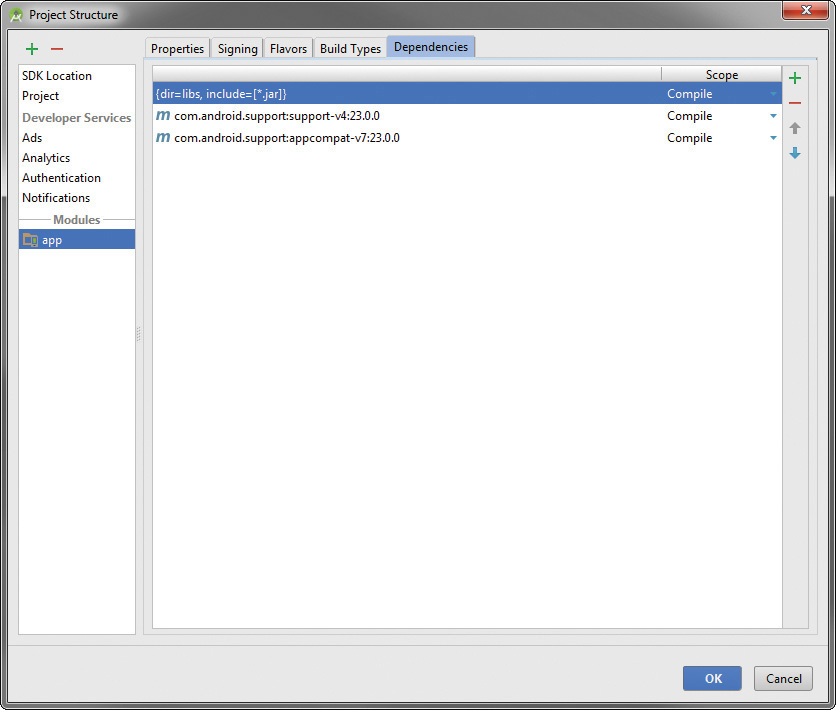
The Dependencies tab allows you to add, remove, reorder, and change the scope of your module dependencies. Figure E.8 shows the Dependencies tab with a local dependency defined and two module dependencies for including the support-v4 library and the appcompat-v7 library, each with the scope of compile.
Adding Library Dependencies
If you wanted to add a module library dependency, a dialog appears after clicking the add icon and presents a list of the available module libraries. Figure E.9 shows the Choose Library Dependency dialog.
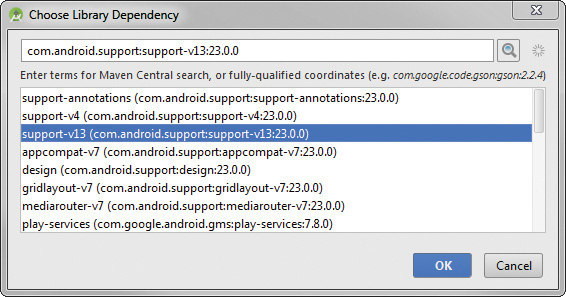
Figure E.9 Adding a new library dependency from the Dependencies tab of the Project Structure dialog.
Here, you will notice the dependencies listed in the app module build.gradle file. These are the same as those from the Dependencies tab of the Project Structure dialog:
dependencies {
compile fileTree(dir: 'libs', include: ['*.jar'])
compile 'com.android.support:support-v4:23.0.0'
compile 'com.android.support:appcompat-v7:23.0.0'
}
Building Different APK Variants
In order to be able to build different APK variants, you need to create the appropriate build variant directories and files. Now that you have configured the productFlavors of free and paid, the following steps will allow you to build these variants:
1. Create a free/ and paid/ directory on your app/src/ path.
2. Create a res/ resource directory with a layout/ and values/ subdirectory in both the free/ and paid/ directories you just created.
3. In the layout/ directory of the free flavor, create an XML file that has the same name of the XML file in your app/src/main/res/layout directory. In our case, the file is named activity_simple_gradle_build.xml. For the layout of the free flavor, create a relative layout with the child TextView and set the text attribute to @string/hello_free_world. Here is the TextView:
<TextView
android:layout_width="wrap_content"
android:layout_height="wrap_content"
android:text="@string/hello_free_world" />
Do the same for the paid flavor, but set the text attribute of the TextView to @string/hello_paid_world. Here is the TextView:
<TextView
android:layout_width="wrap_content"
android:layout_height="wrap_content"
android:text="@string/hello_paid_world" />
4. In the values/ directory of the free flavor, create an XML file that has the same name of the XML file in your app/src/main/res/values directory. Name the file strings.xml and, for the free flavor, put the following in the file:
<resources>
<string name="hello_free_world">Hello free world!</string>
</resources>
For the paid flavor, put the following in the strings.xml file:
<resources>
<string name="hello_paid_world">Hello paid world!</string>
</resources>
5. Now you’re ready to build the variants. From Android Studio, you are able to open the Build Variants tab found on the far left toward the bottom of the IDE (see Figure E.10, right). With the Build Variants tab open you can choose which Build Variant you would like to build. Select either the freeDebug or paidDebug and then build or run your project. After you have built both variants, you will now have an outputs/ folder where the free and paid APK variants have been created (see Figure E.10, right-center).
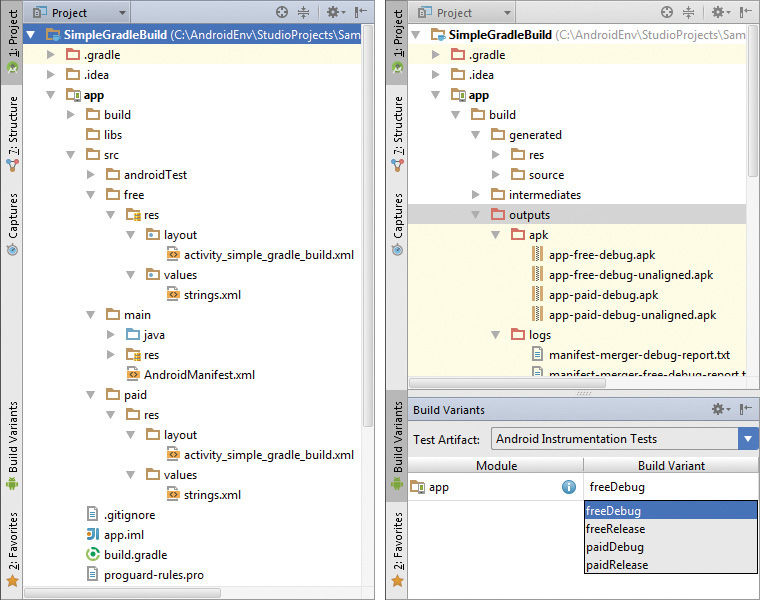
Figure E.10 Here is the SimpleGradleBuild project hierarchy with free/ and paid/ directories in the app/src/ folder for managing different productFlavors (left), and the app/build/outputs/apk/ folder that shows the created APK files after building the project and how to switch between Build Variants (right).
The result of building different APK variants is shown in Figure E.11. The freeDebug build variant is running on the left on an emulator, and the build process determined the appropriate layout and string file for displaying the text “Hello free world!” The paidDebug build variant is running on the right on an emulator, and the build process determined the appropriate layout and string file for displaying the text “Hello paid world!”

Figure E.11 Two different product flavors of the SimpleGradleBuild application, the free version (left) and the paid version (right).
Running Different Gradle Build Tasks
Android Studio provides a number of different Gradle build tasks that you can execute on your project to verify if the project, its modules, and its source files have been configured properly. Figure E.12 shows the install tasks that you have available for the app module. These tasks are specific to the configuration of your project.
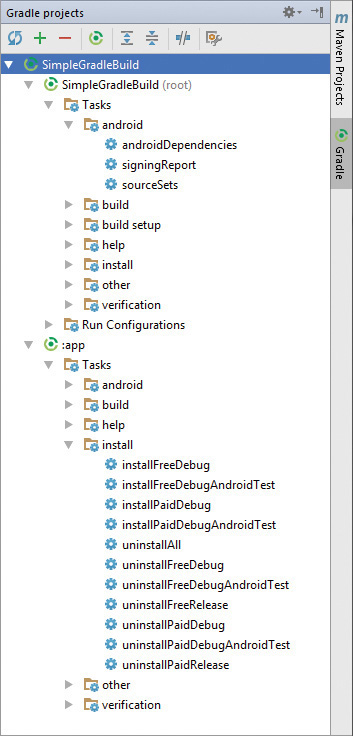
Figure E.12 The Gradle projects tab of the SimpleGradleBuild application with various Gradle tasks available.
You can run these Gradle build tasks by double-clicking a task. You will then see Android Studio executing the task and the results will be displayed similar to what is seen in Figure E.13, where the results of executing the androidDependencies task are listed in the android folder of the SimpleGradleBuild.

Summary
This appendix described the Gradle build system and how it is integrated with Android Studio. You learned the basics of Gradle and how to configure different application build types and product flavors. You also learned how to edit the build.gradle files by using the Groovy syntax with plain text or by using a graphical user interface. You also learned about the various support libraries you can use for module dependencies in your application. You should now be comfortable using Gradle and configuring your project for creating different product flavors and build variants.
Quiz Questions
1. True or false: The gradlew and gradlew.bat files are used for configuring your Gradle settings using plain text.
2. True or false: Gnarly is the name of the domain-specific language used for scripting your Gradle build files.
3. What is the settings.gradle file used for?
4. Why is it preferable to use the Gradle wrapper rather than using your own installation of Gradle on your system?
5. What element is used for defining the compileSdkVersion and buildToolsVersion?
Exercises
1. Familiarize yourself with the “Gradle Build Language Reference” found here: https://docs.gradle.org/current/dsl.
2. Read the “Signing Your Applications” article found with the online documentation here: http://d.android.com/tools/publishing/app-signing.html.
3. Expand on the SimpleGradleBuild application to include the signingConfigs element for both the free and paid version release build.
References and More Information
Android Tools: “Build System Overview”:
http://d.android.com/sdk/installing/studio-build.html
Android Tools: “Configuring Gradle Builds”:
http://d.android.com/tools/building/configuring-gradle.html
Android Tools: “Android Plugin for Gradle”:
http://d.android.com/tools/building/plugin-for-gradle.html
Android Tools: “Manifest Merging”:
http://d.android.com/tools/building/manifest-merge.html
Android Tools: “Building Apps with Over 65K Methods”:
http://d.android.com/tools/building/multidex.html
Android Tools: “Support Library”:
http://d.android.com/tools/support-library/index.html
Android Tools: “Data Binding Guide”:
http://d.android.com/tools/data-binding/guide.html
Android Tools Project Site: “Gradle Plugin User Guide”:
http://tools.android.com/tech-docs/new-build-system/user-guide
“Gradle Build Language Reference”:
https://docs.gradle.org/current/dsl/
“Gradle: The New Android Build System”: