
A. Tips and Tricks: Android Studio
Android Studio—a special version of the JetBrains IntelliJ IDEA Community Edition IDE—includes everything you need to get started developing professional Android applications. Android Studio is the official IDE for Android application development and is recommended. In addition, you may choose to use IntelliJ IDEA Community or Ultimate Editions for developing your Android applications—the same capabilities of Android Studio are available for these editions. Eclipse with the ADT plugin used to be a viable Android development environment before IntelliJ-based IDEs, but this approach is not recommended and support for Eclipse will no longer be available.
In this appendix, we provide a number of helpful tips and tricks for using Android Studio to develop Android applications quickly and effectively. Even though you may choose to use IntelliJ IDEA instead of Android Studio, the instructions provided within this appendix apply to using either Android Studio or IntelliJ IDEA. Since Android Studio and IntelliJ IDEA provide equivalent IDE and Android development capabilities, from here on, we will refer only to Android Studio.
Organizing Your Android Studio Workspace
In this section, we provide a number of tips and tricks to help you organize your Android Studio workspace for optimum Android development.
Integrating with Source Control Services
Android Studio integrates with many source control technologies. This allows Android Studio to manage checking out projects and files from local and remote version control, checking in a project or file to local or remote version control, updating a project or file, and showing a file’s status, as well as a number of other tasks, depending on the support of the integration.
![]() Tip
Tip
Source control integrations are available for GitHub, CVS, Git, Subversion, Mercurial, and Google Cloud.
Generally speaking, not all files are suitable for source control. For Android projects, any file within the bin/, gen/, build/, .idea/, and .gradle/ directories shouldn’t be in source control. You can add file suffixes such as *.apk, *.ap_, *.class, *.dex, local.properties, *.iml, and *.log. Conveniently, this applies to all integrated source control systems.
Repositioning Windows within Android Studio
Android Studio provides some pretty decent layouts by default. However, not everyone works the same way. We feel that some may like to tailor the layouts to suit their Android development workflow.
![]() Tip
Tip
Experiment with organizing your layout to find one that suits your workflow. Each window has its own layout, too.
For instance, the TODO window is usually found on the bottom of Android Studio. This works fine because this tab is only a few lines high. But if your project has a long list of TODO items and you are not able to view the entire list with only a few lines visible, you may want to reposition the TODO window to the right or left of Android Studio, so that your TODO list displays more of the TODO items when you view this window. Luckily, moving a window in Android Studio is easy: simply drag the window tab to the left, right, top, or bottom, and move it to a new location on the IDE, such as the right side of Android Studio where the other window tabs are displayed. This provides the much-needed vertical space to see the dozens of TODO items your project may have. You may also right-click a window tab, choose Move to, and then choose from the available options, which will be Right, Left, Top, or Bottom, depending on where the window tab is currently located.
![]() Tip
Tip
If you mess up a layout or just want to start fresh, you can reset it by choosing Window, Restore Default Layout.
Resizing the Editor Window
Sometimes you might find that the editor window of an open file is just too small, especially with all the extra tool windows and tabs surrounding it. Try this: double-click the tab of the source file that you want to edit. Boom! It’s now nearly the full Android Studio window size! Double-click to return the editor window to normal. (Ctrl+Shift+F12 works on Windows, Command+Shift+F12 on the Mac.)
Resizing Tool Windows
You can resize entire tool windows, too. For instance, if you need more screen space to review the logcat output, found within the tool windows section at the bottom labeled Android, you can double-click the top bar of the Android tool window to expand the window to the full Android Studio windows size. Or, with the Android tool window in focus, you can use Ctrl+Shift+Up on Windows or Command+Shift+Up on the Mac to gradually increase the window size, or Ctrl+Shift+Down on Windows or Command+Shift+Down on the Mac to gradually decrease the window size.
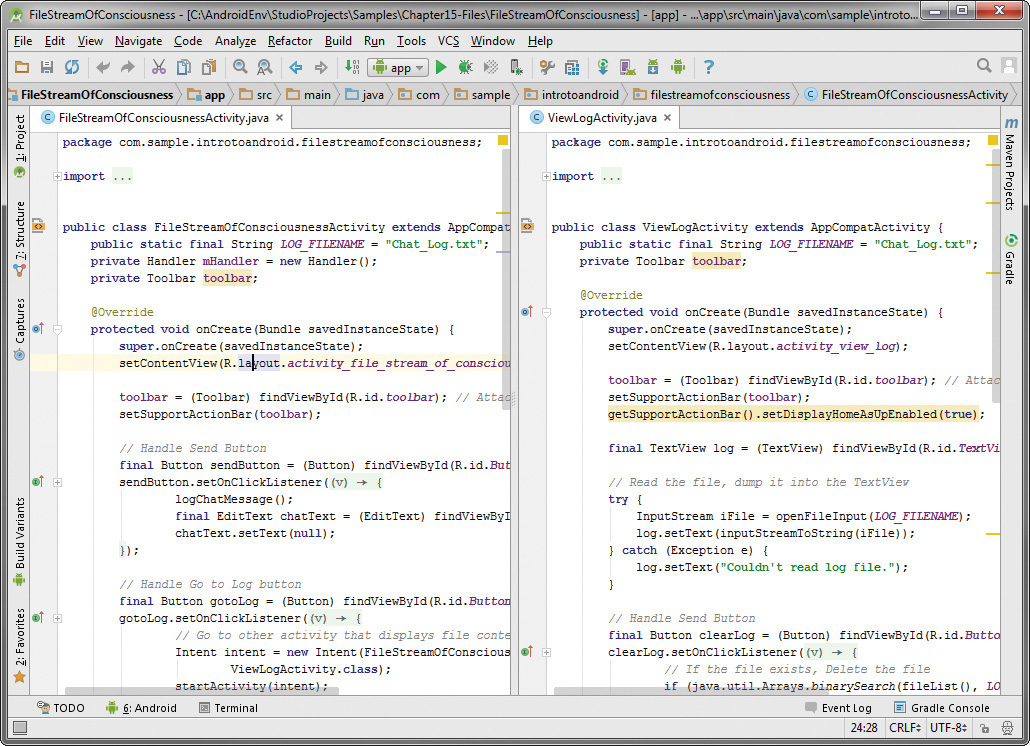
Viewing Editor Windows Side by Side
Ever wish you could see two source files at once? Well, you can! Simply right-click a source file tab and choose Move right or Move down. You will then see each source file docked either side by side with another file (shown in Figure A.1) or below another file (shown in Figure A.2). This creates a parallel editor area where you can drag and rearrange other file tabs as well.
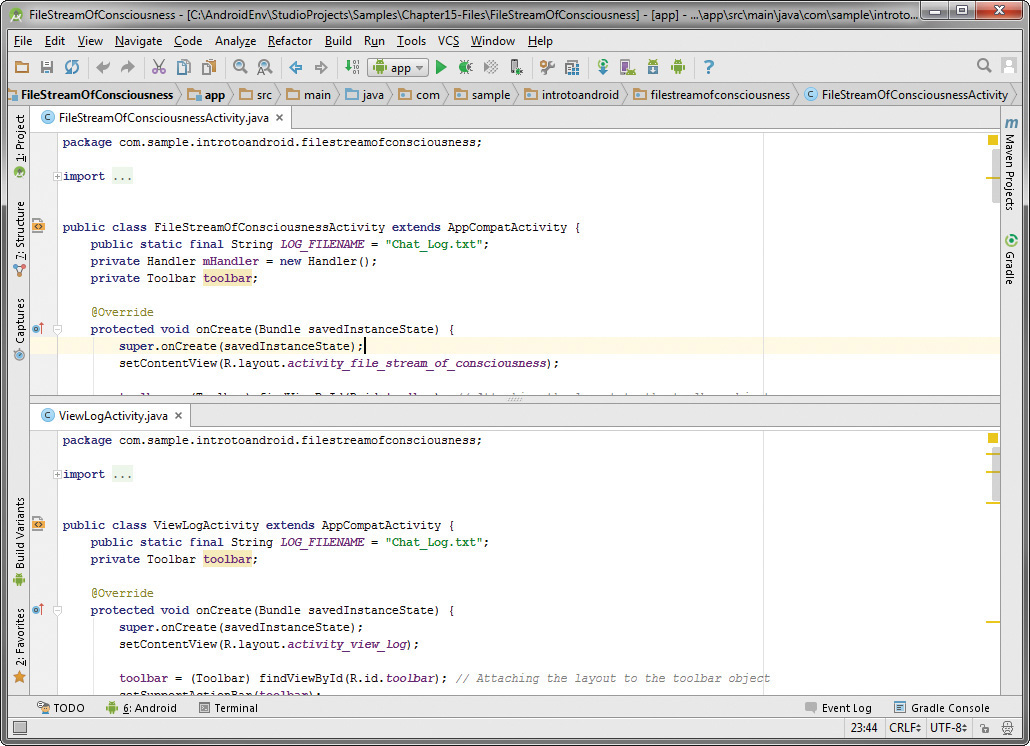
Viewing Two Sections of the Same File
Ever wish you could see two places at once in the same source file? You can! Make sure the file is open and focused, right-click the source file tab, and then choose Split Vertically or Split Horizontally. A second editor tab for the same file comes up either to the side or below. With the previous tip, you can now have two different views of the same file side by side (see Figure A.3) or (see Figure A.4).


Figure A.4 Viewing different sections of the same file in two different windows, one above the other.
If you have split your source file views and would like to return to a non-split view, simply right-click the source file tab and select Unsplit.
Closing Unwanted Tabs
Ever feel like you have far too many tabs open for files you’re no longer editing? We do! There are a number of solutions to this problem. First, you can right-click a file tab and choose Close Others to close all other open files. You can quickly close specific tabs by middle-clicking each tab. (This even works on a Mac with a mouse that can middle-click, such as one with a scroll wheel.) You can even limit closing tabs to a particular vertical or horizontal split by right-clicking a source file tab and choosing Close All in Group.
Keeping Editor Windows under Control
Finally, you can use the Android Studio setting that limits the number of open file editors:
1. Open the Android Studio’s Settings dialog found under the File menu option.
2. Expand Editor, choose General, and then choose Editor Tabs.
3. Edit the value in Tab limit found under the Tab Closing Policy.
This will cause old editor windows to close infrequently used files when new ones are opened. The default value is set to 10, which seems to be a good number to use for the Tab limit option to keep the clutter down but to have enough editors open to still get work done and have reference code open.
Creating Custom Log Filters
Every Android log statement includes a tag. You can use these tags with filters defined in logcat. To add a new filter, you must change the logcat filtering drop-down option found on the logcat menu bar, to the Edit Filter Configuration option, rather than the default option of Show only selected application. The Create New Logcat Filter dialog will appear, and you can modify the current filter or you can click the green plus sign button to add a new filter. Name the filter—perhaps using the tag name—and define any filtering parameters you would like to use, such as the Log_Tag or Package Name. Now logcat will only show messages that contain this tag. In addition, you can create filters that display items by severity level.
Android convention has largely settled on creating tags based on the name of the class. You see this frequently in the code provided with this book. Note that we create a constant in each class with the same variable name to simplify each logging call. Here’s an example:
public static final String DEBUG_TAG = "MyClassName";
This convention isn’t a requirement, though. You could organize tags around specific tasks that span many activities, or you could use any other logical organization that works for your needs. Another, simpler way to do this is as follows:
private final String DEBUG_TAG = getClass().getSimpleName();
Although not as efficient at runtime, this code can help you avoid copy-and-paste errors. If you’ve ever been looking over a log file and had a misnamed debug tag string mislead you, this trick may be useful to you.
Searching Your Project
You have several ways to easily search your project files from within Android Studio. The IDE search options—found under the search icon displayed to the far right of the Android Studio toolbar—allow you to search everywhere—including non-project files if so desired. Most frequently, we use the Find search option found on the toolbar—you can also activate the Find command by pressing Ctrl+F on Windows or Command+F on the Mac—which allows you to search for text within the files.
Organizing Android Studio Tasks
By default, any comment that starts with // TODO will show up on the TODO tab window of Android Studio. This can be helpful for tagging code areas that require further implementation. You can click a specific TODO item and it will take you straight to the comment in the file so you can implement the item at a later time.
You can also create custom comment filters above and beyond TODO items. We often leave comments with people’s initials to make it easy for them to find specific functional areas of the application for code review. Here’s an example:
// LED: Does this look right to you?
// JAJ: Related to Bug 1234. Can you fix this?
// SAC: This will have to be incremented for the next build
When you have to implement something that is less than ideal, you might also use a special comment such as // HACK to flag that code as subject to further review. To add custom filters to your TODO list, edit your Android Studio Settings (available at File, Settings on Windows and at Android Studio, Preferences on the Mac) and navigate to Editor, TODO. Add a new pattern by clicking the green plus symbol found in the Patterns section, typing HACK as the value for Patterns, and then clicking OK. Add any patterns you want to flag. So, for instance, something with your initials might be high priority that you’ll look at right away, but a HACK flag may be a low priority because, presumably, it works but maybe not in the best way possible.
Writing Code in Java
In this section, we provide a number of tips and tricks to help you implement the code for your Android applications.
Using Autocomplete
Autocomplete is a great feature that speeds up code entry. If this feature hasn’t appeared for you yet or has gone away, you can bring it up by pressing Ctrl+Space. Autocomplete not only saves time in typing but also can be used to jog your memory about methods—or to help you find a new method. You can scroll through all the methods of a class and even see the Javadoc’s associated with them. You can easily find static methods by using the class name or the instance variable name. You follow the class or variable name with a dot (and maybe Ctrl+Space) and then scroll through all the names. Then you can start typing the first part of a name to filter the results.
Creating New Classes and Methods
You can quickly create a new Java class and corresponding source file by right-clicking the package to create it in, then choosing New, and then choosing one of the many different types of classes you can create. You then follow a wizard for defining the class to your requirements.
Along the same lines as creating new classes, you can quickly create method stubs within a class in the editor by choosing Code, and then choosing Override Methods, Implement Methods, Delegate Methods, or Generate. Then you follow the associated wizard to choose the methods for which you’re creating stubs.
Organizing Imports
When referencing a class in your code for the first time, you can hover over the newly used class name, press Alt+Enter, and then choose Import class to have Android Studio quickly add the proper import statement.
In addition, the Optimize Imports command (Ctrl+Alt+O) causes Android Studio to automatically optimize your imports by removing any unused imports.
If there is any ambiguity in the name of a class during automatic import, the Android Studio prompts you for the package to import.
Finally, you can configure Android Studio to automatically import on the fly. You may also create an exclude from imports list by package or class name to exclude those from the auto import feature.
To configure automatic imports, perform the following steps:
1. Choose File, then Settings on Windows, or Android Studio, then Preferences on the Mac.
2. Expand Editor, then General, and choose Auto Import.
3. Check Optimize imports on the fly, and/or Add unambiguous imports on the fly, and then click OK.
Reformatting Code
Android Studio has a built-in mechanism for reformatting Java code. Reformatting code with a tool is useful for keeping the style consistent, applying a new style to old code, or matching styles with a different client or target (such as a book or an article).
To quickly reformat a small block of code, select the code and press Ctrl+Alt+L on Windows (or Command+Alt+L on the Mac). The code is reformatted to the current settings. If no code is selected, the entire file is formatted. Occasionally, you need to select more code—such as an entire method—to get the indentation levels and brace matching correct.
Android Studio reformatting settings are found in the Settings under Editor, Code Style, and you can further narrow reformatting options by selecting Java or XML. You can configure these settings on a per-project basis, and you can apply and modify dozens of rules to suit your own style.
Renaming Almost Anything
Android Studio’s Rename tool is quite powerful. You can use it to rename variables, methods, class names, package names, project names, and more. Most often, you can simply right-click the item you want to rename and then choose Refactor, Rename. If you are renaming a top-level class in a file, the filename has to be changed as well. Android Studio usually handles the source control changes required to do this if the file is being tracked by source control. If Android Studio can determine that the item is in reference to the identically named item being renamed, all instances of the name are renamed as well. If renaming options are selected, this means even comments, strings, variables, tests, text, and inheritors are updated with the new name. Quite handy!
Refactoring Code
Do you find yourself writing a whole bunch of repeating sections of code that look, for instance, like the following?
TextView nameCol = new TextView(this);
nameCol.setTextColor(getResources().getColor(R.color.title_color));
nameCol.setTextSize(getResources().
getDimension(R.dimen.help_text_size));
nameCol.setText(scoreUserName);
table.addView(nameCol);
This code sets text color, text size, and text value. If you’ve written two or more blocks that look like this, your code could benefit from refactoring. Android Studio provides useful refactoring tools, two in particular for extracting code by Variable and Method, to speed up this task and make it almost trivial.
Extracting Variables
Follow these steps to extract a Variable:
1. Select the expression getResources().getColor(R.color.title_color).
2. Right-click and choose Refactor, Extract, Variable (or press Ctrl+Alt+V on Windows and Command+Alt+V on the Mac).
3. In the editing box that appears, enter the name for the variable. If a Multiple occurrences found message appears, choose either Replace this occurrence only, or Replace all X occurrences, then enter the name for the variable. Then watch the magic happen.
4. Repeat steps 1–3 for the text size.
The result should now look like this:
int textColor = getResources().getColor(R.color.title_color);
float textSize = getResources().getDimension(R.dimen.help_text_size);
TextView nameCol = new TextView(this);
nameCol.setTextColor(textColor);
nameCol.setTextSize(textSize);
nameCol.setText(scoreUserName);
table.addView(nameCol);
All repeated sections of the last five lines also have this change made. How convenient is that?
1. Select all five lines of the first block of code.
2. Right-click and choose Refactor, Extract, Method (or press Ctrl+Alt+M on Windows or Command+Alt+M on the Mac).
3. Name the method, select a Visibility level, select the Parameters to include, choose the parameters Type, then enter a Name for the parameter variables, and finally click OK and watch the magic happen.
By default, the new method is below your current one. If the other blocks of code are actually identical (meaning the statements of the other blocks are in the exact same order), the types are all the same, and so on, they will also be replaced with calls to this new method. You can see this in the count of additional occurrences shown in the Extract Method dialog. If that count doesn’t match what you expect, check that the code follows exactly the same pattern. Now you should have code that looks similar to the following:
addTextToRowWithValues(newRow, scoreUserName, textColor, textSize);
It is easier to work with this code than with the original code, and it was created with almost no typing! If you had ten instances before refactoring, you’ve saved a lot of time by using a useful Android Studio feature.
Reorganizing Code
Sometimes, reformatting code isn’t enough to make it clean and readable. Over the course of developing a complex Activity, you might end up with a number of embedded classes and methods strewn about the file. A quick Android Studio trick comes to the rescue. With the file in question open in the editor, highlight the code you would like to move.
Simply click and drag the code that you highlighted and place the code where you would like it to appear directly in the editor. Do you have a method that is called only from a certain class but is available to all? Just drag it into that class. You can even drag highlighted code across files in the editor by selecting, dragging, and then dropping. In addition, you can also copy code by holding down the Ctrl key while dragging your selection to the desired location.
Using Intention Actions
The Intention Actions feature—accessible by hovering the mouse over possible problematic code while clicking Alt+Enter or by clicking the lightbulb icon to the left of the line of code in question—isn’t just for fixing possible issues. It brings up a menu of various tasks that can be performed on the highlighted code, and it shows what changes may take effect. One useful Intention Action—Extract string resource—is a type of Intention Action that allows you to extract a string resource from a string literal in your code and quickly move it into an Android string resource file, where the code is automatically updated to use the string resource. Consider how Extract String resource would work on the following two lines:
Log.v(DEBUG_TAG, "Something happened");
String otherString = "This is a string literal.";
The updated Java code is shown here:
Log.v(DEBUG_TAG, getString(R.string.something_happened));
String otherString = getString(R.string.string_literal);
And these entries have been added to the string resource file:
<string name="something_happened">Something happened</string>
<string name="string_literal">This is a string literal.</string>
The process also brings up a dialog for customizing the string name and indicating which alternative resource file it should appear in, if any.
The Intention Actions feature can be used in layout files with many Android-specific options for performing tasks such as extracting dimensions and strings.
Providing Javadoc-Style Documentation
Regular code comments are useful (when done right). Comments in Javadoc style appear in code completion dialogs and other places, thus making them even more useful. To quickly add Javadoc style comments to a method or class, simply type /**, then press the Enter or Return key, and a Javadoc style comment block will appear with associated parameter and return attributes already listed.
Resolving Mysterious Build Errors
Occasionally, you might find that Android Studio finds build errors where there were none just moments before. In such a situation, you can try a couple of quick Android Studio tricks.
A first method is to try synchronizing the project to refresh dependencies if there were any changes made to your Gradle script. Simply right-click the project and choose Synchronize "MyApp" or press Ctrl+Alt+Y. This may just work or it may display error messages that help you debug what is wrong when building your project.
Another method you can try is to run the Clean project command. Android Studio runs the make command on the project, and then rebuilds the project.
Summary
In this appendix, you have learned useful tips and techniques for leveraging many powerful features provided with Android Studio. You have learned quite a few tips for organizing your Android Studio IDE. You have also learned useful tricks for writing code for your applications in Java. The many features of Android Studio make developing Android applications a pleasant experience.
Quiz Questions
1. True or false: It is possible to use source control from within the Android Studio.
2. What is the keyboard shortcut for maximizing the editor window within Android Studio?
3. Describe how to view two source-file windows at once.
4. True or false: It is not possible to view two different sections of the same file in two different windows within Android Studio.
5. What is the keyboard shortcut for reformatting Java code?
6. What is the keyboard shortcut for extracting a variable?
7. What is the keyboard shortcut for using Intention Actions?
Exercises
1. Practice using the various keyboard shortcuts mentioned throughout this appendix.
2. Use the Android Studio or IntelliJ IDEA documentation or the Internet to discover at least one other useful keyboard shortcut for Android development that was not mentioned in this appendix.
3. Practice rearranging the various UI elements within Android Studio until you are comfortable with your arrangement.
References and More Information
Android Tools: “Android Studio Overview”:
http://d.android.com/tools/studio/index.html
Android Tools: “Android Studio Tips and Tricks”:
http://d.android.com/sdk/installing/studio-tips.html
IntelliJ IDEA Help: “Quick Start”:
https://www.jetbrains.com/idea/help/intellij-idea-quick-start-guide.html
IntelliJ IDEA Help: “Keyboard Shortcuts You Cannot Miss”:
https://www.jetbrains.com/idea/help/keyboard-shortcuts-you-cannot-miss.html
Oracle Java SE Documentation: “How to Write Doc Comments for the Javadoc Tool”:
http://www.oracle.com/technetwork/java/javase/documentation/index-137868.html