In the previous chapter, we took a deep dive into the four pre-defined data structures offered by Python, namely, list, set, tuple, and dictionary. We looked at how to create them, delete them, manipulate them, and so much more. Finally, we looked at how to use them in programs and why they’re useful in real-world programming scenarios.
In this chapter, let’s take a small break from all the learning and start creating! We’ll be creating a lot of mini projects. You can brush up the topics you learned so far by creating these mini projects. So, code along with me. Have fun! ![]()
Project 12-1: Odd or even
Let’s start this chapter with something simple. This is a classic puzzle in any programming language.
We’re going to complete this project in two parts. In part 1, we’re going to check if a given number is even or odd. In part 2, we’re going to get a number range from the user and print either the even or odd numbers within that range.
But before we get to the programs, let me ask you a question. How are we going to decide if a number is odd or even? Well, any number that gets divided by 2 without any remainder is an even number, am I right? Numbers that return a 1 when divided by 2 are odd numbers.
The concept is quite simple. Do you remember the modulus operator, the one that returns the remainder of a division operation?
When you divide an even number by 2, what do you get? 0
When you divide an odd number by 2, what do you get? 1
That’s it! So, if the modulus of the number and 2 returns 0, we have ourselves an even number. If not, we got an odd number.
Now, shall we create our program?
Part 1 – Is your number odd or even?
- 1.
Get the input and convert it to an integer.
- 2.
Then, check the modulus. If it’s 0, it’s an even number; otherwise, it’s an odd number.
- 3.
Let’s run the program. My input is going to be 45.
Part 2 – print odd or even numbers within a range
- 1.Get the range and convert them to integers. Get the “choice” too.start = input('Enter the start of the range: ')end = input('Enter the end of the range: ')start = int(start)end = int(end)choice = input('Even or Odd? Enter e or o: ')
- 2.
Before we loop through the range, let’s check if it’s correct. The “start” value should be lesser than the “end” value.
- 3.If it is, let’s create a for loop that loops through the range. If the choice is odd, print only when the result of the modulus is 1. If the choice is even, print only when the result of the modulus is 0. If it’s neither, they’ve given an invalid choice and print an error message.for i in range(start,end+1):if(choice == 'o' or choice == 'O'):if((i % 2) == 1):print(i)elif(choice == 'e' or choice == 'E'):if((i % 2) == 0):print(i)else:print('Enter a valid choice and try again')
- 4.Finally, print an error message for the range too.else:print('Enter a valid range')
- 5.Let’s run this program. My range is going to be 1 to 10, and I’m going to want to print the odd numbers within this range.= RESTART: C:UsersaarthiAppDataLocalProgramsPythonPython38-32dataStructures.pyEnter the start of the range: 1Enter the end of the range: 10Even or Odd? Enter e or o: O13579
Sweet! ![]()
Project 12-2: Is your mom tipping enough?
In this project, we’re going to create a tipping calculator that inputs the total bill and the tip their mom gave the waiting staff. Calculate the percentage of tip their mom gave and say Okay if 10–15%, good if 15–20%, and great if 20+%. If less than 10%, say their mom is not tipping enough.
- 1.Get the bill amount and tip and convert them to integers.bill = input('What was your bill? ')tip = input('How much did you tip? ')bill = int(bill)tip = int(tip)
- 2.Let’s calculate the percentage of the tip. To do this, multiply the tip by 100, and divide by the bill amount. This is just a reverse of how you calculate percentages. Let’s convert the percent (which would be a floating number because of the division) to an integer.percent = (tip * 100) / billpercent = int(percent)
- 3.Now, let’s use if elif else to print out the right message. Simple!
 if((percent >= 10) and (percent <= 15)):print('{}%. You tipped Okay'.format(percent))elif((percent >= 15) and (percent <= 20)):print('{}%. That was a good tip!'.format(percent))elif(percent >= 20):print('{}%. Wow, great tip! :)'.format(percent))else:print("{}%. You didn't tip enough :(".format(percent))
Works! ![]()
Project 12-3: Draw a Christmas tree
Did you know that you can draw a Christmas tree with just your basic Python syntax? No packages or modules, just Python. Shall we try?
So basically, given the height of the tree, I want my program to draw a tree of that height. Simple enough, right?
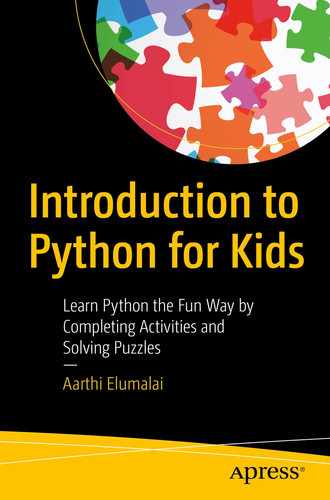
Christmas tree of height 5
How does this program work?
So, we need one loop that loops through each row of the tree and one that loops through its height. This is called nested looping. In this nested loop, the loop that goes through the tree’s height is the outer loop, and for each iteration of the outer loop, we’ll use an inner loop to draw the relevant row.
Let’s do this!
Whenever we try to draw puzzles, or problems of any sort, it’s always best to write an algorithm that’ll help us write our program better. In this case, I’m going to use the preceding tree to reverse engineer my algorithm. Would you like to see how?
- 1.
In Figure 12-1, the height of the tree is 5. So, we need five rows of leaves and one stump at the end (in the middle of the tree).
- 2.
The first row has 1 star, the second row has 1 + 2 (3) stars, the third row has 3 + 2 (5) stars, and so on until the end.
- 3.
If you count the number of spaces before the first star is drawn (first row), it’s four, which is the height of the tree minus one. For the second row, the number of spaces is three, and it reduces by one for every subsequent row.
- 4.
The stump is drawn after four spaces again, so it’s the same as our first row. We’d need a separate for loop to draw the stump because it’s not a part of the tree’s given height.
Okay, now that we’ve arrived at an algorithm, let’s get cranking!
- 1.Let’s get the height of our tree first and convert the string to an integer.n = input("What's the height of your tree? ")n = int(n)
- 2.
Next, let’s assign our variables. I’m going to create a variable sp, which is going to denote the number of spaces. It’s going to start at n–1. I can reduce the value inside the loop.
- 3.Now, let’s draw our tree! The main for loop is going to loop through the entire height of the tree (0 to n–1 so the range is 0,n)#draw the treefor i in range(0,n):
- 4.
We need two inner for loops inside the main outer for loop, one to draw the spaces and one to draw the stars.
We need to loop from 0 to sp, and for every iteration of the loop, print a single space. But here’s the catch. Print statements end at new lines, so if you want to be on the same line, you need to use an attribute called end and give it an empty string as its value. This will make sure that the next space is drawn right next to the first space.#draw spacesfor j in range(0,sp):#By default, a print function ends with a newline. Use the end='' to make it end with an empty string instead, so we can draw the star nextprint(' ',end='') - 5.Now, let’s draw our stars. We need to loop through the range 0,star–1 for that. Use end='' again to make sure they are drawn on the same line.for k in range(0,star):print('*',end='')
- 6.We’re done with the inner for loops now. Before we start the next iteration of the outer for loop (our tree’s next row), let’s change our variable’s values. Let’s increment star by 2 and decrement sp by 1. Let’s place an empty print() at the end because we’re done with the row, and we need a new line for the next row.star += 2sp -= 1print() #so there's a new line
- 7.That’s it for the tree! Now, for the stump. Do what you did in the first row. Make a single for loop run from 0 to n–2 (range 0,n–1), and print a space with end=''. Once the loop is done, print a single star, and we’re done!
 #draw the stumpfor i in range(0,n-1):print(' ',end='')print('*')
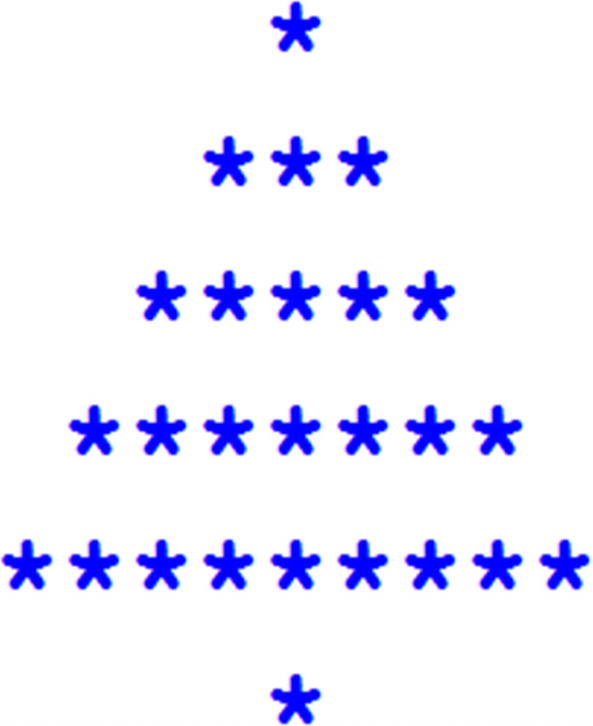
Christmas tree of height 10
Yay! It works! ![]()
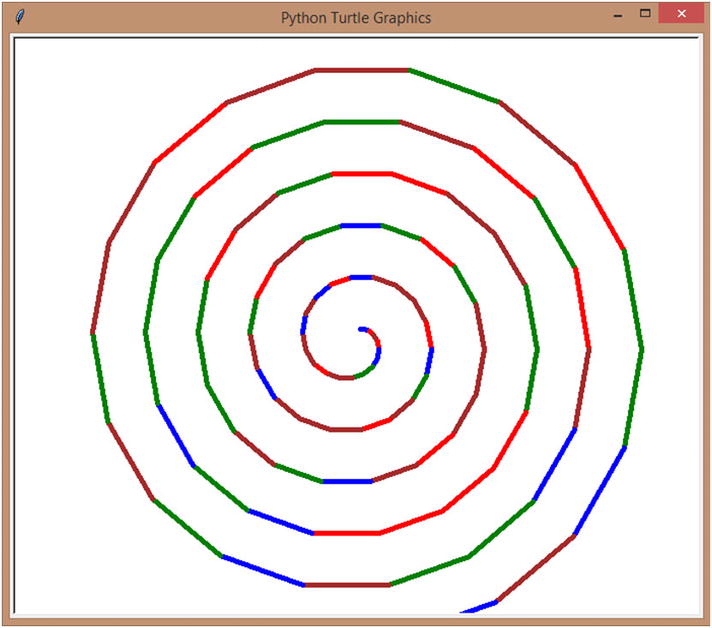
Project 12-4: Spirals!
In this project, we’re going to make different kinds of randomly colored spirals. It’s going to be real fun! ![]()
Square spiral
- 1.To start off, let’s create a square spiral. Since we need to randomly select colors, we need to import both the turtle and random modules.#Square spiralimport turtle, random
- 2.Let’s set up the turtle screen first and set the pen size to 5 and speed to 0.s = turtle.getscreen()t = turtle.Turtle()t.pensize(5)t.speed(0)
- 3.
Since this is going to be a square spiral, I’m going to make the length 4. You’ll see why.
- 4.Let’s also create a list of colors from which we’ll be randomly choosing in our loop.colors = ['Red', 'Brown', 'Green', 'Blue', 'Orange', 'Yellow', 'Magenta', 'Violet', 'Pink']
- 5.Now, let’s create our loop and make it go from 1 to 149 (so 1–150 in the range). I’ve chosen this number after a lot of trial and error. Then, I’m going to use the random.choice method which randomly chooses items from a list and assign the chosen item to the variable “color”.for x in range(1,150):color = random.choice(colors)
- 6.Change the pen color to that color and make your pen move forward by “length” and move right at 90 degrees. Then, add 4 to the current value of length, so in the next iteration, the pen moves forward by four more points. This keeps repeating, and so, we’ve created a spiral that keeps increasing in size (because of the increase in the value of length and because we’re turning 90 degrees right after every line is drawn).t.pencolor(color)t.forward(length)t.right(90)length += 4
- 7.Finally, hide the turtles.t.hideturtle()turtle.hideturtle()

Square spiral
Change the range and the initial value (and increment) of length, and you’ll get differently sized square spirals. Try and see! ![]()
Random spiral
Since we realize that our spiral’s shape depends on the length and the angles, what would happen if we change the angle to something else, maybe 80? We’ll create a randomly shaped spiral, of course!

Random spiral
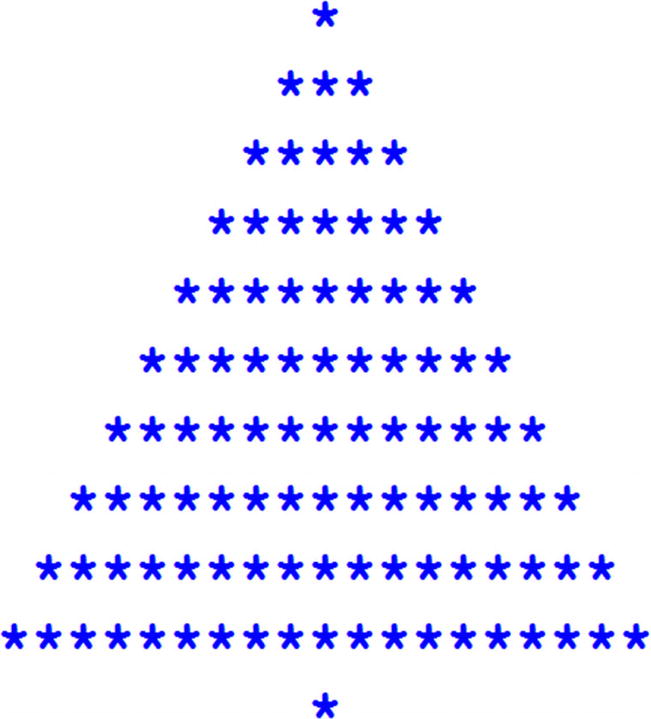
Triangular spiral
Triangular spiral
Star spiral

Star spiral
Circular spiral
Circular spiral
Project 12-5: Complex mandala – completely automated
- 1.Let’s import the random and turtle modules and set up the turtle screen and pen first. Next, let’s change the pen size to 5 and speed to 0.#Mandalaimport turtle, randoms = turtle.getscreen()t = turtle.Turtle()t.pensize(5)t.speed(0)
- 2.
Let’s create a list of colors next.
- 3.
Then, we’re going to make our loop loop through the 1 to 24 (1,25 as the range).
- 4.Let’s choose our random color and change the pen to that color.color = random.choice(colors)t.pencolor(color)
- 5.Now comes the fun part. Mandalas are usually complexly drawn circles, am I right? So, let’s draw 100-point circle for every iteration, but shift the angle by a slight 15 degrees every time, so we get a closely knit mandala design (you’ll see).t.circle(100)t.right(15) #closely formed mandala
- 6.Finally, hide the turtles.t.hideturtle()turtle.hideturtle()
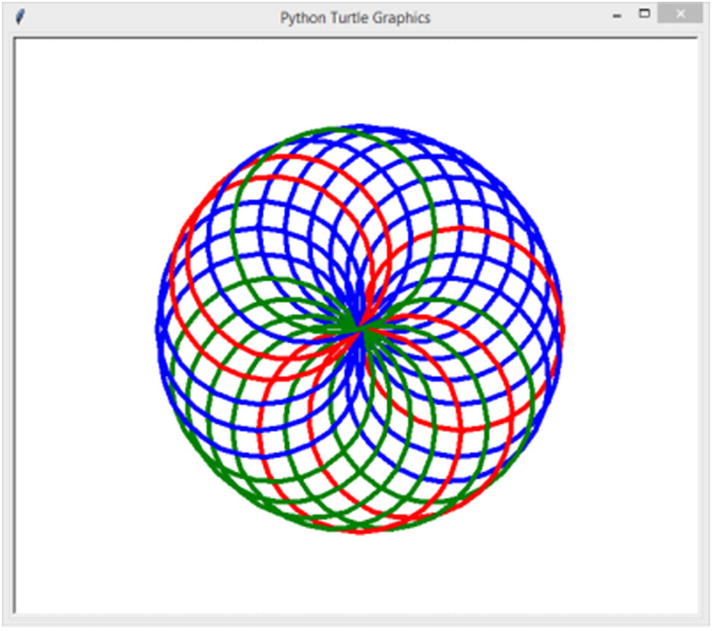
Complex mandala
Try changing the loop’s range, the radius of the circle, and the angle to get different types of mandalas. You can literally create hundreds of designs like this! ![]()
Project 12-6: Turtle race with loops
This is going to be a fun little game that demonstrates the sheer power of for loops and Python’s random package. We’re also going to learn a bunch of Turtle methods we skipped in the Turtle chapters. Excited? Me too!
So, the concept is simple. We’re having three turtles, and we’re going to conduct a race between them. That’s about it. When we’re done, it’ll look like an actual, live race happening on our screen. How do we do that?
- 1.Let’s import the turtle and random packages and set up our screen first.#Turtlesimport turtle, randoms = turtle.getscreen()
- 2.
Now, for our turtle, we aren’t going to go about this the usual way. We’re going to create three separate turtles with the turtle.Turtle() command, named red, blue, and green. Turtle lets us do that. We can create as many turtles as we want and place them anywhere we want and make them draw different things at the same time. Pretty cool, don’t you think?
- 3.Once we create a player (turtle), we’re going to change its pen size to 5, the color of the ‘turtle’ using the color() method, and the shape of the turtle to ‘turtle’ using the shape() method. You’ll see how these works in just a second.red = turtle.Turtle()red.pensize(5)red.color('Red')red.shape('turtle')blue = turtle.Turtle()blue.pensize(5)blue.color('Blue')blue.shape('turtle')green = turtle.Turtle()green.pensize(5)green.color('Green')green.shape('turtle')
- 4.
Finally, let’s hide the main turtle that’s at the center of the screen.
- 5.Right now, if you run the program, you won’t see much. You’d only see the green turtle because that was drawn last. To see the turtles separately, let’s move them to their race positions. I chose arbitrary values after trying out a lot of them. You can choose any starting point you want.#Make turtles move to positionred.penup()red.goto(-250,150)red.pendown()blue.penup()blue.goto(-250,0)blue.pendown()green.penup()green.goto(-250,-150)green.pendown()
- 6.
Now, let’s run the program, and we’ll get this (Figure 12-9).
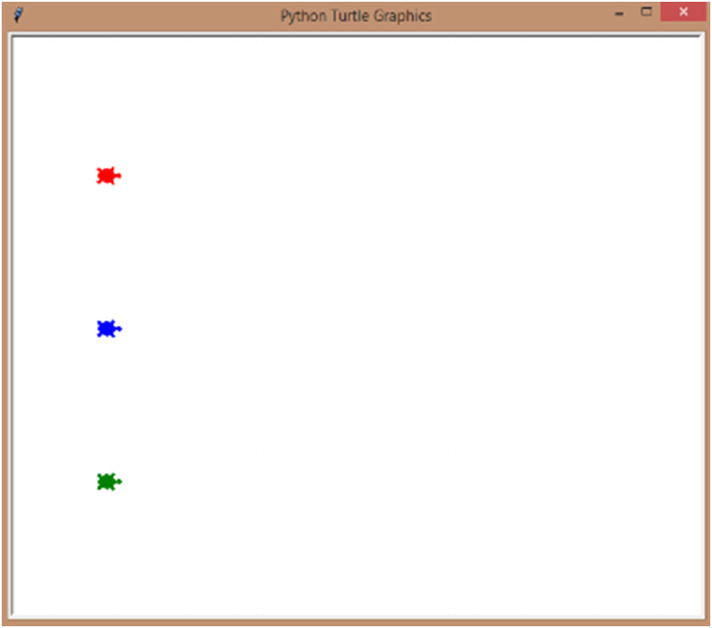
Turtles in position
- 7.Finally, let’s make them race! Create a for loop that runs for 100 iterations. For every iteration, make each of the turtle move forward by a random number from 1 to 10. This way, we don’t know how further any of the turtle will move, and there’s a real-world racing feel to it.#Make the turtles movefor i in range(100):red.forward(random.randint(1,10))blue.forward(random.randint(1,10))green.forward(random.randint(1,10))
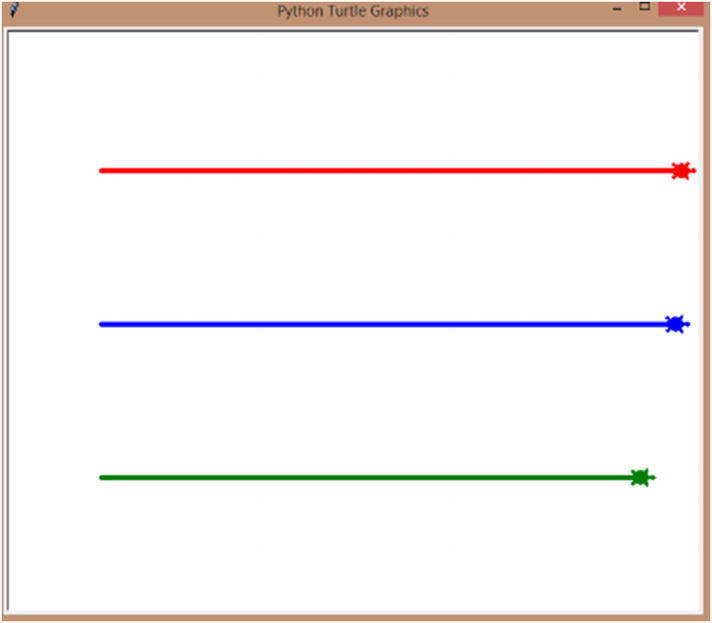
Turtles racing
That’s it for our mini projects! Hope you had fun creating them.![]()
Summary
In this chapter, we looked at six different, interesting and fun, mini projects. We brushed up the concepts we learned in the previous chapters while creating colorful mini projects. We also learned about creating algorithms to solve problems and puzzles in programming.
In the next chapter, let’s learn how to do True automation with functions, how to get arguments to our user-defined functions, how to save time and a lot of lines of code with functions, and a lot more.