This chapter takes a look at the relationship between content related to search engine optimization, including tools you can use to do it yourself. You can think of it as a toolbox of skills, or a skillbox . We’ll take a tour of some of the things I’m suggesting that you’ll want to try when working with search engine optimization.
In some cases, if you’re working for a company, they will already have systems and content, and may even have processes for search engine optimization. Still, there might be the occasional need to develop more, outside of the regular systems. During the learning phase, it can be helpful to know how to do it yourself, so you can get the feel of it or start straight out making “real” content as you’re learning.
The goal is to introduce you to some concepts and tools that I think are worth trying, including for having material to work with as we learn more about search engine optimization through the rest of the book.
Curation vs. Creation vs. Collaboration
The general approach I recommend with content, especially if you’re just learning about search engine optimization, is to think about each of these areas as connected.
Curation
When you curate content, you go out and find it, and then share, review, and comment on it. You might just be gathering and collecting information. Even if you don’t feel like you have a creative bone in your body, you can certainly go out and find material that might be interesting and relevant to your organization and then point to it and comment on it.
For example, in a blog post, you might find a collection of articles on a topic, write brief summaries/reviews, provide links to the original articles, and then offer some kind of conclusion. Or you might find YouTube videos that relate to a particular topic and link to them or embed them in a blog post. Then you might post your blog to social media, and thereby generate some traffic and awareness. The overall goal is to generate traffic to your site, based on providing relevant, compelling content, which will have a positive impact on search engine rank.
Creation
This is the best way to go if you can manage it, and can be the most fun. It takes more time, but it will probably result in the highest impact on search engine optimization. If the content is all you, you are less likely to lead someone to another web site. Ideally, you are inviting people to visit you, and not only giving them a reason to stay on your site longer than 60 seconds, but giving them reasons to come back.
Writing an article, posting to a blog, creating a video—all of these things are fair game, and if you go the extra mile to get know your customers and determine what they actually are interested in, you can create content tailored to the audience. What kind of content you create depends on the organization, but ask yourself who the audience is and consider what kinds of things they’d be interested in. You can ask people in person, by phone, by e-mail, on social media, and so on. It never hurts to test ideas and find out what people are interested in by going directly to them in some way.
Even if you aren’t a “media professional,” it can be helpful to develop some basic content. You can always ask others to review your efforts, and trying it out will help you be in a better position to source it. If you end up having the choice, it’s better to focus on what you do best and hire someone to do the rest.
Collaboration
I think this one is helpful, especially for freelancers, independent business owners, and students. It can be a way to save money, a way to pool resources. You find people you can work with. It might be that you find someone who is a writer, offer to cowrite some content or do some research, and get the benefit of their writing skills or their reputation. If you want to make a video, you find people who are interested in the same outcome—raising awareness of a particular topic—or people who want to try something new just like yourself.
In other words, don’t rule out anything. Even if you don’t feel confident doing it yourself, can’t afford to hire anyone, and don’t know where to start, you might be able to find people who are looking to collaborate, even if it’s just for the learning experience.
In a business sense, it can be the same thing . If a single local business owner doesn’t have enough money for a particular project, you might be able to find a collection of business owners who want to pool resources for some kind of project (such as a video featuring local businesses). Or, using the Internet, you can find similar businesses in different areas and develop an article, a video, or content that could be repurposed for each business. With slight changes, the material could be re-used effectively.
Create a Google Account/Gmail Address
Google has a lot of free tools that make it easier to work with content, and when you have a Google account, it’s easier to sign in to all the tools.
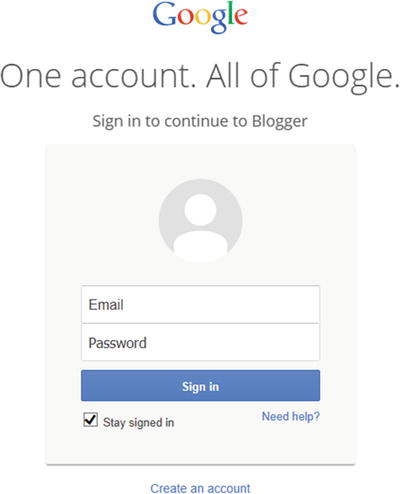
As a first step, I recommend creating a free Google account by going to http://mail.google.com and clicking Create Account. I advise my students in all my classes do this.
Content: Start a Blog (or Find One)
Blogs are an excellent starting places for developing content; they are basically specialized web sites for developing and posting articles on any topic you choose. A blog is a good example of how some of the core areas of digital marketing tie together.

Content : At a typical company, you might have a web site and possibly a blog as platforms for content. The idea is to draw people in and then promote the content.
Social/Search : Then you take some of that content, a blog post for example, and do several things to promote it. You share that article on social media, and you run some ads to let people know about it. You’re putting something out there, and the idea is to draw people back to your site. Google sees it and determines if the content is good enough. If so and if people click on it, Google gives you a bump in your search engine rank.
Analytics : You can put all the effort into digital marketing you want, but if you’re not measuring performance, what’s the point? It’s not just for show, it’s to help your organization be sustainable. The best way to keep things clear is to measure performance, which means paying attention to analytics, such as the number of visitors to your web site.
If you want to start a blog, there are a variety of platforms for blogging, but blogger.com is one of the easiest to use.
My general experience with developing content is that the more complicated you get, the less sustainable it is. That is, you might try to use the most sophisticated platform, approach or tools, but in some cases that can slow you down, when all you really need is good writing and some visuals (or a video). I believe in using the simplest platforms possible, to help make it easier to actually develop content. Blogging and writing articles is one of those things that is easy to set aside or delay. The easier and simpler it is to make and post content, I believe the more likely it will be that you do it regularly. Simplicity is important. That’s why I recommend Blogger as a starting point, and why I ask my students to create a blog as part of every class.
If you’re interested in developing content as a skill, my general suggestion is to create a blog and set the goal of posting to it at least once a month. Choose a topic or tool you’re learning about or a technique you’re interested in, do some research, gather some links, and get in the habit of developing some ongoing posts. It will help keep your skills current and it will also be something you can point to when you’re trying to get clients or find work.
Even if you already have a blog or one that’s been untouched for a while, I still suggest creating a new one in Blogger. It’s always helpful to learn new tools. Another reason it’s helpful is because you could end up in a situation where a client might want to create a blog, and you can help them get started, by being familiar with and showing them different tools.
This same principle applies to some of the other tools we’re looking at in this chapter. I recommend trying them in some way, both for own education but also because the skills could be useful for showing a client (or potential employer) someday.


It turns out that, for this example, the address socialbuzznews.blogspot.com is available. The link for this blog is http://socialbuzznews.blogspot.com .
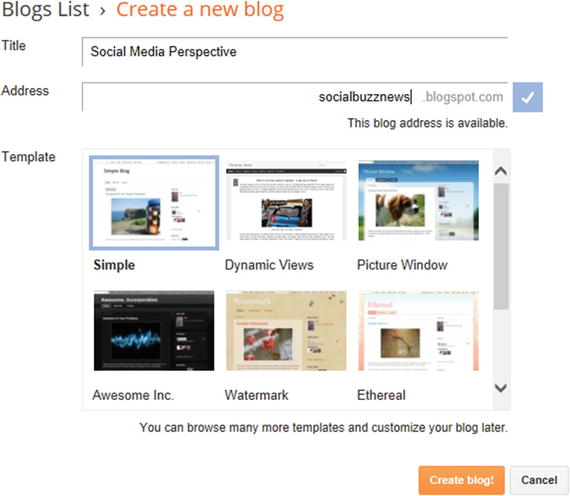
After you’ve selected a template (I recommend starting with Simple), click the Create Blog! button. Following these simple steps, you’ve created a blog and you can start blogging!

Note
One way to “cheat” if you forget the link for your blog is to click on the View Blog button (see the previous screenshot), which will open up the blog in your browser. Then you can copy the link from the address field and paste it into Facebook, or an e-mail, etc.


You can always go there directly using this link: https://support.google.com/blogger .
Weekly Bloggery: What I Do in My Classes
In case you picked the book up from Amazon, you might be interested to try the exercise that I require my students do in the classes I teach, which is simply to blog at least once a week. I often have them blog on specific chapters they are reading.
As a way to learn and as build up a habit of blogging, and as a way to impress recruiters (blogs do), I invite you to start blogging, on this chapter even, and to do so at least once a week. Go into Google Calendar and set up a weekly reminder if you need to. Do whatever it takes. It’s a habit that makes a difference over time.
Simple suggested guidelines until it becomes a habit is to blog as little as 2-3 paragraphs and include a visual of some kind. Learn how to take a screenshot (I recommend using Snagit) or find a picture on a site like www.publicdomainpictures.net .
Just start blogging, simply, and describe something you’re learning. To explore digital marketing more fully, go on over to social media (Facebook or LinkedIn) and share your blog post. Not only will you most likely have people who appreciate seeing it, it will also give you more confidence going forward. That’s no big thing. You might think, “I’m blogging as part of learning how content impacts search engine optimization!”. That sounds impressive, because it is!
Search Drill: Find a Blog
I recommend that you try creating a blog (and even setting a reminder to make a post once a month or more!).
I also a good idea to find a blog that you’re interested in reading, as an example of “curating” content. You can find them using Google (search for “seo blogs”). Find articles that looks interesting and make a note of the links. Then take your readers on a tour of some of the blogs that you found helpful.
Content: Create a Free Web Site
Ultimately, when you talk about search engine optimization, you’re talking about optimizing a web site. To review, a blog can be a web site on its own or it can be part of a larger web site, such as an e-commerce web site where you buy products. But in either case, whatever features a web site has (blog, e-commerce, etc.), it is primarily the content that results in people visiting, the site sending signals to Google, and Google rewarding you with higher search engine rankings.
Whether you are optimizing your own web site or working on someone else’s, it can be helpful to consider creating an “official” web site for a project, event, campaign, or client. I like Blogger because it is simple to use, but it’s not really designed to create general web sites. Other blogging platforms, such as WordPress ( www.wordpress.com —there are free and paid versions), have grown to the point where they can serve as fully-functional web sites, depending on how you organize them.
If you’re getting confused, just think of a blog as a place you post ongoing content, such as a library of articles, and your main site is the reference material that may not change as often, whether it’s for a business or organization.
For general use, I think Google Sites is a good tool for anyone creating a simple web site, and more tools are mentioned at the end of this chapter. I recommend you try making a Google Site and keep it as part of your arsenal. You might even want to have a Google Site be your main site, such as your freelance business, with basic information.
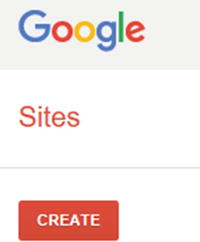
Like Blogger, Google Sites looks simple, but it packs a lot of power. The other advantage of keeping in mind sites like Blogger and Google Sites, is if you’re not a developer, you don’t need to have technical skills in order to create web sites using these tools. It might be a good alternative to provide the service of focusing on the content for the site or marketing, and whip up a site without necessarily having to hire a web developer. There are limits, of course, but it can also be a starting point. For example, use Google Sites to gather content, organize, and prototype, and then, when you have a better idea of where things are going, hire a designer/web developer or get costs and let your client choose.
I think the same applies to marketing microsites—say you develop a social media campaign and you want to have a microsite. A large part of the battle is developing the content—gathering it in the first place—and you could start with a free tool, take it to the limits, and then decide if you need a more flexible or professional looking design.
One other thing I’ll say is that with the rise of mobile devices, the rules of design are changing a bit. It’s not that you want to ignore design, it’s just that you can’t fit as many visuals on a smaller screen, and the mobile user is particularly interested in getting to the information. In other words, going to a site that looks okay on mobile devices (i.e., is simpler) is not such a bad idea.
So, back to Google Sites.
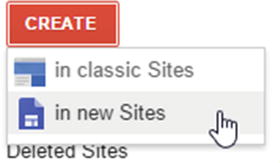

If you’re taking it for granted how easy it is, try going to Godaddy.com and look at how much effort is required to start a hosting account and get a web site started. Whether you’re using a content management system like Drupal, which is a website builder or using a manual tool like Dreamweaver, it’s a lot of work. I guarantee after trying that, you’ll appreciate how much time you’re saving by just being able to click Create. Thanks, Google.
As with Blogger, there are some prebuilt templates you can choose from. In It’s a little bit trickier to go back and change things in Google Sites, so until you spend some time really exploring it, I recommend choosing the Blank template at first.
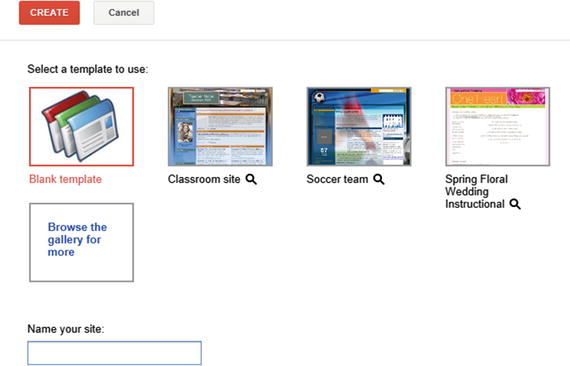

You also have to type in the CAPTCHA code (such as “bitsu” shown previously) before you click the Create button.

Keep trying until you find one that’s available. Voila! You have a new web site.
To learn more about Google Sites, go to either of these links, which point to the same place: https://support.google.com/sites/?hl=en#topic=1689606 or http://tinyurl.com/googsite-help .
My recommendation is to begin by making a basic site. It could be for yourself or your portfolio, or for a potential client, such as an imaginary local business or a promotional campaign of some kind.
Note
There is a “classic” version of Google Sites, and a new one that Google is rolling out. I recommend trying the classic version first, until the new one works. Google may give you a choice of which to use.
Other Systems for Making Web Sites
Take a look and try them out. Even if you’re an intern at a large corporation, sometimes big companies use microsites too—especially in marketing situations.
Personally, I have been pretty impressed with Weebly.
Make/Edit a Video (or Find One)
It’s true that entire books, or sets of books, could be written about each individual section in this chapter, but I’m recommending some simple starting points that are helpful for making content. With video, as with blogs and web sites, you may end up wanting to hire an agency or professional to do the final video. At the same time, individual can do pretty interesting things on their own, with something as simple as an iPhone.
There are a variety of ways to make videos, and if you don’t have a video camera or iPhone, I recommend getting an older iPhone or an iPod (yes, they still make them) for the purpose of filming video. You can get a used iPhone fairly cheaply, connect it to WiFi, and upload videos directly. As of this writing, even a new iPod is $200, which is not too bad, with no monthly cell phone bill. (It’s also true that a used iPhone could be used for making video and some other uses, even over WiFi.) If you’ve always wanted an iPad, there are used options there too.
The reason I recommend one of these options for experimenting with video is because it’s simple, easy to use, creates high-quality video, and you can upload the video directly to YouTube.
Getting familiar with it, including making simple videos (such as interviewing someone) and posting them on your blog or web site, can be good experiments—all good ways to build skills and your portfolio. In more professional environments, even if you’re requesting a budget to hire a professional videographer, you might still want to try prototyping your ideas with cheaper modes of video.
Keep in mind that some of the most popular videos on YouTube were created with really simple equipment—it’s more about the idea than the equipment.

Part of the reason I am suggesting this kind of arrangement is to keep the technical hassles to a minimum, so you focus on the content. The easier it is, the more fun it is, the fewer hassles there are, and the more confidence you will build from trying things out. Just a starting point.
By comparison, you can certainly get a digital camera with built-in video capability, or any number of dedicated cameras, load video editing software on your computer, and then transfer the video to your computer. In fact, I encourage you to explore that approach at some point.
But to begin with, I recommend getting a cheap iPhone or iPod or iPad, perhaps one that isn’t the latest version. Just make sure it has built-in video.
I’m suggesting you try some videos without even editing or just by using YouTube’s built-in editor. Meaning you shoot some short clips on your simple mobile device and upload them to YouTube. Then you edit them on YouTube. Simple, fairly easy, and lets you focus on the content.
Another option is certainly Android, an alternative to an iPod or iPhone. Another option is the Android, an alternative to an iPod or iPhone. My general experience is that Apple takes a lot of time to provide a good, simple, fairly stable user experience, whereas with the Android platform, it depends on the manufacturer. The time you spend on figuring things out may take away from having fun. However, to save money, or to avoid Apple specifically, Android tablets are certainly a good option.
At the time of this writing, you can get an Android tablet, with the capability to shoot video and upload it to YouTube, for about $50 USD.
Editing on YouTube
My recommendation is not to worry too much about the video; just try shooting “something,” even if it’s really simple, and then upload it to YouTube.
The YouTube Editor is located at https://www.youtube.com/editor .
Even though you can do some very basic editing on a phone, you don’t necessarily need video editing software on your computer. On a Mac you’re set for starters, they come with iMovie. Some Windows-based machines include basic video editing software as well. The point is that now you can upload video to YouTube and edit there. Why would you want to edit? To focus things, to pick out clips you want, reassemble them, add some music, and so on.
Getting Going on YouTube


As with the other topics, entire books could be written about on shooting and editing video. You may want to look at some, but I also encourage you to try an experiment of making a simple short video and not worrying too much about technique yet. I think it will give you confidence.
With regards to developing content to help boost search engine rank, it’s worth noting that YouTube is the second most popular search engine.
That’s right, YouTube is a search engine—for videos. So you should develop video and post it on YouTube, and then actually embed it in your blog posts or on your site. (See the front page of www.rgbexchange.org for two “embedded” YouTube videos.)
Putting videos on YouTube is also a form of search engine optimization, only your goal on YouTube itself is to get as many people to come to a section of the site, based on getting ratings, etc. Technically, though, it is still a web site—a section of YouTube that you can manage, where you post your videos and put other information.
YouTube is also a social network, so it’s part of content development and social media marketing. I think video is probably one of the strongest, long-term things that will still be around as social networks rise and fall. Getting familiar with making a video, even if it is rough or simple or mainly informational, is a good thing.
More Reading on Video Editing
Use YouTube Video Editor: https://support.google.com/youtube/answer/183851?hl=en or http://tinyurl.com/useyteditor
Quick and Basic Video Editing with the YouTube Editor: http://www.howtogeek.com/howto/23346/quick-and-basic-video-editing-with-the-youtube-editor/ or http://tinyurl.com/ytquickandbasic
Basics of Video Editing: http://lifehacker.com/5785558/the-basics-of-video-editing-the-complete-guide or http://tinyurl.com/lhvideoediting
Introduction to Basic Concepts: http://diyvideoeditor.com/video-editing-basics/ or http://tinyurl.com/diyvideobasics

Adjusting Digital Images
Another area I recommend exploring for the purposes of social media marketing is digital images. This can mean something as simple as looking on Google for images. Once you find an image you like, you can right-click on it and save it to your computer (Windows) or hold Ctrl down and click on the image to copy it (Mac). Try some simple image searches and practice with those images first. Then explore royalty-free image collections and services like clipart.com.
The point is, eventually you’ll probably want to at least try playing with adding images to a blog post or web site, and it’s good to know how to work with images or pictures for posting to social media. For example, even when you have a text-based post, an interesting, related picture can lead to more attention.
Even though when you upload images to web sites or blogs, there are often built-in “resizing” functions, you still might want to try a tool like www.picresize.com to crop an image or resize it. (Try looking at the help section.)
In other words, there are online tools you can use, without necessarily having to learn a complex image editing program like Photoshop (costly) or Gimp (open source at www.gimp.org ).
Taking Screenshots
For grins, and to add some value to your blog posts, I recommend learning how to take screenshots, especially students and interns—or anyone for that matter. Think of it as a way of taking pictures on the web. For example, most of the images in this book are screenshots, where I take a picture of something and then discuss it.
One reason you might want to do this is because in a blog, you might want to add visuals, and taking a picture of a piece of software, or a web site, is an easy way to get a visual.
Greenshot is one free tool you might like to try. You find it at www.getgreenshot.org .
On the Mac, you can also press Cmd+Shift+4 on your keyboard to capture whatever is on the screen. (See http://guides.macrumors.com/Taking_Screenshots_in_Mac_OS_X for more information.)
Your mission should you choose to accept it is to choose a feature in something like Blogger, Google Sites, or even Facebook, explore it, take a screenshot or two of it, and put it in a blog post.
I also recommend taking a serious look at Snagit. There’s a free trial, and it’s a good way to be able to add arrows and text, easily edit images, take screenshots, etc. (it’s what I use for the books I write).
Conclusion
Congratulations on getting your feet wet with what I believe is the true foundation of search engine optimization—actually making content. Google is always working on updating things, with the goal of making it easier for you to focus on what’s most important—the content, as opposed to all the technical things that go around it. Blogger and Google Sites are good examples of this. They are excellent learning tools for non-profits or small companies that need to be frugal. Then there are always the slightly more sophisticated options, such as WordPress, Wix, and Weebly—the three Ws!
Try one new product or tool each week, and of course blog about it. Use Blogger, Google Sites, Wix, Weebly, or WordPress. Go for it.
Best wishes getting started with content!
Note
What are you supposed to write about? Search engine optimization, of course! You don’t need to be an expert. Just explore as if you were touring a different country, take pictures on your travels (screenshots), and then tell people about your experience in blog posts.
