Writing about video tools in a book about photography tools, in this age of transition at least, means also writing about converging media, or convergence for short. I began writing about convergence years ago when none of the major camera manufacturers had incorporated video at all, let alone decent-quality HD video, into professional still camera equipment. I didn’t have inside industry knowledge, just the crystal ball of experience that told me the convergence of still and video was in the cards for photographers. (See Figure 7.1.)

Figure 7.1. We’ve come a long way from old 16mm “home movie” cameras to the video capture devices that are available today. Copyright © Steve Weinrebe
For the past many decades the moving image and the still image prospered independently. When young people were interested in making images, usually they would have the choice of pursuing film school or photography school, and then to pursue either a career in film or video, or go in the direction of still photography. Each of those avenues had myriad career paths, and each career path took years to master.
Enter the computer, and digital imaging. When I first became professionally involved with digital imaging circa 1991, scanning transparencies into Adobe Photoshop to create photo-illustrations for magazine covers, I started attending computer user groups. I was struck by the way different professions were pulled toward the magnetic core that the computer and Photoshop had become at that time.
One user group I attended was held in a hospital’s amphitheater, populated largely by doctors. Yet the discussions were all about photography and Photoshop, not how computers and imaging might change the practice of medicine. Another user group was attended by architects and graphic designers. Clearly when so many industries are using the same tools, there is going to be a convergence of industries and jobs. If I use a computer and Photoshop, and my customer uses a computer and Photoshop, at what point is my customer going to say, “Hey, I can do that, and I can make more money doing that myself …”? Integration, convergence. (See Figure 7.2.)

Figure 7.2. This is a frame from the award-winning children’s video Popsies, which was shot almost entirely with equipment that would be traditionally considered still photo gear. Copyright © Steve Weinrebe, Getty Images. Copyright © Whole Cloth Productions™
These days, digital imaging tools are standard in all the trades mentioned here. There have been sea changes, caused by digital imaging, in both still and motion picture photography, as well as countless other industries, including news reporting, graphic design, medicine, law enforcement, architecture, real estate, and the list goes on.
When a young person asks me for advice on getting into a career in photography, I tell them, “Learn everything you can about video.” By the time someone has asked me that question, they are usually well along the learning curve in the art of the still image. But making money from still images is another matter, and there is no use pigeonholing a start-up career in the visual arts. The devices we use to make images, the software we use to process images, the devices we use to view images all are capable, or becoming capable, of handling both still and moving images.
Online video websites and social networking have also helped push along convergence. After all, a spontaneous video shot from a point-and-shoot or camera phone is the most fun if it can be immediately shared with others. Part of what is driving convergence is portability. It’s easier to carry a camera phone than a camera and a phone. A point-and-shoot camera substitutes just fine in most situations for a larger video camera. A digital SLR with HD video capabilities replaces an entire other camera bag of video gear, for the pro photographer who shoots both still and video. (See Figure 7.3.)

Figure 7.3. Another still from the children’s puppet video Popsies. The production represents an example of convergence, because it was shot with mostly traditional photo gear. Copyright © Steve Weinrebe, Getty Images. Copyright © Whole Cloth Productions™
Regardless of how sophisticated your end use will be, as I’ve said before, whenever possible, spend your money on good cameras and good lenses. I’ll make some tool recommendations for use with convergent video gear, digital SLR, point-and-shoot, and camera phones, that might save a few pennies along the way.
Tip
More and more photojournalists are being asked to shoot both still and video when covering stories. To see some of the very creative work being done by some of these photographers, scour the online news websites for features that include both still and video. One excellent website showcasing the integration of still and video reportage is www.mediastorm.org.
Technically, this tool is a manure, hay, and bedding fork replacement handle, and I’ll call it a fork handle for short. You can find one at a big box hardware store, and at a local hardware or farm tool store depending where you live. The fork handle is designed as a replacement for the broken wooden handle of a pitchfork for hay. This handle makes an excellent monopod or boom for both smaller and larger cameras. (See Figure 7.4.)
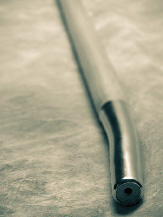
Figure 7.4. A hay fork replacement handle can be easily modified into a monopod or boom for a digital video camera. Copyright © Steve Weinrebe
A monopod takes on great importance when shooting video. The extra sway and easy repositioning of a monopod allows the photographer to pan and pivot the video camera for more seamless and flexible motion capture. Equally important for motion capture is a boom because some shots require the dramatic angle that a boom can provide. For a tool to serve both these purposes, it needs to be heavy enough to be sturdy as a monopod, yet light and inflexible enough to hold out as a boom.
This fork handle is 48 inches long and made from a sturdy hardwood, ash, and has a steel collar covering the end of the pole. The handle is contoured in a way that makes it very comfortable to hold. However, it requires one simple modification—a three-eighths-to-one-quarter-inch adapter screw. (See Figure 7.5.)
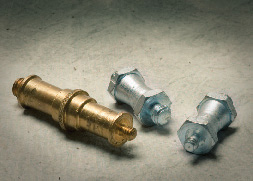
Figure 7.5. Here are a couple of different one-quarter-to-three-eighths-inch tripod screw adapters. The round adapter is called an adapter spigot, and the hexagonal adapter is called a camera stud. Either will work. Copyright © Steve Weinrebe
The fork handle, on the fork end, has a pre-drilled hole just large enough to screw the three-eighths-inch end of a tripod screw adapter into. If you get one that doesn’t have a hole on the end, you’ll want to pre-drill it. Then you’ll need a three-eighths-inch-male-to-one-quarter-inch-male screw adapter, also known as an adapter spigot or a camera stud. Either the spigot or the stud will work. These are commonly available online or at a professional photo retailer. Screw the three-eighths-inch end into the hole at the end of the fork handle, and the quarter-inch end of the adapter can be easily screwed into any camera. (See Figure 7.6.)

Figure 7.6. With a tripod screw adapter attached to the fork handle, the quarter-inch end of the adapter easily screws into most cameras, small or large. Copyright © Steve Weinrebe
Once you’ve attached your camera to the fork handle, you’re set to use it as a monopod or as a boom. A monopod gives that extra bit of stability that can make a motion capture look smooth. Plant the bottom end firmly on the ground, holding the monopod to the ground while panning the camera as need be to get a fluid motion and capture the scene fully. (See Figure 7.7.)
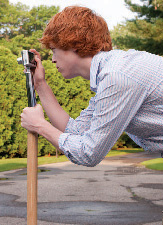
A camera boom can get you shots you otherwise wouldn’t be able to get—looking down and outward from a bridge, for example, without getting the railing in the shot, or up and over obstructions. The fork end of the handle has a slight bend to it that I’ve found works to the photographer’s advantage, when using the fork handle as either a monopod or a boom. You can tip the bend toward you for a slight up angle, and away from you for a slight down angle. (See Figure 7.8.)
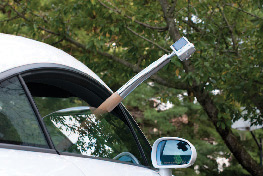
Figure 7.8. Using the fork handle as a boom, the photographer or videographer can capture shots from otherwise impossible vantage points. Copyright © Steve Weinrebe
Tip
Most people think of raising a camera high up when they have the camera on a boom, but one very interesting point of view is a worm’s-eye view, or a view from very low to the ground. Just hold the fork handle with the camera at the bottom and start the capture. The moving image will be upside down so you’ll need video-editing software capable of rotating the video 180 degrees.
My neighbors keep coming over to borrow my light bulb changer. I keep the large one on a painter’s extension pole. Sometimes I use it to change burned-out floodlights that are installed high up on the eaves of my house. But sometimes I use it to hold a camera high up to get a bird’s-eye view, high-angle shot, of a scene that would otherwise be very difficult. The light bulb changer is great for this because it is a cup-shaped device with several spring elements that naturally form around what you put into it. (See Figure 7.9.)
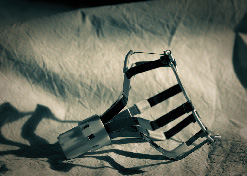
Figure 7.9. A light bulb changer has several spring elements that can clamp around a camera. The base of the changer screws onto a standard extension pole or broom handle. Copyright © Steve Weinrebe
For video with a digital SLR, or with a point-and-shoot, the light bulb changer makes high-up shots simple. Light bulb changers come in different sizes and shapes, designed to remove and replace different sizes of light bulbs. The large changer is designed to wrap around floodlights and can accommodate a digital SLR of moderate size.
The medium-sized changers are designed for standard round, or A19-size, light bulbs. A point-and-shoot camera can fit on end, into one of these medium changers. That makes the medium changer less suitable for video because you’d be stuck with a vertical image. But if you’re doing still work, consider the medium, A19-size light bulb changer as a tool to attach the point-and-shoot to a boom.
For the large bulb changer, you’ll want to use a protector for the camera so the metal of the changer doesn’t scrape the camera body. Rubber grippers (see Chapter 3) work great for this because they don’t take up any extra space, yet protect the camera from scratches and hold the camera in the bulb changer by gripping the camera and changer tightly. (See Figure 7.10.)

Figure 7.10. Use rubber grippers, the kind used to open jar lids, to protect the camera from scratches and help hold it tight in the light bulb changer. Copyright © Steve Weinrebe
Once you’ve placed the digital SLR into the light bulb changer, you can screw an extension pole into the changer to use the setup as a long boom for the bird’s-eye high-angle shots. Some changers actually come with a pole, and that can be a money saver. If you really want to stretch your camera up high for your video shoot, consider investing in a good, solid, painter’s extension pole—something substantial and easy to hold on to.
Whatever pole you use, after you screw it into the light bulb changer’s base and tighten the locking thumb screw, if there is one, test your boom out safely before using it. First gently tug on the camera and make sure it isn’t scraping any rough surfaces. Add padding or another rubber gripper if need be. Then, holding the pole, hover the camera just over a mattress or very padded surface and jiggle the pole gently to make sure the camera doesn’t fall out. If it does, well, better first over a mattress than over pavement or water. And if it falls out, add padding or a flexible strap to make it more secure.
Even still, only use a light bulb changer to nest the camera for work up high, not to hover it laterally, parallel to the ground. Use the fork handle discussed earlier in the chapter for that. For work up high though, the bulb changer boom works very well. (See Figure 7.11.)

Figure 7.11. Use the light bulb changer on a pole to hold a camera up for a high-angle shot. Use a wired video cable to a monitor if you need an accurate preview. Copyright © Steve Weinrebe
Now that the camera is tested and firmly held in the light bulb changer, the boom is ready for action. Start the video capture and then, holding the pole vertically, extend the pole as need be and hold the camera up high. Gently rest the pole against a firm surface if you need stability. Video shots like this are often best edited into shots taken from a standard viewpoint, so you may not need much footage from the high-angle point of view. The unusual viewpoint can add a great deal of drama, though, even if the clip is a moment in a longer scene. To better gauge what’s being captured, use a video-extension cable for a preview on a separate display.
We can’t all afford a professional device to steady video where the videographer is moving. There is some terrific equipment out there for just that use, but it goes beyond the bounds of irreverent tools. But there are ways to make your tracking shots—that is, video where you move along with, or toward, your subject—at least a little more stable. That’s where hook-and-loop fastener straps come in. (See Figure 7.12.)

Figure 7.12. Hook-and-loop fastener straps can hold a tripod or boom to your body while you shoot a video while tracking along with your subject. Copyright © Steve Weinrebe
You can purchase hook-and-loop straps of varying sizes at hardware stores and online. You may even have some lying around unused. If you can, get the type of strap that’s meant to wrap back onto itself, with a buckle on one end so that it can loop back onto itself like a belt. You might find straps like this in a medical supply store.
If you can’t find straps like that, the two-sided straps that peel apart can work, but you don’t want straps with adhesive because you’re going to use the strap like a belt. A fabric store would be a good source for non-sticky hook-and-loop straps in a wide width. You’ll need to sew a piece of the loop side onto the end of the hook side so that, when you wrap it around like a belt, you have something to attach the loop side to.
Either way, you’ll want a strap long enough to wrap around both a tripod and your waist. Depending on what you get, you may need to double up two straps by strapping one to the other. Look for a strap two inches wide because that is pretty comfortable wrapped around your waist. You could use a belt or a stretchable cord for this tool, but neither is as comfortable, easy to tighten, and easy to take off one-handed as the hook-and-loop strap. (See Figure 7.13.)

Figure 7.13. Hook-and-loop fastener straps hold a monopod, or a tripod, around a videographer’s waist to hold the camera steady for a tracking shot. Copyright © Steve Weinrebe
Attach the camera to the tripod first. Then, while holding the tripod against your midsection, wrap the strap around both yourself and the tripod. If you have someone to help you, all the better, but this can easily be done by the photographer alone. The advantage of the hook-and-loop strap with an end buckle is that you can adjust it by pulling it tight before you go to work with the camera. Position the strap high enough above your hip so that the gait of walking won’t sway the camera. You can use your hands to add an extra bit of stability to the tripod, but your waist is doing most of the work and holding much of the weight.
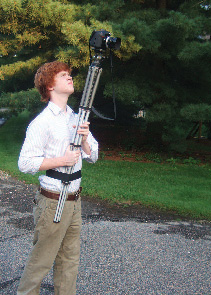
You can also use this for tracking shots where the camera is higher up. Use the hay fork handle, discussed in beginning of this chapter, as a boom with the strap holding the boom tightly to your body. You can track a video segment this way with the camera at least a foot or two above your head. You would never be able to hold the camera as steady with your hands and arms. (See Figure 7.14.)
If holding the camera on a boom via straps on your waist doesn’t steady the camera enough for you, or you have trouble walking with the camera this way, you may want to attach a tripod to a dolly for a moving video shot. A mover’s dolly is ready-made with four wheels on ball-bearing pivots and soft carpeting covering the wood frame. You can purchase mover’s dollies at hardware stores and moving supply stores. They are pre-made and inexpensive. (See Figure 7.15.)

Figure 7.15. A mover’s dolly has pivoting wheels and soft carpeting over the wood frame. A tripod can turn it into a moving dolly for motion video. Copyright © Steve Weinrebe
To use a mover’s dolly as a dolly for a tripod, though, something needs to be added to hold the tripod’s legs to the dolly. What I have used is an inexpensive plumbing item called a floor flange. The floor flange is a disk of metal designed to screw pipe to. You can buy these in the plumbing aisle of a hardware store or at a plumbing supply store. Floor flanges come with different-sized center holes for different-sized tripods so you can buy a set of three to fit the legs of smaller or larger tripods.
The flanges have four screw holes each, so they will be nice and secure on the dolly after you screw them in. Mount the flanges in a triangular pattern. If they’re a little uneven so the tripod isn’t fully spread out, the tripod will still be very steady because of the way the legs push into the flanges.
You won’t need the screw threads of the flange unless you want to be even more irreverent and make your own tripod from plumbing pipe. The legs of the tripod will sit in the holes of the flange and be anchored by the lip around the holes. (See Figure 7.16.)

Figure 7.16. Three floor flanges, bought in the plumbing supply aisle, are mounted to the mover’s dolly to secure the legs of a tripod. Copyright © Steve Weinrebe
Now that the mover’s dolly has something attached that the tripod legs can fit into, simply place the tripod onto the dolly and you have a rolling dolly for moving video shots. Your total cost for a new mover’s dolly and flanges may be less than $50, or a little more depending on where you live and what dolly and flanges you buy.
This is considerably less expensive than any professional equipment made to move a video camera on wheels. But that’s another advantage of convergence. The equipment that still photographers have available for video now is much more lightweight than ever before. I’m not talking about traditional broadcast-quality video gear, but for gorilla or independent, or online video, you can have a lot of fun with motion shots from a simple dolly like this. (See Figure 7.17.)

The kind of tracking shots I’ve referred to are really fake tracking shots, because without a track, it’s not literally a tracking shot for video. If you want to move along with your subject, or move toward or away from your subject, with a more controlled motion than you can get with the mover’s dolly alone, you need something to help the dolly move in a straight line. Heavy track is hardly irreverent for this purpose, but some inexpensive vinyl gutter works just great for lightweight gear like a digital SLR, or point-and-shoot camera, mounted via a tripod on a mover’s dolly. (See Figure 7.18.)
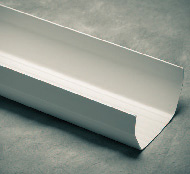
Figure 7.18. Vinyl gutters are inexpensive and can be paired on the ground as a track for a dolly. Copyright © Steve Weinrebe
You can purchase vinyl gutters in 10-foot lengths at hardware stores. They are amazingly inexpensive given that you get 10 feet worth. The gutter pictured cost considerably less than $10. You’ll need a pair of gutters, but they are very lightweight to carry to the checkout line, and to transport home.
Figure out what you want to see in the video tracking shot. Walk the length of the shot and look with your eyes, with cropping Ls, or through the camera. Then lay the vinyl gutters on the ground parallel to each other, and apart as wide as the wheels of your dolly. You can use packing tape or sticky wax to hold the gutters in place. If the surface warrants it, use screws to hold the gutters in place. Then place the dolly onto the track, mount your tripod and camera, and take the tracking shot by moving the dolly along the gutter track while capturing the scene. (See Figure 7.19.)
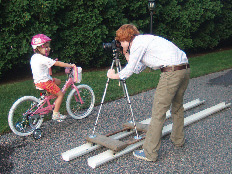
Figure 7.19. Tack the gutters down with wax, tape, or even screws if possible. Place the dolly in the gutters and roll the dolly along the track of the gutters to capture the motion tracking video. Copyright © Steve Weinrebe
The vinyl gutters are very thin and can be easily overlapped to make longer tracks. The track length can be modified by how much sections of gutter overlap. The run of track is going to be straight, but that will serve most motion tracking images. If you really need to turn corners, you may be better off using a boom from out of the window of a slow-moving vehicle. For linear tracking shots, moving alongside a moving subject, or toward or away from a still subject, a straight track works very well.
Tip
To transport a 10-foot length of material like a vinyl gutter, you may need to poke it out of a car window to carry home. If you do, tie something red, like a red bandana, onto the end that’s sticking out of your car. That should be standard operating procedure (SOP) anytime you have something extending out of your car window. If you don’t have a red bandana, use red ribbon. Keep some in the trunk of your car at all times so that, when you do buy something like a 10-foot vinyl gutter, you’ll always have the red safety ribbon with you. Of course, drivers around you will appreciate the warning flag the red bandana or ribbon provides.
There is a dizzying array of lighting solutions available for photographers and videographers. Some of these lighting tools overlap, although you’ll often see different lights, and light modifiers, if you search the photo and video catalogs. With the convergent media that dual-use cameras provide for still and video, photographers can really benefit from keeping several light bulb base adapters for adapting light bulbs to different fixtures for video. (See Figure 7.20.)

Figure 7.20. Light bulb base adapters are made for most screw-in types of bulbs, usually to allow bulbs with smaller bases to fit into fixtures with larger sockets. Copyright © Steve Weinrebe
Whether your video lights are utility lights, professional studio lights, or wall and table lamps, there are too many types of bulb sockets to bother to keep light bulbs for all of them. Likewise, video may require many different wattages of light bulbs, and to keep different wattage bulbs with different sockets on hand is a burden on both the expense account and storage space.
Typically, a problem with using still photography lighting for video is that video requires a much lower light intensity than still photography does. Video lighting also needs to be a continuous light source, not flash. So you need nice light, not bright light.
Traditional photo light modifiers work just fine. Fill reflectors, soft boxes, flags, gobos, snoots, barn doors—all are useful for video lighting. Likewise, natural lighting can look great with video. Light intensity is equally an issue with natural, or available, light. A window might greatly overpower a room light, or a room light might be underpowered to fill in shadows or balance against another room light.
Bulb adapters let you use lower-wattage lights in fixtures designed for higher-wattage lights. That’s safe; the other way around isn’t. Don’t use high-wattage lights in fixtures rated for low-wattage lights; you’ll risk a fire. Bulb adapters let you screw light bulbs with smaller sockets into fixtures designed for light bulbs with larger sockets. (See Figure 7.21.)
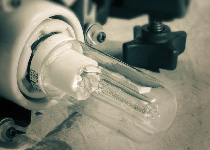
Figure 7.21. Because video requires less light intensity than still work, you can use socket adapters to modify fixtures designed for larger bulbs to accept smaller bulbs, such as with this professional photo light. Copyright © Steve Weinrebe
The types of sockets that you’ll likely be dealing with in the US are the oversized Mogul base, the typical Standard base, and the smaller Candelabra base. You can easily find socket adapters for all of these. The European base is somewhere in between the Candelabra base and the Standard base, and socket adapters are made for those as well.
A light designed for a Mogul base might be rated for bulbs as high wattage as 1,000 watts. Thousand-watt bulbs and 500-watt bulbs typically have a Mogul base, and the fixtures that accept them are rated for the high temperatures those bulbs reach when lit. For video, 250 watts likely is plenty if you’re using a light modifier like a soft box. A 250-watt bulb usually has a Standard base. So screw the lower-wattage Standard base bulb into a Mogul-to-Standard socket adapter and that into the fixture designed for the Mogul base, which may be a spotlight or other tungsten hot-light fixture for photography.
Likewise, if you have a lamp in a room that is a little too bright, and the only low-wattage bulbs you have on hand are 25-watt Candelabra base bulbs for a chandelier, for example, that’s no problem as long as you have some Candelabra-to-Standard socket adapters handy. Screw the Candelabra-based bulb into the socket adapter and that into the lamp. The socket adapters are a lot more convenient and inexpensive than dimmers.
Tip
If you ever find yourself in a conversation with a video lighting expert or salesperson, you may hear light bulbs referred to as lamps. Traditionally, and technically, in the world of light bulbs, “lamp” is the correct terminology for what we usually call a bulb. Conventionally, though, a lamp is something with a shade sitting on the piano, and a bulb is what you screw into it.
Previously, I wrote about an archery quiver as a tool to tote around a small tripod (see Chapter 4). That quiver was cloth, but some quivers have a hard shell and, like the quiver in Chapter 4, hang holster-style from a belt. A hard-shell quiver makes an excellent and accessible case for a shotgun microphone. (See Figure 7.22.)

Figure 7.22. A hard-shell quiver makes an excellent and accessible case for a shotgun microphone. The quiver pictured is a Trophy Ridge Mohican Hip Arrow Holster. Copyright © Steve Weinrebe
The convergence of still and video cameras has yielded some excellent equipment that photographs very good quality HD video. But video is rarely presented without sound. Sophisticated video equipment has either much better microphones as part of the camera package, audio-out ports on the camera, or both. Fortunately, new digital SLR cameras that feature good-quality video incorporate audio-out ports as well. Audio-out ports give the photographer more options because different types of external, wired microphones are made for different purposes. Almost any external microphone—that is, a microphone that’s not built into the camera—will yield better audio recording quality than a built-in microphone on the camera.
A popular type of wired microphone for recording sound for video is called a shotgun microphone. Although some microphones are designed to record ambient noise from all around the tip of the microphone, the shotgun microphone is very directional. Its design is mostly suitable for picking up sound from one direction, such as for a person talking. This makes a shotgun microphone ideal for video shoots where you want to record an actor reciting lines, or a subject being interviewed.
Smaller shotgun microphones might fit in a camera bag, but many shotgun microphones are long and more difficult to carry easily without holding them in your hand. If you want to be ready to capture sound at a moment’s notice, a holster-type archery quiver works very well. If the shotgun microphone isn’t long enough to poke out of the quiver, simply stuff some padding on the bottom of the quiver to adjust the depth the microphone drops to. (See Figure 7.23.)
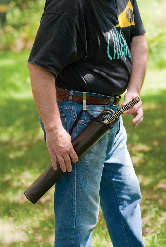
Figure 7.23. The Trophy Ridge Mohican Hip Arrow Holster holding a shotgun microphone at the photographer’s side, ready to pull out and use for directional sound recording. Copyright © Steve Weinrebe
The quiver pictured in Figure 7.23 is a Trophy Ridge Mohican Hip Arrow Holster. Simply hang the quiver from your belt by the included clip, and drop the microphone into the quiver. Because the quiver is open ended and hanging at your side, it’s easy to grab the shaft of the microphone and pull the microphone out to use for directional sound recording. When it’s not in use, you can coil the cord up into the top of the quiver, or into your pocket.
Orange safety cones, you can’t miss them. There’s a reason—because they scream out to anyone driving, walking, or riding a bike that there is something up ahead to watch out for and not run into. I don’t go out for a public shoot without an orange safety cone in the car, just in case. (See Figure 7.24.)
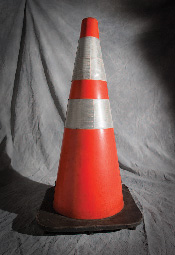
Figure 7.24. Use an orange safety cone to protect yourself from being run into while on video shoots. Copyright © Steve Weinrebe
A typical risky scenario you may need a cone for: you are doing a video interview of someone on a sidewalk in front of his establishment or home. You want to pull back and get more in the frame, so you step farther and farther into the flow of pedestrians, though hopefully not into the flow of traffic. As you pull back, pedestrians in a hurry walk right between the camera and the subject.
Believe it or not, that’s happened to me many times. After all, tourists are interrupted in their picture-taking all the time by people walking in front of the camera, so if there’s nothing official like an orange cone, you might not be doing anything pedestrians feel they should walk around. Place an orange safety cone next to you or off to the side of your setup, and people will be much more inclined to walk around you. The orange cone brings respect.
The orange cone is a small and inexpensive device for safety. You can purchase orange safety cones at hardware stores, and they are not expensive. Add some reflective tape if you are shooting at night.
If you are shooting a large production, you need lots of them. Photographers tend to travel light, though, and I’ll go on the assumption that if you are a photographer shooting some video, you don’t have an army of assistants to divert traffic, nor enough of a budget to pay the parking authority to close the street for your video shoot. An orange safety cone won’t protect you from idiot drivers, nor from idiot pedestrians, but at least it’s a little extra signage to alert anyone around you that there’s a photographer, and some potentially expensive gear, in their path.