Packing equipment to go on location for photography can be a daunting process. Lists don’t help very much because every location shoot has different requirements depending on locale, subject, time of day, and so forth. The inclination is to just bring everything under the sun, in other words every piece of equipment you own, so you don’t forget anything.
I’ll distinguish “location” photography from “travel” or “landscape” photography because location work is usually a different animal. I’m writing of the type of photography generally produced for editorial or advertising projects, stock photography, or student commercial art portfolios. In other words, photo shoots where you need to be in control of a set on location, in essence be able to recreate a studio situation on location.
Your location might be a living room, a public institution, a concert, an office, or a street setting. Indeed, I’ve had photo shoots in all of those, plus hospitals, parking lots, beaches, swimming pools, hotels, helicopters, strawberry fields—the list goes on and on. With few exceptions I have assembled a core roster of photo equipment that has worked well for most locations. From that core assembly of equipment, each location might demand an additional tool or two to be packed for the shoot, but in any case the photographer’s goal is to be prepared so that your work isn’t interrupted by the lack of an essential photo tool. (See Figure 2.1.)
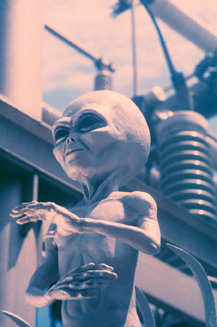
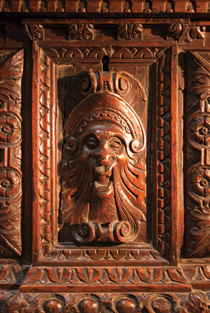
Figure 2.1. A Martian alien prop photographed on location. An assistant stood off camera with a foam-core reflector. Copyright © Steve Weinrebe, Getty Images
In all the assembly of equipment that location photographers must tote on location, there is an array of photo tools that does not look like traditional photography tools and that wasn’t purchased at photography-oriented stores. These tools vary in size and importance, but I wouldn’t be caught on location without them. Much can go wrong on a photo shoot. If you are on your home turf, you’ll likely have a backup for something broken, or a tool to fix it. On location you have what you have brought with you.
Sometimes you can scrounge, but remember that you’ll have camera equipment to think about and that you can’t just leave your gear on a street corner to run to grab some paper towels because the puppy you’re photographing for a magazine just slobbered on your lens. Be realistic and cover yourself, not just with the expected and obvious photo gear, but with some of these irreverent location tools as well.
While you’re reading this chapter, remember that some of these tools could certainly be used in the studio or for other purposes and genres of photography. If anything, location work is often about being resourceful, and that’s a good idea anywhere and anytime when taking pictures.
Furniture sliders, in their modern incarnation, are indispensable. They are constructed from a slippery plastic that is very solid and scratchproof. The surface of these sliders seems permanently slippery, as if oiled, yet has no dampness and leaves no residue. (See Figure 2.2.)

Figure 2.2. Furniture sliders come in many sizes and can make moving heavy furniture, or props, a simple chore. Copyright © Steve Weinrebe
The early advertisements for furniture sliders, showing elderly women moving gargantuan pieces of furniture single handedly, won me over. At first I purchased furniture sliders for some household furniture. We have furniture sliders under the piano legs, for instance, so that the piano won’t dent the floor if we want to move it aside. As time went on I frequently found a use for small stick-on furniture sliders. Then, I began using small stick-on sliders in the studio under some heavy equipment that didn’t have casters, and which I frequently had to move. The small stick-on sliders would have easily earned a spot in the previous chapter on studio tools, except these handy plastic disks have an even more important role on location, making up for a second pair of hands. (See the following sidebar.)
For your location bag of tricks, include at least one set of reusable furniture sliders. The reusable sliders have a foam rubber padding on the top side of the slider to grip whatever you place on top of them. The object you move presses into the foam padding, which shapes itself around the object. (See Figure 2.3.)
Figure 2.3. Small reusable furniture sliders are placed under the feet of a large table to make moving it a cinch. Place reusable furniture sliders under anything heavy to move it out of the way, or to position something heavy for a photograph. Just remember to take the sliders out before you take your picture. Copyright © Steve Weinrebe
There are several brands of furniture sliders on the market. Ideally, keep some large and some smaller reusable sliders in your carry bags. These sliders open up possibilities for what can be moved or rearranged on location. Want to move a heavy wooden desk out of the way? No problem. Need to bring a heavy prop or product into your location set for a photograph? Also no problem. You will have to lift up a corner of whatever you’re moving to place the sliders under the bottom, but even heavy objects can usually be tilted enough to get a slider under each corner, and away it goes. (See Figure 2.4.)
Here’s an irreverent tool I’ve taken to in recent years—rubber carpet padding. This is thin rubber that you can purchase by the yard from a carpet store. In fact, you only may need a yard of it and, as long as you can find a free salesperson, you can be in and out of the carpet store in minutes. This padding may come in brown rubber foam surrounding a strong fiber mesh, a blue waffle-cut foam, or some other incarnation. (See Figure 2.5.)

Figure 2.5. Rubber carpet padding is inexpensive, can be cut to size, and has a strong grip to keep cases and other things from sliding around. Copyright © Steve Weinrebe
Whether you have a pickup truck with a plastic liner, or a van or SUV with a carpeted rear compartment, I’ll bet you’ve had items slide around that you wish didn’t slide around. Cameras and computers are sensitive to shock, so even if you have good equipment cases, you’ll want to prevent them from sliding around when you turn a corner. Simply place rubber carpet padding down first to keep your equipment cases from sliding around the bed of your car. I cut the padding into roughly 6-inch by 12-inch rectangles that can be easily laid down beneath a case, box, or anything else heavy enough that its weight might cause it to shift when driving. (See Figure 2.6.)
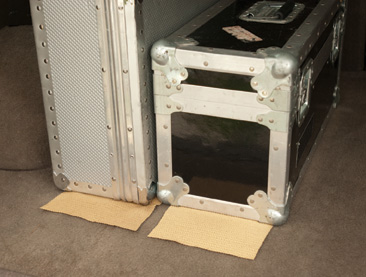
Figure 2.6. Keep rectangles of rubber carpet padding in the bed or trunk of your car so that you can lay them down when packing your equipment. The rubber will prevent just about anything from sliding around on a carpet, or on a hard plastic truck bed liner. Copyright © Steve Weinrebe
Once on location, you might have a rolling cart or some cases stacked in an airport cart for check-in. As soon as you place one case on top of another, even if it’s a laptop case, and you start moving the cases around, you’re at risk that one of the cases is going to slide off or get jostled enough to fall to the ground. Again these swatches of carpet padding come to the rescue. They’re certainly light enough to pack one for each case. When stacking cases, you’ll want to throw a piece of the rubber padding on top before you place your next case down.
When you go on location, don’t advertise the fact that you have something to steal; hide your gear with ugly cases. Unless you have an entourage of assistants standing guard, and even if you do, your equipment is in danger of being stolen. If having people see how cool your equipment cases look is what gives you thrills, well, just do a web search with words like “stolen camera” to see how many results you get, and you might think differently. (See Figure 2.7.)
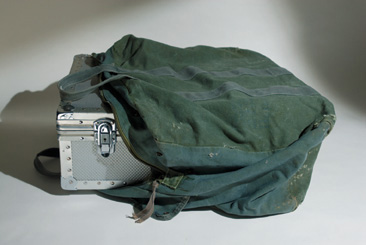
Figure 2.7. Use an unassuming case, or shell for a case, to hide the fact that you have expensive camera or computer equipment inside. This case was purchased at an Army-Navy store and is large enough to hold another, nicer case inside. Copyright © Steve Weinrebe
Camera cases do look handsome. Camera bags are made to look like something that would be worthy of holding your exceptional digital camera. Larger cases are made from aircraft aluminum or rugged black cloth with padded sides. Plywood cases with rounded steel corners scream “video equipment” to anyone who has watched enough television to have seen how movies are made. All these cases are expensive to buy in their own right, not to mention the equipment they hold. And just like shopping for camera gear, advertising and camera store displays make beautiful camera cases look like an essential purchase for any photographer. Heck, you just spent $5,000 on a camera body and some lenses: why not spend a few hundred on a suitable case that looks like it should hold such expensive gear?
But wait—camera cases are not jewel cases. You’re not trying to let people, especially thieves, know what you have inside. You likely (and hopefully) won’t be wearing your cameras if they are stolen. You’ll be distracted talking to someone, or you’ll step away for a few minutes, or the cases will be sitting by the luggage counter in the airport while you jog from your gate to baggage claim. Those brief unattended moments are when photography equipment is at risk of theft, because the case looks like something expensive and isn’t being watched over, if only for just a few seconds. (See Figure 2.8.)
Figure 2.8. A simple duffle bag can camouflage light stands, and could even accommodate an expensive tripod, camouflaging the gear from thieves. Copyright © Steve Weinrebe
Borrow a page from urban bicycle enthusiasts who know how often bikes are stolen, and who will take a $1,000 Italian racing bike and, without a second thought, cover it with black permanent marker, brown paint, and duct tape, to make the bike looks as worthless as possible to any prospective thief. I’ve always admired the avid bicyclists I’ve seen do that. The bike isn’t pretty, but its functionality isn’t altered and more importantly it doesn’t attract thieves.
Sometimes the best photo tools are the simplest to make. Why carry a weight on location when you can carry an empty container and then fill it on location with a readily available, and relatively heavy, substance? Plastic water jugs are easy to find and inexpensive considering the use. A gallon of water weighs 8.33 pounds, close enough to a 10 lb. weight that it will serve a similar purpose. Even better, gallon water jugs have a handle, making them easy to attach to tripods, light stands, or booms with a bungee cord. (See Figure 2.10.)

Figure 2.9. You never know where you’ll be when shooting on location. Protect any equipment you travel with by storing it in ugly cases in your car, or in unattractive luggage for air or rail. Copyright © Steve Weinrebe

Figure 2.10. A gallon water jug, when empty, is light and easy to transport. On location, you can fill it to use as a weight or counterweight. Copyright © Steve Weinrebe
Any convenience store or grocery store sells gallon jugs of spring water, and you can drink the water or pour it out, so that you have the empty jug to store with your location gear. If you routinely buy spring water to drink, consider buying some gallon jugs and simply recycling the jug as a photo weight. Either way you should keep a couple on hand to bring with you as a lightweight alternative to carrying sand bags or steel weights.
Even with your camera on a tripod, camera shake, which can ruin an image capture, can still come from a variety of factors including wind, camera movement from your finger pressing the shutter, or vibration from the mirror flipping up at the moment of exposure. A cable release, or timed release (self-timer), can solve the “finger on the shutter” problem. Locking up the mirror can solve the “mirror vibration” problem. But wind is a tough one. You can stand upwind of the camera and block the breeze from the camera during the exposure, and that can help quite a lot, but you really want the sturdiest tripod possible, and if at all possible some extra weight on the center axis.
Photographers use tripods to stabilize a camera, and many photographers think the stability comes entirely from the three legs—that if the three legs of the tripod are touching solid ground, then there will be no camera shake. But it’s usually the torque, the twisting of the center axis of the tripod, that causes motion blur in an image. Because most cameras have flat sides, wind can easily exert enough pressure on the camera to twist your camera during the exposure, causing some motion blur.
Tip
Test your tripod for susceptibility to torque vibration in this way. Without a camera on the tripod, extend the legs of the tripod all the way and place it on the floor or ground. Make sure all parts of the tripod are tightened. Then press down with both hands on the top of the tripod and twist clockwise and counterclockwise. If your tripod moves visibly without much effort from your twisting motion, you’re at considerable risk from motion blur in even light breezes.
To add stability to your tripod, weigh it down from the center axis. Any method of attaching a weight will help, but the water jug weight comes in handy here. Once filled with water, the weight of the jug hanging from the center post of your tripod will go a long way to stabilizing your camera. If you’re in a very windy situation and the wind is causing the jug to swing back and forth, lower it so that it is just touching ground but still pulling down on your tripod’s center of gravity. (See Figure 2.11.)
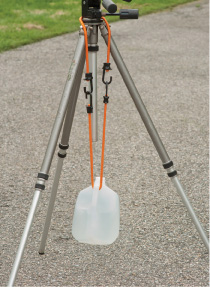
Figure 2.11. Use a bungee cord to attach a water jug to a tripod to make it more solid, and to help prevent camera shake. Copyright © Steve Weinrebe
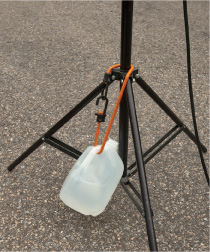
In fact, unless wind is a necessary element to your photo shoot, waving flags or sailboats for example, the wind is your enemy on location. Raise a light stand with flash head, and open an umbrella or soft box at the top, and even the lightest wind can tip it over or swing it in the wrong direction. Photo sandbags are a traditional weight to hold down lighting outdoors, but they’re heavy items to tote on location. Empty water jugs, filled on location, add stability to a stand or tripod and lighten your load as well. In extreme weather, though, you may need someone holding each stand or need much heavier-duty equipment—and of course you’ll need to check the weather report. (See Figure 2.12.)
Milk crates are used in the dairy industry for stability in transport, durability, and ease of carrying. Those attributes make milk crates an excellent photo tool to carry photography gear, such as cords, hardware, drop cloths, cloth backgrounds, and spray cans; and gaffer tools like spring clamps, counterweights, tripod accessories, and so forth. (See Figure 2.13.)

Figure 2.13. Milk crates come in many different colors and various sizes. They are very useful for carrying cords and other necessary gear on location. Copyright © Steve Weinrebe
Because of the popularity of milk crates as storage containers, retailers caught onto the idea and you can purchase plastic milk crates online or at retail stores that specialize in selling storage or containers. Whatever milk crate you buy, make certain it is substantial, and if possible look for a milk crate that is commercial quality and made to stand up to the rigors of working on location. Conduct an online search for “milk crates” and you’ll likely come up with several options to locate or purchase one or two of these terrific storage tools.
If I’m bringing anything that needs electric power to a location photo shoot, I make sure to bring lots of extension cords, including extras of whatever type I may need. That means extra power cords for computer and display, flash units, battery chargers, and extension options for all of the above. A power strip or two can’t hurt either if there is a possibility of a power surge that might damage any equipment. (See Figure 2.14.)

Figure 2.14. Good use of a milk crate for carrying essentials on location: extension cords, gaffer’s tape, a triple socket adapter, and a tripod head. Copyright © Steve Weinrebe
For extension cords, consider carrying some 25-foot heavy-duty cords, as well as at least one 50-foot and one 100-foot cord, just to make sure you can pull power from the nearest outlet, even if that outlet is not conveniently located. (See Figure 2.15.)

Figure 2.15. When I was allowed at ringside to photograph a boxing match, I brought a milk crate full of cords and other photo gear. I knew in the crowded ringside area I could reach in for what I wanted, and I was covered if I needed an extension cord to power an extra light. Copyright © Steve Weinrebe
Empty prescription medicine bottles are the first of a trio of small but strong storage tools that I recommend and that work great for location photography. These tight-lidded marvels make great storage for spare bulbs and small parts. (See Figures 2.16 and 2.17.)

Figure 2.16. Empty medicine bottles make solid containers for storing and protecting spare halogen bulbs. Copyright © Steve Weinrebe
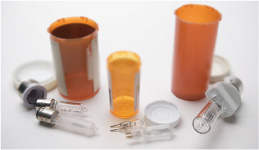
Figure 2.17. Different-sized medicine bottles can be used for different storage needs. Copyright © Steve Weinrebe
After years of being toted around in an equipment case, the cardboard wrapper that’s typical of replacement bulb boxes becomes frayed and torn. Even new bulb (a.k.a. lamp) packaging is not strong enough to withstand pressure from a tightly packed equipment case, and by the time you need the spare bulb, you may find it cracked. Halogen bulbs last a long time, but they do burn out. If you rely in any way on spare bulbs, even for just your flashlight, you should carry some empty prescription bottles to store them in your cases for location work.
Tip
You may not need me to tell you this, but for privacy’s sake please remove any labels from the prescription bottles that you’ll use to store your spare bulbs and small items for photo shoots. Even if the bottles are outdated or belong to someone else, removing the labels is wise policy. Besides, the empty prescription bottles look more professional without labels.
This tool and the next are throwbacks. Forget how they were used then; this is how you can use them now. If you have any 35mm film lying around, you might consider throwing out the film and saving the container. If you use film for any reason, holiday snapshots with the old film point-and-shoot or whatever, always save those handy film containers. If you know any photographers who were working professionally prior to the early 21st century, ask them if they have any film containers lying around that they can give to you. (See Figure 2.18.)

Figure 2.18. Film containers make excellent storage for very small photo items. Copyright © Steve Weinrebe
Besides being perfect for holding quarters for parking meters, something any urbanite may have discovered, the rigid construction and snug pop-top of plastic film containers make them excellent recyclables for photo storage. For small, sharp items like pins and tacks, adapter screws, photo slaves, and anything else you might want to protect for travel on location, film containers are handy tools. I have film containers that I’ve kept small photo items in for so many years, it’s hard to believe these sturdy receptacles were built for two-time use only—holding unexposed film, and then holding exposed film on the way to the photo lab. Then again, film was a delicate substance, sensitive to light and humidity, and it made sense for the manufacturers to give film such excellent packaging. Let’s take advantage of that and, in an irreverent way, use them for something completely different.
Gaffer’s tape is a very traditional photo tool, but a roll of the tape is too large to store easily in most gadget bags. If you are just carrying a shoulder bag or photo backpack, wrap some gaffer’s tape around a film container and throw that in your bag. A few feet should be enough for a quick job taping a neutral gray card to a tree, or to manage whatever your end use for the tape might be. (See Figure 2.19.)

The next throwback item is the slide box. If you took pictures in the pre-digital era, or your parents did, you might have a few, or a few hundred, slide boxes stored away. I’m not talking about the paper ones. Those aren’t rigid enough to be useful storage for going on the road with your photo gear. Plastic slide boxes with clear or frosted lids make excellent storage for an array of necessary photo items from levels to loupes. (See Figure 2.20.)

Figure 2.20. Slide boxes are large enough to store pocket levels or loupes, as well as other small photo gadgets. Copyright © Steve Weinrebe
I carry my pocket level in one of these slide boxes, stored in a case along with other photo gadgets. I put some cotton in the bottom of the slide box for extra cushion and to prevent the level from bouncing around. I wrote “Level” on the frosted lid with a permanent marker. I have other slide boxes in the same case marked “Loupe,” and “Slaves,” for a photo loupe (magnifier) and photo slaves for flash units. I also carry spare batteries, AA and AAA, in slide boxes. Because the boxes are flat, they stack well in a travel case. Small and lightweight, they become protected mini-compartments in a camera case. (See Figure 2.21.)
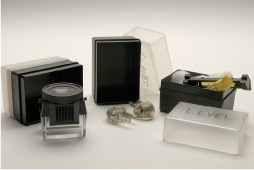
Figure 2.21. Label slide box lids with a permanent marker so you can easily grab what you need from your case. Use cotton balls, or other padding, to keep fragile items from breaking during transport. Copyright © Steve Weinrebe
If you can lay your hands on some slide boxes, you’ll find uses for them. If you don’t have any, try an online auction or used-item website. If you have a photo lab in your hometown, or as a service in a local store, ask the lab personnel if they have a few lying around that they might give you.
Caution tape makes for great signage. You can’t miss it. Even if you are colorblind, the high contrast of the diagonal black and yellow stripes will alert you that there is something you should take care about. On a location photography shoot, that “something” might be an extension cord running along the floor, or the legs of a light stand or tripod. You might not want someone entering a room that you’re shooting in, and if they see caution tape blocking their way, they’ll most likely take heed and stop. (See Figure 2.22.)
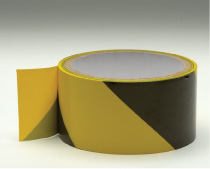
Figure 2.22. Caution tape can be used to cordon off an area or to cover an extension cord on the floor. Copyright © Steve Weinrebe
I’ve talked about other types of tape for different uses, but caution tape isn’t so much for taping as it is for seeing. In fact, the caution tape that I have isn’t sticky enough to keep a cord down on a carpet very well, so I use strips of gaffer’s tape to hold the cord down, and then run caution tape along the entire length of the cord.
People will trip over cords; that’s the danger. As a photographer taking pictures on location, whether it’s an executive’s office or Aunt Hattie’s living room, you’re in charge. You’re responsible for managing the environment and making sure nobody and nothing get damaged. Taping cords down to prevent people from tripping and using caution tape to alert people that there are cords on the floor, or that there may be an area they shouldn’t wander into, is good policy and will make you look more professional. (See Figure 2.23.)
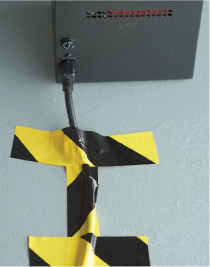
Figure 2.23. Tape down your electrical cords to protect both people and your equipment. Copyright © Steve Weinrebe
You can purchase caution tape from most hardware stores and online. If you are using it to tape down heavy-duty extension cords, get at least 2-inch tape, and preferably 3-inch caution tape.
One of the photo studios I wrote about at the beginning of the book was in a loft in an industrial building. Beneath me was a busy framing shop that did much of the framing and shipping for the area’s art galleries. The framing shop used to sell me individual pieces of foam core whenever I needed a fresh piece for a reflector, and one day while purchasing a piece, I was taught a neat trick by the framer I was speaking to.
The trick was this. Score a piece of foam core down the length of the board, but when doing so, cut through only one side of the board. Because foam core has two paper faces with foam in the middle, by cutting through only one paper face, the board is still held intact by the other paper face. Then stand the board up on end, and with the uncut side facing you, bang the side opposite the cut with your fist. Actually you may only need to hit it with your fingers, but either way the board will fold along the cut, held together very well by the uncut side of the board. (See Figures 2.24 and 2.25.)
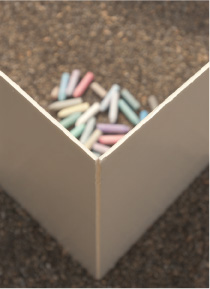
Figure 2.24. Foam board can be cut along one side, making it easy to fold. Here the fold is used to help stand the reflector up, to fill in shadows for a still-life of colored chalk. Copyright © Steve Weinrebe

Figure 2.25. Carry folded foam-core pieces on location for lightweight and inexpensive reflectors, to bounce sunlight into shadows. A foam board reflector bounced daylight into this outdoor still-life of chalk, lifting up the shadow detail in the photograph. Copyright © Steve Weinrebe, Getty Images
Cutting foam core this way gives you a lightweight, dirt cheap, and sturdy lighting reflector. You can even score the board a few times for an accordion fold or other types of folds, but just being able to fold a larger sheet in half makes foam core a size that can fit into the lid of a large gear case, or into a suitcase or a car seat. If the board gets dirty or yellowed, replace it with a new piece.
I generally buy foam core in 32-inch by 40-inch boards. That’s an excellent all-purpose size for studio reflectors—unless you need larger, 8-foot boards for full-figure people photography. For location shooting, though, I cut the 32-inch boards for folding as described, or into smaller pieces. Even the smaller pieces can be taped back together along one side for a similar one-sided fold like I described. Because the board is rigid, you can bend it and stand it up on end. It will support itself as long as it isn’t too windy. Once unfolded, the sheet can be clamped to a light stand for a reflector. (See Figure 2.26.)
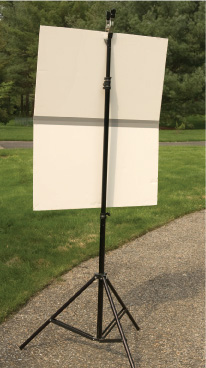
Figure 2.26. Tape the foam core on the side opposite the cut to reinforce the hinge. The sheet of foam core can be opened on location and clamped to a stand for a reflector. Copyright © Steve Weinrebe
Tip
For location shooting, consider packing some folded boards inside the lids of your gear cases. If any of your cases have removable foam in the lid, pull out the foam and lay some foam core, sheets of color light gels, foil, diffusion material, and anything else that you can get away with fitting in there.
The other day I opened up one of my hoop disk reflectors for a photo shoot and a quantity of silver paint shot into the air and down my lungs—yuck. It was clearly time for that old reflector to go into the circular file. I grabbed a roll of aluminum foil and pulled out a few sheets, taped it to some foam core, and went about my work. (See Figure 2.27.)
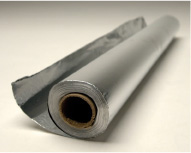
Figure 2.27. Aluminum foil makes great reflector material and can be manipulated for different reflectance qualities. Copyright © Steve Weinrebe
Aluminum foil makes excellent silver reflector material for a host of reasons. It’s highly reflective, yet very heatproof. Aluminum foil has a shiny side and a duller side, so you can choose the quality of reflectance that you want. I like the duller side of the foil.
Typically, if aluminum foil is simply smoothed out and taped to a surface such as foam core to be used as a reflector, the foil is just too shiny and you’ll risk getting a hot spot in your image. Let’s think about what reflectors are; they reflect the light based upon how mirrored or soft the surface is. If you use a plain white reflector such as a sheet of foam core, the bounced light is very soft. (See Figure 2.25.)
But let’s go the other direction. Since we’re talking about location tools, very often you want to bounce light from a distance and in that case a reflector that has a more reflective surface may suit you better. Aluminum foil has a very reflective surface, but you may not want to bounce so much light into your subject that you wash out the shadows. A way to control that reflectance is to crumple up the aluminum foil and then unfold and flatten it. By crinkling the foil first, the reflected light becomes more scattered. You’ll want fine crinkles throughout or the foil will reflect stripes of light where any broad crinkles are. (See Figure 2.28.)

Figure 2.28. Crinkle aluminum foil so that its reflectance diffuses for a less intense bounce of light. The duller side of the foil will slightly soften the intensity when using the foil as a reflector. Copyright © Steve Weinrebe
Once you’ve crinkled and flattened the foil, tape it to some foam core. Aluminum foil tapes very easily, but be gentle because the foil will rip easily as well, especially when it’s been crinkled. If you have trouble working with the foil without its ripping, or if you’ll be in a very windy environment, consider using a heavy-duty oven foil that’s been milled to a greater thickness. (See Figures 2.29 and 2.30.)

Figure 2.29. Tape the foil to a reflector and bounce the light toward your subject as needed. Copyright © Steve Weinrebe
Use the foil taped to a surface such as foam core to bounce light toward your subject. Try moving the reflector around because you’ll get a better idea of all your options for filling in the shadows if you see how different positions, distances, and angles change the quality of the reflected light. (See Figure 2.30.)

Figure 2.30. The photo on the left has more fill light in the shadows from the aluminum foil reflector. The photo on the right has a softer, less high-key fill light from white foam core. Copyright © Steve Weinrebe
Tip
Be aware of the color of whatever reflector you use, because that is the color of the light that will bounce into your subject. If you want to bounce a color, you can go to a crafts store and purchase colored foil, but more likely you want to bounce light into the shadows that’s the same color temperature as the light that is illuminating the overall scene. Old pieces of foam core can get a yellow tinge to them that will bounce yellowish light into your subject. Be careful of cloth reflectors as well, because, unless you plan to produce black-and-white photographs, cloth such as white sheets often has a bluish or cool cast it, which will also affect the color of the reflected light.
Tip
If you own any soft boxes or umbrellas to diffuse your light, you may have some that are new, and some that are older. The older soft boxes or umbrellas may have become weathered and even gotten yellowish from age. Don’t throw them out! I use older soft boxes or umbrellas when I specifically want a warm quality to the light. Usually for portraits I’ll use the older soft boxes and umbrellas because that aged tint mellows the light temperature to the warm side, while I’ll use my newer soft boxes or umbrellas for product, still-life, or high-key corporate portraits.
PVC, or polyvinyl chloride, helped revolutionize the plumbing industry. PVC is lightweight and can be cut and glued together for a water-tight seal. For the photographer, PVC makes for some interesting possibilities. Because PVC tubing is sold in a 4-inch diameter and at 10-foot lengths, the tubing makes an excellent transport container for background paper or rolled canvas backdrops. You can even purchase snap-on end caps, called plugs. (See Figure 2.31.)

Figure 2.31. Four-inch PVC tubing makes a rigid, lightweight, and portable storage container for background paper, or rolled canvas backdrops. Copyright © Steve Weinrebe
The PVC tubing can be cut with a PVC saw, also available at hardware stores. For a very clean cut, use a power miter saw with a masonry blade. If you aren’t bringing a 107-inch roll of background paper (generally called a 9-foot roll, although 107 inches works out to a shade less than 9 feet) on location, but instead are using a 53-inch (4.4-foot) roll, simply cut a 10-foot length of the PVC tubing in half. The two 5-foot lengths you’ll end up with give you sturdy and water-resistant containers for a couple of 53-inch rolls of background paper.
Fifty-three-inch rolls of background paper are generally plenty large enough for the background in simple head-and-shoulder portraits, especially if you’re using a telephoto portrait lens such as an 85mm or 105mm lens (or zoom equivalent). But if you’re going on location to photograph a full-figure or near full-figure portrait, or a small-group portrait, you’ll need a 9-foot roll of background paper. Generally, you want to place the paper far enough behind the subject that your lights don’t cast a shadow on the background and any ripples in the background go soft, or out of focus. You may even want to throw a light on the background for a backlight vignette, or for a high-key background look against white paper, again needing wider paper so you can create some distance between your subject and the background. You especially don’t want to have the background’s edge peeking into your frame, although unwanted edges can be fixed with digital post-processing.
Tip
If you’re dealing with a really large location set for which you need a paper background, stand a 9-foot roll of paper up against a wall with the base of it about 6 to 8 inches away from the wall. It’ll help if you have an extra pair of hands for the next part. Roll the paper vertically along the wall as far over as you need it, cut it, tape it to the wall, and then tuck in the loose part at the bottom. That’ll give you a little sweep, or curl, at the base of the paper along the floor line. If you need a full sweep for a full-figure image, roll another length of paper along the floor and tape it to the first piece. You can retouch seams out of the image in digital post-production.
Use cable ties to attach the PVC tube to your car’s roof rack as a temporary or permanent container for carrying 9-foot rolls of paper on location. If you don’t have a roof rack, you might be able to rent one. If the PVC tube extends beyond the back of your car, be sure to tie a red ribbon onto the end for safety. (See Figure 2.32.)

I was at a rock-and-roll concert the other night (yes, I still indulge) and was amused to see that the rows for seating were marked on the floor with chalk. By the end of the night, the chalk numbers were nowhere to be seen. That’s the nature of chalk—it’s relatively harmless, writes on most textured surfaces, and is easily removed. (See Figure 2.33.)

Figure 2.33. Chalk can be used as an all-purpose, and removable, marker when on location. Copyright © Steve Weinrebe
When shooting outdoors, I use chalk to mark spots on cement or pavement for light stands or tripods. More than once I’ve photographed a storefront or restaurant exterior where I needed to shoot from the street for the best angle of view. Unless I was able to have the street cordoned off (which for still photo shoots is just about never), I would have to run up to the sidewalk with the tripod when a car would come. Understandably, when I got the angle down and framing right for the photograph, I would mark the street with chalk just in front of each tripod leg. That way I could return to the spot and place the tripod down exactly where I had it before the car came along.
There’s an old saying: “Give someone a hammer, and suddenly a lot of things will look like they need nailing.” A variation on that would be, “Give someone a piece of chalk, and a lot of things will look like they need to be marked.” I stash a box of chalk in one of my location bags or, if I’m traveling light, put a stick of chalk in a small plastic bag just in case I need it. Sidewalk chalk would sound like a good choice, but for marking tripod and light stand positions, you can’t get close enough to the legs with the chubby sticks of chalk that children use, and the standard school-room variety works best. (See Figure 2.34.)

Figure 2.34. Bring some chalk on location to mark out tripods and light stands. Here, a tripod’s position is temporarily mapped out on the pavement with chalk markings. Copyright © Steve Weinrebe
Chalk can also be used on location to help you, or your assistants, spread out your lighting setup. If you’re doing a sunrise shoot and you need to set up a tripod and a couple of fill lights, for example, sketch out the setup on the ground for positioning of the lights, and even the lighting ratios, and you or your assistant have a template for the morning’s setup.
Tip
If you’re going to be photographing outdoors on location, on a surface that can’t be easily written on, you have a few options to mark spots for your tripod or light stands besides just throwing rolls of gaffer’s tape on the ground for markers. You can buy powdered chalk in a squeeze dispenser from your local hardware store. Generally used for string markers, powdered chalk comes in a variety of colors including orange, red, blue, and black, so pick whatever color will contrast well with your work surface. If you’re shooting on grass, try orange garden stakes. You can use orange, yellow, or white spray paint on grass if you’re just marking out where to place your equipment, but you don’t want to spray the paint close to the legs of your tripod or stands. The garden stakes can be placed to hug the ground right at the tips of your stands, and can be used in sand as well. (See Figure 2.35.)
When a light source is visible from your lens, you’re at risk of getting flare in your image, which is a bright patch of unwanted highlights, sometimes in the shape of your lens aperture. The sun is a good example of a light source that typically causes flare in a photograph. Sometimes flare, also known as lens flare, is desirable and there are some digital solutions to adding flare to images that didn’t have it in the first place. But usually you don’t want the flare that is coming into your frame because it is distracting in an image and reduces contrast in whatever portion of the image the flare is covering. In fact, sometimes lens flare covers a broad portion of an image, isn’t initially obvious in a preview, and intrudes on an area of your photograph that’s much too large to retouch.
One obvious way to get rid of flare is to frame your subject so that any dominant light source is out of the camera’s field of view. Another typical way to shield the lens from stray light sources is with the use of a lens shade. And yet another way is to use what’s referred to as a flag, or sometimes called a gobo, a flat black piece of material placed in the path from the light source to the lens. (See Figure 2.36.)

Figure 2.36. Use any rigid black material to flag the light from your lens. Black matte board and dark slides work well. Copyright © Steve Weinrebe
Now there’s nothing terribly irreverent about using a flag when lighting a photograph, but I have a suggestion for a flag that will be a throwback for many photographers. If you ever used a 4×5 view camera back in the day when film dominated photography, you probably used 4×5 film holders. Film holders have a dark slide on either side that the photographer pulls out to reveal the film to the shutter before exposure. Those dark slides make great flags. If you don’t have any old film holders collecting dust, you can easily buy 4×5 film holders from an online auction or for-sale website.
After you set up your lights for location or studio shooting, and after you position your camera, peek into the front side of your lens. If you can see a highlight from one of your light sources, you’re at risk of lens flare. That highlight in your lens is what you want to block with a flag. Technically, you can use anything to block unwanted light from hitting your lens. I have stood, or had an assistant stand, to block a light and prevent unwanted flare during an exposure. You can even use your hand. I like dark slides from large format (like 4×5) film holders because they are thin and lightweight, are rigid, are a good size for still photography, and easily clamp to a light stand. (See Figure 2.37.)
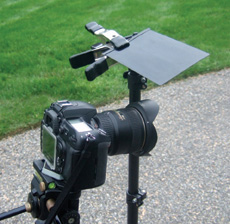
Figure 2.37. Dark slides from film holders can be clamped to a light stand and moved into position to block light from your lens. Here I used two A-clamps to hold the flag to a light stand. Copyright © Steve Weinrebe
You can hold dark slides easily since they have grips on one end. As I mentioned, what you want to get rid of is that reflection in your lens, because if you can see the reflection of a light in your lens, that means your lens can see the light as well, and if you don’t see the reflection in your lens, it’s blocked from your lens.
One way to be certain your flag is in the correct position is to look into the lens until the unwanted light source is no longer reflected. Sometimes you’ll need to wave the flag back and forth to see if the reflection disappears. Look through the viewfinder, or at a live preview, while you’re doing this because you want to make sure you’re blocking the light but don’t have the flag in your frame.
Tip
Wide-angle lenses are the most difficult lenses to flag light coming from unwanted light sources. Because of the wide field of view these lenses have, the lens shades are necessarily small so that they aren’t visible in the frame. The wide field of view makes it harder to both crop light sources out of the frame, and to flag light sources from hitting the lens. Sometimes you have to make a tradeoff between the position of the light and the position of the lens. If you can’t position a flag in the right spot close to the lens, to block the sun from hitting the lens, try a slightly different angle on your subject. A slight shift in camera position might be enough to get the light source out of view of your lens.
The other method to position the flag is to watch for the shadow of the flag as it prevents the light from hitting the lens. This latter method is especially easy when the sun is the offending light source. You can even wave your hand above the lens to find the best spot to shade the lens before positioning the flag.
I’ve mentioned aluminum foil, and I’ve mentioned black flags. Put the two in a camera case and shake, and what do you get? Black aluminum foil, of course. I’ve carried a roll of black foil in one of my location cases for as long as I can remember. Black foil isn’t something most still photographers are going to run into because this material is usually found in the video category of online photo retailers. Don’t let that deter you though. Get a roll and keep it in your location kit. (See Figure 2.38.)

Figure 2.38. Black foil is a sturdy, matte black, malleable material that should be an essential addition to any photographer’s location kit.
Rosco and LEE are two manufacturers of black foil. LEE’s is called Black Foil, and Rosco makes a brand of black foil called Cinefoil. (See Figure 2.39.) You’ll find these brands from many online camera stores. Whether you’ll find black foil on a store shelf near you depends on your location, but if there is a professional camera store or film/video supply house near you, it’s worth a call. Both Rosco and LEE sell black foil in 12-inch and 24-inch widths, in rolls. The rolls come in dispenser boxes with a sawtooth edge for tearing.
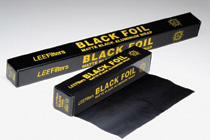
Figure 2.39. LEE is one manufacturer of black foil. The foil comes in two widths, 12-inch and 24-inch, sold in rolls. Copyright © LEE Filters USA
Black foil may be a photographer’s most chameleonic tool—that is, a tool that can be molded and adapted to a tremendous number of uses. One use would be for a black flag, although I still prefer a dark slide for its strength and small form factor. As a large flag (or gobo) though, to control light coming from a light source, black foil works great. For example, you can use tape to attach the foil to the side of a light bank. (See Figure 1.32 back in Chapter 1.)
One endearing quality of black foil is that it is very heat proof. Besides as a flag to control unwanted light from hitting your lens or your photo set, uses for black foil include barn doors, or as a snoot. Barn doors act like flags, tied to a light head, to control the direction of the light. A snoot is a poor-man’s spotlight, simply a cone attached to a light directing the light into a small pool of illumination. (See Figures 2.40 and 2.41.)
Figure 2.40. Control the direction and spread of light by attaching sheets of black foil to one or two sides of a light to create barn doors, or use a cone of black foil as a snoot. Copyright © Steve Weinrebe

Figure 2.41. A pool of light created by a black foil snoot illuminates these small props. The black foil packs easily for location, and can make a faux spotlight. Copyright © Steve Weinrebe
You can also use black foil as a “cookie” or cucoloris. A cookie is a tool to create mottled light, such as light spilling through tree branches and leaves, by shining a light source through a sheet with random-sized and-shaped holes cut out. For a cookie you’ll likely want the larger 24-inch-size roll of black foil. Position your light far enough back from the cookie to create a spotlight effect. If there is too much light spilling around the cookie, you can use more black foil as barn doors to constrain the light to the area of the cookie. (See Figures 2.42 and 2.43.)