
Most computer companies build only one piece of the puzzle. One company makes an OS. Another company assembles hardware into a box. Yet another company creates software to sell. Still other companies create the APIs and widgets to mix it up with all the other companies' offerings.
While Apple, like all large companies, contracts out pieces of their products and assembles important technologies, they also are in control of the entire product. Apple creates computers from the ground up. Hardware, operating system, and applications are all designed, integrated, and sold by Apple.
This end-to-end control of production gives Apple power to design the best personal computers on the planet. Their operating system is probably Apple's greatest strength. OS X is designed with unparalleled modularity.
Recently Apple did the incredible by moving its whole operating system from PowerPC to Intel architecture without an entire rewrite. Such a change is on the scale of moving a sports arena in one piece to a new city without seeing it collapse. The move was successful in large part because of the modular structure of Mac OS X.
In this chapter, I explain the structure of OS X. I introduce the layers of OS X. I explore Darwin with an emphasis on BSD tools and libraries. I also give a quick introduction to Apple's Human Interface Guidelines.
Mac OS X is elegant and complex. OS X is an OS on top of an API on top of an OS on top of a kernel. OS X is a beautiful graphic environment and a gritty nuts-and-bolts terminal-controlled interface.
OS X is an incredible mix of powerful and pleasant technologies.
In this section, I introduce the major building blocks of OS X. Sitting on top of Apple's hardware, you find Darwin, the three major developer frameworks, and the ever-pleasing human interface, as shown in Figure 6.1.
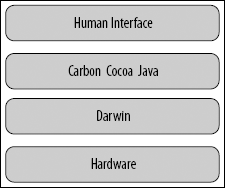
OS X ultimately draws its strength and portability from another operating system, Darwin. Darwin is an OS hiding under the hood of OS X. The reason that OS X successfully moved from PowerPC architectures to Intel-based architectures was because OS X is built on neither architecture. OS X is built on Darwin.
Apple insisted that OS X and its programming frameworks build on Darwin in a hardware agnostic fashion. Hence, when it was time to move OS X to a new architecture, the job was to port Darwin, not OS X. Better yet, Darwin was ported to multiple platforms before OS X was even officially released on Macs.
Darwin sits directly on top of the Mac hardware. Darwin is the foundation under the developer-friendly frameworks that most OS X applications are built on. Darwin also puts the Unix into OS X.
Mac OS X is fully POSIX-compliant. POSIX is an IEEE standard specifying APIs, shell interfaces, and utilities' interfaces. POSIX standardization ensures compatibility between Unix operating systems. Applications created on differing versions of Unix are quickly ported to new operating systems that are POSIX-compliant. OS X enjoys this benefit, too, because hundreds of common Unix tools and applications are available for OS X from volunteer sources.
I return to a discussion of Darwin later in this chapter.
Note
POSIX stands for Portable Operating System Interface for Unix. Luckily, the POSIX acronym used the X from Unix instead of the U. Otherwise, we would all be forced to try to pronounce POSIU instead of POSIX.
Most of the applications available to everyday users of OS X are built on three frameworks: Carbon, Cocoa, and my favorite—Java. Apple develops and maintains these three frameworks internally. The base code used for the Java framework comes from Sun's Java, but the actual integration into OS X and the OS X builds are all created by Apple. Apple's involvement in the Java framework development ensures the closest possible compatibility between Java and the native OS.
Carbon is a C-based framework used for porting applications in C and C++ to OS X. Carbon is an excellent choice for porting JNI-based applications to OS X. Java applications that interface with Carbon have access to OS X features ranging from the Quartz 2D graphics library to BSD OS services.
Cocoa is Apple's Objective-C framework. Your first thought may be, "How do you integrate Java and Objective-C?" Objective-C is built on C, so JNI integrates with Objective-C. In fact, the built-in JNI template in Xcode integrates with Cocoa rather than Carbon.
Note
Chapter 3 contains instructions for creating a Cocoa-based JNI project in Xcode.
On top of all these frameworks sits the Human Interface. The Apple's Human Interface has led all other Operating Systems since the dawn of personal computing. Apple has a nearly 400-page manual detailing how Human Interfaces on OS X should work. I briefly introduce Apple's Human Interface Guidelines at the end of this chapter.
The officially favored approach to wrapping Cocoa and Carbon frameworks for use with Java is JNI. Other approaches such as JNA and JNAerator are also popular. Either way, the library you wrap must contain unique functionality to make the effort worth your time.
Shown in Table 6.1 are descriptions of some important OS X frameworks. Knowing the purposes of OS X frameworks helps you find the libraries you need and avoid spending time with libraries that duplicate features already in Java. I give an overview of Darwin's Unix libraries later in this chapter.
Table 6.1. Important OS X Frameworks
Framework | Description |
|---|---|
AppleScript plug-in creation | |
Carbon | Preferred C-based development layer |
Cocoa | Preferred Objective-C development layer |
Data types and services used by Cocoa and Carbon | |
Abstractions of networking protocols | |
Dictionary access | |
Java | |
Open applications and documents | |
Text searching and indexing | |
ScreenSaver | Screen saver interfaces |
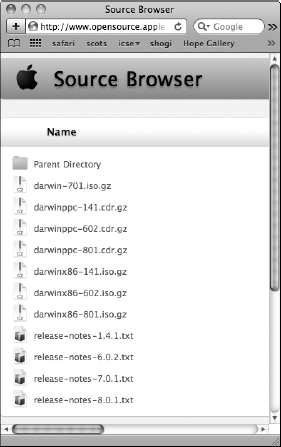
As I mentioned earlier, Darwin is an operating system. In fact, you can install Darwin on computers with absolutely no other operating system using ISOs provided by Apple. The Source Browser at http://www.opensource.apple.com/static/iso/, as shown in Figure 6.2, contains links to Darwin installations.
Tip
If you want to play around with Darwin builds and installs but do not have a spare computer lying around, think of investing in a product such as VMware Fusion for the Mac. With VMware Fusion, not only can you use Windows from inside your Mac, but you can install Linux, Darwin, FreeBSD, and other operating systems as though on their own computer. VMware turns your computer into a virtual playground for hacking operating systems without the need for extra hardware.
Several third-party versions of Darwin have popped up over the years. One currently popular version is GNU-Darwin, whose home page (www.gnu-darwin.org) is shown in Figure 6.3.
GNU-Darwin combines GNU operating systems and Darwin, providing the typical command line driven OS and GUI capabilities through X11.

The point is that Darwin is a powerful OS in its own right. OS X sitting on top of Darwin is really just icing on the cake.
Saying Darwin is a customized version of FreeBSD OS is not accurate. Darwin combines Mach 3.0, FreeBSD 5, and other technologies, forming the base on which OS X rests. Mach 3.0 manages protected memory, virtual memory, preemptive multitasking, cooperative threading, and much more. Darwin is much more than a BSD OS distribution. However, for Java programmers, Darwin's integrated BSD OS has special interest.
Integrating Java with Cocoa or Carbon is common when porting applications to OS X. However, if you have an application that demands access from the command line, such as via ssh, then you may want to consider integrating your Java application directly with the BSD OS libraries and tools found in Darwin.
Tip
FreeBSD is available from The FreeBSD Foundation. The home page is http://www.freebsd.org. Much of the documentation about FreeBSD also applies to Darwin.
Darwin's BSD implementation is fully POSIX-compliant. It contains the POSIX API. Darwin provides the command-line interaction with the operating system. Darwin supports popular scripting languages such as Bash, Perl, Ruby, and Python. Darwin also integrates X11, a Unix windowing system.
Darwin comes with standard Unix tools. These tools range from chmod and ls to grep and awk. It may save you time occasionally to use one of the standard Unix tools from inside your Java application rather than recreate the tool in Java code or look all over the Internet for a Java library that already does the job for you.
Use the Runtime class to execute command-line tools from inside your Java application. Calling the exec() method generates a Process object. Process contains methods for handling the InputStreams and OutputStream connected to the executing tool. Communication between your Java application and the Unix tool your program executes is handled by way of these streams.
The following example, Run.java, takes a command issued as arguments to the Run class and executes the command as though the command were run from the Terminal. Obviously, this class is useful for its illustrative purposes, not as a replacement for Bash.
import java.util.Scanner;
import java.io.IOException;
import java.io.InputStream;
import java.io.InputStreamReader;
import java.io.BufferedReader;
public class Run
{
   public static void main(String[] args)
   throws IOException
   {
      StringBuilder sb = new StringBuilder();
      for(String arg : args)
      {
         sb.append(arg + " ");
      }
      String command = sb.toString();
      command = command.trim();
      Runtime rt = Runtime.getRuntime();
      Process proc = rt.exec( command );
      InputStream is = proc.getInputStream();
      InputStreamReader isr = new InputStreamReader( is );
      BufferedReader br = new BufferedReader( isr );
      String in;
do
{
in = br.readLine();
if (in != null)
System.out.println( in );
}
while (in != null);
}
}Once compiled, execute the Run class from the Terminal and pass a command as arguments to Run. For instance,
java Run ls -la
lists a directory resulting in something similar to the following output.
total 48
drwxr-xr-x  8 tdavis  staff   272 Oct 17 17:22 .
drwxr-xr-x  7 tdavis  staff   238 Oct 16 22:53 ..
-rw-r--r--  1 tdavis  staff   586 Oct 16 23:03 Hello.class
-rw-r--r--  1 tdavis  staff   124 Oct 16 23:02 Hello.java
-rw-r--r--  1 tdavis  staff  1319 Oct 17 18:06 Run.class
-rw-r--r--  1 tdavis  staff   842 Oct 17 18:06 Run.java
-rw-r--r--  1 tdavis  staff   805 Oct 16 23:50 greetings.jar
-rwxr-xr-x  1 tdavis  staff    53 Oct 16 23:04 hi
The Run class begins by concatenating the args[] array passed to main(). The resulting String is placed in command. Next, the Runtime object is retrieved, and its exec() method is called with command. The result is a Process object containing the running command-line tool. I retrieve the InputStream from the Process object and chain it in typical java.io fashion to obtain a BufferedReader. Finally, I read and print the lines provided to the BufferedReader until the OutputStream is finished as indicated by the null value.
It's really pretty simple.
I list common tools found in Darwin in Table 6.2. The list is not even remotely exhaustive, but it gives you an idea of some of the common tasks already written.
Table 6.2. Common Darwin Commands
at | Sets a time to execute a command |
awk | Scans a file and performs instructions on the matching pattern |
banner | Creates a huge vertical text banner base of the string passed to the command |
basename | Extracts a file or command name from a path and arguments |
batch | Executes tasks when system load permits |
Displays a calendar | |
calendar | |
cat | Concatenates files |
cc | GNU compiler for C, C++ and Objective-C |
cd | Changes directory |
chgrp | Changes a file's group ownership |
chmod | Changes a file's permissions mode |
clear | Clears the Terminal |
cmp | Byte comparison of files |
comm | Compares files |
compress | Compresses files |
cp | Copies files |
Prints or changes the date | |
Prints free disk space | |
Prints file differences | |
Shows size of files or directories in disk blocks | |
echo | Echo |
Expands | |
file | Displays file's type based on contents rather than extension |
Searches for files | |
Snoops information about users | |
Wraps lines of text | |
Executes the file transfer protocol program | |
Performs a regular expression-based search | |
Prints groups to which a user belongs | |
Previews first lines of a file | |
Prints the computer's current hostname | |
Terminates a process (Use carefully!) | |
Displays the contents of a file | |
Creates file and directory links | |
login | Logs users in |
Prints a file to the default printer | |
Displays a queue of running print jobs | |
Removes print jobs | |
ls | Lists a directory |
man | Displays a command line tool's manual |
Makes a new directory | |
Moves a file or directory | |
od | Displays a string or file in octal, decimal, hex, or ASCII |
Changes the user's password | |
Displays a process status | |
Prints current path | |
Copies remote files | |
Displays a file with each line reversed | |
rm | Deletes files or directories |
Deletes directories | |
Makes a file called | |
Sleeps like | |
Splits a file into 1000 line files | |
Finds readable strings in binary files | |
Performs a command as the super user | |
Displays the end of a file (Watch log files with | |
Chat with another shell user | |
Archive directories or files | |
Copies standard in to standard out | |
Creates a telnet session | |
Acts as a stopwatch for commands | |
Changes the modification time of a file to the current time and date; also used to create empty files | |
Prints the terminal name | |
ul | Formats underlining |
Decompresses files | |
Outputs a file with duplicate lines removed | |
Converts measures into other units | |
Displays the length of time the computer has been running (My OS X boxes usually measure in months.) | |
Lists the users currently logged into the computer | |
Restores | |
w | Displays current activities of users logged in |
Displays word count (Use | |
Displays a short description of a command | |
Displays the directory location of a command | |
Displays the location of a command | |
Lists the users logged in | |
Used by the very confused | |
Chat with other users | |
Repeats | |
Prints the contents of compressed files |
Darwin contains the standard Unix C libraries. JNI and JNA are common methods of interfacing with these libraries. I list several of the common libraries in Table 6.3. All standard ANSI C libraries also are available.
Table 6.3. Common Darwin Libraries
Library | Description |
|---|---|
assert | Tests the truth of macros |
ldap | OpenLDAP API |
math | Math functions |
memory | Allocates and frees memory |
ncurses | A character screens display library; creates windows in the shell |
pthread | POSIX threading |
regex | Regular expression library |
Tip
Explore the header files found at /usr/include/ for a more exhaustive list of POSIX C libraries.
Common Unix APIs are not the only programming libraries found in Darwin. Hidden away in Darwin is the Core Foundation framework. The Core Foundation framework serves as the base for both the Cocoa and the Carbon programming frameworks.
Core Foundation is written in C, but many of the data types work as-is with the Cocoa Foundation interfaces found in the Cocoa Foundation framework. Carbon-based applications often use the data types found in the Core Foundation framework also. The Core Foundation handles data types, strings, URLs, sockets, ports, XML, preferences, collections, dates, and times.
Users directly access Darwin through commands entered in the Terminal or with shell scripts. In Chapter 4, I introduce shell scripting as it applies to compiling Java projects. Earlier in this chapter, I give an example of executing shell commands from inside a Java application. Many other uses exist for combining command-line tools, shell scripting, and Java.
Note
Command-line tools are often called utilities in Unix circles.
Most tools used at the command line are based on C or C++. However, you certainly can write your own tools in Java. Of course, you can always cd to your Java tool directory and type java <insert tool name> every time you want to use your tool, but that is too much work. After all, tools like cd and ls don't require that kind of exertion. Don't make your Java tools second-class citizens.
The workaround is simple. Wrap your Java file in a shell script. Your Java tool behaves just like C and C++ tools when properly configured. For an example, I use a simple class. It accepts one command-line argument and prints the argument:
public class Hello
{
   public static void main(String[] args)
  {
     System.out.println("Hello " + args[0] + "!");
  }
}
The wrapping shell script is even simpler. It simply specifies the shell as bash and executes the java Hello Jon command. I name the shell script hi with no extension and populate it with the following code:
#!/bin/bash
# basic Java invocation
java Hello Jon
Note
Handling arguments passed to shell scripts is explained in Chapter 4. Use your shell script to pass command-line arguments to your Java tool.
The following steps turn this simple code into a full-fledged command-line tool:
Jar your Java Tool.
For this example, use the command
jar cvf greetings.jar Hello.class.Place the JAR for your Java tool in the /Library/Java/Extensions/ directory.
This directory is in the system classpath. Placing Java libraries in this directory makes them available to all OS X applications.
Place your shell script in /usr/local/bin/ or another bin directory that is part of your PATH.
Check for acceptable paths by typing
envin the Terminal and checking thePATHvariable. Moving the shell script requires the commandsudo mv hi /usr/local/bin/hi.Make the shell script executable by entering chmod 755 hi in the Terminal.
You must perform this command while in the same directory as your shell script.
Tip
The sudo command authorizes administrative commands. Place sudo before a command that normally returns Permission denied, and sudo gives permission. The sudo command requires an administrator password.
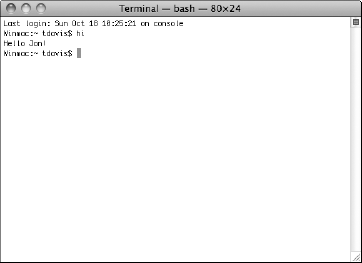
After completing the preceding steps, enter hi in any Terminal window and your Java tool prints Hello Jon!, as shown in Figure 6.4.
One of the greatest strengths of Mac OS X is the user experience. The consistent positive user experience of OS X owners is the result of Apple's extensive Human Interface Guidelines. The Apple Human Interface Guidelines are contained in a nearly 400-page manual documented here: http://developer.apple.com/mac/library/documentation/UserExperience/Conceptual/AppleHIGuidelines/XHIGIntro/XHIGIntro.html
My goal with this section is not to abridge all 400 pages into a quick read, but to explain some of the more important concepts of the guidelines and to expand on information about the guidelines that I introduced earlier in this book. In this chapter, I explain fundamentals of providing a common experience for OS X users. I explain fundamentals of user interface design and testing. This chapter expands on the software installation instructions in Chapter 5 with information about providing software updates for your users. Finally, I give an overview of OS X technologies that you should consider integrating with your Java applications.
Experts at Apple specialize in providing users with interfaces that fade into the background. They solved many issues that prevent users from having a good experience with software. You can benefit from their research.
Most OS X users have never read or even browsed the Human Interface Guidelines, but they have internalized the basics. If you are new to OS X, start by exploring some applications that came with your computer.
Take TextEdit, for example. Even before opening the application, notice the icon is simple yet elegant. Even as a free application that ships with every Mac, TextEdit provides an icon that scales well on the Dock when magnification is turned on. The icon is a pen and paper explaining before the user opens the application or reads the name that the purpose of the application is writing.
After you open TextEdit, the menu bar is detached from the document. Application control is separate from the documents created by the application, separating Model and Control for users, not just the programmer.
If the user does not like the current document, he clicks the red close button in the document window and closes the document without closing the application. Remember that the data and application are divorced even from the user's perspective. So, the user now freely opens a new document without needing to restart the application.
On the menu bar, notice a menu named after the application. Every OS X application has an application menu. Three menu items always found in the application menu are Preferences, About, and Quit. Your OS X users expect to find these menu items there and nowhere else.
Designing the greatest and most useful application on the planet is not enough. The first key to success is familiarity. Create software that conforms to user's expectations. If your software behaves the same way other that OS X applications behave, then you don't need to document those features. Users familiar with OS X already know how to use those features.
Familiarity with your design paradigms prevents user disappointment and confusion. You spend less time on supporting the software. Best of all, reviewers focus on reviewing the utility of your software, not on complaining about your non-conformity to UI standards. A couple of bad reviews can seriously harm sales of your prized software. Ignoring the Human Interface Guidelines makes you an easy target for a reviewer in a bad mood.
Users know good design. If a user opens your application and intuitively knows what to do, you have a good start on a desirable interface. The only way to know if an interface succeeds is to put it in front of users and get their feedback.
Releasing beta versions of your software to the public, or at the very least a large test group, is essential. Do not let pride of authorship prevent you from changing your interface. If your beta testers overwhelmingly hate something, change it. If your beta users overwhelmingly love a feature, keep it. This advice sounds simple, but it's ignored far too often.
Keep clicks down. By this I mean think about what your users do most often. If their favorite feature can be reached only by browsing through three submenus and then clicking "Advanced Features ..." in a dialog box, you are making them work too hard. Determine what features common users of your software are using and make it easy for them to use those features.
A great technique for uncovering design flaws is to invite beta users to a free training session at your company. Throw in free food and maybe free airfare to making it interesting. Then have the application designers sit down and teach the beta users the software. Go around the room answering questions. Make notes on common or tricky questions.
Hold a design meeting the morning after, and review how the trainees used the software. Could their questions have been prevented with UI changes? Again, do not let pride of authorship get in the way of making a good product. Importantly, make sure someone with enough clout to authorize design changes participates in this process, or it is all a waste of time. The entire process is shown in Figure 6.5.

As mentioned in the OS X User Interface Guidelines, your users have a mental model of the tasks they want your software to complete. For instance, music listeners have the concept of music sets internalized, so iTunes realizes this with Playlists. Find out how your users conceptualize their solutions, and emulate this in your software.
Again, get face to face with your users. They are your domain experts. Corner them in a room with a whiteboard. Then map out their mental processes on the white board using UML. This is a wonderful first step to creating your Java-based OS X application.
Another key to a good user interface is "forgiveness." Think "Undo." Users need to feel comfortable exploring and testing features in your application. If they test a feature and cannot undo it, your application is unforgiving. By allowing easy undoes of commands, you encourage your users' exploration of your application and provide a better user experience.
Warn users when they are about to change their data with no possibility of undoing the change. Not warning them results in angry customer-support issues. However, warning users provides for a better user experience.
Remember to include the option in caution dialog boxes to turn off the warning. Experienced users will appreciate it. The example later in this chapter shows how to permanently save option changes in an OS X fashion.
Avoid modal dialog boxes. For instance, the preferences window should not be modal. Let users control the interface. Do not dictate to users what they will do next. Users should always feel in charge of the software, not controlled by the software.
Plan for universal accessibility. Different users have different need and different abilities. Never allow your application to override accessibility features.
Provide expected OS X experiences and pleasant user interfaces through following the Apple Human Interface Guidelines. Every part of your application's user experience should provide appropriate non-jarring interaction. As an example in this section, I explain the Human Interface Guidelines on checking for software upgrades.
Make software updates a soothing experience for your users. The trick to a pleasant upgrade experience is good timing. Requests to update software the user is not currently using are unwelcome. Requests to upgrade software when the user is already working with the software are also unwelcome. Bad timing is unsettling to the user and provides for a poor user experience.
OS X users are not accustomed to intrusive dialog boxes while they work. The proper time to tell a user about upgrades is immediately after the software starts. Do not interrupt their productivity with a dialog box sometime after they are already busy.
If you have written software to check the Internet for upgrades, you know it may take some time to complete a check. Reasons include Internet latency or, with complex software, many time-consuming local and remote checks. How do you prevent a long start up for your customer and provide customers with upgrade alerts only at start up of your application?
The OS X way is as follows:
At startup, create a thread to check for upgrades.
Wait for the next launch of the application.
Upon the second launch of the application, check the local flag for upgrade information.
If the flag is set, notify the user of the update immediately at launch of the application, before he has a chance to use the application.
If the flag is not set, repeat from Step 1 by starting a thread to check for upgrades.
Note
In Chapter 5, I discuss OS X software installations and software bundling.
These standard steps avoid startup latency for the users. Also, these steps avoid unwanted interruption of the user's activities in your application. Obviously, happy customers buy software, and unhappy customers don't.
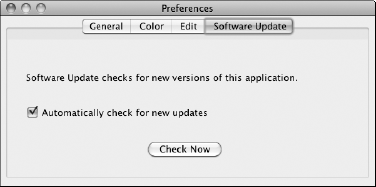
Apple's guidelines require that your program provide a preference panel to optionally deactivating automated update checks and a button to "Check Now" for updates. A complex panel is not needed. Simply add a Software Update tab to your preference window. Include a brief message and check box for deactivating the automated checks. Also include a button with the words "Check Now" that does just that, as shown in Figure 6.6.
Tip
Software Upgrade panes may have frequency choice, instead of a simple check box. Users may want to check weekly or monthly instead of every time the application starts.
When your flag indicates that a new upgrade exists for an application, show a dialog box giving the user more information. Two versions of update dialog boxes exist. One is for free upgrades, and the other is for commercial (or paid) upgrades.
The upgrade dialog boxes consist of a bold question, an explanation, three option buttons, and a badged caution icon. Badging a caution icon means to take a standard OS X caution icon and create a version with your application icon in the bottom-right corner. The standard caution icon is located in the CoreTypes bundle here:
/System/Library/CoreServices/CoreTypes.bundle
Because CoreTypes is a bundle, you need to Control-click the bundle and select Show Package Contents to browse inside the bundle. Once inside the bundle, browse to Contents/Resources/AlertCautionIcons.icns. Base your badged icon on AlertCautionIcon.icns, and size it to 64x64 pixels. For the example, I use a simple badged caution icon in a PNG.
Note
In Chapter 5, I discuss *.icns bundles and Icon Composer.
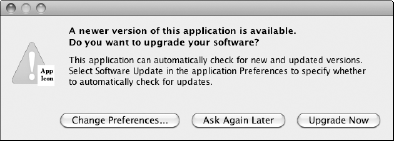
Free upgrade dialog boxes should give the options to Change Preferences..., Ask Again Later, or Upgrade Now, as shown in Figure 6.7. The Change Preferences... button should open the Software Upgrade tab of the Preferences window. The Ask Again Later button leaves the upgrade flag set and allows the user to continue using the application with no further interruptions. The Upgrade Now button goes ahead with the upgrade of the software.
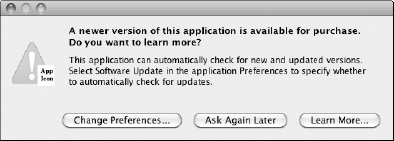
A commercial upgrade dialog box, shown in Figure 6.8, contains a very clear message stating that the upgrade costs money. Also, the upgrade never happens from clicking any of the buttons in the alert. The choices provided for users in a paid upgrade dialog box are Change Preferences..., Ask Again Later, and Learn More.... The first two buttons behave just as in the free upgrade dialog box. The Learn More... button opens a Web browser displaying a page with more information about the commercial upgrade.
Note
Paid upgrades are never performed from within the software but are downloaded as separate installations after purchase.
Note
Examples of the Preference window with Software Upgrade tab, as well as both the paid and free upgrade dialog boxes, are available on the book's Web site.
The following example illustrates doing an automated software update check and paid upgrade dialog box. This example uses a couple of JSPs on a Tomcat Web server. The update check is performed on localhost instead of a remote Web server. The project and Web server with JSPs are all on the book's Web site.
Note
The Tomcat Web server is a pure Java application available from the Apache Software Foundation at http://tomcat.apache.org/. It is available as open-source software under an Apache style license.
Download the UpgradeApplication from the book's Web site. Also download the Tomcat server associated with the UpgradeApplication. The Tomcat server is self-contained and needs no special installation to run on localhost.
Note
Localhost is a special address, meaning your local computer. To reach a Web server running on your local computer, use the address http://localhost/. In the case of Tomcat, the server runs on port 8080, so to reach a default installation of Tomcat running on localhost, use the address http://localhost:8080/.
If you prefer to use a clean Tomcat installation, simply download the Core Binary Distribution from the Tomcat site. I used version 6.0.20, but newer versions likely have the same installation process for new Web pages. Not much has changed there in many years of Tomcat releases.
After downloading and unzipping Tomcat, make sure the *.sh files in the bin directory are given permission to execute. Also, check Tomcat to make sure it is working properly by following these steps:
Unzip Tomcat to a convenient directory.
Using the Terminal application, cd to the Tomcat bin directory.
Enter the command chmod 755 *.sh to make all Tomcat shell scripts executable.
Start Tomcat by entering ./startup.sh in Terminal.
This command assumes you are currently in the Tomcat
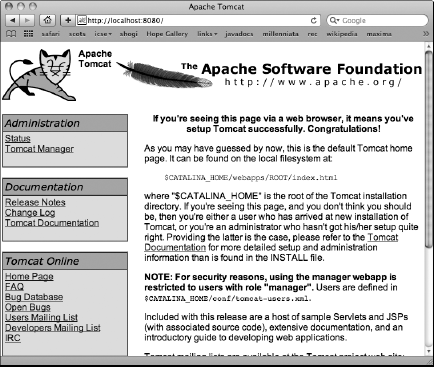
bindirectory. You also may start Tomcat from the main Tomcat directory by entering./bin/startup.sh.Open http://localhost:8080/ with Safari, and verify that you see the default Tomcat installation page.
A line near the top should say something like, "If you're seeing this page via a Web browser, it means you've set up Tomcat successfully. Congratulations!"
Note
I explain the inner workings of shell scripts in Chapter 4. If you are curious about how the Tomcat shell scripts work, open them in Xcode and take a look. You won't hurt anything by just looking.
Tip
To start Tomcat, enter ./startup.sh from the Terminal in Tomcat's bin directory. To stop Tomcat, enter ./shutdown.sh from the same bin directory.
Note
The default Web page displayed by Tomcat is located in the ROOT folder of the webapps directory. Web pages in Tomcat are organized as Web applications in folders of the Web application's name inside the webapps folder. ROOT is a special default Web application displayed at the "root" of the Web site's URL.
Now you have verified that Tomcat works correctly. The default Web page is shown in Figure 6.9. The two additional Web pages used in this example are in a subfolder of webapps called upgrade_example. Check Tomcat to make sure these pages are displayed properly. The addresses are as follows:
http://localhost:8080/upgrade_example/about_upgrade.jsp
and
http://localhost:8080/upgrade_example/get_current_build.jsp
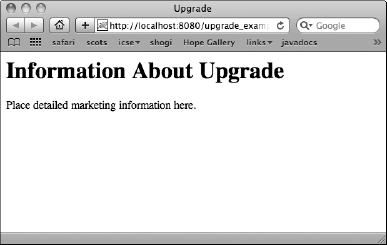
The get_current_build.jsp displays simply 2010 as its content. The content of about_upgrade.jsp is shown in Figure 6.10.
If you open the get_current_build.jsp file in Xcode, you find it contains only 2010 without even a carriage return. In the about_upgrade.jsp file, you find the following code.
<html>
<head>
   <title>Upgrade</title>
</head>
<body>
<h1>Information About Upgrade</h1>
<p>
Place detailed marketing information here.
</p>
</body>
</html>
Nothing in either Web page actually requires JSP over HTML at this point, but presumably you will create more dynamic content for an actual production application. However, for a piece of shareware or freeware, your current version page can be as simple as a single build number. At the end of the day, the real object is to get your code working properly and in a user-friendly manner, not to make your program jump through hoops.
Note
In Chapter 3, I explain the creation of Java Swing application projects in Xcode.
Now we move on to examining the client application in this example. The application is an Xcode project based on the Java application project template found in older versions of Xcode. The project is just a starting point, and it needs some refactoring to bring it into a nice Model View Controller paradigm. However, for the purpose of showing you a basic software update implementation, it works just fine.
The project consists of five Java classes: AboutBox, FreeUpgradeDialog, PaidUpgradeDialog, PreferencesJFrame, and UpgradeExample. UpgradeExample contains the main() method at the bottom of the file. The main() method contains much of the controlling implementation of the update algorithm.
Here is the main() method from the UpgradeExample class:
public static void main(String args[])
{
   mainFrame = new UpgradeExample();

   Preferences prefs = PreferencesJFrame.prefs;
   boolean upgradeFound =
      prefs.getBoolean("upgrade_found", false);

   if (upgradeFound)
{
JDialog d1 = new PaidUpgradeDialog(mainFrame);
d1.setVisible(true);
// If this was a free upgrade the following would
// occur instead of the PaidUpgradeDialog
//JDialog d2 = new FreeUpgradeDialog(mainFrame);
//d2.setVisible(true);
}
else
{
Thread upgradeCheckThread = new Thread(new Runnable()
{
public void run()
{
Preferences prefs = PreferencesJFrame.prefs;
boolean autoCheckPref =
prefs.getBoolean ("auto_upgrade_check", true);
if ( autoCheckPref &&
BUILD_NUMBER < PreferencesJFrame.checkBuild())
{
prefs.putBoolean ("upgrade_found", true);
}
}
});
upgradeCheckThread.start();
}
}The main() method starts the application simply by constructing the UpgradeExample class. The rest of the main method deals with the upgrade algorithm. You might consider moving the algorithm into a separate method in a control class in production-quality code.
First, I get the Preferences object. Java's Preferences class is found in the java.util.prefs package introduced in Java 1.4. It is responsible for persisting OS agnostic preferences between invocations of your application. To obtain a properly configured Preferences object, call Preferences.userNodeForPackage() passing in a class representative of your application's main Java package. For instance, I call the following in PreferencesJFrame:
Preferences.userNodeForPackage(PreferencesJFrame.class);
I use the Preferences object to check the status of two properties. I check the upgrade_found property to see if the last check for an upgrade succeeded. Further down, I check whether the auto_upgrade_check property allows my application to automatically check for newer versions on the Web.
If I have found an upgrade previously, I open a dialog box to inform the user. This is the appropriate time to inform the user, because the application has just started and the user has not yet begun work with the application. This the least unsettling approach to informing the user of the upgrade.
I provided dialog boxes for both commercial (paid) upgrades and free upgrades with this project. To use the dialog boxes in your own project, replace the attention icon with an attention icon badged with your application icon and modify the dialog box text.
If no upgrade was previously found, I create a Thread to check the Web, or in our case localhost, for the current available build number. In this case, I have hardcoded the build number as a final int. This works for a commercial upgrade, because the upgrade is installed from a downloaded installation file or package. No automated installations happen from within the program as they would with a free upgrade. In a free upgrade, the current version number should persist in the application preferences so you can change the version during an automated upgrade. Finally, I do a check of the Web server with the checkBuild() method described shortly.
As mentioned earlier, I provide custom JDialogs for both paid and free upgrades. If you are familiar with Swing and AWT, nothing too surprising is hidden away in their code. Here are the three action event handlers for PaidUpgradeDialog:
private void changePreferencesClicked(ActionEvent e)
{
   UpgradeExample.prefs.setVisible(true);
   this.setVisible(false);
   this.dispose();
}
private void askAgainLaterClicked(ActionEvent e)
{
   this.setVisible(false);
   this.dispose();
}
private void learnMoreClicked(ActionEvent e)
{
   try
   {
      String aboutURL =
         "http://localhost:8080" +
         "/upgrade_example/about_upgrade.jsp";
      URI uri = new URI(aboutURL);
      Desktop dt = Desktop.getDesktop();
      dt.browse(uri);
   }
   catch (IOException ioe)
   {
      ioe.printStackTrace();
   }
catch (URISyntaxException use)
{
use.printStackTrace();
}
finally
{
this.setVisible(false);
this.dispose();
}
}The ChangePreferencesClicked() method sets the PreferencesJFrame visible so the customer can easily modify the Software Update preferences. Ideally, the Software Update preference tab is focused. Minimally, make the JFrame and desired tab visible.
The askAgainLaterClicked() method only disposes of the dialog box. The customer sees this dialog box again the next time the application starts up. All flags and preferences remain the same.
The action you want is learnMoreClicked(). Because this is a paid application, the action opens a Web site with marketing information about the new version of your application. I perform the magic of opening the Web site with the Desktop object. Obtain an instance of the Desktop with this code:
Desktop.getDesktop();
Open your preferred URL with a call to Desktop's browse() method, passing in the URL as a String.
Warning
This UpdateExample application relies on the Tomcat server, mentioned earlier in the chapter. Start the Tomcat server before running the UpdateExample.app, or the example application will find no server on localhost:8080 with which to connect.
Checking the current application version against the currently available application version happens in the checkBuild() method. I placed the checkBuild() method in the PreferencesJFrame class as shown here:
private int checkBuild()
{
   int retval = −1;
   try
   {
      String address =
         "http://localhost:8080/upgrade_example" +
         "/get_current_build.jsp";
      URL url = new URL(address);
URLConnection connection = url.openConnection();
InputStream is = connection.getInputStream();
Scanner scanner = new Scanner(is);
retval = scanner.nextInt();
}
catch (MalformedURLException mue)
{
mue.printStackTrace();
}
catch (IOException ioe)
{
ioe.printStackTrace();
}
return retval;
}Tip
When using java.util.prefs.Preferences, the actual preferences are stored in *.plist files in ~/Library/Preferences or /Library/Preferences.
I check the Web site for the current version of the application using a Scanner. I simply call scanner.nextInt() to find the build number represented as an int. Setting up the Scanner is simple too. A Servlet, JSP, or even HTML file returns the build number, so use a URL object created from a String containing the Web site address. Take the URL and instantiate a URLConnection with a call to openConnection(). At this point, get an InputStream from the connection, and construct your Scanner object.
At this point, you simply need to be concerned with a couple of exceptions: MalformedURLException and IOException. I'm sure those exceptions will never be an issue, though. After all, the Internet never fails us. (By the way, if you believe that Internet connections never have issues, I own a bridge you may be interested in purchasing.)
The upgrade example in this chapter integrates OS X style menus. As you have undoubtedly noticed by now, on OS X menus appear at the top of the screen rather than at the top of the application JFrame. Top menus contain several special menu items, but do not require you to leave the comfort of a pure Java language environment. In Chapter 7, I explain details of Apple-specific Java libraries provided with OS X.
When you are ready to leave your pure Java comfort zone, OS X provides several built-in technologies to give your users a more Mac-like experience. Much of this book explains how to interface Java applications with common OS X languages such as JavaScript, AppleScript, Objective-C, and C to take full advantage of available Mac libraries, frameworks, and features.
Your Java application can step outside the Java box. Consider creating advanced Screen Savers. What useful Dashboard widgets can increase your productivity? Imagine integrating your application with Address Book, iCal, or iTunes. Even working in the Terminal or via ssh, your command-line applications can bring a great user experience interfacing with ncurses. OS X is a feature-rich operating system. Do not confine yourself or your creative genius.
I began this chapter by describing the architecture of OS X. The operating system is made up of multiple modular layers. These layers include the human interface, the programming frameworks, Darwin, and the actual Mac hardware. The modularity of OS X lends to its strength as a modern operating system.
Darwin sits on top of the Mac hardware and is the foundation of OS X. Darwin is an operating system in itself. Darwin is open-source software, and several operating systems are based on it. You can integrate Java directly with Darwin through calls to Runtime's exec() method, turning Java programs into command-line tools with shell scripts and calling Unix C libraries included in Darwin directly with JNI.
The Human Interface interacts with OS X users. Apple provides an extensive 400-page manual explaining proper creation of user interfaces for OS X. Apple provides several technologies for use in your applications, including AddressBook, iTunes, and iCal. I provided the Xcode project, UpdateExample, as an illustration of implementing the Human Interface Guidelines for software update checks into your Java applications.