
Not too long ago, Apple deprecated and then removed all the Cocoa Java libraries from OS X. A common perception was that Apple was backing away from support of Java development on OS X. This perception is not accurate. A more correct statement is that Apple has streamlined Java on OS X.
Properly written Java applications are still first-class citizens of OS X. The application menu is fully available to Java applications. System events such as quit events are available. Even the Help Viewer is available to Java applications on OS X.
Using Apple's provided libraries, you can create applications that look and feel just like other OS X applications. You can adhere to Apple's Human Interface Guideline when creating your Java applications. Your users need never realize that your application is Java-based and not written in C or Objective-C.
All this OS X integration is available without JNI. At some point, you may desire to venture into the realm of JNI. JNI is the preferred solution for interfacing Java applications with Cocoa or Carbon frameworks in situations where Cocoa or Carbon integration is completely unavoidable. Most applications do not need to go to this extreme. Most common integration tasks are available from the packages com.apple.eio and com.apple.eawt without the need for JNI.
Chapter 8 contains an overview of JNI as used with the com.apple.eawt.CocoaComponent class. Chapter 9 provides a deeper look at JNI for OS X Cocoa, Carbon, and Darwin integration. This chapter shields you from more complex integration and stays in the realm of (mostly) pure Java calls involving the com.apple.eio and com.apple.eawt packages. This chapter is a JNI-free zone.
In this chapter, I introduce OS X file system peculiarities, such as file types and creators. I explain Dock menu integration. I provide an example of implementing HTML-based help books with your applications. Also, I explain the three most common application menu items used in Java applications.
Note
I do not discuss either the com.apple.eawt.ApplicationBeanInfo or the com.apple.eawt.CocoaComponent in this chapter. The ApplicationBeanInfo class is not intended for direct use in your applications. The CocoaComponent class requires some JNI, so I put off discussion of the class until Chapter 8.
The com.apple.eio package contains only one class. The class is FileManager. FileManager contains only static methods. So you never construct FileManager instances.
OS X disk formats save information not accessible, or at least not immediately available, with standard Java calls. Application bundle locations, bundle resource locations, file types, and file creators are all available through the com.apple.eio.FileManager class.
This section explores bundle locations, resource locations, file type codes, and creator codes. I also provide an example of using the FileManager in a short program that identifies file type codes and creator codes.
OS X developers often need to find the location of the application bundle that started their Java application. The trick to finding the application bundle is calling the following:
FileManager.getPathToApplicationBundle()
This class returns a Java String representing the path to your Java application bundle. As an example, if the getPathToApplicationBundle() method is called from inside an application named My App.app located on the Desktop, the returned String looks something like this:
/Users/the_user_name/Desktop/My App.app
Another common task that proves difficult without Apple's Java APIs is finding application bundle resources. Apple provides three versions of the FileManager.getResource() method to make finding resources easy. All three methods return a String specifying the full file path to the requested resource.
These are the signatures of the three getResource() methods:
public static String getResource(
                        String fileName)
public static String getResource(
                        String fileName,
                        String subDirectory)
public static String getResource(
                        String fileNameWithoutExtension,
                        String subDirectory,
                        String extension)
These three methods throw FileNotFoundExceptions, as you probably expect. The first two methods take a filename with an extension such as .txt or .png. The final method expects the root name as the first parameter and the extension as the last parameter.
On OS X, files are identified by file extensions. Also, files are identified by types and creators. A type identifies what type of data is in a file or if a file is executable. A creator identifies what application should open a file. Extensions, types, and creators all serve as clues to the operating system as to what to do with files.
Warning
A file's creator is not necessarily its actual creator. For instance, your program may export a screen capture to a PNG, but purposely set its creator to Adobe Photoshop, because your application cannot open PNGs.
Note
Many files do not set their type or creator. Applications that do not set their type or creator have a default value of 0.
Types and creators are both represented by four bytes. Of course, four bytes conveniently fit into 32bit ints. Java has lots of those.
These methods are available for handling types and creators from FileManager:
public static int getFileType( String fileName )
public static int getFileCreator( String fileName )
public static void setFileType( String fileName, int type )
public static void setFileCreator(String fileName, int creator )
public static void setFileTypeAndCreator(
                        String filename,
                        int type,
                        int creator)
Each of these methods throws an IOException.
The use of these five FileManager methods is straightforward. Use full paths for the first parameter and Java ints for the types and creators.
Tip
When "exporting" files rather than saving files from your applications, set the exported file's creator to an application that handles that type of file. For example, if you exported a *.png file from your application, you might set the creator to Photoshop instead of your application.
What is not so straightforward is figuring out what the common types and creators are that you want to use when creating your documents. The FileManagerExample application that follows provides you with a quick, easy tool for finding Java ints representing types and creators. The FileManagerExample also demonstrates the use of the FileManager class.
The source and a double-clickable Java application bundle version of this program are both found on the book's Web site.
package com.genedavis;
import java.awt.Container;
import java.awt.event.ActionEvent;
import java.awt.event.ActionListener;
import java.io.File;
import java.io.IOException;
import javax.swing.JButton;
import javax.swing.JFileChooser;
import javax.swing.JFrame;
import javax.swing.JOptionPane;
import javax.swing.JPanel;
import com.apple.eio.FileManager;
public class FileManagerExample
{
   JFrame mainFrame;

   public static void main( String[] args ) throws Exception
   {
      new FileManagerExample();
   }

   public FileManagerExample()
   {
      mainFrame = new JFrame("File Manager Example");
      Container pane = mainFrame.getContentPane();
      pane.setLayout( null );

      JButton button = new JButton("Open Dialog");
      mainFrame.add( button );
      button.setBounds(120, 70, 160, 32);
button.addActionListener(new ActionListener()
{
public void actionPerformed(ActionEvent ae)
{
Thread t = new Thread(new Runnable()
{
public void run()
{
openDialog();
}
});
t.start();
}
});
mainFrame.setSize(400, 200);
mainFrame.setVisible(true);
}
private void openDialog()
{
try
{
JFileChooser jfc = new JFileChooser();
jfc.showDialog(mainFrame, "Get Type and Creator");
File file = jfc.getSelectedFile();
String path = file.getCanonicalPath();
// Get the creator and type using FileManager
int creator = FileManager.getFileCreator(path);
int type = FileManager.getFileType(path);
JOptionPane.showMessageDialog(
mainFrame,
"File: " + path + "
" +
"Creator: " + creator + "
" +
"Type: " + type);
}
catch (IOException ioe)
{
ioe.printStackTrace();
}
}
}The book's Web site contains the source for the FileManagerExample class. The source is in the file_manager_example project. I created the file_manager_example project based on the Xcode Organizer Java Application template. The project is an Ant-based project, so you can integrate it into most popular Java IDEs.
To build the project, open Terminal from the /Applcations/Utilities/ directory. Change your directory to the project directory root with the cd command. Enter the command ant in the Terminal. The Ant project creates a Mac OS X application bundle and places it in the dist/ directory. Navigate to the project dist/ directory from Finder and double-click your new application to run the example.
Note
In Chapter 3, I explain use of Organizer to create Java project templates.
This application opens a JFrame. The JFrame contains one button. Clicking the button opens a file browser. Select a file with the file dialog box; and if it has a type and creator, they are displayed, as shown in Figure 7.1. Otherwise, 0 is displayed for each value.
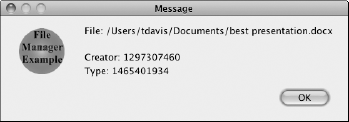
I use the FileManager class near the end of the openDialog() method. I call both getFileCreator() and getFileType(). Both static methods return int values. I display those two values in the message dialog box.
Most applications need a Help Viewer, a customized Dock menu, or at least a working preference menu item in the application menu. Intercepting system quit events, implementing an application menu preference item, and providing menu item searching from a Help menu on your screen menu may not "wow" your customers, but your OS X customers will notice if those features are missing. The com.apple.eawt package contains the classes for all these tasks.
One of the most obvious features of OS X is the Dock. When magnification is turned on, beautiful icons seem to burst into view as users mouse over them. Properly bundled Java applications take full advantage of the Dock and Dock menus.
The com.apple.eawt.Application class provides several methods for manipulating the OS X Dock. The Application's setDockIconImage() method allows you to customize your Dock icon beyond displaying your default application bundle icon. Also, the Application's setDockIconBadge() method enables system badging of the Dock icon. (In this context, badges are small images attached to an application's Dock icon that provide visual clues as to the current state of the application.)
The com.apple.eawtApplication method most commonly used by Java developers is the setDockMenu() method. This method places custom menu items and submenus on the dock.
Follow these steps to customize the Dock menu:
Instantiate your application's
JFrame.Create a
java.awt.PopupMenufor use in the Dock.Add menu items and submenus to the
PopupMenu.Add your
PopupMenuto yourJFramewith theadd()method.Instantiate a
com.apple.eawt.Applicationobject.Add your
PopupMenuto yourApplicationobject using thesetDockMenu()method.
Tip
I encourage Java application bundling on OS X. However, if you want to forgo the joys of creating application bundles for your Java applications and still want to have a nice-looking name and icon in the OS X Dock, I have a couple of command line arguments for you.
The -Xdock:name=<some name> argument customizes your application name in the Dock, and the -Xdock:icon=<some path> argument customizes your Dock icon. For example,
java -Xdock:name="My App" -cp ame.jar ¬
   com.genedavis.ApplicationMenuExample
sets com.genedavis.ApplicationMenuExample to run under the name My App.
Tip
When running a bundled application in headless mode, meaning no menu or Dock icon, use a combination of the java.awt.headless property set to true and LSUIElement set to 1.Set both properties in your Info.plist.
Some employers may not want a full application bundle created for their cross-platform Java application. Never fear, Dock modifications are available from double-clickable JAR files as well as bundled applications. The following example works well from the command line, a double-clickable JAR, and an application bundle.
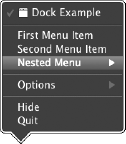
The following source is for the DockExample class. DockExample follows the steps I stated for modifying the Dock menu with a PopupMenu. The DockExample class illustrates adding custom menus and menu items to the OS X Dock. The final Dock menu for the Dock Example program is shown in Figure 7.2. The source files for Dock Example are on the book's Web site.
package com.genedavis;
import java.awt.Menu;
import java.awt.MenuItem;
import java.awt.PopupMenu;
import java.awt.event.ActionEvent;
import java.awt.event.ActionListener;
import javax.swing.JFrame;
import javax.swing.JOptionPane;
import com.apple.eawt.Application;
public class DockExample {
   public static void main( String[] args )
   {

      //create the JFrame
      final JFrame mainFrame = new JFrame("Dock Example");


      // Make sure the dock exists before you
      // attempt to modify it.
      Application app = new Application();
      PopupMenu popup = new PopupMenu();
      Menu submenu = new Menu( "Nested Menu" );
// create MenuItems (not JMenuItems)
MenuItem firstItem =
new MenuItem("First Menu Item");
MenuItem secondItem =
new MenuItem("Second Menu Item");
MenuItem thirdItem =
new MenuItem("Third Menu Item");
// create action listeners
firstItem.addActionListener(
new ActionListener () {
public void actionPerformed ( ActionEvent ae )
{
JOptionPane.showMessageDialog(
mainFrame,
"First Action");
}
});
secondItem.addActionListener(
new ActionListener () {
public void actionPerformed ( ActionEvent ae )
{
JOptionPane.showMessageDialog(
mainFrame,
"Second Action");
}
});
thirdItem.addActionListener(
new ActionListener () {
public void actionPerformed ( ActionEvent ae )
{
JOptionPane.showMessageDialog(
mainFrame,
"Third Action");
}
});
// make the JFrame visible before adding popup
mainFrame.setSize(400, 200);
mainFrame.setVisible(true);
//adding menus and menu items
popup.add( firstItem );
popup.add( secondItem );submenu.add( thirdItem );
popup.add( submenu );
// your popup must be added to your JFrame
// even though it is used by the Dock
mainFrame.add( popup );
// finally you are ready to set the
// custom Dock menu
app.setDockMenu( popup );
}
}The book's Web site contains the source for the DockExample class. The source is in the dock_example project. I created the dock_example project based on the Xcode Organizer Java Application template. The project is an Ant-based project, so you can integrate it into most popular Java IDEs.
To build the project, open Terminal from the /Applcations/Utilities/ directory. Change your directory to the project directory root with the cd command. Enter the command ant in the Terminal. The Ant project creates a Mac OS X application bundle and places it in the dist/ directory. Navigate to the project dist/ directory from Finder and double-click your new application to run the example.
Help Viewer is the Apple help system. Help Viewer displays help books created for application documentation purposes. OS X users are accustomed to the Help Viewer, so again, the Apple-provided technology is the best API to use in your OS X Java applications.
In this section, I explain simple Help Viewer integration into Java applications. This section explains Info.plist properties associated with help, help book creation, help book placement, and integration into the menu bar.
Follow three steps to implement Help Viewer integration:
Create Web pages with relative links containing your support pages.
This is your help book.
Place your help book in a subdirectory of your application bundle's
Resourcesfolder.I chose the name of
help_bookfor the directory in this section's example.Set the
CFBundleHelpBookNameandCFBundleHelpBookFolderproperties in your application'sInfo.plistfile.
As I mentioned earlier, Help Viewer displays help books. A help book, in its simplest form, is a collection of HTML 4.01 pages. Many applications ported from other platforms already have HTML-based help systems. HTML is a common approach for help implementation.
HTML is the language of Web pages. If you have a set of customer support pages on your Web site, your first step in creating a help book is retrieving a copy of those pages. All image tags and hyperlinks must contain relative links. The Web developer who set up your Web site understands how to create relative links. Be sure to request relative links, or your help book may contain broken links.
Your entry Web page needs the following lines of code in the header somewhere above the title tag:
<meta http-equiv="content-type"
            content="text/html;charset=iso-8859-1">
<meta NAME="AppleTitle" CONTENT="<apple title goes here>">
Change <apple title goes here> to your desired help book title. The title should not have angle brackets.
Browse your help book with a normal Web browser, such as Safari, in order to test that all the resources are linked properly. Move your help book into your application bundle with the following steps:
Name the entry page for your help book
index.html.The filename must be
index.htmlin order for Help Viewer to recognize it. It is very likely that the entry page is already namedindex, but with a different file extension, such asphporjsp.Create a folder for your help book under the
Resourcesfolder in the application bundle.Copy your help book into the new help book folder.
Note
Relative links are links that give an address "relative" to the current file and directory.
Your application bundle contains a file called Info.plist. Double-clicking the Info.plist file opens it in the Property List Editor. Using the Property List Editor, add the CFBundleHelpBookName and the CFBundleHelpBookFolder properties. The alternate names for these properties are Help Book identifier and Help Book directory name.
The CFBundleHelpBookName identifies the help book to the system. Choose a name that you feel is appropriate. The name actually displayed in the Help Viewer is taken from the HTML file's head area.
The CFBundleHelpBookFolder names the directory under Resources in which your help book is stored. This folder is the directory you created in Step 2 of the preceding list.
The last step to implementing a basic help book is creating your Help menu. You can use two tricks to make the implementation easier. First, set your menu preference to screen menus. On OS X, menus can reside in the application window or at the top of the monitor. Most OS X application have their menus set to use screen menus instead of menus attached to windows. Set your preferred menu style with the following line of code:
System.setProperty( "apple.laf.useScreenMenuBar", "true" );
Second, call openHelpViewer() on your com.apple.eawt.Application object when your help menu item is selected.
Create your menu bar, menus, and menu items using JMenuBar, JMenu, and JMenuItem, just as you do with other Java applications. Also, add your JMenuBar to your JFrame as normal. Create a JMenu titled Help and add a menu item to the Help menu for opening the Help Viewer. The action performed by the help menu item is openHelpViewer().
That's all you need to do to create a basic OS X-compliant help book for your Java application.
When you run your Java application from the application bundle, notice that you get an extra search field under your help menu for free. Probably the coolest feature of this free search is that it searches for menu items matching the search parameters. For instance, if you have a JMenuItem titled "Coolest Feature of All Time" hidden away in 16 layers of submenus, all your user has to do is type "Coolest Feature" into Help
Now an example is in order. The following example is available on the book's Web site. The code consists of a three-file help book, one main class named HelpViewerExample, and an application bundle.
As I just mentioned, the book's Web site contains the source for the HelpViewerExample class and the help files. The source is in the help_viewer_example project. I created the help_viewer_example project based on the Xcode Organizer Java Application template. The project is an Ant-based project, so you can integrate it into most popular Java IDEs.
To build the project, open Terminal from the /Applcations/Utilities/ directory. Change your directory to the project directory root with the cd command. Enter the command ant in the Terminal. The Ant project creates a Mac OS X application bundle and places it in the dist/ directory. Navigate to the project dist/ directory from Finder and double-click your new application to run the example.
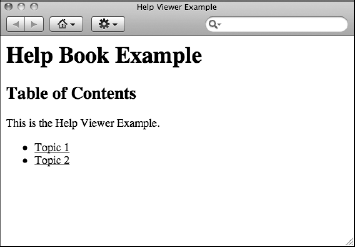
The following three basic HTML files are interlinked creating a base help book. The file index.html is the entry point for the help book. Help books, like Web pages, use files named index.html for their default page.
Note
The official Apple Help Book Programming Guide is available here: http://developer.apple.com/mac/library/documentation/Carbon/Conceptual/ProvidingUserAssitAppleHelp/user_help_intro/user_assistance_intro.html
The following source code is for the index.html page. This is the entry page for your help book. Notice the two meta tags mentioned earlier. The meta tag containing the AppleTitle attribute should not appear in other help book Web pages.
<html>
   <head>
      <meta http-equiv="content-type"
            content="text/html;charset=iso-8859-1">
      <meta NAME="AppleTitle" CONTENT="Help Viewer Example">
      <title>Help Viewer Example</title>
   </head>
   <body bgcolor="white">
      <h1>Help Book Example</h1>
      <h2>Table of Contents</h2>
      <p>This is the Help Viewer Example.</p>
      <ul>
         <li><a href="topic_1.html">Topic 1</a></li>
         <li><a href="topic_2.html">Topic 2</a></li>
      </ul>
  </body>
</html>
The following source code is for the topic_1.html page. Notice the relative hyperlinks in anchor tags.
<html>
   <head>
      <title>Help Viewer Example: Topic 1</title>
   </head>
   <body bgcolor="white">
      <h1>Topic 1</h1>
      <p>This is the Help Viewer Example Topic number 1.</p>

      <ul>
         <li><a href="index.html">Table of Contents</a></li>
         <li><a href="topic_2.html">Topic 2</a></li>
      </ul>
  </body>
</html>
The following source code is for the topic_2.html page, for completeness:
<html>
   <head>
      <title>Help Viewer Example: Topic 2</title>
   </head>
   <body bgcolor="white">
      <h1>Topic 2</h1>
      <p>This is the Help Viewer Example Topic number 2.</p>

      <ul>
         <li><a href="index.html">Table of Contents</a></li>
         <li><a href="topic_1.html">Topic 1</a></li>
      </ul>
  </body>
</html>
I placed these three HTML files in the application bundle. Their location is Contents/Resources/help_book. I named the help book folder help_book.
The Info.plist file contains the two help book specific properties, CFBundleHelpBookName and CFBundleHelpBookFolder, as shown in Figure 7.3. CFBundleHelpBookName is set to the value of Help Viewer Example Help. CFBundleHelpBookFolder is set to help_book.
The following code is the source for the HelpViewerExample class. HelpViewerExample is the only Java class in this example. In HelpViewerExample, I instantiate a com.apple.eawt.Application object. I configure the menu bar to display as a screen menu rather than in the Java JFrame. Next, I set up a JFrame, complete with menu bar and Help menu, and Example Help Book menu item. Finally, I set the JFrame to visible.
package com.genedavis;
import java.awt.event.ActionEvent;
import java.awt.event.ActionListener;
import javax.swing.JFrame;
import javax.swing.JMenu;
import javax.swing.JMenuBar;
import javax.swing.JMenuItem;
import com.apple.eawt.Application;
public class HelpViewerExample {
   public static void main( String[] args )
   {

      // com.apple.eawt.Application
      final Application app = new Application();

      // setting the look and feel to use apple screen menu
      System.setProperty( "apple.laf.useScreenMenuBar", "true" );

      JFrame mainFrame = new JFrame( "Help Viewer Example" );

      // configuring and adding menubar to mainFrame
      JMenuBar jmb = new JMenuBar();

      JMenu fileMenu = new JMenu( "File" );
      JMenu editMenu = new JMenu( "Edit" );
      JMenu windowMenu = new JMenu( "Window" );
      JMenu helpMenu = new JMenu( "Help" );

      jmb.add( fileMenu );
      jmb.add( editMenu );
      jmb.add( windowMenu );
      jmb.add( helpMenu );

      JMenuItem newItem = new JMenuItem("New" );
      JMenuItem openItem = new JMenuItem( "Open..." );

      JMenuItem cutItem = new JMenuItem( "Cut" );
      JMenuItem copyItem = new JMenuItem( "Copy" );
      JMenuItem pasteItem = new JMenuItem( "Paste" );
JMenuItem helpExampleItem =
new JMenuItem("My Example Help Book");
// event that opens the help book is here
helpExampleItem.addActionListener(
new ActionListener () {
public void actionPerformed ( ActionEvent ae )
{
app.openHelpViewer();
}
});
fileMenu.add( newItem );
fileMenu.add( openItem );
editMenu.add( cutItem );
editMenu.add( copyItem );
editMenu.add( pasteItem );
helpMenu.add( helpExampleItem );
mainFrame.setJMenuBar( jmb );
// setting the size of the JFrame
mainFrame.setSize( 400, 200 );
// making the JFrame visible
mainFrame.setVisible( true );
}
}Once bundled, the example Help menu contains a Search menu item and the Help Book Example menu item as shown in Figure 7.4. When you select Help
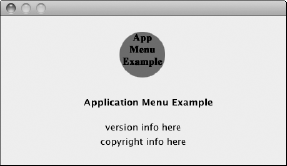
All windowed OS X applications contain an application menu. The application menu is right next to the apple menu in the top-left corner of the screen. When Java applications are not packaged in application bundles, the application menu is branded with the fully qualified Java name of the application's main class. For instance, com.genedavis.ApplicationMenuExample is the application menu name of this section's example when run from a JAR, as show in Figure 7.6.
If an application is properly bundled, the title of the application menu matches the actual application name, as shown in Figure 7.7. Many users are confused by a class name when they are expecting an application name. Properly bundled applications present more professional-looking user interfaces and confuse fewer users.
When you are ready to bundle your Java application, use the Jar Bundler application installed with Xcode to create and properly name your application bundle. Bundling your Java application results in a properly branded application menu. The Jar Bundler application is located in the /Developer/Utilities/ directory.
Note
In Chapter 5, I introduce bundling of Java applications in depth.
Tip
The first step to creating an application bundle is packaging your Java application in a JAR file. Make a JAR file quickly from the Finder by selecting the files and folders you desire to JAR. Next, Control-click (or right-click) the selection. Choose Compress Items from the contextual menu. Finally, change the name of the resulting Archive.zip file to some_name.jar. After all, JAR files are really just ZIP files.
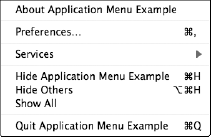
The application menu contains three menu items of interest to Java application developers. The menu items are the About menu item, the Preferences... menu item, and the Quit menu item, as shown in Figure 7.8. These menu items are not available through the standard Java APIs. However, Apple provides two classes and an interface that provide access to these menu items.
Tip
Versions of the About and Quit menu items are provided by default by OS X. However, the behavior does not satisfy the needs of your advanced programs. For instance, if you do not handle the Quit event, your users' unsaved documents summarily disappear without the chance of recovery when your users accidentally quit without saving.
With just a few simple steps, the About, Preferences..., and Quit menus integrate with your application. I give a detailed example of the integration steps later in this section, but here's a short version:
Extend
com.apple.eawt.ApplicationAdapterto create your ownApplicationAdapter.Implement the
handleAbout()method in yourApplicationAdapter.Implement the
handlePreferences()method in yourApplicationAdapter.Implement the
handleQuit()method in yourApplicationAdapter.Call
setEnableAboutMenu()on yourApplicationobject with the argument oftrue.Call
setEnablePreferencesMenu()on yourApplicationobject with the argument oftrue.Call
addApplicationListener()on yourApplicationobject with yourApplicationAdapterimplementation as the argument.
Tip
The javadoc for the Application class, the ApplicationAdapter class, and the ApplicationListener interface is found here: http://developer.apple.com/mac/library/documentation/Java/Reference/JavaSE6_AppleExtensionsRef/api/com/apple/eawt/Application.html
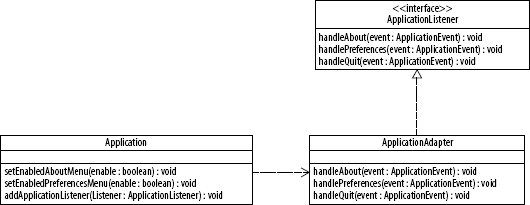
The Application class is the key class when integrating with the application menu. The Application class provides the About, Preferences..., and Quit events to an ApplicationListener. In the case of the preceding steps, the ApplicationAdapter is an implementation of the ApplicationListener interface. Figure 7.9 is a diagram showing the relationship of these classes with the applicable methods.
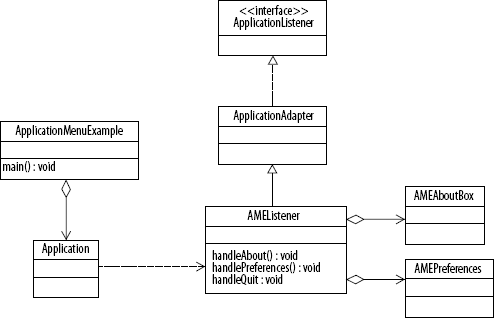
The Application Menu Example application found on the book's Web site demonstrates implementing the three menu items in the application menu. The application consists of four classes. The classes are ApplicationMenuExample, AMEListener, AMEAboutBox, and AMEListener. The Application Menu Example is diagrammed in Figure 7.10.
As I mentioned, the book's Web site contains the source for the ApplicationMenuExample, AMEListener, AMEAboutBox, and AMEListener classes. The source is in the application_menu_example project. I created the application_menu_example project based on the Xcode Organizer Java Application template. The project is an Ant-based project, so you can integrate it into most popular Java IDEs.
To build the project, open Terminal from the /Applcations/Utilities/ directory. Change your directory to the project directory root with the cd command. Enter the command ant in the Terminal. The Ant project creates a Mac OS X application bundle and places it in the dist/ directory. Navigate to the project dist/ directory from Finder and double-click your new application to run the example.
The ApplicationMenuExample class contains the main() method. In the main() method, I instantiate the Application object and then set the About and Preferences... menu items to enabled. Next, I instantiate the AMEListener and add it to the Application object. Finally, I create the application's JFrame.
Here is the source for the ApplicationMenuExample class:
package com.genedavis;
import javax.swing.JFrame;
import com.apple.eawt.Application;
public class ApplicationMenuExample {
   public static void main( String[] args )
   {
Application app = new Application();
app.setEnabledAboutMenu(true);
app.setEnabledPreferencesMenu(true);
AMEListener listener = new AMEListener();
app.addApplicationListener( listener );
JFrame mainFrame = new JFrame("Application Menu Example");
mainFrame.setSize(400, 200);
mainFrame.setVisible(true);
}
}The AMEListener extends the ApplicationAdapter. The ApplicationAdapter is an implementation of the ApplicationListener. Extending the ApplicationAdapter simplifies implementing the ApplicationListener, if you do not want the bother of implementing all the ApplicationListener methods.
The following source is the source for the AMEListener class. Notice that only the handleAbout(), handlePreferences(), and handleQuit() methods are implemented. Both the AMEAboutBox and the AMEPreferences JDialogs are contained by the AMEListener. They are merely set to visible as needed.
Notice that all three methods call setHandled( true ). The system does not assume that these three events are handled correctly. You must notify the system when each event is handled.
The handleQuit() method deserves a note or two. Quitting from the Dock, from the application menu, and from the Command+Q key combination all require this method implementation. Providing this method implementation gives your users a natural Mac experience. Here's the code:
package com.genedavis;
import javax.swing.JOptionPane;
import com.apple.eawt.ApplicationAdapter;
import com.apple.eawt.ApplicationEvent;
public class AMEListener extends ApplicationAdapter
{

   private AMEAboutBox about = new AMEAboutBox();
   private AMEPreferences preferences = new AMEPreferences();

   @Override
   public void handleAbout ( ApplicationEvent e )
   {
      about.setVisible( true );
      e.setHandled(true);
   }
@Override
public void handlePreferences ( ApplicationEvent e )
{
preferences.setVisible( true );
e.setHandled(true);
}
@Override
public void handleQuit( ApplicationEvent e )
{
JOptionPane.showMessageDialog( null, "Quit handled." );
e.setHandled(true);
System.exit(0);
}
}AMEPreferences is the preferences dialog box for the Application Menu Example app. As shown by AMEPreferences, Java applications on OS X should use the java.util.prefs.Preferences class to persist application preferences.
Warning
It is very common for applications (Java and non-Java alike) on Unix operating systems to persist user preferences and other configurations in dot directories in users' home directories. Don't let that convention throw you.
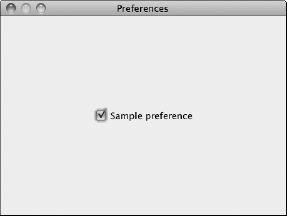
The next example is the source for the AMEPreferences class. If you run the Application Menu Example app, you see that the preferences dialog box has one working preference, as shown in Figure 7.11. The preference is a simple check box. The preference value is stored in the sample_preference preference. It is retrieved with a call to getBoolean() on the Preferences instance. It is set with a call to putBoolean() on the Preferences object.
The only tricky part of using the java.util.prefs.Preferences class is instantiating it. The storage location is based on the package name of the class that you pass the Preferences constructor. I usually use the class that contains my main() method when instantiating a Preferences constructor.
Tip
If you want to modify your Java preferences by hand, navigate to the ~/Library/Preferences directory. Then open the com.apple.java.util.prefs.plist file in the Property List Editor.
Warning
If multiple applications use the same package to store preferences, naming conflicts can occur. When naming conflicts occur with preferences, the applications can overwrite each other's preferences. Choose wisely, and you will never have naming conflicts.
package com.genedavis;
import java.awt.*;
import java.awt.event.*;
import java.util.prefs.Preferences;
import javax.swing.*;
public class AMEPreferences extends JDialog
{
   private Preferences prefs =
      Preferences.userNodeForPackage(
         ApplicationMenuExample.class);
   private JCheckBox sampleCheckBox;

   public AMEPreferences()
   {
      boolean samplePref =
         prefs.getBoolean ("sample_preference", false);
      initComponents();
      sampleCheckBox.setSelected(samplePref);
   }
   private void changePreference(ActionEvent e)
   {
      JCheckBox jcb = (JCheckBox) e.getSource();
      boolean selected = jcb.isSelected();
      prefs.putBoolean ("sample_preference", selected);
   }
   private void initComponents()
   {
      sampleCheckBox = new JCheckBox();
      setTitle("Preferences");
      Container contentPane = getContentPane();
      contentPane.setLayout(new BorderLayout());
      sampleCheckBox.setText("Sample preference");
sampleCheckBox.setHorizontalAlignment(SwingConstants.
CENTER);
sampleCheckBox.addActionListener(new ActionListener() {
public void actionPerformed(ActionEvent e) {
changePreference(e);
}
});
contentPane.add(sampleCheckBox, BorderLayout.CENTER);
setSize(400, 300);
setLocationRelativeTo(null);
}
}Apple's Human Interface Guidelines are very specific about the design of About boxes. About boxes provide branding, versioning, and copyright for your application. About boxes are optional, but most software has them. Users often open the About box looking for contact information.
Your About box should contain a title bar with no title. The title bar should contain the three window control gem icons on the left side with only the red window closing icon active. About boxes are not resizable. About boxes are modeless. Allow users to move their About boxes. About boxes do not appear in application window lists. About boxes remain visible, even when the application is not in focus.
These are typical contents of an About box:
Graphic branding, such as an application icon
Application name
Version info, matching the version displayed by the Finder
Copyright (optional)
Contact information (optional)
Credits (optional)
A button opening a company Web page (optional)
I provide an example of an About box with the AMEAboutBox class, shown in Figure 7.12. To conform with the Human Interface Guidelines, the AMEAboutBox is not modal. This means that the About box does not block users from working in other windows while the About box is open.
Also, the About box is not resizable or minimizable. The only window control that is active is the red closing icon in the top-left corner of the About box. In Java, this is accomplished with a custom JDialog, rather than with a JWindow or JFrame. JWindows do not have the title bar with the close control. JFrames have no way of disabling the minimize button.
Occasionally, you want to know where your mouse is on the screen. You can use two methods to find your mouse location. Your choice of methods depends on the version of OS X you are coding against.
Prior to the Java 1.5 release for OS X, finding the mouse location on the screen was handled with the com.apple.eawt.Application class. The method getMouseLocationOnScreen() was called. The getMouseLocationOnScreen() returns an AWT Point object containing the mouse pointer's hot spot on the monitor.
Since the release of Java 1.5, Apple deprecated the getMouseLocationOnScreen() method. On newer version of OS X, use a combination of the MouseInfo getPointerInfo() method and the PointerInfo's getLocation() method. The result is the same. The getLocation() method returns an AWT Point object.
Note
Location coordinates on the monitor are arranged the same way as the location in JFrames. The upper-left corner is (0, 0) and the lower-right corner is (resolution width - 1, resolution height - 1).
Warning
Location coordinates can be negative when moving the mouse to a second monitor to the right or above the current monitor.
The following example, FindTheMouse, illustrates the old and new methods for finding the location of the mouse on the screen.
package com.genedavis;
import java.awt.MouseInfo;
import java.awt.Point;
import java.awt.PointerInfo;
import com.apple.eawt.Application;
public class FindTheMouse
{
   public static void main(String[] args)
   {

      Application app = new Application();
      PointerInfo pi;
      Point p1, p2;

      while (true)
      {
         p1 = app.getMouseLocationOnScreen();

         pi = MouseInfo.getPointerInfo();
         p2 = pi.getLocation();

         System.out.println(
               "Old way (" + p1.x + ", " + p1.y + "),
" +
               "New way (" + p2.x + ", " + p2.y + ")

");

         try
         {
           Thread.sleep(500);
         }
         catch (Exception e)
         {}
      }
   }
}
To compile the com.genedavis.FindTheMouse class from the Terminal, place the class in a directory structure matching the package structure. Then use the following command:
javac com/genedavis/FindTheMouse.java
After compiling the FindTheMouse class, use the following command to run the application from the Terminal:
java com.genedavis.FindTheMouse
The FindTheMouse class contains only a main() method. First, I create the com.apple.eawt.Application class, and then I put the application into an infinite while loop. The loop checks the mouse location with the old method,
p1 = app.getMouseLocationOnScreen();
and then checks the mouse location with the new method,
pi = MouseInfo.getPointerInfo();
p2 = pi.getLocation();
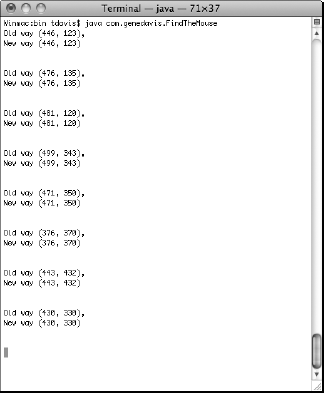
The code then prints out the locations, as shown in Figure 7.13, and sleeps for half a second. If you see a difference between the mouse location retrieved with the old and new method, the difference is probably because the mouse is moving while the locations are retrieved.
In this chapter, I discussed the com.apple.eio and com.apple.eawt packages. OS X has several common features not covered by the pure Java APIs, so it requires additional APIs for Java applications to feel like native applications. These features include application bundle resources, the Help Viewer, the Dock, and the application menu.
The com.apple.eio.FileManager contains static methods for handling OS X-specific features related to files. FileManager includes methods for finding paths to application bundle resources. It contains a method for finding your application's enclosing bundle. It also contains methods for getting and setting file types and creators.
I discussed two of the classes found in the com.apple.eawt package. The classes I explained are the Application class and the ApplicationAdapter class. These classes contain methods for handling Dock modifications, system events, and help books.
In this chapter, I purposely avoided discussion of the CocoaComponent class because of its advanced nature. It requires the use of JNI. I begin discussion of JNI and OS X integration in Chapter 8.