In this chapter, you will learn:
How the Java source code used to be written, packaged, and deployed prior to JDK 9 and the underlying issues with that approach
What a module is in JDK 9
How to declare modules and their dependencies
How to package modules
What a module path is
What observable modules are
How to print the list of observable modules
How to print the description of a module
This chapter is meant to give you a brief conceptual overview of the module system introduced in JDK 9. Subsequent chapters cover all these concepts in detail, with examples. Don’t worry if you do not understand all module-related concepts the first time. Once you gain experience developing modular code, you can come back and re-read this chapter.
Life Before Java 9
Prior to JDK 9, developing a Java application involved the following steps:
The Java source code was written in the form of Java types such as classes, interfaces, enums, and annotations.
Types were arranged into packages. A type always belonged to a package—explicitly or implicitly. A package was a logical collection of types, essentially providing a namespace for the types contained in it. A package may have public types, private types, and some types that are internal implementations even though declared public.
The compiled code for types was packaged into one or more JAR files, also known as application JARs because they contained application code. The code in one package might span multiple JARs.
The application might use libraries. Libraries were also supplied as one or more JAR files, also known as library JARs.
The application was deployed by placing all JAR files, application JARs, and library JARs on the class path.
Figure 2-1 shows a typical arrangement of code packaged in a JAR file. The figure shows only the packages and types, excluding other contents such as the manifest.mf file and resource files.
Figure 2-1. The code arrangement in a JAR file
For over 20 years, the Java community lived with this way of writing, compiling, packaging, and deploying Java code. However, the 20-year long journey has not been as smooth as you would hope! There were inherent problems in arranging and running Java code this way:
A package was simply a container for types without enforcing any accessibility boundary. A public type in a package is accessible in all other packages; there was no way to prevent this global visibility of public types in a package.
Packages were open for extension, except packages starting with java and javax. If you had types in a JAR with package-level access, they could be accessed inside other JARs that defined types in a package named the same as yours.
The Java runtime saw a flat set of packages loaded from a list of JARs. There was no way to know whether you had multiple copies of the same type in different JARs. The runtime would load the type found in a JAR that was encountered first on the class path.
You could have cases of missing types at runtime caused by not including one of the JARs required by your application in the class path. Missing types raise their ugly heads as runtime errors when the code tries to use them.
There was no way to know at startup that some types used in the application were missing. You could also include a wrong version of a JAR file and receive an error at runtime.
These problems were so frequent and infamous in the Java community that they got a name—JAR-hell. I have been through JAR-hell several times during my job as a Java developer! The term JAR-hell even has its own Wikipedia entry at https://en.wikipedia.org/wiki/Java_Classloader#JAR_hell .
Packaging the JDK and JRE was also a problem. They were available as a huge monolithic artifacts, thus increasing the download time, startup time, and the memory footprint. The monolithic JRE made it impossible to use Java on devices with little memory. If you deploy your Java applications to the cloud, you pay for the memory you use. Most often, the monolithic JRE uses more memory than is required, which means you pay more for the cloud service. The Compact profiles introduced in Java 8 took a step forward in reducing JRE size—and hence the runtime memory footprint—by allowing you to package a subset of the JRE in a custom runtime image called a compact profile.
Tip
In early access releases, JDK 9 contained three modules named java.compact1, java.compact2, and java.compact3 that corresponded to the three compact profiles in JDK 8. Later, they were dropped because the modules in JDK give you full control over the list of modules you can include in your custom JRE.
You can put these problems in the JDK/JRE before JDK 9 into three categories:
Unreliable configuration
Weak encapsulation
Monolithic structure of the JDK/JRE
Figure 2-2 shows the how the Java runtime sees all JARs on the class path and how code in one JAR can be accessed from other JARs without any restrictions, except for the ones specified by the type declarations in terms of access controls.
Figure 2-2. JARs on the class path as loaded and accessed by the Java runtime
Java 9 addresses these problems by introducing a new way of developing, packaging, and deploying Java applications. In Java 9, a Java application consists of small interacting components called modules. Java 9 has organized the JDK/JRE as a set of modules as well. The focus of this chapter is an overview of modules. Subsequent chapters explain modules in detail.
The New Module System
Java 9 introduced a new program component called a module. You can think of a Java application as a collection of interacting modules with a well-defined boundaries and dependencies between those modules. The module system was developed with the following goals:
Reliable configuration
Strong encapsulation
Modular JDK/JRE
These goals were to solve the problems faced in developing and deploying Java applications prior to Java 9.
Reliable configuration solves the problem of the error-prone class path mechanism used to look up types. A module must declare explicit dependencies on other modules. The module system verifies the dependencies in all phases of the application development—compile-time, link time, and runtime. Suppose a module declares a dependency on another module and the second module is missing at startup. The JVM detects that a dependency is missing and fails at startup. Prior to Java 9, such an application would generate a runtime error (not at startup) when the missing types were used.
Strong encapsulation solves the problem of accessibility-at-will of public types across JARs on the class path. A module must explicitly declare which of its public types are accessible to other modules. A module cannot access public types in another module unless those modules explicitly make their public types accessible. A public type in Java 9 does not mean that it is accessible to all parts of the program. The module system has added more refined accessibility control. I explain the accessibility controls in another chapter.
Tip
Java 9 provides reliable configuration by allowing a module to declare explicit dependency and verifying those dependencies in all phases of development. It provides strong encapsulation by allowing a module to declare packages whose public types are accessible to other modules.
JDK 9 was rewritten by breaking down its predecessor’s monolithic structure into a set of modules called platform modules. JDK 9 also introduced an optional phase called link time, which may occur between compile-time and runtime. During link time, you use a linker, which is a tool called jlink that ships with the JDK 9, to create a custom runtime image of your application that includes only the modules used in your application. This shrinks the size of the runtime to its optimum size.
What Is a Module?
A module is a named collection of code and data. It can contain Java code and native code. Java code is organized as a set of packages containing types such as classes, interfaces, enums, and annotations. The data may include resources such as image files and configuration files.
For Java code, a module acts as a collection of zero or more packages. Figure 2-3 shows three modules named policy, claim, and utility in which the policy module contains two packages, the claim module contains one package, and the utility module contains no packages.
Figure 2-3. Arrangement of types, packages, and modules
A module is much more than just a container of packages. Apart from its name, a module definition contains the following:
A list of other modules it requires (or depends on)
A list of packages it exports (its public APIs) that other modules can use
A list of packages that it opens (its entire API, public and private) to other modules for reflective access
A list of services it uses (or discovers and loads using the java.util.ServiceLoader class)
A list of implementations for services that it provides
When you work with a module, you work with one or more of these aspects. I cover a few more theoretical aspects of modules before I show you how to define your own modules.
The Java SE 9 Platform Specification divides the platform into a set of modules known as platform modules. An implementation of the Java SE 9 platform may contain some or all of the platform modules, thus providing a scalable Java runtime. Standard modules have names prefixed with java. Examples of Java SE standard modules are java.base, java.sql, java.xml, and java.logging. APIs in standard platform modules are supported and are intended for use by developers.
Non-standard platform modules are part of the JDK, but not specified in the Java SE Platform Specification. These JDK-specific modules have names prefixed with jdk. Examples of JDK-specific modules are jdk.charsets, jdk.compiler, jdk.jlink, jdk.policytool, and jdk.zipfs. APIs in the JDK-specific modules are not intended for use by developers. These APIs are typically used in the JDK itself and by library developers who cannot easily get the desired functionality using the Java SE APIs. If you use APIs from these modules, they might not be supported or could change in the future without notice.
JavaFX is not part of the Java SE 9 Platform Specification. However, JavaFX-related modules are installed when you install JDK/JRE. JavaFX modules names are prefixed with javafx. Examples of JavaFX modules are javafx.base, javafx.controls, javafx.fxml, javafx.graphics, and javafx.web.
The java.base module, which is part of the Java SE 9 platform, is the primordial module. It does not depend on any other modules. The module system knows only about the java.base module. It discovers all other modules through the dependencies specified in the modules. The java.base module exports core Java SE packages such as java.lang, java.io, java.math, java.text, java.time, java.util, etc.
Module Dependencies
Up to JDK 8, a public type in one package could be accessed by other packages without any restrictions. In other words, packages did not control the accessibility of the types they contained. The module system in JDK 9 provides fine-grained control over the accessibility of types.
Accessibility across modules is a two-way agreement between the used module and the using module: A module explicitly makes its public types available for use by other modules and the modules using those public types explicitly declare dependency on the first module. All non-exported packages in a module are private to the module and they cannot be used outside the module.
Making public APIs in a package available to other modules is known as exporting that package. If a module named policy makes the public types in a package named pkg1 available to other modules, it is said that the policy module exports the package pkg1. If a module named claim declares a dependency on the policy module, it is said that the claim module reads the policy module. If the claim module reads the policy module, it means that all public types in the exported packages of the policy module can be accessed inside the claim module. A module can also export a package selectively only to one or more named modules. Such exports are called qualified exports or module-friendly exports. The public types in a package in a qualified export are accessible only to the specified named modules.
In the context of the module system, three terms—requires, reads, and depends on—are used interchangeably. Java documentation promotes the usage of the term reads in such contexts. The following three statements mean the same: P reads Q, P requires Q, and P depends on Q, where P and Q are two modules.
Figure 2-4 depicts the dependency between two modules named policy and claim. The policy module contains two packages named pkg1 and pkg2 and it exports the package pkg1, which I have shown using the dashed boundary to distinguish it from package pkg2, which is not exported. The claim module contains two packages, pkg3 and pkg4, it does not export any package. It declares a dependency on the policy module.
Figure 2-4. Declaring dependency between modules
In JDK 9, you can declare these two modules as follows:
module policy {exports pkg1;}module claim {requires policy;}
Tip
The syntax for indicating dependency in a module is asymmetric—you export a package, but require a module.
This module declaration requires you to know the module name if your module depends on another module. Several Java frameworks and tools rely heavily on reflection to access your non-exported module’s code at runtime. They provide great features such as dependency injection, serialization, implementation for the Java Persistence API, code-automation, and debugging. Spring, Hibernate, and XStream are examples of such frameworks and libraries. These frameworks and libraries do not know about your application modules. However, they need access to the types in your modules to do their job. They also need access to private members of your modules, which breaks the premise of strong encapsulation in JDK 9. When a module exports a package, other modules that depend on the first module can access only the public API in the exported package. To grant deep reflective access (accessing public as well as private APIs) on all packages of a module at runtime, you can declare an open module.
Figure 2-5 shows an open module named policy.model. I show the module and its packages in dashed boundaries to indicate that the module is open and the packages are accessible to any other module. The jdojo.jpa module accesses the types in the policy.model module at runtime using reflection. The jdojo.jpa module provides implementation for JPA and the policy.model module explicitly depends on the jdojo.jpa module.
Figure 2-5. An open module that allows reflective access to all its members
In JDK 9, you can declare these two modules as follows:
open module policy.model {requires jdojo.jpa;}module jdojo.jpa {// The module exports its packages here}
Module Graph
The module system knows about only one module: java.base. The java.base module does not depend on any other modules. All other modules implicitly depend on the java.base module.
The modular structure of an application can be visualized as a graph called a module graph. In a module graph, each module is represented as a node. A directed edge from a module to another module exists if the first module depends on the second module. A module graph is constructed by resolving the dependencies of a set of initial modules called root modules against a set of modules known to the module system called observable modules.
Tip
Module resolution or resolving a module means that modules on which this module depends are available. Suppose a module named P depends on two modules named Q and R. Resolving module P means you locate modules Q and R and recursively resolve module Q and R.
A module graph is constructed by resolving the module dependencies at compile-time, link time, and runtime. The module resolution starts at root modules and follows the dependency links until the java.base module is reached. Sometimes, you may have a module on the module path, but you might get an error that the module is not found. This can happen if the module was not resolved and was not included in the module graph. For a module to be resolved, it needs to be in the dependency chain starting from the root modules. A default set of root modules is selected based on the way the compiler or the Java launcher is invoked. You can also add modules to the default set of root modules. It is important to understand how default root modules are selected in different situations:
If the application code is compiled from the class path or the main class is run from the class path, the default set of root modules consists of the java.se module and all the non-java.* system modules such as jdk.* and javafx.*. If the java.se module is not present, the default set of root modules consists of all java.* and non-java.* modules.
If your application consists of modules, the default set of root modules depends on the phase:
At compile-time, it consists of all modules being compiled.
At link time, it is empty.
At runtime, it contains the module that contains the main class. You use the --module or -m option with the java command to specify the module and its main class to be run.
Continuing with the example of two modules named policy and claim, suppose pkg3.Main is the main class in claim and both modules are packaged as modular JARs in the C:Java9Revealedlib directory. Figure 2-6 shows the module graph that is constructed at runtime when the following command is used to run the application:
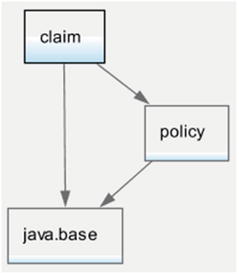
Figure 2-6. An example of a module graph
C:Java9Revealed>java -p lib -m claim/pkg3.MainThe claim module contains the main class of the application. Therefore, claim is the only root module when the module graph is created. The policy module is resolved because the claim module depends on the policy module. The java.base module is resolved because all other modules depend on it and so do these two modules.
The complexity of a module graph depends on the number of the root modules and the level of dependencies among the modules. Suppose, apart from depending on the policy module, the claim module also depends on the platform module named java.sql. The new declaration of the claim module looks like this:
module policy {requires policy;requires java.sql;}
Figure 2-7 shows the module graph that will be constructed when you run the pkg3.Main class in the claim module. Notice that the java.xml and java.logging modules are also present in the graph because the java.sql module depends on them. In the graph, the claim module is the only root module.
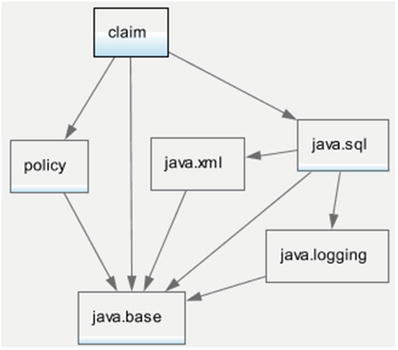
Figure 2-7. A module graph showing a dependency on the java.sql module
Figure 2-8 shows one of the most complex module graphs for the platform module named java.se. The module declaration for the java.se module is as follows:
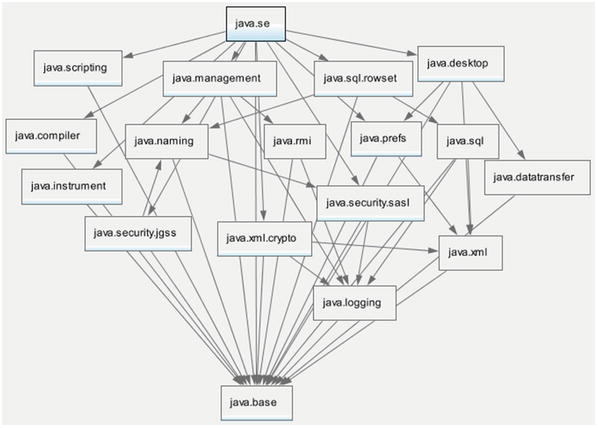
Figure 2-8. A module graph with the java.se module as the root module
module java.se {requires transitive java.sql;requires transitive java.rmi;requires transitive java.desktop;requires transitive java.security.jgss;requires transitive java.security.sasl;requires transitive java.management;requires transitive java.logging;requires transitive java.xml;requires transitive java.scripting;requires transitive java.compiler;requires transitive java.naming;requires transitive java.instrument;requires transitive java.xml.crypto;requires transitive java.prefs;requires transitive java.sql.rowset;requires java.base;requires transitive java.datatransfer;}
Sometimes, you need to add modules to the default set of root modules so the added modules are resolved. You can specify the additional root modules using the --add-modules command-line option during compile-time, link time, and runtime:
--add-modules <module-list>Here, <module-list> is a comma-separated list of module names.
You can use the following special values as a module list with the --add-modules option that have special meaning:
ALL-DEFAULT
ALL-SYSTEM
ALL-MODULE-PATH
All three special values are valid at runtime. You can use the ALL-MODULE-PATH value only at compile-time.
If ALL-DEFAULT is used as the module list, the default set of root modules used when the application is run from the class path is added to the root set. This is useful for an application that is a container and hosts other applications that may need other modules not required by the container application itself. This is a way to make all Java SE modules available to the container, so any of the hosted applications may use them.
If ALL-SYSTEM is the used as the module list, all system modules are added to the root set. This is useful for running test harnesses.
If ALL-MODULE-PATH is the used as the module list, all modules found on module paths are added to the root set. This is useful for tools such as Maven, which ensures that all modules on the module path are needed by the application.
Tip
You may receive an error that a module is not found even when the module is present on the module path. In such cases, you need to add the missing module to the default set of root modules using the --add-modules command-line option.
JDK 9 supports a useful non-standard command-line option that prints the diagnostic messages describing the steps used to resolve modules while the module graph is constructed. The option is -Xdiag:resolver. The following command runs the pkg3.Main class in the claim module. A partial output is shown. At the end of the diagnostic messages, you will find a Result: section that lists the resolved modules.
C:Java9Revealed>java -Xdiag:resolver -p lib -m claim/pkg3.Main[Resolver] Root module claim located[Resolver] (file:///C:/Java9Revealed/lib/claim.jar)[Resolver] Module java.base located, required by claim[Resolver] (jrt:/java.base)[Resolver] Module policy located, required by claim[Resolver] (file:///C:/Java9Revealed/lib/policy.jar)...[Resolver] Result:[Resolver] claim[Resolver] java.base...[Resolver] policy
Aggregator Modules
You can create a module that contains no code of its own. It collects and re-exports the contents of other modules. Such a module is called an aggregator module. Suppose there are several modules that depend on five modules. You can create an aggregator module for those five modules, and now, your modules can depend on only one module—the aggregator module.
Aggregator modules exist for convenience. Java 9 contains several aggregator modules such as java.se and java.se.ee. The java.se module gathers parts of the Java SE that do not overlap with Java EE. The java.se.ee module gathers all of the modules that comprise the Java SE, including modules that overlap with the Java EE.
Declaring Modules
This section contains a quick overview of the syntax used to declare modules. I explain each part in greater detail in subsequent chapters. If you do not understand everything mentioned about modules in this section, keep reading. I will cover them again with examples in later chapters.
A module is defined using a module declaration, which is a new construct in the Java programming language. The syntax is as follows:
[open] module <module> {<module-statement>;<module-statement>;...}
The presence of the open modifier, which is optional, declares an open module. An open module exports all its packages to be accessed by other modules using reflection. <module> is the name of the module being defined. <module-statement> is a module statement. You can have zero or more module statements in a module declaration. If it is present, it can be one of five types of statements:
An exports statement
An opens statement
A requires statement
A uses statement
A provides statement
The exports and opens statements are used to control access to the module’s code. The requires statement is used to declare dependency of a module to another module. The uses and provides statements are used to express service consumption and service provision, respectively. The following is an example of a module declaration of a module named myModule:
module myModule {// Exports the packages - com.jdojo.util and// com.jdojo.util.parserexports com.jdojo.util;exports com.jdojo.util.parser;// Reads the java.sql modulerequires java.sql;// Opens com.jdojo.legacy package for reflective accessopens com.jdojo.legacy;// Uses the service interface java.sql.Driveruses java.sql.Driver;// Provides the com.jdojo.util.parser.FasterCsvParser// class as an implementation for the service interface// named com.jdojo.util.CsvParserprovides com.jdojo.util.CsvParserwith com.jdojo.util.parser.FasterCsvParser;}
You can create an open module by using the open modifier in the module declaration. An open module grants reflective access to all its packages to other modules. You cannot use opens statements inside an open module because all packages are implicitly open in an open module. The following snippet of code declares an open module named myLegacyModule:
open module myLegacyModule {exports com.jdojo.legacy;requires java.sql;}
Module Names
A module name can be a Java-qualified identifier. A qualified identifier is one or more identifiers separated by a dot, for example, policy, com.jdojo.common, and com.jdojo.util. If any part in a module name is not a valid Java identifier, a compile-time error occurs. For example, com.jdojo.common.1.0 is not valid module name because two parts, 1 and 0, in the name are not valid Java identifiers.
Similar to the package-naming convention, use the reverse-domain name pattern to give your modules unique names. Using this convention, the simplest module, which is named com.jdojo.common, may be declared as follows:
module com.jdojo.common {// No module statements}
A module name does not hide variables, types, and packages with the same name. Therefore, you can have a module as well as a variable, a type, or a package with the same name. The context of their use will differentiate which name is referring to what kind of entity.
In JDK 9, open, module, requires, transitive, exports, opens, to, uses, provides, and with are restricted keywords. They are explained briefly later in this chapter and in detail in subsequent chapters. They have special meaning only when they appear in module declarations at specific positions. You can use them as identifiers everywhere else in programs. For example, the following module declaration is valid, even though it does not use an intuitive module name:
// Declare a module named modulemodule module {// Module statements go here}
The first module word is interpreted as a keyword and the second one is a module name.
You can declare a variable named module anywhere in your program:
String module = "myModule";Controlling Access to Modules
An exports statement exports the specified package of the module to all modules or a list of named modules at compile-time and runtime. It takes the following two forms:
exports <package>;
exports <package> to <module1>, <module2>...;
Examples of using the exports statement are as follows:
module M {exports com.jdojo.util;exports com.jdojo.policyto com.jdojo.claim, com.jdojo.billing;}
An opens statement grants reflective access to the specified package to all modules or a list of specified modules at runtime. Other modules can access all types in the specified package and all members (private and public) of those types using reflection. The opens statement takes the following forms:
opens <package>;
opens <package> to <module1>, <module2>...;
Examples of using the opens statement are as follows:
module M {opens com.jdojo.claim.model;opens com.jdojo.policy.model to core.hibernate;opens com.jdojo.services to core.spring;}
Tip
Compare the effects of the exports and opens statements. The exports statement lets you access only the public API of the specified package at compile-time and runtime, whereas the opens statement lets you access public and private members of all types in the specified package using reflection at runtime.
If a module needs to access public types from another module at compile-time and private members of types in the same at runtime using reflection, the second module can export and open the same package as shown:
module N {exports com.jdojo.claim.model;opens com.jdojo.claim.model;}
You will come across three phrases when reading about modules:
A module M exports a package P
A module M opens a package Q
A module M contains a package R
The first two phrases correspond to the exports and opens statements in a module. The third phrase means that the module contains a package named R that is neither exported nor opened. In the early design of the module system, the third situation was phrased as “A module M conceals a package R”.
Declaring Dependency
A requires statement declares dependence of the current module to another module. A "requires N" statement in a module named M means that the module M depends on (or reads) the module N. The statement takes the following forms:
requires <module>;
requires transitive <module>;
requires static <module>;
requires transitive static <module>;
The static modifier in a requires statement makes the dependence mandatory at compile-time, but is optional at runtime. A "requires static N" statement in a module named M means that the module M depends on the module N and the module N must be present at compile-time in order to compile the module M; however, the presence of module N at runtime in order to use module M is optional. The transitive modifier in a requires statement causes any module, which depends on the current module to have implicit dependence on the module specified in the requires statement. Suppose there are three modules P, Q, and R. Suppose the module Q contains a "requires transitive R" statement. If the module P contains a "requires Q" statement, it means that the module P implicitly depends on the module R.
Configuring Services
Java allows using a service provider mechanism in which service providers and service consumers are decoupled. JDK 9 allows you to implement services using the uses and provides module statements.
A uses statement specifies the name of a service interface that the current module may discover and load using the java.util.ServiceLoader class. It takes the following form:
uses <service-interface>;An example of using a uses statement is as follows:
module M {uses com.jdojo.prime.PrimeChecker;}
Here, com.jdojo.PrimeChecker is a service interface whose implementation classes will be provided by other modules. The module M will discover and load the implementations of this interface using the java.util.ServiceLoader class.
A provides statement specifies one or more service provider implementation classes for a service interface. It takes the following form:
provides <service-interface>with <service-impl-class1>, <service-impl-class2>...;
An example of using the provides statement is as follows:
module N {provides com.jdojo.prime.PrimeCheckerwith com.jdojo.prime.generic.GenericPrimeChecker;}
It is possible for the same module to provide service implementations and discover and load the service. A module can also discover and load one kind of service and provide implementation for another kind of service. The following are a few examples:
module P {uses com.jdojo.CsvParser;provides com.jdojo.CsvParserwith com.jdojo.CsvParserImpl;provides com.jdojo.prime.PrimeCheckerwith com.jdojo.prime.generic.FasterPrimeChecker;}
Module Descriptors
After learning about how to declare modules in the previous section, you may have several questions about the source code for a module declaration:
Where do you save a module declaration’s source code? Is it saved in a file? If so, what is the filename?
Where do you place the module declaration source code file?
How is the source code for a module’s declaration compiled?
I will answer these questions before I show you the first modular program in action.
Compiling Module Declarations
A module declaration is stored in a file named module-info.java, which is stored at the root of the source file hierarchy for that module. The Java compiler compiles a module declaration to a file named module-info.class. The module-info.class file is known as a module descriptor and it is placed at the root of the compiled code hierarchy for the module. If you package the compiled code for a module in a JAR file, the module-info.class file is stored at the root of the JAR file.
A module declaration does not contain executable code. In essence, it contains configurations for a module. Why don’t we keep a module declaration in a text file in XML or JSON format instead of in a class file? The class file was chosen as a module descriptor because a class file has an extensible, well-defined format. A module descriptor contains the compiled form of a source-level module declaration. It can be augmented by tools, e.g. the jar tool, to include additional information in class file attributes after the module declaration is initially compiled. The class file format also allows developers to use imports and annotations in a module declaration.
Module Version
In the initial prototype of the module system, a module declaration also included a module version. Including the module version in the declaration made the implementation of the module system complex, so the module version was dropped from the declaration.
The extensible format of the module descriptor (class file format) is exploited to add a version to a module. When you package a module’s compiled code into a JAR, the jar tool provides an option to add the module’s version, which is finally added to the module-info.class file. I explain how to add information to a module descriptor in Chapter 3.
Module Source Files Structure
Let’s walk through an example of organizing the source code and the compiled code for a module named com.jdojo.contact. The module contains packages for working with contact information, such as addresses and phone numbers. It contains two packages:
com.jdojo.contact.info
com.jdojo.contact.validator
The com.jdojo.contact.info package contains two classes—Address and Phone. The com.jdojo.contact.validator package contains one interface named Validator and two classes called AddressValidator and PhoneValidator. Figure 2-9 shows the contents of the com.jdojo.contact module.

Figure 2-9. Contents of a module named com.jdojo.contact
In Java 9, several options have been added to the Java compiler tool, javac. It allows you to compile one module at a time or multiple modules at a time. If you want to compile multiple modules at a time, you must store the source code for each module under a directory, which has the same name as the name of the module. You can follow this source directory naming convention even if you have only one module.
Suppose you want to compile the source code for the com.jdojo.contact module. You can store its source code in a directory named C:j9rsrc, which contains the following files:
module-info.javacomjdojocontactinfoAddress.javacomjdojocontactinfoPhone.javacomjdojocontactvalidatorValidator.javacomjdojocontactvalidatorAddressValidator.javacomjdojocontactvalidatorPhoneValidator.java
Note that you need to follow the package hierarchy to store the source files for interfaces and classes as you have been doing since Java 1.0.
If you want to compile multiple modules at once, you must name the source code directory com.jdojo.contact, which is the same as the module’s name. In this case, you might store the module’s source code in a directory called C:j9rsrc, whose contents are as follows:
com.jdojo.contactmodule-info.javacom.jdojo.contactcomjdojocontactinfoAddress.javacom.jdojo.contactcomjdojocontactinfoPhone.javacom.jdojo.contactcomjdojocontactvalidatorValidator.javacom.jdojo.contactcomjdojocontactvalidatorAddressValidator.javacom.jdojo.contactcomjdojocontactvalidatorPhoneValidator.java
The compiled code for the module will follow the same directory hierarchy as you saw previously.
Packaging Modules
A module’s artifacts can be stored in:
A directory
A modular JAR file
A JMOD file, which is a new module-packaging format introduced in JDK 9
A Module in a Directory
When the compiled code for a module is stored in a directory, the root of the directory contains the module descriptor (the module-info.class file) and the sub-directories mirror the package hierarchy. Continuing from the example in the previous section, suppose you store the compiled code for the com.jdojo.contact module in the C:j9rmodscom.jdojo.contact directory. The directory’s contents would be as follows:
module-info.classcomjdojocontactinfoAddress.classcomjdojocontactinfoPhone.classcomjdojocontactvalidatorValidator.classcomjdojocontactvalidatorAddressValidator.classcomjdojocontactvalidatorPhoneValidator.class
A Module in a Modular JAR
The JDK ships with a jar tool to package Java code in a JAR (Java Archive) file format. The JAR format is based on the ZIP file format. JDK 9 has enhanced the jar tool to package a module’s code in a JAR. When a JAR contains the compiled code for a module, the JAR is called a modular JAR. A modular JAR contains a module-info.class file at the root.
Wherever you were using JARs before JDK 9, you can use modular JARs now. For example, modular JARs can be placed on the class path and, in that case, the module-info.class file in the modular JAR is ignored because module-info is not a valid class name in Java.
While packaging a modular JAR, you can use various options available in the jar tool, which were added in JDK 9, to add pieces of information to the module descriptor such as a module version and the main class name.
Tip
A modular JAR is a JAR in all respects, except it contains a module descriptor at the root.
Typically, a non-trivial Java application consists of multiple modules. A modular JAR can contain the compiled code for only one module. There is a need to package all modules of an application into a single JAR to simplify shipping an application in one artifact. At the time of this writing, this is an open issue, and it’s described at http://openjdk.java.net/projects/jigsaw/spec/issues/#MultiModuleExecutableJARs .
Continuing the example from the previous section, the modular JAR’s contents for the com.jdojo.contact module is as follows. Note that a JAR always contains a MANIFEST.MF in the META-INF directory.
module-info.classcom/jdojo/contact/info/Address.classcom/jdojo/contact/info/Phone.classcom/jdojo/contact/validator/Validator.classcom/jdojo/contact/validator/AddressValidator.classcom/jdojo/contact/validator/PhoneValidator.classMETA-INF/MANIFEST.MF
A Module in a JMOD File
JDK 9 introduced a new format, called JMOD, to package modules. A JMOD file uses a .jmod extension. JDK modules are compiled into JMOD formats and are placed in the JDK_HOMEjmods directory; for example, you will find a java.base.jmod file that contains the contents of the java.base module. JMOD files are supported only at compile-time and link time. They are not supported at runtime. I will explain the JMOD format in detail in Chapter 6.
Module Path
The class path mechanism to look up types has existed since the beginning of the JDK. A class path is a series of directories, JAR files, and ZIP files. When Java needs to look up a type at various phases (compile-time, runtime, during usage of tools, etc.), it uses the entries from the class path to find the type.
Java 9 types exist as part of modules. Java needs to look up modules during different phases, not types as it did prior to Java 9. Java 9 introduced a new mechanism to look up modules and it is called module path.
A module path is a sequence of path names containing modules, where a path name may be a path to a modular JAR, a JMOD file, or a directory. The path names are separated by a platform-specific path-separator character, which is a colon (:) on the UNIX-like platforms and a semicolon (;) on the Windows platform.
It is easy to understand when a path name is a modular JAR or a JMOD file. In this case, if the module descriptor in the JAR or JMOD file contains the module definition for the module being looked up, the module is found. If a path name is a directory, the following two cases exist:
If a class file exists at the root of the directory, the directory is considered to have a module definition. The class file at the root will be interpreted as the module descriptor. All other files and sub-directories will be interpreted as part of this one module. If multiple class files exist at the root, the first found file is interpreted as the module descriptor. After a few experiments, the JDK 9 build 126 seems to pick up the first class file in alphabetically sorted order. This way of storing a module compiled code is sure to give you a headache. Therefore, avoid adding a directory to the module path if the directory contains multiple class files at root.
If a class file does not exist at the root of the directory, the contents of the directory are interpreted differently. Each modular JAR or a JMOD file in the directory is considered a module definition. Each sub-directory, if it contains a module-info.class file at its root, is considered to have a module definition in exploded directory tree format. If a sub-directory does not contain a module-info.class file at its root, it is not interpreted as containing a module definition. Note that if a sub-directory contains a module definition, its name does not have to be the same as the module name. The module name is read from the module-info.class file.
The following are valid module paths on Windows:
C:mods
C:modscom.jdojo.contact.jar;C:modscom.jdojo.person.jar
C:lib;C:modscom.jdojo.contact.jar;C:modscom.jdojo.person.jar
The first module path contains the path to a directory named C:mods. The second module path contains paths to two modular JARs—com.jdojo.contact.jar and com.jdojo.person.jar. The third module path contains three elements—the path to a directory C:lib and the paths to two modular JARs—com.jdojo.contact.jar and com.jdojo.person.jar. The equivalent of these paths on a UNIX-like platform are shown:
/usr/ksharan/mods
/usr/ksharan/mods/com.jdojo.contact.jar:/usr/ksharan/com.jdojo.person.jar
/usr/ksharan/lib:/usr/ksharan/mods/com.jdojo.contact.jar:/usr/ksharan/mods/com.jdojo.person.jar
The best way to avoid module path problems is not to use an exploded directory as a module definition. Have two directories as the module path—one directory containing all application modular JARs and another containing all modular JARs for external libraries. For example, you can use C:applib;C:extlib as a module path on Windows where the C:applib directory contains all application modular JARs and the C:extlib directory contains all external libraries’ modular JARs.
JDK 9 has updated all its tools to use a module path to look up modules. Those tools provide new options to specify a module path. Until JDK 9, you have seen UNIX-style options that start with a hyphen (-), for example, -cp and -classpath. With so many additional options in JDK 9, JDK designers were running out of short names for options that were also meaningful to developers. Therefore, JDK 9 started using GNU-style options where an option starts with two consecutive hyphens and the words are separated by hyphens. Here are a few examples of GNU-style command-line options:
--class-path
--module-path
--module-version
--main-class
--print-module-descriptor
Tip
To print a list of all standard options supported by a tool, run the tool with the --help or -h option and, for all non-standard options, run the tool with the -X option. For example, the java -h and java -X commands will print a list of standard and non-standard options for the java command, respectively.
Most of the tools in JDK 9, such as javac, java, and jar, support two options to specify a module path on the command line. They are -p and --module-path. The existing UNIX-style options will continue to be supported for backward compatibility. The following two commands show you how to use the two options for specifying the module path for the java tool:
// Using the GNU-style optionC:>java --module-path C:applib;C:lib other-args-go-here// Using the UNIX-style optionC:>java -p C:applib;C:extlib other-args-go-here
I use the GNU-style option, --module-path, to specify the module path in all the examples in this book.
When you use the GNU-style option, you can specify the value for the option in one of two forms:
--<name> <value>
--<name>=<value
The previous command can also be written as follows:
// Using the GNU-style optionC:>java --module-path=C:applib;C:lib other-args-go-here
When using spaces as name-value separators, you need to use at least one space. When you are using a = as a separator, you must not include any spaces around it. The option --module-path=C:applib is valid. The option --module-path =C:applib is invalid because =C:applib will be interpreted as a module path, which is an invalid path.
Observable Modules
During the module lookup process, the module system uses different types of module paths to locate modules. The set of modules found on the module paths together with system modules are known as observable modules. You can think of observable modules as a set of all the modules available to the module system in a specific phase, for example, compile-time, link time, and runtime, or available to a tool.
JDK 9 added a new option named --list-modules for the java command. The option can be used to print two types of information: the list of observable modules and a description of one or more modules. The option can be used in two forms:
--list-modules
--list-modules <module1>,<module2>...
In the first form, the option is not followed with any module names. It prints the list of observable modules. In the second form, the option is followed with a comma-separated list of module names, which prints the module descriptors for the specified modules.
The following command prints the list of observable modules, which includes only the system modules:
c:Java9Revealed> java --list-modulesjava.base@9-eajava.se.ee@9-eajava.sql@9-eajavafx.base@9-eajavafx.controls@9-eajdk.jshell@9-eajdk.unsupported@9-ea...
The output shown is partial. Each entry in the output contains two parts—a module name and a version string separated by an @ sign. The first part is the module name and the second part is the version string of the module. For example, in java.base@9-ea, java.base is the module name and 9-ea is the version string. In the version string, the number 9 stands for JDK 9 and ea stands for early access. You may get a different output for version strings when you run the command.
I placed three modular JARs in my C:Java9Revealedlib directory. If I provide C:Java9Revealedlib as the module path to the java command, those modules will be included in the list of observable modules. The following command shows how the list of observable modules changes when you specify a module path. Here, lib is a relative path and C:Java9Revealed is the current directory.
C:Java9Revealed>java --module-path lib --list-modulesclaim (file:///C:/Java9Revealed/lib/claim.jar)policy (file:///C:/Java9Revealed/lib/policy.jar)java.base@9-eajava.xml@9-eajavafx.base@9-eajdk.unsupported@9-eajdk.zipfs@9-ea...
Note that, for application modules, the --list-modules option also prints their location. This information is helpful in troubleshooting when you are getting unexpected results and you do not know which modules are being used and from which locations.
The following command specifies the com.jdojo.intro module as an argument to the --list-modules option to print the module’s description:
C:Java9Revealed>java --module-path lib --list-modules claimmodule claim (file:///C:/Java9Revealed/lib/claim.jar)exports com.jdojo.claimrequires java.sql (@9-ea)requires mandated java.base (@9-ea)contains pkg3
The first line of the output contains the module name and the modular JAR location containing the module. The second line indicates that the module exports the com.jdojo.claim module. The third line indicates that the module requires the java.sql module. The fourth line indicates that the module depends on the mandated java.base module. Recall that every module, except the java.base module, depends on the java.base module. You will see the requires mandated java.base line in every module’s description, except for the java.base module. The fifth line states that the module contains a package named pkg3, which is neither exported nor opened.
You can also print the description of system modules, for example, java.base and java.sql, using the --list-modules. The following command prints the description of the java.sql module.
C:Java9Revealed>java --list-modules java.sqlmodule java.sql@9-eaexports java.sqlexports javax.sqlexports javax.transaction.xarequires transitive java.xmlrequires mandated java.baserequires transitive java.logginguses java.sql.Driver
Summary
Packages in Java have been used as containers for types. An application consisted of several JARs placed on the class path. Packages acted as containers for types without enforcing any accessibility boundaries. Accessibility of a type was embedded in the type declaration using modifiers. If a package contained internal implementations, there was no way to prevent other parts of the program from accessing the internal implementations. The class path mechanism searched for a type linearly when the type was used. This lead to another issues of receiving errors at runtime when types are missing from the deployed JARs—sometimes long after the application was deployed. These problems can be categorized into two types: encapsulation and configuration.
JDK 9 introduced the module system. It provides a way to arrange Java programs. It has two main goals: strong encapsulation and reliable configuration. Using the module system, an application consists of modules, which are named collections of code and data. A module controls—through its declaration—the parts of the module that can be accessed by other modules. A module that accesses parts of another module must declare dependence to the second module. The two aspects—controlling access and declaring dependence—are the basis of achieving the goal of strong encapsulation. A module’s dependency is resolved at startup. In JDK 9, if a module depends on another module and the second module is missing when you run your application, you will receive an error at startup rather than sometime after the application is running. This is the basis for reliable configuration.
A module is defined using a module declaration. The source code for a module is typically stored in a file named module-info.java. A module is compiled into a class file, which is typically named module-info.class. The compiled module declaration is called a module descriptor. A module declaration does not allow you to specify a module version. Tools such as the jar tool that packages a module into a JAR can add the module version to the module descriptor.
A module is declared using the module keyword, which is followed by the module name. A module declaration can use five types of module statements: exports, opens, requires, uses, and provides. An exports statement exports the specified package of the module to all modules or a list of named modules at compile-time and runtime. An opens statement grants reflective access to the specified package to all modules or a list of specified modules at runtime. Other modules can access all types in the specified package and all members (private and public) of those types using reflection. The uses and provides module statements are used to configure a module to discover service implementations and provide service implementations of a specific service interface.
As of JDK 9, open, module, requires, transitive, exports, opens, to, uses, provides, and with are restricted keywords. They have special meaning only when they appear in module declarations at specific positions.
A module’s source code and compiled code are arranged in a directory, a JAR file, or a JMOD file. In a directory and a JAR file, the module-info.class file is located at the root.
Similar to the class path, JDK 9 introduced the module path. However, they differ in the way they are used. The class path is used to search a type’s definition whereas the module path is used to locate modules, not a specific type in the module. Java tools such as java and javac have been updated to use module paths as well as class paths. You can specify the module path to these tools using the --module-path or -p option.
JDK 9 introduced GNU-style options to be used with tools. The options start with two dashes and each word is separated by a dash, for example, --module-path, --class-path, --list-modules, etc. If an option accepts a value, the value can follow the option after a space or a =. The following two options are the same:
--module-path C:lib
--module-path=C:lib
The list of modules available to the module system in a phase (compile-time, runtime, tools, etc.) is known as observable modules. You can use the --list-modules options with the java command to list the observable modules available at runtime. You can also use this option to print the description of a module.