
The JSTL<sql:update> tag allows us to modify database data either through SQL INSERT, UPDATE, or DELETE statements. Just like other JSTL tags we have discussed so far, the easiest way to use this tag with NetBeans is to drag the appropriate item from the NetBeans palette into our page.
To execute an INSERT statement, we can drag the DB Insert item from the NetBeans palette into our page.

After dropping the DB Insert item into our page, we are prompted for additional information.
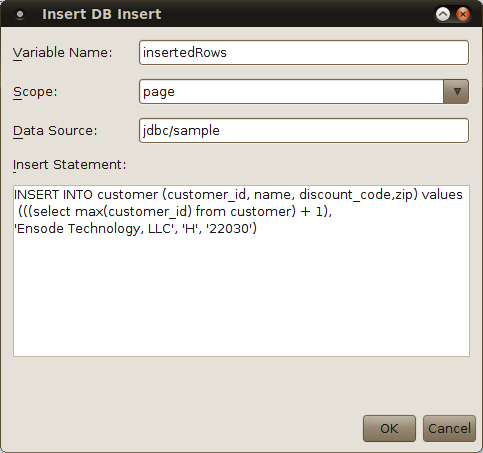
The value of the Variable Name field is a variable of type java.lang.Integer that will hold the number of rows that were inserted into the database after the INSERT statement was executed.
The Scope field must contain the scope where the value of the Variable Name field will be stored.
The Data Source field must contain the JNDI name of the data source used to obtain a database connection. This data source must be added as a Resource Reference to our application's web.xml deployment descriptor as explained earlier in this chapter.
Finally, the value of the Insert Statement field allows us to specify the SQL INSERT statement to be executed.
After entering the appropriate data for all fields in the Insert DB Insert window, the following markup is generated in our page:
<sql:update var="insertedRows" dataSource="jdbc/sample">
INSERT INTO customer (customer_id, name,
discount_code,zip) values
(((select max(customer_id) from customer) + 1),
'Ensode Technology, LLC', 'H', '22030')
</sql:update>
The attributes and the body of the generated<sql:update> tag get populated from the data we entered in the Insert DB Insert window.
We can add a DB Report item from the NetBeans palette, so that we can see the value we inserted into the database. After doing so, the body of our page looks like this:
<body>
<h2>Hello World!</h2>
<sql:update var="insertedRows" dataSource="jdbc/sample">
INSERT INTO customer (customer_id, name,
discount_code, zip) values
(((select max(customer_id) from customer) + 1),
'Ensode Technology, LLC', 'H', '22030')
</sql:update>
<sql:query var="result" dataSource="jdbc/sample">
SELECT customer_id, name, discount_code, zip FROM
customer where name like ?
<sql:param value="Ensode%" />
</sql:query>
<table border="1">
<!-- column headers -->
<tr>
<c:forEach var="columnName" items="${result.columnNames}">
<th><c:out value="${columnName}"/></th>
</c:forEach>
</tr>
<!-- column data -->
<c:forEach var="row" items="${result.rowsByIndex}">
<tr>
<c:forEach var="column" items="${row}">
<td><c:out value="${column}"/></td>
</c:forEach>
</tr>
</c:forEach>
</table>
</body>
Notice that inside the body of the<sql:query> tag we added an<sql:param> tag, this tag is used to dynamically substitute items in the WHERE clause of the SQL SELECT statement in the tag, similar to the way the java.sql.PreparedStatement interface works. In the query, question marks are used to indicate parameters that need to be substituted with<sql:param> tags. Should our query have multiple parameters (for example, when the values of two or more columns are used in its WHERE clause), we can use a question mark for each parameter in the query. The body of the<sql:query> tag must have a<sql:param> tag for each question mark in the query, the first<sql:param> will contain the value for the first question mark, the second one will contain the value for the second question mark, and so forth. The value attribute of the<sql:param> tag can contain a String literal or a JSTL expression.
By deploying our application and pointing the browser to our page (or simply right-clicking on the page and selecting Run File), we can see the<sql:update> tag in action.
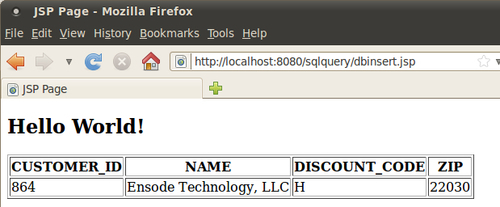
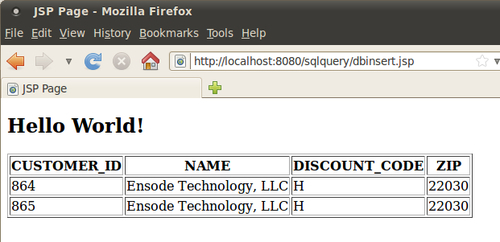
Every time we reload our page, a new row is added to the database, and the table on the page is updated accordingly.
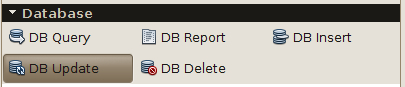
As we mentioned earlier, the<sql:update> tag can be used for executing both SQL INSERT and UPDATE statements in the database. The easiest way to use this tag to execute an SQL UPDATE statement is to drag the DB Update item from the NetBeans palette into our page.
In addition to being used to insert rows into a database table, the<sql:update> tag can be used to modify existing rows in the database table. The main difference is that an SQL UPDATE statement is used in its body, as opposed to an SQL INSERT statement.
Like most JSTL SQL tags discussed so far, the easiest way to create an<sql:update> statement that updates existing rows in a database table is to drag the DB Update item from the NetBeans palette into our page.
After doing so, we are prompted for the usual additional information.
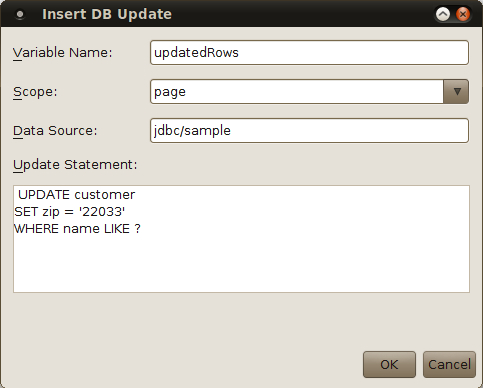
Here we see the same fields we saw when we were using this tag to insert a row into a database table. In this case the Variable Name field indicates the number of rows that were updated by the UPDATE statement. When clicking on the OK button, the following markup is generated in the location where we dropped the DB Update palette item:
<sql:update var="updatedRows" dataSource="jdbc/sample">
UPDATE customer
SET zip = '22033'
WHERE name LIKE ?
</sql:update>
Since we have a parameter in our query, we need to add a<sql:param> tag inside our<sql:update> tag:
<sql:update var="updatedRows" dataSource="jdbc/sample">
UPDATE customer
SET zip = '22033'
WHERE name LIKE ?
<sql:param value="Ensode%"/>
</sql:update>
Just as we did in our last page, we can add a DB Report item from the NetBeans palette so that we can visually inspect the effect of the<sql:update> tag. After doing so, the body of our page looks like this:
<body>
<h2>Hello World!</h2>
<sql:update var="updatedRows" dataSource="jdbc/sample">
UPDATE customer
SET zip = '22033'
WHERE name LIKE ?
<sql:param value="Ensode%"/>
</sql:update>
<sql:query var="result" dataSource="jdbc/sample">
SELECT customer_id, name, discount_code, zip
FROM customer where name like ?
<sql:param value="Ensode%" />
</sql:query>
<table border="1">
<!-- column headers -->
<tr>
<c:forEach var="columnName"
items="${result.columnNames}">
<th><c:out value="${columnName}"/></th>
</c:forEach>
</tr>
<!-- column data -->
<c:forEach var="row" items="${result.rowsByIndex}">
<tr>
<c:forEach var="column" items="${row}">
<td><c:out value="${column}"/></td>
</c:forEach>
</tr>
</c:forEach>
</table>
</body>
After deploying our application and opening our page in the browser, we can see the results of our SQL UPDATE statement.
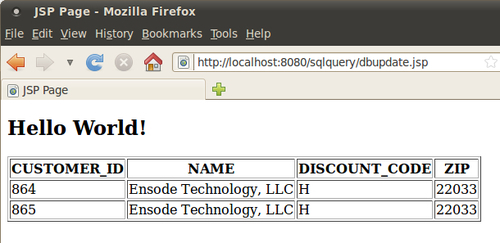
As we can see, the zip codes for all rows we inserted earlier were modified by our SQL UPDATE statement.
The<sql:update> tag can be used to delete data from the database. This can be done by placing an SQL DELETE statement inside its body. With NetBeans, we can simply drag the DB Delete item from the NetBeans palette into our page.
After doing so, we are asked for the usual additional information.
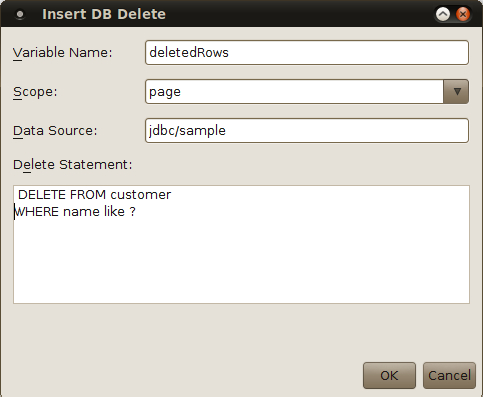
In this case the Variable Name field will hold the number of rows that were deleted, the Scope and Data Source fields hold the scope for the Variable Name field and the JNDI name for the data source to be used to connect to the database, respectively. The Delete Statement field contains the SQL DELETE statement we will use to delete data from the database, notice in our example, we used a question mark as a placeholder for an<sql:param> tag.
After clicking on the OK button, the following markup is generated in our page:
<sql:update var="deletedRows" dataSource="jdbc/sample">
DELETE FROM customer
WHERE name LIKE ?
</sql:update>
In order to substitute the question mark with the appropriate value, we need to add an<sql:param> tag inside the<sql:update> tag.
<sql:update var="deletedRows" dataSource="jdbc/sample">
DELETE FROM customer
WHERE name like ?
<sql:param value="Ensode%"/>
</sql:update>
Just as we did in previous examples, we will drag the DB Report item from the NetBeans palette into our page, so that we can see the effect the DELETE statement had in the database. After doing so, the body of our page now looks like this:
<body>
<h2>Hello World!</h2>
<sql:update var="deletedRows" dataSource="jdbc/sample">
DELETE FROM customer
WHERE name like ?
<sql:param value="Ensode%"/>
</sql:update>
<sql:query var="result" dataSource="jdbc/sample">
SELECT customer_id, name, discount_code, zip FROM customer where name like ?
<sql:param value="Ensode%" />
</sql:query>
<table border="1">
<!-- column headers -->
<tr>
<c:forEach var="columnName" items="${result.columnNames}">
<th><c:out value="${columnName}"/></th>
</c:forEach>
</tr>
<!-- column data -->
<c:forEach var="row" items="${result.rowsByIndex}">
<tr>
<c:forEach var="column" items="${row}">
<td><c:out value="${column}"/></td>
</c:forEach>
</tr>
</c:forEach>
</table>
</body>
After executing our page by right-clicking on it and selecting Run File from the pop up menu, we can see the results of our DELETE statement.
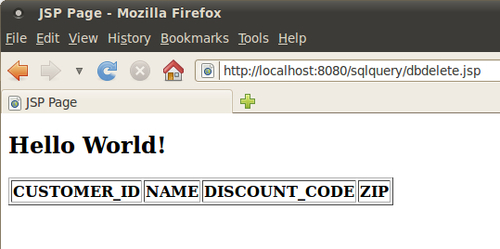
Since we deleted all rows matching the criteria in the WHERE clause of the<sql:query> tag generated by the DB Report item we dragged into our page, all we see in the rendered page is a table containing only column headers.