
In the previous section, we saw how NetBeans provides sample WebSocket applications we can use as a base for our own projects. In this section, we will build a web application that contains a WebSocket server endpoint that will populate a form with default values.
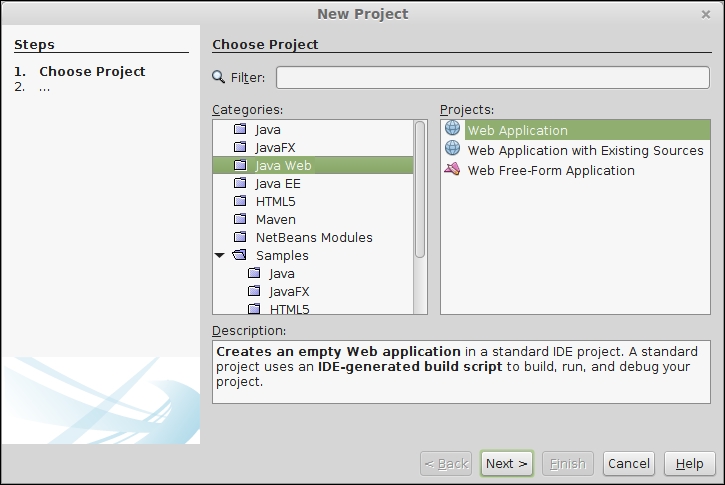
To build a WebSocket application, create a web application project by going to File | New Project, selecting the Java Web option from the Categories list, and selecting Web Application from the Projects list.
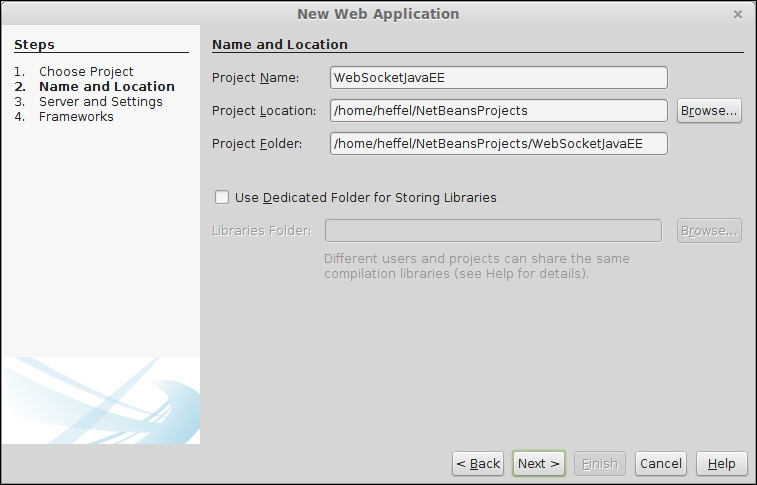
Then, we pick a name and location as usual.
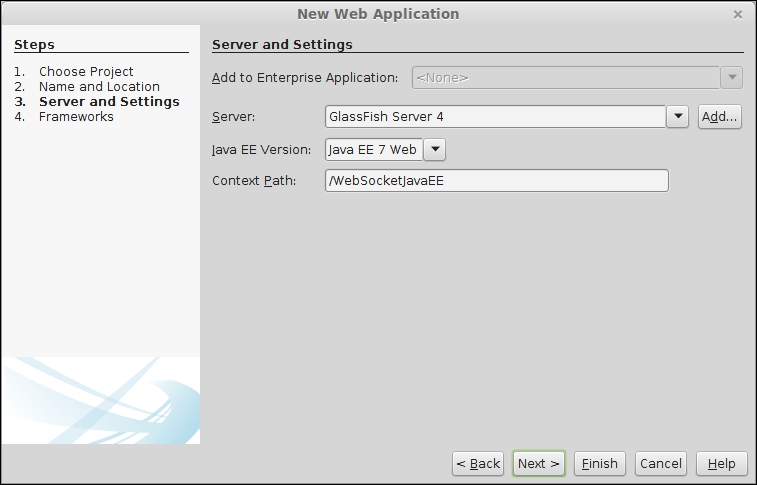
The Java API for WebSocket was introduced in Java EE 7; therefore, we must select this Java EE version if we want to develop WebSocket applications. The default values in this step of the wizard are sensible and can be used as they are:
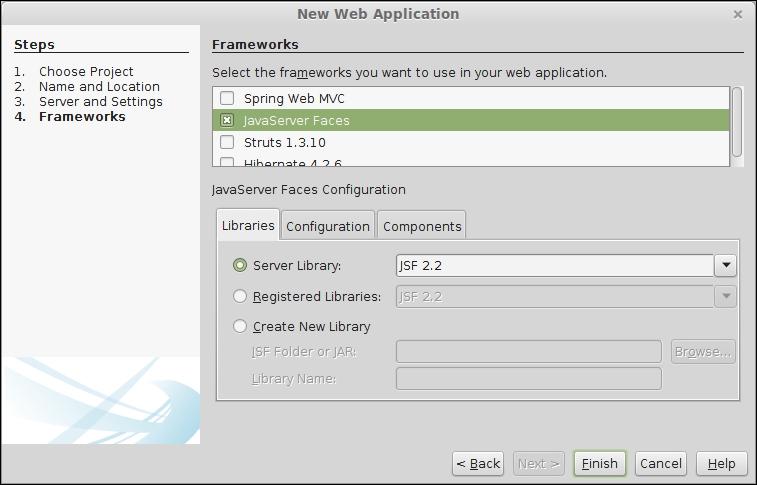
In our example, we will be using JSF for the user interface. Therefore, we need to select JavaServer Faces from the Frameworks list.
Now, we are ready to develop our WebSocket application.
Before developing the WebSocket-specific code, let's develop the user interface using JSF 2.2 and HTML5-friendly markup as explained in Chapter 2, Developing Web Applications Using JavaServer Faces 2.2.
When adding JSF as a framework to a NetBeans project, an index.xhtml file is automatically generated. Take a look at the following code:
<?xml version='1.0' encoding='UTF-8' ?>
<!DOCTYPE html PUBLIC "-//W3C//DTD XHTML 1.0 Transitional//EN" "http://www.w3.org/TR/xhtml1/DTD/xhtml1-transitional.dtd">
<html xmlns="http://www.w3.org/1999/xhtml"
      xmlns:h="http://xmlns.jcp.org/jsf/html">
    <h:head>
        <title>Facelet Title</title>
    </h:head>
    <h:body>
        Hello from Facelets
    </h:body>
</html>
The generated markup uses JSF-specific tags. We need to make a few small changes to modify it to use HTML5-friendly markup. Take a look at the following code:
<?xml version='1.0' encoding='UTF-8' ?>
<!DOCTYPE html PUBLIC "-//W3C//DTD XHTML 1.0 Transitional//EN" "http://www.w3.org/TR/xhtml1/DTD/xhtml1-transitional.dtd">
<html xmlns="http://www.w3.org/1999/xhtml"
      xmlns:jsf="http://xmlns.jcp.org/jsf">
    <head jsf:id="head">
        <title>Facelet Title</title>
    <head>
    <body jsf:id="body">
        Hello from Facelets
    </body>
</html>
The main change we made was to replace the xmlns:h=http://xmlns.jcp.org/jsf/html namespace with xhmlns:jsf=http://xmlns.jsp.org/jsf; the former specifies JSF-specific tags (that we won't use in our application), while the latter specifies JSF-specific attributes (that we will use in our applications). Then, we changed the JSF-specific <h:head> and <h:body> attributes with their standard HTML counterparts, and we added the JSF-specific jsf:id attribute to both tags. Recall from Chapter 2, Developing Web Applications Using JavaServer Faces 2.2, that to make JSF interpret HTML tags, we need to add at least one JSF-specific attribute to the tags.
Then, we need to add a form and a couple of simple input fields. Later, we will use the Java API for WebSocket to populate these fields with default values.
After making the previously mentioned modifications, our markup now looks like this:
<?xml version='1.0' encoding='UTF-8' ?>
<!DOCTYPE html PUBLIC "-//W3C//DTD XHTML 1.0 Transitional//EN" "http://www.w3.org/TR/xhtml1/DTD/xhtml1-transitional.dtd">
<html xmlns="http://www.w3.org/1999/xhtml"
      xmlns:jsf="http://xmlns.jcp.org/jsf">
    <head jsf:id="head">
        <title>WebSocket and Java EE</title>
    </head>
    <body jsf:id="body">
        <form method="POST" jsf:prependId="false">
            <table>
                <tr>
                    <td>First Name</td>
                    <td>
                        <input type="text" jsf:id="firstName"
                               jsf:value="#{person.firstName}"/>
                    </td>
                </tr>
                <tr>
                    <td>Last Name</td>
                    <td>
                        <input type="text" jsf:id="lastName"
                               jsf:value="#{person.lastName}"/>
                    </td>
                </tr>
                <tr>
                    <td></td>
                    <td>
                      <input type="submit" value="Submit"
                        jsf:action="confirmation"/>
                    </td>
                </tr>
            </table>
        </form>
    </body>
</html>
We just added some simple HTML to the markup and used JSF-specific attributes so that the HTML tags are treated like their equivalent JSF-specific tags.
Note that the input fields in our markup are bound to properties of a CDI named bean with a name of person. The Person bean looks like this:
package com.ensode.websocket;

import javax.enterprise.context.RequestScoped;
import javax.inject.Named;

@Named
@RequestScoped
public class Person {

    private String firstName;
    private String lastName;

    public String getFirstName() {
        return firstName;
    }

    public void setFirstName(String firstName) {
        this.firstName = firstName;
    }

    public String getLastName() {
        return lastName;
    }

    public void setLastName(String lastName) {
        this.lastName = lastName;
    }

}
As we can see, the Person bean is a simple request scoped CDI named bean.
Now that we have a simple JSF application that uses HTML5-friendly markup, the next step is to modify it to take advantage of the Java API for WebSocket.
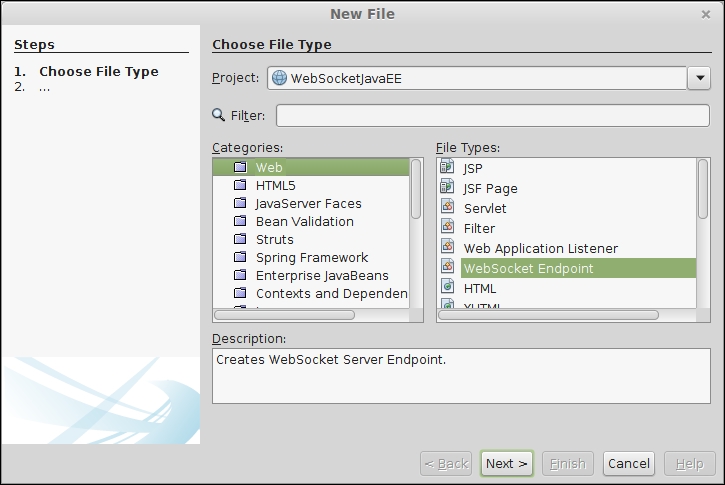
Once we have our JSF code in place, we can add a WebSocket server endpoint to our project by going to File | New File, selecting the Web category, and selecting WebSocket Endpoint as the file type.
We need to give our endpoint a name and specify the value for WebSocket URI.

After clicking on Finish, NetBeans generates a WebSocket server endpoint for us:
package com.ensode.websocket;

import javax.websocket.OnMessage;
import javax.websocket.server.ServerEndpoint;

@ServerEndpoint("/defaultdataendpoint")
public class DefaultDataEndpoint {

    @OnMessage
    public String onMessage(String message) {
        return null;
    }
}
Notice how the value attribute of the @ServerEndpoint annotation matches the value we entered when creating the class with the wizard. NetBeans also generates a dummy method annotated with @OnMessage for us to modify. We will modify this method to return a JSON string that will be parsed by the client side. The modified onMessage() method looks like this:
    @OnMessage
    public String onMessage(String message) {
        String retVal;

        if (message.equals("get_defaults")) {
            retVal = new StringBuilder("{").
                    append(""firstName":"Auto",").
                    append(""lastName":"Generated"").
                    append("}").toString();
        } else {
            retVal = "";
        }

        return retVal;
    }
Note
In this example, we are generating a simple JSON string by hand. JSON can be generated with the Java API for JSON-P. Refer to Chapter 8, Java API for JSON Processing, for details.
The message parameter of the onMessage() method represents the value of the message that will be sent from the client. If our onMessage() method receives the get_defaults string from the client, it generates a JSON string with default values that will be used to populate the form.
The JSON string will then need to be parsed by JavaScript on the client side. In order to implement this last piece of the puzzle, we need to add some JavaScript to our JSF markup.
Now, we need add JavaScript code to our markup to interact with our WebSocket server endpoint. Take a look at the following code:
<?xml version='1.0' encoding='UTF-8' ?>
<!DOCTYPE html PUBLIC "-//W3C//DTD XHTML 1.0 Transitional//EN" "http://www.w3.org/TR/xhtml1/DTD/xhtml1-transitional.dtd">
<html xmlns="http://www.w3.org/1999/xhtml"
      xmlns:jsf="http://xmlns.jcp.org/jsf">
    <head jsf:id="head">
        <title>WebSocket and Java EE</title>
        <script language="javascript" type="text/javascript">
            var wsUri = getRootUri() +
                "/WebSocketJavaEE/defaultdataendpoint";

            function getRootUri() {
                return "ws://" + (document.location.hostname == "" ?
                    "localhost" : document.location.hostname) + ":" +
                     (document.location.port == "" ? "8080" :
                     document.location.port);
            }

            function init() {
                websocket = new WebSocket(wsUri);
                websocket.onopen = function (evt) {
                    onOpen(evt)
                };
                websocket.onmessage = function (evt) {
                    onMessage(evt)
                };
                websocket.onerror = function (evt) {
                    onError(evt)
                };
            }

            function onOpen(evt) {
                console.log("CONNECTED");

            }

            function onMessage(evt) {
                console.log("RECEIVED: " + evt.data);

                var json = JSON.parse(evt.data);

                 document.getElementById('firstName').value=
                     json.firstName;
                document.getElementById('lastName').value=
                     json.lastName;
            }

            function onError(evt) {
                console.log('ERROR: ' + evt.data);
            }

            function doSend(message) {
                console.log("SENT: " + message);
                websocket.send(message);
            }

            window.addEventListener("load", init, false);

        </script>

    </head>
    <body jsf:id="body">
        <form method="POST" jsf:prependId="false">
            <input type="button" value="Get Defaults"
                onclick="doSend('get_defaults')"/>
            <table>
                <tr>
                    <td>First Name</td>
                    <td>
                        <input type="text" jsf:id="firstName"
                               jsf:value="#{person.firstName}"/>
                    </td>
                </tr>
                <tr>
                    <td>Last Name</td>
                    <td>
                        <input type="text" jsf:id="lastName"
                               jsf:value="#{person.lastName}"/>
                    </td>
                </tr>
                <tr>
                    <td></td>
                    <td>
                        <input type="submit" value="Submit"
                             jsf:action="confirmation"/>
                    </td>
                </tr>
            </table>
        </form>
    </body>
</html>
We based the JavaScript code in this example on the Echo sample application included with NetBeans and discussed this earlier in this chapter. The first change we made was to change the value of the wsUri variable to match the URI of our WebSocket server endpoint. The URI of the WebSocket endpoints we develop will always consist of the context root of our application followed by the value of the value attribute of the @ServerEndpoint annotation (in our example, /defaultdataendpoint).
Note
The context root of a Java EE application is the part of the URL that we type right after the port; by default, the context root matches the name of our WAR file.
For example, our application's URL is http://localhost:8080/WebSocketJavaEE. Therefore, the context root of our application is WebSocketJavaEE.
In the original Echo sample application, a new WebSocket connection was created every time we clicked on the button labeled Press me. We modified the JavaScript code to establish the connection only once when the page loads for the first time. We added the necessary calls to the init() JavaScript function. In this function, we bind some of our JavaScript functions to react to certain WebSocket events. Our onOpen() function will be called when a connection is made to our WebSocket server endpoint. The onMessage() function will be invoked when the client receives a message from the WebSocket server endpoint, and onError() will be invoked if there is an error while communicating with the WebSocket server endpoint.
Our onOpen() and onError() JavaScript functions are slightly modified versions of the corresponding functions in the Echo sample message; in our case, we modified them to simply display a message on the browser log.
Our onMessage() function parses the JSON string sent by our WebSocket server endpoint and populates our form with the appropriate values.
As far as the actual markup goes, we added a button labeled Get Defaults that invokes our doSend() JavaScript function, passing the get_defaults string as a parameter. The doSend() function, in turn, passes this string to our WebSocket server endpoint via the send() function of the JavaScript WebSocket object. Our WebSocket server endpoints returns a JSON string with default values when it gets this exact string as a parameter.
The following screenshot shows our application in action:
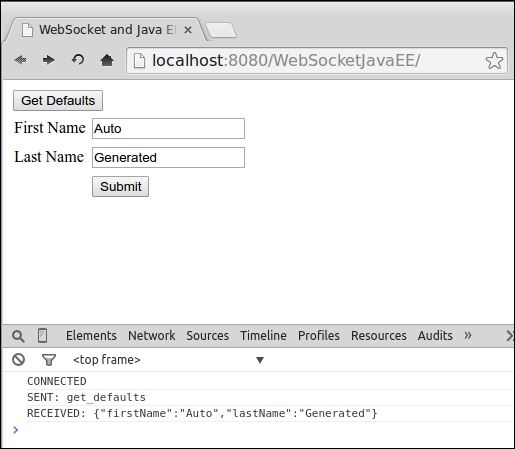
Our screenshot shows what happens after we click on the button labeled Get Defaults. Text fields are populated with the values we got from the JSON-formatted string we got from the server. At the bottom of the screenshot, we can see the output of the values we sent to the browser log.